MediaKind RX8000 User manual

MediaKind RX8000 www.mediakind.com
1
MediaKind RX8000 Fox Cable IRD
Installation Guide
Installation Guide

MediaKind RX8000 www.mediakind.com
2
Document History
Issues of this document are listed below:
Doc
issue
Author Date Change
RA5 GS 01/10/20 First issue
RA6 GS 07/12/20 Added Fox phone number
and changed tuning to S2X
and Auto.
RA7 GS 08/12/20 Changes following review
RA8 RH 08/12/20 Changes to follow actual
unit
RA9 GS 16/12/20 Addition of analogue out
connection
RB RH 28/01/21 Correction to Search Range,
adding the need to insert
the CAM, and moved
section 5 to before the old
section 2. Added audio
output settings.

MediaKind RX8000 www.mediakind.com
3
Contents
1 Overview ............................................................................................... 4
2 Connecting the RX8200 ........................................................................ 4
3 Tuning the RX8200 ............................................................................... 5
3.1 Input Configure ................................................................................................. 5
3.2 Source 1 Configure ............................................................................................ 5
3.3 LNB LO Frequency ............................................................................................. 5
3.4 Satellite Frequency ........................................................................................... 5
3.5 Symbol Rate ...................................................................................................... 6
3.6 Modulation Mode ............................................................................................. 6
3.7 FEC Mode .......................................................................................................... 6
3.8 Roll Off .............................................................................................................. 6
3.9 FEC Mode .......................................................................................................... 7
3.10 Search Range ..................................................................................................... 7
3.11 LNB Power ......................................................................................................... 7
3.12 LNB 22 kHz ........................................................................................................ 7
4 Setting IP Address ................................................................................ 9
4.1 Control Port 1 IP Address and Subnet .............................................................. 9
4.2 Default Gateway 1 ............................................................................................ 9
5 Setting CAM Auto Recovery.................................................................. 10
5.1 CAM Auto Recovery ........................................................................................ 10
6 Configuring the Analog Audio Outputs ................................................. 11
7 Authorising the RX8200 ....................................................................... 12
7.1 Unit Serial Number ......................................................................................... 12
MediaKind RX8000 www.mediakind.com
4
1 Overview
This document describes how to perform a basic set-up of the RX8200 for Fox Cable.
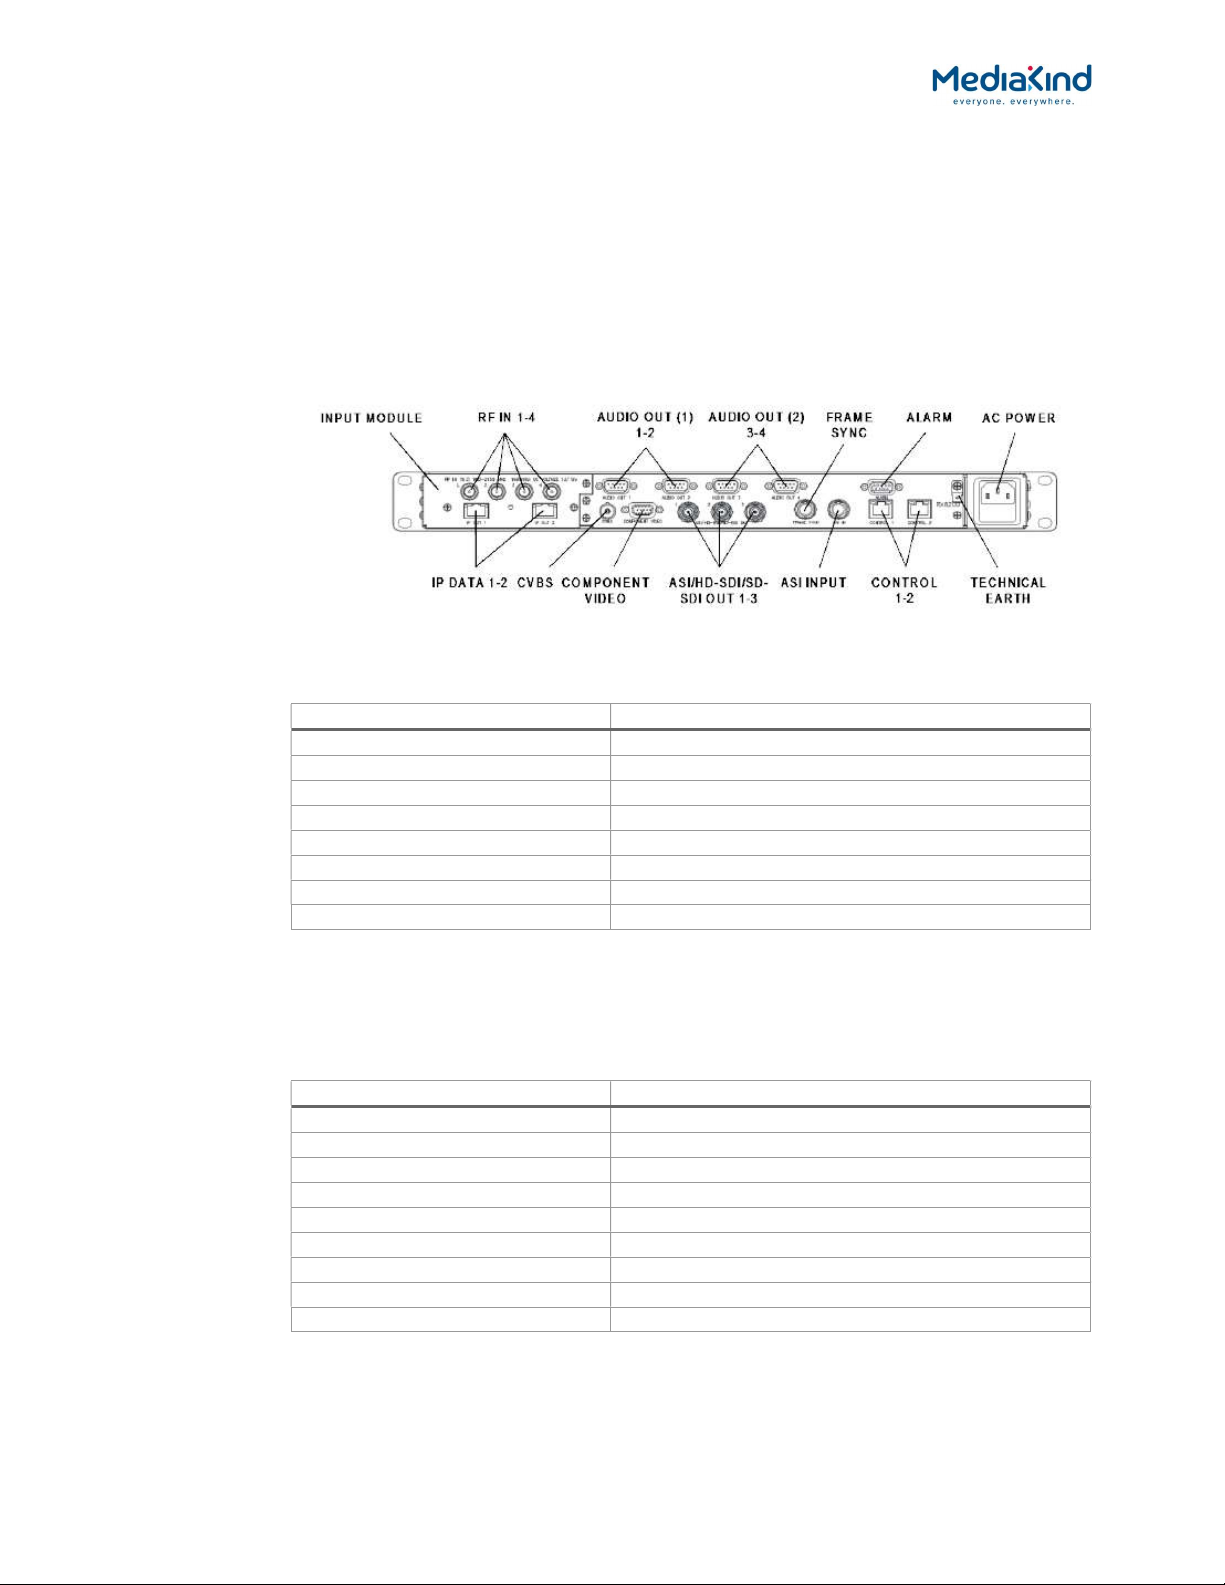
2 Connecting the RX8200
The above diagram shows the rear panel of the RX8200. The following connections shall be made
on the rear panel of the RX8200:
Insert the supplied CAM into the slot on the front panel. NOTE: the CAM is marked with the serial
number of the RX8200. This must match.
Connect the audio, using the 9-pin D-shell connectors and break-out cables. The audio 9-pin D-
shell connectors provide analog stereo outputs as well as AES3 digital outputs.
Connect the AC power.
Connector Source
CVBS Composite Video Output > SD Analogue (75
BNC)
RF IN 1
G15 Vertical
RF IN 2 G17 Vertical
RF IN 3 G15 Horizontal
RF IN 4
G17 Horizontal
ASI/HD-SDI/SD-SDI Out 1 SD-SDI Output 1
ASI/HD-SDI/SD-SDI Out 1SD- SDI Output 2
FRAME SYNC Black and Burst Signal
Pin Use
1 AES3 Digital Audio +
2 Ground
3
Left +
4 Right +
5 Ground
6
AES3 Digital Audio
-
7 Ground
8 Left -
9 Right -
MediaKind RX8000 www.mediakind.com
5
3 Tuning the RX8200
The RX8200 should be set-up for over air control by Fox at first unboxing using its front panel. To
do this, the unit must first be tuned to a Fox over-air service. The tuning menus are accessed by
selecting root menu 3 (the input menu). To navigate to this page, press the (Down) key on
the front panel three times (this will take you to the input status menu).
3.1 Input Configure
To access this function, use the (Forward) key. This menu provides the ability to select both
the current Transport Stream and Primary Inputs.
INPUT |SELECT INPUT SAT
3.1 |PRIMARY INPUT SAT
Use the (Forward) and (Back) keys to move between select input and primary input then use
then after selecting EDIT key use (Up) (Down) keys to select the required value from the
available options. This shall be set to SAT for both SELECT INPUT and PRIMARY INPUT.
Once the selection is made press the SAVE key.
Next navigate to menu page 3.3.2 using the
(Down) and
(Forward) keys.
3.2 Source 1 Configure
This menu provides sub-menus that enable viewing and configuration of various Source 1 Input 1
parameters.
SOURCE 1 |CONFIGURE Input 1 (L-band)
3.3.2 |(UNLOCKED) >
3.3 LNB LO Frequency
This field should be entered (in MHz, in steps of 1 kHz) with the frequency of the LNB (low noise
block down-converter) used with the satellite dish. This shall be set to 05150.00 (this is the
local oscillator frequency for North American C-band LNBs)
To access this menu from the above menu, press the (Forward) key.
SOURCE 1 |LNB LO FREQUENCY
3.3.2.1 |05150.000 MHz (UNLOCKED)
Press EDIT then use the (Up), (Down), (Forward) and (Back) keys to enter the
frequency. Once the selection is made press the SAVE key
3.4 Satellite Frequency
This field should be entered (in MHz, in steps of 1 kHz) with the wanted satellite downlink
frequency. This will normally be within the C-band or KU band frequency range (in this case C
band). For the Fox transponder G15 Vertical this shall be set to 03820.00. Once the
selection is made press the SAVE key.
To access this menu from the above menu, press the (Down) key.

MediaKind RX8000 www.mediakind.com
6
SOURCE 1 |SATELLITE FREQUENCY
3.3.2.2 |3820.000 MHz (UNLOCKED)
Press EDIT then use the (Up), (Down), (Forward) and (Back) keys to enter the
frequency.
3.5 Symbol Rate
This field should be entered with the symbol rate of the wanted signal. This shall be set to
31.250000.
To access this menu from the above menu, press the (Down) key.
SOURCE 1 |SYMBOL RATE
3.3.2.3 |31.250000 MSym/s (UNLOCKED)
Press EDIT then use the (Up), (Down), (Forward) and (Back) keys to enter the
frequency. Once the selection is made press the SAVE key.
3.6
Modulation Mode
Determines the modulation standard - DVB-S, DVB-S2 or DVB-S2X. This shall be set to DVB-
S2X.
To access this menu from the above menu, press the (Down) key.
SOURCE 1 |MODULATION
3.3.2.4 |DVB-S2X (UNLOCKED)
Press EDIT then use the (Up) and (Down) keys to toggle between the available modulation
types. Once the selection is made press the SAVE key.
3.7 FEC Mode
Determines the FEC rate. This shall be set to Auto.
To access this menu from the above menu, press the (Down) key.
SOURCE 1 |FEC
3.3.2.5 |AUTO (UNLOCKED)
Press EDIT then use the (Up) and (Down) keys to toggle between the available modulation
types. Once the selection is made press the SAVE key.
3.8 Roll Off
Determines the roll-off rate. This shall be set to 20%.
To access this menu from the above menu, press the (Down) key.

MediaKind RX8000 www.mediakind.com
7
SOURCE 1 |ROLL OFF
3.3.2.6 |20% (UNLOCKED)
Press EDIT then use the (Up) and (Down) keys to toggle between the available modulation
types. Once the selection is made press the SAVE key.
3.9 FEC Mode
Determines the sense of the incoming signal. This shall be set to Auto.
To access this menu from the above menu, press the (Down) key.
SOURCE 1 |SPECTRAL SENSE
3.3.2.7 |AUTO (UNLOCKED)
Press EDIT then use the (Up) and (Down) keys to toggle between the available modulation
types. Once the selection is made press the SAVE key.
3.10 Search Range
Allows the IRD to automatically determine the most appropriate frequency search range or to use
a user defined Search Range. This shall be set to 2500 kHz.
To access this menu from the above menu, press the (Down) key once.
SOURCE 1 |SEARCH RANGE
3.3.2.8 |2500 kHz (UNLOCKED)
Press EDIT then use the (Up), (Down), (Forward) and (Back) keys to change the Search
Range. Once the selection is made press the SAVE key.
Next navigate to menu page 3.3.2.14 using the
(Down) key.
3.11 LNB Power
Allows the user to set the LNB value.
To access this menu from the above menu, press the (Down) key until you reach this menu.
This shall be set to OFF Note: The LNB is not being controlled by the RX8000.
SOURCE 1 |LNB POWER
3.3.2.14 |OFF (UNLOCKED)
Press EDIT then use the (Up) (Down) keys to select the required value from the available
options. Once the selection is made press the SAVE key.
3.12 LNB 22 kHz
This menu item enables the LNB 22 kHz signal to be activated. Enabling the 22 kHz tone will
command the LNB to switch to its high band local oscillator frequency. This shall be set to
DISABLE
To access this menu from the above menu, press the (Down) key.

MediaKind RX8000 www.mediakind.com
8
SOURCE 1 |LNB 22KHz
3.3.2.15 |DISABLE (UNLOCKED)
Press EDIT then use the (Up) (Down) keys to select ENABLE or DISABLE. Once the
selection is made press the SAVE key.
MediaKind RX8000 www.mediakind.com
9
4 Setting IP Address
The RX8200 can connect to a control network via either of the two IP control interfaces on the rear
of the IRD (labelled ETHERNET 1 / 2 or CONTROL 1 / 2). In this case please select CONTROL
or ETHERNET 1
Enter the settings for the relevant control port (IP Address, Subnet and Gateway) via the front
panel 1.1 Network Settings menu. Navigate to this page using the (Forward) and (Down)
keys from the root menu.
4.1 Control Port 1 IP Address and Subnet
This menu displays the Control Port 1 IP Address and. To navigate to this menu, press the
(Forward) key. Please enter the IP address and subnet as needed for your network configuration.
IP 1 |IP: 000.000.000.000
1.1.1 |SUBNET: 000.000.000.000
After selecting EDIT use the (Forward) and (Back) keys to move between IP and Subnet,
then use then use the (Up), (Down), (Forward) and (Back) keys to enter the address.
4.2 Default Gateway 1
This menu enables the viewing and editing of the gateway address for the control network. To
navigate to this menu from the above menu, press the (Down) key four times.
GATEWAY |GATEWAY
1.1.5 |000.000.000.000
Use the (Up), (Down), (Forward) and (Back) keys to enter the address. Please enter the
gateway address as needed for your network configuration.
MediaKind RX8000 www.mediakind.com
10
5 Setting CAM Auto Recovery
For the Fox use case it is required that the CAM auto recover feature is disabled. To do this:
Enter the CA menu 5.4 CI menu. Navigate to this page using the (Forward) and (Down) keys
from the root menu.
5.1 CAM Auto Recovery
This menu displays the CAM auto recover control. To navigate to this menu, press the (Forward)
key then the (Down) key to reach this menu. Please set this item to FALSE
CI |CI AUTO RECOVER
5.4.5 |FALSE
Press EDIT then use the (Up) (Down) keys to select TRUE or FALSE. Once the selection is
made press the SAVE key.

MediaKind RX8000 www.mediakind.com
11
6 Configuring the Analog Audio Outputs
To configure the analog audio output, connect to the RX8200 UI using a web browser using the
Control Port 1 IP address as the URL.
From the dashboard, select Advanced View, from the top right of the page.
Select the Decode tab and click on the Output Routing button found in the Audio Decoders section.
Select the source audio that will be fed onto each connector. The default is the source Audio1 is
output on connector 1, and source Audio 2 on connector 2.

MediaKind RX8000 www.mediakind.com
12
7 Authorising the RX8200
Once set up, the RX8200 will need to be authorised over air by Fox. To do this, the serial number
of the unit will need to be communicated to Fox.
7.1 Unit Serial Number
This menu displays the unit serial number. To navigate to this menu, press the (Forward) key
once then the (Down) key twice.
USN |UNIT CHASSIS IDENT
1.3 |FL12345
Make a note of this value, it is the unit serial number. The number is also printed on a sticker on
the back panel of the unit. (The example given is FL12345).
Call Fox on the following telephone number:
1-888-882-5295
Ask for the unit to be authorised, identifying it by this serial number.
Other manuals for RX8000
1
Table of contents


