MediaTech MT4151 User manual
User’s Manual
MT4151
USB TV BOX
Watch & record TV programs on Your PC!

Contents
Features..........................................................................................2
System Requirements...............................................................2
Package Contents.......................................................................3
Installation Drivers And Application ...................................3
How to use TVR ...........................................................................5
TV settings ....................................................................................6
Video settings..............................................................................6
Record settings ...........................................................................7
Etc Dialog ......................................................................................8
Video Playback Control ............................................................8
Volume Control...........................................................................9
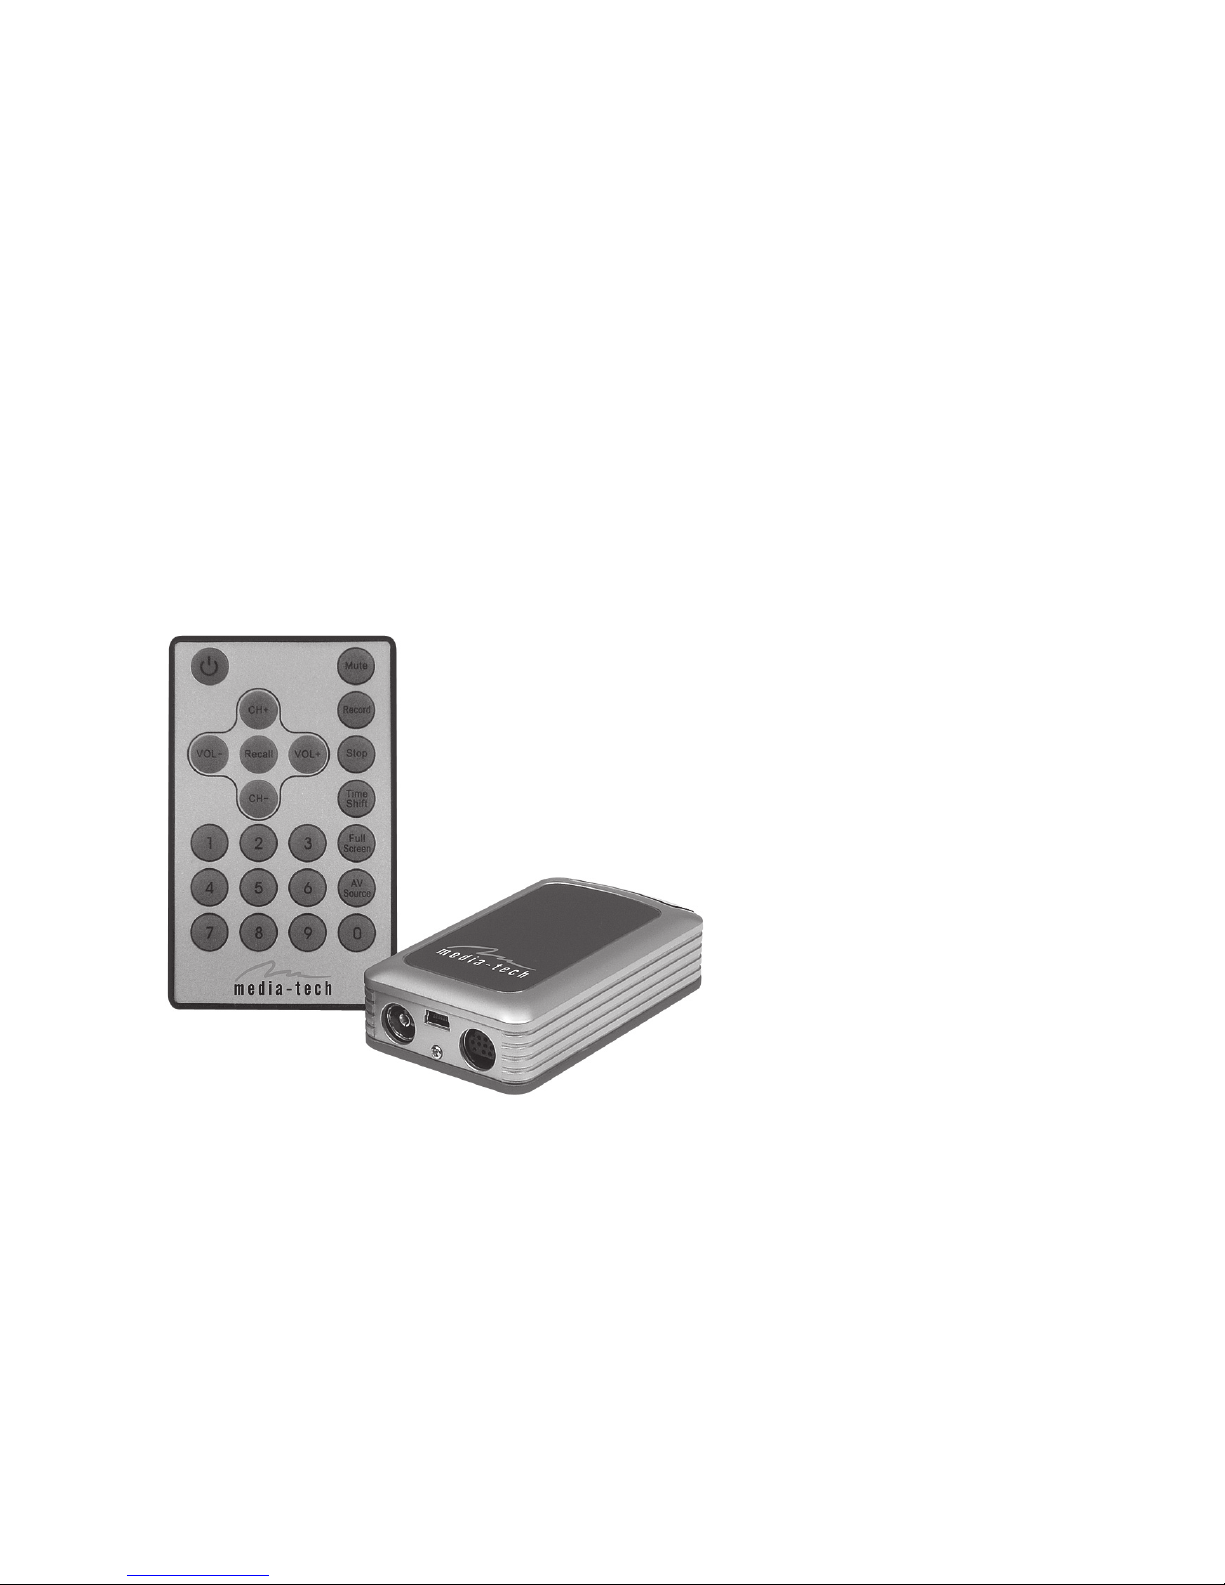
Remote Controller......................................................................9
2
Features
■External USB TV BOX
■
Resolution up to 720X576 for PAL, 720X480 for NTSC
■Supported TV systems: PAL-DK/BG or NTSC
■Personal video recorder
■Scheduled recording and time shift function
■AV and S-Video input for connecting VCR, DVD, cam-
corder, etc.
■IR remote controller
■
Full TV control and settings by intuitive user interface
■Support encoding MPEG-1/2 and WMV
■Saving still image snapshots to bitmap file
■USB 2.0 interface
■Windows ME/2000/XP compatible
■Size: 95x55x27mm
■Weight: 170g
System Requirements
■OS: WindowsXP-SP2
■Pentium 4 1700MHz or higher CPU
■256Mb or higher memory
■500Mb free hard disk space
■Free USB2.0 port
■Compliant with DirectX 8.1 or higher display card
3
Package Contents
■USB2.0 TV BOX
■Remote Controller
■User’s Manual
■USB Cable
■Audio & Video Cable
■S- Video Cable
■Driver & Application CD
Installation Drivers And Application
Caution!!! Please don’t connect the USB TV BOX to
the PC before installing software.
Execute X:\SETUP.EXE under CD root list (X is the CD-
ROM), choose “next” according to cue and then click
“yes”.
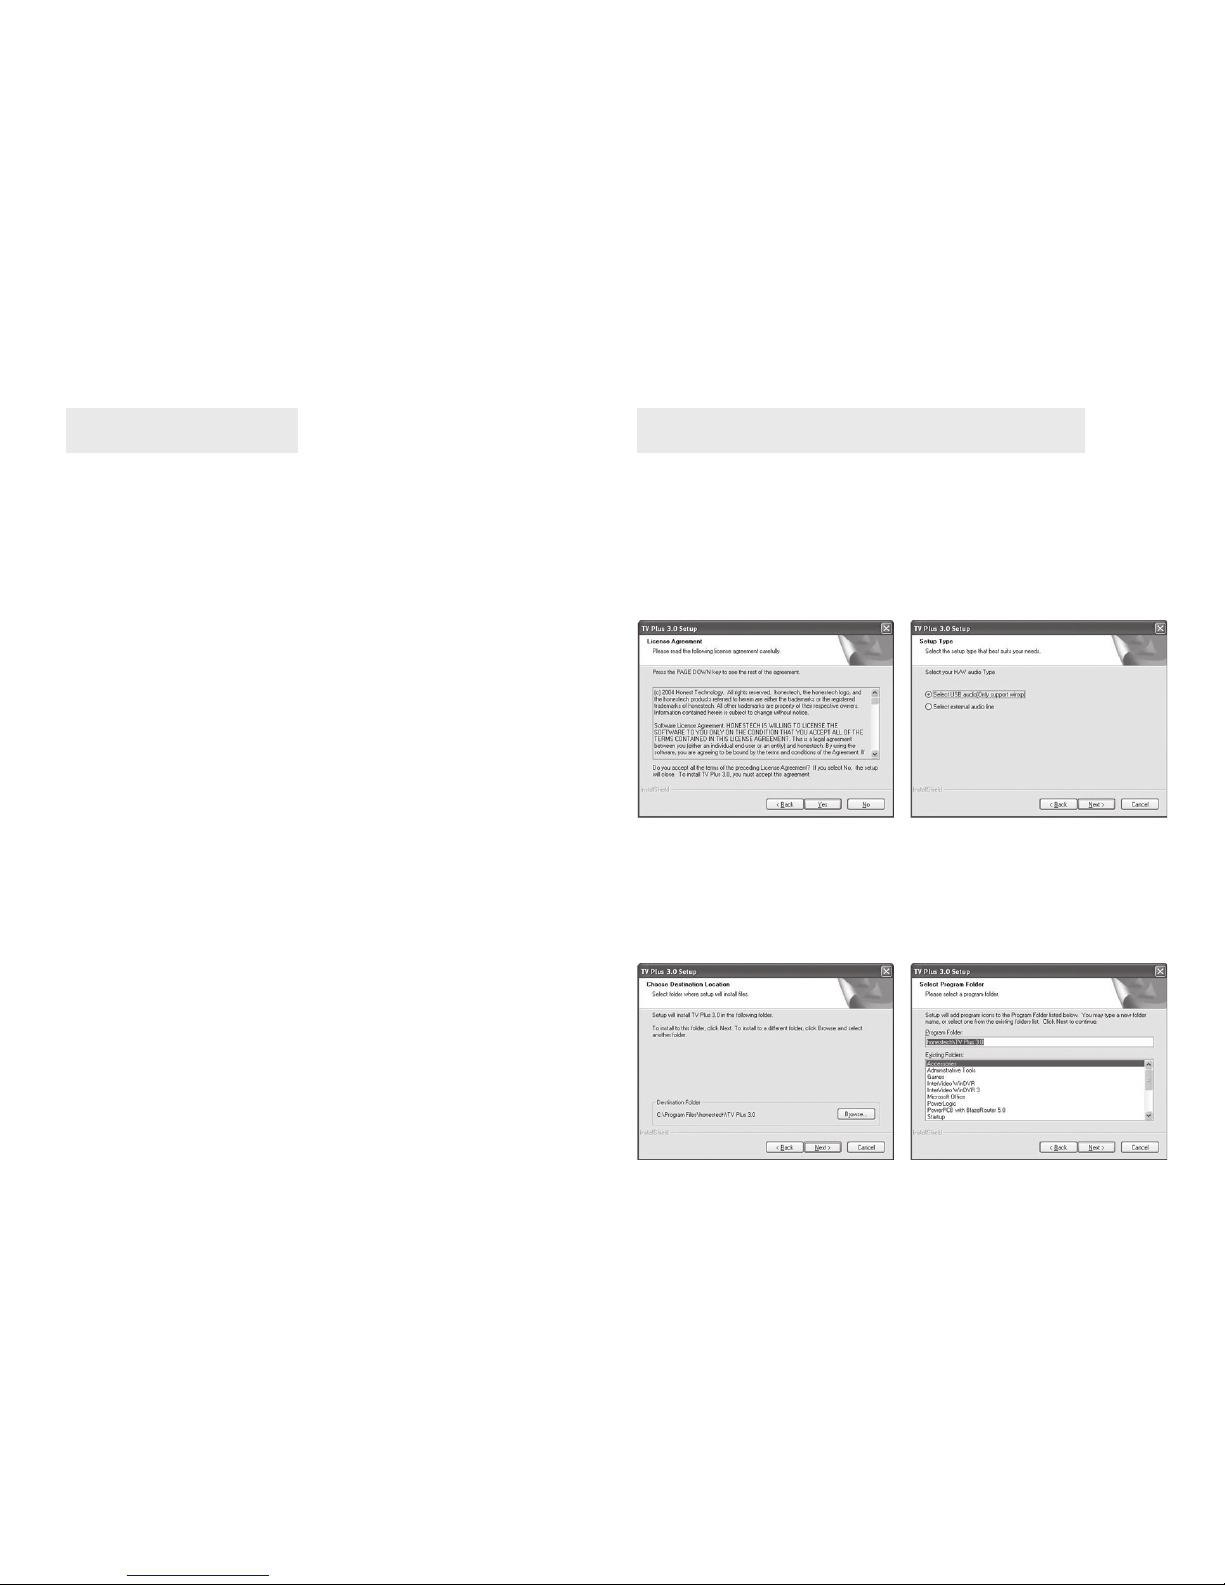
The system shows “SELECT YOUR H/W AUDIO TYPE”
cue, choose“SELECT USB AUDIO”and click“next”.
Choose the installation path of program and click
“next”.

4
When the system display information about “Windows
Media Format9”, click “yes”.
The system shows that the driver installed soon had not
passed Microsoft’s authentication, click “still continue”,
the system will automatically go on with installing
drive software, then gives a cue of “new hardware may
be used”.
Double click the icon of “TV PLUS3.0” on the desktop
and can turn on TV play out software.
When you operate the first time, you need input the
software sequence number. According to the sequence
number on the CD bag, please click“ok”.
Click“yes”again,acceptthe
authorizing agreement.
Click “ok”.
Click “finish” and finish installing.
system will clue to find new hardware and automatically
install driver for new hardware, click“next”.
Then windows automatically execute driver software
installation, click “next”, “finish” according to cue and
then choose “yes, I will restart windows”.
After the system is restarted, use the USB cable and
connect USB TV BOX to the USB2.0 port of the PC, the

5
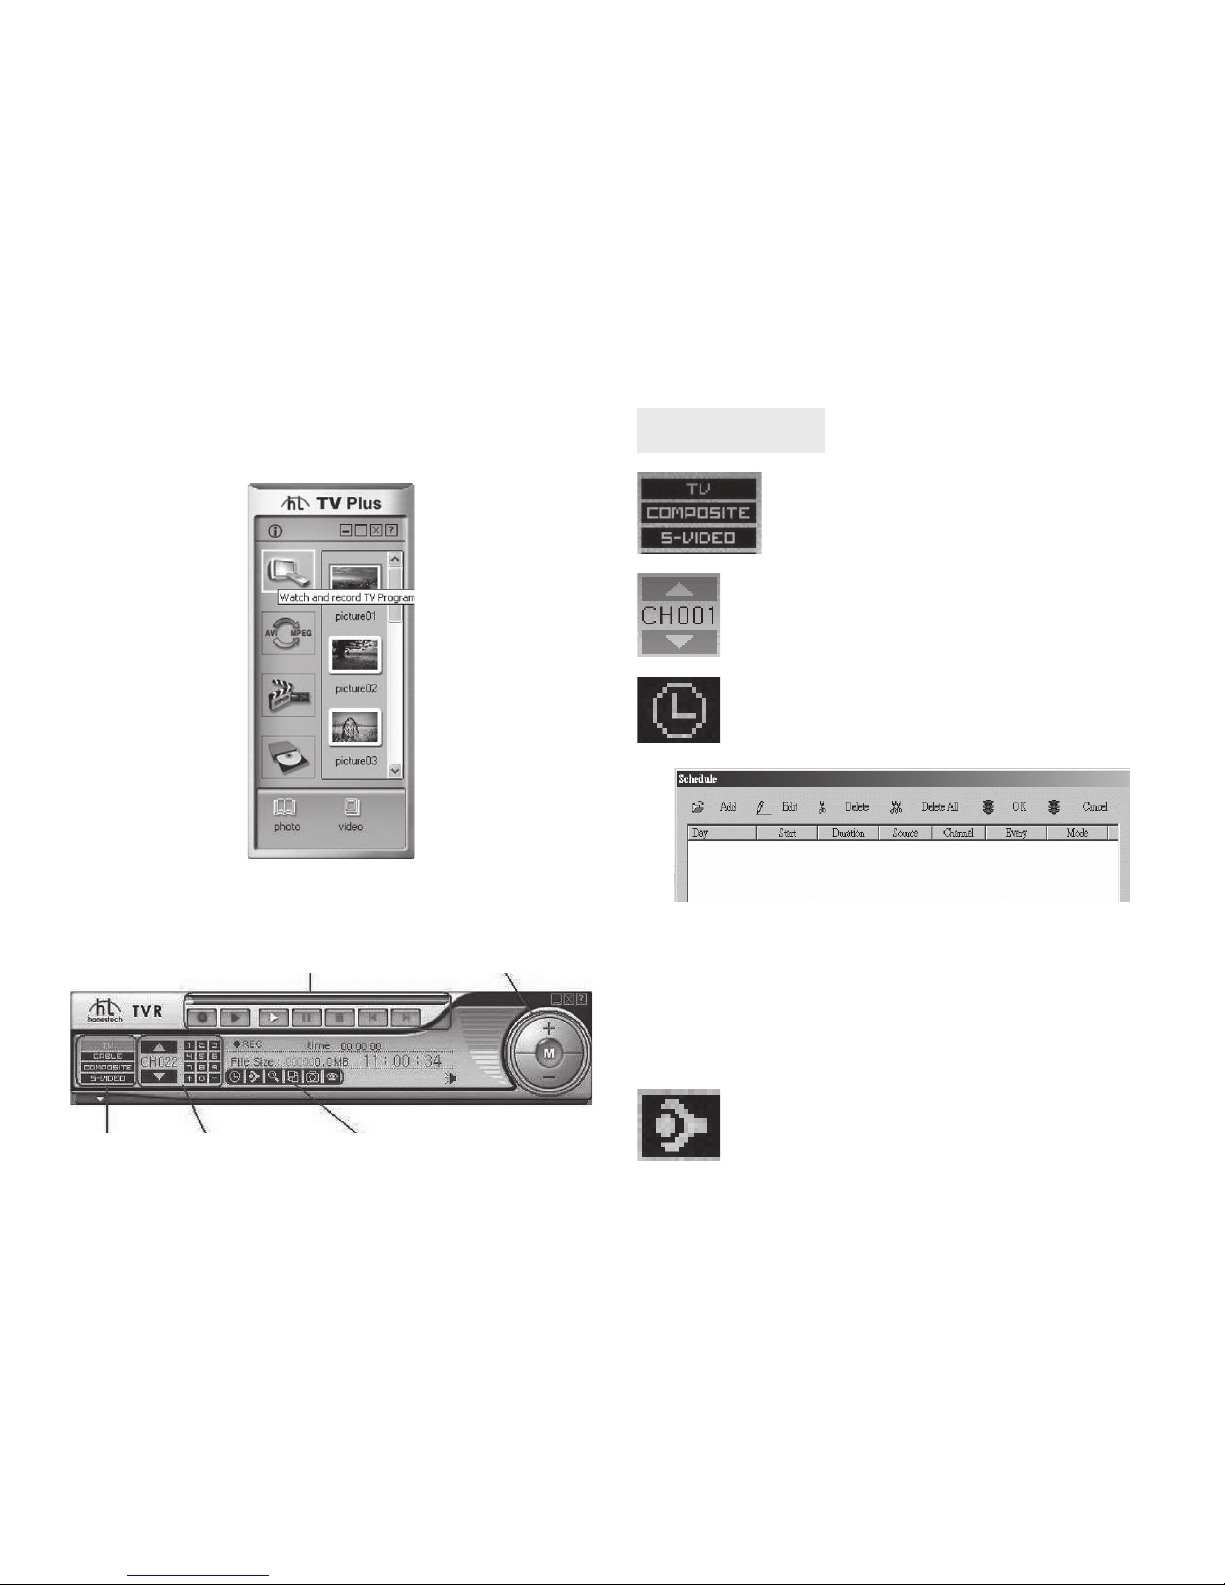
How to use TVR
Click here to switch TV =Antenna;
Cable = Cable TV
Choose input source for TV/Composite/
S-VHS/
Click the arrow up or down to select channel.
Channel No. will show between the arrows.
Click this icon, will show a dialog box for
setting schedule recording:
Add – Set a new schedule for recording
Edit – Rename a recorded video file.
Delete – Delete the selected video file.
Delete All – Delete all video files from the list
OK – Confirm all setting and exit.
Cancel – Cancel all setting and exit
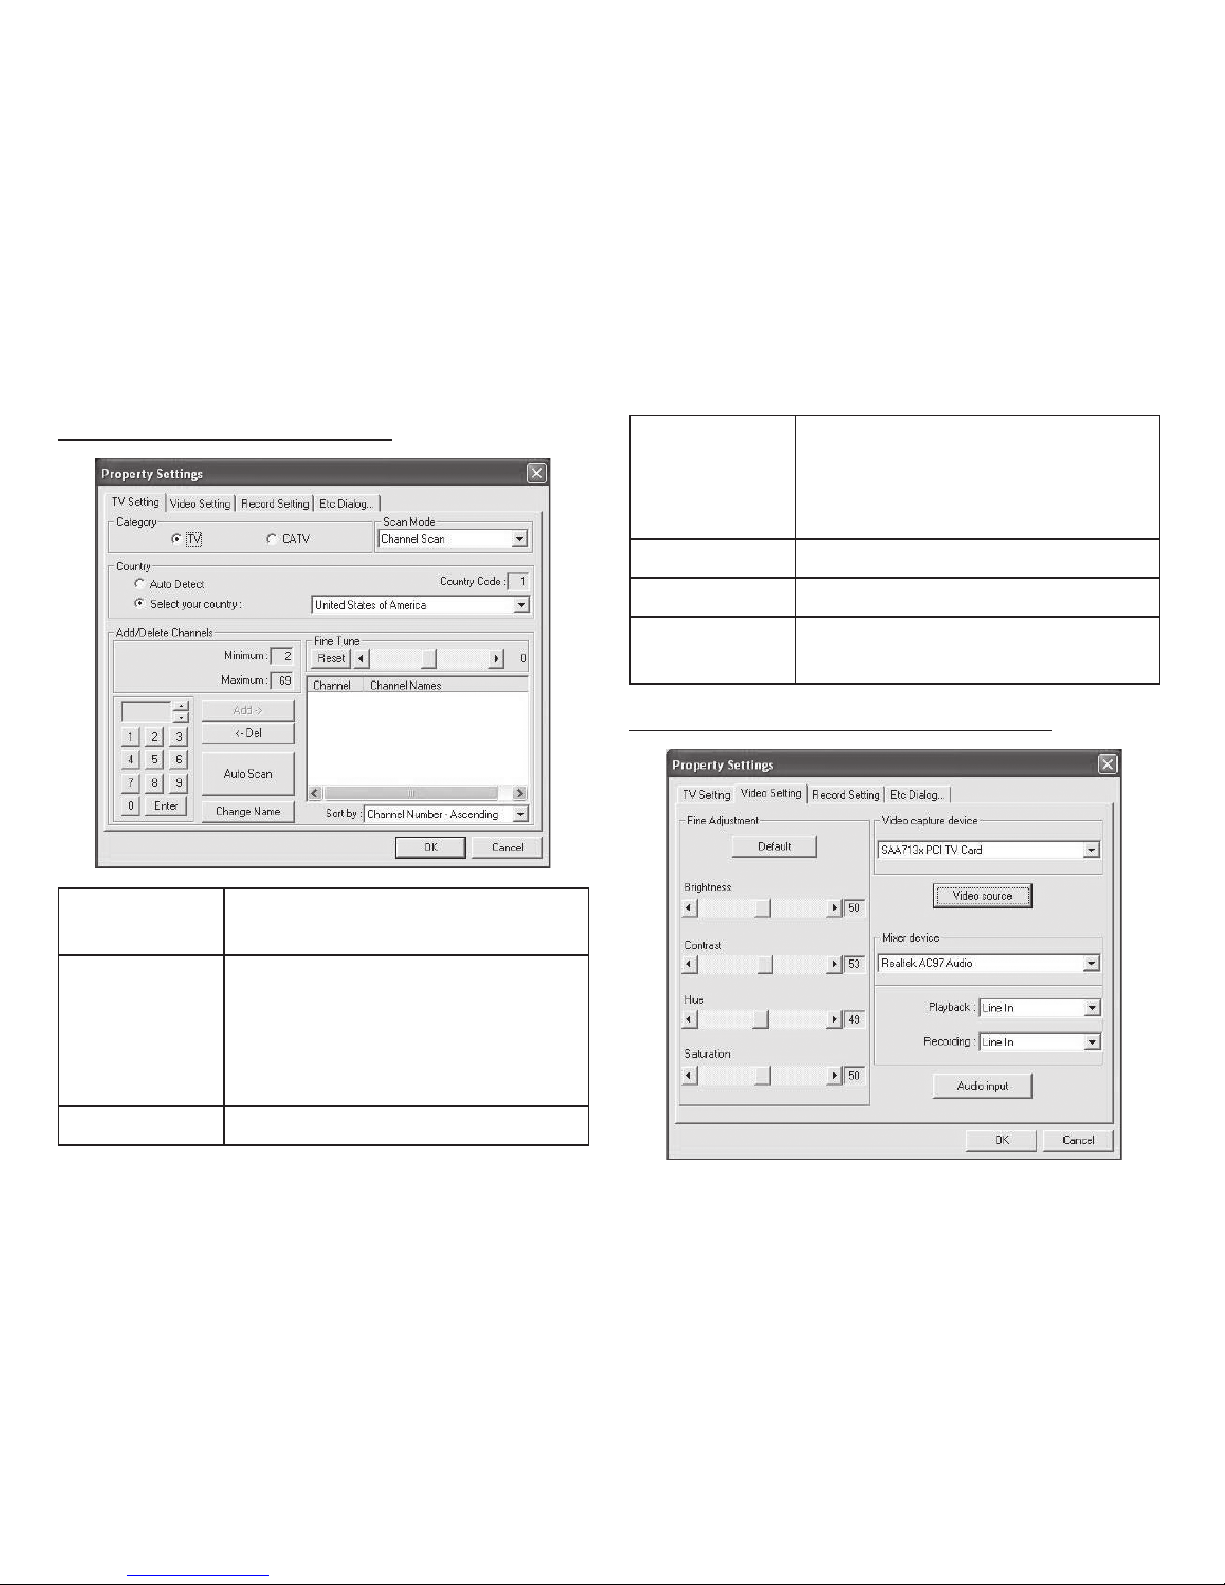
Properties Settings
The interface of playing and recording TV module is
operated as follows:
After TV PLUS3.0 software is started, the main interface
as the following drawing:
Input Source
Record, Time Shift, Player Volume adjust
Channel Adjust Basic Tools

6
TV settings Add/Delete
Channels
Add > – add a channel
< Del – delete a channel
Auto Scan – channel scan
Change Name Choose any channel and click to
rename
Fine Tune Adjust single Channel
Sort by Sort by Channel No. or by Channel
Name.
Video Settings
Category Setting TV signal from Antenna or
Cable (TV=antenna; CATV=Cable)
Scan Mode Use Scroll to select:
Chanel Scan > Scan by channel
Table
Frequency scan > Scan by each
Frequency
Country Set your country
7
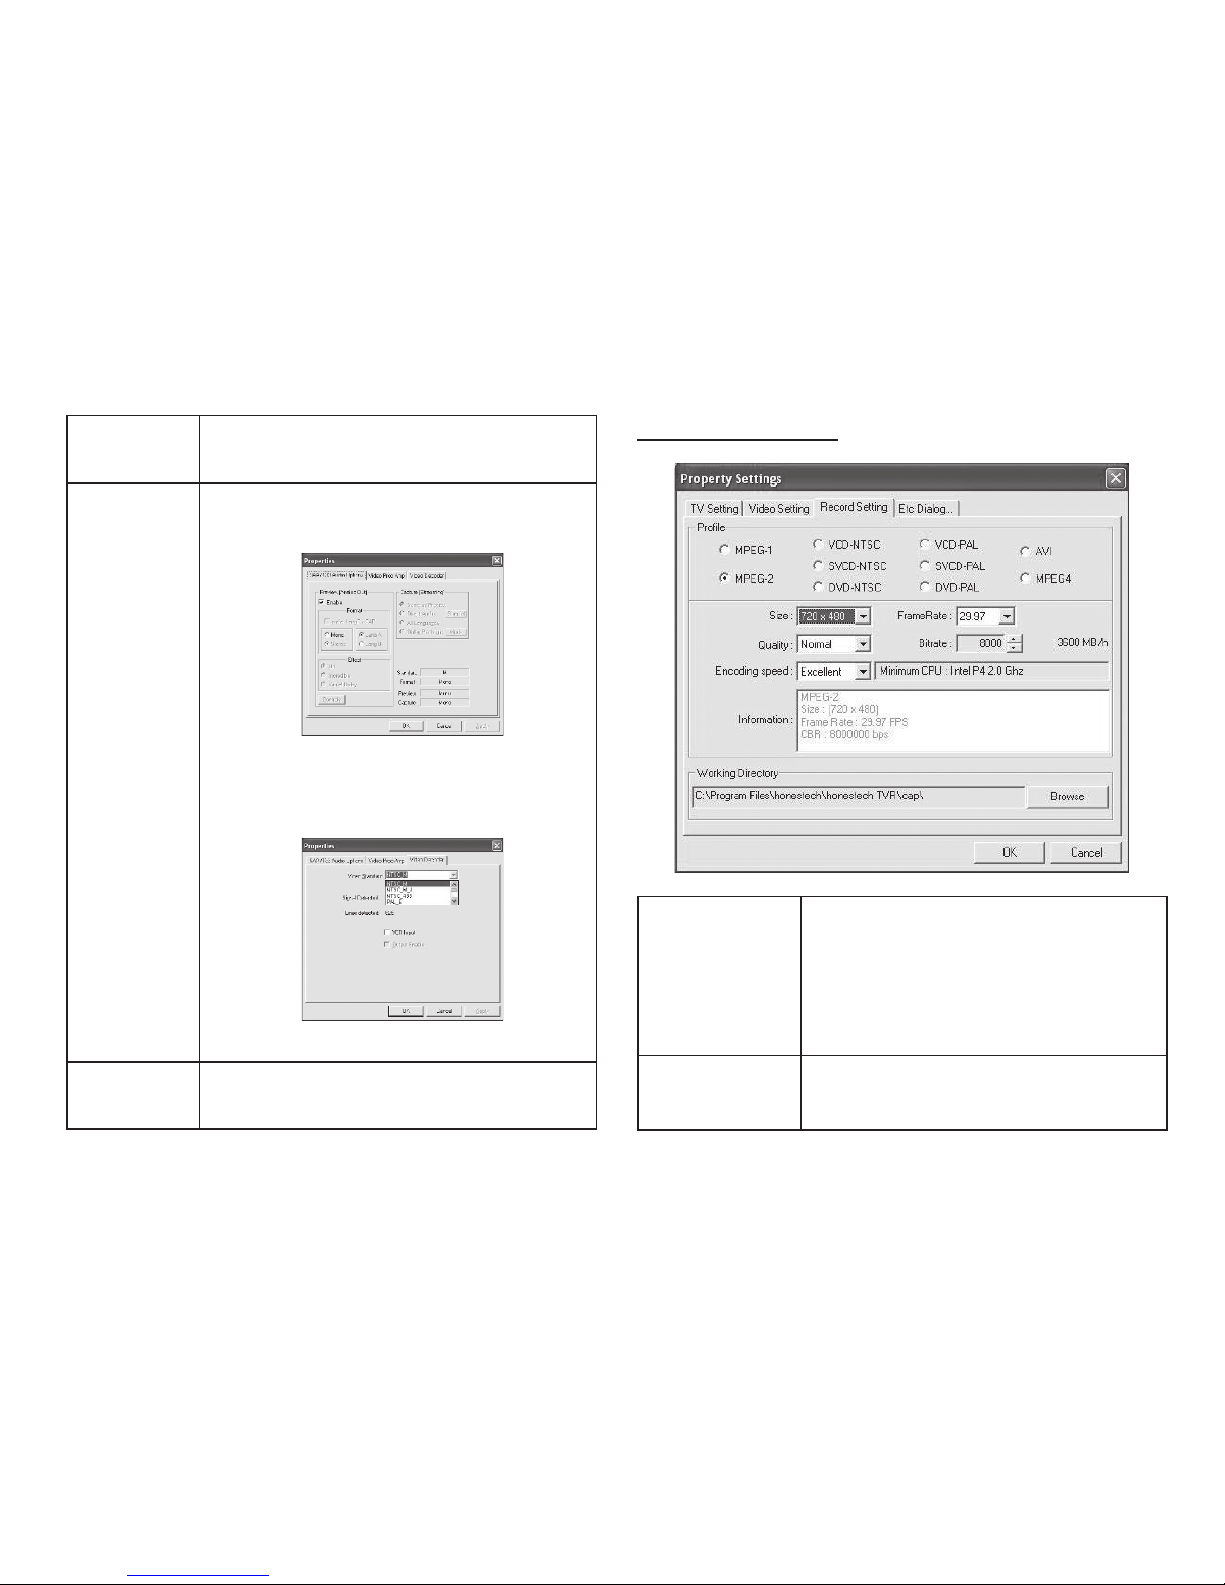
Record Settings
Fine
Adjustment
Setting Brightness, Contrast, Hue and
Saturation;
Video
Capture
Device
Select different Video Capturing Device
Click Video source:
Source Setting
Preview: Disable for overlay mode.
Video Proc Amp: Video Settings
Video Decoder:
Set TV Format
Mixer
Device
Select your Sound Card
Profile Select different Recording Format
– Select MPEG1 and MPEG2 you
can set bit-rate for different Video
Quality
– Select other format for fix bit-rate
Working
Directory
Set saving path for recorded Video
8
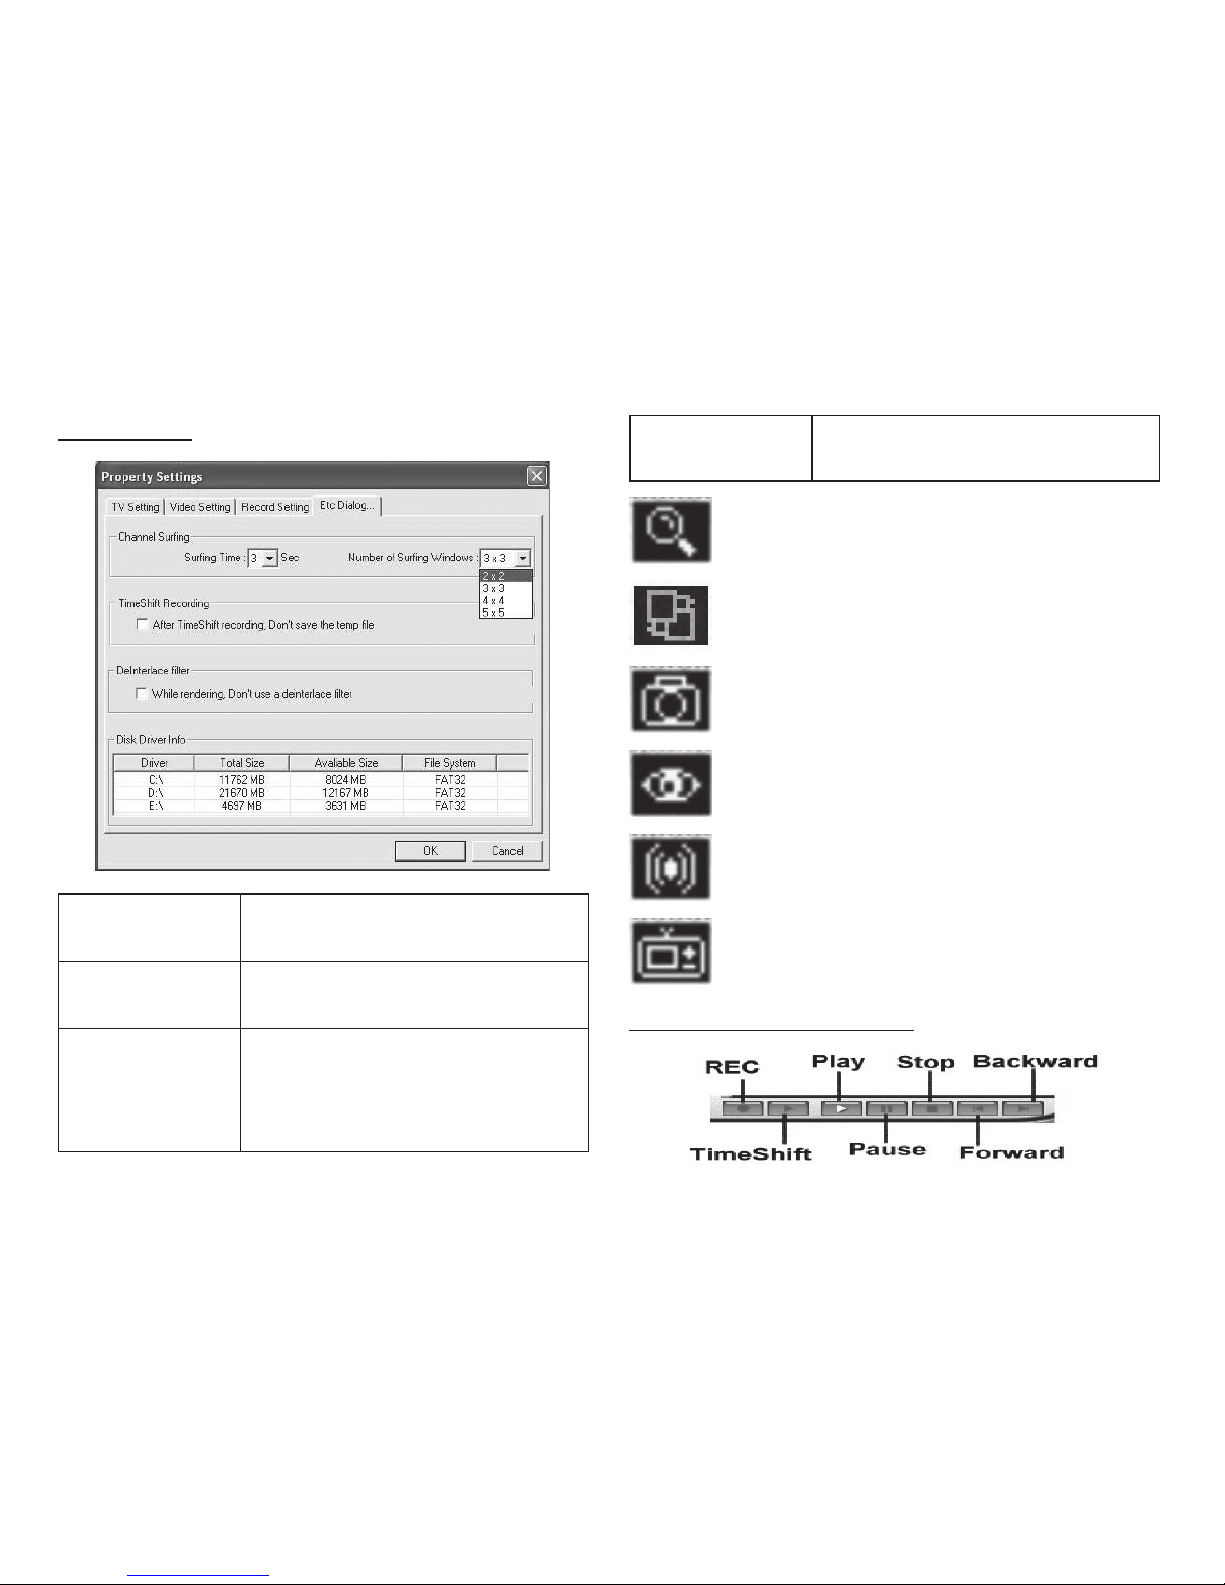
Etc Dialog
Channel
Surfing
Set Surfing Time
Number of surfing Windows
Time Shifting
Recording
Select to save Video in HDD while
activating Time-Shifting.
De-interlace
Filter
Select to disable De-interlace
Mode (Disable De-interlace will
reduce Video Quality but will also
reduce CPU Loading)
Disk Device Info Show your HDD total Size and
available Size.
Click to start scanning channel.
Change different color of your control panel.
Make screen capture while playing back
video.
Multi-Channel Preview (Please see for
Setting Surfing time and channels)
Audio Setting
iEPG
Internet Electronic Program Guide
Video playback control
9
REC Click to record, click again to stop recording
Time Shift Activate Time-Shifting
Play Playback recorded video
Pause Pause while playing back
Stop Stop playing back
Forward Fast forward
Rewind Rewind
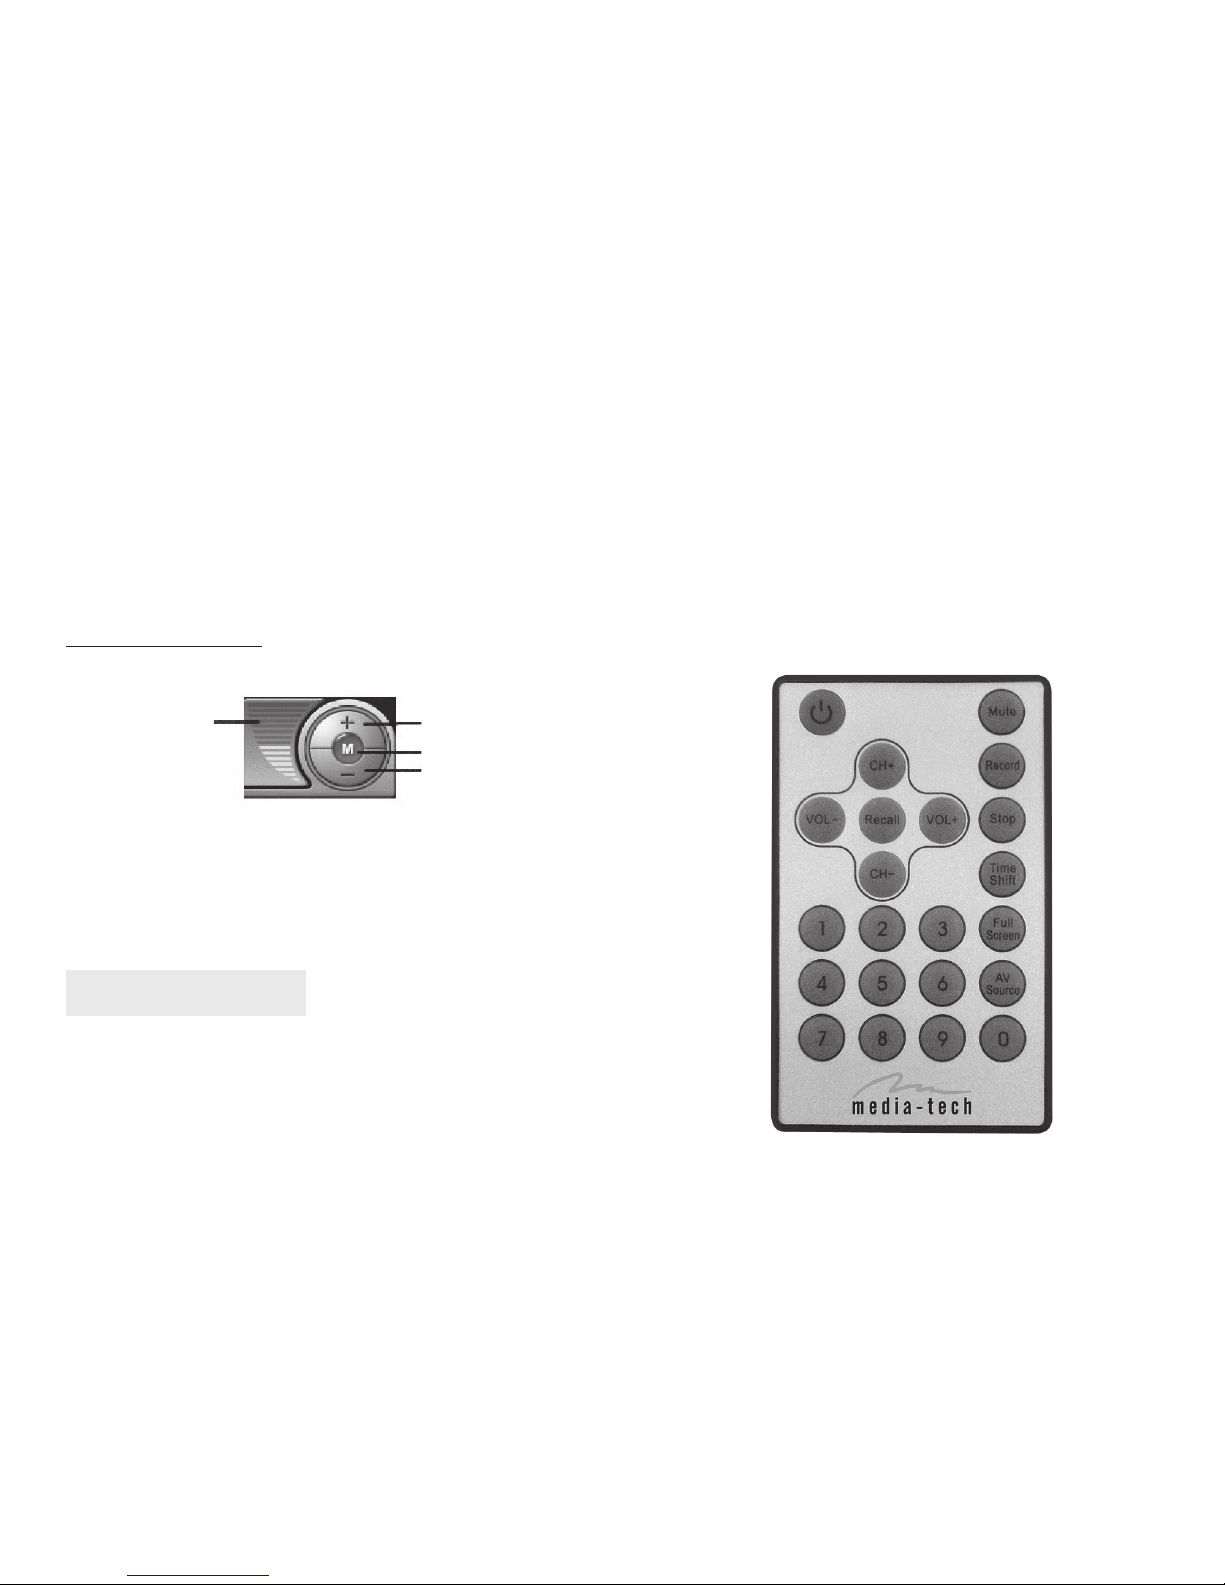
Volume control
Decrease
the volume
Increase
the volume
Display
Volume Mute
Remote Controller
Power: open/close Tv Plus3.0
AV Source: select Av Source
0~9: select Channel Number
Recall: return Last Time Channel
Mute: mute
Stop: stop
Record: rec Multimedia Files
CH+ : Channel Up
CH- : Channel Down
VOL+ : Volume Up
VOL- : Channel Down
Full Screen: Enlarge Picture
Time Shift: Timeshift
* About the detailed operation instruction of TV
PLUS3.0 play out software, please refer to the help
file of this software.

10

MT4151
USB TV BOX
Instrukcja obsługi
Watch & record TV programs on Your PC!

Spis treści
Właściwości ................................................................................12
Specyfikacja................................................................................12
Zalecenia systemowe..............................................................13
Zawartość opakowania..........................................................13
Instalacja sterowników i oprogramowania.....................13
Używanie TVR ............................................................................15
Ustawienia TV ............................................................................16
Ustawienia obrazu ...................................................................16
Ustawienia nagrywania .........................................................17
Pozostałe ustawienia ..............................................................18
Odtwarzanie wideo .................................................................18
Regulacja głośności.................................................................19
Pilot zdalnego sterowania.....................................................19
12
Właściwości
■Zewnętrzny tuner TV USB
■Rozdzielczość obrazu 720X576 ppi PAL lub720X480
ppi NTSC
■Współpraca z systemami TV: PAL-DK/BG lub NTSC
■Cyfrowy magnetowid
■Planowane nagrywanie oraz funkcja time shift
■Wejścia AV i S-Video do podłączenia magnetowidu,
DVD, kamery, itp.
■Pilot zdalnego sterowania
■Pełna kontrola tunera za pomocą intuicyjnego inter-
fejsu użytkownika
■Kodowanie MPEG-1/2, WMV
■Zapis klatek obrazu to plików graficznych
■Interfejs USB 2.0
■Zgodność z Windows ME/2000/XP
■Wymiary: 95x55x27mm
■Waga: 170g
Specyfikacja
■Standardowe gniazdo antenowe RF
■Standardowe wejście S-Video
■Standardowe wejście Video
■Wejście Audio
■Wyjście Audio

13
Instalacja sterowników i oprogramowania
Uwaga!!! Proszę nie podłączać urządzenia do kom-
putera dopóki nie zostanie zainstalowane oprogra-
mowanie.
Uruchom program SETUP.EXE z płyty CD, następnie wy-
bierz “Next” a następnie “yes”.
Zalecenia systemowe
■OS: WindowsXP-SP2
■Pentium 4 1700MHz lub wyższy CPU
■256MB lub większa pamięć
■500MB wolnego miejsca na twardym dysku
■Wolny port USB2.0
■Zgodność z DirectX 8.1 i nowszym
Zawartość opakowania
■USB2.0 Tuner TV
■Pilot zdalnego sterowania
■Instrukcja obsługi
■Kabel USB
■Kabel AV
■Kabel S-Video
■Płyta CD z oprogramowaniem
Program wyświetli “SELECT YOUR H/W AUDIO TYPE”,
wybierz “SELECT USB AUDIO”i kliknij “Next”.
Kliknik “Next” aby rozpocząć instalację we wskazanym
folderze.

W momencie, gdy system poinformuje o instalacji
“Windows Media Format 9”, kliknij “Yes”.
W przypadku instalacji po raz pierwszy niezbędne
może być wpisanie numeru seryjnego oprogramowa-
nia, które znajduje się na opakowaniu płyty.
14
Kliknij “Yes”ponownie,
aby zaakceptować warun-
ki autoryzacji. Kliknij “Ok”
Kliknij “Finish” i zakończ instalację.
Po ponownym uruchomieniu komputera, podłącz
kablem USB Tuner TV do portu USB2.0 w komputerze,
system poinformuje o wykryciu nowego sprzętu i auto-
matycznie zainstaluje sterowniki, kliknij “Next”.
W tym momencie system automatycznie wyświetli
okno instalacji sterowników, kliknij “next”, a następnie
“finish” zgodnie ze wskazówkami I wybierz opcję “yes, I
will restart windows”.
Podwójne kliknięcie ikony“TV PLUS3.0”na Pulpicie po-
zwala przejść do odbioru TV.
15
Moduł interfejsu odtwarzacza i nagrywarki TV jest ob-
sługiwany wg schematu:
Używanie TVR
Kliknij tu aby wybrać nadawcę:
TV = antena; Cable = telewizja kablowa
Wybierz źródło sygnału TV, Composite
lub S-VHS
Klikając na strzałki wybierz kanał (musi być
wcześniej zdefiniowany).
Ta ikona otwiera okno dialogowe planowa-
nego nagrywania
Add – ustawianie nowego planu nagrywania
Edit – zmiana nazwy nagranego pliku wideo
Delete – kasowanie wybranego pliku wideo
Delete all – kasowanie wszystkich plików wideo
OK – potwierdzenie wszystkich ustawień i wyjście z opcji
Cancel – anulowanie dokonanych ustawień
Ustawienia właściwości
Po zainstalowaniu i uruchomieniu programu TV PLUS
3.0, główne okno dialogowe powinno mieć następują-
cy wygląd:
Wybór źródła AV
Nagrywanie, odtwarzanie, time-shift Głośność
Wybór kanału Ikony narzędziowe
16
TV settings (ustawienia TV) Add/Delete
Channels
Add > – dodawanie kanału
< Del – kasowanie kanału
Auto Scan – automatyczne wyszu-
kiwanie kanałów
Change Name Zmiana nazwy wybranego kanału
Fine Tune Dostrajanie wybranego kanału
Sort by Sortowanie listy kanałów według
nazwy lub numeracji
Video Settings (ustawienia obrazu)
Category Wybór rodzaju sygnału: antena lub
telewizja kablowa
Scan Mode Wybór:
Chanel Scan > wyszukiwanie we-
dług listy kanałów
Frequency scan > wyszukiwanie
według częstotliwości
Country Wybór kraju odbioru TV.

17
Record Settings (ustawienia nagrywania)
Fine
Adjustment
Ustawienie parametrów obrazu:
jasność, barwa, kontrast, nasycenie
Video
Capture
Device
Wybór urządzenia wizyjnego
Kliknij Video source:
Ustawienie źródła
Zaznacz „Preview” aby kontrolować
zmiany
Na karcie Video Proc Amp ustaw
parametry obrazu
Ustaw standard nadawanego sygnału TV
Mixer
Device
Wybierz główną i aktywną kartę
dźwiękową w Twoim komputerze
Profile Wybór profilu MPEG1 lub 2
umożliwia ręczne ustawianie
parametrów ale i wiedzy na te-
mat kompresji obrazu.
Pozostałe profile mają predefi-
niowane parametry kompresji
Working Directory Ustawienie ścieżki zapisu pliku
z nagraniem

18
Etc Dialog (pozostałe ustawienia)
Channel
Surfing
Ustawienie czasu i ilości podglądów
programów
Time
Shifting
Recording
Aktywacja i deaktywacja bufora
wideo (bufor korzysta z przestrzeni
dyskowej HDD)
De-interlace
Filter
Filtr zmniejszający obciążenie pro-
cesora kosztem pogorszenia jakości
(istotne przy słabszych komputerach)
Disk Device
Info
Pokazuje pojemności dostępnych
dysków
Wyszukiwanie kanałów
Zmiana wyglądu panelu sterowania
Wykonanie zrzutu ekranu
Przegląd kanałów w postaci miniaturek
(ustawienia Chanel Surfing)
Zmiana rodzaju dźwięku
Internetowy przewodnik po programach
(o ile nadawany)
Odtwarzanie wideo

19
REC rozpoczyna i zatrzymuje nagrywanie
Time Shift aktywacja i deaktywacja bufora wideo
Play odtwarzanie nagrania
Pause zatrzymanie odtwarzania
Stop stop odtwarzania
Forward przewinięcie do przodu
Rewind przewinięcie do tyłu
Regulacja głośności
Ciszej
Głośniej
Wskazanie
regulacji Wyciszenie
Pilot zdalnego sterowania
Power: otwórz/ zamknij TV PLUS3.0
AV Source: źródło AV
0~9: wybierz numer kanału
Recall: powróć do ostatnio oglądanego kanału
Mute: wyłączenie dźwięku
Stop: zatrzymanie odtwarzania
Record: nagrywanie plików multimedialnych
* Więcej informacji na temat obsługi TV PLUS3.0
znajdziesz w pliku pomocy programu.
CH+ : kanał do przodu
CH- : kanał do tyłu
VOL+ : zwiększenie głośności
VOL- : zmniejszenie głośności
Full Screen: wyświetlanie obrazu TV na całym
ekranie monitora
Time Shift: funkcja bufora TIMESHIFT

20
Table of contents
Languages:
Other MediaTech TV Receiver manuals


