Medistrom Pilot-12 Lite User manual
PRODUCT MANUAL
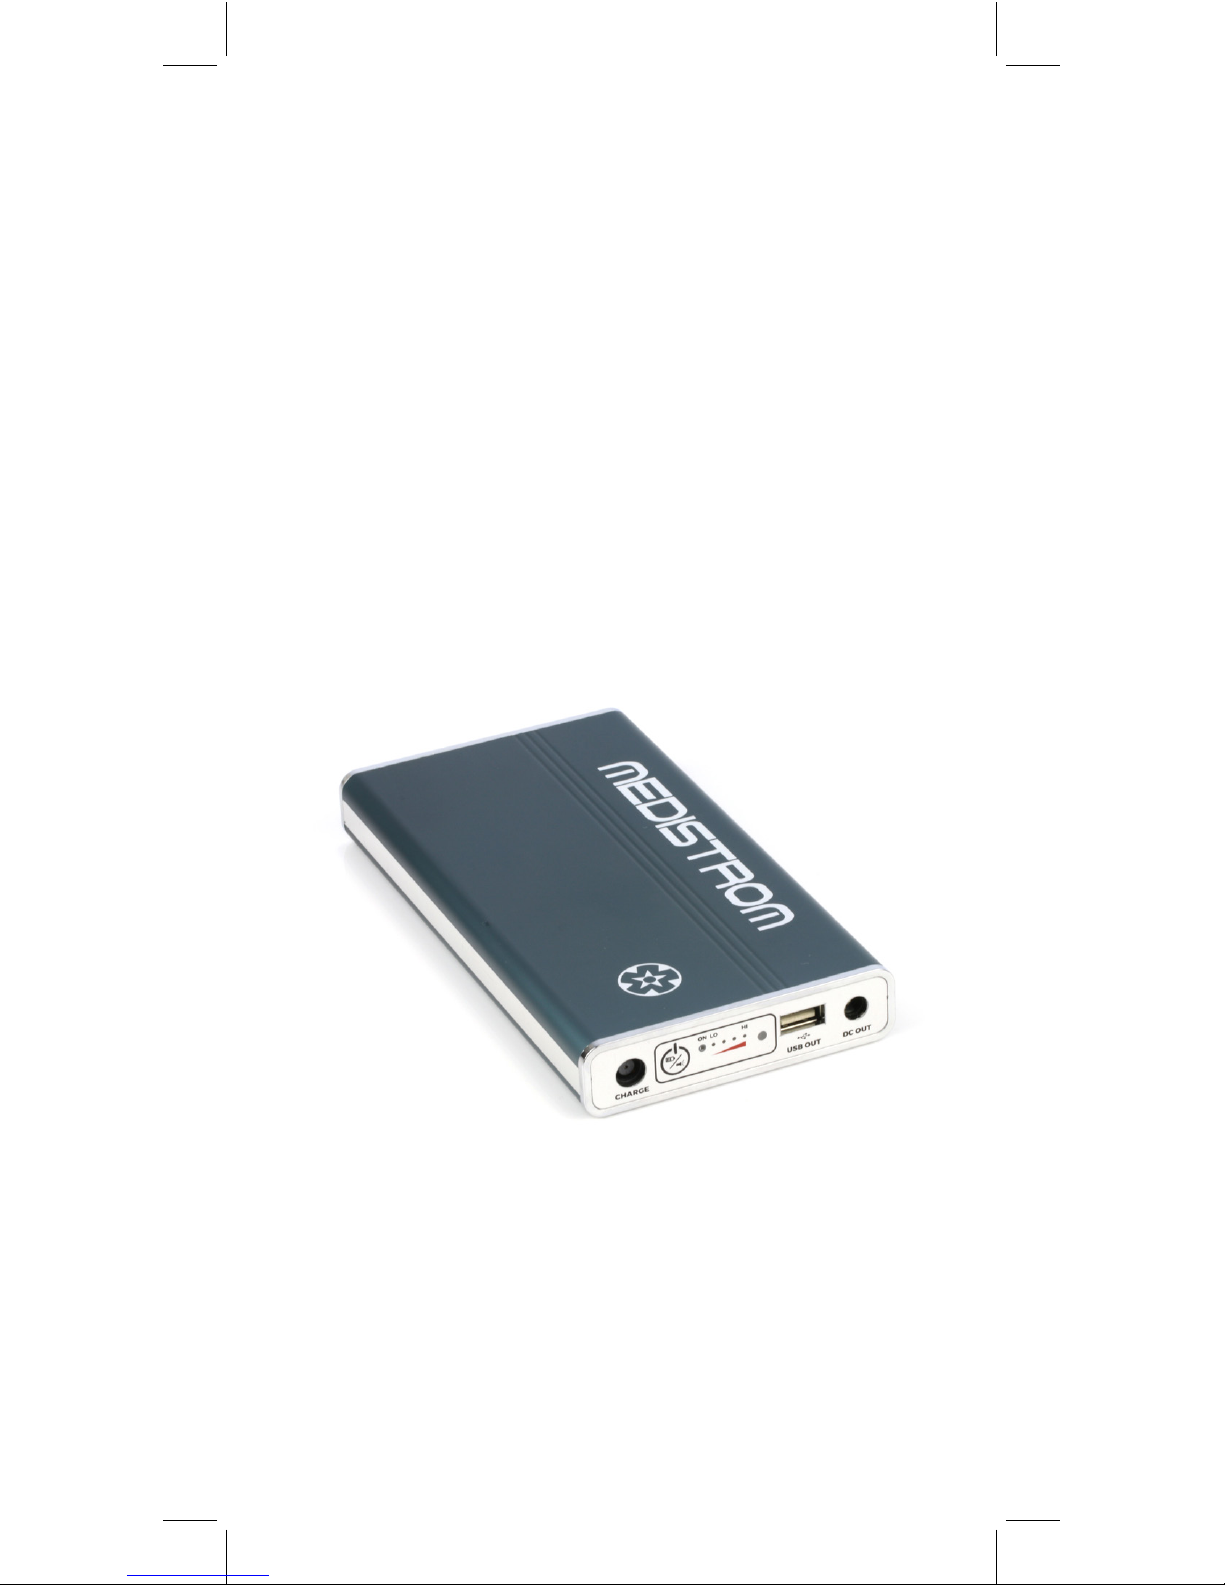
Medistrom Pilot-12 Lite
Medistrom Pilot-24 Lite
Battery and Backup Power Supply
Thank you for purchasing the Medistrom
CPAP Battery Portable Power Supply.
Please read this product manual carefully
before putting the equipment into
operation for the rst time.

2
Contents
English
1. PILOT-12 LITE
1.1 Pilot-12 Lite Package Contents 4
1.2 Pilot-12 Lite PAP Device Compatibility 4
1.3 IMPORTANT PILOT-12 LITE SAFETY USAGE INFORMATION 5
1.4 Pilot-12 Lite Intended Use and Compatibility 5
1.5 Pilot-12 Lite Control Panel 5
1.6 Pilot-12 Lite Setup 6
1.7 Pilot-12 Lite Specications 7
2. PILOT-24 LITE
2.1 Pilot-24 Lite Package Contents 8
2.2 Pilot-24 Lite PAP Device Compatibility 8
2.3 IMPORTANT PILOT-24 LITE SAFETY USAGE INFORMATION 9
2.4 Pilot-24 Lite Intended Use and Compatibility 9
2.5 Pilot-24 Lite Control Panel 10
2.6 Pilot-24 Lite Setup 10
2.7 Pilot-24 Lite Specications 12
3. Care Instructions for Pilot Lite 12
4. Travelling with Pilot-12/24 Lite Battery Backup Power Supply 12
5. Storage and Disposal of your Pilot-12/24 Lite Battery Backup Power Supply 13
6. Warnings and Safety Precautions 13
7. Warranty Information 14
8. Troubleshooting Guide 14
French
1. PILOT-12 LITE
1.1 Contenu de l’emballage de Pilot-12 Lite 17
1.2 Compatibilité des périphériques PAP Pilot-12 Lite 17
1.3 Renseignements Importants Sur L’utilisation Sécurisée Du Pilot-12 Lite 18
1.4 Pilot-12 Lite Utilisation prévue et compatibilité 18
1.5 Panneau de conguration Pilot-12 Lite 18
1.6 Conguration du Pilot-12 Lite 19
1.7 Spécications du Pilot-12 Lite 20
2. PILOT-24 LITE
2.1 Contenu de l’emballage du Pilot-24 Lite 21
2.2 Compatibilité des périphériques PAP Pilot-24 Lite 21
2.3 Renseignements Importants Sur L’utilisation Sécurisée Du Pilot-24 Lite 22
2.4 Pilot-24 Lite Utilisation prévue et compatibilité 22
2.5 À propos de votre panneau de contrôle Pilot-24 Lite 23
2.6 Conguration du Pilot-24 Lite 23
2.7 Spécications sur le Pilot-24 Lite 25
3. Instructions d’entretien pour le Pilot Lite 25
4. Voyager avec l’alimentation de secours de la batterie Pilot-12/24 Lite 25
5. Stockage et mise au rebut de l’alimentation de secours de votre batterie Pilot-12/24 Lite 26
6. Avertissements et précautions de sécurité 26
7. Informations sur la garantie 27
8 .Guide de dépannage 27

3
German
1. PILOT-12 LITE
1.1 Pilot-12 Lite Lieferumfang 30
1.2 Pilot-12 Lite PAP-Geräte Kompatibilität 30
1.3 Wichtige Sicherheitshinweise Zur Verwendung Des Pilot-12 Lite 31
1.4 Pilot-12 Lite Bestimmungsgemäße Verwendung und Kompatibilität 31
1.5 Pilot-12 Lite Bedienteil 31
1.6 Pilot-12 Lite einrichten 32
1.7 Pilot-12 Lite Technische Daten 33
1.7 Pilot-12 Lite Technische Daten 34
2. PILOT-24 LITE
2.1 Pilot-24 Lite Lieferumfang 35
2.2 Pilot-24 Lite PAP-Geräte Kompatibilität 35
2.3 Wichtige Sicherheitshinweise Zur Verwendung Des Pilot-24 Lite 36
2.4 Pilot-24 Lite Bestimmungsgemäße Verwendung und Kompatibilität 36
2.5 Über Ihr Pilot-24 Lite Bedienteil 37
2.6 Pilot-24 Lite Einrichten 37
2.7 Pilot-24 Lite Technische Daten 39
3. Pegehinweise für Pilot Lite 39
4. Reisen mit dem Pilot-12/24 Lite als Notstromversorgung 39
5. Lagerung und Entsorgung der Pilot-12/24 Lite Akku-Notstromversorgung 40
6. Warnungen und Sicherheitsvorkehrungen 40
7. Garantiehinweise 41
8. Anleitung zur Fehlerbehebung 41
Spanish
1. PILOT-12 LITE
Sección 1.1 Pilot-12 Lite Contenido del paquete 44
Sección 1.2 Pilot-12 Lite Compatibilidad del dispositivo PAP 44
Sección 1.3 Pilot-12 Lite Información Importante De Seguridad 45
Sección 1.4 Pilot-12 Lite Uso Previsto Y Compatibilidad 45
Sección 1.5 Pilot-12 Lite Panel de control 45
Sección 1.6 Pilot-12 Lite Instalación 46
Sección 1.7 Pilot-12 Lite Especicaciones 47
2. PILOT-24 LITE
Sección 2.1 Pilot-24 Lite Contenido del paquete 48
Sección 2.2 Pilot-24 Lite Compatibilidad del dispositivo PAP 48
Sección 2.3 Pilot-24 Lite Información Importante De Seguridad 49
Sección 2.4 Pilot-24 Lite Uso Previsto Y Compatibilidad 49
Section 2.5 About Your Pilot-24 Lite Panel de control 50
SECTION 2.6 Pilot-24 Lite instalación 50
SECCIÓN 2.7 Pilot-24 Lite Especicaciones 52
3. Instrucciones de cuidado para Pilot Lite 52
4. Viajando con Batería y fuente de poder de respaldo Pilot-12/24 Lite 52
5. Almacenamiento y eliminación de su batería - fuente de poder de reserva Pilot-12/24 Lite 53
6. Advertencias y precauciones de seguridad 53
7. Información de la garantía 54
8. Guía de solución de problemas 54

4
NOTE: The Pilot-12 Lite is NOT COMPATIBLE with the Phillips Respironics DreamStation
Go. The Phillips Respironics DreamStation Go is compatible only with the Pilot-24
series batteries. For complete PAP compatibility information including compatibility
for Bi-Level devices, please visit www.medistrom.com or contact Medistrom technical
responsible for any damage caused by improper use of the Pilot-12 Lite.
SECTION 1 - PILOT-12 LITE
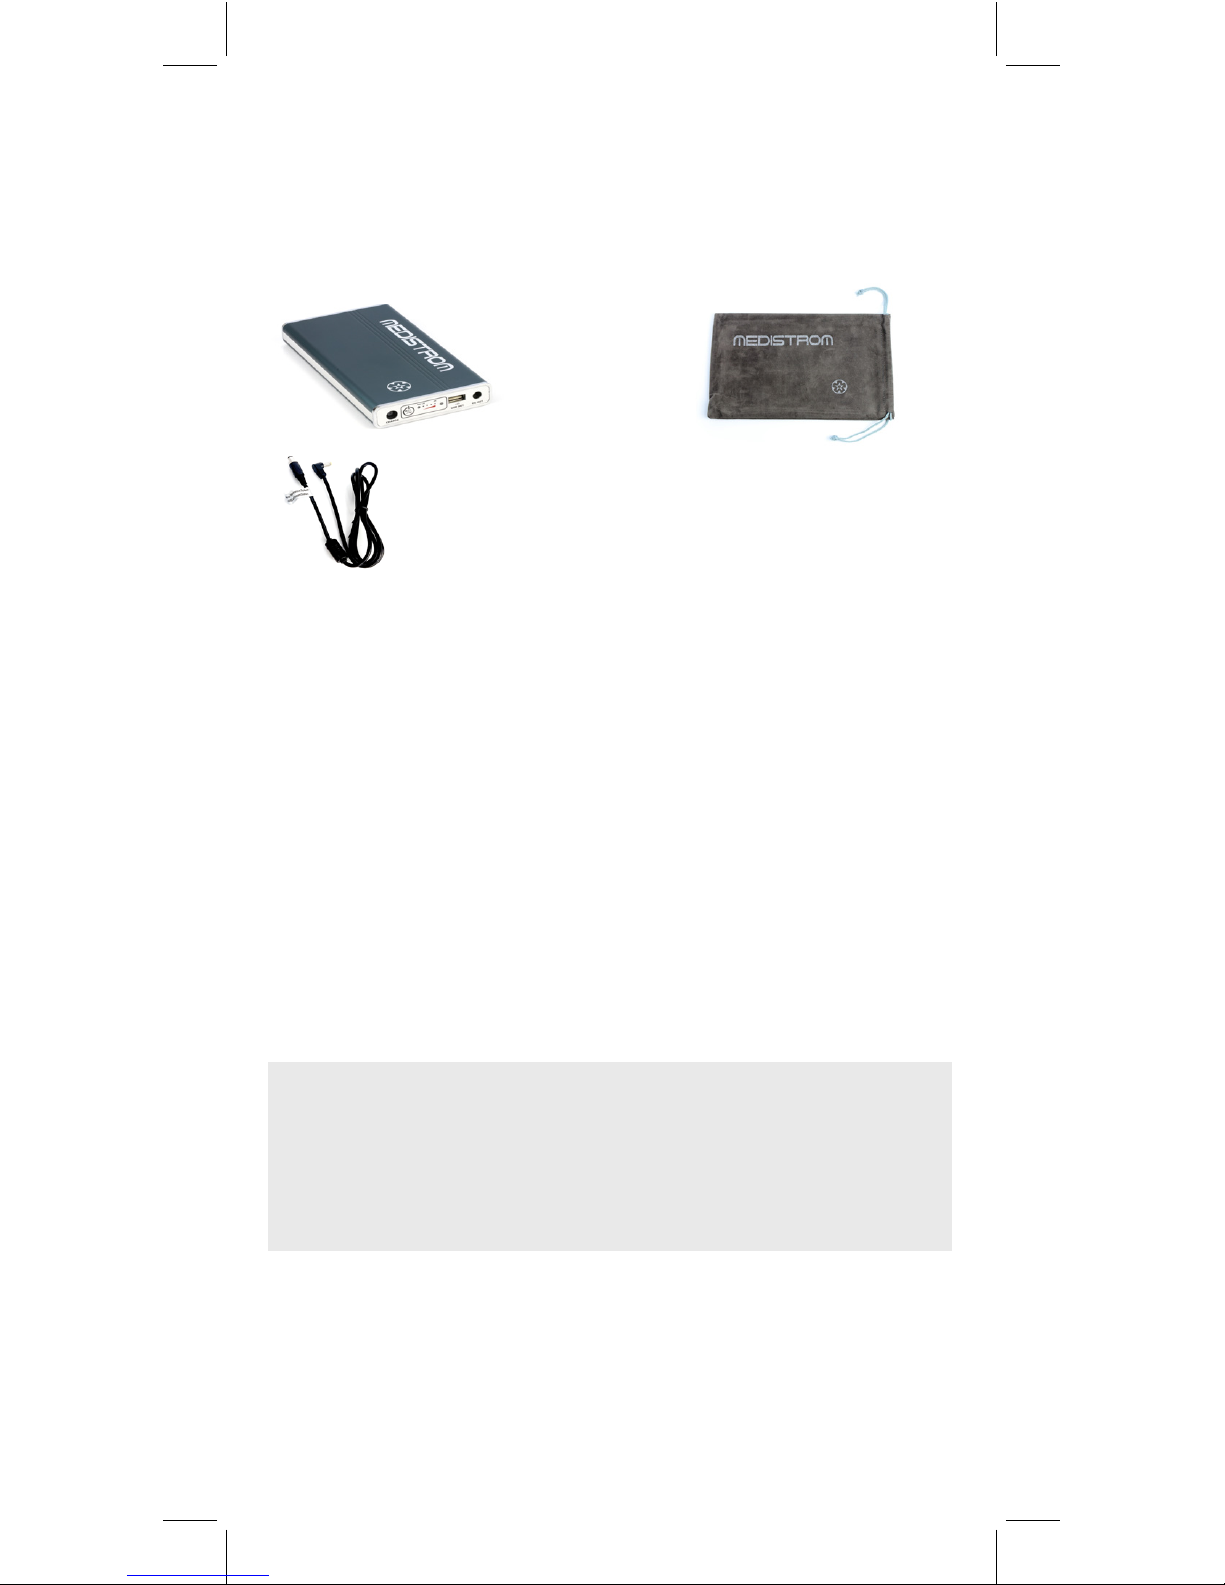
Section 1.1 Pilot-12 Lite Package Contents
THIS PACKAGE INCLUDES:
Pilot-12 Lite Battery Carry Sleeve
DC Out Cable for
Phillips Respironics
DreamStation /System One S60
1) Car Charger for Pilot Lite (SKU #P99ACCPCC)
2) Mixed kit for Pilot-12 Lite (SKU# P12MXDPLK)
Includes:
a. DC Output Cable for Intellipap I /HDM Z1
b. Short Charging Adapter Cable for Intellipap I /HDM Z1
c. DC Output Cable for Intellipap II
3) Solar Panel, 50W (SKU# P99ACCS50)
ADDITIONAL ACCESSORIES FOR PILOT-12 LITE
(SOLD SEPARATELY)
Section 1.2 Pilot-12 Lite PAP Device Compatibility
The Pilot-12 Lite can be used with ONLY the following APAP/CPAP devices:
• Phillips Respironics System One S60
• Phillips Respironics DreamStation
• DeVilbiss IntelliPAP I and IntelliPAP II (cables sold separately, SKU# P12MXDPLK)
• HDM Z1 (cables sold separately, SKU# P12MXDPLK)
SUPPORTED PAP DEVICES
Pilot-12 Lite is designed to be charged using the Phillips Respironics
DreamStation, System OneS60 and theDeVilbiss IntelliPAP IIseries original AC
power adapters directly. It can also be charged using the DeVilbiss IntelliPAP
I and HDM Z1 series original AC power adapters by using the corresponding
short charging adapter cables (sold separately, SKU #P12MXDPLK). For more
detailed instructions, please see SECTION 1.6 Pilot-12 Lite Setup, Step 1.
5
Battery Carry Sleeve
Section 1.3 IMPORTANT PILOT-12 LITE
SAFETY USAGE INFORMATION
Using a humidier or heated tubing while powering your compatible PAP device
with the Pilot-12 Lite will signicantly decrease the battery run time. For optimal
run times please disable and/or detach any humidiers and heated tubing.
• DO NOT expose battery to temperatures above 40°C / 104°F (Fire Hazard!)
• DO NOT expose battery to temperatures below -10°C / 14°F (Cell Damage
Hazard!)
• DO NOT expose battery to relative humidity above 85% (Electrical Hazard!)
• Normal operating ambient temperatures are 0°C / 32°F to 35°C / 95°F
• Fully charge battery before storage and at least every 6 months thereafter
Section 1.4 Pilot-12 Lite Intended Use and Compatibility
Pilot-12 Lite is manufactured with genuine LG industrial grade rechargeable
lithium ion cells. The Pilot-12 Lite can be used as a backup power source to
prevent interruption to PAP therapy in the case of a power outage.
Pilot-12 Lite can serve as a portable PAP battery during travel by air, land, or sea
when the mains power source is not available.
Pilot-12 Lite is designed to be used with most 12V PAP Devices (Refer to Section
1.2 PAP Device Compatibility).
Pilot-12 Lite has a USB port (output: 5V 2.5A) which can be used to charge
cellphones, tablets and other commonly used handheld devices rated for
receiving the above USB power output.
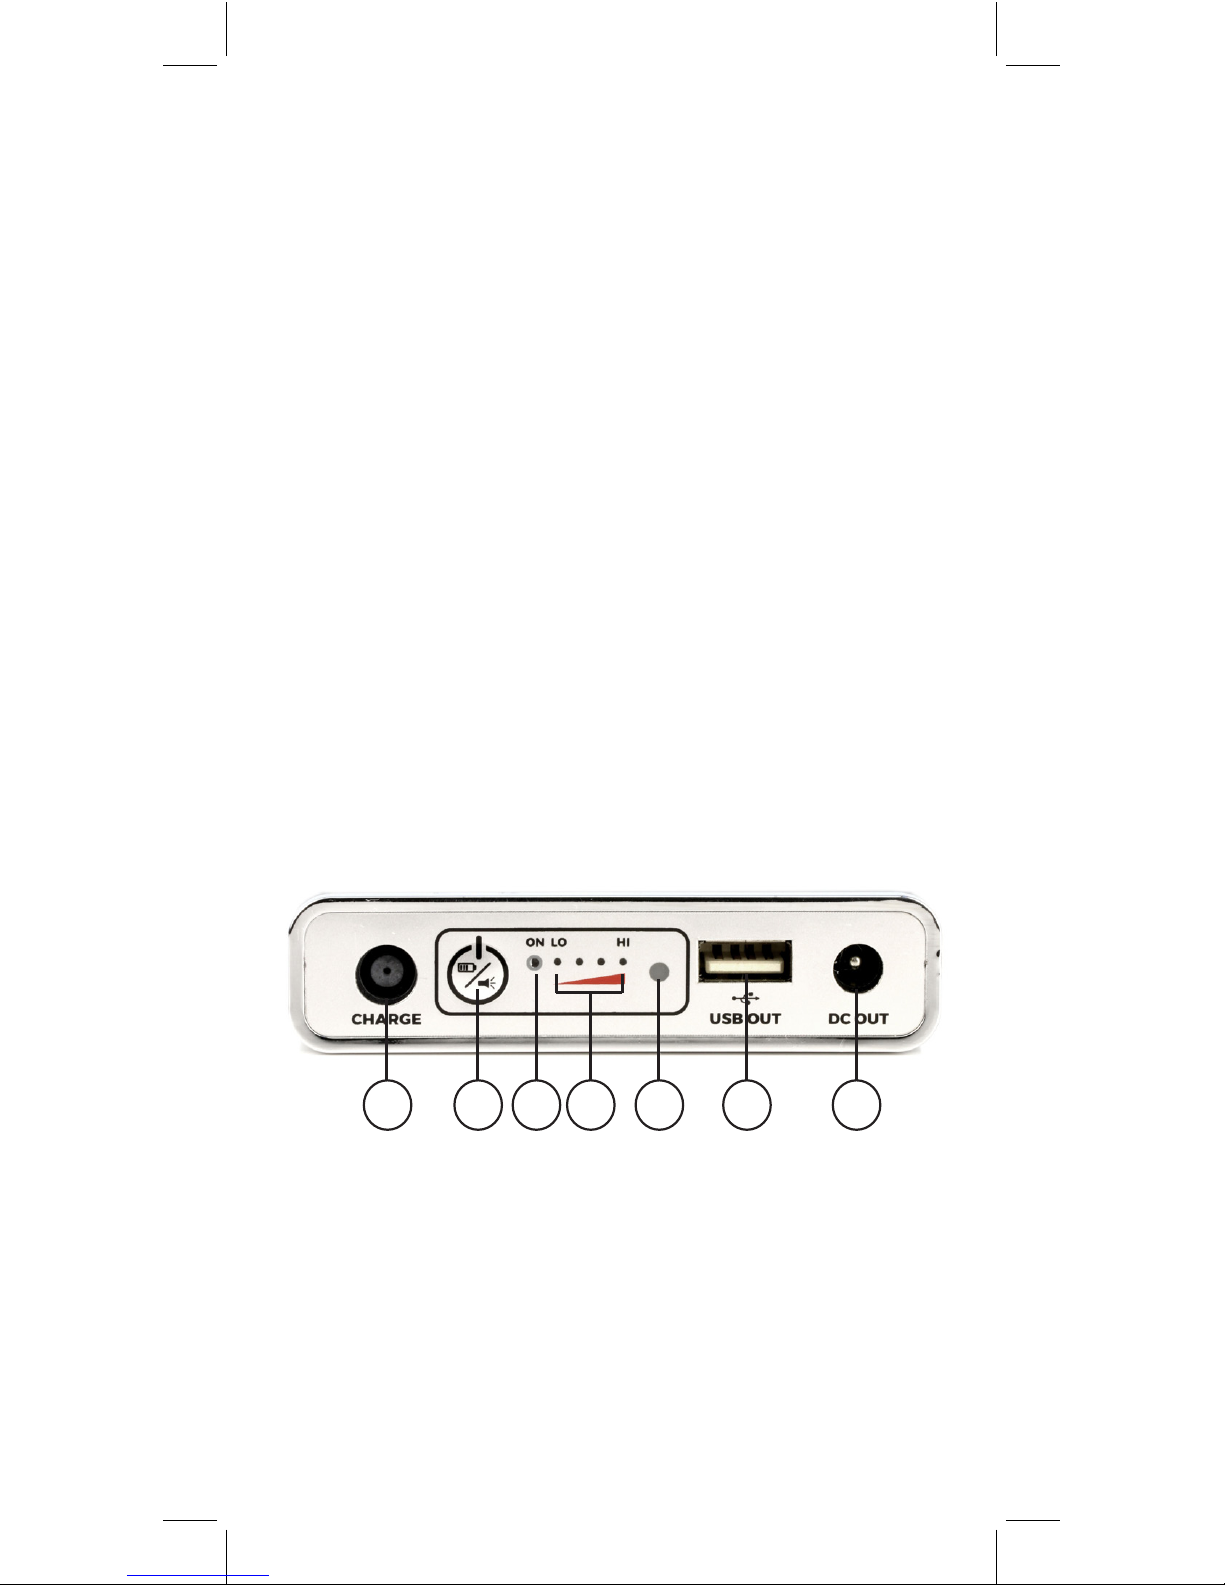
Section 1.5 Pilot-12 Lite Control Panel
1. Charge Port
Plug the compatible AC adapter into this port (use the short charging adapter cable if
required). Ensure that the AC adapter is plugged into the mains power outlet. Once the
battery is charging the 4 green Charge Level Indicator Lights will turn on.
2. Multi Function Button
Pressing the button once will show the battery’s charge level (if the battery is in Standby
Mode: refer to Stand-by Mode in Section 1.6)
Holding the button for 3 seconds will turn the LED Flashlight On and O
3. Blue “ON” Indicator Light
The light will shine solid blue once the battery is connected and is sending power to a
compatible PAP device. (If this light is ashing, please check the error code in Section 8).
1 2 3 5 6 74

6
4. Green Charge Level Indicator Lights
When the battery is being charged, the lights will blink, and then shine solid green
showing the level of charge going from Lo to Hi. Refer to Section 8 for a guide to charge
levels.
5. LED Flashlight
Can be turned ON and OFF by holding the Multi Function Button for 3 seconds.
Note: If the Pilot Lite battery is not connected to a device, the ashlight will turn OFF
automatically after 10 minutes, otherwise, the ash light will remain ON.
6. USB Port (5V 2.5A Out)
Can be used to charge handheld devices (please check that the output Voltage and
Amperage is compatible with the device that needs charging via the USB before
connecting). Once connected press the Multi Function Button to turn on the battery.
7. DC Out Port
This port is used to connect a compatible PAP device to the battery by using the
matching DC output cable.
Section 1.6 Pilot-12 Lite Setup
NOTE: No power adapters are included with your Pilot-12 Lite Battery and Backup
Power Supply. Refer to section 1.2 (PAP Device Compatibility)
Using Pilot-12 Lite as a Backup Power Supply for PAP devices
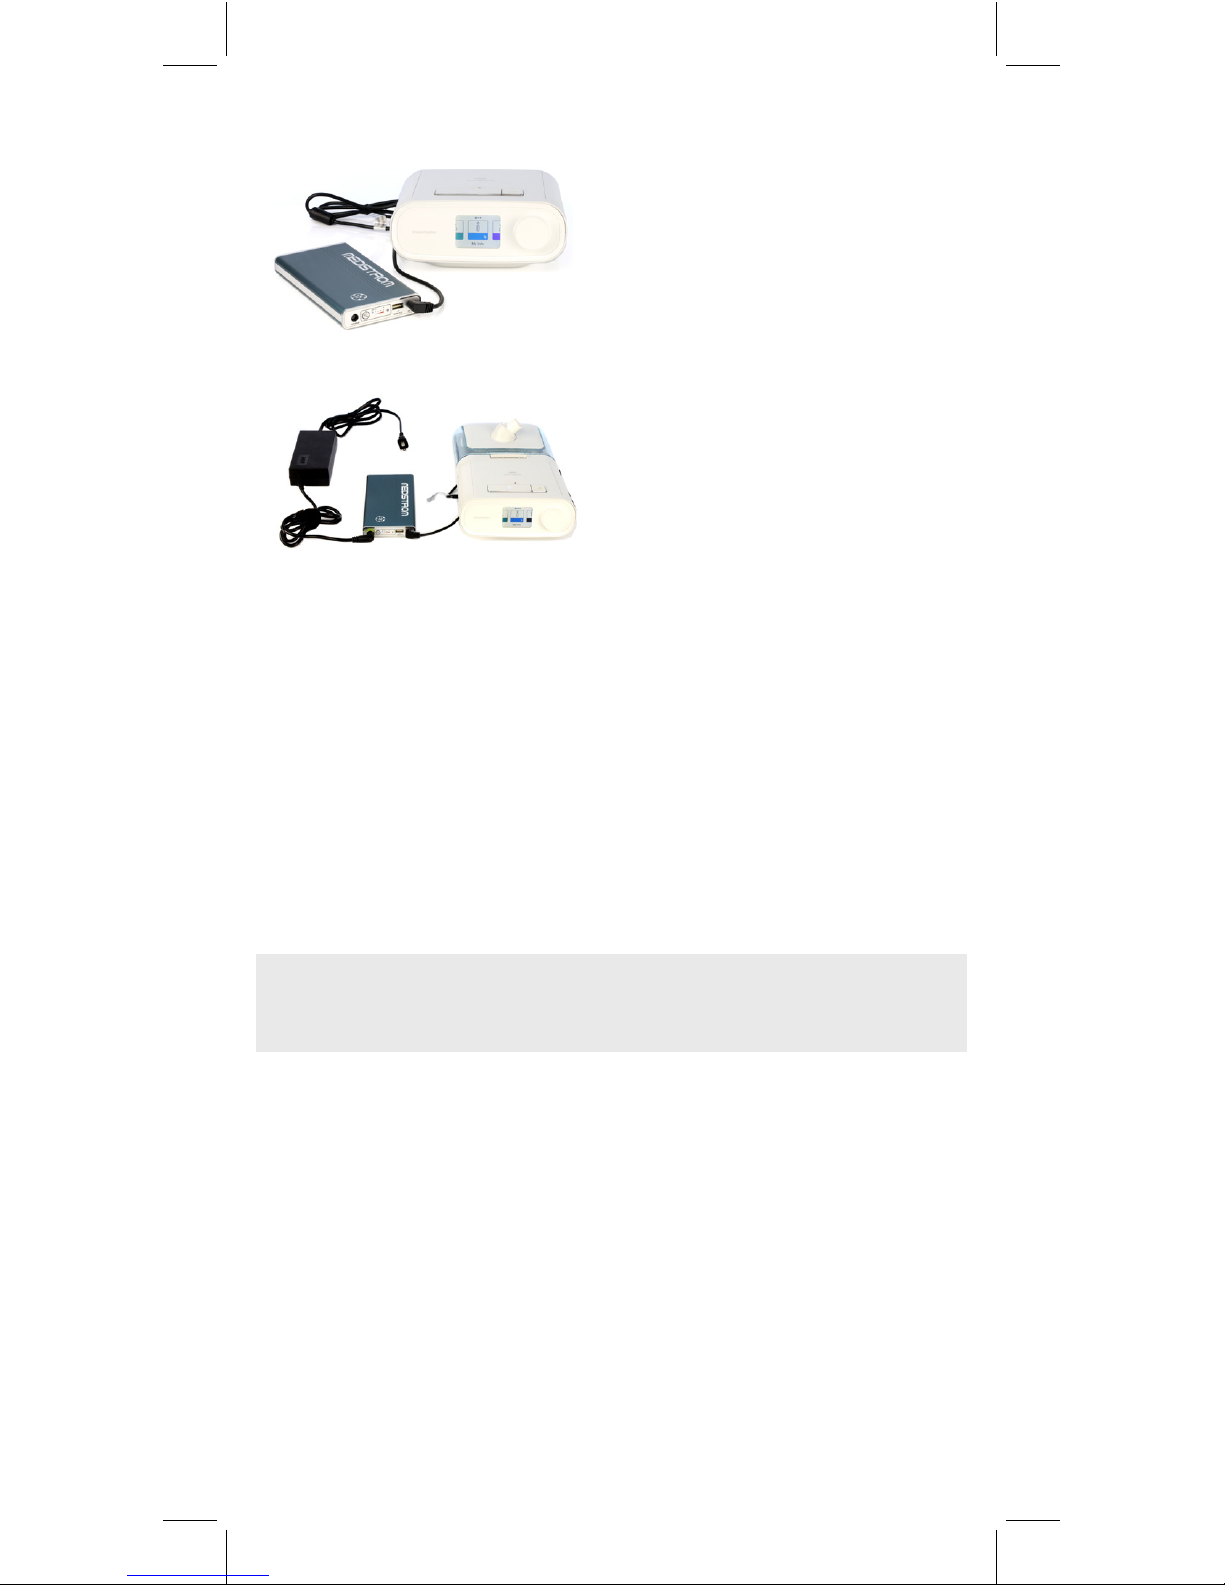
STEP 1 – Connecting Pilot-12 Lite to AC Power Adapter
Plug the power connector from the
Phillips Respironics DreamStation/
System One S60 AC adapter into the
Charge Port of the Pilot-12 Lite and
plug the other end into the power
outlet.
NOTE: Please use the Short Charging
Adapter Cable for the DeVilbiss
IntelliPAP I, HDM Z1 series devices
(sold separately SKU# P12MXDPLK)

7
STEP 2 – Connecting Pilot-12 Lite to PAP Device
Plug the L-shaped yellow tipped
end of the DC Out Cable for Phillips
Respironics DreamStation into the
DC Out Port of your Pilot-12 Lite and
plug the other black tipped circular
end into the power connector port of
Respironics DreamStation PAP Device.
Stand-by Mode
If the PAP device has been connected but not used within 10 min (or the PAP device is
turned o for 10 min), the Pilot-12 Lite will go into Stand-by Mode to conserve power.
To wake the Pilot-12 Lite press the Multi Function Button.
Charging Pilot-12 Lite
Follow STEP 1 above. Charge times for the Pilot-12 Lite via the Phillips Respironics
System One S60 or DreamStation AC adapter is approximately 2-3 hours. Charge time
via other compatible power adapters may vary.
Using Pilot-12 Lite as a Portable Battery with a compatible PAP device
Follow STEP 2 above. Run times will vary based on prescribed pressure, patient
breathing pattern, mask seal, use of any additional features or attachments such as
pressure relief, heated humidier and heated tubing.
NOTE: For optimal run times while using your Pilot-12 Lite with a compatible PAP
device please disable and/or detach any humidiers and heated tubing.
ATTENTION! Mask leaks or high PAP pressures can greatly decrease run times.
Once the Pilot-12 Lite is connected
to your PAP device, the Charge Level
Indicator Lights will turn on briey and
then the On Indicator Light will turn
solid blue. At this point your PAP device
will show that it is receiving power. If
your PAP device is not receiving power,
please check the cable connections
and press the Multi Function Button.
Section 1.7 Pilot-12 Lite Specications
• Capacity: 95Wh
• Cell Type: LG Industrial grade genuine rechargeable lithium ion cells
• Rated Input: 12V, 60W(NORMAL) 80W(MAX)
• Rated Output: DC 12V, 6.5A
• USB Out: 5V, 2.5A
• Life Span: Over 500 full charge/discharge cycles
• Case: Aluminum
• Dimensions: 17cm x 9cm x 2cm, Weight 1.3lbs
• Power Gauge: 4 stage Charge Level Indicator Lights
• Recharge time: 2-3 hours via Respironics DreamStation AC Adapter
(charging via other compatible adapters may be longer)

8
SECTION 2 - PILOT-24 LITE
Section 2.1 Pilot-24 Lite Package Contents
Short Charging Adapter
Cable for ResMed AirMini
1) Car Charger for Pilot Lite (SKU #P99ACCPCC)
2) DreamStation Go/BMC Luna Kit for Pilot-24 Lite (SKU# P24PDGPLK)
Includes: a. Respironics DreamStation Go DC Output Cable (ATTENTION!
Phillips Respironics DreamStation Go, compatible with Pilot-24 series batteries
ONLY) b. Pilot-24 Lite AC Power Adapter c. 3B Medical Luna DC Output Cable.
3) ResMed S9 Kit for Pilot-24 Lite (SKU# P24R09PLK)
Includes: a. Output Cable for ResMed S9. b. Short Charging Adapter Cable
for S9.
4) Apex ICH kit for Pilot-24 Lite (SKU# P24AMIPLK)
Includes: a. Output cable for APEX iCH b. Short Charging Adapter Cable for
APEX iCH
5) Medistrom AC Power adapter (SKU# P24ACCACA)
6) Solar Panel, 50W (SKU# P99ACCS50)
ADDITIONAL ACCESSORIES FOR PILOT-24 LITE
(SOLD SEPARATELY)
THIS PACKAGE INCLUDES:
DC Out Cable for
ResMed AirSense 10
Section 2.2 Pilot-24 Lite PAP Device Compatibility
The Pilot-24 Lite can be used with ONLY the following APAP/CPAP devices:
• ResMed AirSense 10 series
• ResMed AirMini
• Phillips Respironics DreamStation Go series (cables sold separately, SKU#
P24PDGPLK)
• BMC Luna (cables sold separately, SKU# P24PDGPLK)
• ResMed S9 series (cables sold separately, SKU# P24R09PLK)
• Apex iCH series (cables sold separately, SKU#P24AMIPLK)
SUPPORTED PAP DEVICES
Pilot-12 Lite Battery Carry Sleeve
DC Out Cable for
ResMed AirMini

9
Short Charging Adapter
Cable for ResMed AirMini
Battery Carry Sleeve
DC Out Cable for
ResMed AirMini
NOTE: The Pilot-24 Lite is NOT COMPATIBLE with the Phillips Respironics
DreamStation. The Phillips Respironics DreamStation is compatible only with
the Pilot-12 series batteries. For complete compatibility information including
compatibility for Bi-Level devices, please visit www.medistrom.com or contact
Medistrom technical support at 1-888-407-4791 or email support@medistrom.
com. Medistrom is not responsible for any damage caused by the improper use
of the Pilot-24 Lite.
Pilot-24 Lite is designed to be charged using the original ResMed AirSense 10
series AC power adapter directly. It can also be charged using the AirMini series
power adapter by using the short charging adapter cable for ResMed AirMini.
Charge time via the ResMed AirMini AC adapter is approximately 7-9 hours.
For faster charging time, please use Medistrom AC Power adapter (SKU#
P24ACCACA). Pilot-24 Lite can be also charged with the ResMed S9 series
original AC power adapter by using the ResMed S9 short charging adapter
cable (sold separately, SKU# P24R09PLK), the Apex iCH via the Apex iCH Short
Charging Adapter Cable (sold separately, SKU # P24AMIPLK), and the Medistrom
Pilot-24 Lite AC adapter (sold separately, SKU# P24ACCACA). For more detailed
instructions on charging, please see SECTION 2.6 Pilot-24 Lite Setup, Step 1.
Section 2.3 IMPORTANT PILOT-24 LITE SAFETY USAGE INFOR-
MATION
Using a humidier or heated tubing while powering your compatible PAP device
with the Pilot-24 Lite will signicantly decrease the battery run time. For optimal
run times please disable and/or detach any humidiers and heated tubing.
• DO NOT expose battery to temperatures above 40°C / 104°F (Fire Hazard!)
• DO NOT expose battery to temperatures below -10°C / 14°F (Cell Damage
Hazard!)
• DO NOT expose battery to relative humidity above 85% (Electrical Hazard!)
• Normal operating ambient temperatures are 0°C / 32°F to 35°C / 95°F
• Fully charge battery before storage and at least every 6 months thereafter
• Please refer to the next section for a list of compatible devices.
Section 2.4 Pilot-24 Lite Intended Use
and Compatibility
Pilot-24 Lite is manufactured with genuine LG industrial grade rechargeable lithium ion
cells. The Pilot-24 Lite can be used as a backup power source to prevent interruption to
PAP therapy in the case of a power outage.
Pilot-24 Lite can serve as a portable PAP battery during travel by air, land, or sea when
the mains power source is not available.
Pilot-24 Lite is designed to be used with most 24V PAP Devices (Refer to Section 2.2
PAP Device Compatibility)
Pilot-24 Lite has a USB port (output: 5V 2.5A) which can be used to charge cellphones,
tablets and other commonly used handheld devices.
10
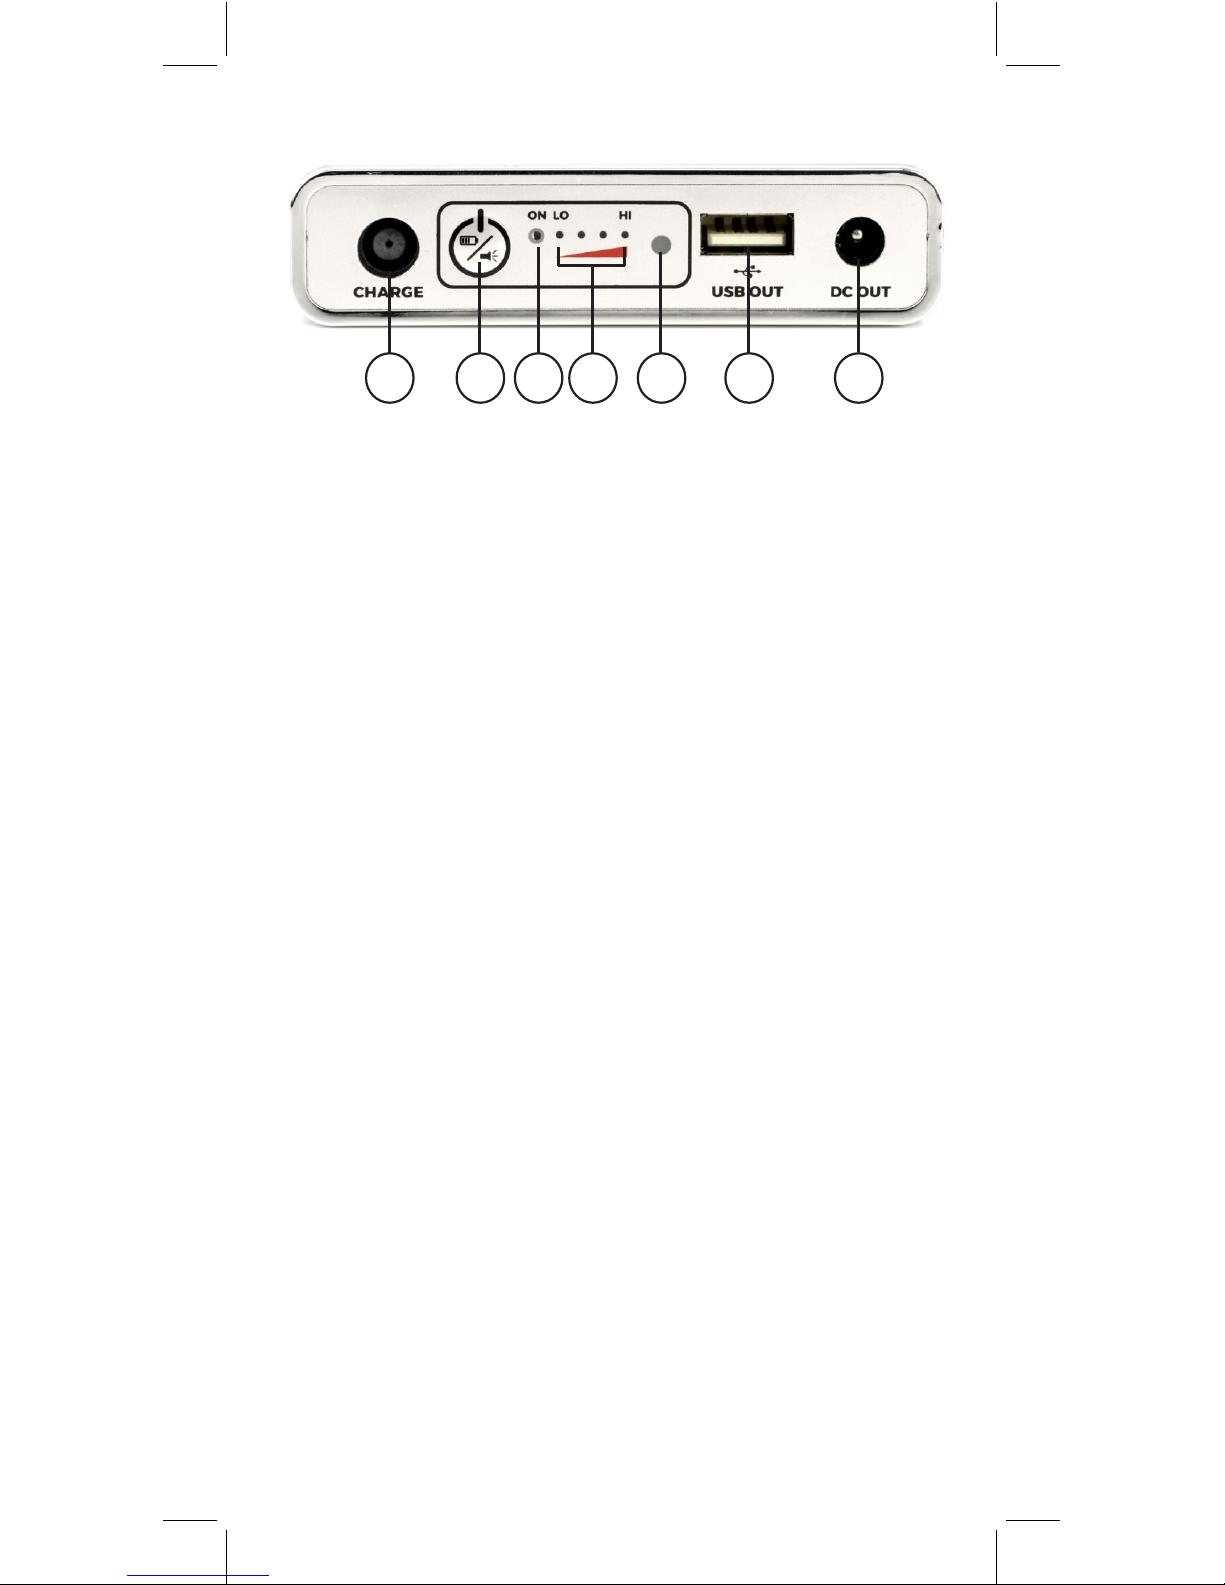
Section 2.5 Pilot-24 Lite Control Panel
1 2 3 5 6 74
1. Charge Port
Plug the compatible AC adapter into this port (use the short charging adapter cable if
required). Ensure that the AC adapter is plugged into the mains power outlet. Once the
battery is charging the 4 green Charge Level Indicator Lights will turn on.
2. Multi Function Button
Pressing the button once will show the battery’s charge level (if the battery is in Standby
Mode: refer to Stand-by Mode in Section 2.6)
Holding the button for 3 seconds will turn the LED Flashlight On and O
3. Blue “ON” Indicator Light
The light will shine solid blue once the battery is connected and is sending power to a
compatible PAP device. (If this light is ashing please check the error code in Section 8)
4. Green Charge Level Indicator Lights
When the battery is being charged, the lights will blink, and then shine solid green
showing the level of charge going from Lo to Hi. Refer to Section 8 for a guide to charge
levels.
5. LED Flashlight
Can be turned ON and OFF by holding the Multi Function Button for 3 seconds.
Note: If the Pilot Lite battery is not connected to a device, the ashlight will turn OFF
automatically after 10 minutes, otherwise, the ash light will remain ON.
6. USB Port (5V 2.5A Out)
Can be used to charge handheld devices (please check that the output Voltage and
Amperage is compatible with the device that needs charging via the USB before
connecting). Once connected press the Multi Function Button to turn on the battery.
7. DC Out Port
This port is used to connect a compatible PAP device to the battery.
Section 2.6 Pilot-24 Lite Setup
ATTENTION: No power adapters are included with your Pilot-24 Lite Battery and
Backup Power Supply. Please refer to section 2.2 PAP Device Compatibility on
information how to charge your battery.
Using Pilot-24 Lite as a Backup Power Supply for PAP devices

11
STEP 1 – Connecting Pilot-24 Lite to AC Power Adapter
Plug the original ResMed AirSense 10 AC
power adapter into the Charge Port of the
Pilot-24 Lite and plug the other end into the
power outlet.
NOTE: Please use the Short Charging
Adapter Cable for ResMed AirMini
(included with Pilot-24 Lite) to plug the
original ResMed AirMini AC power adapter
into the Charge Port of the Pilot-24 Lite.
STEP 2 – Connecting Pilot-24 Lite to PAP Device
Plug the L-shaped yellow tipped end of
the DC Out Cable for ResMed AirSense 10
Series into the DC Out Port of your Pilot-24
Lite and plug the other black tipped circular
end into the power connector port of your
AirSense 10 PAP device.
Stand-by Mode
If the PAP device has been connected but not used within 10 min (or the PAP device is
turned o for 10 min), the Pilot-24 Lite will go into Stand-by Mode to conserve power.
To wake the Pilot-24 Lite press the Multi Function Button.
Charging Pilot-24 Lite
Follow STEP 1 above. Charge times for the Pilot-24 Lite via the ResMed AirSense 10, S9
or the Medistrom Pilot-24 AC adapter is approximately 2-3 hours. Charge time via the
ResMed AirMini AC adapter is approximately 7-9 hours.
Once the Pilot-24 Lite is connected to your
PAP device, the Charge Level Indicator
Lights will turn on briey and then the On
Indicator Light will turn solid blue. At this
point your PAP device will show that it is
receiving power. If your PAP device is not
receiving power, please check the cable
connections and press the Multi Function
Button.

12
NOTE: The ResMed AirMini AC adapter can only be used to charge the Pilot-24 Lite
and cannot be used in the Backup Power Supply conguration. To use the ResMed Air
Mini PAP Device in the backup conguration with Pilot-24 Lite please use Medistrom
AC Power Adapter for Pilot-24 Lite (Sold separately, SKU# P24ACCACA) or the original
ResMed AirSense 10 AC power adapter, or the original ResMed S9 power adapter with
the short charging adapter cable.
Using Pilot-24 Lite as a Portable Battery for compatible PAP device
Follow STEP 2 above. Run times will vary based on prescribed pressure, patient
breathing pattern, mask seal, use of any additional features or attachments such as
pressure relief, heated humidier and heated tubing.
NOTE: For optimal run times while using your Pilot-24 Lite with a compatible PAP
device please disable and/or detach any humidiers and heated tubing. Mask leaks or
high PAP pressures can greatly decrease run times.
SECTION 2.7 Pilot-24 Lite Specications
• Capacity: 95Wh
• Cell Type: LG Industrial grade genuine rechargeable lithium ion cells
• Rated Input: 24V, 60W (NORMAL), 90W (MAX)
• Rated Output: DC 24V, 3.5A
• USB Out: 5V, 2.5A
• Life Span: Over 500 full charge/discharge cycles
• Case: Aluminum
• Dimensions: 9cm x 17cm x 2cm, Weight 1.3lbs
• Power Gauge: 4 stage Charge Level Indicator Lights
• Recharge time: 2-3 hours (7 to 9 hours via the ResMed AirMini AC Adapter)
SECTION 3 Care Instructions for Pilot Lite
CAUTION! Fully charge your Pilot Lite before storage and at least EVERY 6 MONTHS
thereafter. Failure to do this will be considered negligence and will void the warranty.
CAUTION! Do not expose the battery to liquids of any kind. Keep out of direct sunlight.
If your unit becomes soiled, disconnect it from the power source and the PAP device
and wipe the exterior casing with a clean, dry cloth.
SECTION 4 - Travelling with Pilot-12/24 Lite
Battery Backup Power Supply
The Pilot-12/24 Lite Battery Backup Power Supplies each have a 95Wh capacity. Many
airlines will allow batteries under 100Wh to be taken into the cabin for travel. Please
always consult with your particular airline and ight to conrm that your Pilot-12/24
Lite can be taken with you in your carry-on prior to travelling.
If you plan on charging your Pilot-12/24 Lite with the car charger, please make sure to
test the car charger before travelling.
If you plan on travelling and you have not used your Pilot-12/24 Lite in the battery
conguration, we strongly suggest that you test run the unit in the battery conguration
prior to travelling in order to get an idea of what run-time you could expect. For
optimal run times please disable any additional features such as the heated hose, the
humidier, EPR as well as properly adjust your mask to minimize air leakage.

13
SECTION 5 - Storage and Disposal of your
Pilot-12/24 Lite Battery Backup Power Supply
CAUTION! Fully charge your Pilot Lite before storage and at least EVERY 6 MONTHS
thereafter. Failure to do this will be considered negligence and will void the warranty.
Store the Pilot-12 Lite or Pilot-24 Lite in a cool, dark, well ventilated place with normal
temperatures of 0 °C / 32 °F to 35 °C / 95 °F. CAUTION! Keep out of direct sunlight!
The disposal of this unit should be carried out in accordance with applicable laws and
regulations reecting the purchaser’s geographic location. For more information on
where to recycle this product, please call 1-877-723-1297 or visit: www.call2recycle.org
If you have any other inquiries or would like to download the Medistrom Travel
Letter please visit www.medistrom.com or www.choiceonemedical.com. For further
SECTION 6 - Warnings and Safety Precautions
Please read this product manual carefully in it’s entirety before putting the equip-
ment into operation for the rst time. Observe all safety instructions.
• Do not expose the Pilot-12 Lite / Pilot-24 Lite to any hard, physical impact.
• Do not expose the Pilot-12 Lite / Pilot-24 Lite to water, rain or moisture of any
kind.
• Do not expose the Pilot-12 Lite / Pilot-24 Lite to an open ame or extreme heat,
including direct sunlight. Exposure to any of these may result in damage to the
lithium-ion cells and may cause an explosion.
• •Do not disassemble or attempt to repair the Pilot-12 Lite / Pilot-24 Lite.
• Ensure the product is thoroughly inspected for any physical damage. If any
damage is found, the equipment should not be used.
• Any improper use or operation of the device, i.e., that is not consistent with
the instructions, will result in forfeiture of all claims under the manufacturer’s
warranty.
• Prevent the risk of electric short circuit by using only the appropriate AC
adapters and DC output cables outlined in this manual.
• If the battery pack becomes damaged and is leaking, do not touch the
battery leakage directly: electrolyte leakage can cause skin irritation. In case
the electrolyte comes into contact with the eyes, rinse with water as soon as
possible. Do not rub eyes. Seek medical attention as soon as possible.
• Do not operate the device if the battery housing or AC adapter you are using
is damaged. Immediately disconnect the damaged device from the power by
pulling the plug and disposing of the unit appropriately.
• Do not expose the equipment to extreme temperatures, aggressive chemical
vapors, moisture, shocks, vibration, or strong electromagnetic elds.
• Do not allow liquids to enter the device.
• Keep out of reach of children.
CAUTION! Fully charge your Medistrom Pilot Lite battery pack every six months or
less, failure to charge the unit regularly will cause damage to the lithium-ion cells and
permanently diminish run time. Failure to charge the unit regularly is considered
neglect and will not be covered under warranty.
14
SECTION 7 - Warranty Information
Please contact your CPAP battery dealer for any warranty related issues or you can
Medistrom guarantees that Pilot-12 Lite or Pilot-24 Lite Battery Backup Power Supply
shall remain free from manufacturer defects for twelve months from the date of
purchase. This warranty is not transferrable and will only be available to the original
purchaser.This warranty does not cover physical damage resulting from improper use.
Medistrom reserves the right to choose whether to repair or replace the product.
CAUTION! Fully charge your Medistrom Pilot-12 Lite or Pilot-24 Lite Battery Backup
Power Supply before storage and EVERY 6 MONTHS. Failing to do so will void the
warranty. Medistrom reserves the right to update the warranty policy without notice.
For the most up to date warranty information please visit www.medistrom.com or
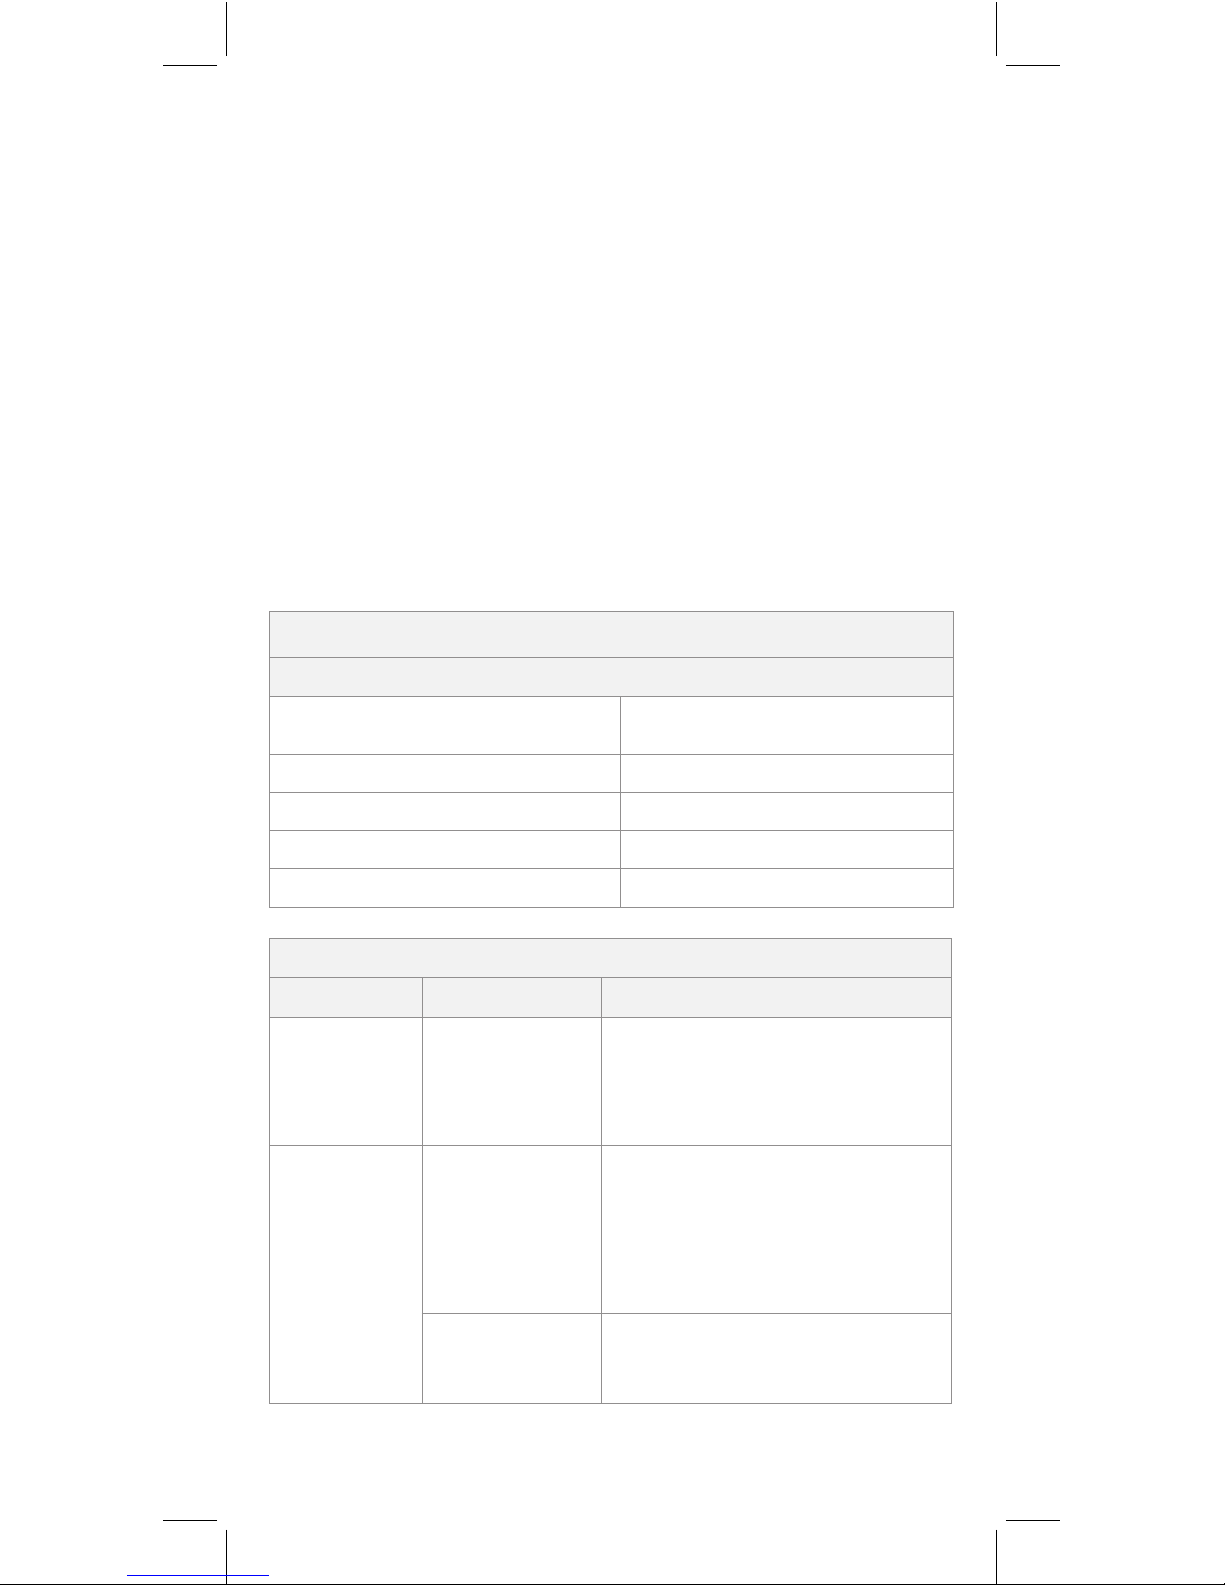
SECTION 8 - Troubleshooting Guide
NORMAL OPERATION
Green Charge Level Indicator Lights
4 solid green lights Greater than 90% capacity
remaining
3 solid green lights 65% - 90% capacity remaining
2 solid green lights 40% - 65% capacity remaining
1 solid green light 10% - 40% capacity remaining
Green lights ashing consecutively Battery is charging
ERROR CODES
Error Possible Cause Solution
Blue and green
LEDs alternate
ashing
(Over Discharge
State)
Battery has
entered over-
discharge
protection to
prevent damage to
the cells.
Contact Medistrom technical support at
1-888-407-4791 (North America), 1-300-
146-358 (Australia) or email support@
medistrom.com
Blue LED
ashing rapidly
accompanied
by short
(200ms)
beeping pattern
Incorrect AC
adapter Pilot-12 Lite: use the AC adapter provided
with your Respironics DreamStation or
Respironics System One S60 or other
compatible power adapters (see section
1.3).Pilot-24 Lite: use the AC adapter
provided with your ResMed S9 or ResMed
AirSense 10 or the Medistrom AC adapter
(see section 2.3).
Power source is
damaged Power strip or outlet wiring may be
damaged. Plug AC adapter directly into
wall outlet or try using the battery with
a dierent wall outlet.

15
Blue LED ashing
accompanied by
long (1s) beeping
pattern
The
environmental
temperature is
too high for the
battery to
operate safely
Ensure that the battery is placed
where there is no excess heat. Do not
rest the battery on top of radiators or
electronic devices that may emit heat.
Do not attempt to use the battery in
temperatures exceeding 40° C / 104° F
Blue LED ashing
accompanied by
short (500ms) and
long (1s) alternate
beeping pattern
Incorrect AC
adapter being
used
Pilot-12 Lite: use the AC adapter
provided with your Respironics
DreamStation or Respironics System
One S60 or other compatible
power adapters (see section 1.3).
Pilot-24 Lite: use the AC adapter
provided with your ResMed S9 or
ResMed AirSense 10 or the Medistrom
AC adapter (see section 2.3).
PAP device
connected
to battery is
incompatible
Ensure that the PAP device you are
using is compatible with the Pilot-12
Lite or Pilot-24 Lite (see sections 1.3
and 2.3 respectively)
Four green LEDs
ashing together
accompanied by
long (1s) beeping
pattern
Incorrect AC
adapter being
used
Pilot-12 Lite: use the AC adapter provided
with your Respironics DreamStation or
Respironics System One S60 or other
compatible power adapters (see section
1.3)
Pilot-24 Lite: use the AC adapter provided
with your ResMed S9 or ResMed AirSense
10 or the Medistrom AC adapter (see
section 2.3)If problem persists please
contact Medistrom technical support at
1-888-407-4791 (North America), 1-300-
146-358 (Australia) or email support@
medistrom.com
Blue LED ashing
accompanied by
a short (500ms)
short (500ms)
long (1s) beeping
pattern
PAP device
connected
to battery is
incompatible
Ensure that the PAP device you are
using is compatible with the Pilot-12
Lite or Pilot-24 Lite (see sections 1.3
and 2.3 respectively)
DC output cable
is damaged Ensure that the cable connecting the
Pilot-12 Lite or Pilot-24 Lite to your
compatible PAP device is not damaged
Blue LED ashing
accompanied
by three short
(500ms) beeping
pattern
PAP device
connected
to battery is
incompatible
Ensure that the PAP device you are
using is compatible with the Pilot-12
Lite or Pilot-24 Lite (see sections 1.3
and 2.3 respectively)
Blue LED
periodically
ashing (no
pattern)
Maximum battery
power output No action required, the battery is
operating correctly. Depending on
your prescribed pressure, enabled
PAP device features and breathing
rate the battery may reach maximum
power output which is indicated by the
periodically ashing blue LED
Blue LED ashing
every 0.5 seconds Battery capacity is
below 5% Charge the battery as soon as
possible. The battery power level is
critically low. Not charging the battery
for a prolonged period will cause it to
go into Over Discharge State.

16
Battery Not
Providing Power
(PAP Device or
USB)
Battery is in
Stand-by Mode Press the Multi Function Button to
wake the battery from Stand-by Mode.
Disconnect all devices and cables.
Plug your DC output cable into the DC
Out port on the battery and press the
Multi Function Button.For USB Devices:
Disconnect all devices and cables. Plug
your DC output cable into the DC Out
port on the battery then plug in your
USB device into the USB Out port and
press the Multi Function Button.
Coil whine Battery is being
charged on
lower voltage or
lower wattage
No action required, the battery is
operating correctly. The Pilot-12 Lite
and Pilot-24 Lite are 12V and 24V backup
batteries respectively. You may hear
coil whine (a faint buzzing sound) in
later stages of charging if the battery is
charging on lower voltages or on a lower
wattage.
If errors persist after taking the recommended action(s) contact Medistrom technical
support toll-free at 1-888-407-4791 (North America), 1-300-146-358 (Australia) or via
service the device yourself.
17
REMARQUE: Le Pilot-12 Lite n’est PAS COMPATIBLE avec le Phillips Respironics
DreamStation Go. REMARQUE : Le Philips Respironics DreamStation Go est
uniquement compatible avec les batteries de la série Pilot-24. Pour obtenir des
informations complètes sur la compatibilité PAP, y compris la compatibilité pour
les périphériques à deux niveaux, visitez le site www.medistrom.com ou contactez
le support technique de Medistrom au 1-888-407-4791 ou par courriel à support@
medistrom.com. Medistrom n’est pas responsable des dommages causés par une
mauvaise utilisation du Pilot-12 Lite.
SECTION 1 - PILOT-12 LITE
Section 1.1 Contenu de l’emballage de Pilot-12 Lite
Cette offre inclut :
Pilot-12 Lite Batterie Carry Sleeve
Câble de sortie DC pour
Phillips Respironics
DreamStation /System One S60
1) Chargeur de voiture pour Pilot Lite (SKU #P99ACCPCC)
2) Kit mixte pour Pilot-12 Lite (SKU # P12MXDPLK)
Comprend : a. Câble de sortie DC pour Intellipap I / HDM Z1
b. Câble adaptateur de charge court pour Intellipap I / HDM Z1
c. Câble de sortie CC pour Intellipap II
3) Panneau solaire, 50W (SKU # P99ACCS50)
ACCESSOIRES SUPPLÉMENTAIRES POUR PILOTE-12 LITE
(VENDU SÉPARÉMENT)
Section 1.2 Compatibilité des périphériques PAP Pilot-12 Lite
Le Pilot-12 Lite peut être utilisé avec SEULEMENT les appareils APAP / CPAP suivants:
• Phillips Respironics System One S60
• Phillips Respironics DreamStation
• DeVilbiss IntelliPAP I I et IntelliPAP II (câbles vendus séparément, SKU # P12MXDPLK)
• HDM Z1 (câbles vendus séparément, SKU # P12MXDPLK)
APPAREILS PAP PRIS EN CHARGE
Pilot-12 Lite est conçu pour être rechargé directement à l’aide de la
DreamStation Philips Respironics, du System One S60 et des adaptateurs
d’alimentation CA série DeVilbiss IntelliPAP II. Il peut également être rechargé
à l’aide des adaptateurs secteur d’origine DeVilbiss IntelliPAP I et HDM Z1 en
utilisant les câbles d’adaptateur de courtes charges correspondants (vendus
séparément, SKU # P12MXDPLK). Pour des instructions plus détaillées, veuillez
consulter la SECTION 1.6 de Pilot-12 Lite, Étape 1.

18
L’utilisation d’un humidicateur ou d’une tubulure chauée pendant l’alimentation de
votre appareil PAP compatible avec le Pilot-12 Lite réduit considérablement le temps
de fonctionnement de la batterie. Pour des durées de fonctionnement optimales,
veuillez désactiver et / ou détacher les humidicateurs et les tubes chauants.
• NE PAS exposer la batterie à des températures supérieures à 40° C / 104° F (risque
d’incendie !)
• NE PAS exposer la batterie à des températures inférieures à -10° C / 14° F (Risque d’une
surcharge dangereuse !)
• NE PAS exposer la batterie à Humidité relative supérieure à 85 % (danger électrique !)
• Les températures ambiantes normales de fonctionnement sont de 0° C / 32° F à 35° C
/ 95° F
• Chargez complètement la batterie avant de la remiser et au moins une fois tous les 6
mois par la suite
Section 1.4 Pilot-12 Lite Utilisation prévue et compatibilité
Pilot-12 Lite est fabriqué avec des cellules lithium-ion rechargeables de qualité
industrielle LG. Le Pilot-12 Lite peut être utilisé comme source d’alimentation de
secours pour éviter l’interruption de la thérapie PAP en cas de panne de courant.
Pilot-12 Lite peut servir de batterie PAP portable lors d’un déplacement dans l’air,
terre ou mer lorsque la source d’alimentation secteur n’est pas disponible.
Pilot-12 Lite est conçu pour être utilisé avec la plupart des périphériques PAP 12 V
(reportez-vous à la section 1.2 Compatibilité des périphériques PAP)
Pilot-12 Lite dispose d’un port USB (sortie : 5V 2,5A) qui peut être utilisé pour
recharger des téléphones portables, des tablettes et autres appareils de poche
couramment utilisés, classés pour recevoir la sortie d’alimentation USB ci-dessus.
Section 1.5 Panneau de conguration Pilot-12 Lite
1. Port de Charge Branchez l’adaptateur secteur compatible dans ce port (utilisez
le câble d’adaptateur de charge court si nécessaire). Assurez-vous que l’adaptateur
secteur est branché au même réseau. Une fois la batterie en charge, les 4 voyants
verts du niveau de charge s’allumeront.
2. Bouton multifonction Appuyez une fois sur le bouton pour acher le niveau
de charge de la batterie (si la batterie est en mode veille : se reporter au mode veille
à la section 1.6) Maintenez le bouton enfoncé pendant 3 secondes pour allumer et
éteindre la lampe de poche à DEL
3. Voyant bleu «ON» Le voyant reste bleu lorsque la batterie est connectée et
envoie l’alimentation à un périphérique PAP compatible. (Si ce voyant clignote, veuillez
vérier le code d’erreur dans la section 8).
1 2 3 5 6 74
Section 1.3 Renseignements Importants Sur L’utilisation
Sécurisée Du Pilot-12 Lite

19
4. Niveau de charge vert des voyants Lorsque la batterie est en cours de charge, les
voyants clignotent, puis brillent en vert et indiquent le niveau de charge allant de Lo à
Hi. Reportez-vous à la section 8 pour un guide sur les niveaux de charge.
5. Lampe de Poche DEL Peut être allumé et éteint en maintenant le bouton
multifonction enfoncé pendant 3 secondes. Remarque : Si la batterie Pilot Lite n’est pas
connectée à un périphérique, la lampe de poche s’éteint automatiquement au bout de
10 minutes, sinon, la lumière du ash reste allumée.
6. USB Port (5V 2.5A Out) Peut être utilisé pour charger des appareils de poche
(veuillez vérier que la tension et l’intensité de sortie soient compatibles avec l’appareil
qui doit être rechargé via l’USB avant de le connecter). Une fois connecté, appuyez sur
le bouton multifonctions pour allumer la batterie.
7. Port de sortie DC Ce port est utilisé pour connecter un périphérique PAP compatible
à la batterie en utilisant le câble de sortie DC correspondant.
Section 1.6 Conguration du Pilot-12 Lite
REMARQUE: Aucun adaptateur d’alimentation n’est inclus avec votre pile Pilot-12
Lite et avec l’alimentation de secours. Reportez-vous à la section 1.2 (Compatibilité
des périphériques PAP)
Utilisation du Pilot-12 Lite comme alimentation de secours pour les
périphériques PAP
ÉTAPE 1 - Connexion du Pilot-12 Lite à l’adaptateur secteur
Branchez le connecteur d’alimentation
de l’adaptateur CA Dreamville / System
One S60 de Philips Respironics dans
le port de charge du Pilot-12 Lite et
branchez l’autre extrémité dans la
prise.
REMARQUE : Veuillez utiliser le câble
d’adaptateur à courte charge pour les
appareils DeVilbiss IntelliPAP I, série
HDM Z1 (vendu séparément, numéro
de référence P12MXDPLK)
20
Branchez l’extrémité jaune en forme
de L du câble de sortie DC pour Phillips
Respironics DreamStation dans le
port de sortie DC de votre Pilot-12
Lite et branchez l’autre extrémité
circulaire à pointe noire dans le
port d’alimentation du périphérique
Respironics DreamStation PAP.
Une fois que le Pilot-12 Lite est
connecté à votre périphérique PAP,
les voyants de niveau de charge
s’allument brièvement, puis le voyant
d’activation devient bleu xe. À
ce stade, votre périphérique PAP
indiquera qu’il est alimenté. Si votre
périphérique PAP n’est pas alimenté,
vériez les connexions des câbles et
appuyez sur le bouton multifonction.
Section 1.7 Spécications du Pilot-12 Lite
• Capacité : 95Wh
• Type de cellule: Cellules lithium-ion authentiques rechargeables de qualité industrielle
• Entrée évaluée : 12V, 60W (NORMAL) 80W(MAX)
• Sortie nominale : DC 12V, 6.5 A
• Sortie USB : 5V, 2,5A
• Durée de vie : plus de 500 cycles de charge / décharge complets
• Boîtier : Aluminium
• Dimensions : 17cm x 9cm x 2cm, poids 1,3 livres
• Indicateur de niveau de puissance : 4 voyants de niveau de charge
• Temps de recharge : 2-3 heures via l’adaptateur secteur Respironics DreamStation
(le chargement via d’autres adaptateurs compatibles peut être plus long)
Mode veille Si le périphérique PAP a été connecté mais n’est pas utilisé dans les 10
minutes (ou si le périphérique PAP est éteint pendant 10 minutes), le Pilot-12 Lite passe
en mode veille pour économiser de l’énergie. Pour réveiller le Pilot-12 Lite, appuyez sur
le bouton multifonction.
Chargement du pilote-12 Lite Suivez l’ÉTAPE 1 ci-dessus. Les temps de charge du
Pilot-12 Lite via l’adaptateur Philips Respironics System One S60 ou DreamStation est
d’environ 2 à 3 heures. Le temps de charge via d’autres adaptateurs d’alimentation
compatibles peut varier.
Utilisation du Pilot-12 Lite comme batterie portable avec un appareil PAP
compatible Suivez l’étape 2 ci-dessus. Les durées de fonctionnement varient en
fonction de la pression prescrite, de la respiration du patient, de l’étanchéité du
masque, de l’utilisation de fonctions supplémentaires ou d’accessoires tels que la
décompression, l’humidicateur chauant et la tubulure chauée.
REMARQUE: Pour des durées d’utilisation optimales lors de l’utilisation de votre
Pilot-12 Lite avec un appareil PAP compatible, veuillez désactiver et / ou détacher les
humidicateurs et les tubes chauants.
ATTENTION ! Les fuites de masque ou les pressions PAP élevées peuvent réduire
considérablement les temps de fonctionnement.
ÉTAPE 2 - Connexion du Pilot-12 Lite à l’adaptateur secteur
Other manuals for Pilot-12 Lite
1
This manual suits for next models
1
Table of contents
Languages:
Other Medistrom Power Supply manuals


