Medistrom Pilot-12 plus User manual

1
Pilot-12 Plus
Pilot-24 Plus
CPAP BATTERY / BACKUP POWER SUPPLY
CPAP BATERIA / ALIMENTACIÓN PORTÁTIL USTED
BATTERIE CPAP / ALIMENTATION PORTABLE
ENGLISH - Thank you for purchasing MEDISTROM Pilot-12 Plus/Pilot-24 Plus CPAP
Battery /Portable Power Supply. Please read this product user guide carefully before
putting the equipment into operation for the first time.

2
ENGLISH –page 3
ESPAÑOL –página 25
FRANÇAIS –page 48

3
TABLE OF CONTENTS
SECTION 1 - Pilot-24 Plus .............................................................................4
1.1 PACKAGE CONTENTS: Pilot-24 Plus ................................................4
1.2 IMPORTANT! ..................................................................................5
1.3 INTENDED USE AND COMPATIBILITY: Pilot-24 Plus........................5
1.4 CONTROL PANEL: Pilot-24 Plus.......................................................6
1.5 INSTRUCTIONS FOR USE: Pilot-24 Plus...........................................8
A. Charging the battery ......................................................................8
B. Using with PAP Device as a portable battery .................................9
C. Using with PAP device as a backup power supply........................10
1.6 PRODUCT SPECIFICATIONS: Pilot-24 Plus.....................................10
1.7 CAR CHARGER FOR PILOT-24 PLUS INSTRUCTIONS:.....................11
SECTION 2 - Pilot-12 Plus ...........................................................................12
2.1 PACKAGE CONTENTS: Pilot-12 Plus ..............................................12
2.2 IMPORTANT! ................................................................................13
2.3 INTENDED USE AND COMPATIBILITY: Pilot-12 Plus......................13
2.4 CONTROL PANEL: Pilot-12 Plus.....................................................14
2.5 INSTRUCTIONS FOR USE: Pilot-12 Plus.........................................16
2.6 PRODUCT SPECIFICATIONS: Pilot-12 Plus.....................................17
2.7 CAR CHARGER FOR PILOT-12 PLUS INSTRUCTIONS:.....................18
SECTION 3 –Using Co-Pilot Add-on unit ....................................................18
SECTION 4 - CARE INSTRUCTIONS: Pilot-24 Plus / Pilot-12 Plus .................19
SECTION 5 - TRAVELLING WITH THE BATTERY: Pilot-24 Plus / Pilot-12 Plus
...................................................................................................................19
SECTION 6 - WARRANTY Pilot-24 Plus / Pilot-12 Plus.................................19
SECTION 7 - STORAGE AND DISPOSAL: Pilot-24 Plus / Pilot-12 Plus ..........20
SECTION 8 - WARNINGS AND SAFETY PRECAUTIONS: Pilot-24 Plus / Pilot-
12 Plus........................................................................................................20
Section 9 General Troubleshooting……………………………………………..…………..22

4
SECTION 1 - PILOT-24 PLUS
1.1 PACKAGE CONTENTS: Pilot-24 Plus
A. CPAP Battery
B. Output cable for ResMed S9™
C. Output cable for ResMed AirSense™ 10
D. Connector Tip for ResMed S9™ Original Power Adapter
E. Battery sleeve
****** SOLD SEPARATELY ******
F. Car charger for Pilot-24 Plus
G. Co-Pilot-24 Plus –add-on unit
to extend battery life (Not
functional as stand-alone unit)

5
1.2 IMPORTANT!
Using Pilot-12 Plus/ Pilot-24 Plus as Portable CPAP Battery
with humidifier will significantly decrease run times! For
optimal run times please disconnect the humidifier!
DO NOT Expose battery to temperatures above 40°C / 104°F –
Fire Hazard!
DO NOT Expose battery to temperatures below -10°C / 50°F as
the lithium ion cells may become damaged!
DO NOT Expose battery to relative humidity above 85%!
Normal operating temperatures are 0°C / 32°F to 35°C / 95°F!
Fully charge battery before storage and every 6 months!
Use only with following PAP devices:
-ResMed S9™ series
-ResMed AirSense™ 10 series
Manufacturer is not responsible for damage done by the battery to
any other device not listed above.
1.3 INTENDED USE AND COMPATIBILITY: Pilot-24 Plus
Pilot-24 Plus is equipped with industrial grade genuine rechargeable
lithium ion cells which can be used as a backup power source to
prevent interruption to PAP therapy in the case of an overnight
power outage.
Pilot-24 Plus can serve as a portable CPAP battery during travel by
air, land, or sea when the mains power source is unavailable.
Pilot-24 Plus also comes with a USB port which can be used to charge
cellphones and other commonly used handheld devices.
Pilot-24 Plus is mainly intended to be used with ResMed PAP
machines such as the S9™ and AirSense™ 10 series devices.
For a complete list of compatible devices, please visit our website:
www.medistrom.com

6
1.4 CONTROL PANEL: Pilot-24 Plus
1. CHARGE
2. OFF/ON SWITCH
2a - OFF/ON indicator light
3. CHARGE LEVEL INDICATOR
3a - discharge level indicator button
3b - warning light is the far left LED
3c - 4 charge indicator lights
3d - LO to HI charge level indicator image
4. USB Port
5. DC OUT
6. Flashlight
7. Flashlight Control Button
8. Protection Alarm Mute Button
1. CHARGE PORT:
Charging the battery with ResMed AirSense™ 10 Original Power
Adapter (Please Note: ResMed AirSense™ 10 Original Power
Adapter is NOT included with Pilot-24 Plus. It is provided with the
ResMed AirSense™ 10 PAP Device). Plug the ResMed AirSense™ 10
Original Power Adapter into the battery’s CHARGE port. Ensure that
the other end of the ResMed AirSense™ 10 Original Power Adapter
is plugged in to the mains power outlet. Please note: The battery can
be charged regardless of whether or not the battery is switched ON
or OFF. If the battery is charging properly, the 4 green charge
indicator lights (3c) will flash, and will light up solid green once it is
fully charged.
Charging the battery with ResMed S9™ Original Power Adapter
(Please Note: The ResMed S9™Original Power Adapter is NOT

7
included with the Pilot-24 Plus. It is provided with the ResMed S9™
PAP device) plug the Connector Tip (D) into the ResMed S9™Original
Power Adapter. Plug the other end of the Connector Tip (D) into the
battery’s CHARGE port. Ensure that the other end of the ResMed
S9™ Original Power Adapter is plugged in to the mains power outlet.
Please note: The battery can be charged regardless of which way the
OFF/ON switch is toggled. If the battery is charging properly, the
four green charge indicator LEDs (3c) will flash, and will light up solid
green once it is fully charged.
2. OFF/ON SWITCH: This switch allows the battery to be turned ON
for usage and turned OFF for storage. When the battery is switched
to the ON position, a blue OFF/ON indicator LED (2a) will turn on
above the switch. When the battery is switched to the OFF position,
the OFF/ON indicator light (2a) will NOT light up. IMPORTANT!
Please remember to toggle this switch to the ON position before
using the battery with the PAP device. Remember to turn the switch
to OFF position before storing the battery. CAUTION! FULLY CHARGE
BATTERY BEFORE STORAGE AND EVERY 6 MONTHS AFTERWARD!
3. CHARGE LEVEL INDICATOR: By pressing the charge level indicator
button (3a) the charge level of the battery can be checked. The
green LED (3c) will light up for 4 seconds showing the battery charge
level while the battery is powering your PAP device. If 4 charge
indicator lights (3c) are lit green, then the battery is fully charged.
Please refer to the LO to HI charge level indicator image (3d) to
determine the remaining power level. When the battery is charging,
the charge indicator LEDs (3c) will light up in sequence until the
charge reaches each level. When the battery is plugged into the
charger, but is already fully charged, then all charge indicator lights
are lit solid green. Warning Indication: Once CPAP battery is fully
discharged, the orange warning light (3b) will flash, and the sound
alarm will beep. Discontinue using your PAP device and charge the
battery as soon as possible.
4. USB PORT: This port can be used to power and charge most
electronic hand-held devices.

8
5. DC OUT: This port is used to connect a PAP device to the battery.
First, select the proper output cable for the PAP device being used.
Select Output Cable (B) for ResMed S9™, or Output Cable (C) for
ResMed AirSense™ 10. Attach one end of the output cable to the
PAP device and plug the other end into the “DC OUT” port on the
battery.
6. LED Flashlight: LED Flashlight provides light.
7. LED Flashlight Control Button: This button is used to turn the LED
Flashlight on and off. Press the LED flashlight control button once to
turn the flashlight on. Press it again to turn the flashlight off.
8. PROTECTIVE ALARM: Alarm will sound and yellow LED will flash
when the remaining power of the battery is less than 5% or in case
of battery failure. When alarm sounds, press the Mute button once
to mute the sound. Yellow LED light stops flashing only after battery
is charged or battery is turned off. Please note: if alarm sounds while
battery is charging, please remove the charger from battery, and
sound alarm will stop.
1.5 INSTRUCTIONS FOR USE: Pilot-24 Plus
A. Charging the battery
Charging the battery with ResMed AirSense™ 10 Original Power
Adapter
(Please Note: ResMed AirSense™ 10 Original Power Adapter is NOT
included with Pilot-24 Plus. It is provided with the ResMed
AirSense™ 10 PAP Device). Plug the ResMed AirSense™ 10 Original
Power Adapter into the battery’s CHARGE port. Ensure that the

9
other end of the ResMed AirSense™ 10 Original Power Adapter is
plugged in to the mains power outlet. Please note: The battery can
be charged regardless of whether or not the battery is switched ON
or OFF. If the battery is charging properly, the 4 green charge
indicator lights (3c) will flash, and will light up solid green once it is
fully charged.
Charging the battery with ResMed S9™ Original Power Adapter
(Please Note: ResMed S9™ Original Power Adapter is NOT included
with Pilot-24 Plus. It is provided with the ResMed S9™ PAP Device)
Plug the Connector Tip (D) into ResMed S9™Original Power
Adapter. Plug the other end of the Connector Tip (D) into the
battery’s CHARGE port. Ensure that the other end of the ResMed
S9™ Original Power Adapter is plugged in to the mains power outlet.
Please note: The battery can be charged regardless of whether or
not the battery is switched ON or OFF. If the battery is charging
properly, the 4 green charge indicator lights (3c) will flash, and will
light up solid green once it is fully charged.
B. Using with PAP Device as a portable battery
Please Note: For longer run times, please disconnect the heated
humidifier from the PAP device. When the PAP device is connected
10
with the heated humidifier and is used with the battery, the battery
run time may be significantly decreased. Use DC OUT port to
connect the PAP device to the battery. First, select the proper
output cable for the PAP device being used. Select Output Cable (B)
for ResMed S9™, or Output Cable (C) for ResMed AirSense™ 10.
Attach one end of the output cable to the PAP device and plug the
other end into the “DC OUT” port on the battery. Ensure that the
battery is switched to "ON" position by using the OFF/ON switch (2)
on battery control panel.
C. Using with PAP device as a backup power supply
Step 1 –Connect the battery to the charger (see instructions on
charging the battery).
Step 2 –Connect the battery to PAP device and turn battery ON
(see instructions above on using with PAP device as portable
battery)
1.6 PRODUCT SPECIFICATIONS: Pilot-24 Plus
Capacity: 98 Wh
Cell Type: Industrial grade genuine rechargeable lithium
ion cells manufactured by LG®
Rated Output: DC 24 V, 3.75 A
Life Span: Over 500 full discharge cycles
Case: Aluminum
Dimensions: 19x12x2 cm, Weight 1.8 lbs
Power Gauge: 5 stage LED display power level indicator
(includes charge and discharge state)
Recharge time: About 2.5 hours per battery

11
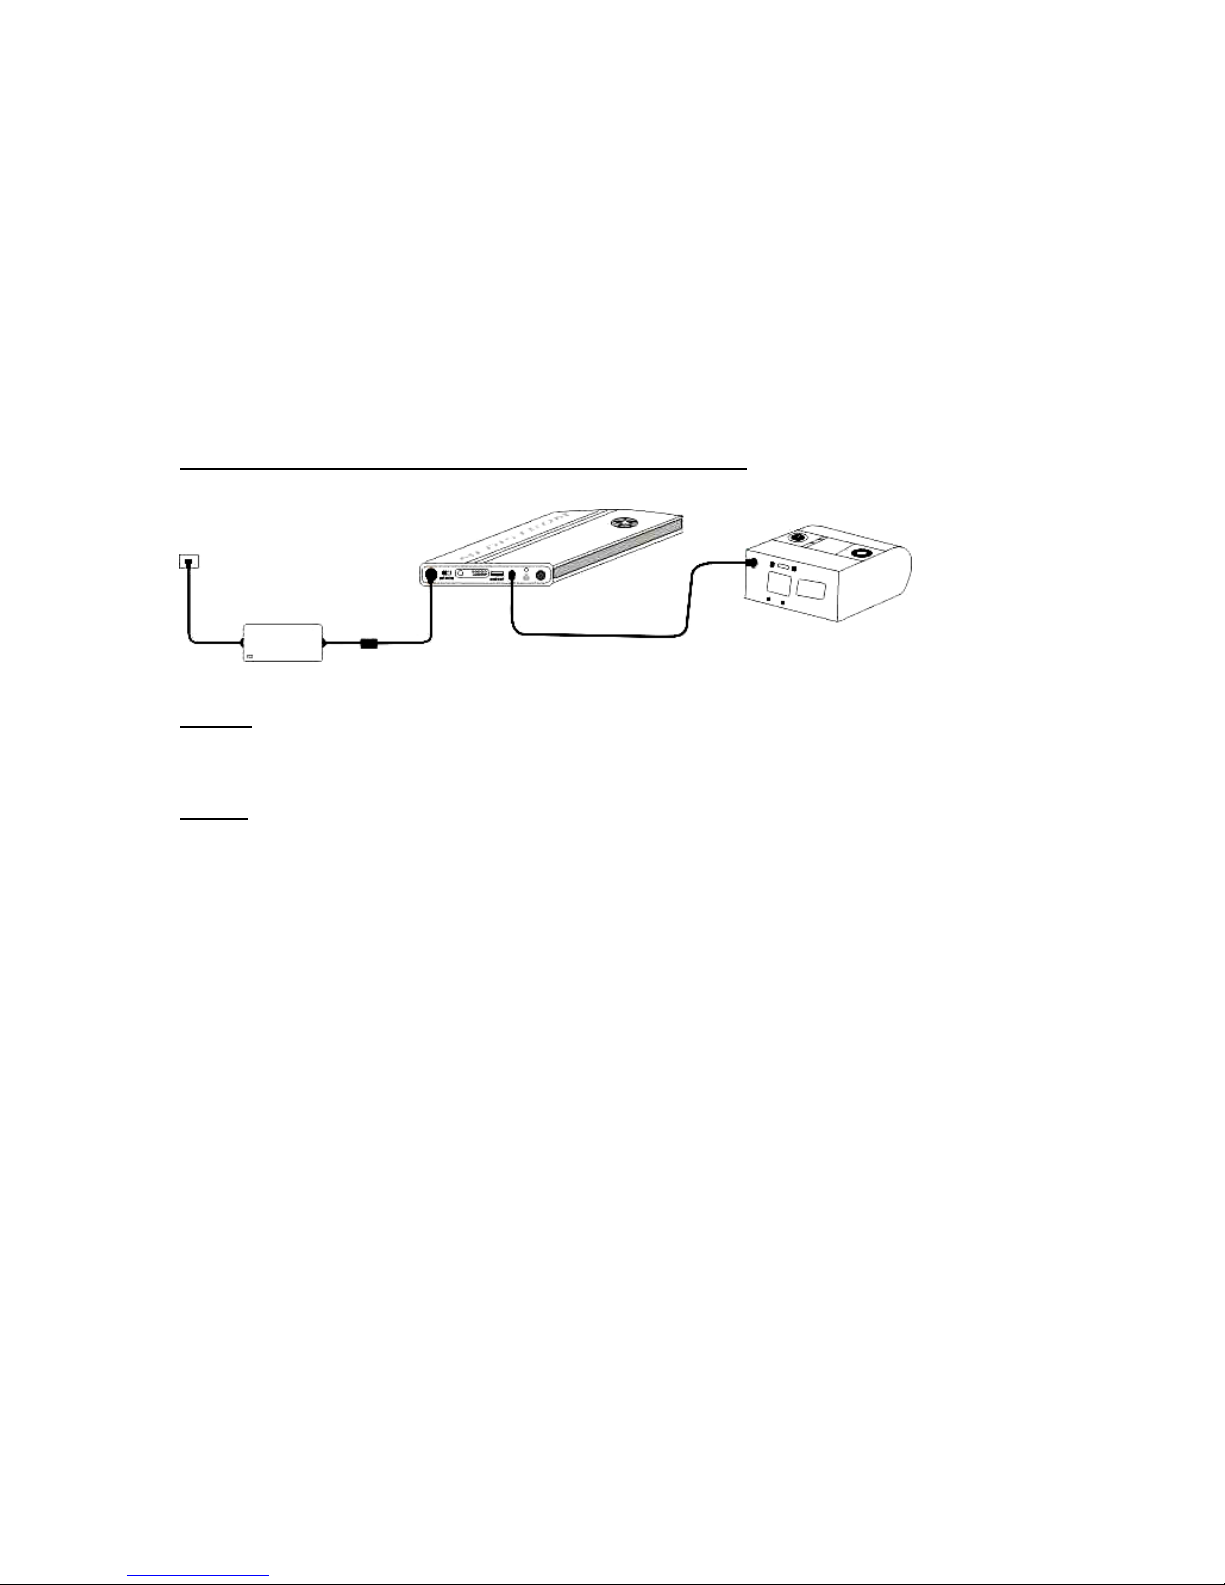
1.7 CAR CHARGER FOR PILOT-24 PLUS INSTRUCTIONS:
Step 1: Plug End 1 of the Medistrom™ Car Charger into the 12 V car
cigarette lighter socket and End 2 into the 24 V converter.
Step 2: NOTE! Please use your Output Cable for ResMed AirSense™
10 (c) that is included with your Pilot-24 Plus CPAP Battery for Step
2! Plug in your Output Cable for ResMed AirSense™ 10 (c) into 24 V
converter on one end, and into the Pilot-24 Plus CPAP Battery
“CHARGE” jack on the other end.
12
SECTION 2 - PILOT-12 PLUS
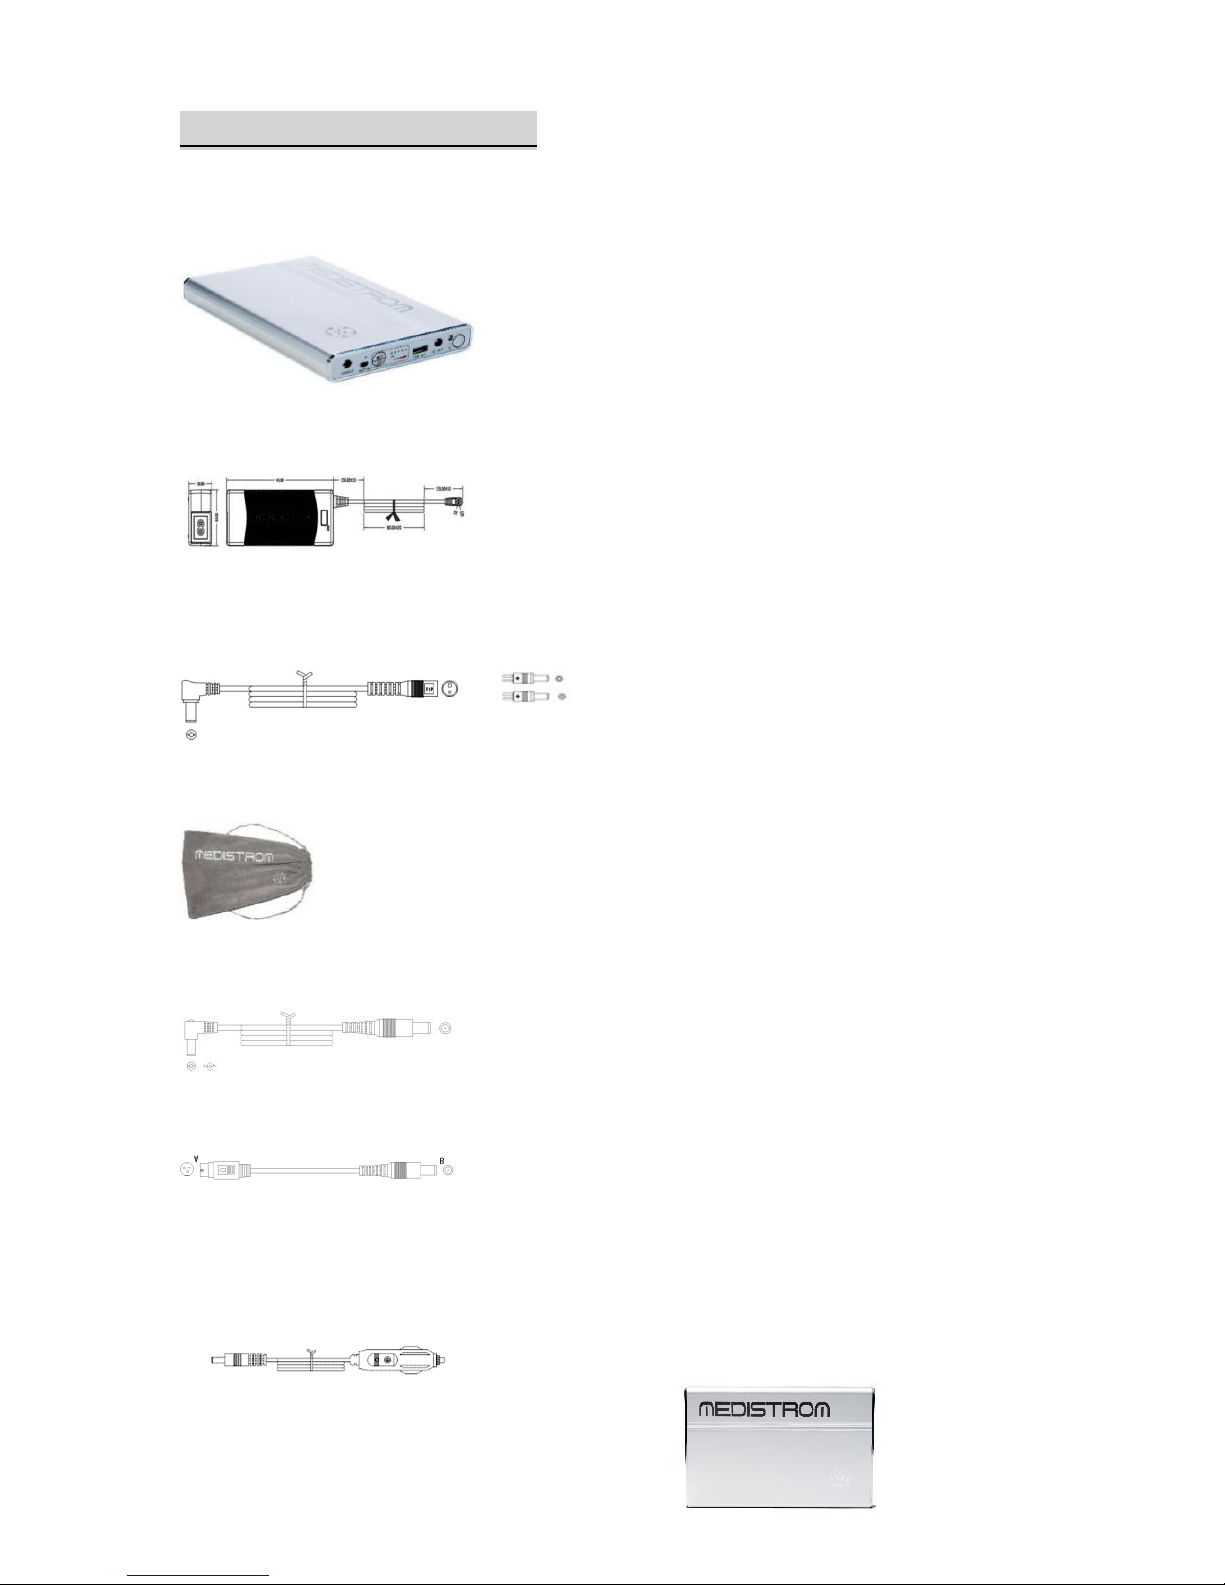
2.1 PACKAGE CONTENTS: Pilot-12 Plus
A. CPAP Battery
B. 90W battery charger
C. General output cable and D. Two connector tips (choose the tip
that fits the PAP device being used with the battery)
E. Battery sleeve
F. Output Cable for Respironics DreamStation
G. Output Cable for Respironics RemStar System One S60
****** SOLD SEPARATELY ******
H. Car charger for Pilot-12
I. Co-Pilot-12 –add-on unit to
extend battery life (Not
functional as stand-alone unit)

13
2.2 IMPORTANT!
DO NOT Expose battery to temperatures above 40 °C / 104 °F –
Fire Hazard!
DO NOT Expose battery to temperatures below -10°C / 50 °F as
the lithium ion cells may become damaged!
DO NOT Expose battery to relative humidity above 85%!
Normal operating temperatures are 0 °C / 32 °F to 35°C/95°F!
Fully charge battery before storage and every 6 months!
Use only with following PAP devices:
-Philips Respironics RemStar System One series
-Philips Respironics RemStar System One S60 series
-Devilbiss Intellipap series
-HDM Z1 series
Manufacturer is not responsible for damage done by the battery to
any other device not listed above!
2.3 INTENDED USE AND COMPATIBILITY: Pilot-12 Plus
RESMED DEVICE WARNING!!! Pilot-12 Plus is NOT COMPATIBLE
with any PAP devices manufactured by ResMed, even if one of the
three connector tips (D) fits the ResMed device. Medistrom is NOT
RESPONSIBLE for damages caused as a result of such misuse.
Pilot-12 Plus is equipped with industrial grade genuine rechargeable
lithium ion cells which can be used as a backup power source to
prevent interruption to PAP therapy in the case of an overnight
power outage. Pilot-12 Plus can serve as a portable CPAP battery
during travel by air, land or sea when the mains power source is
unavailable. Pilot-12 Plus also comes with a USB port which can be
used to charge cellphones and other commonly used handheld
devices. Pilot-12 Plus is intended to be used with 12 V PAP
machines such as most PAP devices manufactured by Philips
Respironics, DeVilbiss, and others.
For a complete list of compatible devices please visit our website:
www.medistrom.com

14
2.4 CONTROL PANEL: Pilot-12 Plus
1. CHARGE
2. OFF/ON SWITCH
2a - OFF/ON indicator light
3. CHARGE LEVEL INDICATOR
3a - discharge level indicator button
3b - warning light is the far left LED
3c - 4 charge indicator lights
3d - LO to HI charge level indicator image
4. USB PORT
5. DC OUT
6. Flashlight
7. Flashlight Control Button
8. Protection Alarm Mute Button
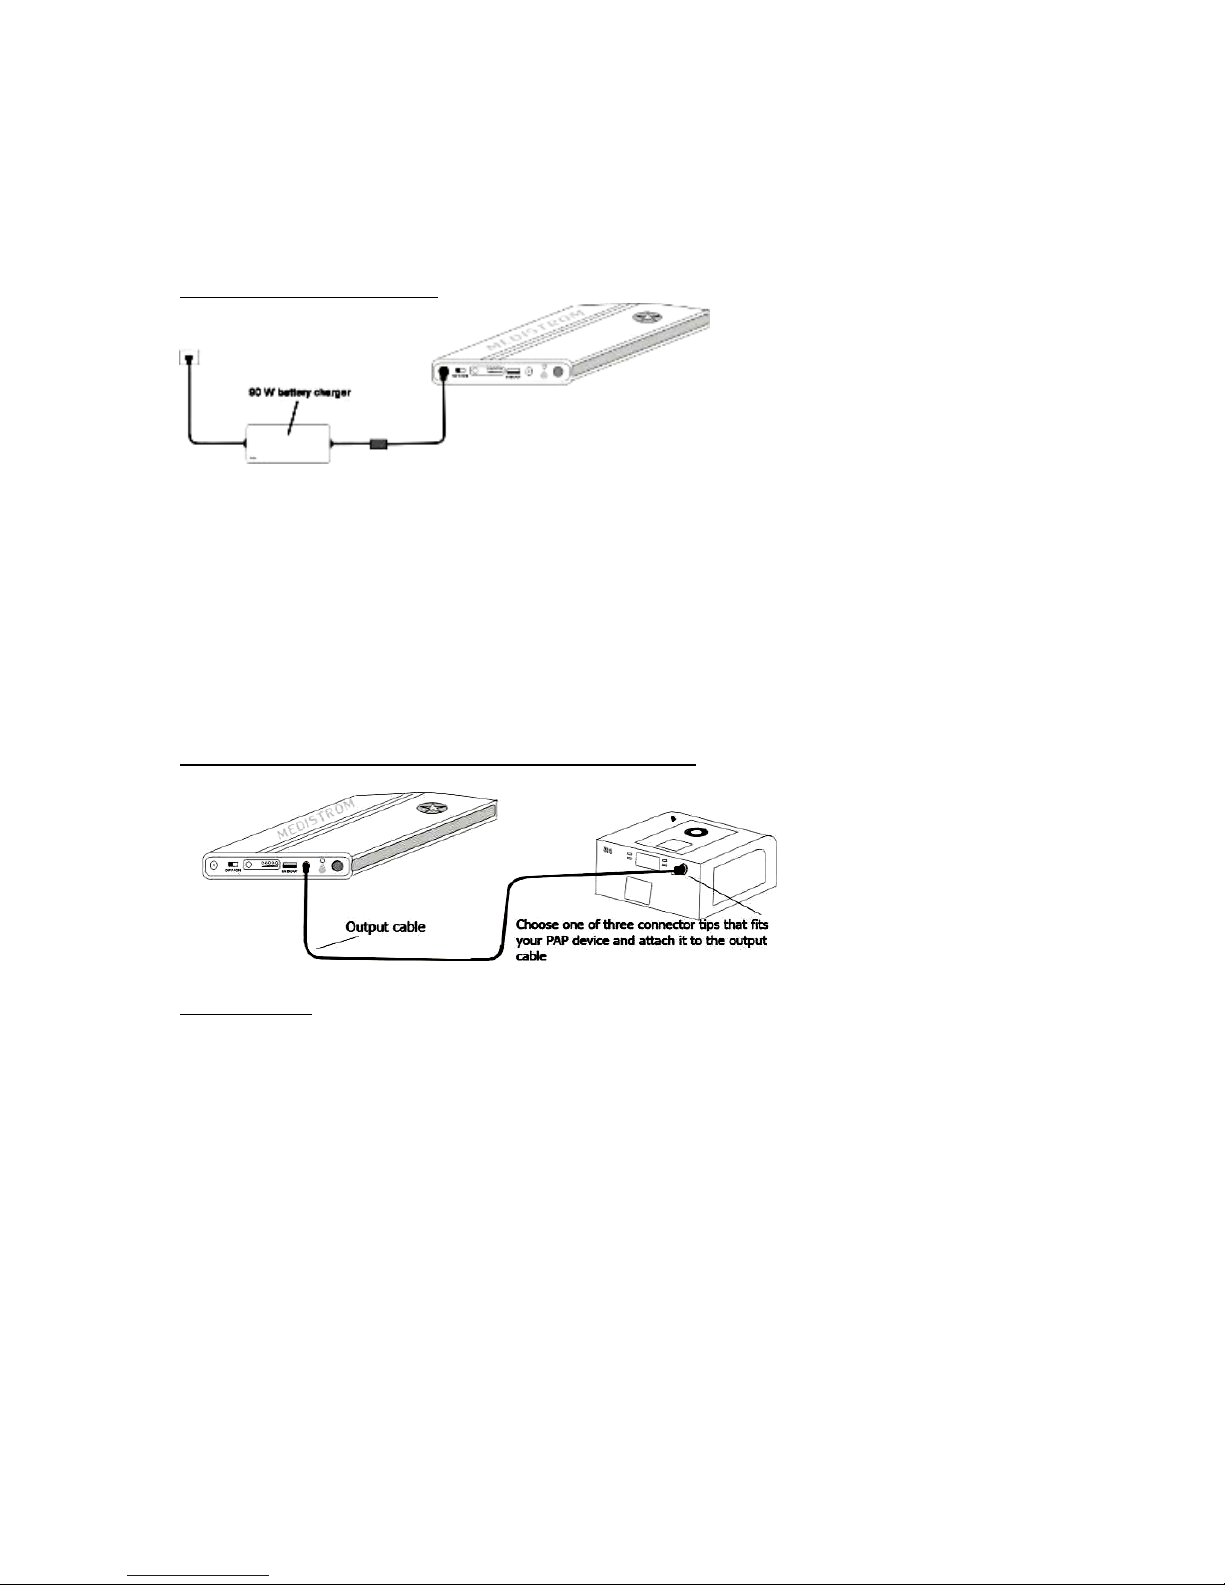
1. CHARGE PORT: Plug the 90W battery charger (B) into the battery’s
CHARGE port. Ensure that the other end of the charger is plugged in
to the mains power outlet. Note: The battery can be charged
regardless of which position the OFF/ON switch is toggled. If the
battery is charging properly, the four green charge indicator LEDs
(3c) will flash, and will light up solid green once it is fully charged.
2. OFF/ON SWITCH: This switch allows the battery to be turned ON
for usage and turned OFF for storage. When the battery is switched
to the ON position, a blue OFF/ON indicator light (2a) will appear
above the switch. When the battery is switched to the OFF position,
the OFF/ON indicator light (2a) will NOT appear. IMPORTANT: Please
remember to turn this switch to ON position before you start using
the battery with the PAP device. Remember to toggle the switch to

15
the OFF position before storing the battery. CAUTION: FULLY
CHARGE BATTERY BEFORE STORAGE AND EVERY 6 MONTHS!
3. CHARGE LEVEL INDICATOR: By pressing the charge level indicator
button (3a) the charge level of the battery can be checked. The
green LED (3c) will light up for 4 seconds showing the battery charge
level, while battery is powering your PAP device. If 4 charge
indicator lights (3c) are lit green, then the battery is fully charged.
Please refer to the LO to HI charge level indicator image (3d) to
determine the remaining power level. When the battery is charging,
the charge indicator LEDs (3c) will light up in sequence the charge
reaches each level. When the battery is plugged into the charger,
but is already fully charged, then all charge indicator lights are lit
solid green. Warning Indication: Once CPAP battery is fully
discharged, the orange warning light (3b) will flash, and the sound
alarm will beep. Discontinue using your PAP device and charge the
battery as soon as possible.
4. USB PORT: This port can be used to power and charge most
electronic hand-held devices.
5. DC OUT: This port is used to connect a PAP device to the battery.
First, select the proper output cable for the PAP device being used.
Select Output Cable (B) for ResMed S9™, or Output Cable (C) for
ResMed AirSense™ 10. Attach one end of the output cable to the
PAP device and plug the other end into the “DC OUT” port on the
battery.
6. LED Flashlight: LED Flashlight provides light.
7. LED Flashlight Control Button: This button is used to turn the LED
Flashlight on and off. Press the LED flashlight control button once to
turn the flashlight on. Press it again to turn the flashlight off.
8. PROTECTIVE ALARM: Alarm will sound and yellow light will flash
when the remaining power of the battery is less than 5% or in case
of battery failure. When alarm sounds, press the Mute button once
to mute the sound. Yellow LED light stops flashing only after
battery is charged or battery is turned off. Please note: if alarm
16
sounds while battery is charging, please remove the charger from
battery, and the sound alarm will stop.
2.5 INSTRUCTIONS FOR USE: Pilot-12 Plus
A. Charging the battery
Plug the 90W battery charger (B) into the battery’s CHARGE port.
Ensure that the other end of the charger is plugged in to the mains
power outlet. Please note: The battery can be charged regardless of
whether or not the battery is switched ON or OFF. If the battery is
charging properly, the four green charge indicator lights (3c) will
flash, and will light up solid green once it is fully charged.
B. Using with PAP Device as a portable battery
Please Note: To increase run time, please disconnect the heated
humidifier from the PAP device. When PAP device is connected
with the heated humidifier and is used with the battery, the battery
run time may be significantly decreased. Use DC OUT port to
connect the PAP device to the battery. First, select one of the Two
Connector Tips (D) that fits the PAP device being used, then connect
this tip to the Output Cable (C). Attach the end of the Output Cable
(C), with the connector tip (D), to the PAP device and plug the other
end of the Output Cable (C) into the “DC OUT” port on the battery.
Ensure that the battery is switched to "ON" position by using the
OFF/ON switch (2) on battery control panel.

17
C. Using with PAP device as a backup power supply
Step 1 –Connect the battery to the charger (see instructions on
charging the battery).
Step 2 –Connect the battery to PAP device and turn battery ON (see
instructions above on using with PAP device as portable battery)
2.6 PRODUCT SPECIFICATIONS: Pilot-12 Plus
•Model Name: Pilot-12 Plus
•Capacity: 98 Wh
•Cell Type: Industrial grade genuine rechargeable lithium ion cells
manufactured by LG®
•Rated Output: DC 12 V, 6.67 A
•Life Span: Over 500 full discharge cycle
• Case: Aluminum
•Dimensions: 19x12x2 cm
•Weight: 1.8 lbs
•Power Gauge: 5 stage LED display power level indicator (includes
charge and discharge state)
•Recharge time: 3 to 4 hours per battery
18
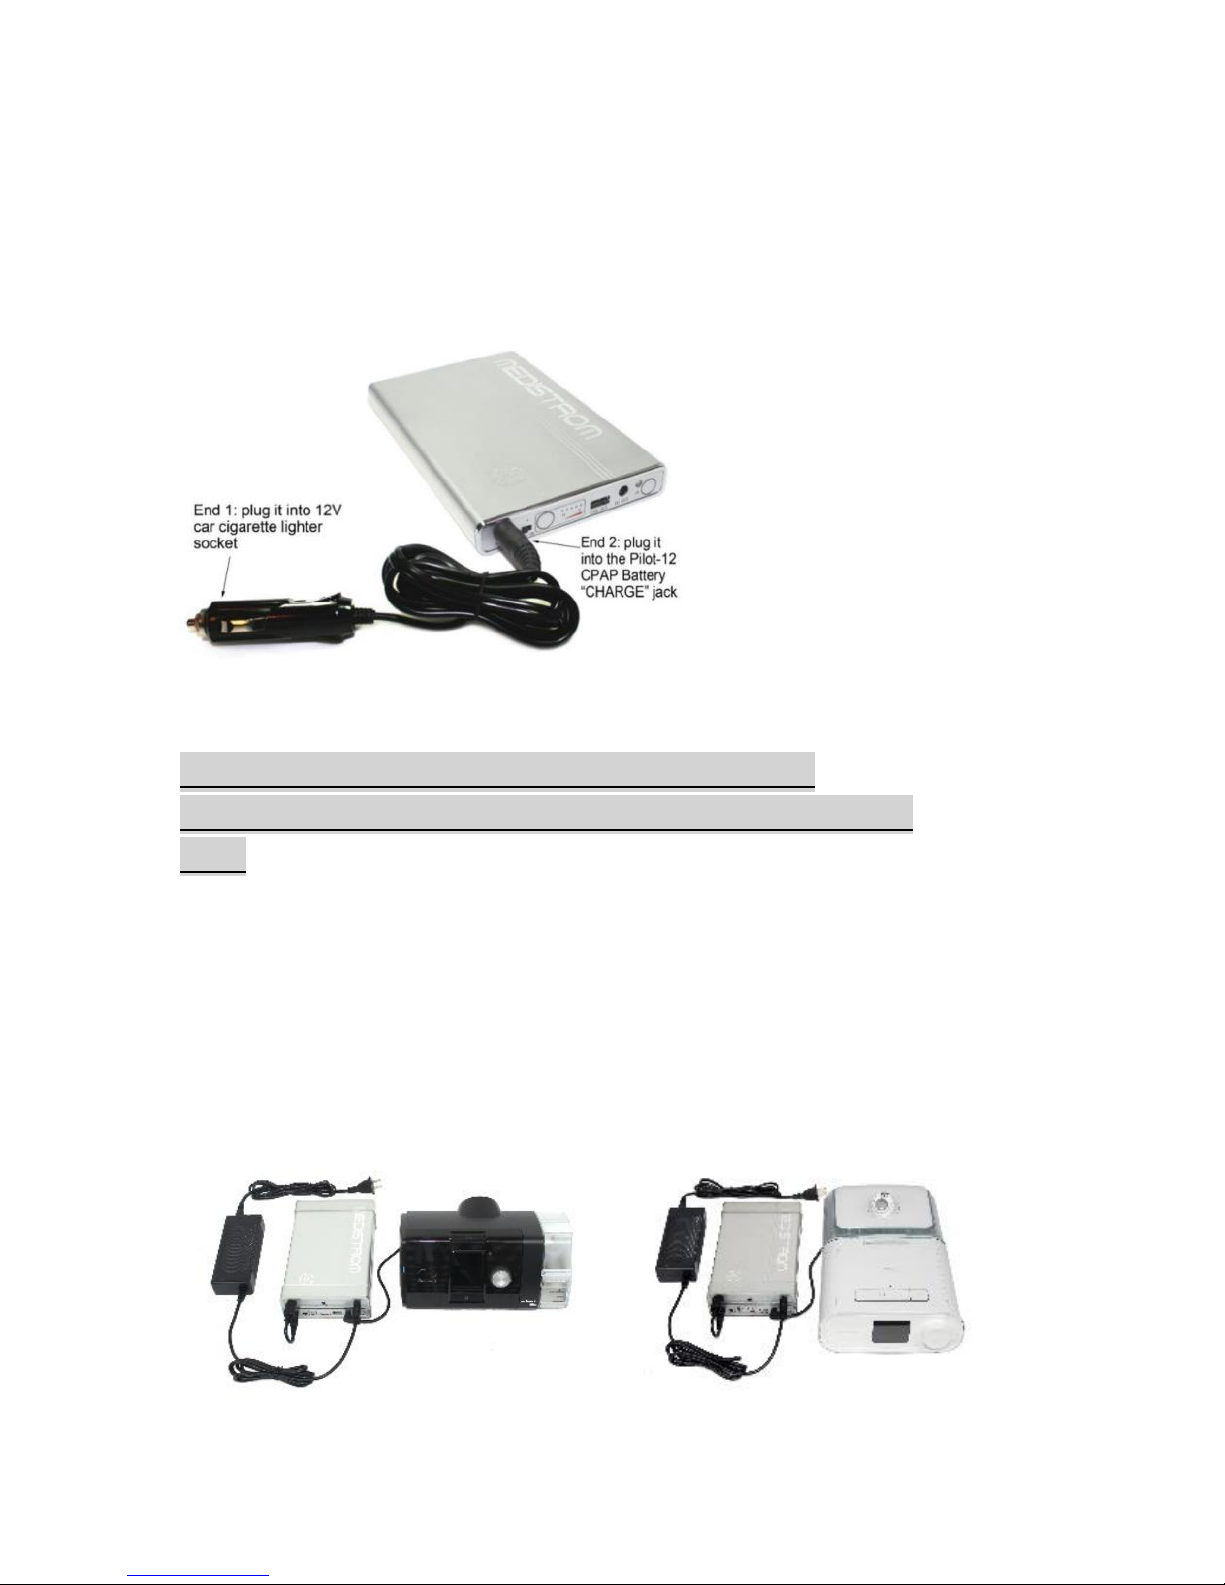
2.7 CAR CHARGER FOR PILOT-12 PLUS INSTRUCTIONS:
Plug End 1 of the Medistrom™ Car Charger into the 12 V car
cigarette lighter socket, and the End 2 into the “CHARGE” jack of
your Pilot-12 Plus CPAP Battery as shown on the diagram on page
18. The battery will charge in 3-4 hours.
SECTION 3 –USING CO-PILOT ADD-ON UNIT TO
INCREASE THE RUN TIME OF PILOT-24 PLUS / PILOT-12
PLUS
Pilot-24 Plus and Pilot-12 Plus can be used with an add-on unit Co-
Pilot-24 and Co-Pilot-12. Using Co-Pilot will increase the CPAP
battery run times. Please refer to the diagram below in order to set
up dual configuration. Co-Pilot can be used in dual configuration
with Pilot Plus in order to serve as BOTH Backup and/or Portable
CPAP Battery.

19
SECTION 4 - CARE INSTRUCTIONS: PILOT-24 PLUS /
PILOT-12 PLUS
Do not expose the Pilot-12 Plus/Pilot-24 Plus to liquids of any kind.
Keep out of direct sunlight.
If your unit becomes soiled, disconnect from both the power source
and the PAP device and wipe the exterior casing with a clean, dry
cloth.
SECTION 5 - TRAVELLING WITH THE BATTERY: PILOT-24
PLUS / PILOT-12 PLUS
Prior to travel, please consult with your specific carrier to gain
approval to take your Pilot-12 Plus/Pilot-24 Plus on board the
aircraft.
SECTION 6 - WARRANTY PILOT-24 PLUS / PILOT-12
PLUS
Please contact your CPAP battery dealer for any warranty related
issues.
Medistrom guarantees that Pilot-12 Plus/Pilot-24 Plus CPAP battery
shall remain free from manufacturer defects for twelve months
from the date of purchase.
This warranty is not transferrable and will only be available to the
original purchaser.
This warranty does not cover physical damage resulting from
improper usage.
Medistrom reserves the right to choose whether to repair or replace
the product.

20
SECTION 7 –STORAGE AND DISPOSAL: PILOT-24 PLUS /
PILOT-12 PLUS
Pilot-12 Plus / Pilot-24 Plus must be fully charged before storage.
Pilot-12 Plus/ Pilot-24 Plus must be fully recharged every 6 months
thereafter.
Store the Pilot-12 Plus / Pilot-24 Plus in a cool, dark, well ventilated
place with normal temperatures of 0 °C / 32 °F to 35 °C / 95 °F.
CAUTION! Keep out of direct sunlight! The disposal of this unit
should be carried out in accordance with applicable laws and
regulations reflecting the purchaser’s geographic location. For
more information on where to recycle this product, please call 1-
877-723-1297 or visit: www.call2recycle.org
SECTION 8 –WARNINGS AND SAFETY PRECAUTIONS:
PILOT-24 PLUS / PILOT-12 PLUS
Please read this product user guide carefully before putting
the equipment into operation for the first time. Observe
the safety instructions.
Do not expose the Pilot-12 Plus / Pilot-24 Plus to any hard,
physical impact.
Do not expose the Pilot-12 Plus / Pilot-24 Plus to water, rain
or moisture of any kind.
Do not expose the Pilot-12 Plus / Pilot-24 Plus to an open
flame or extreme heat, including direct sunlight. Exposure
to any of these may result in an explosion.
Do not disassemble or attempt to repair the Pilot-12 Plus /
Pilot-24 Plus or the included AC charger.
Ensure the product is thoroughly inspected for any physical
damage. If any damage is found, the equipment should not
be used.
The device complies with CE and CSA directives and
standards for electrical safety and electromagnetic
compatibility. Improper use or handling can, however,
result in damage and/or injury.
This manual suits for next models
1
Table of contents
Other Medistrom Power Supply manuals


Popular Power Supply manuals by other brands

Keithley
Keithley Series 2200 Operation guide

Phoenix Contact
Phoenix Contact QUINT4-PS/1AC/24DC/20 datasheet

TDK-Lambda
TDK-Lambda GENESYS 750W HALF RACK user manual

Preen
Preen AFV-P Series user manual

Monster Power
Monster Power Reference PowerCenter HTS2600 owner's manual

Viking
Viking PS-48-RGA Technical practice


