Meditech ABPM-05 User manual

User Guide
ABPM-05 & BlueBP-05
Ambulatory Blood Pressure Monitors

BP5BB5LR_UMEN_V05-20170703 2
Table of Content
Product description..................................................................................................................................................... 3
Name of parts............................................................................................................................................................ 3
LCD display.................................................................................................................................................................4
Buttons........................................................................................................................................................................... 5
How to use the monitor............................................................................................................................................7
1. Install the software.............................................................................................................................................7
2. Setup the monitor ..............................................................................................................................................7
3. Test communication .......................................................................................................................................9
4. Program the monitor.....................................................................................................................................10
6. Retrieve data.........................................................................................................................................................11
7. Customize, review & print data ...............................................................................................................12
ABPM-05 manual programming .....................................................................................................................12
Patient information....................................................................................................................................................13
Cuffs.....................................................................................................................................................................................14
Dimensions................................................................................................................................................................14
Application .................................................................................................................................................................15
Batteries ........................................................................................................................................................................... 16
Safety concerns............................................................................................................................................................17
Cleaning & protection ............................................................................................................................................. 18
Maintenance ................................................................................................................................................................. 19
Disposal............................................................................................................................................................................ 19
Indications, contraindications..........................................................................................................................20
Indications................................................................................................................................................................20
Contraindications................................................................................................................................................20
Possible accessories list ......................................................................................................................................20
Technical specifications .........................................................................................................................................21
Troubleshooting...........................................................................................................................................................21
Error codes................................................................................................................................................................ 22
Meditech product warranty information ................................................................................................... 22
Conventions ................................................................................................................................................................. 23
EMC information .......................................................................................................................................................26

BP5BB5LR_UMEN_V05-20170703 3
Product Description
Meditech ABPM-05, and its Bluetooth-capable version BlueBP-05, provides
accurate information on blood pressure variability, overnight dipping and morning
surge for reliable hypertension management and control.
Both ambulatory blood pressure monitors incorporate an algorithm validated to
BHS (British Hypertension Society) and AAMI (Association for the Advancement of
Medical Instrumentation) protocols.
Name of parts
day/night button
event button
start button
LCD display
interface connection
cuff connection
sticker with the serial number
battery compartment

BP5BB5LR_UMEN_V05-20170703 4
LCD display
Information displayed on both ABPM-05 and BlueBP-05.
Normal status: time
is displayed.
Pulse rate value of
just completed
measurements
(beats/minute)
Blood pressure
measurement
initiated (mmHg)
Event marker set
during a button
push
Pumping for
measurement,
current pressure is
displayed (mmHg)
Error code display
Deflation during
measurement,
current pressure is
displayed (mmHg)
The device is
switched off.
Systolic value of
just completed
measurement
(mmHg)
The blood pressure
measurement is
cancelled by
pressing a button.
Diastolic value of
just completed
measurement
(mmHg)
Heart symbol
blinking:
measurement in
progress (mmHg)
Night mode: time is
displayed, moon
sign is lit.
LCD check: all
segments are
displayed
Battery voltage
display (2,37V)
The crossed battery
symbol warns of low
battery
Information displayed on BlueBP-05 only
The device is in
Bluetooth
discoverable mode

BP5BB5LR_UMEN_V05-20170703 5
Information displayed on ABPM-05 only
Communication
with a personal
computer
Blood pressure
measurement
initiated (kPa)
Pumping for
measurement,
current pressure is
displayed (kPa)
Deflation during
measurement,
current pressure
displayed (kPa)
Systolic value of a
just completed
measurement (19,2
kPa)
Heart symbol
blinking:
measurement in
progress (kPa)
Diastolic value of a
just completed
measurement (kPa)
Buttons
The monitor has 3 buttons: start, event and day/night. Any blood pressure
measurement can be interrupted by pressing any button at any time while the cuff
is inflated. This will result in immediate fast cuff deflation.
Start button
- start a manual BP recording
- switch on/off
- LCD check
- battery voltage check
Event button
- set an event marker
Day/night button
- mark the time of
sleeping/awakening
- manual day/night shift

BP5BB5LR_UMEN_V05-20170703 6
Start button functions
-to start a manual blood pressure measurement (press shortly)
Typical causes for this use: dizziness, pain (angina pectoris or headache),
palpitation.
-to switch the device off (press and hold for more than 10 seconds)
Press and hold the Start button until 2 horizontal segments appear on the
LCD ( - - ).
-to switch the device on (press and hold for more than 3 seconds)
-to check the LCD
Press and hold the start button to light up all segments of the LCD to check
if they all work correctly.
-to check battery voltage (press and hold for more than 5 seconds but less
than 10 seconds)
The voltage for fully charged accumulators should be over 2,5V (2_50 on the
LCD).
Event button functions
-to set a patient event marker (press shortly)
Typical cause for this use is taking medicine. The patient should be
instructed to record the reason for setting an event marker in a diary.
Day/night button functions
-Marking the time of sleeping and awakening
If the day/night shift function is disabled during programming, the patient
can press the day/night button to mark the time of sleeping (in the evening)
and awakening (in the morning).
-Manual day/night shift (only in the 2 hour period before the prescheduled
shift)
If this function is enabled during the programming, the patient can manually
shift the measurement frequency period (day or night) by pressing the
day/night button.
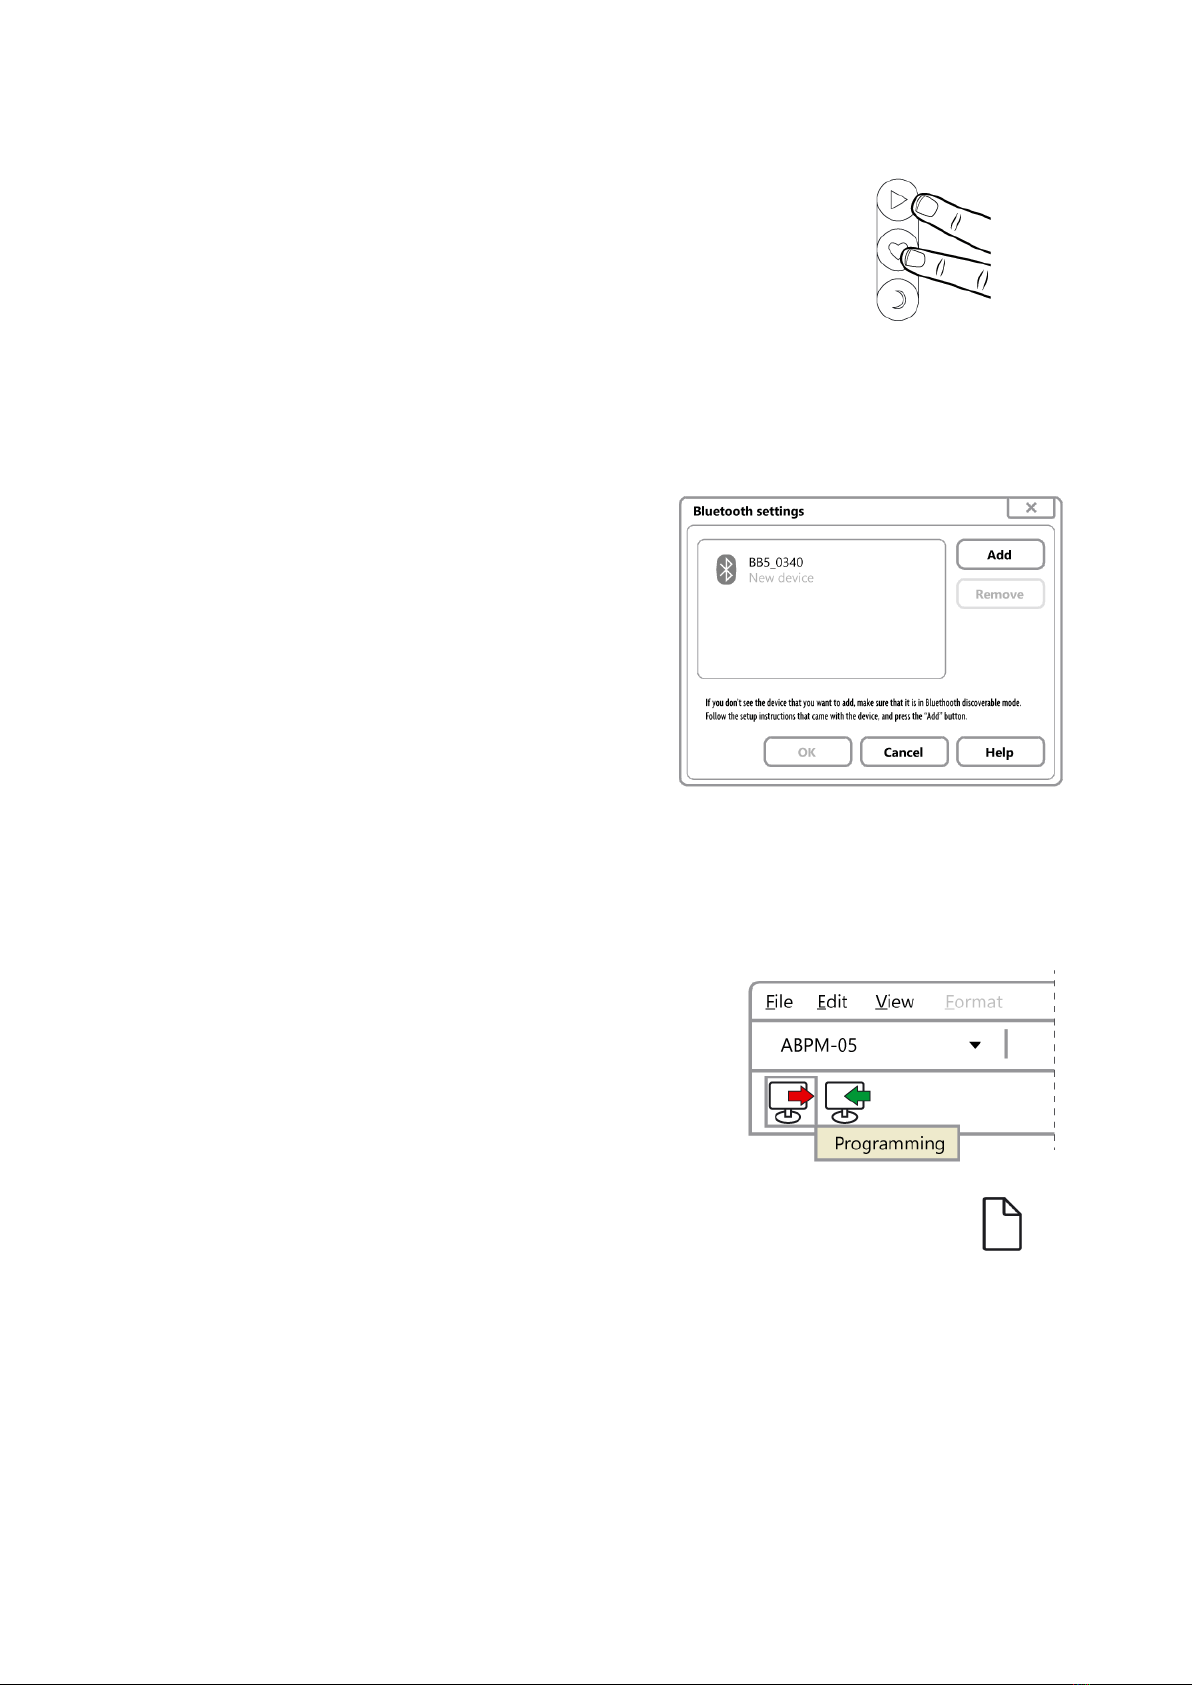
Bluetooth functions –BlueBP-05 only
- Switching to Bluetooth discoverable mode
to start communication
You can initiate the Bluetooth mode by
pressing the Start and the Event buttons
simultaneously for longer than 3 seconds
then release them, until you can see this on
the LCD screen: PC --.
- Switching off Bluetooth discoverable mode
You can switch off the Bluetooth mode by
pressing the Start and the Event buttons
simultaneously. The discoverable mode is
automatically ceased after reading out or
programming or if the connection fails to be
established in one minute.
BP5BB5LR_UMEN_V05-20170703 7
How to Use the Monitor
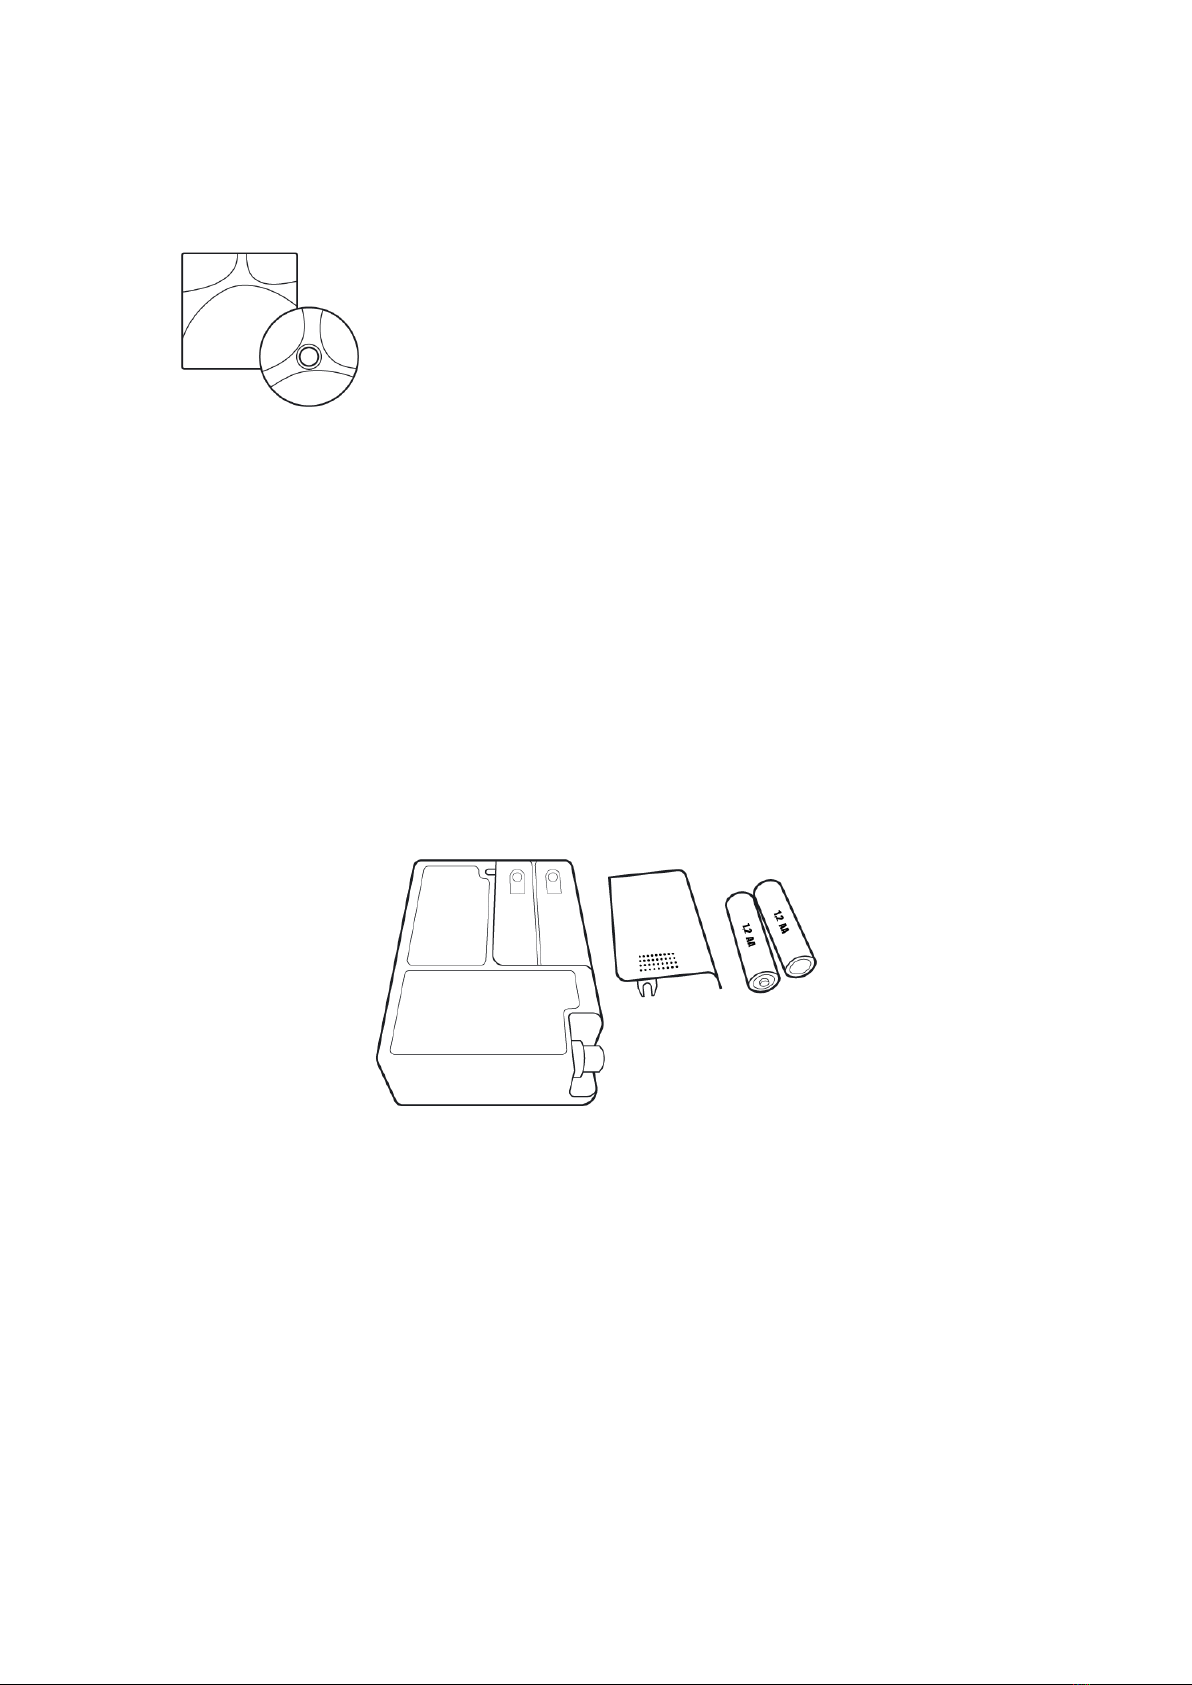
1. Install the software
Install either CardioVisions or EasyABPM software to your
PC from the installation CD. If the CD does not
automatically start, run the start.exe program.
CardioVisions: for ABPM-05 and/or BlueBP-05 (also for research purposes).
EasyABPM: for ABPM-05 (for quick and basic solutions).
2. Setup the monitor
2.1 Install 2 AA batteries into the monitor
Accumulator voltage should be over 2.5V. To check: press the Start button for at
least 5 seconds.
2.2 Setup communication between the monitor and the PC
ABPM-05
ABPM-05 works with a special USB optical cable, which connects the monitor to
your PC. Always install the software before connecting the USB optical cable to the
PC! (The USB driver is installed together with the software, in the absence of which
the PC will not recognize the interface.)

BP5BB5LR_UMEN_V05-20170703 8
Locate a USB port (often labelled ) or free
9-pin serial port (also called RS232) on your
computer.
If you have a USB port on your computer,
connect the USB-type optoelectronic interface
from Meditech. If you have a serial RS232 port
on your computer, just plug in the OI3 or any
newest serial optoelectronic interface. If you
have a USB port on your computer but you
have a serial optoelectronic interface, use a
USB-to-serial converter.
Take the optoelectronic interface unit with the
optical cable out of package.
Connect the interface unit to the port.
Connect the recorder to the optical cable.
If a Meditech USB optical interface cable has been supplied to your
monitor, always install the USB driver before connecting the USB cable
to the computer! The USB driver can be installed with CardioVisions
software installation!
The interface unit converts optical signals to electric ones and vice versa. The twin
optical cable transfers optical signals between the interface unit and the recorder.
The cable is flexible, but it is sensitive to overfolding and to cutting forces. If you
fold the optical cable in too small radius, or if a strong cutting force (e.g. by the edge
of a drawer) is applied to it, the optical cable may become optically distorted, which
might result in communication errors.
BlueBP-05
BlueBP-05 is capable of wireless communication
with the PC using Bluetooth technology. For
successful communication, you need a properly
connected and installed Bluetooth adapter. Most
up-to-date computers today come with in-built
Bluetooth capability, or are easily extendible using
a small USB Bluetooth dongle (supplied by
Meditech as well).
Make your monitor Bluetooth discoverable by
pressing the Start and the Event buttons together
for longer than 3 seconds.
Bluetooth functionality works seamlessly in
Windows XP Service Pack 2 or newer releases, but
it can be usually handled to older Windows

BP5BB5LR_UMEN_V05-20170703 9
versions as well. Windows XP Help, as well as the documentation of Bluetooth
dongles, contains detailed information how wireless devices can be used, and this
is described in detail in our software Help as
well.
3. Test communication
ABPM-05
CardioVisions:
Tools/Options/Communication.
Select ABPM-05, select the type of your
interface unit, select the required port or
simply click on Test.
EasyABPM: Device/Read data.
BlueBP-05
If you want to use a BlueBP-05 with
Bluetooth under Windows XP SP 2, follow the
steps below. With other Windows versions,
please refer to the documentation of the
Bluetooth device used in your computer.
Start CardioVisions and click
Tools/Options/Communication, select
BlueBP-05 and click on Bluetooth settings.
In the appearing dialog, click on the Connect
setup button to go to the next step.
BP5BB5LR_UMEN_V05-20170703 10
Make your device Bluetooth-discoverable by pressing the
Start and the Event button simultaneously for longer than 3
seconds, and then release them. The LCD displays the PC--
marking, indicating the recorder is discoverable. The recorders
remain discoverable for a minute then switches back to
standby mode. If a recorder switches back to standby mode,
make it discoverable again.
If there is a moving torch on the screen, the PC searches for
Bluetooth devices. Should a recorder switch back to standby mode due to a
timeout, make it discoverable again then click on the Add button.
After the search the found devices are listed.
The name of the recorder in case of BlueBP-05
is BB5_xxxx, where xxxx is the last four digits
of the serial number found on the back of the
recorder. After selecting the appropriate
recorder, the OK button becomes active, click
on it.
As authentication key (PIN) enter the last four
digits of the serial number. After entering the
PIN, click on the Finish button. Wait until the
system installs and configures the new Bluetooth device. By clicking on the Test
button you can check the communication. Make the recorder discoverable before
the test as described above.
4. Program the monitor
4.1 Start programming
CardioVisions (Home screen): select your
device type and click programming.
EasyABPM: Device/New examination
4.2 Enter new patient data or select patient from the database.
4.3 Create a monitoring plan adjusted to the patient’s daily routine by filling out the
parameters for the new study.

BP5BB5LR_UMEN_V05-20170703 11
4.4 Send the monitoring plan from the computer to the recorder unit.
5. Fit the patient with the monitor
5.1 Apply a proper-size cuff to the patient’s non-
dominant arm and be sure that the artery indicator is
over the brachial artery.
5.2 Connect the hose to the monitor.
5.3 Place the monitor in the pouch and affix the patient
with the belt.
5.4 Start a manual BP reading to verify if the monitor is
working properly.
5.5 Provide a diary for the patient (a sample is available on the installation CD) and
inform the patient about the goal and the expected results of the monitoring and
about the use of the monitor.
6. Retrieve data
6.1 Remove the unit and the cuff from the returned patient and ask for the patient
diary for any events/symptoms/observations or complaints.
6.2 Start the software.
6.3 Establish communication between the monitor and the PC and retrieve data.
CardioVisions (Home screen): select
your device from the dropdown list and
click on Reading data. If you have selected
manual programming or the device was
programmed from another database,
record patient information into the
database after reading in data.

BP5BB5LR_UMEN_V05-20170703 12
EasyABPM: Device/Read data
7. Customize, review & print data
7.1 Customize your standard report
CardioVisions: Tools/Options/Standard reports/ABPM report
EasyABPM: Tools/Settings/Report
7.2 Review the study and edit data if necessary.
7.3 Create and save or print the report
ABPM-05 Manual Programming
ABPM-05 if programmed manually can be used by CardioVisions software 1.13 or
later versions. Plans are stored in the inbuilt memory of the device and they cannot
be changed. The following three measurement plans can be selected during the
programming of the device:
PLAN A): measurements every 15 minutes at day and every 30 minutes at night.
PLAN B): periods with 20 minutes at day and 40 minutes at night.
PLAN C):30-minute periods independent of day or night time.
Other settings are the same in all the three plans: undecided cuff size, 300 mmHg
pressure limit, LCD display enabled, manual day/night shift disabled. Daytime
starts at 6:00, while nighttime starts at 22:00, special session is disabled. Patient
data can be selected or created later in CardioVisions database.
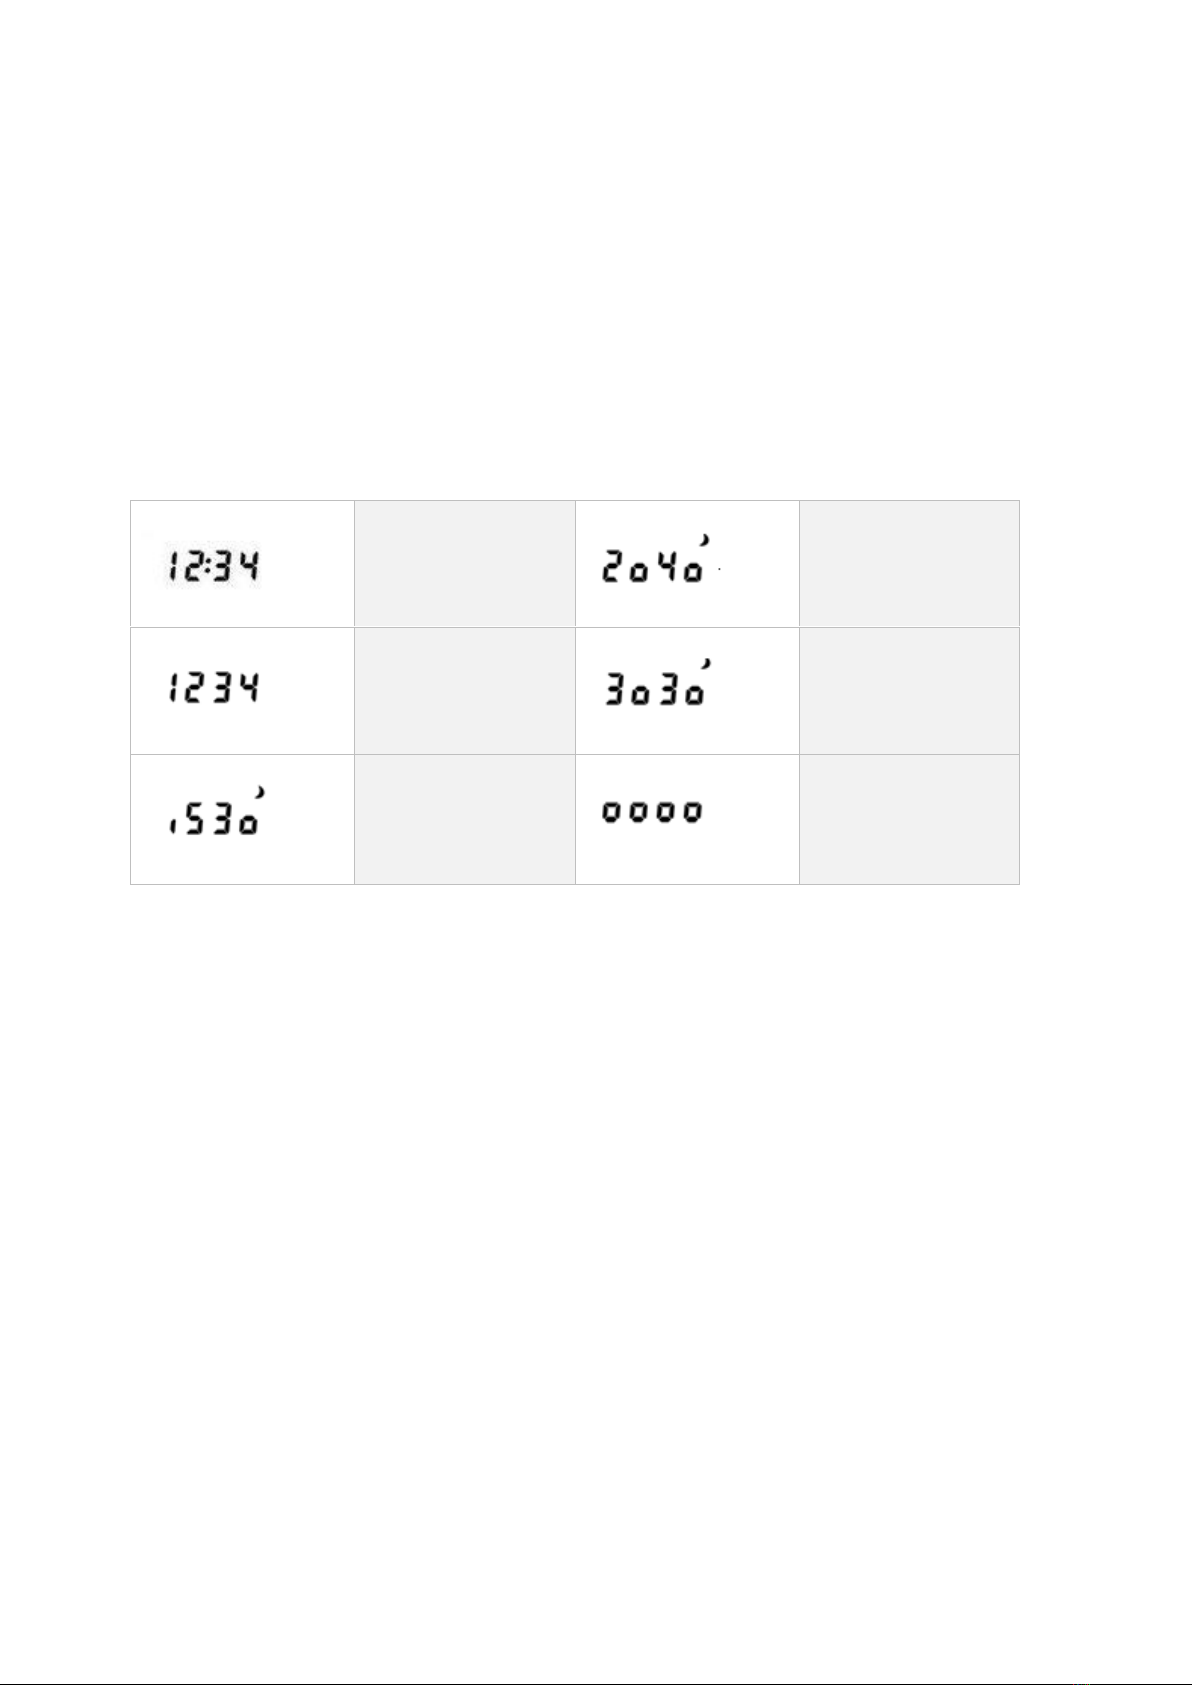
How to program manually
Press and hold the Start and the Day/night buttons
simultaneously. Measurement frequency of the
measurement plans will be displayed after 10 seconds
for 3-3 seconds.
To choose the measurement plan, release the buttons
when the specific plan is displayed. You will hear two
beeps and the LCD will display four blinking „o”
letters, which indicates that programming the device
is in progress. After a successful programming you
can hear 5 beeps, and the selected plan can be seen
again. If programming fails for some reason, the E90
error code will be displayed on the LCD.
In case of manual programming there is no time setting. If the time setting is
BP5BB5LR_UMEN_V05-20170703 13
imprecise, the time of measurements may be false. If you want to use the manual
programming function, do not leave the device without batteries for a longer period.
If it could happened so, insert batteries again into the device, set the inner clock by
programming the device by a PC and leave the batteries in the device (the
suggested period is 24 hours).
The first measurement has a controlling purpose and it starts in the second minute
after programming, then other measurements cannot be started in the next five
minutes. The rest of the measurements are taken at specific 15/20/30/40 minute
intervals and there are measurements at the 6:00 and 22:00 hour shifts. The last
measurement is exactly 24 hours after the second measurement.
LCD displays
Normal status: time
is displayed.
2. measurement
plan: 20/40 minute
day/night intervals
10 second delay
state
3. measurement
plan: 30/30 minute
day/night intervals
1. measurement
plan: 15/30 minute
day/night intervals
Programming is in
progress: blinking
signal
Patient Information
Wearing a thin shirt under the cuff is recommended.
It does not influence the accuracy of the blood pressure measurement, but it
prevents problems caused by long-time wear of the cuff (sweat, itching, soreness,
etc.)
The cuff should be properly placed on and connected.
The cuff tube should be pointed towards the patient’s shoulder and the white
tissue-sign (textile cuff) or the ’artery’ indicator (PU fabric leather cuff) on the cuff
should be placed above the brachial artery.
Hold your arm slightly away from your chest during a measurement.
Patients should avoid excess movement during blood pressure measurements.
They should hold their arm loose, slightly away from their chest.
Should the blood pressure measurements cause bloodshots, torpidity or pain in the
hand, the cuff should be removed from the arm immediately and disconnected from
the recorder.
Such occurrence should be reported to the physician latest after the monitoring
session.
如果是手动编程,则没有时间设置。如果时间设置不精确,则测量时间可能是错误的。如果要使用手动编程功能,请不要让设备长时间没有
电池。如果可能发生这种情况,请将电池重新插入设备,通过PC对设备进行编程来设置内部时钟,并将电池留在设备中(建议的周期为24
小时)。第一次测量具有控制目的,在编程后的第二分钟开始,然后在接下来的五分钟内不能开始其他测量。其余的测量以特定的
15/20/30/40分钟间隔进行,在6:00和22:00小时轮班进行测量。最后一次测量正好是第二次测量后24小时。

BP5BB5LR_UMEN_V05-20170703 14
Press any button to stop a blood pressure measurement.
Should the blood pressure measurements cause bloodshots, torpidity or pain in the
hand, the cuff should be removed from the arm immediately and disconnected from
the recorder. Such occurrence should be reported to the physician latest after the
monitoring session.
Don’t remove the recorder even at night.
By loosening the straps, patients can avoid problems when turning in their sleep.
The recorder does not disturb most patients at night.
Use the buttons, if necessary.
The patient can initiate extra blood pressure measurements by pressing the Start
button. By pressing the Event button the patient can mark events, e.g. taking
medication etc. The time of going to and rising from bed can be marked by the
Day/night button.
Should the batteries run down during a monitoring session, they can simply be
replaced.
Monitoring will continue and data will not be lost.
Don’t block the air flow in the cuff tube.
Take care to avoid blocking the air flow in the tube of the cuff and twisting the tube.
Never measure anybody else’s blood pressure with the recorder during an
ambulatory blood pressure monitoring session.
Cuffs
Dimensions
Name
Bladder
dimensions
Arm circumference
range
large
15*33 cm
33-42 cm
normal
12*25 cm
25-32 cm
small
9*18 cm
18-24 cm
If the patient’s arm circumference range is out of the ranges indicated above, use
the cuff which best fits for the patient and make a so-called undercuffing or
overcuffing calculation.
BP5BB5LR_UMEN_V05-20170703 15
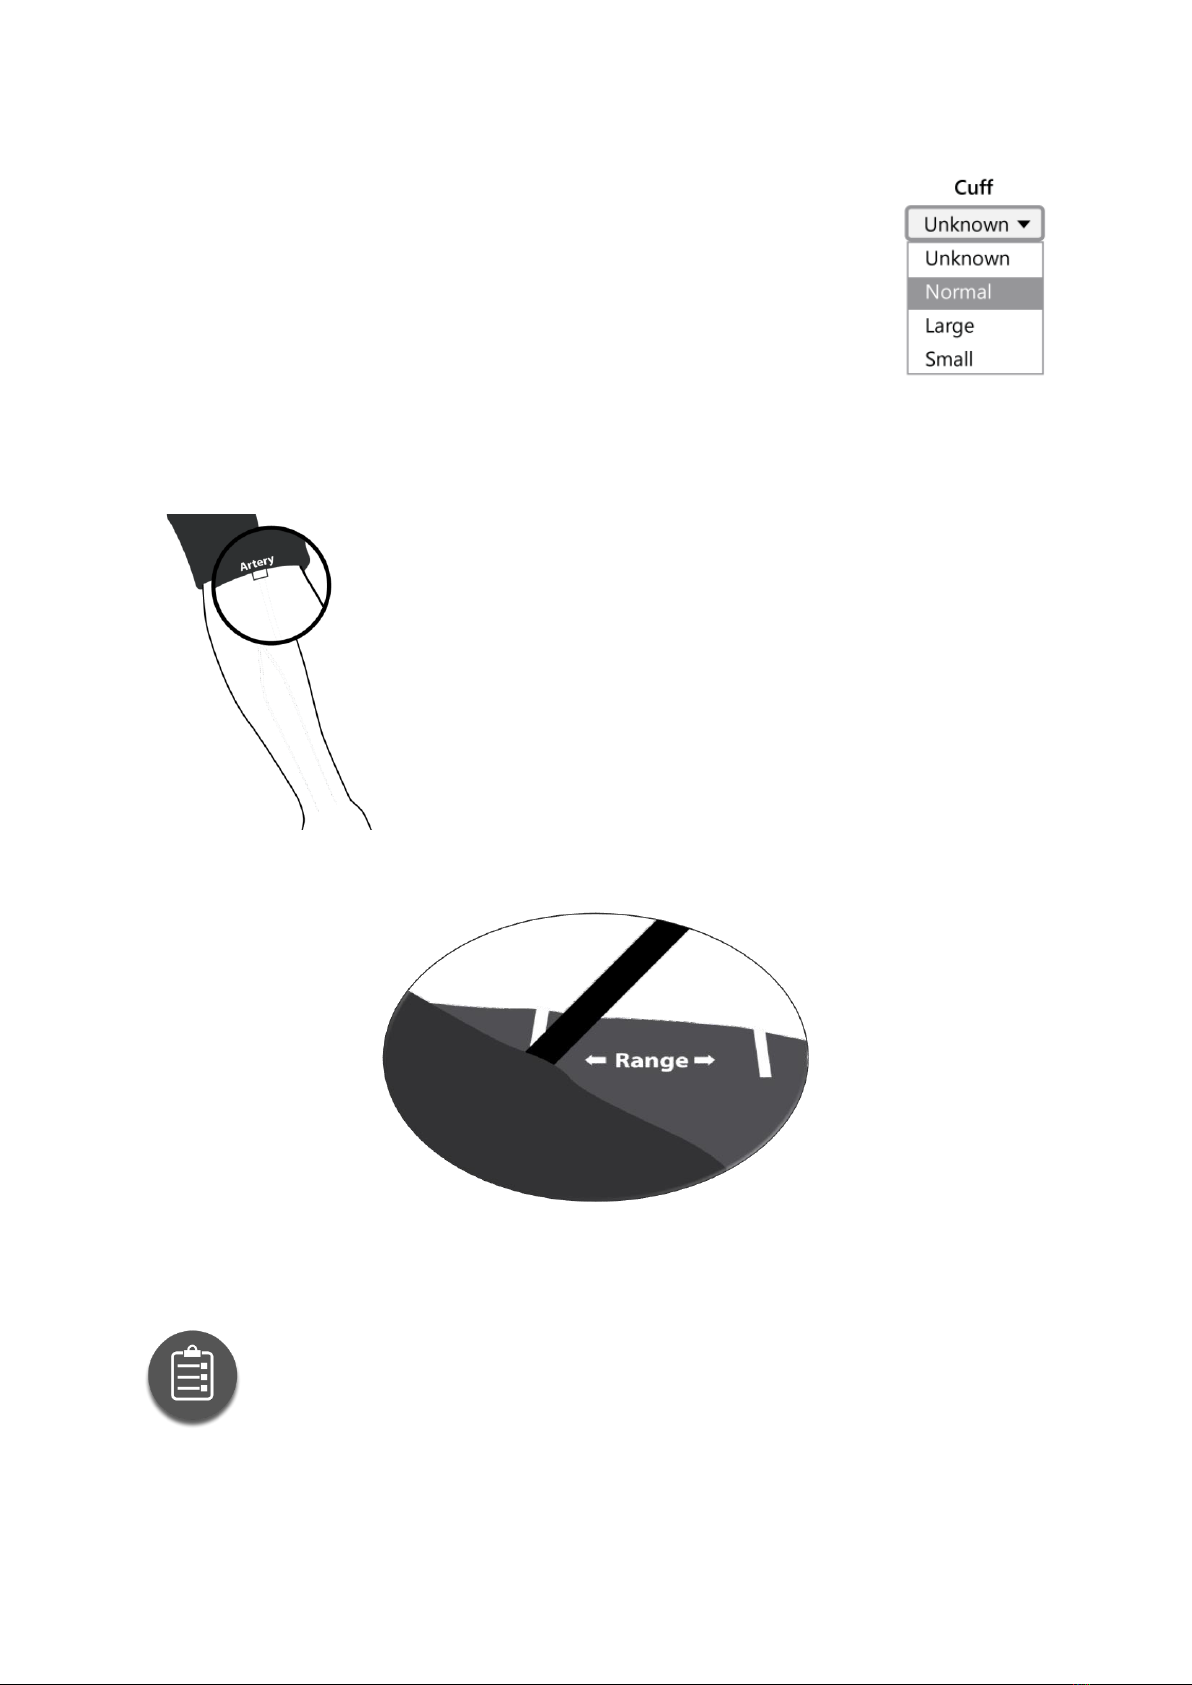
Application
Set the cuff size during programming the monitor
The monitors recognize three different cuff sizes. The size to be
used should be set during programming of the device.
Inappropriate setting of the cuff size may lead to device
malfunctioning, which is inconvenient for the patient and may
lead to an unsuccessful measurement.
Wear a thin shirt or blouse under the cuff
It is advisable to wear a thin shirt or blouse under the cuff, because it prevents
possible problems caused by long-time wear (sweating, itching, etc.).
Apply the cuff and be sure the artery indicator is over the
brachial artery
Place the cuff on the upper arm so that the rubber tube
points towards the patient’s shoulder and the white
tissue-sign and the ’artery’ indication of the cuff is
placed above the brachial artery, if possible. Contrary to
the usual placement with the tube pointing downwards,
the advantage is that the patient can wear a loose jacket
over the cuff.
When properly applied, the end of the sleeve (the one closer to the tube) should fall
in the indicated range.
Connect the hose to the monitor
Connect the air connector of the cuff into the air connector socket of the device by
turning it clockwise with a slight pressure.
Take care to avoid blocking the air flow in the tube of the cuff and
twisting the tube. Make sure the cuff and its tubing do not cause
strangulation or a circulation problem. Should the patient experience arm
numbness or pain remaining after any blood pressure reading is
completed, the cuff should be removed to avoid permanent vascular or neural injury.
The application of the cuff over a wound can cause further injury! The application of
the cuff and its pressurization could result in injury to the patient because of

BP5BB5LR_UMEN_V05-20170703 16
temporary interference to blood flow on any limb where intravascular access or
therapy, or an arterio-venous (A-V) shunt is present. The pressurization of the cuff
can temporarily cause loss of function of simultaneously used monitoring medical
equipment on the same limb.
No relevance can be shown in the application of the cuff and its pressurization on
the arm of the side of a mastectomy.
The cuff should be applied as tightly as comfortable for the patient.
A too loose application may result in longer or aborted measurements, because the
device has to pump even to reach the proper tightness. Longer measurements may
cause inconvenience for the patient, and aborted measurements result in less data
for evaluation. If the patient removes the cuff for a period during the monitoring
session, it should be reapplied with appropriate tightness, with help from another
person, if necessary.
The cuff is the component which, by definition of the relevant standard, is protected
against a defibrillator discharge. The substitution of a cuff different from that
supplied by Meditech might result in measurement error and/or in certain cases it
causes damage to the main recorder unit.
Batteries
Meditech ABPM-05 and BlueBP-05
operate either with two 1.5V AA normal
batteries or with two 1.2V AA
rechargeable batteries.
A set of properly charged, high capacity
batteries will enable both recorders to
perform 250 blood pressure
measurements during a 24-48 hour
long monitoring session. If you use
alkaline batteries, choose high capacity,
long-life products to enable reliable
operation.
In order to change batteries, take the recorder out of the holder pouch and remove
the battery compartment cover on the back-side. Place two properly charged, high
capacity AA rechargeable or two new, long-life AA alkaline batteries into the
compartment then close it.
Use standard alkaline or NiCd/NiMH rechargeable batteries
Use only standard long-life (alkaline) batteries, or standard NiCd or
NiMH rechargeable batteries of the proper size. Do not use lithium
batteries. Do not mix different battery types; do not mix new and old
batteries. Never use batteries of low or unknown quality or pre-used batteries, as
they may not cover the power needs of the recorder, and they may damage the
recorder, or they may contain acidic electrolytes which may leak and corrode
electronic components. Never use batteries damaged in any way.

BP5BB5LR_UMEN_V05-20170703 17
Do not start a new monitoring session with low batteries.
It is strongly recommended to use freshly charged accumulators or new batteries
with each patient so that batteries do not run down during monitoring, even in case
of very high blood pressure values and/or a long monitoring session. After inserting
batteries in Meditech ambulatory blood pressure monitors, it is advised to check
their voltage before programming them. The typical voltage for fully charged
rechargeable batteries should be over 2,5V and for fresh alkaline batteries, over 3V.
Battery voltage check: Press the Start button for at least 5 seconds.
If measurements do not start in due time keep fresh batteries in the recorder
If a recorder is not used for a long period, the in-built backup cell, ensuring the
operation of the internal clock, may get discharged. In this case keep freshly
charged batteries in the recorder for at least one day; this will recharge the backup
cell. It is possible to use the recorder afterwards. If the backup cell is not properly
charged, the internal clock may work incorrectly, and the recorder may not start
measurements in due time. If the recharging of the cell is not successful, the backup
cell must be changed by the service personnel. This is an out of warranty act.
If the batteries run down, replace them even during a monitoring session
Should the batteries run down during a monitoring session, they can be replaced.
Monitoring will continue and data will not be lost.
Remove the batteries if the recorder is out of use
If you do not use the recorder, it is advisable to remove batteries since they may run
down due to the constant small power consumption of the integrated circuits of the
device. Data in the recorder are not lost even if batteries run down or are removed.
Safety Concerns
Electric shock hazard protection
Both ABPM-05 and BlueBP-05 recorder meet the relevant shock hazard protection
standards. The devices operate with two 1.5V AA batteries or two 1.2V AA
rechargeable batteries, which excludes all electric shock hazards, even in the
unlikely case of multiple device errors.
Many personal computers do not meet shock hazard protection standards or strict
safety regulations applicable to medical devices. Therefore, during the computer-
based use of Meditech recorders, keep at least a 2 meter distance between the
patient and the computer. This is the required minimum safety distance. ABPM-05
communicates via a plastic optical cable, the 3 m standard length of which allows
for the required safety distance. The plastic optical cable ensures perfect electric
separation and reduces the effects of external electric noise. It does not conduct
electricity. BlueBP-05 recorders communicate via radiofrequency transmission
(Bluetooth). This ensures the perfect electronic separation from the PC.
Biocompatibility
To avoid infection risks, and for general hygienic reasons, the device, cuff and
tubing should never contact the patient's skin directly. Cuff materials meet the
related biocompatibility requirements.

BP5BB5LR_UMEN_V05-20170703 18
Hazardous materials
Used batteries qualify as hazardous waste and should be disposed with care.
Meditech recorders do not contain any materials qualified as pharmaceutical
substance or tissue of animal origin. They emit no material hazardous to humans.
Risk of incorrect diagnosis
The basic intended use of Meditech recorders is to record blood pressure and pulse
rate values. Patients should be informed about rules of cooperative behavior;
proper handling of the recorder used, and expected results of monitoring in
advance. The recorders only provide data to support diagnostic decisions of a
qualified physician; they do not automatically provide a diagnosis of any kind.
During the evaluation of recorded blood pressure values, possible artefacts due to
external disturbances, motion artefacts, and electrical noise should be observed
and handled with caution.
See chapter Cuffs for more information!
Cleaning & Protection
Meditech ambulatory blood pressure
monitors are not specially protected
against spills or ingression of water or
other liquids.
Cleaning the monitor
A recommended means of cleaning is to
wipe the recorder with a disinfectant
cleaning tissue. Alternatively, wipe with a
slightly damp cloth then dry it with an
antistatic tissue. Do not expose recorders
to extreme heat or radiation, including long
exposure to direct strong sunlight.
Cleaning the cuffs
To clean the textile cuff please do the following:
- Remove the bladder.
- Wash by hand the sleeve with lukewarm water and regular washing liquid suitable
for black material. Rinse well.
- If required, wipe the bladder with a mild cleaning tissue.
- Allow both bladder and sleeve to air dry.
- Replace bladder in the sleeve: place the sleeve with its pocket-side up and put the
integrated bladder into the pocket pulling the rubber tube through the hole
designated for it. Place the opposite end of the rubber below the inner ply of the
sleeve. Adjust the bladder to the linings of the sleeve.
To clean the PU leather fabric cuff, please do the following:
Wipe the sleeve with a damped cloth or detergent/disinfectant tissue (e.g.: ethanol
70%, isopropyl-alcohol 70%, microzid). The bladder cannot be removed!

BP5BB5LR_UMEN_V05-20170703 19
Avoid any leakage into the tube while cleaning the cuff. (Plug the end of
the tube.)
Don’t take the unit into a sterilizing machine!
Don’t use bleach!
Protection
Do not immerse the recorder in water or any cleaning fluid and protect it from spills
and splashes. Do not expose it to heavy rain or steam and do not wear it in wet
environment e.g.: shower, bath or swimming pool. In case of minor effects of wet
environment, wipe off water drops with a dry cloth. Keep the recorder in a normal
dry room for at least one hour before use if condensation is suspected.
In case of ingress of water in the recorder, remove batteries from the unit, and refer
the unit to authorized service.
Never place a recorder unit in a disinfecting or sterilizing machine!
Maintenance
Verification of the pressure measurement accuracy is recommended biannually.
All the devices are covered by a two-year warranty under general warranty
conditions of Meditech Ltd, see relevant topic. This warranty does not cover any
malfunction or defects arising from improper use, the use of inadequate
accessories, accident, theft, or use of the device outside operating environmental
specifications or intended measurement range. Removing the closing label from
the back side of the device voids this warranty.
There are no user serviceable parts inside Meditech recorders; they contain high
complexity electronic and fine mechanical components. If you have any problems,
please refer the recorder to qualified service personnel. All consequences of
improper servicing are the sole responsibility of the user. Contact Meditech or your
distributor for more service information. Documentation and service know-how are
available at Meditech and the distributor entities as well.
Disposal
Each ABPM recorder includes an internal NiCd coin cell which falls under the
category of hazardous waste and should be disposed with proper care. The other
parts of the device should be handled as normal electronic waste at roll-out. Used
batteries may also fall under the category of hazardous waste and should be
disposed with proper care.

BP5BB5LR_UMEN_V05-20170703 20
Indications & Contraindications
Indications
- Suspected white-coat hypertension
- Suspected nocturnal hypertension
- To establish dipper status
- Resistant hypertension
- Elderly patient
- As a guide to antihypertensive drug treatment
- Type 1 diabetes
- Hypertension of pregnancy, including pre-eclamptic patients
- Evaluation of hypotension
- Autonomic failure
Contraindications
- Non-cooperative patients, unconscious or otherwise incapable patients
- Patients requiring urgency/emergency cardiac care
- Patients with coagulation disturbances
- Patients with serious mobility or other impairments without supervision
- Children without supervision, or children younger than 8 years
- Though the blood pressure measurement algorithm used in the monitors has
been found to function properly on patients with atrial fibrillation or other common
arrhythmias, the oscillometric blood pressure measurement method is generally
recommended for use only with special caution in patients with arrhythmias,
Parkinson’s disease or other diseases with tremor.
Possible Accessories list
-USB interface cable (ABPM-05); Bluetooth USB dongle (BlueBP-05)
-pouch for the recorder with shoulder and waist straps
-normal size cuff
-2 sets of AA long-life battery (recommended capacity: min. 1600 mAh)
-CD containing the latest software, user manual and patient diary
-user documentation (patient information and declaration of conformity)
Device accessories may vary from order to order.
Other manuals for ABPM-05
3
This manual suits for next models
1
Table of contents
Other Meditech Blood Pressure Monitor manuals


