Meditub 3060WCA Manual
WHER E SAFETY MEE T S LUXURY
INSTALLATION & OPERATING INSTRUCTIONS
INSTALLATION & OPERATINGINSTRUCTIONS
3060WCA
MODEL
www.agingsafelybaths.com

WHERE SAFETY MEETS L U XUR Y
TABLE OF CONTENTS
THANK YOUFOR CHOOSINGMEDITUBWALK-IN BATHTUBS ®.......................................... 2
CONTACTINFORMATION........................................................................................... 2
PRODUCTREGISTRATION* ....................................................................................... 3
SAVETHIS MANUAL! ............................................................................................... 4
UNPACKINGTHE UNIT.............................................................................................. 5
PRE-INSTALLATION*................................................................................................ 6
INSTALLATIONPREPARATION.................................................................................... 7
ELECTRICALPREPARATION....................................................................................... 8
INSTALLATIONPROCEDURES .................................................................................... 9
DRAINCONNECTION................................................................................................ 10
CONNECTING THE AUTODRAIN................................................................................... 11
INSTALLATION AND EXTENSION PANELS...................................................................... 12
FAUCET INSTALLATION............................................................................................. 13
OPERATING SAFETY INSTRUCTIONS............................................................................ 14
OPERATING INSTRUCTIONS ...................................................................................... 16
TUBCONTROLS...................................................................................................... 18
CLEANINGANDMAINTENANCE.................................................................................. 19
WARRANTY........................................................................................................... 20
RETURN POLICY..................................................................................................... 22
PRODUCT REGISTRATION CARD................................................................................. 23
TABLE OF CONTENTS
TABLE OF CONTENTS

Page 3Page 2
WHER E SAFETY MEE T S LUXURY
WHERE SAFETY MEETS L U XUR Y
THANK YOU & CONTACTINFORMATION
THANK YOUFOR CHOOSINGMEDITUB WALK-IN
BATHTUBS ®
Our mission is to help you maintain independence over essential bathing needs and improve the quality of life!Meditub Walk-In
Bathtubs
®has designed the most accessible, most comfortable walk-in bathtub on the market today! Until recently, if you have
diculty getting in and out of a bathtub, it was almost impossible for you to take a bath.Meditub Walk-InBathtubs
® specializes
in accessibility and security. Safe transfers in and out of the bathtub are the most critical part of bathing safely.Meditub Walk-In
Bathtubs
®is committed to providing acompletebathing experience for the elderly and mobility-impaired.
THANK YOUFOR YOUR PURCHASE!
CONTACTINFORMATION
MEDITUB WALK-IN BATHTUBS
5701 NW 35 Avenue
Miami, FL 33142
Phone866-633-4882
Fax866-560-1060
http://www.meditub.com
THANK YOU / CONTACT
PRODUCT REGISTRATION
PRODUCT REGISTRATION
PRODUCTREGISTRATION*
*Toensurethatyourwarrantyis registeredwithMeditubWalk-InBathtubs™,complete,sign andreturnthisregistrationcardwithin 30 daysofthepurchase.NOTE:Yourwarrantywill not be recognized
byMeditubWalk-InBathtubs™ unless this card is fully completedand returned to: MeditubWalk-InBathtubs™– 5701 NW 35th Ave, Miami, FL 33142
IMPORTANT
To ensure that your warranty is registered and conrmed with the manufacturer, please take a few moments to complete, sign and
return the Product Registration Card (below)within 30 days.
WARRANTY CONFIRMATION
By returning this Product Registration Card we conrm the date of purchase for your new product. This conrmation will allow
MeditubWalk-InBathtubs™toprocess any warranty claims.
PURCHASE REGISTRATION
Theinformationprovided onProduct Registration Card(foundonpage23)will be keptonle withMeditub Walk-InBathtubs™as
an ocial Purchase Registration. Thecompleted card should be mailed to :
MEDITUB WALK-IN BATHTUBS
5701 NW 35 Avenue
Miami, FL 33142
Phone866-633-4882
Fax866-560-1060
http://www.meditub.com

Page 5Page 4
WHER E SAFETY MEE T S LUXURY
WHERE SAFETY MEETS L U XUR Y
SAVE THIS MANUAL
SAVETHIS MANUAL!
GENERAL INFORMATION
READ THESEINSTRUCTIONSCOMPLETELYBEFOREINSTALLING THEPRODUCTS.FAILURE TODOSO COULDRESULTIN AN
IMPROPER INSTALLATIONANDCOULD VOIDTHE WARRANTY.
RESPONSIBILITY OF THE INSTALLER
THE INSTALLER MUST INSPECT AND WATER-TEST THE PRODUCT PRIOR TO INSTALLATION TO ENSURE THE UNIT IS FREE
OF DEFECTORDAMAGE. IN THEEVENTOFAPROBLEM,THE UNIT MUSTNOTBEINSTALLED. IF THECRATE ORTHE PRODUCT
HAS BEEN DAMAGEDDURING SHIPPING, PLEASE CALLUS IMMEDIATELY.
THIS PRODUCTMUST BE INSTALLED BY ALICENSED/CERTIFIEDCONTRACTOR
LICENSED PLUMBERS AND ELECTRICIANS SHOULD BE EMPLOYED TO INSURE PROPER INSTALLATION. INSTALLERS
ASSUME ALL LIABILITY FOR THE CORRECT INSTALLATION PROCEDURES. ONLY ACCESSORIES AUTHORIZED BY THE
MANUFACTURER SHOULD BE USED WITH THIS PRODUCT.
IMPORTANTSAFETY INSTRUCTIONS
WARNING!WHEN USINGTHIS PRODUCT, BASIC PRECAUTIONSSHOULDALWAYS BE FOLLOWED.
READANDFOLLOW ALLINSTRUCTIONSPERTAININGTORISK OFFIRE, ELECTRICALSHOCK, AND/
OR OTHER INJURIES.
SAVE THIS MANUAL
UNPACKING
UNPACKING
UNPACKINGTHE UNIT
INSPECTINGTHE PACKAGING
Inspectthe carton.If any damages are noted,photograph the damaged area(s) and notify the deliverer/carrier.
LIFTING/ TRANSPORTING
Never lift the walk-in bathtub by the plumbing. Doing so may result in damaging the plumbingand causinga leak.
INSPECTINGTHE UNIT
Immediately inspect the unit for damage even if there is no carton damage. Once the unit is installed surface damages will be
assumed to be installation relatedif notreported atthis point.
PLACINGTHE UNIT
Please notethat an installer(s)assumes full liability for damages tothe walk-in bathtub afterthe unit is installed in the “cradle”/niche.
Page 7
OPERATING INSTRUCTIONS
OPERATING INSTRUCTIONS
Page 6
WHER E SAFETY MEE T S LUXURY
WHERE SAFETY MEETS L U XUR Y
SAFETY
SAFETY
PRE-INSTALLATION*
*All Walk-In BathTubs are 100% water tested at the factory certied to be free of leaks.Transportation and mishandling may cause leaks.It is necessary to test the bathtub while there is access to
all sidesof thebathtub.
READANDFOLLOW ALLINSTRUCTIONS
•Place the tub onacompletely at surface inanarea whereit may be drained after testing.
•Close thedrainand ll the tub until it is above the highestjet. Ifit’s a soaker ll up tonormal water height level.
•Allow the water to stand in tub for 30 minutes andthen inspect all plumbing and seals for leaks.
•If tub is jetted, supply electric to unit andrun for10 minutes and inspect for leaks.Inspect theunionsaround thepump; ifleaks
persist from the unions after tightening; loosen the unions and insure the O-ring is seated properly.
NOTE:IFTHEPUMPSDONOT OPERATE,CHECKTHEBREAKER TO ENSURE POWER ISONANDTHECABLECONNECTINGTHE
CONTROLS TOTHE PUMP ISATTACHED.
WARNING! DO NOT RUN ANY PUMPS UNLESS THE TUB IS FILLED WITH WATER TO PROPER
LEVEL. DAMAGEDUETODRY RUNNINGPUMPS IS NOTCOVEREDUNDERWARRANTY. FAILURE TO
PERFORMTHESE TESTS BE FORE INSTALLATIONWILL MAKETHE INSTALLER L IABLE FOR FUTURE
REPAIR COSTS.
INSTALLATIONPREPARATION
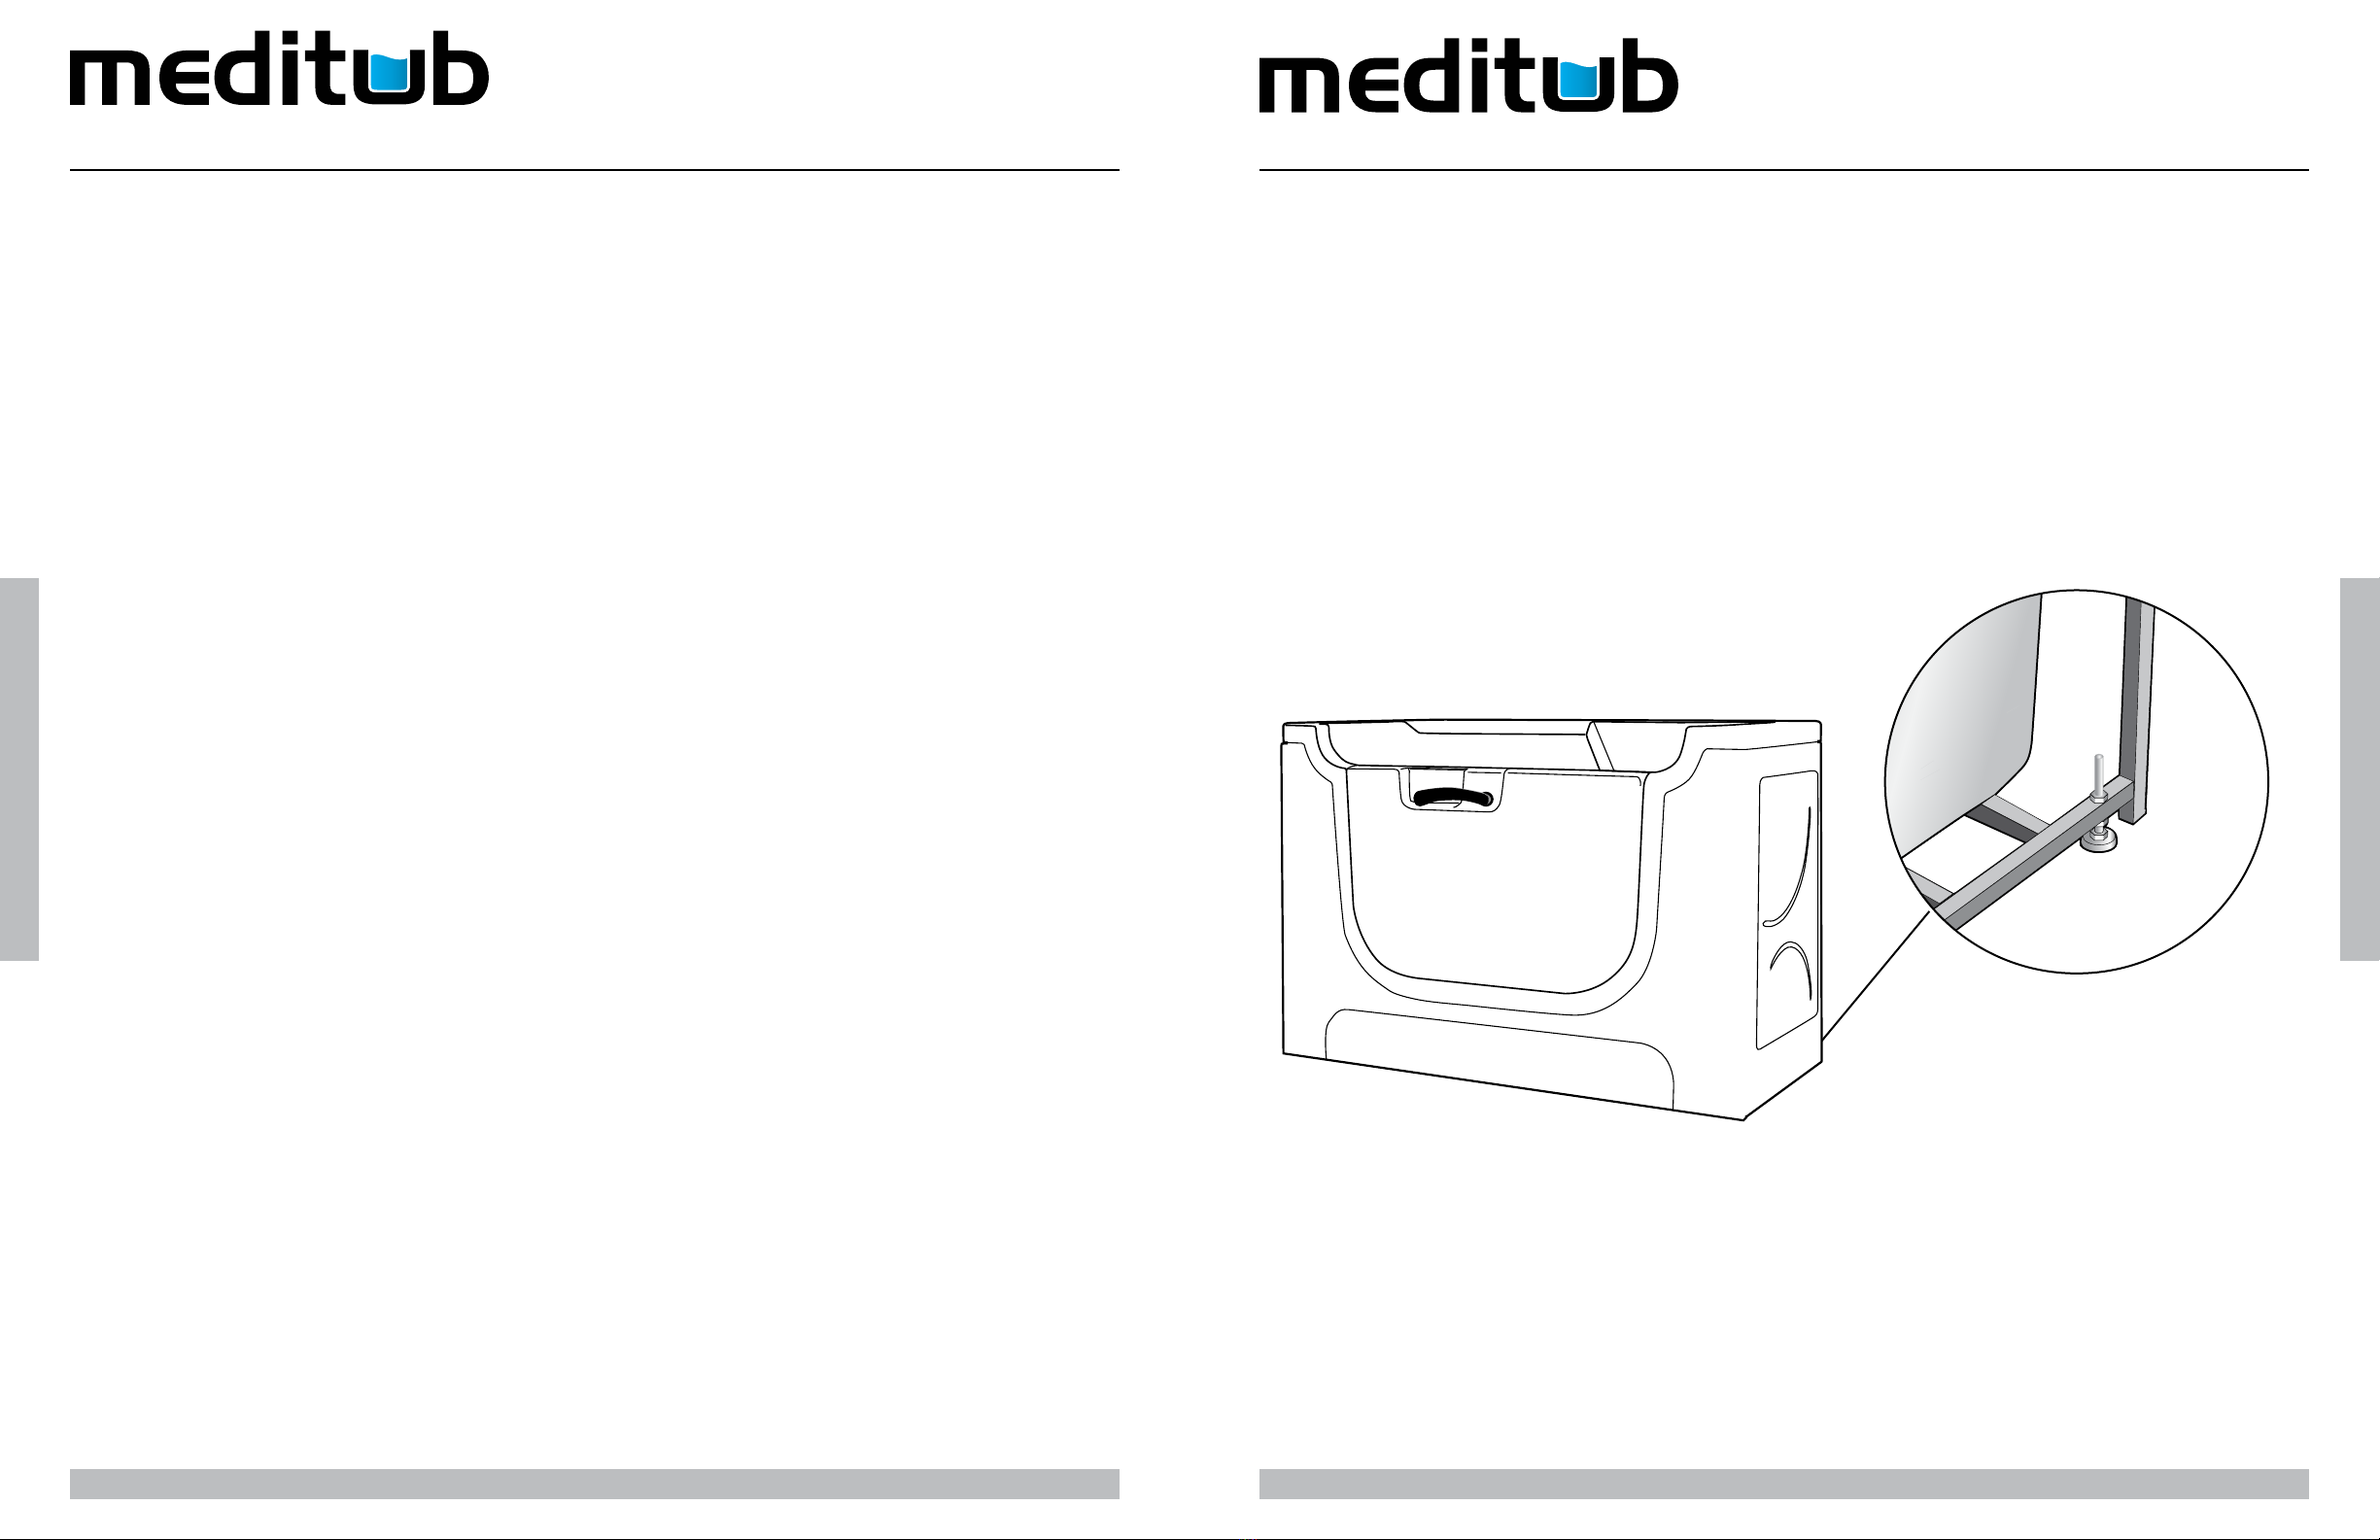
1. Check the oor area where the tubis to beinstalled.
•a. Clean area of anydebris or trash.
•b.Use a5or6-footlevel anddetermine if the oor is level. Ifthe ooris notlevel, adjust all 5levelingfeet to perfectly level thetub.
•NOTE: IT IS IMPORTANT THAT ALL LEVELING FEET ARE COMPLETELY TOUCHING THE FLOOR
AND LEVEL FOR THE DOORSYSTEMTO WORK PROPERLY.
2. Check toensure that the drainpiping has been “roughed-in” at the proper location.
3. Ensure that the proper electrical service has been installed at the pump location. See electrical requirements in the manual (on
followingpage).
Model 30x53
Installation Instructions
MediTub
W h e r e S a f e t y Meets L u x u r y
Page 9Page 8
WHER E SAFETY MEE T S LUXURY
WHERE SAFETY MEETS L U XUR Y
INSTALLATION PROCEDURES
INSTALLATION PROCEDURES
ELECTRICAL PREPARATION
ELECTRICALPREPARATION
Allelectricalwiring mustbeinstalledinaccordancewiththeNationalElectricalCode andwithalllocalcodes.Allwiringshallbedone
byaqualiedelectrician.Runone,twoorthreebranch circuits(asrequired) fromthe main electricalservicepaneltothe pumparea
of the framing structureto provide powerto the unit.
Electricalcomponentshave specic wiringrequirements. Refertothematrixbelowfor the electricalsupplyrequirements forthe jet
massage bathtub and factory installedcomponents.
Branch circuits must be rated for 110 – 120 volts. Use 12 Gauge, 3 conductor cable for the circuits. If the length run exceeds 100
feetcheckwithlocalcodesforrequirements.Installmoistureproofjunctionbox(s)6”abovethe ooratthe pumpend oftheframing
foreach circuit.
NOTE: DONOTINSTALL THEJUNCTIONBOX(S)WHERE IT CANBE REACHEDWHILE SITTINGOR STANDINGINTHE TUB OR
TOUCHINGTHE FAUCETS.
AUTODRAIN™, LIGHTS,WHIRLPOOL, AIR SPA, COMBO& HEATER ELECTRIAL
REQUIREMENTS
This section lists thefactoryinstalledcomponents ofthe JetMassage and/or Air Massage Systems.
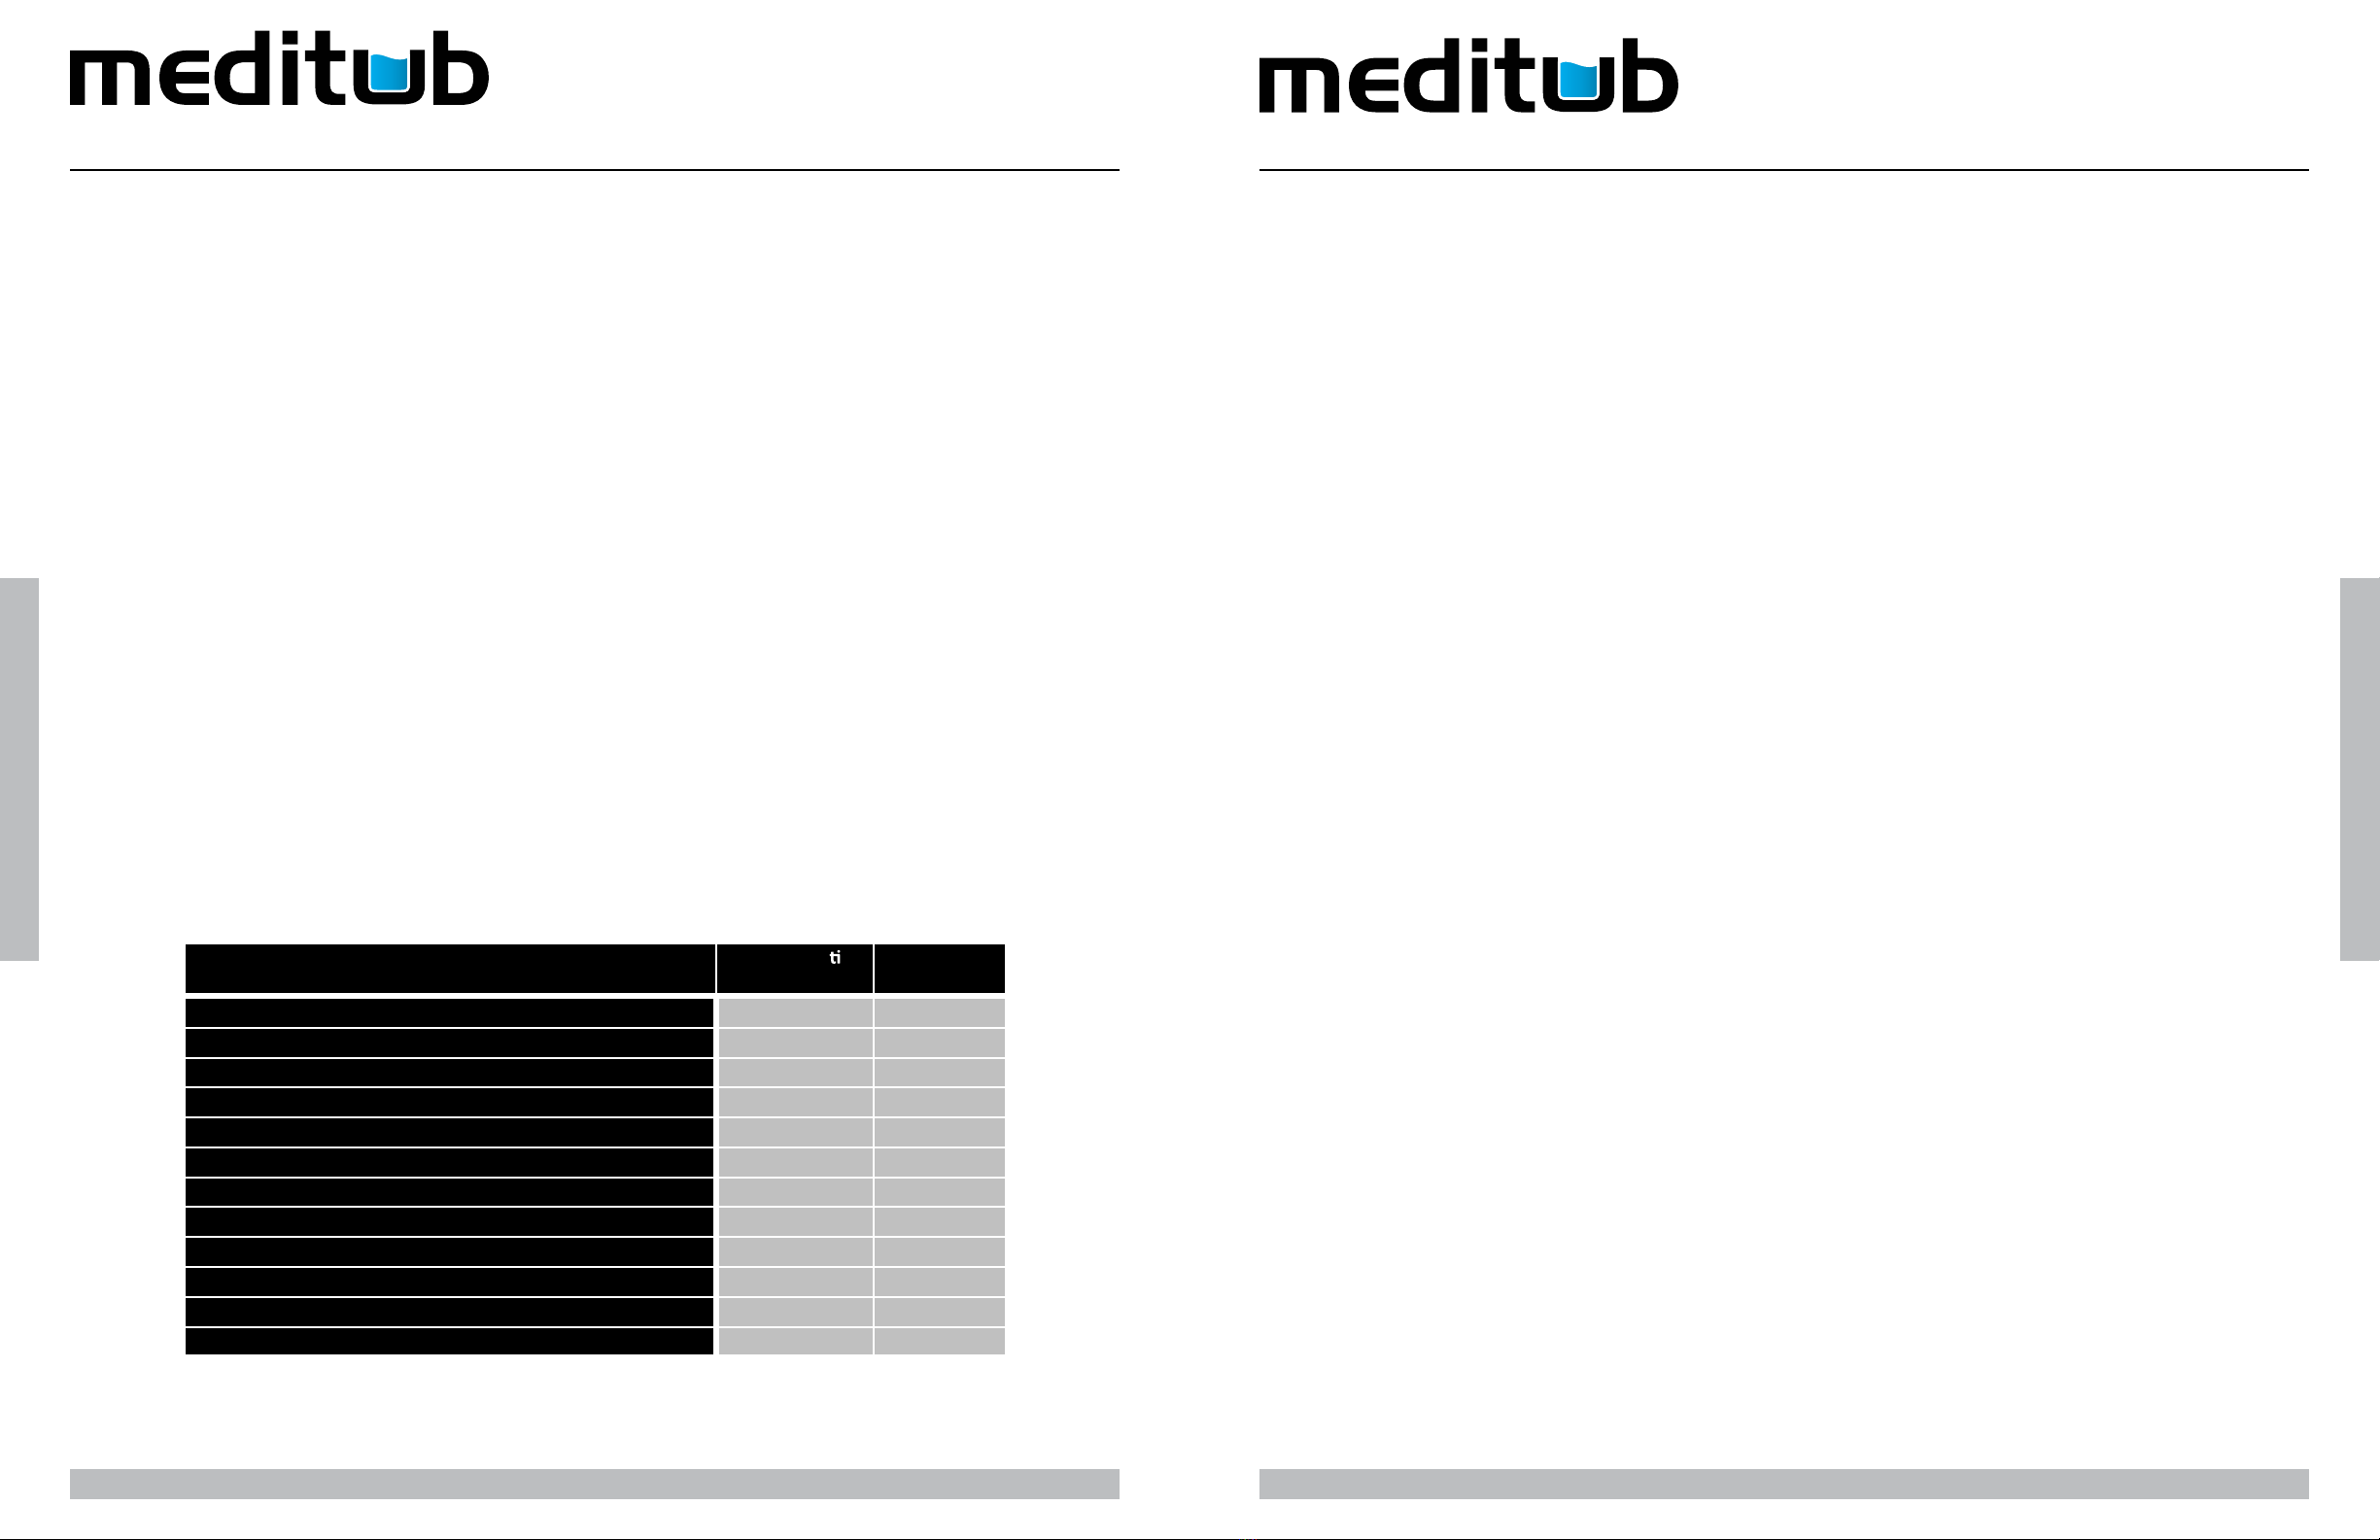
Systems Electrical Ra ng
Circuit 1
Dedicated
Circuit
Soaker w / Auto Drain™ 15 Amp GFCI
Soaker w / Light 15 Amp GFCI
Soaker w / Auto Drain™ w / Light 15 Amp GFCI
Jet Massage Or Air Massage
15 Amp GFCI
Jet Massage Or Air Massage w / Light 15 Amp GFCI
Jet Massage Or Air Massage w/ Auto Drain™ 15 Amp GFCI
Jet Massage Or Air Massage w/ Light & Auto Drain™ 15 Amp GFCI
Jet Massage & Air Massage (Dual) 20 Amp GFCI
Jet Massage & Air Massage (Dual) w/ Light 20 Amp GFCI
Jet Massage & Air Massage (Dual) w/ Auto Drain™ 20 Amp GFCI
Jet Massage & Air Massage (Dual) w/ Light & Auto Drain™ 20 Amp GFCI
Whirlpool Inline Heater - Dedicated 15 Amp Circuit
15 Amp GFCI
All electrical connectionsmust becarried out by a certiedelectricianin accordance with local electrical requirements andcodes.
ELECTRICAL PREPARATION
INSTALLATIONPROCEDURES
WARNING! WHEN INSTALLING JET MASSAGE BATH, THE FOLLOWING BASIC PRECAUTIONS
SHOULD BEFOLLOWED.
DANGER! RISK OF ELECTRIC SHOCK. CONNECT ONLY TO SEPARATE CIRCUIT PROTECTED BY A
GROUNDFAULT CIRCUIT INTERRUPTER ( GFCI) ON PLUG IN UNITS.
NOTE:INSTALLATIONMUSTPROVIDE ACCESS FORSERV ICINGPUMP/MOTOR(ALLTUBSCOME WITHANACCESSPANEL
FOR THE PUMP/MOTOR).
GENERAL GUIDE-THROUGH
•Installtub waste/overowaccordingtoinstructions (see page 10).
•Standardinstallation-Afterframing is acomplete(seeattacheddiagrams),setproductinplacetomakecertainthatthe tubcan
be properly leveled. (Caution: If a walk-in bathtub is not resting on all leveling feet, water will not drain properly and may cause
the door to leak) (see page 7).
•Verify the product’s level by checkingtub’s deck surfaceandensureall leveling feet aretouching the ground (see page 7).
•Electrical connection is made pre-instruction onspecied models.
•Afterplumbing andelectrical connections have beenmade, the tub should be cleanedof dirtand debris.
•Installationis notcomplete untilthe tubhasbeen tested in place.
Page 11
OPERATING INSTRUCTIONS
OPERATING INSTRUCTIONS
Page 10
OPERATING INSTRUCTIONS
OPERATING INSTRUCTIONS
WHER E SAFETY MEE T S LUXURY
WHERE SAFETY MEETS L U XUR Y
DRAINCONNECTION
To ensure safe transit for your walk-in tub, the overow drain components are
not connected to the unit during the process of production. The following in-
structions are provided for installation purposes: Your walk-in tub is supplied
with a 1 ½” drain pipe overow. The open and close valve with the turn knob
should be attached to the unit at the 1 ½” pre-drilled opening in the wall of the
unit from the outside. The opposite end of the overow should be attached to
the 1 ½” pre-drilled opening in the foot well of the unit from the underside. The
chrome turn knob and the drain cover should be attached to the appropriate ends
oftheoverowdrainfromtheinside oftheunit.Placethechromecapwithsteminto
theoordraintocloseotheopening.Thecableattachedtotheturnknoboftheoverowisalsoconnectedtoaleverinsidetheoordrain
whichallowsthedraintobeopenedorclosed.Oncethecomponentsoftheoverowaresecuredintoplace,turntheoverowknobtothe
openandclosedpositiontoensureproperfunction.Thecapandstemwillmoveupanddown,openingandclosingthedrain(Figure1).
Your walk-in tub also has a door drain to remove excess water from the door after
each use. Fromthe underside of the unit, ahoseis connectedtothedoor drainwith
acheckvalve. This hoseand valveis toprovide a one-way ow fromthe doordrain
to the main drain pipe. The check valve will constrict the water ow away from the
door.Insertthe opposite end of the hoseintothe portonthe maindrain.Besurethe
port is open before attaching the hose. Secure the hose with clamps or ties. Once
the hose is in place, close the door on the unit, place the handle in the locked posi-
tion,and lltubwithatleast12”ofwatertotestthe connection.Oncethe completion
of the drain components are installed and have been tested for proper function, the unit can be leveled and give a nal water test
beforeinstallationof unit(Figure2).
1 1/2” Door Drain Pipe supplied7 1/2”
FIGURE 1
Floor Drain
Incorrect
Flow
Door Drain
Correct
Check Valve
Flow
FIGURE 2
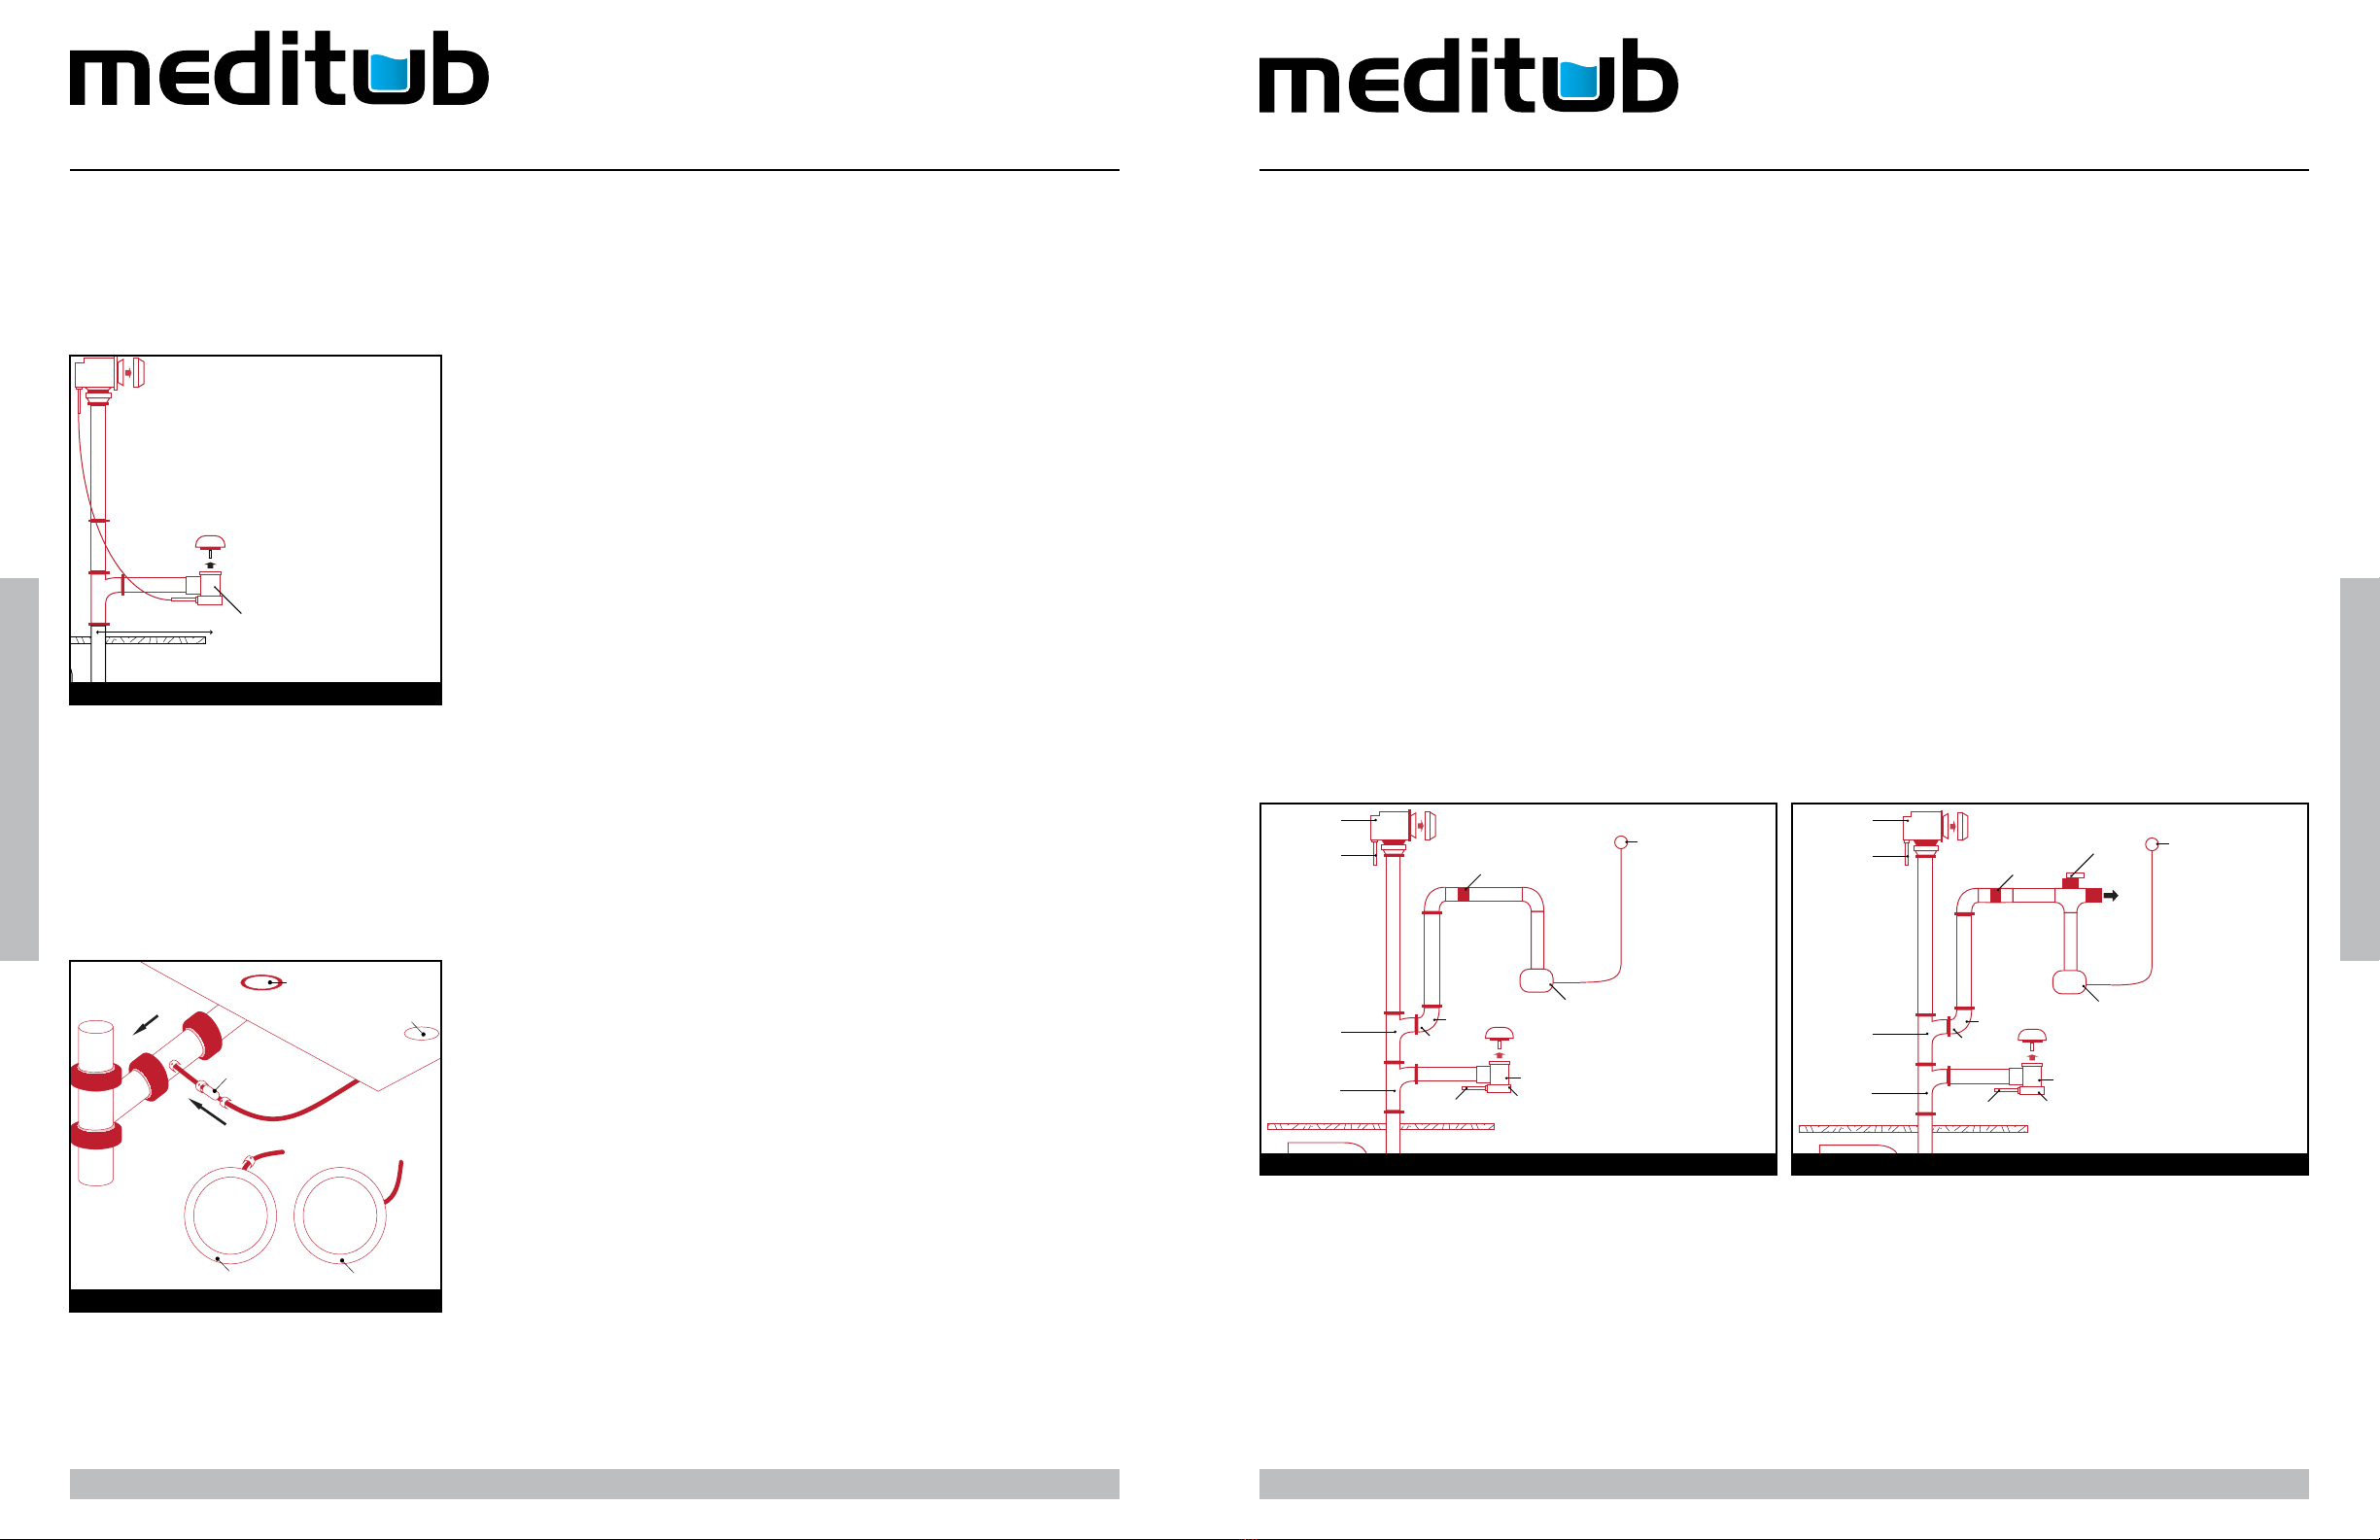
CONNECTING THE AUTODRAIN
HIGH-SPEED AUTODRAINFOR SOAKINGTUBAND/ORAIR SYSTEM
•Drain System requires the connection toa minimum 1 ½ sanitary drain line.
•Use UPCApprovedPVCGlue,primer, and Schedule 40 1 ½ ’ pipe.
•Do not change or modify the location and orpiping of the Back FlowPreventer.
•Thesanitary tee is installed directly above the drain tee withclearance not greater than 1’’.
•Drytthe drain overow assembly to the sanitary drainage pipe and check for proper t.
•Glue the High-SpeedAutodrain Fittings,pipe and drain overow assembly to the sanitarydrainage pipe.
NOTE:WATERTIGHT INSTALLATION OF THE WASTE/ OVERFLOW ISTHE INSTALLER’S RESPONS IBILITY. DRAINLEAKAGEIS
EXCLUDEDFROMMEDITUB WARRANTY OF THIS PRODUCT.
NOTE: WE HAVE TAKEN RESPONSIBLE PRECAUTIONS TO ENSURE THE HIGH-SPEED AUTODRAIN IS SUITABLE FOR
RESIDENTIAL PLUMBING. IT IS RESPONS IBILITY OF THE INSTALLER TO INSURE THE SANITARY SYSTEM IS ACCEPTABLE
FOR THE USE OF THE HIGH-SPEED AUTODRAIN. WE DO NOT ACCEPT RESPONSIBILITY FOR DAMAGE ARISING FROM THE
USE OF THE HIGH- SPEED AUTODRAIN.*
*-Ensurecompliance with local plumbing codes.
110Vt-60hz pump (15 Amp Circuit)
overow
draincable
draincable drain
drainshoe
sanitary tee
drain tee
90° Elbow
reducer 1 1/2-1”
air button (on/o)
back ow preventer
air button (on/o)
diverter valve
jets
overow
draincable
draincabledrain
drain shoe
sanitary tee
drain tee
90°Elbow
reducer 1 1/2-1”
back ow preventer
110Vt-60hz pump (15 Amp Circuit)
SOAKER& AIR AUTODRAIN CONNECTION HYDRO& DUALAUTODRAIN CONNECTION
Page 13
OPERATING INSTRUCTIONS
OPERATING INSTRUCTIONS
Page 12
OPERATING INSTRUCTIONS
OPERATING INSTRUCTIONS
WHER E SAFETY MEE T S LUXURY
WHERE SAFETY MEETS L U XUR Y
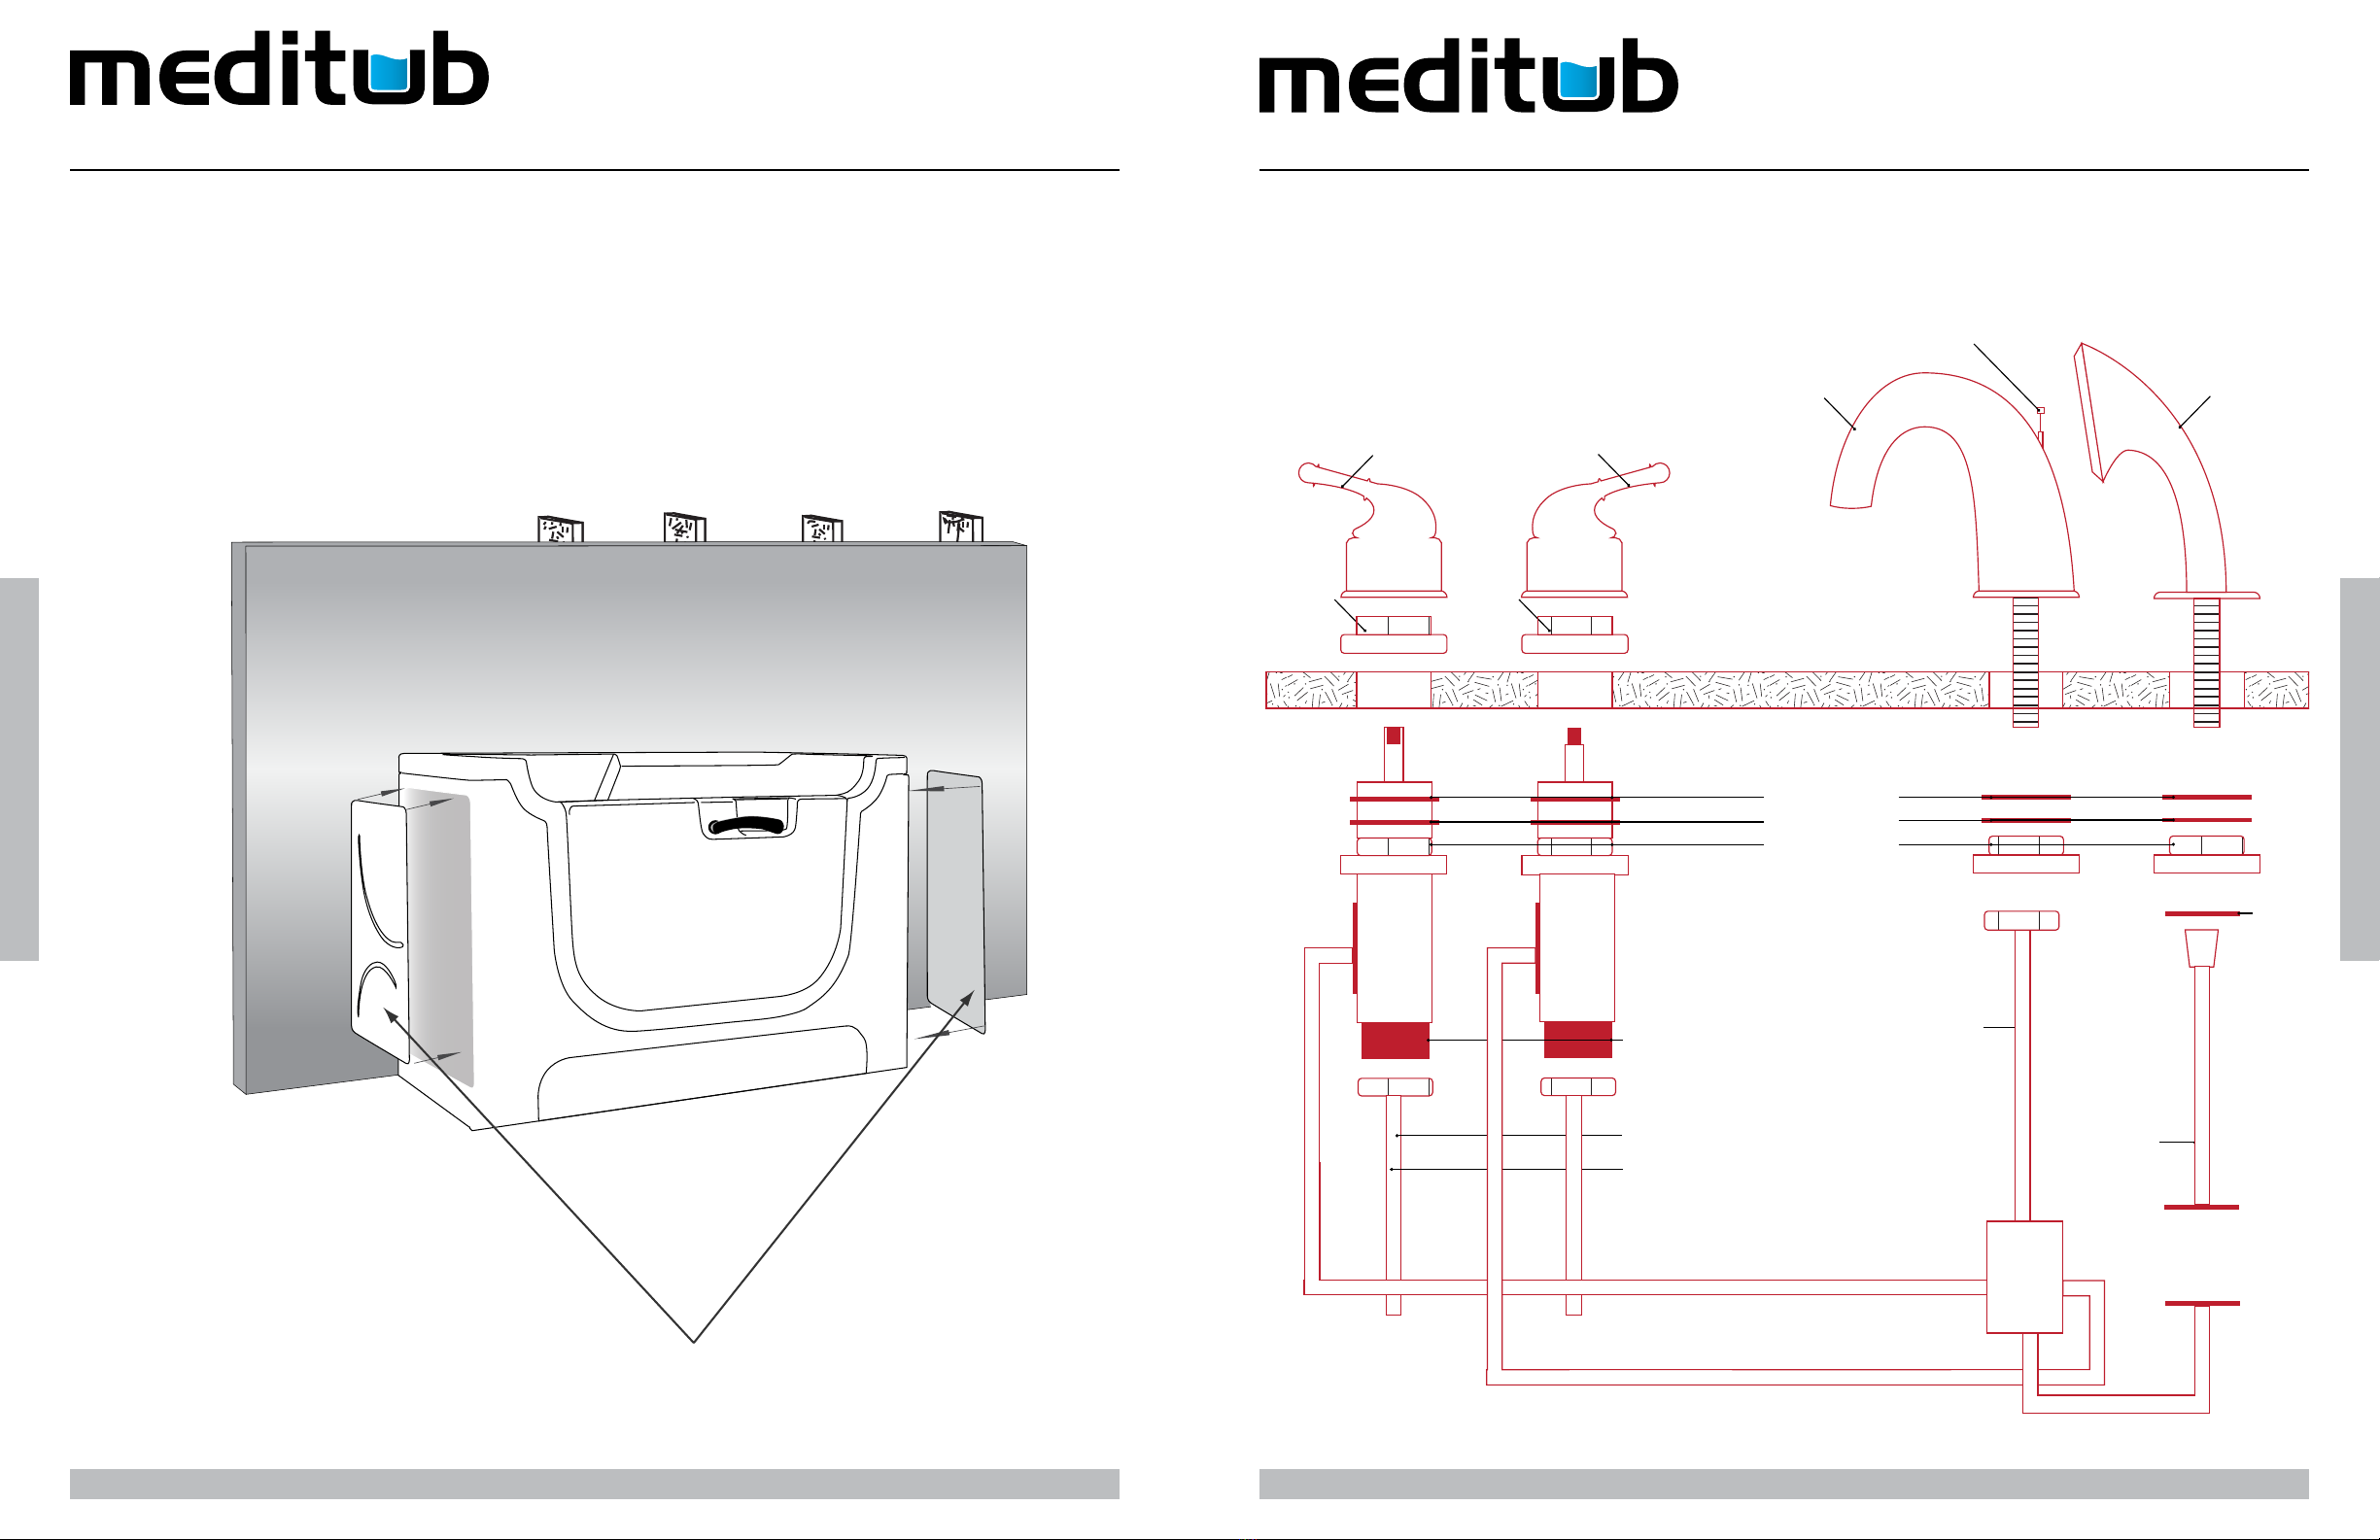
FAUCETINSTALLATION
xing nut xing nut
xing nut
hot control handlecold control handle
spoutshower head
diverter
rubber washer
ber washer
valve body
gasket
steel braded 19” hose
steel braded 19” hose
72” shower hose
local water line
hot water
cold water
SIDE ACCESS PANELS FOR 3-SIDE
ENCLOSURE
ASSEMBLY & PLACEMENT
Verify access tounit’ssystem from one of the side enclosures

Page 15
OPERATING INSTRUCTIONS
OPERATING INSTRUCTIONS
Page 14
OPERATING INSTRUCTIONS
OPERATING INSTRUCTIONS
WHER E SAFETY MEE T S LUXURY
WHERE SAFETY MEETS L U XUR Y
OPERATINGSAFETY INSTRUCTIONS
INSTRUCTIONS PERTAINING TO RISK OF FIRE, ELECTRICAL SHOCK OR INJURY
TOPERSONS
WARNING! RISK OF PERSONAL INJURY:
• Usethis unitforitsintendeduseasdescribedinthis manual. DONOTuseattachmentsnotrecommendedbythemanufacturer.
• To avoid injury, exercise caution when enteringor exiting your walk-in tub.
• To reduce the risk of injury, do not permit children or persons with inrmities to use this product unless they are closely
supervised at alltimes.
•The maximum recommendedtemperatureis 102 F° (38.8C°). Fifteen minutes per soak is the recommendedmaximum time at
102 F°, which may induce Hyperthermia which is an increase in body temperature. This can be a serious medical condition and
all bath users are cautioned against lengthy immersion at high water temperatures. Should you become light-headed, dizzy, or
nauseous, immediately get out of thebath and cool o.
• Risk of electric shock; do not permit electric appliances (such as a hair dryer, lamp, telephone, radio or television) within four
feet of this bathtub.
• Neverdropor insert anyobjects into anyopenings.
• Do not operate this unit without theguard overthe suctionttings.
WARNING! RISK OF HYPERTHERMIA AND POSSIBLEDROWNING. Peopleusing medications,herbal remedies,sleepaids,
and /orhaving adverse medical historyshould consultaphysicianbefore using this product.
WARNING! NOFOOD ORALCOHOLICBEVERAGES. Useof yourbathtubimmediatelyaftermeals is notrecommended. Avoid
alcohol consumption before or during the bathing. Alcoholic beverages can cause drowsiness or hyperthermia resulting in loss of
consciousnessor evendrowning.
The unitmustbe connectedonlytoasupplycircuit thatis protectedbyaground-faultcircuit-interrupter(GFCI).Such aGFCIshould
beprovidedbythe installerand shouldbetestedonaroutinebasis.Totestthe GFCI,pushthe testbutton.The GFCIshouldinterrupt
power. Push the reset button. Power should be restored. If the GFCI fails to operate in this manner, there may be a ground current
owing, indicating the possibility of an electric shock. Do not use this massage bathtub. Disconnect the jet massage bathtub and
have the problemcorrectedbya qualied service representative before using.
Toreducethe riskofelectricalshock,thededicatedelectricalsupplycircuit(s)mustbegrounded. Todothis,connectthe thirdlegof
the 3-conductor wiring cable to the grounding terminal of the electrical service panel and run continuously to the green grounding
screw on the GFCI or electrical receptaclein the wiring compartment.
Page 17
OPERATING INSTRUCTIONS
OPERATING INSTRUCTIONS
Page 16
OPERATING INSTRUCTIONS
OPERATING INSTRUCTIONS
WHER E SAFETY MEE T S LUXURY
WHERE SAFETY MEETS L U XUR Y
OPERATINGINSTRUCTIONS
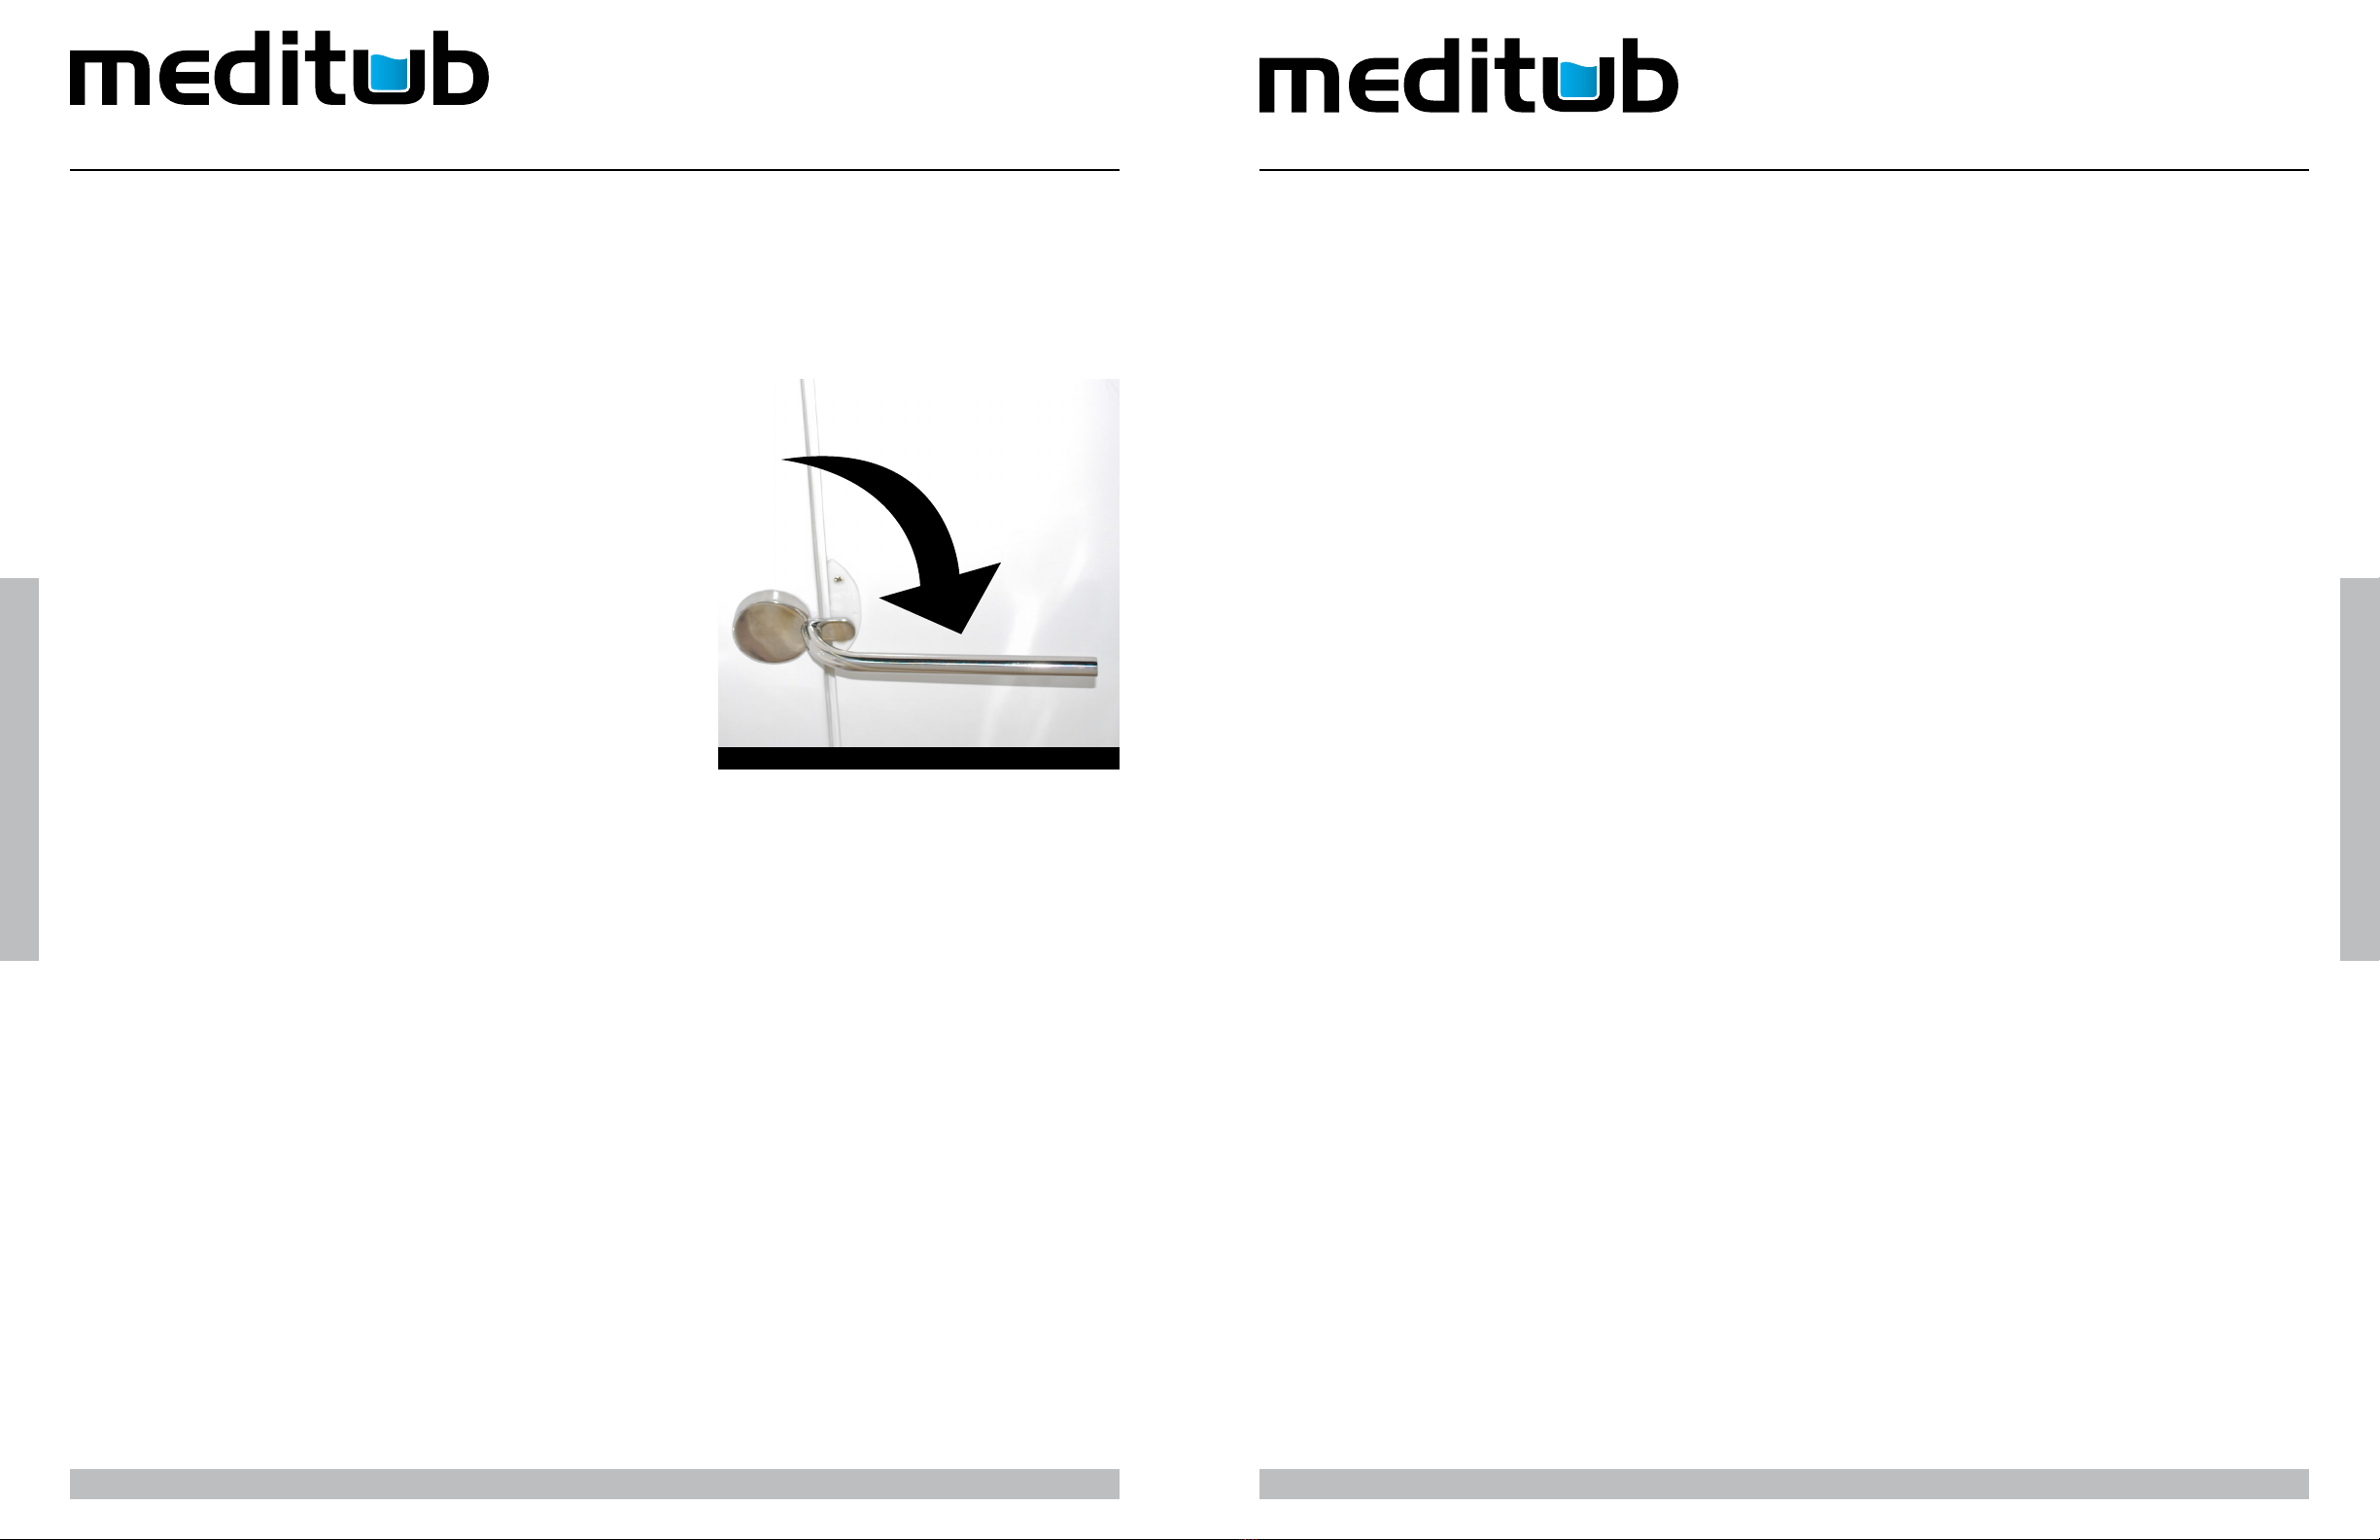
When entering an Meditub walk-in tub, be sure to close the door, placing the
handlein thedown position. Before activating any of the jetting controls, you
must rst ll the bath to a water level at least 2 inches above the highest jet
placement. Do not put weight on the door when entering and exiting the tub.
It is recommended to leave the door in the open position when the tub is not
in use.
The pumpis operatedbythehydrocontrolbutton,which startsthe waterow.
The blower is operated by theair control buttonwhich starts the air ow (see
page 18).
Adjustthe directionand rateofowofthejetsbymovingthe nozzlefordirection.Turneitherthe outside ring orthe nozzleclockwise
orcounterclockwiseforow(somejetsadjustthe ow withthe outside ringandsome withthe nozzle).Adjusttheairpressure ow
of all water jetsby using theairvolume control(see page 18), whichcontrols air-watermixture.
Meditubwalk-intubs equippedwiththechromotherapylights(ordered separately),featurea dedicatedon/o switch.Pressingthe
switch o and backon will change thecolor of light (seepage 18).
PURGE CYCLE
All air blowers are equipped with a purge cycle to remove residual water from the lines. The cycle will begin approximately 30
minutes afterthe unit is turned o and will continuefor 1 - 2 minutes.
WARNING: DO NOT PUSH THE BUTTON ONCE THE CYCLE BEGINS. DOING SO WILL CAUSE
EXAMPLETUB DOOR HANDLE
THE BLOWER TO RESTARTONCE T HE PURGE CYCLEENDS.
IN-LINEHEATERS
If your bathtub is equippedwith anin-line heater, itwill operate only when the pump is on.
NOTE: THE IN-LINEHEATER ISDESIGNEDTOKEEP YOURWATER WARMERLONGER,BUT ISNOTDESIGNED TOINCREASE
THE WATER TEMPERATURE.HEATSETT INGS ARE NOTADJUSTABLE.
Page 19
OPERATING INSTRUCTIONS
OPERATING INSTRUCTIONS
Page 18
OPERATING INSTRUCTIONS
OPERATING INSTRUCTIONS
WHER E SAFETY MEE T S LUXURY
WHERE SAFETY MEETS L U XUR Y
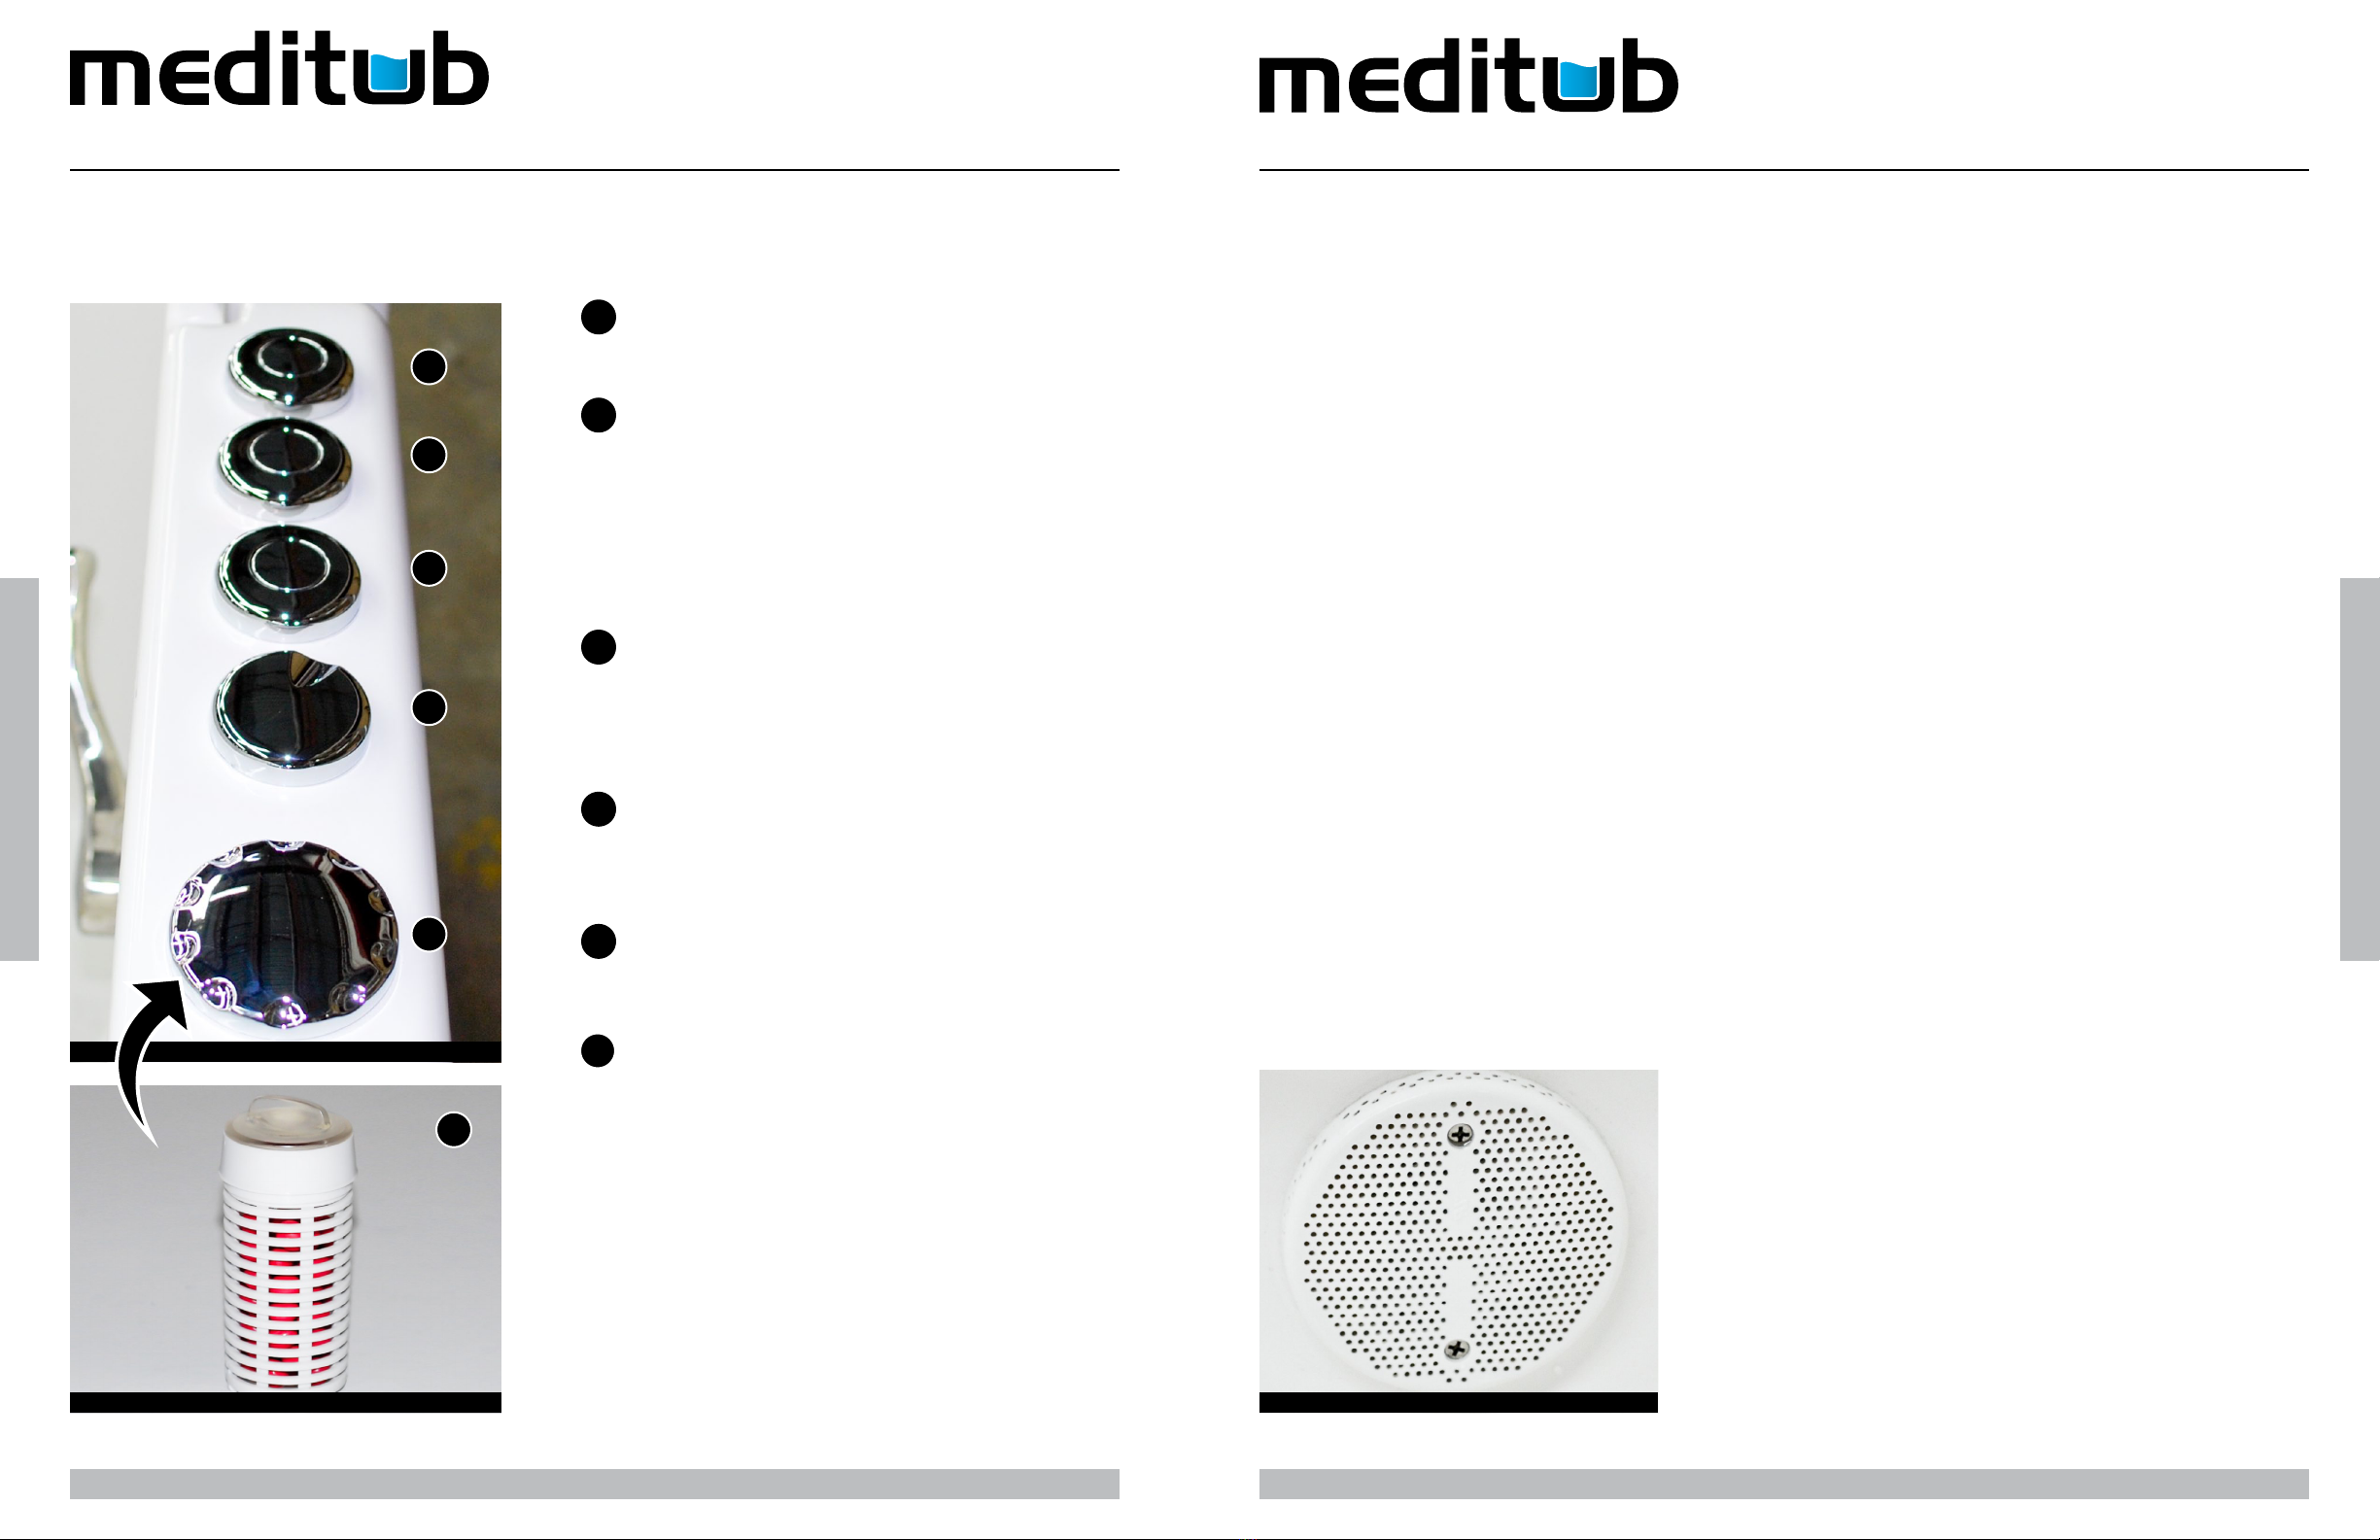
TUB CONTROLS
AROMACANISTER
EXAMPLETUB CONTROLS*
1
2
3
4
5
6
HYDROCONTROL(PUMP)
Used toturnthe water jetsONandOFF.
AIR CONTROL(BLOWER)
Used tocontrolthe air jetsonthe system.
1st Press: Blower startsatMAXspeed
2ndPress: Blower atMEDspeed
3rdPress: Blower atMINspeed
4thPress: Blower turnsOFF
CHROMOCONTROL(LIGHT)
Used toturnthe chromotherapylightsONandOFF.
Pressing the button repeatedly will cycle through dierent
color modes.
AIR PRESSURE CONTROL
Used to increase or decrease air pressure owing through the
water jets.
AROMACONTAINER
Unscrewto place orreplace the aromacanister.
AROMACANISTER
Placed inside the aroma container. Check frequently and
replace as needed.
1
2
3
4
6
5
*Controlsdepictedmay varyfrom thosefoundonyourunit.Varianceisbasedonthe
options purchased duringtheorder process.
CLEANINGANDMAINTENANCE
Pumpandpipe circulationsystems should be ushed beforerst use and on a monthlybasis when productis under normal use.
Below arethe recommended proceduresforcleaning:
•Do notrun whirlpooldry. Fill thetubwithhotwater2-3 inches abovethejets andadd2-3 teaspoonsof lowfoaming
detergent suchas dishwashingmachine detergent
•Turnonwhirlpoolsystemandrunfor 10 minutes
•Draintubcompletely
•Filltubwithcoldwaterabovejets
•Turnonwhirlpoolsystemandrunfor 15 minutes
•Draintubcompletely
•Cleaningthesuctioncover:Cleanandremoveanyhairorlintfromthesuctioncover(seeimagebelow).Onamonthlybasis,
unscrewthe suctioncoverandclean awayany hair,lintordebris fromthecoverandhousing,thenremountthe coverinplace.Some
suctions are not designed to be removed; only suctions that have screws on the cover, visible from the inside of the tub, can be
removed.
WARNING! NEVEROPERATE THE UNIT WITHTHE SAFETY SUCTION COVER OFF.
SUCTIONCOVER

Page 21Page 20
WHER E SAFETY MEE T S LUXURY
WHERE SAFETY MEETS L U XUR Y
WARRANTY
This 10-year bath tub warranty is extended to the rst user, to be free from defects in workmanship and material
under normal use and conditions, for a period of10 years from the date of the original purchase. This warranty
relates to the bathtub shell, frame and nish. The nish’s warranty does not apply to fading, cracking, delaminating
or blistering due to excessive wear, sun fading or scouring due to cleaning. Dierent warranty periods apply. The
tub and all its components including motors, electronic controls, waste and overow, ttings and all plated nishes
are covered by a limited one year warranty, subject to verication of the defect or malfunction. All labor and repair-
related services are covered within the rst90 days of purchase. This warranty is non-transferable and applies only
to the original owner as stated on the original purchase order. Noticationmustbesent via certied mail to5701NW
35Avenue.Miami,F L33142. The manufacturer will not be responsible for any water damage to any structures or any
property for any reason (including but not limited to manufacturer defects or improper installation). Manufacturer
will assume no responsibility for the loss of the system, inconvenience due to loss, damage to real or personal
property or any other consequential damage. Manufacturer will not be liable for any incidental expenses or material
charges in connection with removal or replacement of the purchased part or any part or parts of the system. This
warranty shall not apply to any type of failure resulting from negligence, abuse, misuse, misapplication, improper
installation, alteration or modication, chemical corrosion or improper maintenance. Every walk-in tub must be
installed by a licensed plumber, electrician and/or contractor; Failure to do so will hereby void the warranty. There
will be a charge for replacement parts or the replacement of the entire electrical unit if the defective unit is returned
for any of the reasons listed above.
NOTE: WITHIN THE LIMITED ONE YEAR WARRANTY, T HERE WILL BE A PRORATED CHARGE FOR ANY ELECTRICAL AND
PLATED REPLACEMENTS PARTS, INCLUDING SHIPPING ANDHANDLING CHARGES.
Manufacturer reserves the sole authority to make any type of warranty changes at any time. The manufacturer will
not be responsible for any warranty information that is being misrepresented by outside sources including dealers,
WARRANTY
WARRANTY
WARRANTY
WARRANTY
retailers, distributors or contractors. Manufacturer does not warranty the installation, plumbing or electrical related
connections, of any of our products including Walk-In Baths, shower pans or shower stalls. Improper or negligent
installation of the product or other components, alterations or medications to the system, may cause the product
or the system to malfunction. Such problems are not covered by warranty. Manufacturer warranties the door seal
for the life of the unit under normal use and conditions. This warranty shall not apply to any failure resulting from
negligence, abuse, misuse, misapplication, alternation, or medication or improper maintenance.
The replacement door seal will be issued to the end user and it will be the responsibility of the end user to determine
the means of installation. Manufacturer will not be liable for any incidental expenses or material charges in connection
with removal or replacement of the door seal.
NOTE: TO THE EXTEND PERMITTED BY LAW, ALL IMPLIED WARRANTIES INCLUDING THOSE OF MERCHANT ABILITY
ANDFITNESS FOR A PARTICULAR PURPOSE ARE HEREBY DISCLAIMED. Meditub Walk-In BathtubsANDSELLER HEREBY
DISCLAIM ANY LIABILITYFOR SPECIAL,I NCIDENTAL, OR CONSEQUENTIAL DAMAGES.
Some states/provinces do not allow limitations on how long an implied warranty lasts, or the exclusion or limitation
special, incidental or consequential damages, so these limitations and exclusions may not apply to you. This warranty
gives you specic legal rights. You may have other rights, which vary by state/province. All lawsuits must be led
in Florida. Tub units are for residential use only.

Page 23Page 22
WHER E SAFETY MEE T S LUXURY
WHERE SAFETY MEETS L U XUR Y
PRODUCT REGISTRATION
PRODUCT REGISTRATION
PRODUCTREGISTRATION CARD
Thecompleted cardshould be cutoutor copied, completed, andmailed to:
MEDITUB WALK-IN BATHTUBS
5701 NW 35 Avenue
Miami, FL 33142
RETURN POLICY
Meditub Walk-In Bathtubs
®is committedto providingpremiumcustomer service.In the event that a product must be returned
due to reasonsother than defects,asmentioned inthe warranty,the following procedures apply:
Requests for returns and/or exchangesmust be made within30 daysof receipt ofproduct. The product mustbe in its original
packaging and received atMeditubWalk-InBathtubs
®in saleable condition. Allreturns willreceive a15% restockingfeeplus all
freightcostsof the original shipment and returnshipmenttoMeditub Walk-In Bathtubs
®.
All requests forreturn must rst be approved byMeditubWalk-In Bathtubs
®andhave an assignedReturned Merchandise
Authorizationnumber(RMA#).
RETURN POLICY
RETURN POLICY
Meditub Walk-InBathtubs™ Product Registration Card
Name..................................................................................... Address............................................................................................................................
City............................................... State........................... Zip.............................. Phone......................................................................................
Date of Purchase........................... Dealer......................... Address............................................................................................................................
Installed by................................... Address............................................................................................................................ State...........................
Phone.................................................................................... State........................... Zip...............................
I have read theMeditub Walk-InBathtubs™ Owner’s Manual carefully and understand and agree that any installation, operation or maintenance of the
walk-in bathtub must be done strictly in accordance with instructions and guidelines contained in theMeditub Walk-InBathtubs™ owner’s manual and
installation guide.
Signature____________________________________________________________Date_______________________________________________

WHER E SAFETY MEE T S LUXURY
INSTALLATION & OPERATINGINSTRUCTIONS
INSTALLATION & OPERATING INSTRUCTIONS
W H ERESAFETY MEETS LUXU R Y
Table of contents
Popular Medical Equipment manuals by other brands


Richmar
Richmar Quattro 2.5 instruction manual

Harvard Apparatus
Harvard Apparatus 683 user manual

natus
natus Madsen Zodiac user guide

bort medical
bort medical ManuCarpal quick guide

Smiths Medical
Smiths Medical Level 1 H-1200 Step-by-step guide

bort medical
bort medical SellaFix N Black Edition quick guide


