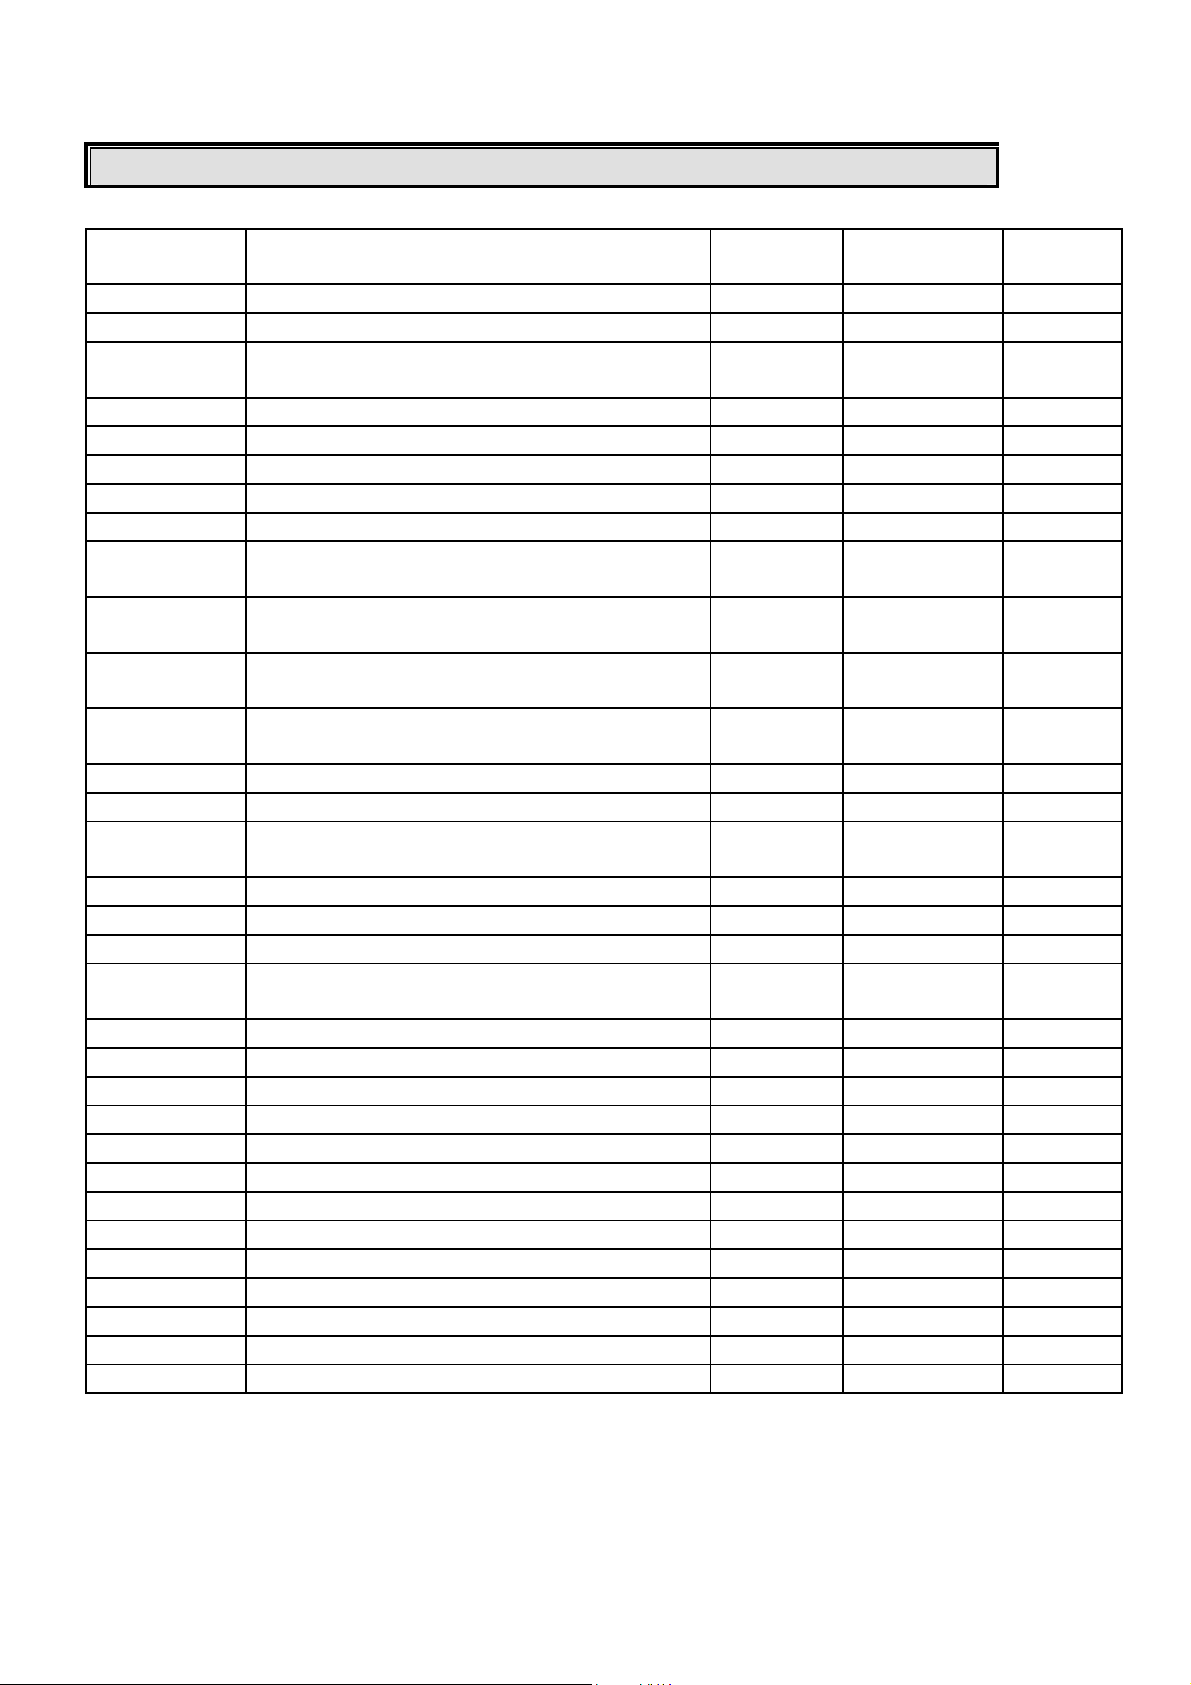
Medline MDR107003L User manual

1
The Medlite Home Care Bed
Owner’s Assembly and Operating Manual
Medline Home Care Beds
Full-Electric Bed Model MDR107003L
Semi-Electric Bed Model MDR107002L
Manual Bed Model MDR107000P
DEALER: This manual must be given to the user of the Medline Home Care Bed.
USER: Please read this manual completely for warnings, proper assembly, maintenance,
and safe usage instructions before using this bed. Save manual for future reference.

2
Congratulations on your selection of the Medline Home Care Bed.
Medline’s Home Care Bed is the right choice for
value and performance. It is specially designed for
easy assembly and operation, and is manufactured to
precise quality standards with the finest materials.
We sincerely hope it will provide the very best in
functionality, comfort, rest and convenience.
Thank you for choosing the Home Care Bed.
Typical Product Specifications for the Medline Home Care Bed:
Full Electric
3 motor Semi-Electric
2 Motor, 1 Crank Manual
3 Crank
Model Number MDR107003L MDR107002L MDR107000P
Head Ends Min: 28.5”
Max: 35.75” Min: 28.5”
Max: 35.75”
Foot Ends Min: 26”
Max: 33” Min: 26”
Max: 33” Min: 26”
Max: 33”
Fabric Height Min: 14.5”
Max: 22.5” Min: 14.5”
Max: 22.5”
80” spring overall bed Length: 89”
Width: 35.75” Length: 89”
Width: 35.75”
Spring Deck Width 34.5” 34.5” 34.5”
Spring Deck Height Min: 14.5”
Max: 22.5” Min: 14.5”
Max: 22.5”
Shipping Weight lbs. 176.5 173 189
Weight Capacity lbs. 450 450 500
Head Section Adjust Approximately 75°Approximately 75°Approximately 75°
Knee Section Adjust Approximately 40°Approximately 40°Approximately 40°
Motor DC Input DC Input NA

3
TO ENSURE YOUR SAFETY IN USING THIS MEDLINE HOME CARE BED, ALL
WARNINGS AND SAFETY INFORMATION AND ALL INSTRUCTIONS MUST
BE FOLLOWED. FAILURE TO DO SO MAY RESULT IN SERIOUS BODILY
INJURY OR DAMAGE TO THE BED.
DO NOT USE THIS PRODUCT WITHOUT FIRST READING AND
UNDERSTANDING THE INSTRUCTIONS CONTAINED IN THIS BOOKLET. IF
YOU ARE UNABLE TO UNDERSTAND THE WARNINGS, CAUTIONS OR
INSTRUCTIONS, CONTACT A HEALTHCARE PROFESSIONAL, DURABLE
MEDICAL DEALER OR TECHNICAL PERSONNEL, OR CONTACT MEDLINE
AT
1-800- MEDLINE BEFORE USE - OTHERWISE SERIOUS BODILY INJURY OR
PRODUCT DAMAGE MAY OCCUR.
A QUALIFIED TECHNICIAN MUST PERFORM ANY REPAIR OR CHANGE TO
THIS BED OR SERIOUS INJURY MAY OCCUR. TECHNICIANS: DO NOT
SERVICE THE BED WITHOUT FIRST READING AND UNDERSTANDING THIS
OWNER’S MANUAL. IF YOU ARE UNABLE TO UNDERSTAND THE
WARNINGS, CAUTIONS OR INSTRUCTIONS, OR HAVE ANY QUESTIONS,
CONTACT MEDLINE AT 1-800- MEDLINE.
DO NOT USE ACCESSORIES, PARTS, OR ADAPTERS OTHER THAN THOSE
AUTHORIZED BY MEDLINE.
WARNINGS/CAUTION NOTICES USED IN THIS MANUAL APPLY TO
HAZARDS OR UNSAFE PRACTICES WHICH COULD RESULT IN PERSONAL
INJURY AND/OR PROPERTY DAMAGE.
SAVE THESE INSTRUCTIONS FOR FUTURE REFERENCE!
ÌWARNING
!

4
Product Specifications………………………………………………………………….…………. 2
General Warnings................................................................................................................. 3
Table of Contents………………………………………………………………………………….. 4
Basic Home Care Bed Terminology
Full Electric Bed schematic…………………………………………………………………… 5
Bed schematic Legend / Parts List…………………………………………………………... 6
Warnings and Safety Instructions
General Cautions………………………………………………………………………………. 7
Electrical Cautions……………………………………………………………………………... 9
Weight Limitations……………………………………………………………………………... 10
Unpacking the Bed………………………………………………………………………………… 11
Bed Assembly
Eight Easy Steps……………………………………………………………………………….. 12
Connecting the Two Frames………………………………………………………………... 13
Connecting the Spring Fabric………………………………………………………………… 14
Installing the Casters…………………………………………………………………………... 15
Installing the Headboard and Footboard…………………………………………………….. 16
Patient Hand Control…………………………………………………………………………... 17
Adjusting & Connecting the Head Spring Pull Tube……………………………………….. 18
Installing the Center Drive Shaft……………………………………………………………… 19
Junction Box Connections…………………………………………………………………….. 21
Leveling the Bed……………………………………………………………………………….. 21
Bed Operation
Hand Control: Semi-electric & Full Electric Beds…………………………………………… 22
Manual Bed Operation………………………………………………………………………… 23
Emergency Crank……………………………………………………………………………… 23
Optional Bed Rails……………………………………………………………………………... 24
Bed Maintenance
Cleaning the Bed…………………………………………………………………………….. 24
Inspecting the Bed…………………………………………………………………………… 25
Troubleshooting Guide……………………………………………………………………………. 26
Motor Adjustment………………………………………………………………………………….. 27
Limited Warranty…………………………………………………………………………………… 28
TABLE OF CONTENTS

5
MEDLITE HOMECARE BED PARTS DIAGRAM
Full Electric Bed See Page 7 for List of Terms
Head Spring
Assembly
Foot Spring
Assembly

6
MEDLITE HOMECARE BED PARTS LIST
Medline Home Care Bed
Part
Number Description Bed
Style* Item
Number Quantity
1 Foot Spring Assembly All MDR630054 1/EA
2 Head Spring Assembly All MDR630114 1/EA
3 Foot Board Assembly S/M MDR630014 1/EA
Foot Board Assembly F MDR630314 1/EA
4 Headboard Assembly All MDR630024 1/EA
5 Casters- 2 locking, 2 non-locking All MDR620034 4/Bx
6 Drive Shaft (Two Pieces) All MDR620124 1/EA
7 Emergency Crank Handle All MDR620104 1/EA
8 Motor Guard Tube All MDR620044 1/EA
9 Pendant With Cord (Two Motor) S MDR630094 1/EA
Pendant With Cord (Three Motor) F MDR630154 1/EA
10
Junction Box (2 motor)
Junction Box (3 motor) S
F MDR630084
MDR630144 1/EA
1/EA
11 Motor/ Actuator for Foot Spring S/F MDR630074 1/EA
Handle/ Shaft Assembly for Foot Spring M MDR620224 1/EA
12 Motor/ Actuator for Head Spring S/F MDR630064 1/EA
Handle/ Shaft Assembly for Head Spring M MDR620214 1/EA
13 Hi-Low Motor Assembly F MDR630164 1/EA
14 Gear Box for Head Board All MDR620025 1/EA
15 Gear Box For Footboard With Handle S/M MDR620015 1/EA
Gear Box For Footboard No Handle F MDR630035 1/EA
16 Handle Assembly For Hi-Low S/M MDR620085 1/EA
17 Quick Release Lock for Motor All MDR620175 4/Set
18 Fasteners Set for Head Spring Motor All MDR620005 1 Set
19 Extension Tube of Head Motor Assembly S/F MDR630065 1/EA
Extension Tube, Handle/ Shaft Assembly M MDR620075 1/EA
20 Screw, J-Box S/F MDR620095 2/Set
21 Fasteners Set for Head Spring Motor All MDR620055 1 Set
22 Screw with Lock Nut for Motor Guard Tube All MDR620045 4/Set
23 Springs for head section All MDR620105 62/CS
24 Springs for foot section All MDR620115 12/CS
25 Mesh Grid for head section All MDR620125 204/EA
26 Mesh Grid for foot section All MDR620135 259/EA
27 Engaging Clip All MDR620145 6/BX
28 Hi-Low Motor Screw F MDR630165 2/Set
29 Gear Box Screw All MDR620155 4/Set
30 Panel for Headboard All MDR630244 2/Set
31 Panel for Footboard All MDR620254 2/Set
32 Composite Inserts for Casters All MDR620185 4/Set
Bed Style F= Full-Electric Bed: MDR107003L
S= Semi- Electric Bed: DR107002L
M= Manual Bed: MDR107000P

7
WARNINGS & SAFETY INSTRUCTIONS
ÌGeneral CAUTIONS
DO NOT use this product without first reading and understanding the instructions
contained in this booklet. If you are unable to understand the Warnings, Cautions or
Instructions, contact a healthcare professional, durable medical equipment dealer or
technical personnel, or contact Medline at
1-800- Medline before use - otherwise serious bodily injury or product damage may occur.
Read ALL general guidelines, warnings and cautions before performing any repair /
maintenance on the bed. All repair and maintenance on the bed should be performed by
a qualified technician. After any adjustments, repair or service and BEFORE use, make
sure all attaching hardware is tightened securely.
Inspect all parts for shipping damage before assembly and use. In case of damage, do
not use. Contact your shipping carrier immediately for instructions. For any non-
shipping issues, contact your Medline Dealer for further instructions.
Do not use near explosive gases. Possible fire hazard when used with oxygen
administering equipment other than nasal or masked type.
Use ONLY mask or nasal type oxygen administering equipment around the bed. The use
of any other type of oxygen administering equipment can result in a fire hazard.
When using nasal or masked type administering equipment, oxygen or air tubing must be
routed and secured properly to ensure that tubing does not become entangled and
eventually severed during normal operation of the bed.
When using liquids in or around the bed, caution should be taken to ensure that liquids of
any kind are not spilled. If a liquid is spilled in or around the electric bed, unplug the bed
immediately before cleaning. Clean up the spill and let the bed or area around it dry
thoroughly before using the electric controls again.
Close supervision is necessary when this product is used by or near children or
physically challenged individuals.
NEVER PERMIT ANYONE TO BE UNDER THE BED OR IN BETWEEN THE RAISED BED
FRAME COMPONENTS AT ANY TIME.
Never permit more than one person on/in the bed at any time.
!

8
WARNINGS & SAFETY INSTRUCTIONS
ÌGeneral CAUTIONS
Keep the bed a minimum of 12 inches away from any direct heat source.
When the bed is not going to be used for an extended period, UNPLUG electric bed from
the wall outlet.
DO NOT unplug the power cord from the junction box.
The bed is not designed to be used as a patient transport. When transporting a patient,
use an approved patient transport, otherwise injury or damage may result.
When operating or moving the bed, always ensure that the individual in the bed is
properly positioned within the bed. DO NOT allow extremities to extend beyond the sides
or between the bed rails when performing these functions.
After assembly, test to make sure that all sections are properly and securely in place and
operate correctly BEFORE use.
Ensure that the head and foot spring sections are securely locked to each other and to
the head and foot-boards BEFORE use.
Ensure that the pendant and power cords are routed and secured properly so the cords
do not become entangled, pinched and/or severed during operation of the electric bed.
NEVER operate the bed if these cords are damaged.
Keep all moving parts and all drive shafts free of obstructions during operation of the
bed. (i.e. blankets/sheets, heating blankets/pads, tubing, wiring, etc. and other types of
products using electric cords which may get tangled around the bed, legs or optional
side rails).
Ensure the bed caster locks are properly engaged to prevent casters from moving
whenever the bed is stationary. ALWAYS lock the caster locks when transferring into or
out of the bed. Inspect the caster locks BEFORE using the bed to ensure the locks
function adequately. Even with casters properly locked, some floor surfaces will allow
the bed to move under some conditions. Use of the bed on such floor surfaces must be
evaluated by the care provider.
If any part of the bed is not working properly, call a qualified technician to examine and
repair it.
!

9
WARNINGS & SAFETY INSTRUCTIONS
ÌGeneral CAUTIONS
Improper use of some bed accessories (patient restraints, side rails, trapeze devices, etc.)
can cause patient injury or death. Consult your health care professional or the accessory
manufacturer for proper use instructions.
If using optional bed side rails and bed extension kit, check to ensure they are properly
and securely in place BEFORE using the bed.
Ensure the mattress is centered on the frame. This will minimize the risk of the occupant
becoming trapped between the mattress and the bed rail.
Individuals that cannot prevent themselves from rolling/climbing out of the bed may
require alternative safe means of restraint.
Replacement mattresses and bed rails with dimensions different than the original
equipment supplied or approved by Medline may not be interchangeable. Variations in
bed side rail design and thickness, size or density of the mattress could cause
entrapment. Use ONLY authorized Medline replacement parts.
For semi-electric and full electric beds, always remove the manual crank before
performing electronic functions. If left in place, the crank will turn when the motor is on
and could cause personal injury or damage to the bed.
When disassembling the bed, make sure all parts are in the lowest position.
ÌElectrical CAUTIONS
Never operate the bed if it has a damaged cord or plug. If it is not working properly call a
qualified electrician.
The beds are equipped with three-prong (grounding) plugs for protection against
possible shock hazards. Connect only to a three-prong outlet. Do not defeat the
grounding safety feature by using a three-prong to two-prong adapter. If necessary, have
outlet ground reliability checked by a qualified electrician.
Never plug into an outlet that is greater than 120 Volts AC.
Keep all cords away from heated or hot surfaces.
Ensure all cables and cords are routed in a way such that they will not become entangled
or pinched.
!
!

10
WARNINGS & SAFETY INSTRUCTIONS
ÌElectrical CAUTIONS
Do not open assemblies such as the motors, hand control unit, junction boxes or
electrical control boxes. There are no user serviceable parts inside. Only trained service
personnel are qualified to repair these parts. If uncertified individuals perform any work
on these beds, the warranty is voided.
Do not use parts, accessories, or adapters other than those authorized by Medline.
Unplug the power cord BEFORE performing any maintenance on the bed.
After installing any connectors into the junction box, be sure the cable plug is secure
otherwise injury or damage may occur.
DO NOT force connectors into the junction box otherwise injury or damage may occur.
DO NOT unplug the power cord from the junction box.
DO NOT operate the bed unless the ground wire is attached to frame.
ÌWeight Limitations
The TOTAL weight limit of the Medline Home Care Bed (including accessories, mattress,
occupant and any other object positioned on the bed) is 450 lbs for full or semi electric
beds, and 500 lbs for manual bed.
Never permit more than one person on/in the bed at any time.
Replacement mattresses and bed rails with dimensions different than the original
equipment supplied or approved by Medline may not be interchangeable. Variations in
bed side rail design, and thickness, size or density of the mattress could cause
entrapment. Use ONLY authorized Medline replacement parts.
Body weight should be evenly distributed over the surface of the bed. Do not lay, sit or
lean in such a way that your entire body weight is placed only on RAISED head or foot
sections of the bed. This includes when repositioning or transferring in or out of bed.
!
!

11
UNPACKING THE BED
The Medline Home Care Bed will arrive in two (2) boxes with the following contents:
Box 1
1 Head Board
1 Head Spring section
4 Casters (2-locking, 2-non-locking)
1 Manual
1 Wrench
Box 2
1 Foot Spring section: Full and Semi-Electric Models include motors, a junction box and
Electrical cord already attached. Manual Model includes handle cranks on the frame.
1 Hand Pendant Control and Cord: Full and Semi-Electric Models only
1 Emergency Crank Handle: Full and Semi-Electric Models only
3 Hand cranks (Manual bed)
1 Foot Board
1 Drive Shaft: length adjusts to adapt to Full Electric, Semi-Electric and Manual models
Figure 1: Example of Major Components

12
BED ASSEMBLY
Before assembly, examine each item carefully for shipping damage. If a part is found to be damaged,
DO NOT use. Contact your Dealer or Medline for instructions.
WARNINGS:
During assembly, DO NOT rotate the pull tube or the shaft of the motors; all motors
are adjusted to proper position prior to shipping. Rotation will lead to misadjustment
of motors which may cause frame damage.
DO NOT attempt to operate the bed controls until assembly of the entire bed is complete as
damage to bed components or personal injury may occur.
Bed Assembly Instructions in 8 Easy Steps
1. Connect head
section to foot
section.
6. Connect pull tube
to head section of
bed.
2. Straighten bed
assembly.
7. Mount bed rails to
sides of bed.
3. Connect bed
assembly to
headboard and
footboard.
8. Place mattress on
bed.
4. Connect center
drive shaft.
See following sections for full assembly
instructions.

13
BED ASSEMBLY
Connecting the Two Frames:See Figure 2
1. Place the Head Spring Section on its side to your left with the center mounting hooks
to your right.
2. Place the Foot Spring Section on its side to your right with the head frame pull tube at
the top of the assembly and the center mounting rivets facing to the left.
3. The crank handles and/or motors should be at your right.
4. The head and foot springs should now be on their sides at approximately a 90° angle
to one another.
5. Hook the bottom head spring center mounting latches to the bottom foot spring center
mounting rivets. (see Figure 2a)
6. Hook the top head spring center mounting latches to the top foot spring center
mounting rivets. (It may be necessary to lift slightly on the head spring or foot spring to
secure the mounting latches and rivets.)
7. After head and foot springs are connected, slowly open the springs into a horizontal
(straight) position while still on their sides. Make sure the hooks engage the rivets at
all times.
8. Lay the bed flat with the springs facing up.
Head Spring Section Foot Spring Section
Figure 2: Connecting the head and foot frames

14
BED ASSEMBLY
Connecting the Spring Fabric: See Figure 3
1. With the bed flat and the springs facing up, lift the head spring section upward
to give slack to the fabric. Connect the spring fabric together with the links
provided.
2. Hook together all the links to the spring fabric.
3. Lower the head spring section back down.
Figure 3: Connecting the spring fabric
Head Spring Section Foot Spring Section

15
BED ASSEMBLY
To Install Casters
Ensure that the locking casters are installed diagonally from each other and are locked. This will
provide maximum locking stability.
1. Lay the bed ends flat on the floor.
2. Position the two locking casters so they will be diagonally opposite from one another when the bed is
assembled. See Figure 4B.
3. Insert the shaft of the caster into the caster socket of each bed leg. Ensure the stem is fully inserted
into the socket. See Figure 4.
4. To prevent excess movement of the bed during assembly, lock each of the two locking casters by
pushing down on the caster lock.
Note: Locking the casters may not prevent the bed from moving on slick or
slippery surfaces.
5. To unlock the two locking casters, pull up on the caster lock.
Insert caster shaft
into bed leg socket
Caster Lock:
Push DOWN to Lock
Push UP to Unlock
Figure 4: Casters
Figure 4B: Locking Caster
positioning

16
BED ASSEMBLY
To Install the Headboard and Footboard
It is recommended that 2 people perform this procedure.
Caution: Do not place your hand between the spring section and the bed ends
while attaching the bed boards as injury may occur.
To Attach Bed Boards See Figure 5: illustration of attached headboard
1. Stand the headboard as close to the head frame as possible.
2. Raise the head frame until the rivets on the corner plates of the head frame fit into the corner locks on
the headboard. The headboard may need to be tilted backward slightly for the rivets to slide into the
locks.
3. Return the headboard to its full upright position to lock it into place.
4. Repeat this entire procedure for the foot end section.
Headboard Foot
Spring
Section
Figure 5: Headboard & Footboard
connection
Corner plate of head
spring frame with rivets
headboard with
corner locks

17
BED ASSEMBLY
Patient Hand Control
Connect the patient hand control to the bed by inserting the connector into the Junction box and securing
it with the Cable Securing Strap once all plugs are connected.
Figure 6: Bed Junction Box connections
CAUTIONS:
Ensure hand pendant cable is routed in a way such that it will not become entangled or
pinched when the bed is adjusted.
Do not place the pendant hand control under or between objects. This may
unintentionally press the buttons which may cause injury or damage to occur.
Figure 7: Patient Hand Controls
Patient Hand Control Connection
Bed Junction Box
Hand Control for
Full Electric Bed
Hand Control for
Semi- Electric Bed
Hand
Pendant
Connector
Cable Securing Strap

18
BED ASSEMBLY
BED ASSEMBLY
Adjusting and Connecting the Head Spring Extension Tube
Note: Early models of the Medline Lite bed utilized a solid tube with a split end for mounting (Type 2). Later
models now come with a telescoping tube (Type 1). Please locate which head spring extension tube your
bed contains and use the instructions regarding that type of extension tube.
Cotter Pin Grommet / Washer
Clevis Pin
Headspring pull tube
Outer Pull Tube Adjusting Hole
Inner Pull Tube
Nylon Washer
Cotter Pin
Grommet / Washer
Clevis Pin
Lift-Arm Slot
Figure 8: Head Spring Pull Tube assembly
Type 1
Telescoping
design
Type 2
Slot Design

19
Adjusting and Connecting the Head Spring Extension Tube
Figure 9A Type 1 Extension tube attachment
1. To provide up and down movement of the head section,
disconnect the head pull tube assembly from the side frame
of the foot spring by removing the cotter pin and washer
from the clevis pin.
2. Align the pull tube with the hole on frame.
3. Connect the pull tube assembly to the lift-arm of the head
spring by inserting the clevis pin into the lift-arm slot.
Reconnect the grommet and washer and secure the cotter
pin.
Figure 9B Type 2 Extension tube attachment
1. To provide up and down movement of the head section,
attach the head extension tube to head spring motor.
Make sure tube end with black plastic insert is mounted on
motor shaft as shown on right.
2. Pull out extension tube and slide onto frame as shown in
Figure 9B.
3. Connect the pull tube assembly to the lift-arm of the head
spring by inserting the clevis pin into the lift-arm slot.
Reconnect the grommet and washer and secure the cotter
pin.
Headspring
pull tube

20
Installing the Center Drive Shaft
The drive shaft is composed of two sections that are shipped unassembled. The inner shaft, which has a
positioning spring button, and the outer shaft, which has two positioning holes and one storage position
hole. Together they make the telescoping center drive shaft used on all manual and electric Hi-Lo model
beds.
BED ASSEMBLY
Installing the Center Drive Shaft
1. Depress the spring button on the inner shaft and insert the inner shaft into the outer shaft.
2. Slide the inner shaft to the correct position for the type of bed being used and engage the spring
button into the proper positioning hole, as follows:
a. For semi-electric and manual beds: engage the spring button into the first hole
position in the outer shaft.
b. For the full electric model: engage the spring button into the second hole position
in the outer shaft.
3. Connect the drive shaft to the bed by attaching either end of the drive shaft to the
headboard gearbox. See Figures 11 & 12. Then:
Drive Shaft
inner shaft
outer shaft
Spring button of inner shaft inserted
into first hole of outer shaft (position
for semi-electric and manual beds)
Figure 10: Drive Shaft position
Spring button hole position
for Full electric bed
Fi
g
ure 11: Cut-awa
y
detail of drive shaft: inner shaft alread
y
p
laced in outer shaft
Table of contents
Other Medline Indoor Furnishing manuals