MEE T1N1 User manual

www.MEEaudio.com/T1N1
Bluetooth®Wireless
headphone system for tv
Includes Bluetooth Wireless audio Transmitter
and Wireless Neckband In-Ear Headphones
Visit MEEaudio.com/ConnectHelp for
easy-to-follow setup videos, full user manuals,
and the latest troubleshooting information.
CONNECT SUPPORT GUIDE
USER MANUAL

Bluetooth®Wireless
headphone system for tv
FOR ADDITIONAL SUPPORT
View and download complete user manuals for
Connect transmitter and N1 headphones at
MEEaudio.com/Support
View our Connect Support Guide at
MEEaudio.com/ConnectHelp for easy-to-follow
setup videos and troubleshooting information
•
•
•

PACKAGE CONTENTS
CONNECT
Bluetooth Transmitter
TOSLINK digital optical
S/PDIF audio cable
3.5mm to RCA
adapter
3.5mm audio cable
2 x Micro-USB
charging cable
3 pairs of eartips
N1 Bluetooth
Stereo Headphones

1
CONNECT
2
hrs
CHARGE HEADPHONES
PLUG USB POWER CABLE INTO TRANSMITTER
plug into AC
adapter, TV,
or computer
USB port
N1
AOFF ON AOFF ON
2
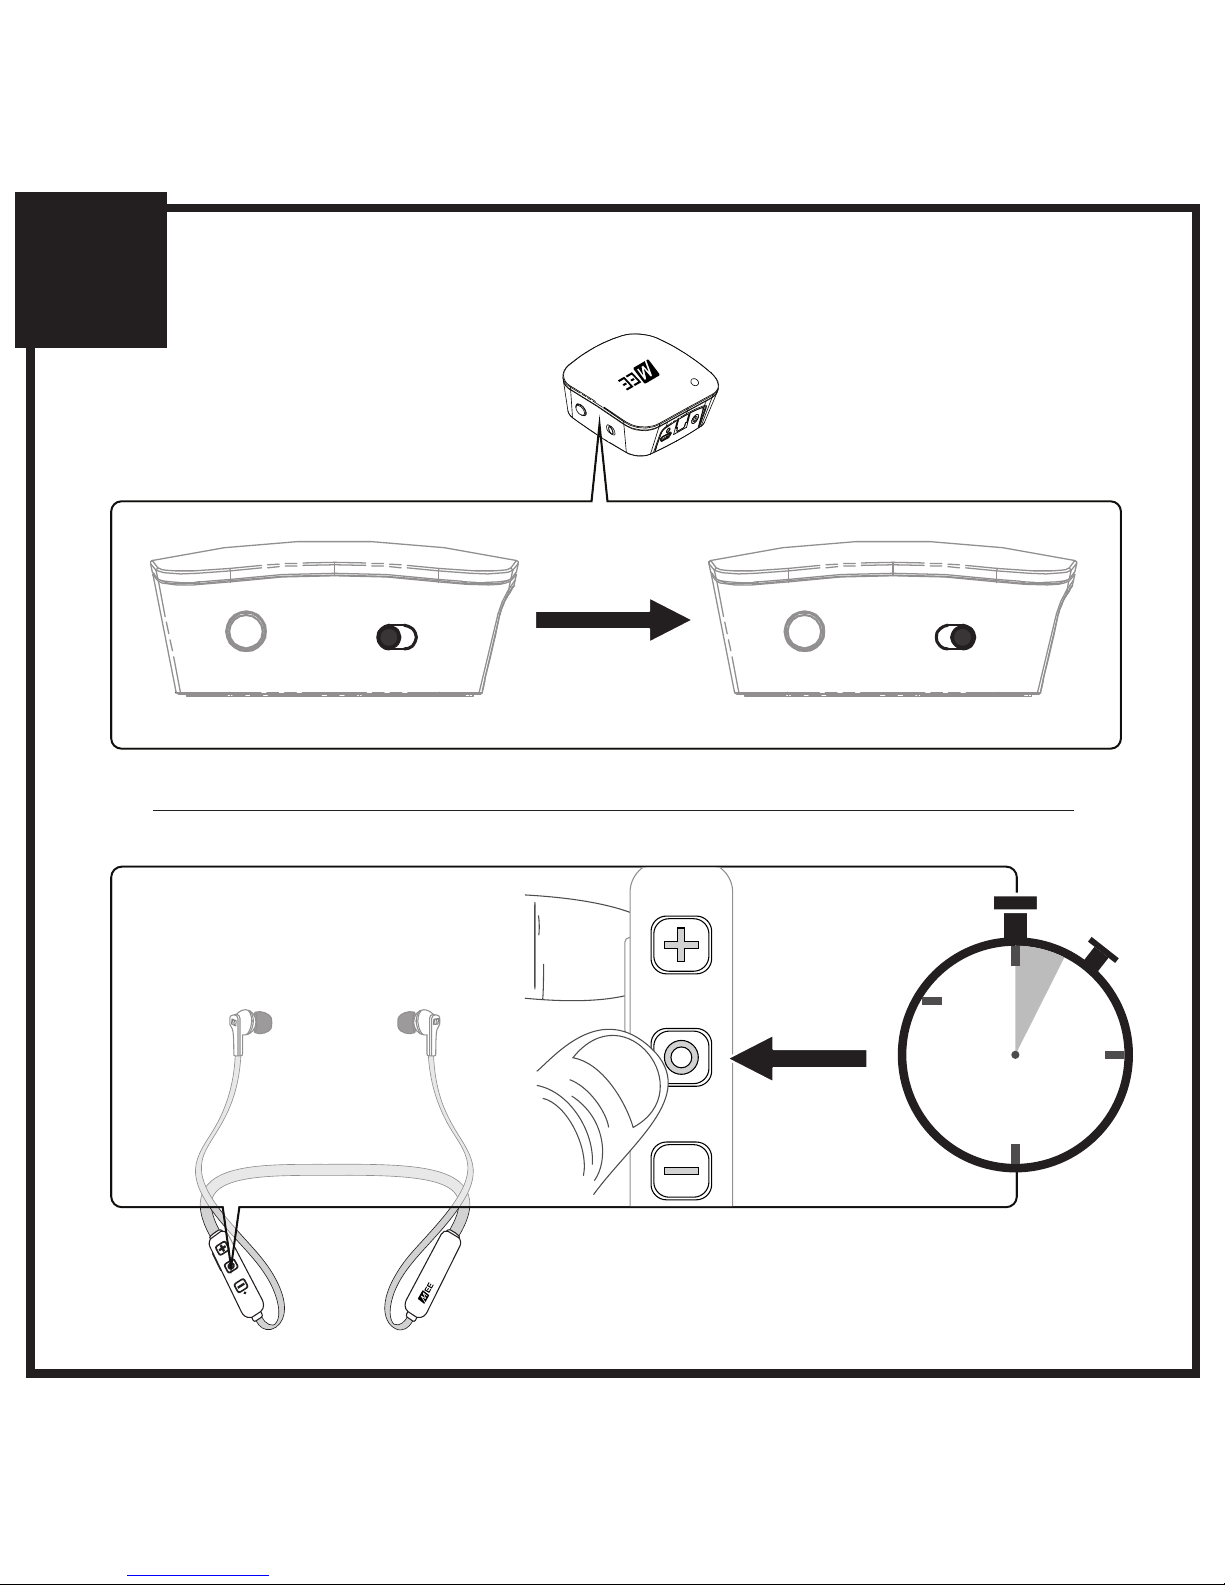
POWER ON TRANSMITTER
POWER ON HEADPHONES
3
seconds
HOLD
AOFF ON

B
3
CONNECTION IS ESTABLISHED
solid blue light on transmitter
indicates connection
IF NO SOLID BLUE LIGHT, PERFORM PAIRING
PROCEDURE IN STEP 6

†
EXACT MENU AND ITEM NAMES MAY VARY BETWEEN TVS
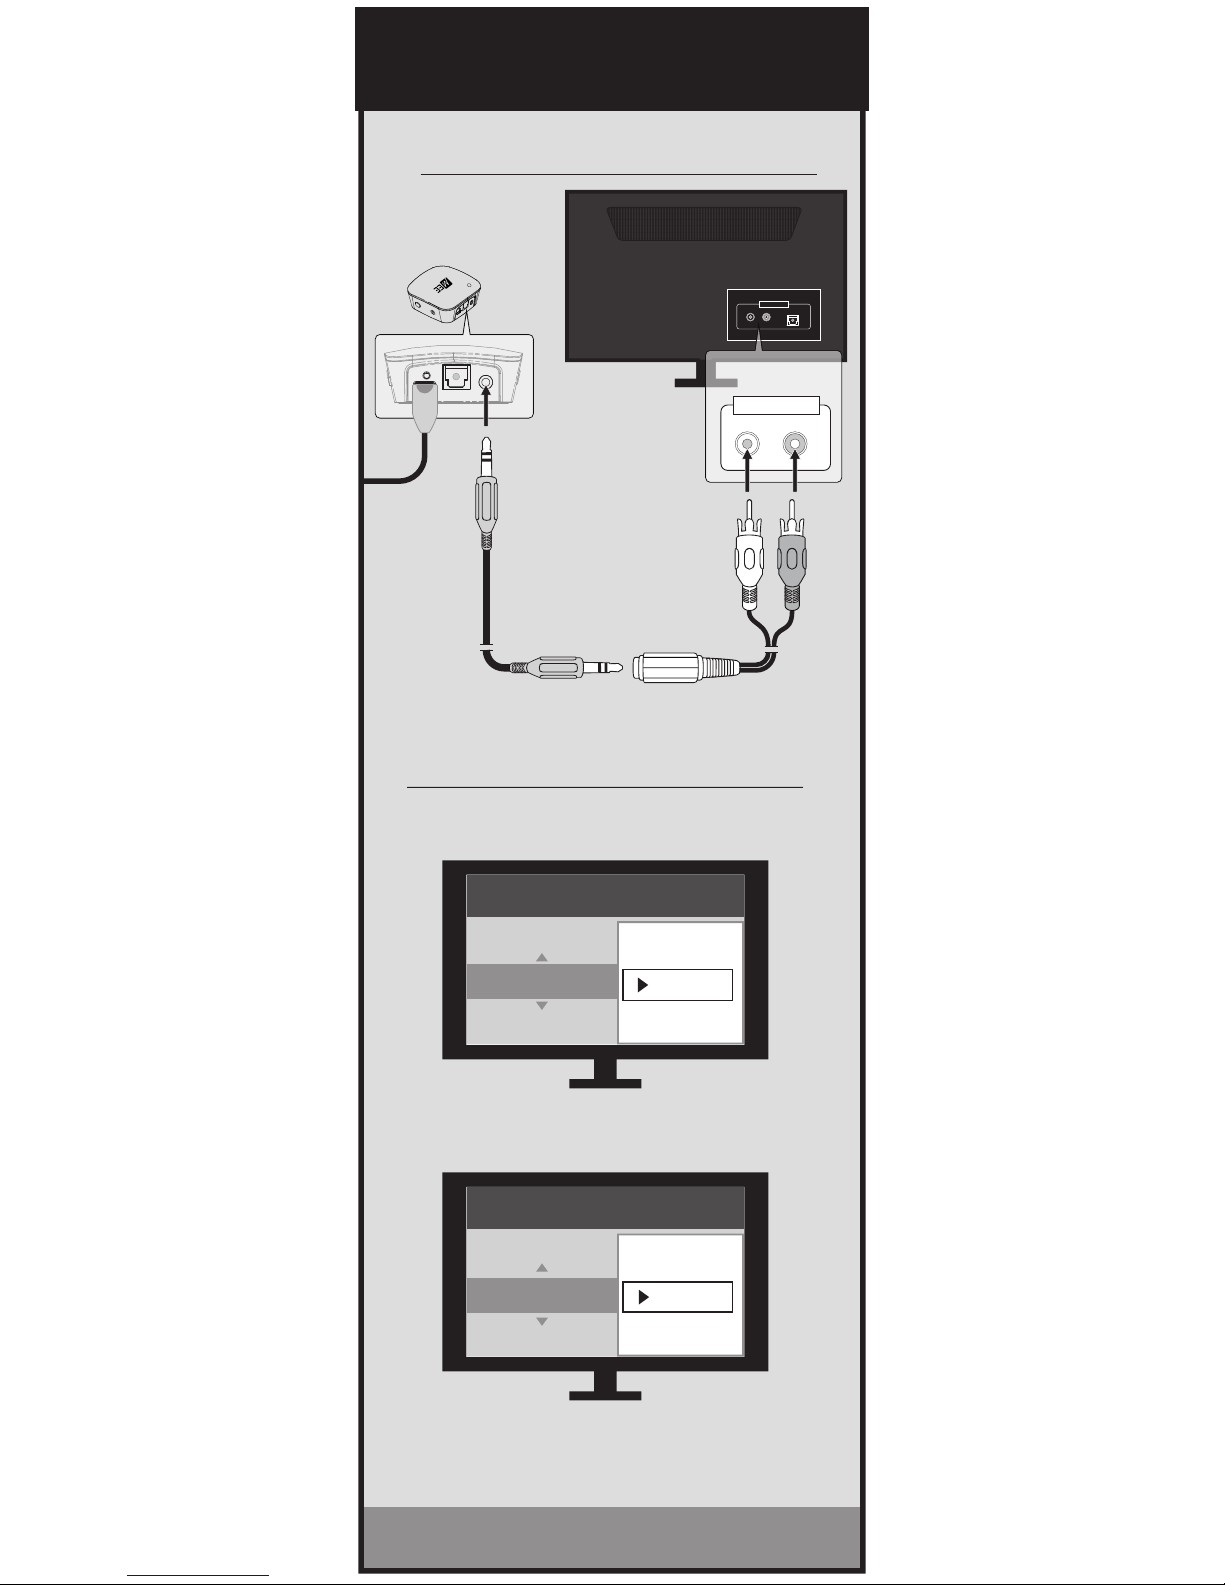
4. choose an audio cable supported
by your tv
OPTICAL S/PDIF [DIGITAL]
AOFF ON
settings
Sound / Audio
digital Audio Output
auto
dolby digital
pcm / stereo
DTS
AUDIO OUPUT
R L
OPTICAL
IF TV AUDIO PLAYS FROM HEADPHONE,
SETUP IS COMPLETE. PROCEED TO STEP 5.
NO SOUND? CHECK TV SETTINGS MENU.†
PROCEED TO STEP 5
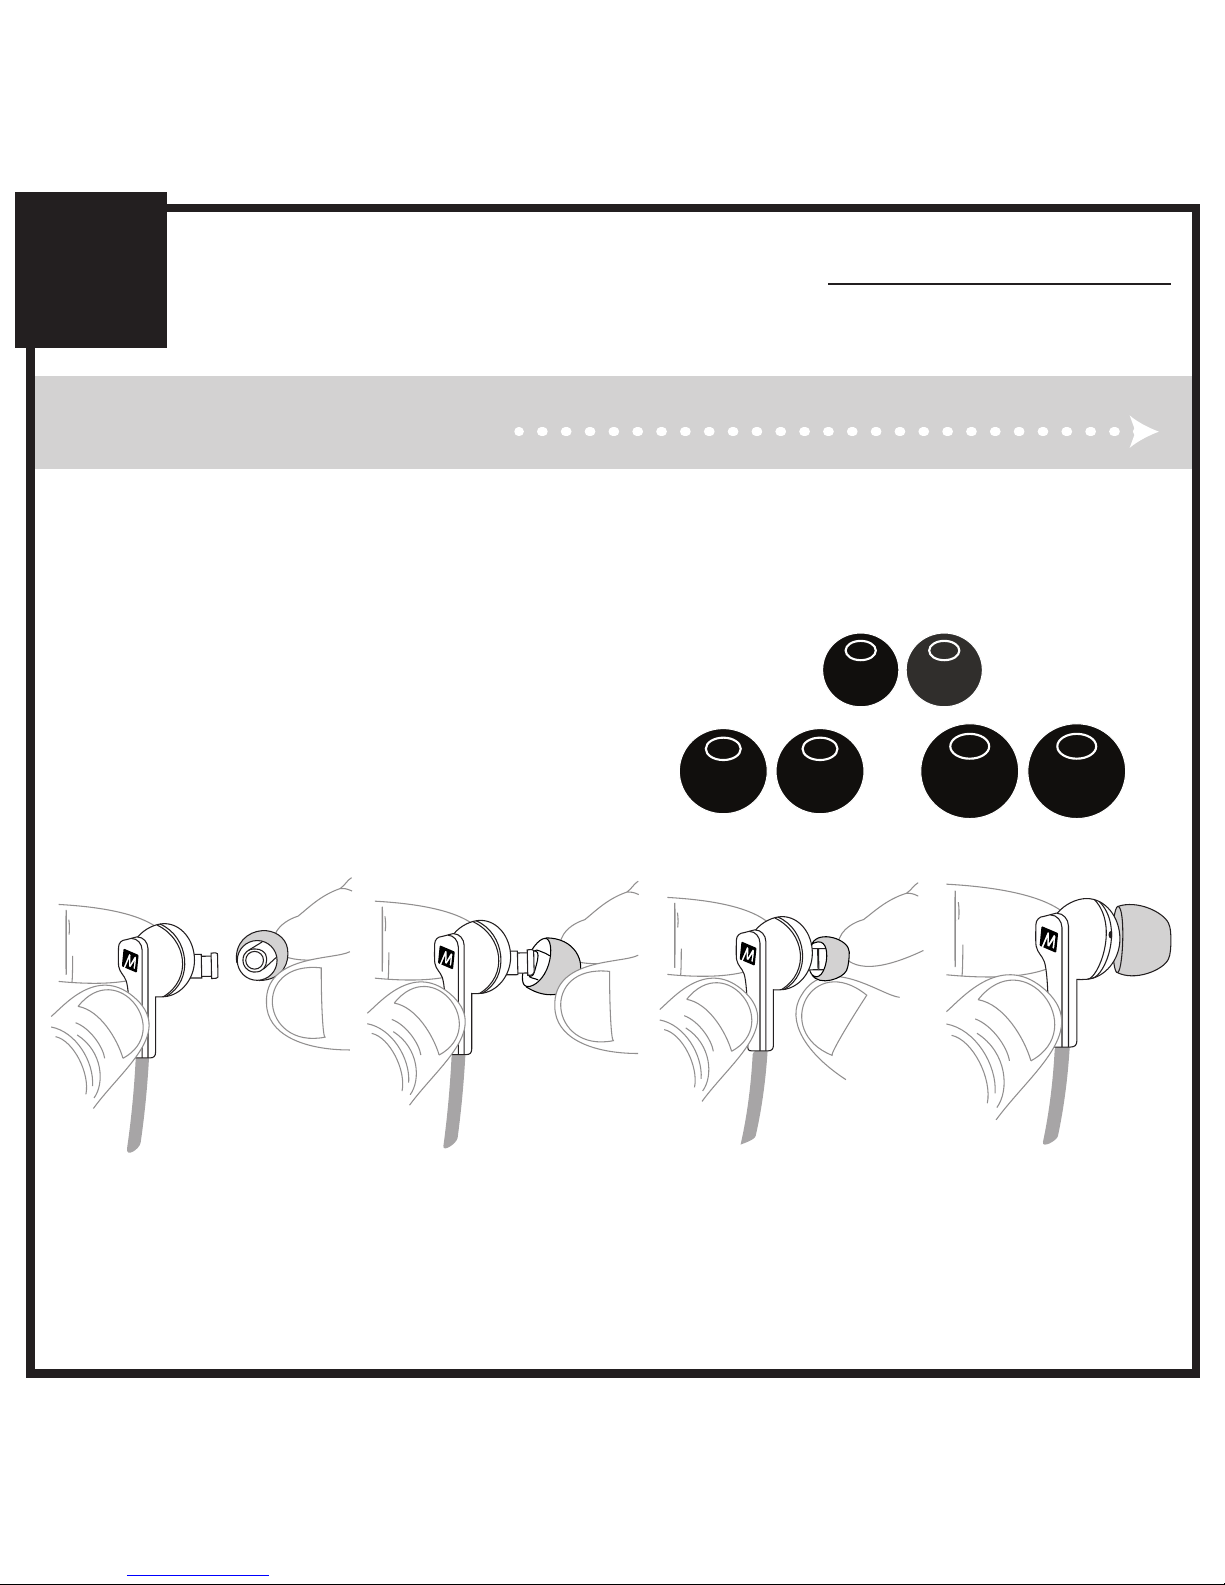
remove
protective caps
select “PCM / Stereo” in the audio
output settings menu*of your TV
*if sound is still not audible, select “PCM / Stereo” in the audio output
settings menu(s) of your video streaming app(s) and/or device(s)
AUDIO OUPUT
OPTICAL
plug the
optical cable
into TV’s digital
audio output
RCA
PROCEED TO STEP 5
set TV’s internal speakers to “OFF”
select “Variable” in the audio output
settings menu of your TV
AOFF ON
AUDIO OUPUT
R L
OPTICAL
IF TV AUDIO PLAYS FROM HEADPHONE,
SETUP IS COMPLETE. PROCEED TO STEP 5.
NO SOUND? CHECK TV SETTINGS MENU.†
AUDIO OUTPUT
R L
plug the stereo
cable into RCA
adapter and
connect to TV’s
red/white RCA
jacks labeled
“AUDIO OUT”
settings
sound / audio
Analog audio out
fixed
variable
settings
sound / audio
tv speakers
on
off
†
EXACT MENU AND ITEM NAMES MAY VARY BETWEEN TVS
4. choose an audio cable supported
by your tv

4. choose an audio cable supported
by your tv
3.5MM [HEADPHONE JACK]
Volume max vol+
AOFF ON
plug the stereo
cable into TV’s
headphone
jack
headphone
jack may be
located on
front, side, or
rear of TV
AUDIO
maximize the volume on your TV
5
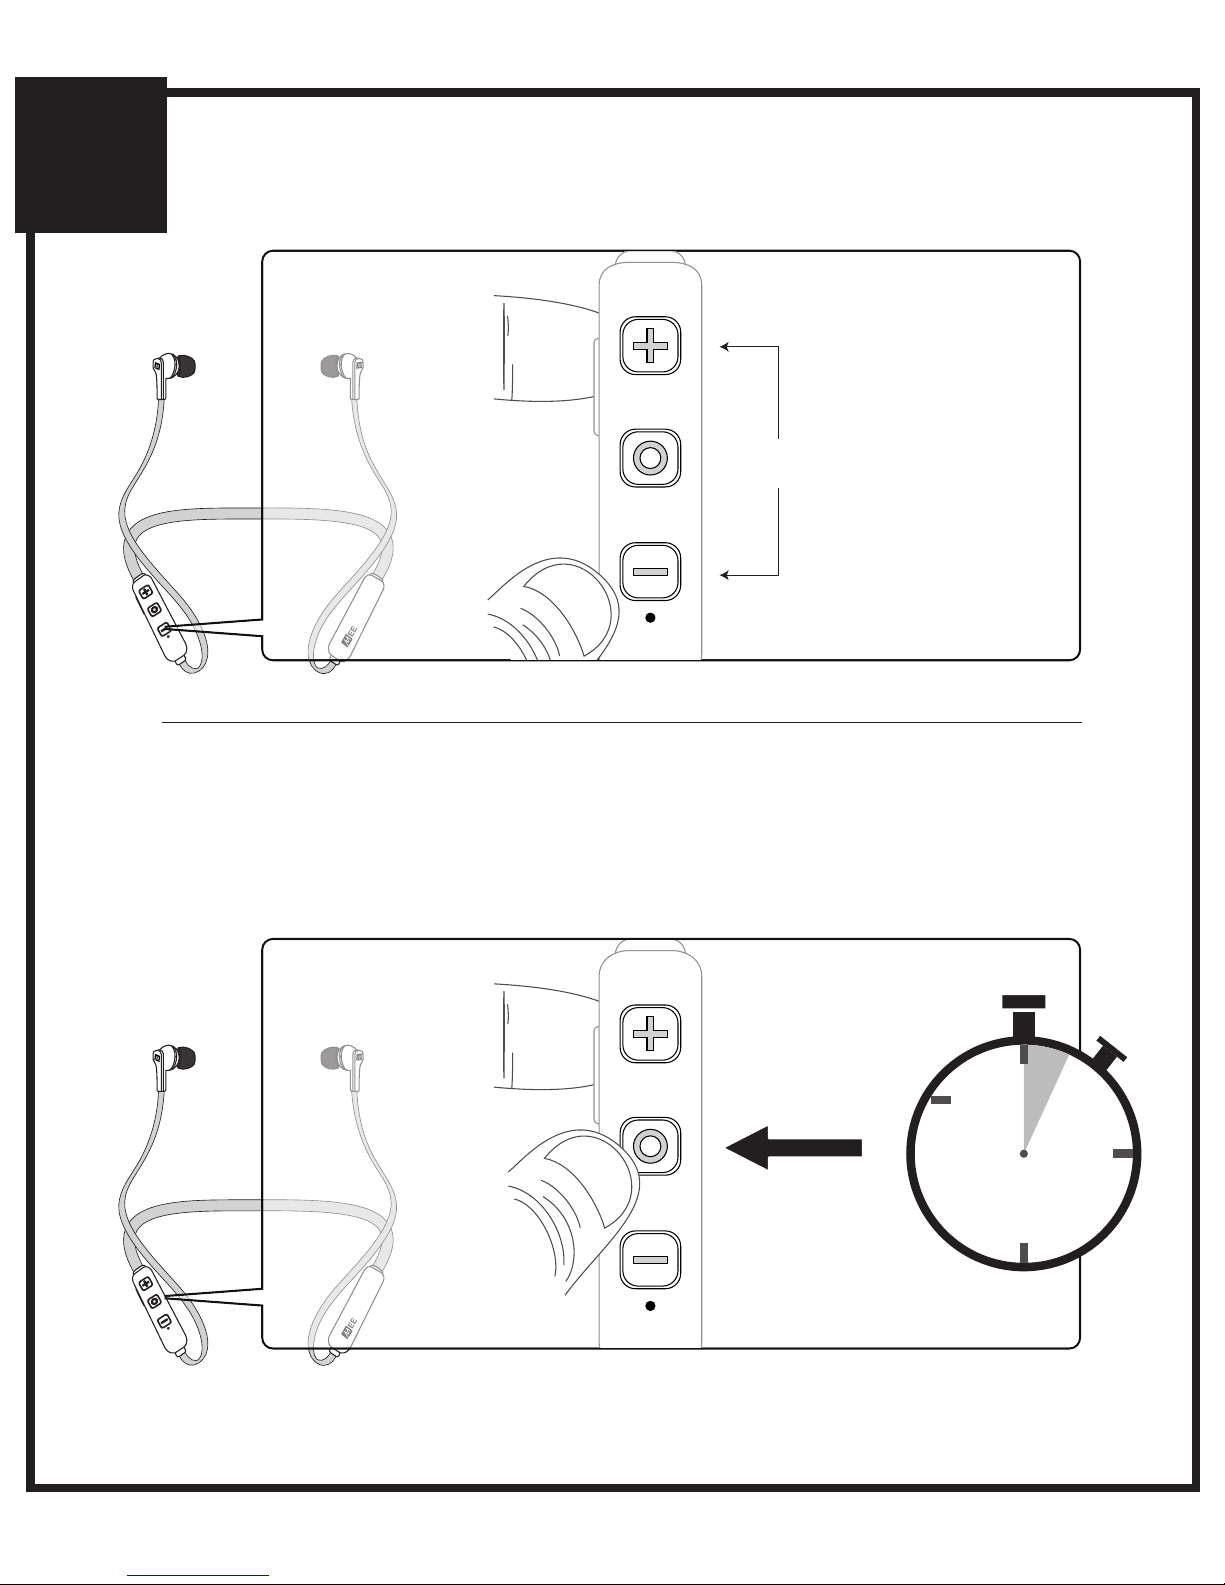
ADJUSTING HEADPHONE VOLUME
WHEN FINISHED, POWER OFF
HEADPHONES UNTIL NEXT USE
HOLD
POWER OFF HEADPHONES
TAP
to increase
volume
TAP
to decrease
volume
3
seconds

ADDITIONAL INFORMATION
6
PRODUCT OVERVIEW
N1
Micro-USB
charging
port
Volume up /
skip track
button
Volume down /
previous track
button
Multifunction
button
Status
indicator
light
ADDITIONAL INFORMATION
6
STEP 1: SELECTING EARTIPS
Select the eartips with the best
sound and comfort for your ears.
If your music sounds tinny or
lacks bass, try different eartips.

ADDITIONAL INFORMATION
6
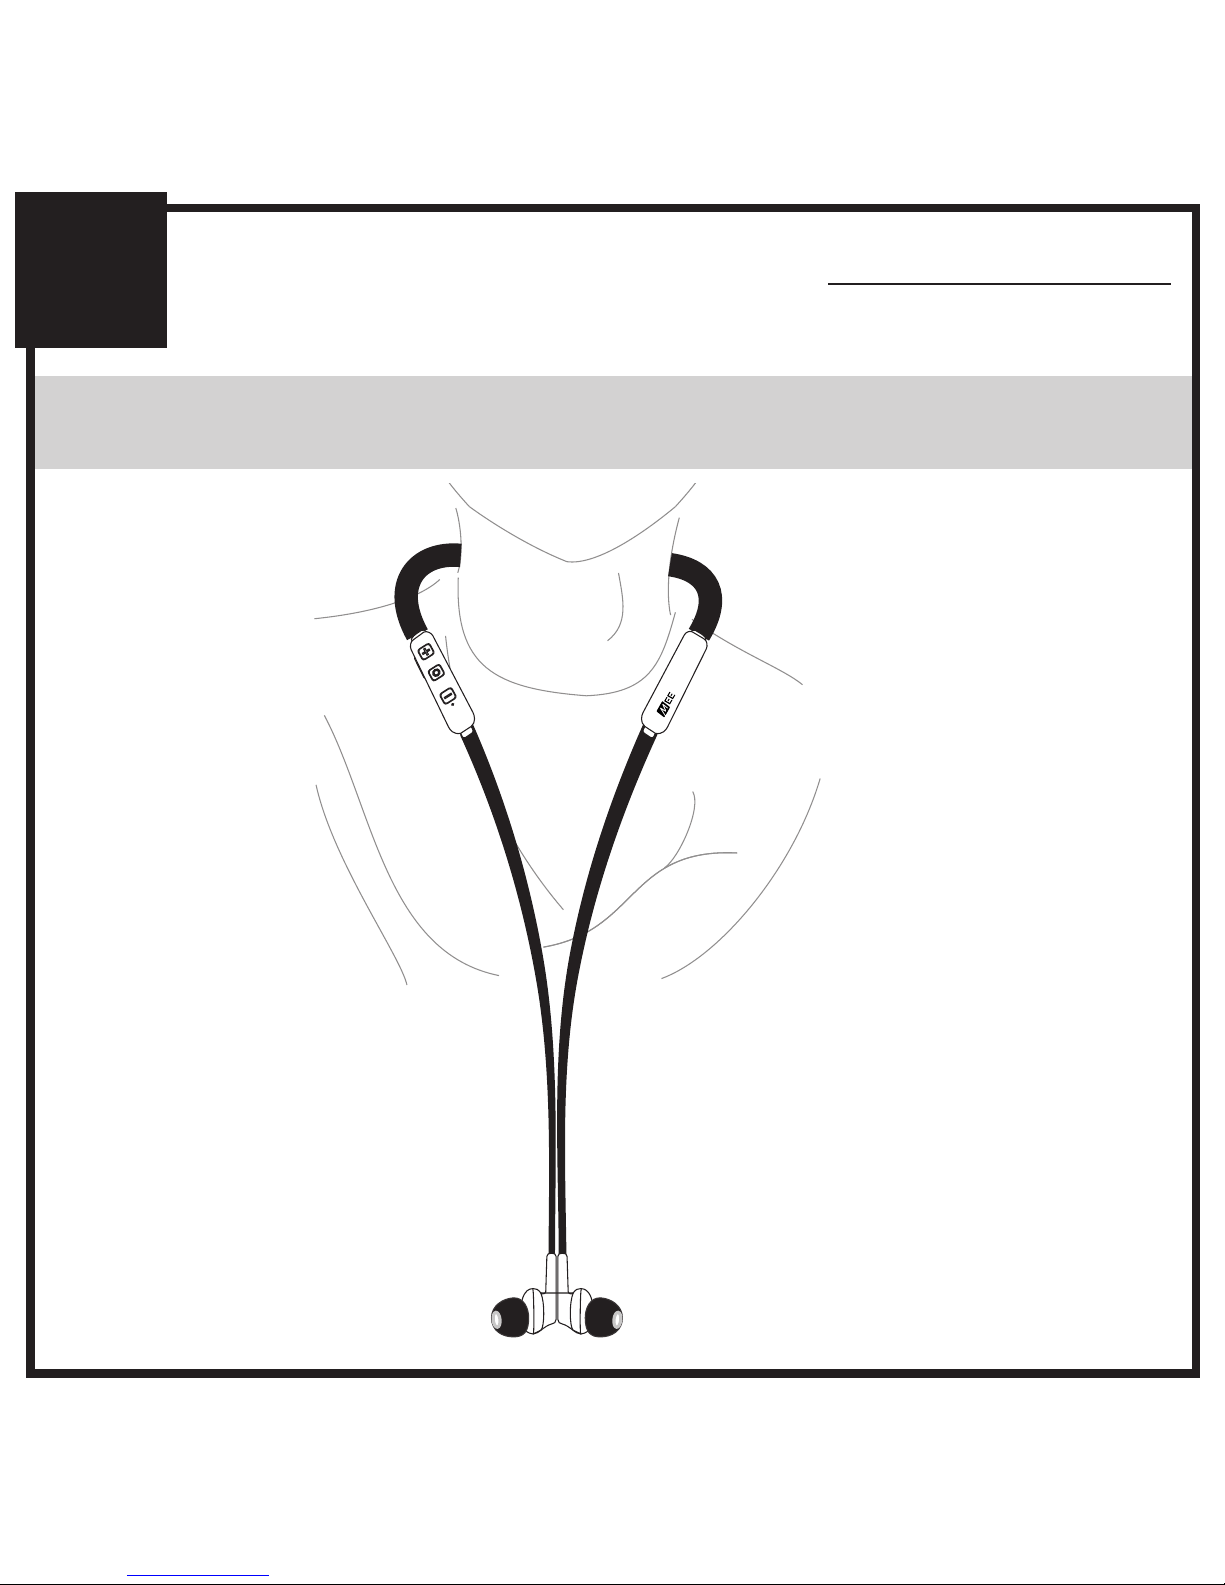
Wear neckband so that controls are facing upwards
and place each earpiece in the corresponding ear.
STEP 2: WEARING THE N1

Battery performance will be severely decreased when stored
in extreme temperatures: below -10°C/14°F or above
45°C/113°F including direct sunlight.
The lifetime of the battery will be significantly reduced if your
device is not charged for a long time. It is recommended to
charge your device at least once a month.
Clean with a soft, slightly damp cloth. Do not use chemical
cleaners.
There are no user replaceable/reparable parts in this device.
Disassembling it will void your warranty.
Do not expose the device to liquids. If the device comes in
contact with liquids, quickly wipe away.
If submersed in water, do not turn the device on until
completely dried.
Note: liquid submersion voids the warranty.
Do not use around flammable gasses as fire or explosion
may occur.
•
•
•
•
•
•
ADDITIONAL INFORMATION
6
Adjust each earpiece until it fits flush in
your ear and the eartip seals the ear canal.
STEP 2: WEARING THE N1 (CONTINUED)
ADDITIONAL INFORMATION
6
STEP 2: WEARING THE N1 (CONTINUED)
When not in use,
clip earphones
together using
built-in magnets.

STEP 3. PAIRING WITH OTHER DEVICES
ADDITIONAL INFORMATION
6
Press and hold the
Multifunction button for about
7 seconds until you hear the
headset say “Pairing” and the
light flashes red and blue.
The N1 can be used as a headset when connected to
phones and tablets. It will first need to be paired with
each device by following the procedure below:

ADDITIONAL INFORMATION
6
STEP 3. PAIRING WITH OTHER DEVICES (CONTINUED)
Open the Bluetooth menu on the device you wish to pair
(usually located in Settings > Bluetooth). If needed, select
“search for devices”, “add new device”, or “refresh”.
AT&T LTE 12:26 PM 95%
Bluetooth
Settings
Searching...
Bluetooth
Devices

STEP 3. PAIRING WITH OTHER DEVICES (CONTINUED)
ADDITIONAL INFORMATION
6
AT&T LTE 12:26 PM 95%
Bluetooth
Settings
MEE audio N1
Bluetooth
Select “MEE audio N1” and allow pairing to complete.
Use “0000” if a pin is required.
Visit the Bluetooth Support Page at
MEEaudio.com/Bluetooth for additional Bluetooth pairing
and setup information.
Note: Once paired, N1 will automatically reconnect to the
paired device each time it is powered on. To pair a new
device, first turn off Bluetooth on any devices nearby that
have previously been paired with the N1.

CONTROLS WITH PHONES AND TABLETS
ADDITIONAL INFORMATION
6
Volume Down / Previous Track button
- Decrease Volume
- Previous Track
- Mute / Unmute Microphone
(during phone call)
Volume Up / Skip Track button
[TAP]
[HOLD 2 sec]
- Increase Volume
- Next Track
Multifunction button
[HOLD 3 sec]
[TAP]
[TAP]
[HOLD 2 sec]
[DOUBLE TAP]
[HOLD 2 sec]
[HOLD 3 sec]
- Power On
- Play / Pause (during media playback*)
- Answer Incoming Call / End Call
- Reject Incoming Call
- Redial**
- Activate Siri®/ Voice Command**
- Power Off
[TAP]
[HOLD 2 sec]
[HOLD 2 sec]
You may need to bring
your music player
application up on the
screen for media
playback to start
Not all devices support
this functionality
*
**

ADDITIONAL INFORMATION
6
PAIRING A HEADPHONE
This procedure is used to pair an additional headphone
or speaker with the Connect, or to re-pair the N1.
Make sure your Bluetooth headphone or speaker is
turned off. Put it in pairing mode. Consult the user
manual of the headphone or speaker if you are not sure
how to enter pairing mode.
Once the headphone or speaker is in pairing mode,
click pairing button “A” located on the side of the
Connect (use pairing button “B” when pairing a second
headphone or speaker). A blue light will blink rapidly on
the top of the unit to indicate that the Connect is ready
to pair. Once paired, the light will turn solid blue.
FACTORY RESET/CLEAR MEMORY
The Connect can be reset by holding pairing button “A”
for approximately 5 seconds, until the blue indicator
light stops blinking. All previously paired devices will be
cleared from memory and a new pairing will need to be
created by following the procedure in the previous step.
Table of contents
Other MEE Headset manuals


