Mega MPT12 User manual

MPT
MEGA PORTABLE TANK
MEGA CORP.®
700 Osuna Rd. N.E. • Albuquerque, NM 87113 • 1-800-345-8889 • 505-345-2661 • Fax 505-345-6190
www.megacorpinc.com
® MEGA Corp., Inc. All Rights Reserved
GENUINE MEGA.
TECHNICAL MANUAL
SPECIALTY HAULAGE SOLUTIONS FOR CONSTRUCTION AND MINING

MPT12 Manual
24 May 2017
TABLE OF CONTENTS
A
Section 1 Definitions and Abbreviations . . . . . . . . . . . . . . . . . . . . . . . . . . . . . . . . . . . . . . . . . . . . . . . . .1-1
Section 2 System Description. . . . . . . . . . . . . . . . . . . . . . . . . . . . . . . . . . . . . . . . . . . . . . . . . . . . . . . . . . . .2-1
Section 3 Commissioning . . . . . . . . . . . . . . . . . . . . . . . . . . . . . . . . . . . . . . . . . . . . . . . . . . . . . . . . . . . . . . .3-1
Section 4 Operation Instructions. . . . . . . . . . . . . . . . . . . . . . . . . . . . . . . . . . . . . . . . . . . . . . . . . . . . . . . . .4-1
Section 5 Maintenance and Repair. . . . . . . . . . . . . . . . . . . . . . . . . . . . . . . . . . . . . . . . . . . . . . . . . . . . . . .5-1
Section 6 Scheduled Maintenance Inspections . . . . . . . . . . . . . . . . . . . . . . . . . . . . . . . . . . . . . . . . . . .6-1
Section 7 Recommended Support Parts. . . . . . . . . . . . . . . . . . . . . . . . . . . . . . . . . . . . . . . . . . . . . . . . . .7-1
Section 8 Illustrated Parts Breakdown. . . . . . . . . . . . . . . . . . . . . . . . . . . . . . . . . . . . . . . . . . . . . . . . . . . .8-1
Section 9 Appendix: Installation Drawings . . . . . . . . . . . . . . . . . . . . . . . . . . . . . . . . . . . . . . . . . . . . . . .9-A
Page

MPT12 Manual
24 May 2017
TABLE OF CONTENTS
B (Blank)

1-1
MPT12 Manual
24 May 2017
SECTION 1
Definitions and Abbreviations
Contents
MANUAL USAGE
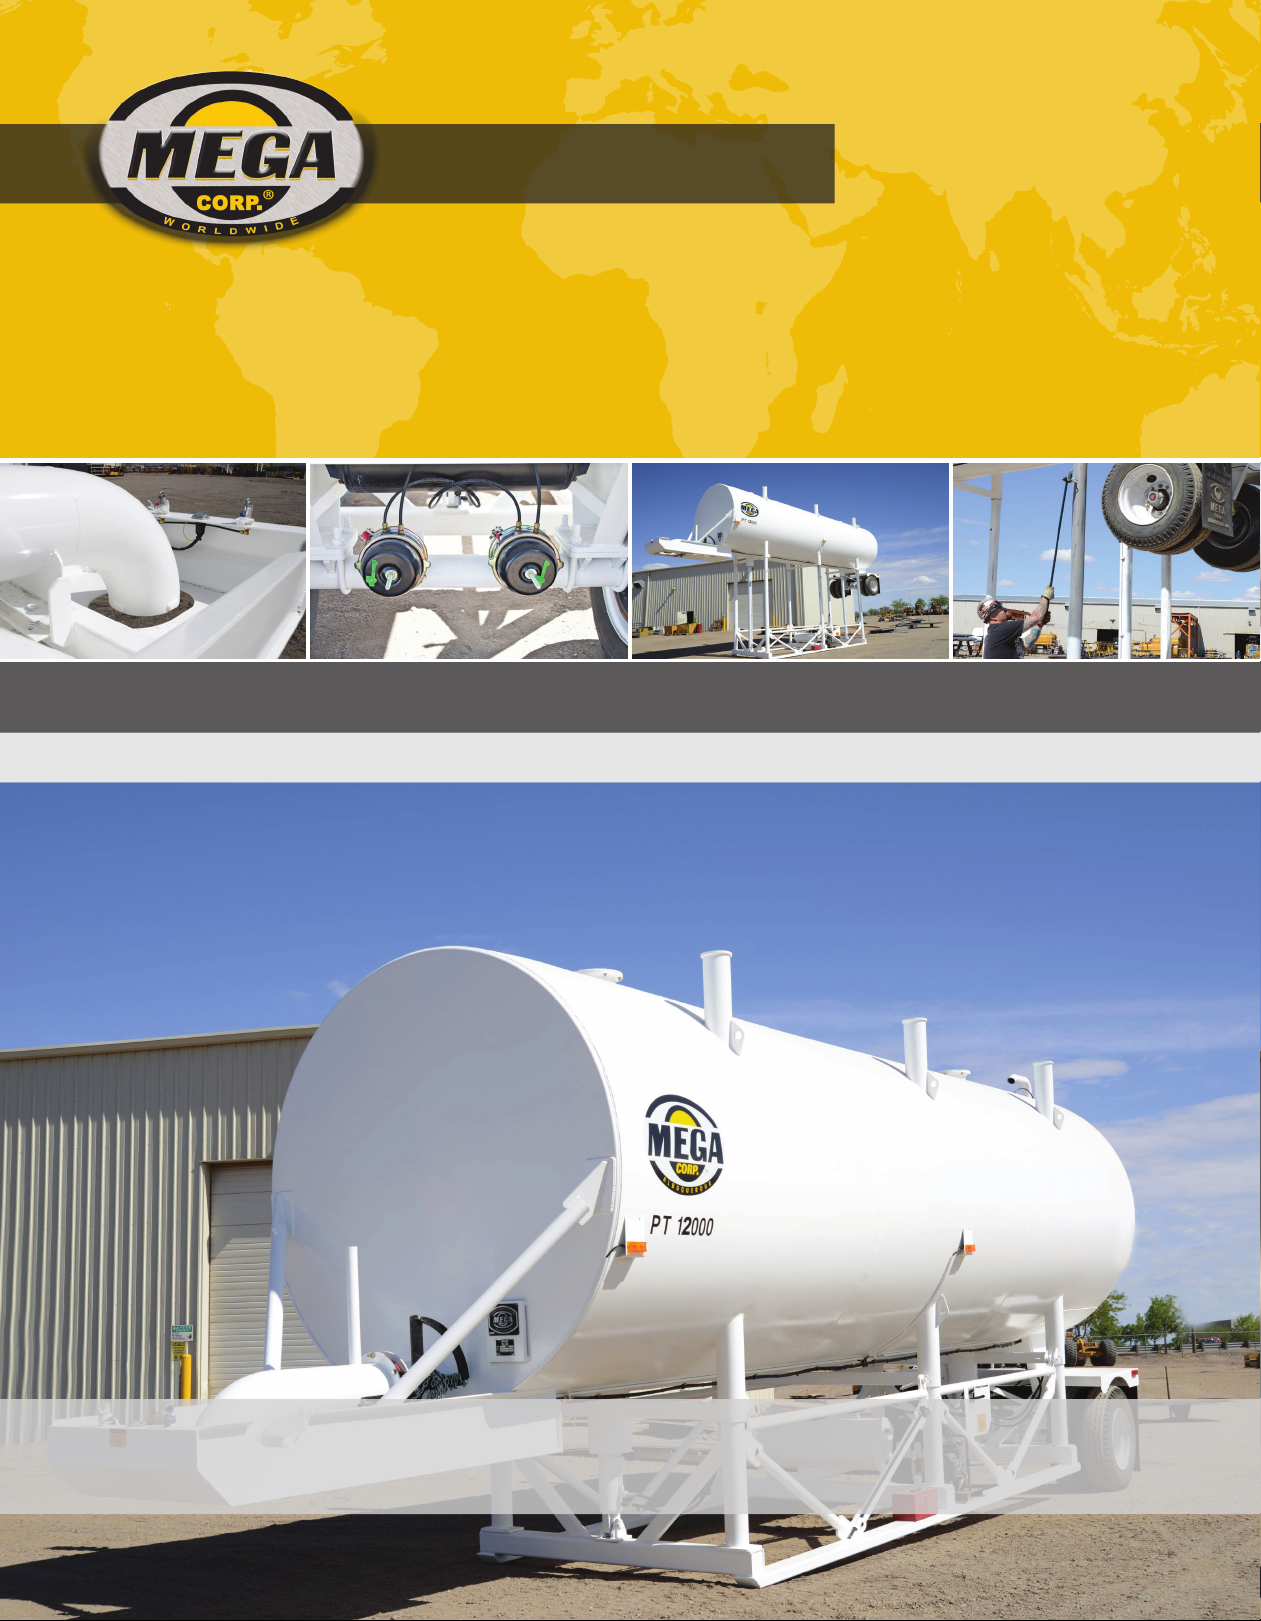
This technical manual only contains information
required to safely operate and maintain the Mega
Portable Tank. If your system is not covered in this
manual please contact MEGA Corp. Product Support
at: 1-800-345-8889 or visit our website at
www.megacorpinc.com for more detailed
information.
The exact location of the hazards and description of
the hazards are reviewed in this section. All personnel
working on or operating the machine must become
familiarized with all the safety messages.
Due to the nature of these processes, ensure that all
safety information, warnings and instructions are
read and understood before any operation or any
maintenance procedures are performed. Some
procedures take place with heavy components and
at moderate heights, ensure proper safety
procedures are maintained when performing these
actions. Failure to use and maintain proper safety
equipment and procedures will cause injury, death or
damage to equipment.
WARNING, CAUTION AND NOTES
The following definitions are found throughout the
manual and apply as follows:
Operating procedures and techniques, which could
result in personal injury and/or loss of life if not
carefully followed.
Operating procedures and techniques, which could
result in damage to equipment if not carefully
followed.
Operating procedures and techniques that are
considered essential to emphasize.
USE OF SHALL, WILL, SHOULD AND MAY
Shall and Will – Used when application of a
procedure is mandatory.
Should – Used when application of a procedure is
recommended.
May - Used to indicate an acceptable or suggested
means of accomplishment.
Manual Usage ...................................................................1-1
Warning, Caution And Notes ......................................1-1
Use Of Shall, Will, Should And May ...........................1-1
Safety Messages ..............................................................1-2
Abbreviations ...................................................................1-3
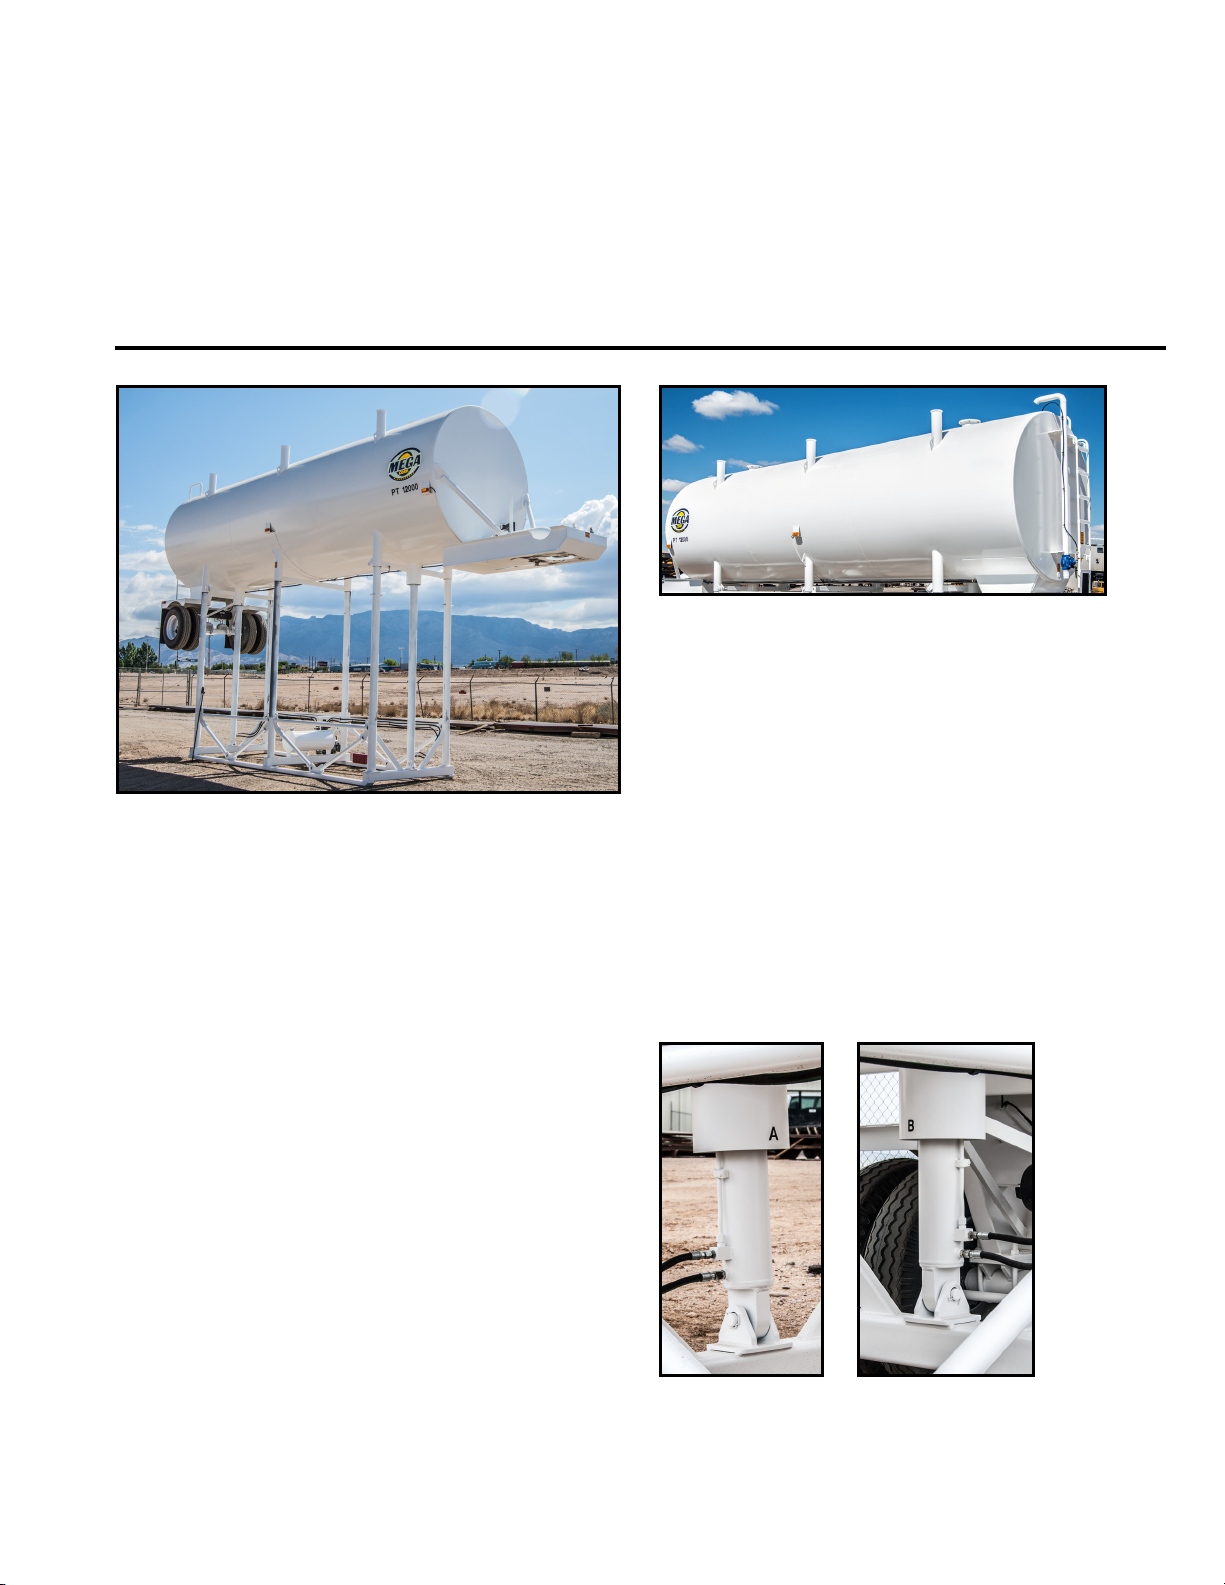
MPT Overview (Typical) ................................................1-4

MPT12 Manual
24 May 2017
SECTION 1
Definitions and Abbreviations
1-2
SAFETY MESSAGES
There are several specific safety messages applicable
to this machine. Some of these safety messages have
associated warning labels located on the machine.
The descriptions of the hazards and the locations (if
applicable) of their warning labels are reviewed in
this section. All personnel working on or operating
the machine must become familiarized with all the
safety messages.
Make sure that all of the safety labels are legible.
Clean or replace the safety labels if you cannot read
the words. Replace the illustrations if the illustrations
are not legible. When you clean the safety labels, use
a cloth, water and soap. Do not use solvent, gasoline
or other harsh chemicals to clean the safety labels.
Solvents, gasoline or harsh chemicals could loosen
the adhesive that secures the safety labels. Loose
adhesive will allow the safety labels to detach.
Replace any safety label that is damaged or missing.
If a safety label is attached to a part that is replaced,
install a new safety label on the replacement part.
TOXIC GAS HAZARD (1)
Cutting or welding operation on the inside of the
tank can cause the accumulation of toxic gases.
Read and understand instructions and warnings
in the Maintenance Manual. Failure to provide
proper ventilation or breathing apparatus while
conducting these operations may result in serious
injury or death.
FREEZING (2)
This safety label is located on the front of the
machine, by the discharge pipe..
Drain tank, fill pipe, and drain valve in freezing
weather. Refer to the Operator and Maintenance
Manual for the procedure to follow.
NON-POTABLE (3)
This safety label is located at the rear of the tank, near
the ladder.
Water held within tank is not potable. Do not use
tank for transport of water intended for human or
animal consumption or serious injury or death
may result.

MPT12 Manual
24 May 2017
SECTION 1
Definitions and Abbreviations
1-3
FALL HAZARD (4)
Do not walk on the top of tank without fall arrest
PPE. Serious injury or death could occur from a
fall.
HIGH PRESSURE MOTOR (5)
Hydraulic motor and supply lines contain oil
under high pressure. Improper removal and
repair procedures could cause severe injury. To
remove or repair, instructions in the Maintenance
Manual must be followed.
CONFINED SPACE (6)
Do not enter confined spaces without following
established site specific procedures. Failure to
follow proper safety procedures will result in
serious injury or death.
ABBREVIATIONS
BFV - Butterfly Valve
CCW - Counterclockwise
CW - Clockwise
FIP - Fault Isolation Procedures
Ft-lbs - Foot Pounds of Torque
GPM - Gallons per Minute
IPB - Illustrated Parts Breakdown
LT - Left (as viewed from the rear of the
vehicle looking forward)
MPT - Mega Portable Tank
n-m - Newton Meters of Torque
PSI - Pounds per Square Inch
RT - Right (as viewed from the rear of the
vehicle looking forward)
RPM - Revolutions per minute

MPT12 Manual
24 May 2017
SECTION 1
Definitions and Abbreviations
1-4
8
1
5
2
4
61HYDRAULIC CYLINDERS
2ENGINE & HYDRAULIC PUMP
3LEVER CONTROL SYSTEM
4FILL PIPE
5FILL PIPE VALVE
6ACCESS LADDER
7TOOL BOX
8DISCHARGE TUBE
9D.O.T. LIGHTS
10 HYDRAULIC TANK
REAR VIEW
SIDE VIEW
1
1
3
7
5
4
6
9 9
9
10
MPT OVERVIEW (TYPICAL)

2-1
MPT12 Manual
24 May 2017
SECTION 2
System Description
Contents
DESCRIPTION
The Mega Portable Tank (MPT) is a 12,000 gallon
platform or stand tank designed for towing with a
fifth-wheel on-highway tractor. The Mega MPT is
used to rapidly fill water distribution equipment to
maximize productivity. All Mega MPTs are self-
erecting by use of an engine-driven hydraulic pump
and hoist cylinders with pin locks. Mega MPTs have a
10 inch diameter discharge pipe capable of filling a
5,000 gallon tank in approximately 2 minutes. The
MPT can be filled from a municipal water source or
with other water pumping equipment. The 3” fill pipe
is equipped with an automatic shut off to prevent
overfilling.
The MPT is designed to comply with all Department
of Transportation requirements, and is available in
custom colors and with special signage as specified
by the customer. For more information, please
contact the Mega Sales Department at 1-800-345-
8889, or contact your local dealer.
MPT TANK
The MPT tank is 2.59m (8.5 ft) in diameter, 11.13m
(36.5 ft.) in length, and has a capacity of 45.42 L
(12,000 gallons). The corners of the tank are
reinforced to provide sturdy connection to supports.
An access ladder leading to the top of the tank is
located at the rear of the trailer, and a ladder is
located inside of the tank. An 8” diameter float is
located inside of the tank for automatic fill shut-off
when the tank is full.
SELF-RAISING SYSTEM
The MPT’s self-raising system incorporates dual
hydraulic cylinders and a 6.5 horsepower engine with
a hydraulic pump.
HYDRAULIC CYLINDERS
Dual 127mm (5 inch) diameter double-acting
hydraulic cylinders that allow the tank to be raised for
connection to a tractor. The frame can be lifted with
the same cylinders after tractor hook-up is complete.
Description.........................................................................2-1
MPT Tank .............................................................................2-1
Self-Raising System .........................................................2-1
Water Discharge System ...............................................2-2
Axle .......................................................................................2-2

MPT12 Manual
24 May 2017
SECTION 2
System Description
2-2
ENGINE
A 6.5 horsepower engine and hydraulic pump that is
mounted on the base of the MPT. The engine is
equipped with a handle for removal and storage after
the tank has been locked in the raised position. Quick
disconnects for the lines to the hydraulic pump are
located on the structure for storage of the hydraulic
hoses after the motor/pump package is removed.
PIN HANDLER
The Mega Pin Handler is a tool that allows a person to
install and remove all six (6) MPT hitch pins while
standing at ground level, eliminating the need for a
ladder and saving time in the process.
WATER DISCHARGE SYSTEM
The MPT’s water discharge system includes a 10 inch
diameter discharge pipe with a flow rate of
approximately 2,000 gal/min, a shut-off valve with
both a constant force wheel to ensure positive
closure, a weight and pulley system to secure the
chain while positioning the tanker beneath the
discharge pipe spout, and a canvas discharge sock for
the discharge pipe spout.
AXLE
The heavy-duty utility axle has a 20,000 lb. capacity
with an oil-lubricated bearing and auto slack
adjusters. It is the highest strength axle tube
generally available for utility vehicle axles. The
materials used allow for a stiffer and stronger axle
beam with no camber required.
The axle utilizes air braking. The backing plate of the
hydraulic brake mounts onto the piloted axle brake
flange, allowing the brakes to perform at their
optimum effectiveness.

MPT12 Manual
24 May 2017
SECTION 2
System Description
2-3
BUTTERFLY VALVE REMOTE CONTROL
SYSTEM (IF EQUIPPED)
The remote control system is designed to let the
operator activate the butterfly valve without using
the force wheel to start and stop water flow from the
tank. The system consists of a linear actuator, remote
control box, remote FOB, sealed battery, and solar
panel charger/analyzer.
Linear Actuator
Mounted to the gooseneck and connected to the
force wheel via a spring-loaded pin. A lanyard is
connected to the spring loaded pin in case power is
low or actuator failure, and the butterfly valve must
be activated by using the manual chain. The actuator
is 12 volts and powered through the remote control
box. Full activator travel is about five (5) seconds.
Remote Control Box
Mounted on top of the battery storage box and
contains the remote control receiver and charger
analyzer. Provides 12-volt power to the linear
actuator as commanded by the remote FOB’s.
1. Remote Control Receiver
2. Solar Panel Charge Controller
3. 20 Amp Actuator Fuse
Remote FOB’s
Provided to command the operation of the butterfly
valve through the remote control box.
Programming (Remote FOB’s)
The remote control FOB’s can be programmed to
operate in two different ways. From Mega, it is set in
push and hold mode. Push and hold the UP button
to open the valve, push and hold the DN button to
close the valve. If the button is depressed at any time
during open or closing the valve, it will stop in that
position. Mega receives the FOB’s in its default
setting. Press the UP button to open the valve and
the DN button to close the valve. Once pressed and
released, the valve will go to fully open or fully
closed. To stop the valve from opening or closing
fully, press the command directional button a second
time to stop the valve in the commanded position.
To change the FOB functions , please refer to the
following illustrations: NOTE: Please test prior to
1
2
3

MPT12 Manual
24 May 2017
SECTION 2
System Description
2-4
changing functions as the operation of the FOB may
have been changed from the default setting.
• Jumper for S1 on the remote control circuit
board; no pins are connected by the jumper. This
is the DEFAULT setting.
• Jumper for S1 on remote control circuit board;
both pins connected by jumper. This setting will
activate the “Push and Hold” to operate.
Sealed Battery (Black Box)
A 12-volt sealed battery located in a case and
mounted in the gooseneck. The battery is charged
and conditioned by the chagrer/analyzer unit.
Solar Panel
Mounted on the front of the unit. It provides
charging of the sealed battery as controlled by the
charger/analyzer.
LIMITATIONS
The remote control transmitter range is
approximately 30 to 50 yards (27 to 46 meters) with a
clear line of sight in the raised position. Note: the
transmission range can be limited by metal objects
interfering with the radio signals. See illustration.

MPT12 Manual
24 May 2017
SECTION 2
System Description
2-5
Butterfly Valve Remote Control Disconnect
A disconnect lanyard (1) is provided to allow
disconnect/release of the actuator pin (2) from the
force wheel to allow for manual operation of the
valve.
SIDE DISCHARGE PIPE (IF EQUIPPED)
This option provides a means to discharge water to
either side of the unit. The pipe is mounted on a
hinged flange to allow deployment and storage.
Simply unstow the pipe, then swing out to allow
bolting of the hinged flange and secure with the
bolts. Once deployed and bolted, check the wire for
security and adjust the turn buckle accordingly.
Once properly rigged and set, the tank can be raised
and filled.
M
P
T
1
2
30 – 50 Yards

MPT12 Manual
24 May 2017
SECTION 2
System Description
2-6 (Blank)

3-1
MPT12 Manual
24 May 2017
SECTION 3
Commissioning
Contents
DESCRIPTION
The following section details the test procedure steps
required for inspection of the stand tank prior to
placing the stand tank into service. If you are having
difficulties with these procedures, please contact The
MEGA Corp. Product Support Group at: U.S. Toll Free
1-800-345-8889 or Direct 1-505-345-2661 or visit our
website at www.megacorpinc.com for more contact
information.
1. Check hydraulic oil level.
2. Check oil level in wheel hubs.
3. Check engine oil & fuel.
4. Start engine.
5. Remove locking pins.
6. Raise tank until pin hoist clears top pinhole.
7. Lower tank& replace locking pins.
8. Butterfly in closed position.
9. Fill with water.
10. Pull up on float, adjust valve until water flow
shuts off
11. Fill tank to check operation of float.
12. Drain water back into main supply.
13. Tie down float, toolbox, and hydraulic tank cap.
Description.........................................................................3-1

MPT12 Manual
24 May 2017
SECTION 3
Commissioning
3-2 (Blank)

4-1
MPT12 Manual
24 May 2017
SECTION 4
Operation Instructions
Contents
DESCRIPTION
This section includes the steps required for lowering,
transporting, and set-up of the MPT. Failure to adhere
to these steps and their associated warnings,
cautions, and notes may result in death, severe injury,
or damage to the equipment. If your system is not
covered in this manual or you are having difficulties
with the installation please contact The MEGA Corp.
Product Support Group at: U.S. Toll Free 1-800-345-
8889 or Direct 1-505-345-2661 or visit our website at
www.megacorpinc.com for more contact
information.
LOWERING
1. Read the engine operator’s manual prior to
operation.
2. Remove water from the tank.
Empty tank of water prior to lowering. Never
move a tank containing water.
3. Start the hydraulic power unit and use the
hydraulic control valves to slightly raise the tank
and remove weight from the hitch pins.
The tank should always be positioned on stable,
level ground before filling with water and/or
raising. The ground beneath the tank must be
capable of supporting the tank and a full payload
of water as well as the weight of the equipment
utilizing the tank.
4. Remove hitch pins and store in the tool box.
5. Turn off the hydraulic power unit.
6. Use the hydraulic control valves to lower the tank
until it is resting on the ground.
Keep feet from under the frame or personal injury
could occur. Remove hoses or tools from under
frame before lowering tank.
Extension of the front and rear hydraulic cylinders
are controlled by separate valves. To avoid
damage when raising or lowering the tank adjust
hydraulic cylinders to keep the tank level at all
times.
TRANSPORTING
1. Read the engine operator’s manual prior to
operation.
2. Remove water from the tank.
Empty tank of water prior to transporting. Never
move a tank containing water.
3. Start the hydraulic power unit and use the
hydraulic control valves to lower the tank to level
ground.
4. Start the hydraulic power unit and use the
hydraulic control valves to raise the tank into a
position that aligns the trailer kingpin with the
tractor’s fifth wheel height.
The tank should always be positioned on stable,
level ground before filling with water and/or
raising. The ground beneath the tank must be
capable of supporting the tank and a full payload
of water as well as the weight of the equipment
utilizing the tank.
Description.........................................................................4-1
Lowering .............................................................................4-1
Transporting ......................................................................4-1
Set-Up ..................................................................................4-2
Butterfly Valve Remote Control Disconnect (If
Equipped)...........................................................................4-3

MPT12 Manual
24 May 2017
SECTION 4
Operation Instructions
4-2
5. Back tractor into locking position and connect
the trailer to the tractor. While keeping the tank
level, use the hydraulic control valves to lower the
tank until the tires are on the ground.
Keep feet from under the frame or personal injury
could occur. Remove hoses or tools from under
frame before lowering tank.
Extension of the front and rear hydraulic cylinders
are controlled by separate valves. To avoid
damage when raising or lowering the tank, adjust
hydraulic cylinders to keep the tank level at all
times.
6. Connect air and electrical systems between the
tractor and tank.
7. Check brakes and lights for proper operation.
Check tires for correct air pressure.
8. Use the hydraulic power unit to completely raise
the tank frame.
The tank should always be positioned on stable,
level ground before filling with water and/or
raising. The ground beneath the tank must be
capable of supporting the tank and a full payload
of water as well as the weight of the equipment
utilizing the tank.
9. Insert hitch pins with hitch pin clips into the
bracket between the tank and tank frame at all
six (6) locations.
10. Pin float ball in locked position.
11. Remove all loose items from the unit. Turn off the
hydraulic power unit. Secure the tool box.
SET-UP
1. Read the engine operator’s manual prior to
operation.
2. Select a level area with a stable foundation for
positioning of the tower. The area should be level
in all directions and offer good access to water
haulage equipment.
The tank should always be positioned on stable,
level ground before filling with water and/or
raising. The ground beneath the tank must be
capable of supporting the tank and a full payload
of water as well as the weight of the equipment
utilizing the tank.
3. Disconnect air and electrical controls from the
tractor.
4. Start the hydraulic power unit and remove the
hitch pins from the brackets between the tank
and frame. Retain the pins for use after raising the
tank.
5. Use the hydraulic controls to lower the frame to
the ground. Raise the tank until it is possible to
disconnect the tractor from the tank.
Keep feet from under the frame or personal injury
could occur. Remove hoses or tools from under
frame before lowering tank.
Extension of the front and rear hydraulic cylinders
are controlled by separate valves. To avoid
damage when raising or lowering the tank, adjust
hydraulic cylinders to keep the tank level at all
times.
6. Disconnect the tractor.
7. Remove the float ball pin from the transport
position.
8. Continue to raise the tank evenly until the desired
height is reached.

MPT12 Manual
24 May 2017
SECTION 4
Operation Instructions
4-3
9. Install the hitch pins into all six (6) frame legs.
Install all the hitch pins and be sure that they
extend completely through both sides of each
leg. Use the hitch pin installation tool if necessary
to reach the holes.
Failure to install hitch pins in all six (6) frame legs
may result in damage to the tower.
10. Use the hydraulic controls to lower tank until it
rests upon the hitch pins. Turn off the power unit.
Keep feet from under the frame or personal injury
could occur. Remove hoses or tools from under
frame before lowering tank.
Extension of the front and rear hydraulic cylinders
are controlled by separate valves. To avoid
damage when raising or lowering the tank, adjust
hydraulic cylinders to keep the tank level at all
times.
11. Connect the water supply to the tank. Check the
ball float ball and float valve for proper operation.
12. Use tie downs to prevent wind damage to the
tower tank in high wind conditions. Tie-down
locations and details are given in “Figure 4-1: Tie-
downs” on page 4-5.
BUTTERFLY VALVE REMOTE CONTROL
DISCONNECT (IF EQUIPPED)
If the valve fails to operate, a release mechanism can
be activated by using the pin installation tool to pull
the release cable. This will release the pin for the
actuator to disengage it from the butterfly valve.
If multiple systems are in close proximity to one
another (less than 100 yards or 92 meters), it may be
possible to operate more then one unit
simultaneously. This may cause unexpected opening
of the butterfly valve releasing water from the tower.
Ensure there is enough distance between the
systems, and all personnel are clear from underneath
tanks. Test to ensure only the desired tank valve
opens when signaled.
REMOTE CONTROL DISCONNECT
To release the pin from the wheel:
1. Remove the pin handler tool from the storage
rack
2. Insert shear pin tool in wire hoop near the left
front leg of tank.
3. Pull down sharply to release cotter pin spring to
eject actuator from wheel. If actuator does not
release from wheel, move manual operation
chain to release tension on actuator until the
actuator springs off of pin allowing manual
operation of butterfly valve
4. Operate the butterfly valve by using the chain.
REMOTE CONTROL RE-CONNECT
To re-install actuator:
1. Ensure tank contains no water
2. Start engine and Raise tank sufficiently to remove
weight from shear pins
3. Remove 6 (six) shear pins and stow in tool box
4. Lower tank to ground
5. Troubleshoot system to isolate failed component
and repair or replace
6. Fully retract actuator
7. Locate wheel pin, three flat washers, spring and
cotter pin
8. Insert actuator pin from the back of the wheel
9. Install one flat washer on outside of pin
10. Install spring on pin

MPT12 Manual
24 May 2017
SECTION 4
Operation Instructions
4-4
11. Install one flat washer on outside of spring
12. Compress spring and slide actuator rod onto the
pin
13. Install one flat washer on outside of actuator rod
14. Insert cotter pin in hole of pin.
• Ensure release cable is free and not binding when
cotter pin is installed. Test actuator to ensure cor-
rect operation and release cable does not bind or
interfere with butterfly valve wheel, and butterfly
valve moves to the completely closed position.
15. Return stand tank to normal service.
COLD WEATHER STORAGE
Ice will cause serious damage to the fill pipe and fill
pipe valves if water is allowed to freeze in the tank or
water piping. Ensure all water is drained from the unit
when the temperatures are expected to fall below
freezing for any period of time.
1. Ensure that the unit is stable and is positioned on
level ground. Do not lower the tank.
Empty tank of water prior to lowering. Never
move a tank containing water.
2. Shut-off all water fill sources (hydrant or pump) to
the fill pipes.
3. Open discharge BFV and drain water from the
tank. Be careful not to drain the water so quickly
that it will erode the ground beneath the frame.
4. Use the hydraulic controls to lower the frame to
the ground (as described previously in
“Lowering” procedures).
Keep feet from under the frame or personal injury
could occur. Remove hoses or tools from under
frame before lowering tank.
Extension of the front and rear hydraulic
cylinders are controlled by separate valves. To
avoid damage when raising or lowering the tank,
adjust hydraulic cylinders to keep tank level at all
times.
5. Disconnect and drain fill source hosing.
6. Open fill pipe valves. In order to fully drain the
7. fill pipe, the pipe plug (shown in the Section 8
Illustrated Parts Breakdowns) must be
unscrewed.
8. Check to ensure that all water has drained from
tank, fill pipes, and valves.
REACTIVATING UNIT
1. Re-install pipe plug into fill pipe valve.
2. Close discharge BFV and fill pipe valves.
3. Set up the tank in accordance with “Set Up”
operating procedures.

MPT12 Manual
24 May 2017
SECTION 4
Operation Instructions
4-5
Figure 4-1: Tie-downs
Table of contents
Popular Water Heater manuals by other brands

Bosch
Bosch GWH 635 ES Service Bulletin Booklet

State Water Heaters
State Water Heaters GS6-40-UBPDS Installation and operating manual

STIEBEL ELTRON
STIEBEL ELTRON DNM 3 Operation and installation

Haier
Haier FCD-JTHMG80-III Mode d'emploi

Nofer
Nofer SB150N User and installation manual

Atmor
Atmor Enjoy Installation and operation guide

Danfoss
Danfoss TERMIX PM2+P installation guide

Uponor
Uponor 324702 Installation instruction

AE
AE DEX 18-27 Installing instructions for the professional

WIKORA
WIKORA WKS 155 Installation manual operating instructions

STIEBEL ELTRON
STIEBEL ELTRON DHA 4/8 L Operating and installation

enertik
enertik BC-F20HWR2-200L Installation and user manual