Melco N1 Series User manual

English
Deutsch
Français

Diagrams ......................................................................................................1
Power On .....................................................................................................4
Available Devices and Ports ...............................................5
Enabling the External Clock Generator...............6
Importing Files.......................................................................................7
Checking Imported Files..........................................................8
Contents
Preparing the Player for Playback ..............................9
Playing Files..............................................................................................10
Using SFP Ports Instead of Ethernet Ports.....11
Specifications.........................................................................................12
Operation Manuals Available Online........................13
Warning
• This product is not waterproof. To prevent fire or electric hazards, do not
place any containers filled with liquid near this product (such as a vase or
flower pot) or expose it to dripping, splashing, rain or moisture.
• To prevent fire hazards, do not place any naked flame sources (such as a
lighted candle) on or near the product.
• This is a class A product. Class A devices are those that are marketed for
use in a commercial, industrial or business environment. This product is
only intended for professional use, and should not be used in an office or
household environment.
This product may cause interference if used in residential areas.
Such use must be avoided unless the user takes special measures to
reduce electromagnetic emissions to prevent interference to the
reception of radio and television broadcasts.
• Slots and openings in the cabinet are provided for ventilation to ensure
reliable operation of the product, and to protect it from overheating. To
prevent fire hazards, the openings should never be blocked or covered
with items (such as newspapers, table-cloths, curtains) and never operate
the product on thick carpeting or a bed.
Caution
• This product becomes warm, so be careful not to touch it to avoid
hazards.
• This product is not suitable for use in locations where children are likely to
be present.
• Make sure to leave space around the unit for ventilation to improve heat
radiation (at least 20 cm; 7.9 in. at top and rear, and 5 cm; 2 in. at each
side). Do not block the front of the unit such as with doors.
Operating Environment
Operating environment temperature and humidity: +5°C to +35°C (+41°F to
+95°F); less than 80% RH (cooling vents not blocked)
Do not install this unit in a poorly ventilated area, or in locations exposed to
high humidity or direct sunlight (or strong artificial light).

1
English
7Down Button ( )
5
Menu/Enter Button ( )
4Back Button ( )
Display
3
2Power Button ( )
1Power LED
Diagrams
Buttons and Ports
8USB 3.0 Port 13 USB 3.0 Port for
Expansion USB Drive
9Clock Generator Select
Button
10 Connector for External
Clock Generator
18 Power Connector
17 SFP Port
16 Ethernet Port for
Router
or Hub
14 USB 3.0 Port for Backup
USB Drive
15
Ethernet Port for Player
6Up Button ( )
2 3 4 65 8 131110914 15 16 17 18
11 USB 2.0 Port for
USB-DAC
12 USB 3.0 Port for
USB-DAC
712
1

2
English
192.168.10.41
2%
N-00BA
Diagrams
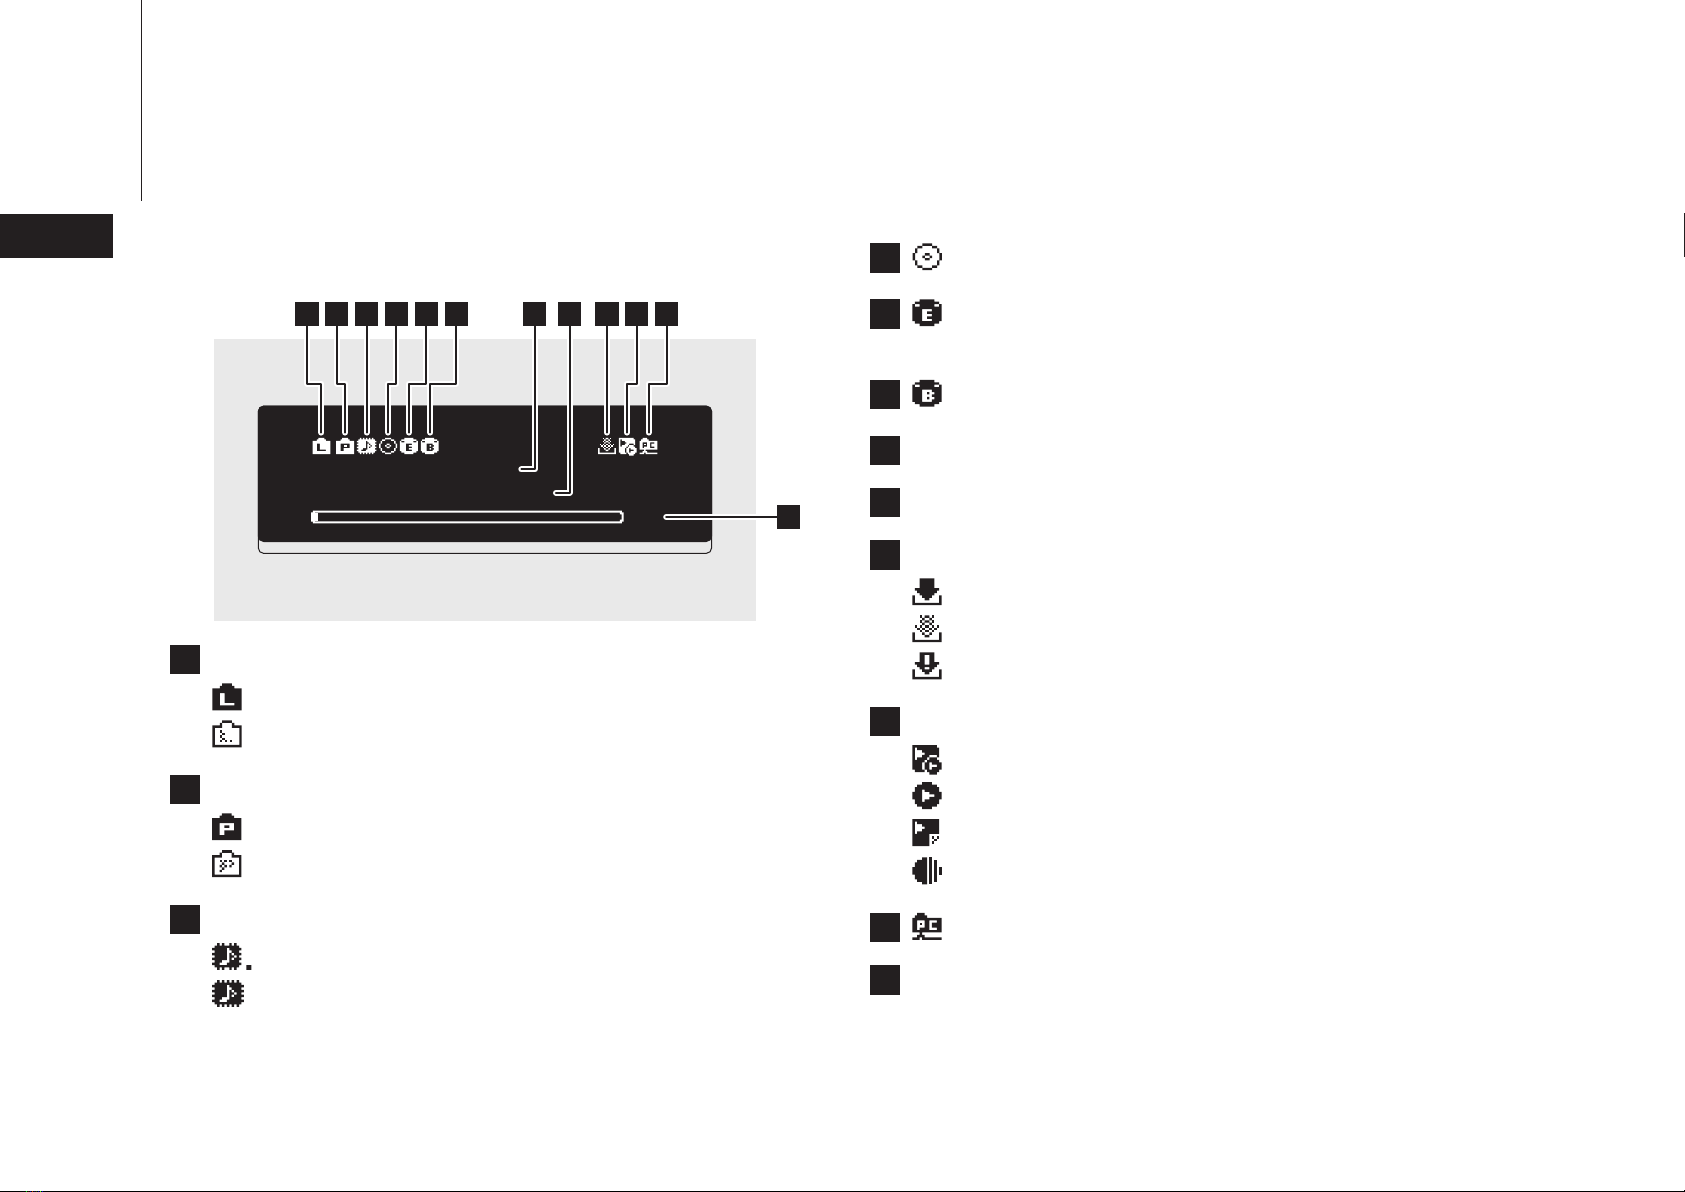
Display - Home Screen
1Status of Connected Router or Hub
2Status of Connected Player
3Markerless DSD Compatibility for USB-DAC (lit when
connected)
9Status of Downloader
7Friendly Name (Hostname)
IP Address
8
Connected
Not connected
Not connected
Connected
4Optical Drive Indicator (lit when detected)
10 Controller Settings (lit when a USB-DAC is connected)
5Expansion Drive Indicator
(lit solid when detected, flashes when recognizing)
Backup Drive Indicator (lit when detected)
6
Markerless DSD-incompatible
Markerless DSD-compatible
An error occurred
Working
Disabled
UPnP/DLNA-compatible mode enabled
Playlist mode enabled
1 2 3 4 5 6 9 10 118
12
7
Hybrid mode enabled
12 Usage Capacity of Internal Drive
11 File Sharing Indicator (lit when enabled)
Roon Ready mode enabled
Note: The icons and the layout displayed may be different after future firmware updates.
For the latest information, refer to the product manuals available from our website.
3
English
Select the action to take for the
USB drive connected to the front
USB port.
Import
Select the action to take for the
USB drive connected to the front
USB port.
Mount and Scan
Status
Browse Songs 0
Backup
Settings
Diagrams
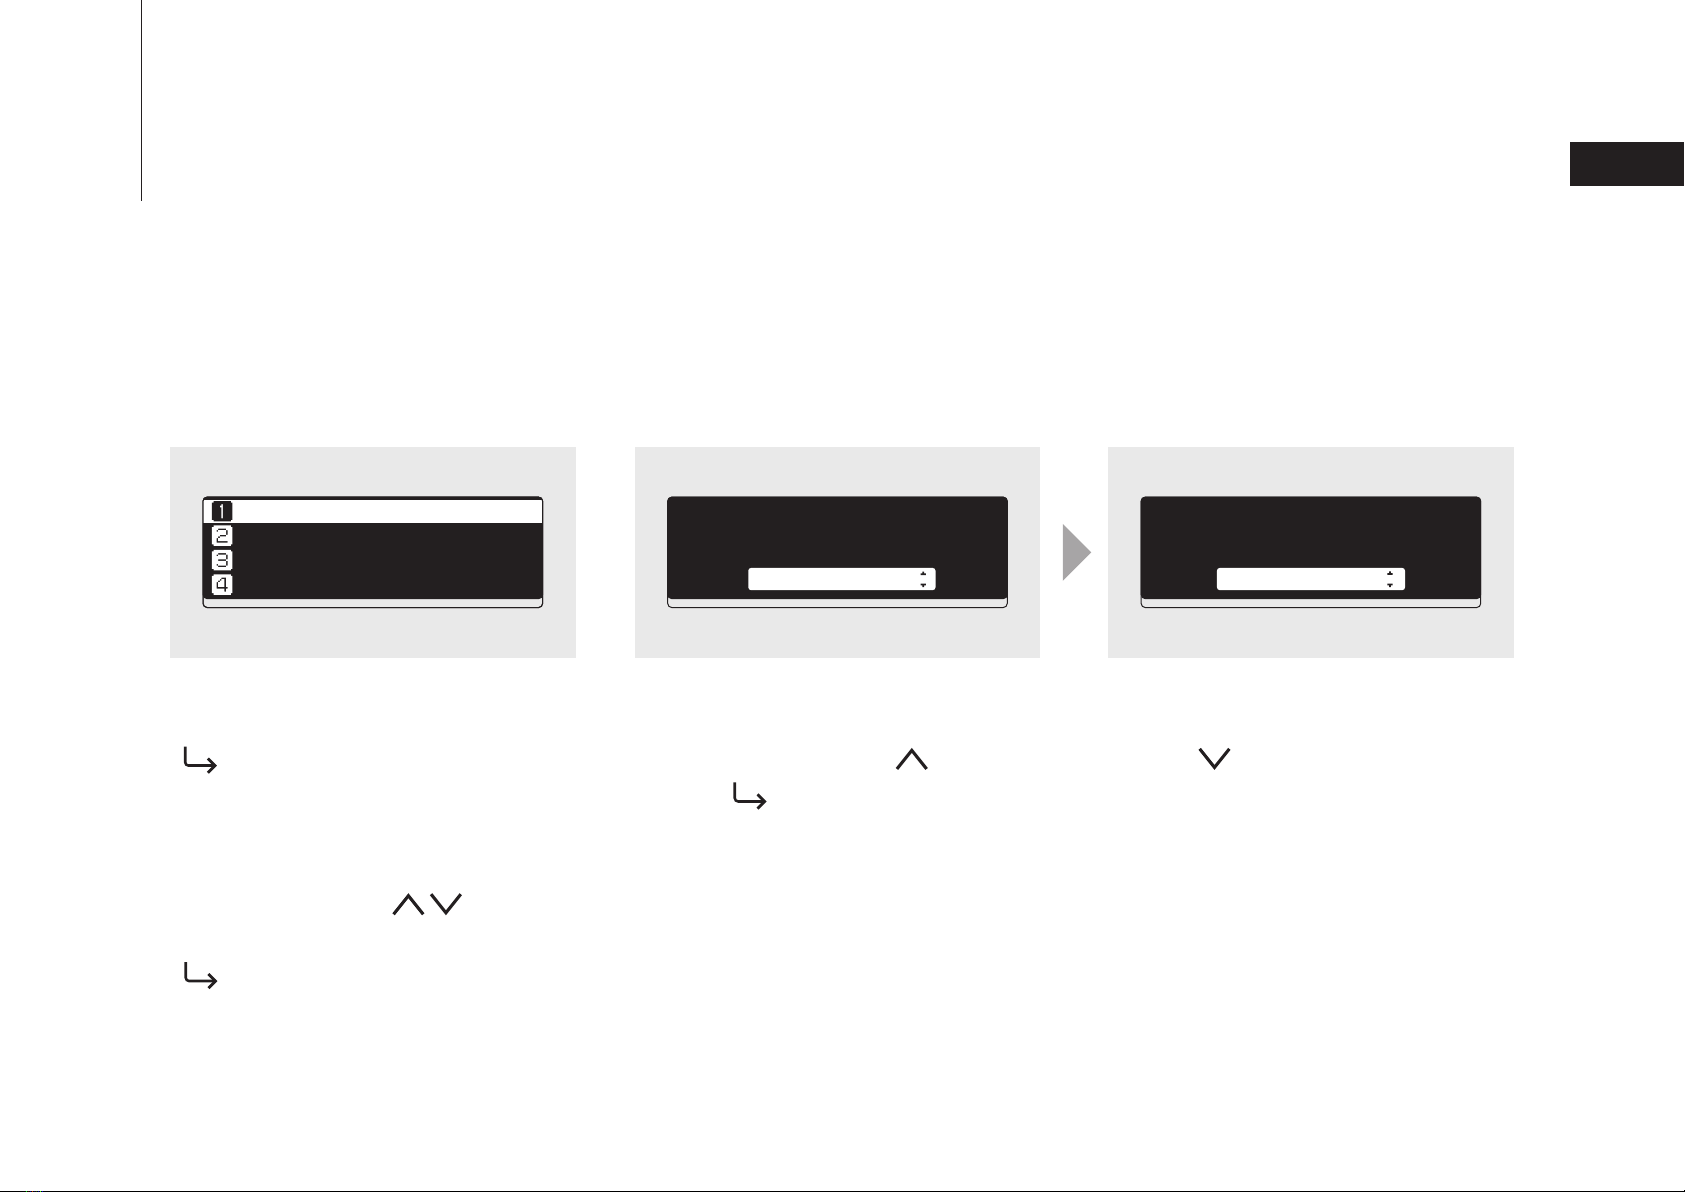
Display - Menus and Dialogs
Press the Menu/Enter button
( ) while the home screen is
displayed to bring up the menu
screen.
Move the cursor by pressing the
Up/Down button ( ) and
press the Menu/Enter button
( ) to make a selection.
The dialog screen will be displayed when confirming an operation. Press
either the Up button ( ) or the Down button ( ) then the Menu/Enter
button ( ) to make a selection.
Menu Screen Dialog Screen

4
English
Music Library 192.168.10.41
2%
N-00BA
2
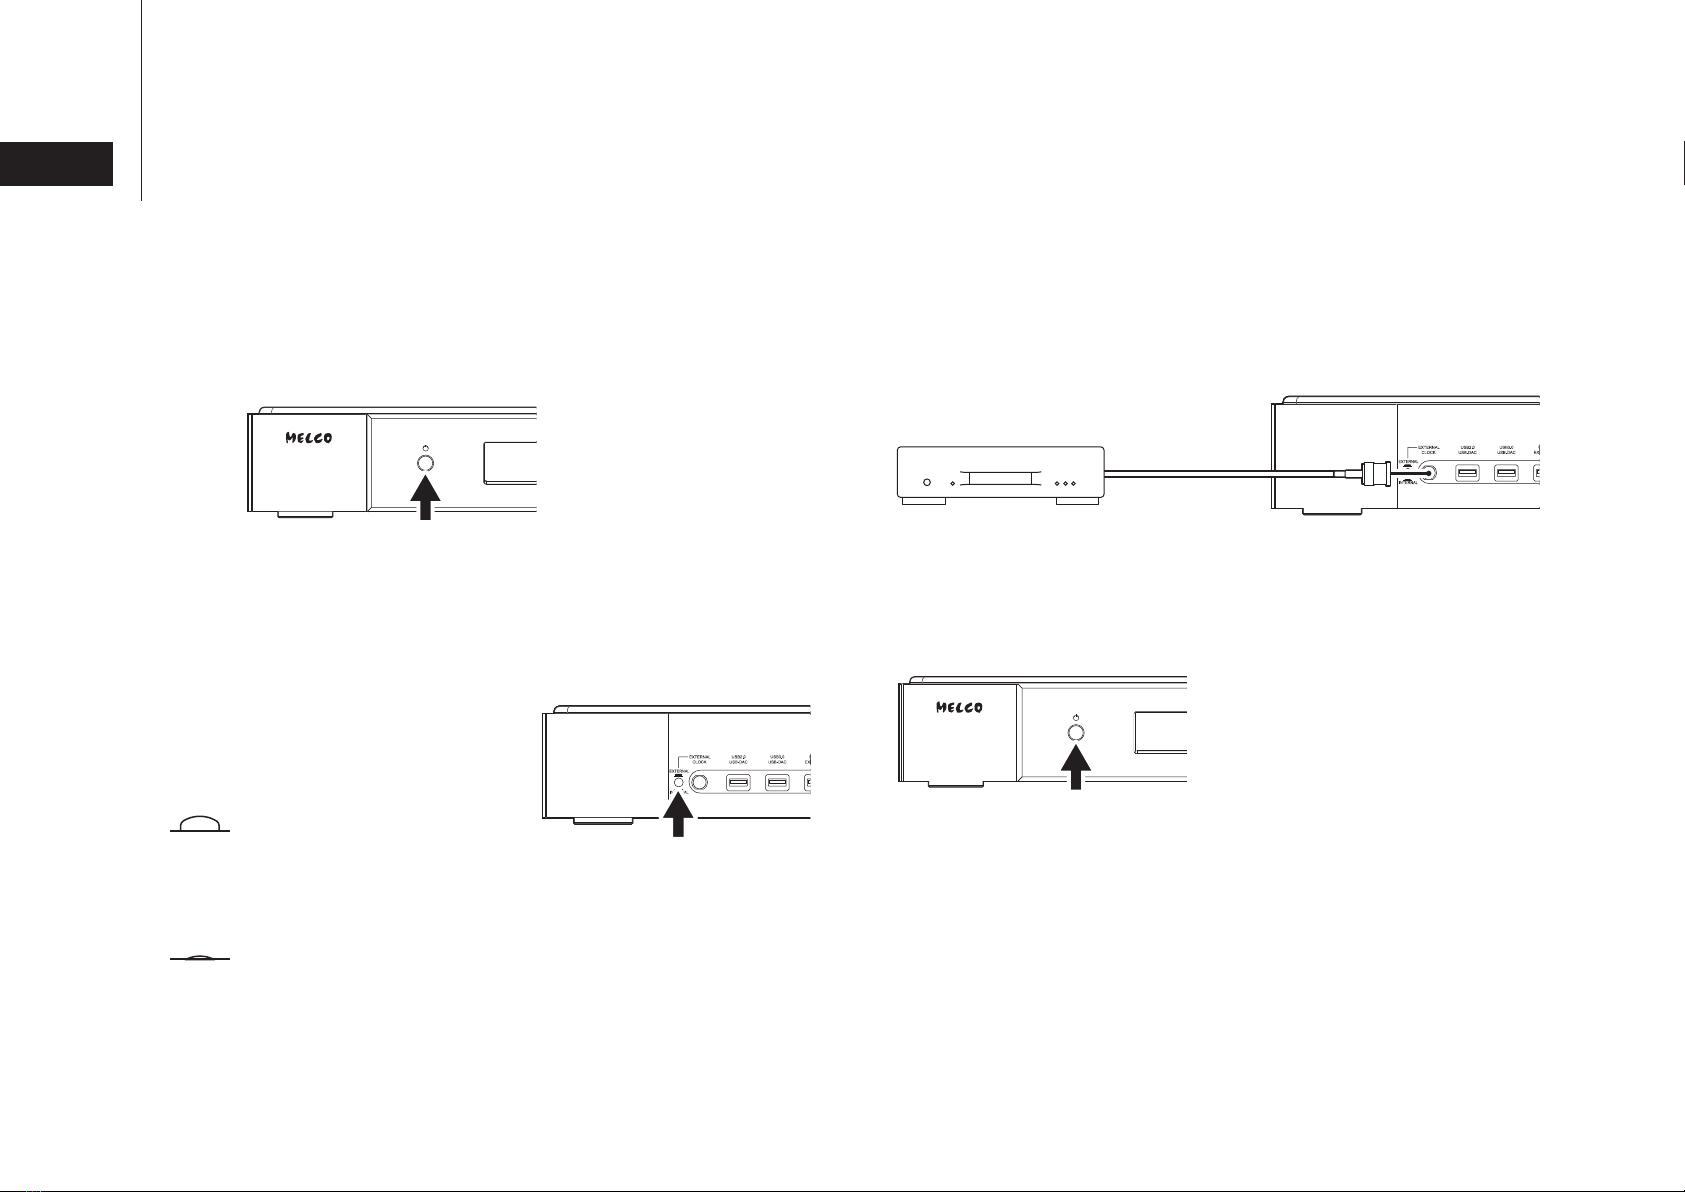
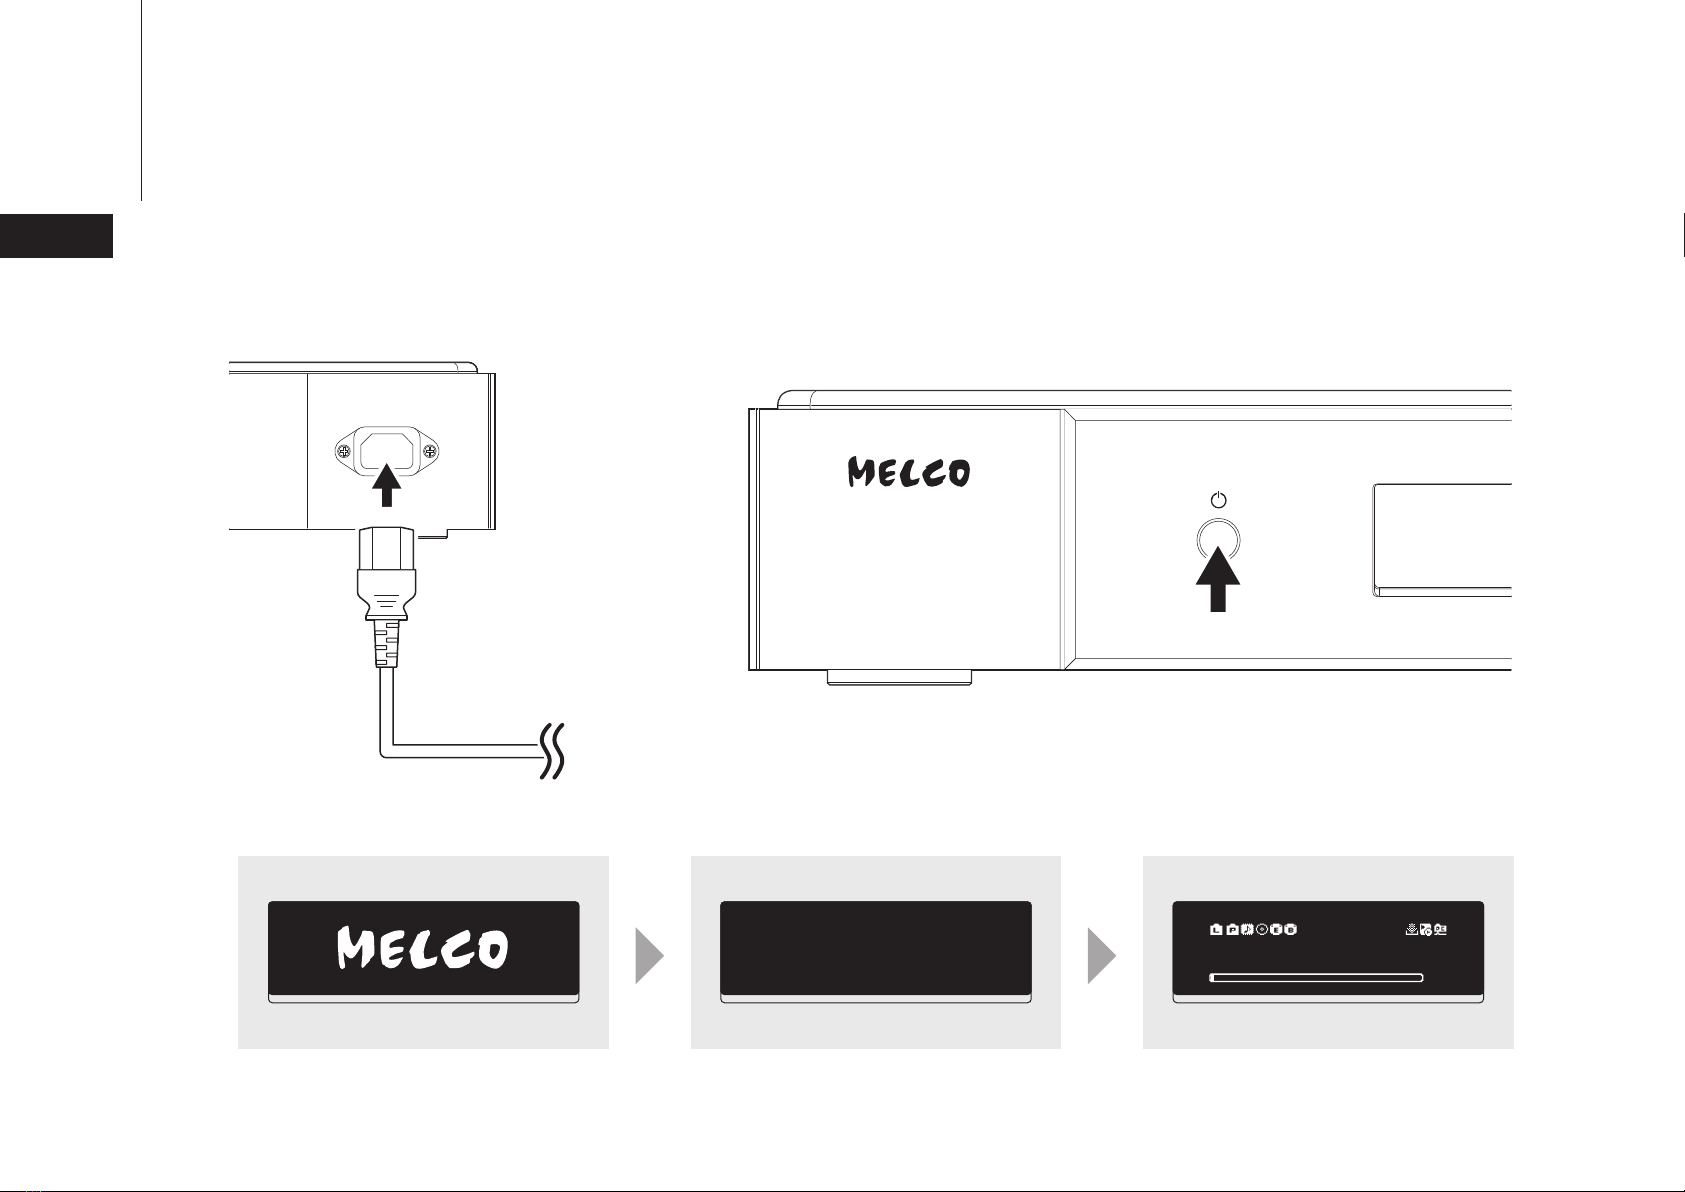
Power On
1
3

5
English
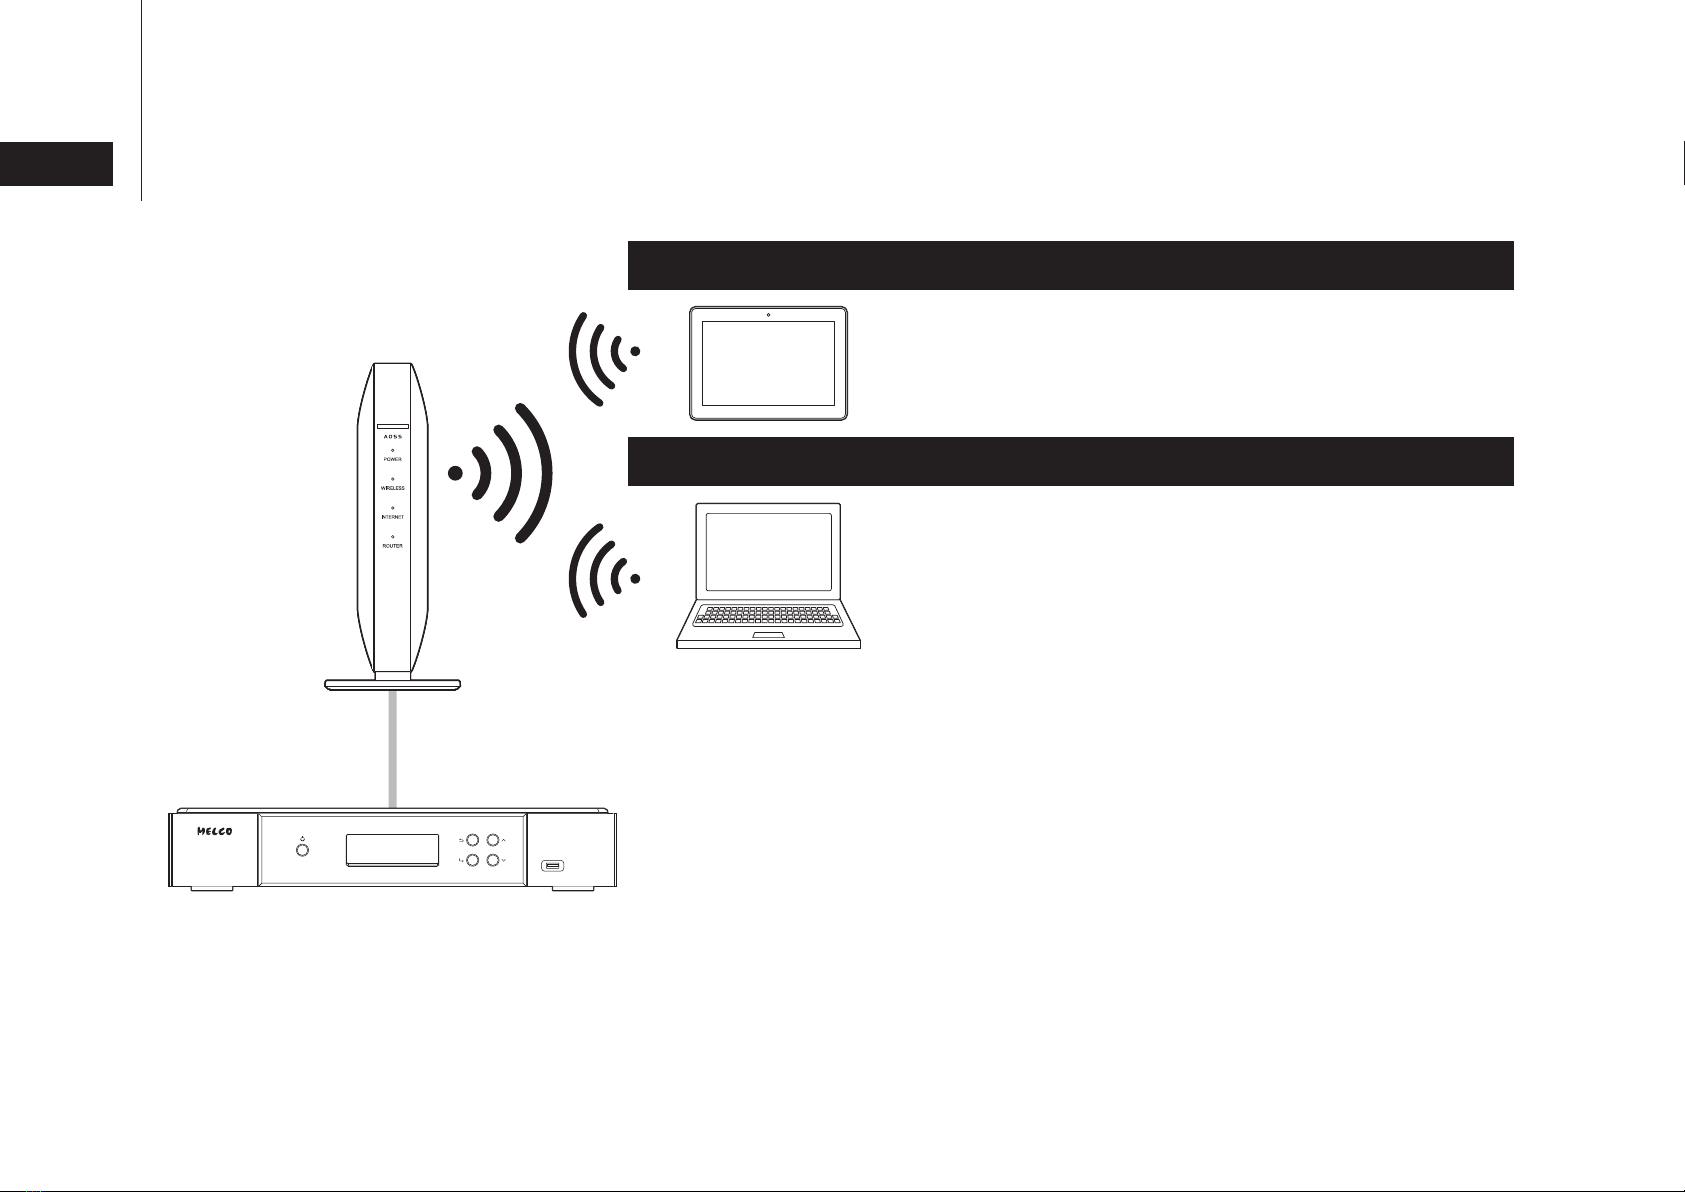
Internet
Required for downloading music files from a
streaming site, importing files from a CD, and
checking for new firmware releases.
Wireless
Router
Computers
Available for saving or playing music files.
Mobile Devices
Available for playing music files.
Available Devices and Ports
USB-DAC
Available as a player.
Network Audio Player
Available as a player.
USB Memory Device
Available for serving as an import source device expanding the capacity, or updating
the firmware.
USB Drive
Available for serving as an import source device expanding the capacity, or serving as
a backup destination.
Optical Drive (CD, DVD, or Blu-ray drive)
Available for serving as an import source device or playing a CD via a USB-DAC.
Clock Generator
Available as a master clock generator
instead of the internal clock generator of the
Digital Music Library.
Use a 10 MHz clock generator only.
6
English Enabling the External Clock Generator
Press the Clock Generator Select
Button to Get It to the Unpressed
Position
3
Connect the Clock Generator
2
Clock Generator
10 MHz Output Connector
Turn the Digital Music Library Off
1
BNC Coaxial
Cable
BNC Coaxial
Cable
Unpressed Position
The external clock generator will become the master clock
generator. If the clock generator has not been connected, the
power LED will blink.
Pressed Position (Default)
The internal clock generator of the Digital Music Library will be
the master clock generator.
Turn the Digital Music Library On
4

7
English
OK
Import from CD?
ALBUM NAME A
OK
ALBUM NAME A
Select the title and proceed.
ALBUM NAME B
ALBUM NAME C
OK
Import from rear USB drive?
OK
Finished.
OK
OK
Finished. Insert another CD for
importing.
OK
OK
1.Track A
2.Track B
3.Track C
OK
20 mm; 0.8 in
9 mm; 0.35 in
Note: When using the front USB port, a USB
connector larger than the size noted below
cannot be connected.
2Press the Menu/Enter button ( ).
3Press the Down button ( )
to check the imported tracks.
Importing Files
For USB Drives
For CDs
4Press the Menu/Enter button ( ).
Press the Menu/Enter button ( ).
1Select the album title.
8
English
For Mobile Devices
For Computers
1Enter “\\” and the N1’s IP address or friendly
name (hostname) into the address bar of
Explorer, then press the Enter key.
For macOS, click Go from Finder and select
Connect to Server, then enter “smb://” and the
N1’s IP address or friendly name (hostname).
If the username and password are required,
enter “nobody” for both.
2The “Internal” folder will be displayed.
Double-click the “Internal” folder and if all the
imported files are displayed, import was
finished properly.
Install a UPnP/DLNA-compatible app to check
the imported files and make sure importing was
finished successfully.
You can also directly import files from the computer to the displayed
“Internal” folder mentioned in the step above by dragging and dropping
them from one folder to the other.
Checking Imported Files
9
English
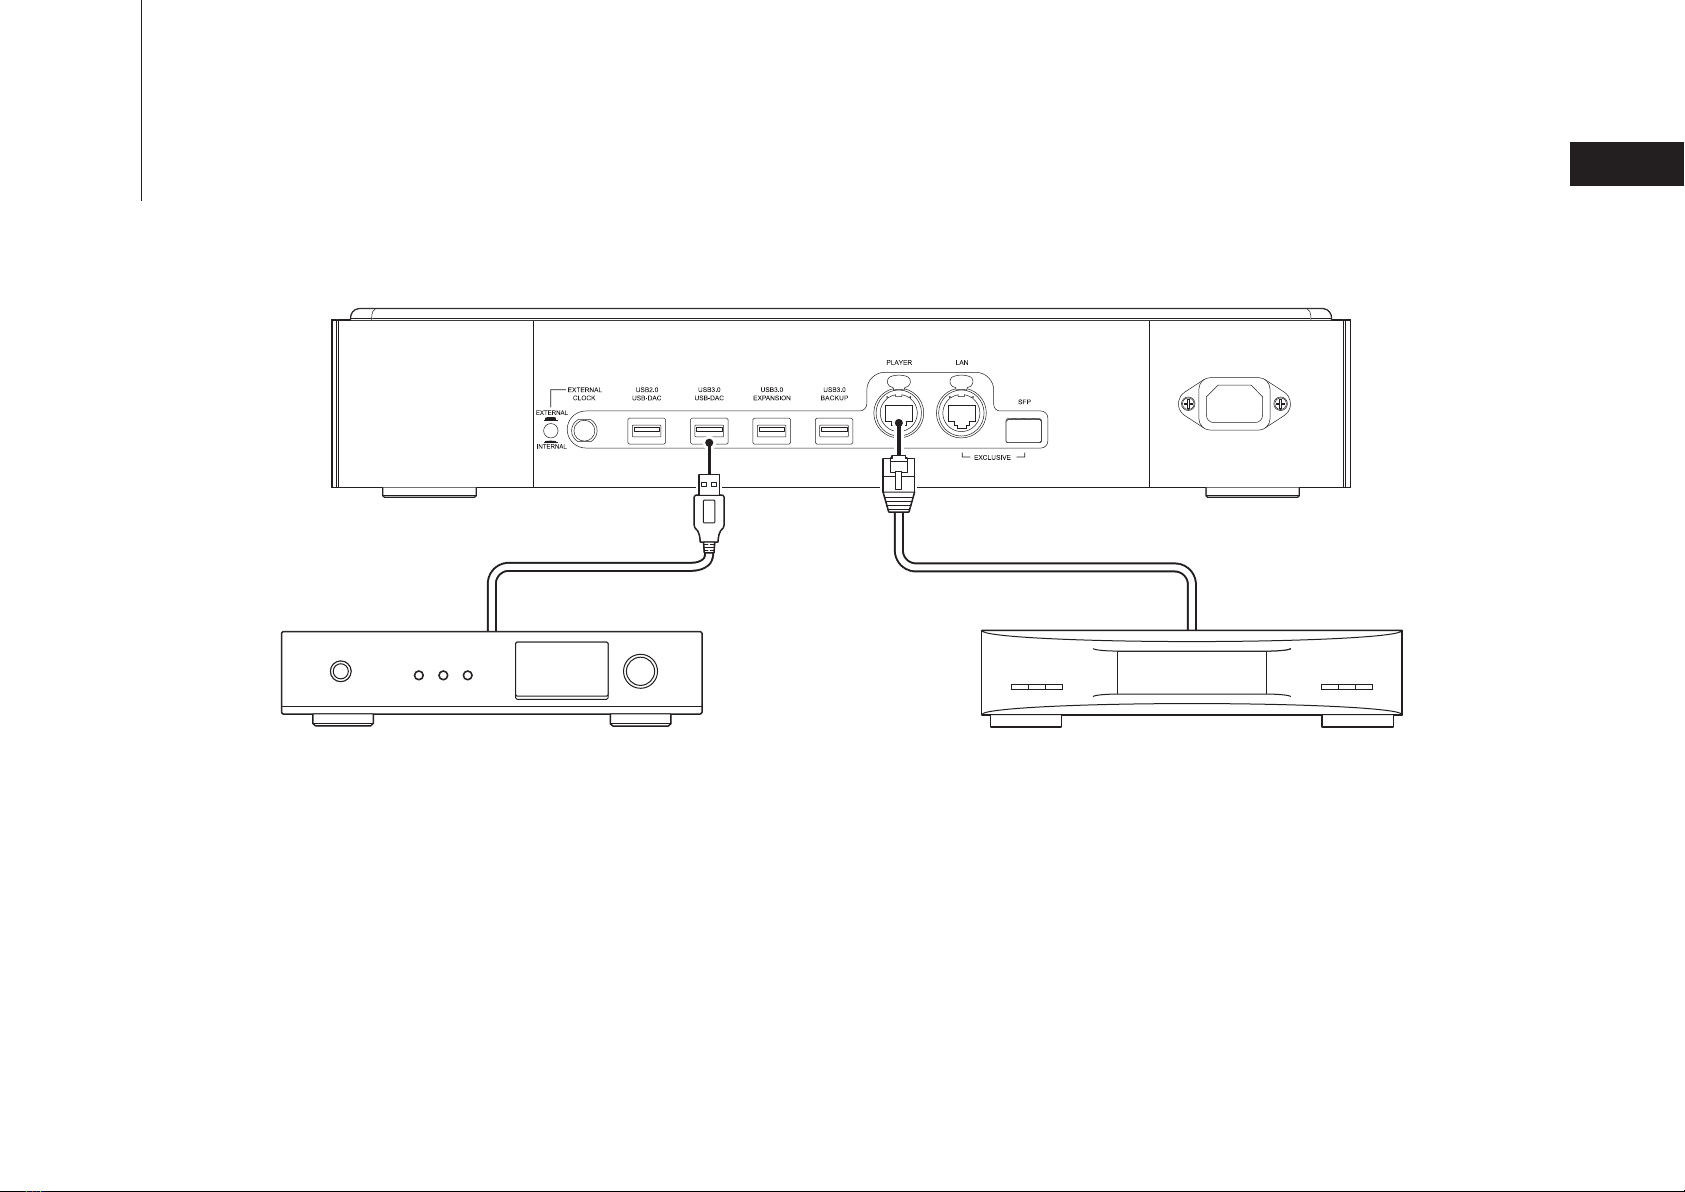
The N1 has an Ethernet port that can connect a Network Audio Player directly. Using this port is recommended
for high quality audio playback. To play music files using a Network Audio Player, refer to the manual of the
player before playing. The N1 will be used as a NAS (network-attached storage) device.
USB-DAC
After turning it on, you may be able to play music files by
changing the input to USB. You can use ports other than the
USB-DAC port, but only one device will be detected if two or
more USB-DAC devices are connected.
Network Audio Player
After turning it on, you may be able to play music files by
changing the input to music server or network. You can also
use another player on the network rather than the player
connected to the player port.
Preparing the Player for Playback

10
English
Network Audio Player
N1 Audio File
or
Select the Player
1Select the Libraries or Files
2Play
3
Digital Music Library and USB-DAC
Play music files by using a UPnP/DLNA-compatible controller app on your mobile device or computer.
If playing music files on the Network Audio Player, it is best to use an app recommended by the player
manufacturer.
If playing music files on the USB-DAC, it is best to use an app recommended by us. Recommended apps are
listed on our website. You can also play music files using buttons on the N1.
Playing Files
11
English
8
12 8
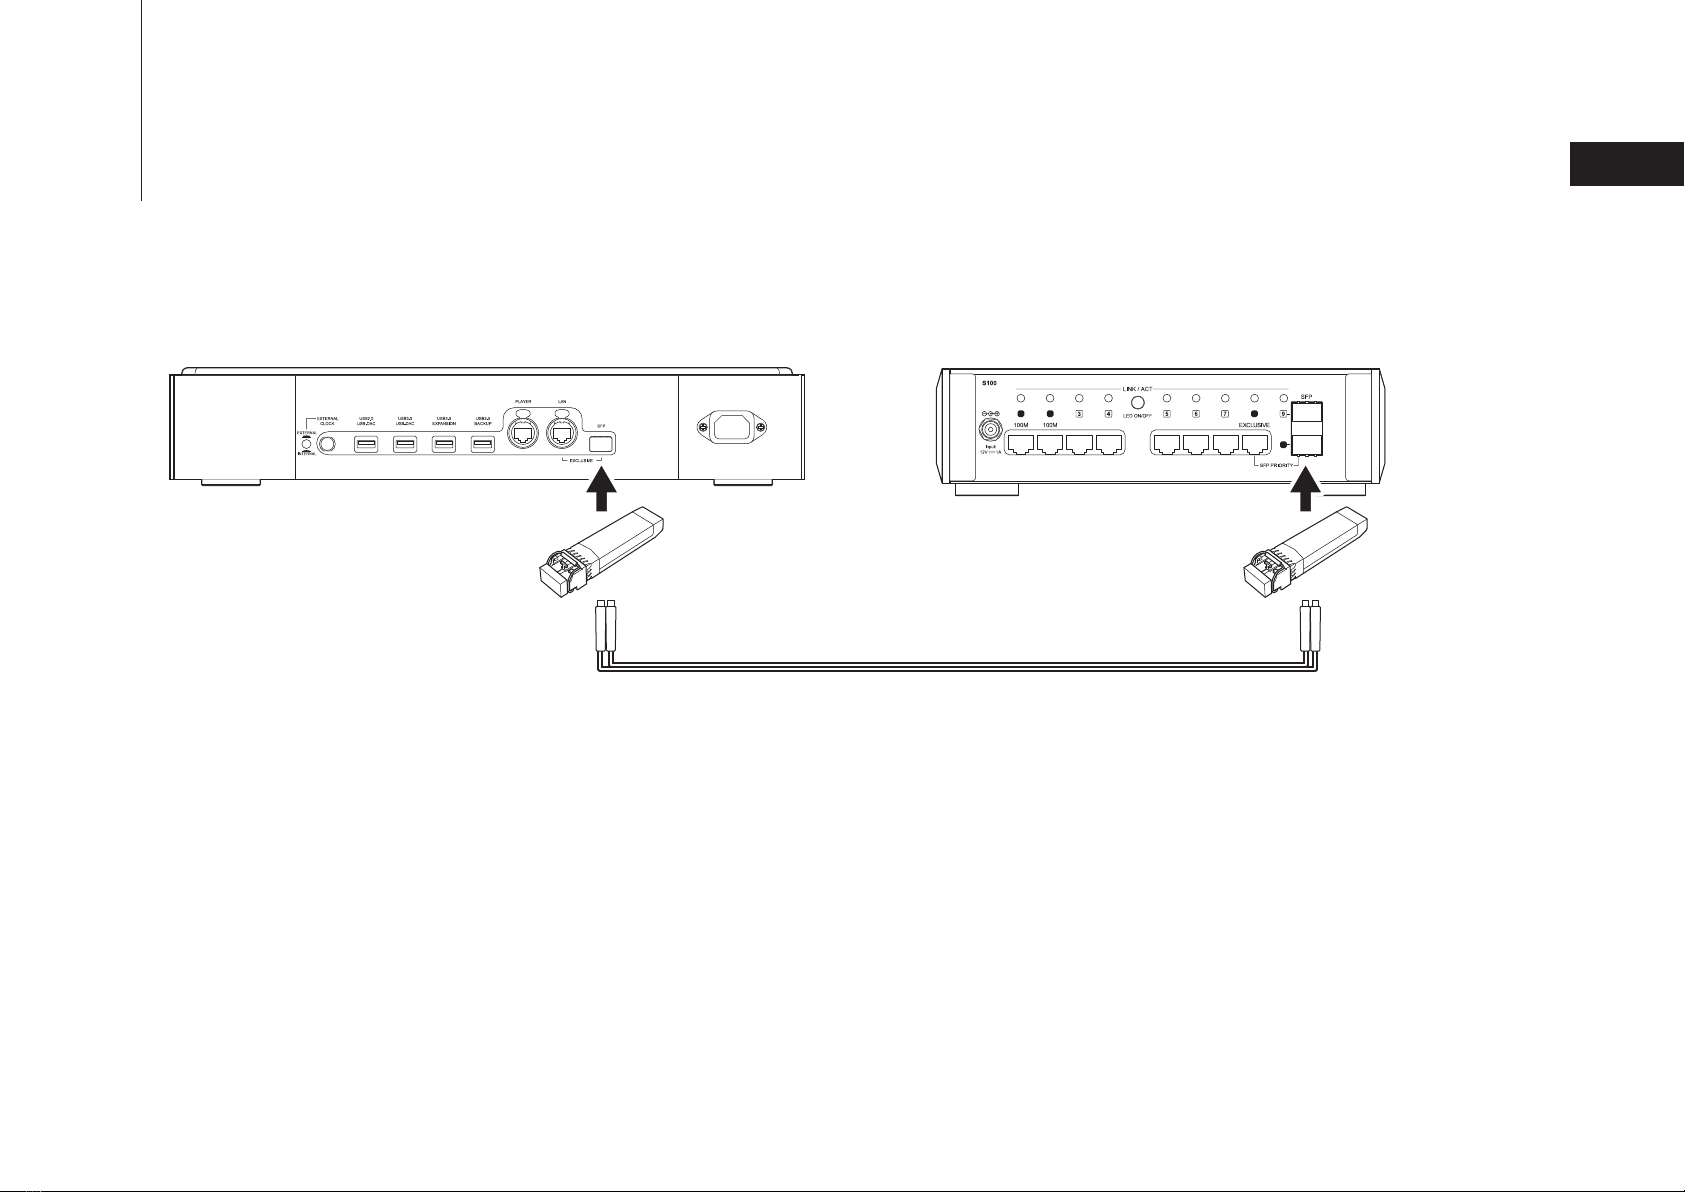
Using SFP Ports Instead of Ethernet Ports
The SFP port can be used instead of the LAN port (the Ethernet port for router or hub) by using an SFP module
(not included).
Device with SFP PortsDigital Music Library

12
English
Clock Input
BNC, 10 MHz, 50 Ω,0.5–5 Vpp
*Excluding protruding parts
Data Transfer
Rates
LAN Port, Player Port (
RJ-45
):
100/1000 Mbps
SFP Port: Max. 1000 Mbps
Number of
USB Ports
USB 3.0 (front): 1
USB 3.0 (rear): 3
USB 2.0: 1
Power Supply
AC 230 V, 50/60 Hz
Specifications
Dimensions*
(W × H × D)
440 × 82 × 353 mm;
17.3 × 3.2 × 13.9 in.
Output
Current
USB 3.0: Max. 0.9 A per port
Max. 1.8 A total
USB 2.0: Max. 0.5 A
Weight Approx. 14 kg; 31 lbs

13
English
Product specifications and operating procedures may change
after future firmware updates to improve the product. For the
latest information, refer to the product manuals available from our
website. You can access the site using the URL or QR code at the
right.
Operation Manuals Available Online
If you need help or repair services, please send us an email by
referring to our website, accessible using the URL or QR code at
the right, or call the vendor from whom you purchased the product.
https://melco-audio.com/downloads/
https://melco-audio.com/support/
Additional Support and Service

Deutsch
Vorder- und Rückseite ...............................................................15
Einschalten ................................................................................................18
Verfügbare Geräte und Anschlüsse.........................19
Den externen Taktgeber aktivieren..........................20
Importieren von Dateien...........................................................21
Prüfung der importierten Dateien ................................22
Inhalt
Vorbereiten des Spielers für die Wiedergabe
.....23
Wiedergeben von Dateien.....................................................24
SFP-Anschlüsse anstelle von
Ethernet-Anschlüssen nutzen..........................................25
Technische Daten ............................................................................26
Betriebsanleitungen online verfügbar....................27
Warnung
•
Dieses Produkt ist nicht wasserdicht. Um eine Brandgefahr oder einen
elektrischen Schlag zu vermeiden, stellen Sie keine mit Flüssigkeit gefüllten
Behälter in der Nähe dieses Produkts (z.B. Vase oder Blumentopf) und
setzen Sie das Produkt nicht Tropfen, Spritzern, Regen oder Feuchtigkeit aus.
• Verwenden Sie keine offene Flamme auf oder in der Nähe des Produkts
(z.B. eine brennende Kerze), um Brandgefahren zu vermeiden.
•
Dies ist ein Produkt der KlasseA. Produkte der KlasseA werden für die
Nutzung in einer kommerziellen, industriellen oder geschäftlichen Umgebung
vertrieben. Dieses Produkt ist nur für die professionelle Nutzung geeignet und
sollte nicht in einer Büro- oder Haushaltsumgebung verwendet werden.
Bei einer Nutzung in Wohngebieten können bei diesem Produkt Störungen
auftreten. Eine solche Nutzung soll vermieden werden, außer der Nutzer
ergreift bestimmte Maßnahmen, um elektromagnetische Strahlung zu
reduzieren und Störungen der Radio- und Fernsehübertragung zu vermeiden.
•
Spalte und Öffnungen im Gehäuse sind für die Belüftung vorgesehen, um einen
zuverlässigen Betrieb des Produkts zu gewährleisten und es vor Überhitzung zu
schützen. Um Brandgefahren zu vermeiden, sollten die Öffnungen niemals durch
Gegenstände (z.B. Zeitungen, Tischdecken, Vorhänge) blockiert oder abgedeckt
sein oder das Produkt auf einem dicken Teppich oder einem Bett betrieben werden.
Vorsicht
• Das Produkt wird warm. Sie sollten daher darauf achten, es nicht zu
berühren, um Gefahren zu vermeiden.
• Dieses Produkt ist nicht zur Nutzung an Orten geeignet, an denen sich
Kinder aufhalten können.
• Achten Sie darauf, dass um das Gerät herum Platz für die Belüftung und
eine verbesserte Wärmeabstrahlung gelassen wird (mindestens 20cm
oben und an der Rückseite sowie jeweils 5cm an der Seite). Die
Vorderseite des Geräts darf nicht blockiert werden, z.B. durch Türen.
Betriebsumgebung
Temperatur der Betriebsumgebung und Luftfeuchte: +5°C bis +35°C (+41
°F bis +95°F); unter 80% rel. Feuchtigkeit (RH) (Lüftungsschlitze nicht
blockiert)
Installieren Sie das Gerät nicht in schlecht belüfteten Räumen oder an
Orten, die hoher Luftfeuchtigkeit oder direktem Sonnenlicht (oder starkem
Kunstlicht) ausgesetzt sind.

15
Deutsch
7Nach unten-Taste ( )
5
Menü/Eingabe-Taste ( )
4Zurück-Taste ( )
Display
3
2Netzschalter ( )
1Strom-LED
8USB-3.0-Anschluss 13 USB-3.0-Anschluss für
USB-Erweiterungslaufwerk
9Auswahltaste für den
Taktgeber
10 Anschluss für den
externen Taktgeber
18 Stromanschluss
17 SFP-Anschluss
16 Ethernet-Anschluss für
Router oder Hub
14 USB-3.0-Anschluss für
USB-Backup-Laufwerk
15 Ethernet-Anschluss für
Player
6Nach oben-Taste ( )
2 3 4 65 8 131110914 15 16 17 18
11 USB-2.0-Anschluss für
USB-DAC
12 USB-3.0-Anschluss für
USB-DAC
712
1
Vorder- und Rückseite
Tasten und Anschlüsse
16
Deutsch
192.168.10.41
2%
N-00BA
Display – Startbildschirm
1Status für angeschlossenen Router oder Hub
2Status für angeschlossenen Player
3
Markerless DSD-Kompatibilität für USB-DAC (leuchtet, wenn verbunden)
9Status für Downloader
7Anzeigename (Hostname)
IP-Adresse
8
12 Nutzbare Kapazität des internen Laufwerks
Verbunden
Nicht verbunden
Nicht verbunden
Verbunden
11 Dateifreigabe-Anzeige (leuchtet, wenn freigegeben)
4Optische Laufwerksanzeige (leuchtet bei Erkennung)
10
Controller-Einstellungen (LED leuchtet, wenn USB-DAC angeschlossen ist)
5Erweiterungslaufwerksanzeige (leuchtet stetig bei
Erkennung, blinkt bei Anerkennung)
Datensicherungslaufwerksanzeige (leuchtet bei Erkennung)
6
Markerless DSD-inkompatibel
Markerless DSD-kompatibel
Ein Fehler ist aufgetreten
In Betrieb
Deaktiviert
UPnP/DLNA-kompatibler Modus freigegeben
Wiedergabelistenmodus freigegeben
Hybridmodus freigegeben
Roon Ready-Modus freigegeben
1 2 3 4 5 6 9 10 118
12
7
Hinweis: Die Symbole und das angezeigte Layout können sich bei zukünftigen Firmware-Updates
ändern. Die neuesten Informationen finden Sie in den Produkthandbüchern auf unserer Website.
Vorder- und Rückseite

17
Deutsch
Status
Songs durchsuchen 0
Backup
Einstellungen
Wählen Sie die Aktion für das an
den vorderen USB-Laufwerk.
Erweiterung
Wählen Sie die Aktion für das an
den vorderen USB-Laufwerk.
Import
Display – Menüs und Dialoge
Drücken Sie die Menü/Eingabe-Taste
( ), während der Startbildschirm
angezeigt wird, um den
Menübildschirm hochzuziehen.
Bewegen Sie den Cursor, indem Sie
die Nach oben-/Nach unten-Taste
( ) betätigen, und drücken Sie
die Menü/Eingabe-Taste ( ), um
die gewünschte Auswahl zu treffen.
Der Dialogbildschirm wird angezeigt werden, wenn ein Vorgang bestätigt
wird. Drücken Sie die Nach oben-Taste (
) oder die Nach unten-Taste
(
), dann die Menü/Eingabe-Taste (
), um eine Auswahl zu treffen.
Menübildschirm Dialogbildschirm
Vorder- und Rückseite
18
Deutsch
Music Library 192.168.10.41
2%
N-00BA
21
3
Einschalten
Other manuals for N1 Series
3
Table of contents
Languages:
Other Melco MP3 Player manuals


