Melco N1 Series User manual
Digital Music Library
N1
User Manual
This user manual uses sample screenshots captured on firmware version 1.02. Depending on the firmware version
that is installed on your Digital Music Library, functions described and screenshots contained in the user manual
may appear differently, so functions on your product may not work as described in the user manual. Always update
the firmware to the latest version. The version of the firmware installed will show up during startup, or you can
check it by opening the main menu and scrolling to the“System Update”option.
For the procedure of updating the firmware to the latest version, refer to the“Updating the Firmware” section in
chapter 4.
Please make sure to read this user manual before using and follow the procedures. If you have any inquiries about
the product, contact us via the website on the warranty statement. Do not discard any included documents, the
warranty statement, or the packing box.
35022657-01
February 2023

Table of Contents
Chapter 1 Notice .............................................................5
Regulatory Compliance Information..............................................5
Warning Symbols and Graphical Icons on the Product.................6
Safety Precautions ...........................................................................6
Chapter 2 Getting Started .............................................7
Summary of User Manual ................................................................7
Chapter 3 Basic Usage....................................................8
Diagrams...........................................................................................8
Display ........................................................................................... 10
Home Screen ............................................................................................10
Menu .........................................................................................................12
Dialog........................................................................................................12
Streaming Screen.....................................................................................12
Remotely Operating the Digital Music Library......................................14
Switching Between the Internal or External Clock Generator... 15
Importing Music Files ................................................................... 16
Importing from USB Drives.....................................................................16
Importing from a Music CD .....................................................................17
Importing Files from a Computer ...........................................................19
Confirming Imported Files......................................................................23
Downloading Music Files from Streaming Sites......................... 24
Adding Accounts......................................................................................25
Enabling or Disabling Periodic Downloads ...........................................27
1

Deleting Accounts....................................................................................28
Playing Music Files on a Network Audio Player.......................... 30
Streaming Imported Music Files.............................................................30
Playing Music Files on USB-DAC Devices .................................... 31
Playing Music Files on the Digital Music Library or a USB Drive..........31
Playing a CD Using an Optical Drive.......................................................33
Operation While Playing Music Files ......................................................33
Configuring the Mode for Managing USB-DAC Using Controller App 34
Changing the DSD Playback Mode.........................................................37
Backing Up and Restoring............................................................ 39
Backup Operations ..................................................................................39
Backing Up Data ......................................................................................40
Restoring Data .........................................................................................42
Deleting the Imported Music Files............................................... 44
Deleting All Files ......................................................................................44
Deleting Each File One by One................................................................44
Chapter 4 Advanced Usage......................................... 45
Using a USB Drive as an Expansion Drive.................................... 45
Connecting a USB Drive as an Expansion Drive ....................................45
Importing Music Files to an Expansion Drive ........................................45
Streaming Music Files from Expansion Drives ......................................45
Disconnecting an Expansion Drive.........................................................46
Formatting Drives ......................................................................... 46
Formatting Internal Drives......................................................................46
Formatting Connected USB Drives.........................................................47
Erasing Data on the Digital Music Library Completely .............. 49
Changing the IP Address .............................................................. 51
2

Changing the Friendly Name (Hostname)................................... 52
Configuring the Date and Time.................................................... 54
Changing the Time Zone .............................................................. 55
Configuring Display and LED Settings ........................................ 56
Changing the Display Brightness ...........................................................56
Changing the Power LED Brightness......................................................57
Configuring Automatic Power-Off............................................... 58
Changing the Display Language.................................................. 59
Updating the Firmware................................................................. 60
Updating via the Network.......................................................................60
Updating from the USB Device ...............................................................61
Checking for Updates Automatically .....................................................62
Restoring Factory Defaults........................................................... 63
MELCO Intelligent Music Library.................................................. 64
SongKong for Melco Lite Music Tagger..................................................65
MinimServer 2..........................................................................................65
Chapter 5 Appendix .................................................... 67
Menu List ....................................................................................... 67
Status ........................................................................................................67
Browse Songs/Play Songs .......................................................................67
Backup ......................................................................................................67
Settings.....................................................................................................68
Dismount USB Drive ................................................................................72
System Update .........................................................................................72
Language..................................................................................................72
Support.....................................................................................................72
3


Chapter 1 Notice
Regulatory Compliance Information
For Customers in the United States
This equipment has been tested and found to comply with the limits for a Class A digital device, pursuant to part
15 of the FCC Rules. These limits are designed to provide reasonable protection against harmful interference when
the equipment is operated in a commercial environment. This equipment generates, uses, and can radiate radio
frequency energy and, if not installed and used in accordance with the instruction manual, may cause harmful
interference to radio communications. Operation of this equipment in a residential area is likely to cause harmful
interference in which case the user will be required to correct the interference at his own expense.
This device complies with Part 15 of the FCC Rules. Operation is subject to the following two conditions: (1) this
device may not cause harmful interference, and (2) this device must accept any interference received, including
interference that may cause undesired operation.
For Customers in Canada
CAN ICES-003 (A)/NMB-003 (A)
For Customers in Europe and the United Kingdom
Warning: This is a class A product. In a domestic environment this product may cause radio interference in which
case the user may be required to take adequate measures.
This product may cause interference if used in residential areas. Such use must be avoided unless the user takes
special measures to reduce electromagnetic emissions to prevent interference to the reception of radio and
television broadcasts.
Environmental Information
• The equipment that you have purchased has required the extraction and use of natural resources for its
production.
• The equipment may contain hazardous substances that could impact health and the environment.
• In order to prevent the dissemination of those substances into the environment, and to relieve pressure on
natural resources, we encourage you to seek out an appropriate take-back program. Take-back programs will
reuse or recycle materials of any end-of-life equipment in a responsible way.
• Products with the crossed-out wheeled-bin symbol above should not be recycled. Instead, seek out a take-back
program as mentioned.
• If you need more information on the collection, reuse, and recycling of our end-of-life products, please contact
your local or regional waste administration.
5
Chapter 1 Notice

Warning Symbols and Graphical Icons on the Product
Warning symbols are used on the product for safety operation and prevention of injury to you and damage to the
unit. The following explains the meanings of symbols used on the product.
This symbol indicates important warnings or cautions for operation and maintenance.
Additional information will follow this symbol.
This symbol indicates the presence of an alternating current.
This symbol indicates danger of hazardous high voltage.
Safety Precautions
Before using your device, basic safety instructions should always be followed.
(1) Read these instructions.
(2) Keep these instructions.
(3) Heed all warnings and follow all instructions.
(4) The socket-outlet shall be installed near the equipment and shall be easily accessible.
(5) Only use the cables and accessories that are included in the package. Don’t use other accessories or cables
unless specifically instructed to in the documentation. Also, do not use USB cables that are 3 meters or longer to
connect USB devices.
(6) Caution: Do not remove the cover.
6
Chapter 1 Notice
Chapter 2 Getting Started
Summary of User Manual
Display Panel
Import Playback
Backup, Format, and
Advanced Usage
Display Panel Details
- Chapter 3 “Display”
Display Settings
- Chapter 4 “Configuring Display and LED Settings”
Display Language
- Chapter 4 “Changing the Display Language”
Playback on a Network Audio Player
- Chapter 3 “Playing Music Files on a
Network Audio Player”
Playback on USB-DAC Devices
- Chapter 3 “Playing Music Files on
USB-DAC Devices”
Backing Up Music Files and Settings
- Chapter 3 “Backing Up and Restoring”
Deleting Imported Files
- Chapter 3 “Deleting the Imported Music Files”
Drive Settings and Formatting
- Chapter 4 “
Formatting Drives
”
Changing the IP Address and Hostname
-
Chapter 4 “Changing the IP Address”, “Changing the Friendly Name (Hostname)”
Date, Time, and Time Zone Settings
- Chapter 4 “Configuring the Date and Time”, “Changing the Time Zone”
Firmware Update - Chapter 4 “Updating the Firmware”
Importing from a USB Device
- Chapter 3 “Importing Music Files”
Importing from a CD
- Chapter 3 “Importing Music Files”
Checking If the Import Finished
Successfully
- Chapter 3 “Confirming Imported Files”
Importing from a Computer
- Chapter 3 “Importing Music Files”
Downloading
- Chapter 3 “Downloading Music Files
from Streaming Sites”
7
Chapter 2 Getting Started
Chapter 3 Basic Usage
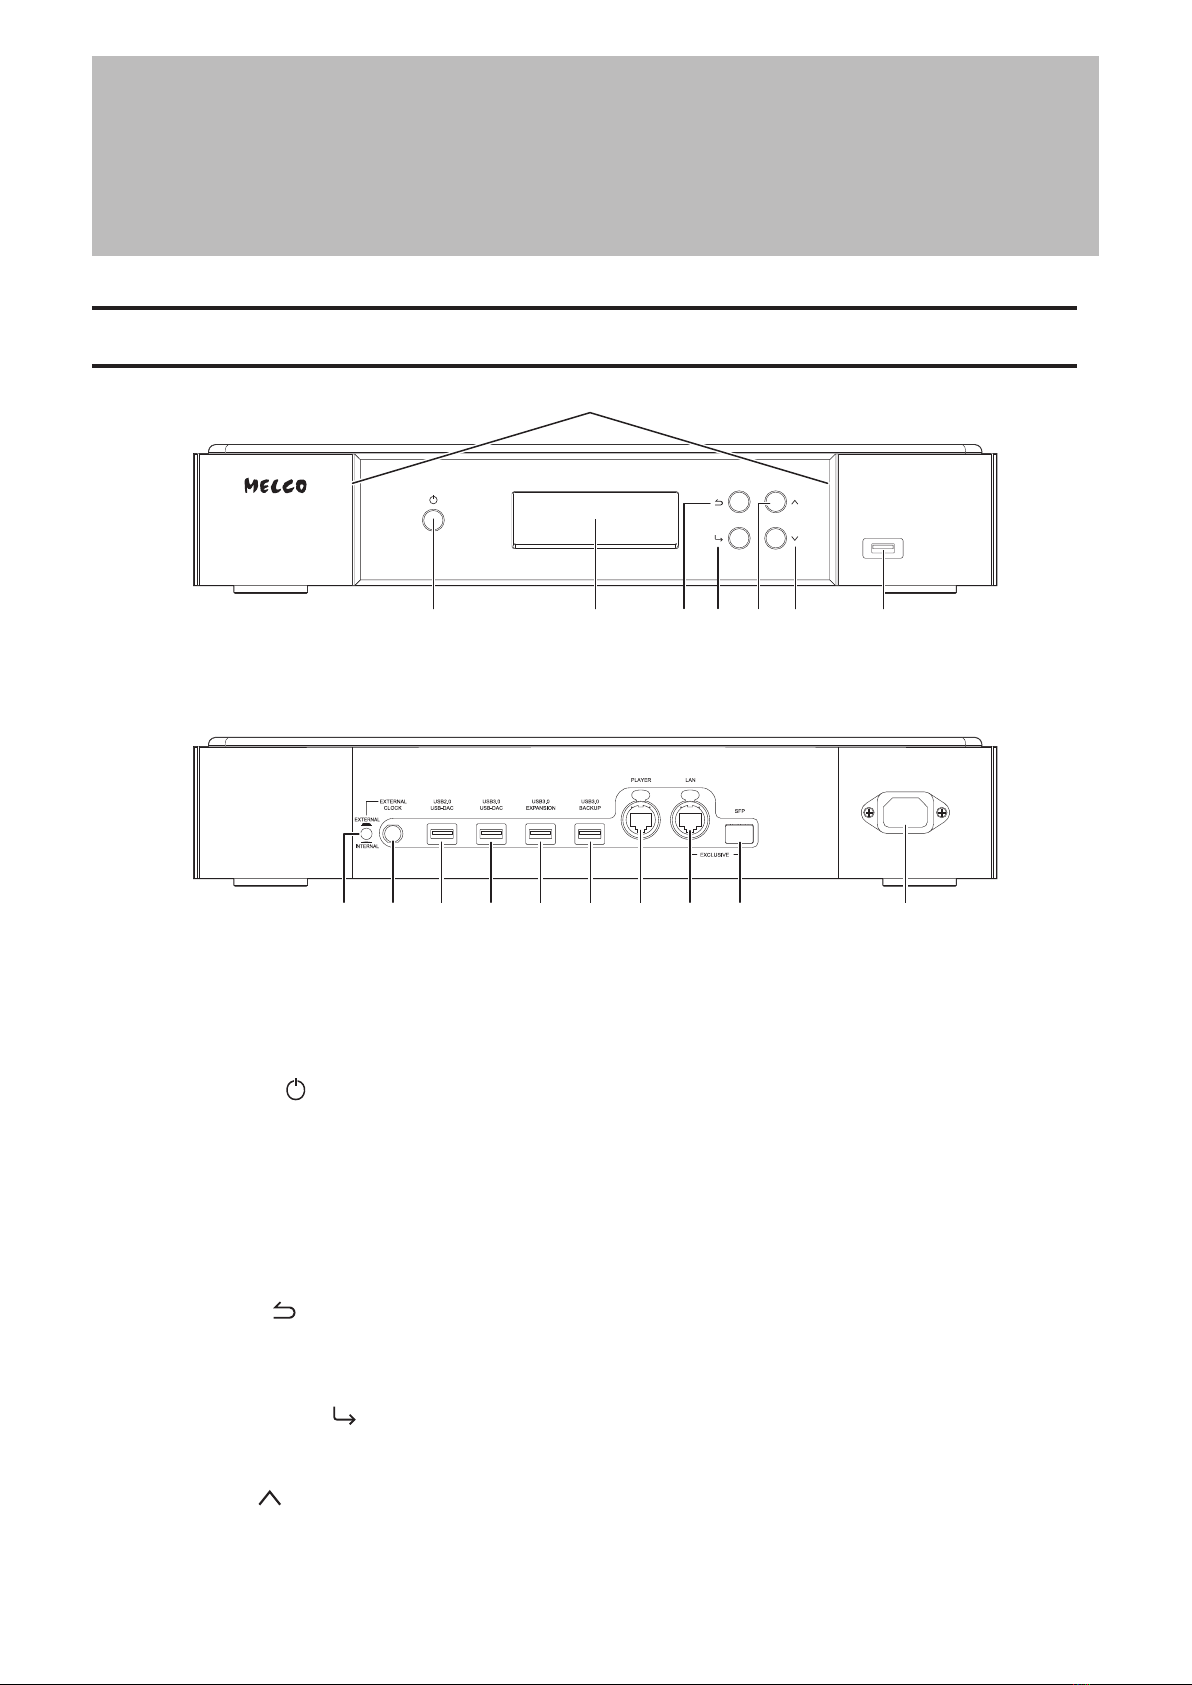
Diagrams
1
2345 67 8
1091112131415171816
1 Power LED
While the Digital Music Library is powered on, the LED will glow blue. It will extinguish when powering off.
Note: The brightness of the power LED can be changed from Settings - Display - Power LED Brightness.
2 Power Button ( )
To turn the power on, press the button. To turn the power off, press and hold down the button.
3 Display
Displays the device’s status and settings menu. In case of an error, displays the error code and message.
Note: The brightness of the display panel can be changed from Settings - Display - Brightness. If the display
brightness is set to Dark Mode, the display panel will be turned off.
4 Back Button ( )
Press this button to return the menu to the previous screen. If you press and hold this button for 2 seconds
while at the home screen, the display panel will be turned off.
5 Menu/Enter Button ( )
Press to make a selection on the display panel.
6 Up Button ( )
Press this button to scroll up.
8
Chapter 3 Basic Usage
7 Down Button ( )
Press this button to scroll down.
To initialize settings, press the power button while holding down this button.
8 USB 3.0 Port *
Connect a compatible USB hard drive or optical drive for music playback, or a USB flash drive for updating the
firmware.
9 Clock Generator Select Button
Press to enable the external clock generator. Refer to the “Switching Between the Internal or External Clock
Generator” section in chapter 3 for more detailed information on how to enable the external clock generator.
Before pressing this button, you will need to power off the Digital Music Library first as
stated in the section mentioned above. If you do not follow the procedure, the Digital Music
Library may stop working, and malfunction of the unit may also result.
10 Connector for External Clock Generator
Connect an external clock generator. Refer to the “Switching Between the Internal or External Clock Generator”
section in chapter 3 for more detailed information on how to connect the external clock generator.
Before connecting or disconnecting the external clock generator, you will need to power off
the Digital Music Library first as stated in the section mentioned above. If you do not follow
the procedure, the Digital Music Library may stop working, and malfunction of the unit may
also result.
11 USB 2.0 Port for USB-DAC
Use this port to connect a USB-DAC device.
12 USB 3.0 Port for USB-DAC
Use this port to connect a USB-DAC device.
13 USB 3.0 Port for Expansion USB Drive *
Connect a compatible USB hard drive to expand the Digital Music Library’s storage capacity.
14 USB 3.0 Port for Backup USB Drive *
Connect a compatible USB hard drive to back up or restore the data or settings of the Digital Music Library.
15 Ethernet Port for Player
This is a dedicated port for Network Audio Players. Use an Ethernet cable to connect a Network Audio Player or
AV receiver directly to this port.
Note: If your Network Audio Player is directly connected to the Player port, it will not be visible on the network
when the Digital Music Library is powered off. If this will be an issue, connect your Network Audio Player to the
router or switch instead.
16 Ethernet Port for Router or Hub
Use an Ethernet cable to connect a wireless router, hub, or switch on your network to this port. Then you will
be able to access the Digital Music Library from computers and mobile devices on your network.
17 SFP Port
This port can be used instead of the LAN port (the Ethernet port for router or hub) by using an SFP module
(not included). Use only the supported SFP modules listed on melco-audio.com.
18 Power Connector
Use the included power cable.
9
Chapter 3 Basic Usage

*Only the first partition of a connected USB drive is mounted. Additional partitions are not recognized. To utilize the
capacity of the whole drive, connect the USB device to the Expansion or Backup port; navigate to Settings - Drive,
select Format USB Drive, then select Erase All Data to format all partitions. Please note that all data currently on the
drive will be deleted with this operation.
Display
Home Screen
Turn on the Digital Music Library. After it boots, the home screen will be displayed.
Notes:
• Refer to the“Remotely Operating the Digital Music Library” section in chapter 3 to remotely operate the Digital
Music Library using a web browser on a mobile device or a computer.
• The display will automatically turn off about 30 minutes after stopping any Digital Music Library operations. To
turn the display back on, push any button on the Digital Music Library other than the power button. The display
will not automatically turn off while the Digital Music Library is in any of the following situations:
◦Connected to a Network Audio Player that is powered on.
◦Connected to a USB-DAC device that is powered on.
◦Connected to a backup drive.
◦Being accessed from a computer.
◦Accessing a media server.
×ßØÔ×ÜÞÔ×ÖÔÚ×
ØË
ôÓÖÖèçÔđĔĈĆđ
1 2 3 4 5 6 9 101187
1312
The home screen displays the following information:
Number Item Description
1Status of Connected Router or
Hub
: Displays when a router or switch that is connected to
the Digital Music Library’s LAN port is on. ( displays when
connecting to the SFP port *)
: Displays when no Ethernet cable is connected to the LAN
port or a router or switch is off. ( displays when connecting to
the SFP port *)
2Status of Connected Player
The icon in the diagram appears when the Player port is enabled
through the settings.
: Displays when the Player port is configured to bridged
mode and a connected Network Audio Player is on.
: Displays when no Ethernet cable is not connected to the
Player port or a connected Network Audio Player is off.
10
Chapter 3 Basic Usage
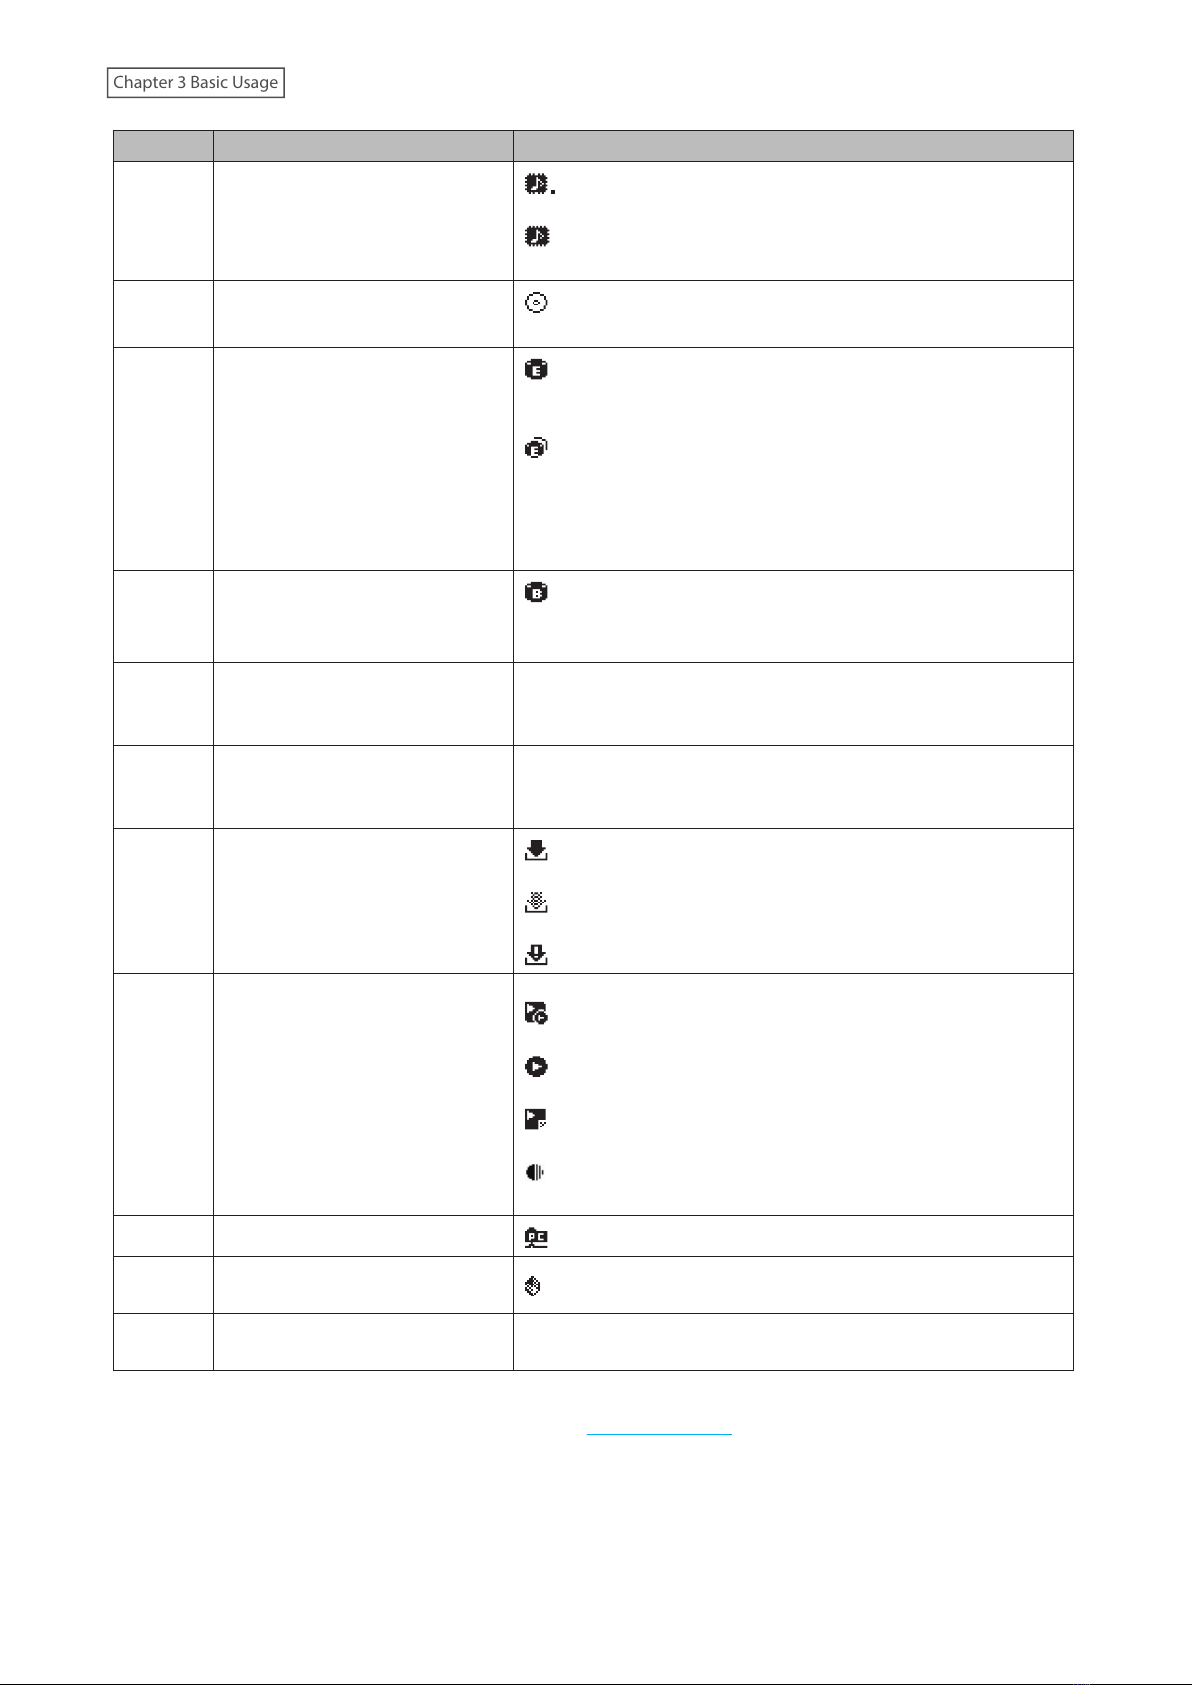
Number Item Description
3Markerless DSD Compatibility for
USB-DAC
: Displays when a USB-DAC device that is compatible with
Markerless DSD is connected.
: Displays when a USB-DAC device that is not compatible
with Markerless DSD is connected.
4Optical Drive Indicator : Displays if an optical drive is connected. The icon will be
extinguished if no optical drives are connected.
5Expansion Drive Indicator
: Displays when a USB drive is connected to the Expansion
port, or when a USB drive is connected to the front USB port and
“Mount and Scan” is selected as an action for the drive.
: Displays when USB drives are connected to the front and
Expansion ports.
The icon will blink while the device searches for music files.
When the icon stops blinking, playback is ready.
6Backup Drive Indicator
: Displays when a USB drive is connected to the Backup port,
or when a USB drive is connected to the front USB port and
“Backup or Restore” is selected as an action for the drive.
7Friendly Name (Hostname)
Displays the friendly name (hostname) of the Digital Music
Library. The friendly name is used when accessing the Digital
Music Library from an app or computer.
8IP Address
Displays the IP address. The IP address is used when accessing
the Digital Music Library from a computer. If no IP address is
displayed, the Player port is set to isolated mode.
9Status of Downloader
: Displays when an account was added and periodic
downloads is enabled.
: Displays when an account was added but periodic
downloads is disabled.
: Displays when an error occurs and downloading fails.
10 Controller Settings
The icon will appear when a USB-DAC device is connected.
: Displays when controller mode is configured to“Hybrid
Mode”.
: Displays when controller mode is configured to“UPnP/DLNA
compatible Mode”.
: Displays when controller mode is configured to“Playlist
Mode”.
: Displays when controller mode is configured to“Roon Ready
Mode”.
11 File Sharing Indicator : Displays when file sharing is enabled.
12 External Clock Generator
Indicator : Displays if an external clock generator is connected.
13 Usage Capacity of Internal Drive Displays the used capacity of the internal drive in the Digital
Music Library, using a bar chart and a percentage (%).
*The SFP port can be used instead of the LAN port (the Ethernet port for router or hub) by using an SFP module (not
included). Use only the supported SFP modules listed on melco-audio.com.
11
Chapter 3 Basic Usage

Menu
Press the Menu/Enter button while the home screen is displayed.
ùęĆęĚĘ
èėĔĜĘĊÆùĔēČĘÆ Ö
èĆĈĐĚĕ
ùĊęęĎēČĘ
Move the cursor by pressing the Up button or the Down button, then press the Menu/Enter button to make a
selection.
Dialog
When confirming an operation, the dialog screen will be displayed.
ùĊđĊĈęÆęčĊÆĆĈęĎĔēÆęĔÆęĆĐĊÆċĔėÆęčĊ
ûùèÆĉėĎěĊÆĈĔēēĊĈęĊĉÆęĔÆęčĊÆċėĔēę
ûùèÆĕĔėęÔ
ïĒĕĔėę
ùĊđĊĈęÆęčĊÆĆĈęĎĔēÆęĔÆęĆĐĊÆċĔėÆęčĊ
ûùèÆĉėĎěĊÆĈĔēēĊĈęĊĉÆęĔÆęčĊÆċėĔēę
ûùèÆĕĔėęÔ
óĔĚēęÆĆēĉÆùĈĆē
Move the cursor by pressing the Up button or the Down button, then press the Menu/Enter button to make a
selection.
Streaming Screen
When the Digital Music Library starts streaming music files, the display panel will show music information for the
streaming files.
Notes:
• If the music file is playing from a computer, the music information will not be displayed on the display panel.
• Depending on the streaming player, file format, or file tag information, music information may not always be
displayed properly on the display panel.
Streaming to a Network Audio Player
1
2óëòéõÆóçô
ßÜÔÖñîğÆìòçéÆĔēÆôĊęĜĔėĐÆöđĆĞĊė
The display panel displays the following information:
Number Item Description
1Title Display the title of the music file.
12
Chapter 3 Basic Usage
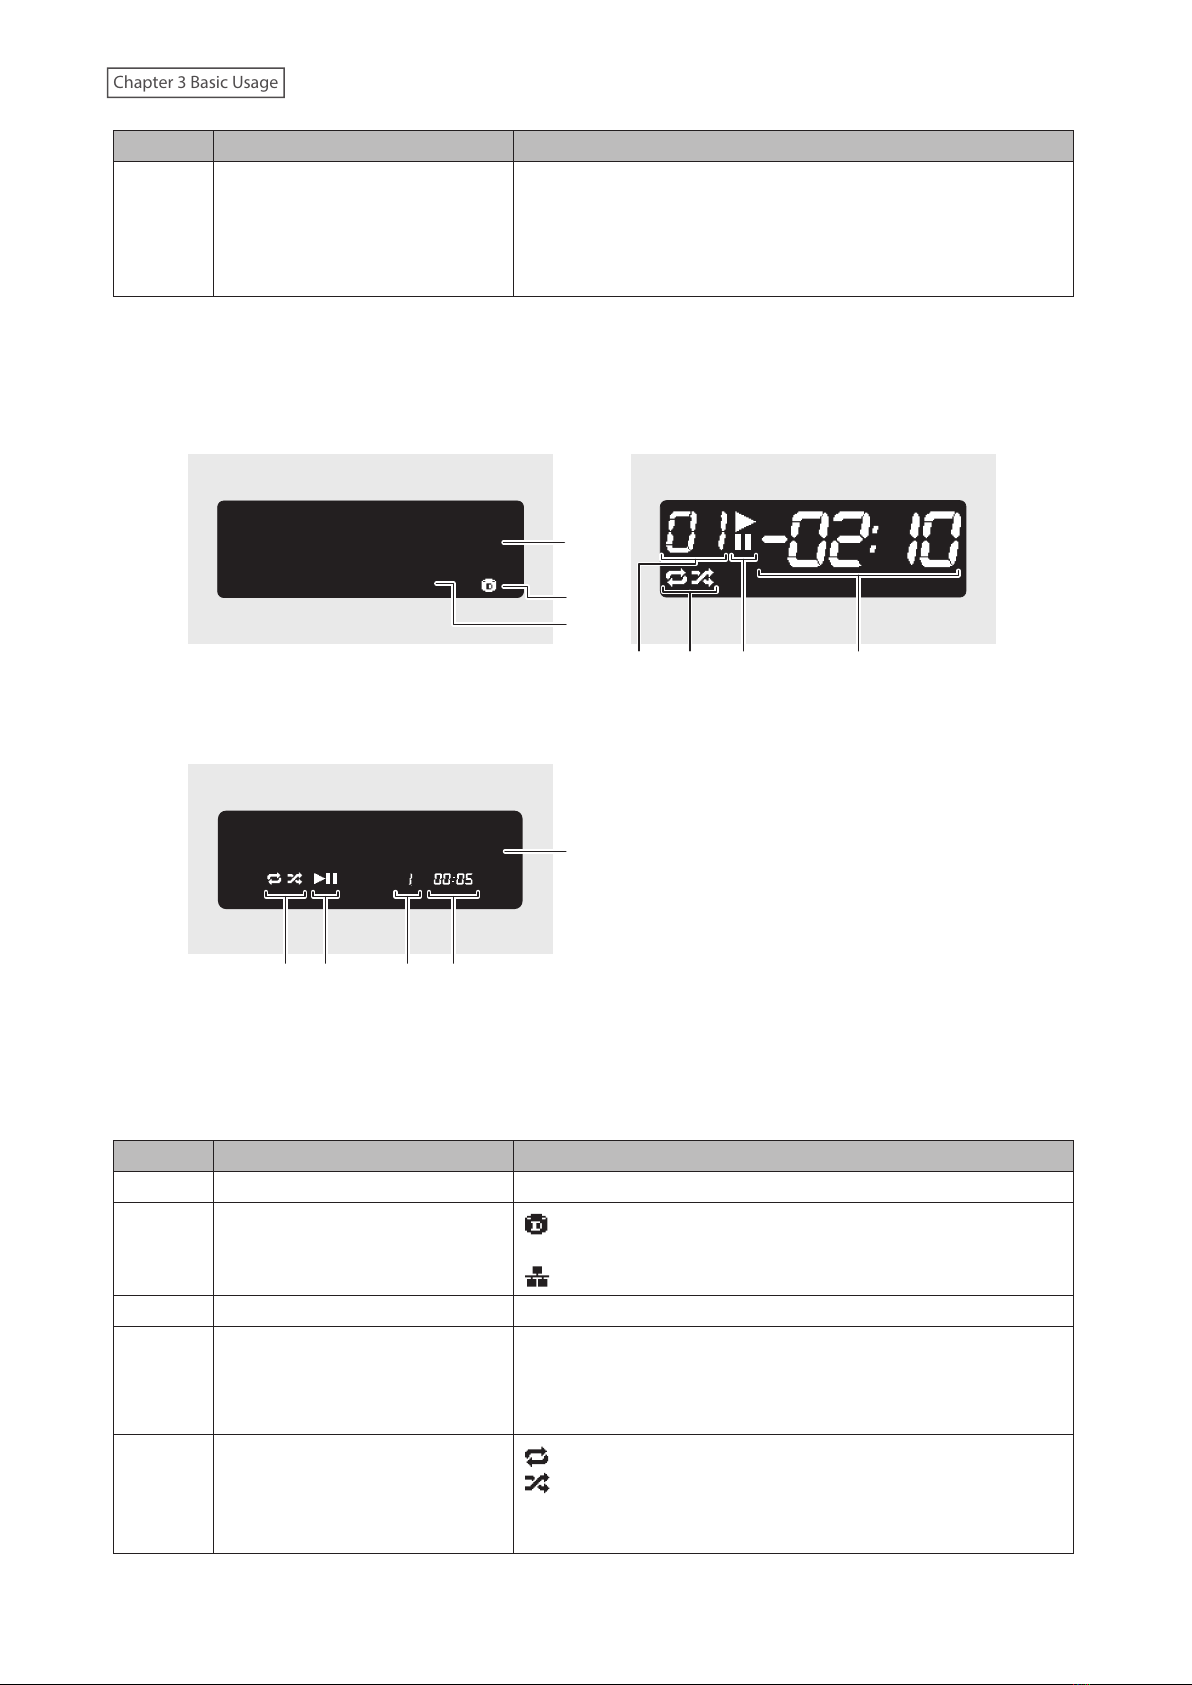
Number Item Description
2Player Information and Music File
Information
Displays the sampling rate, file format, and the player
information during file playback.
Note: This item will not be shown by default. To show this item,
navigate to Settings - Display - Display of song titles and select
“Extended”.
Streaming to a USB-DAC Device
Selecting a Music File on the USB-DAC device Selecting a CD Track Using Buttons on the Digital
Music Library
ÚÚÔ×đîğÕ×ÜćĎęÆýçü
óëòéõÆóçô 1
2*
3*
4567
Selecting a Music File Using Buttons on the Digital
Music Library
5* 6* 7*4*
óëòéõÆóçôÆÕÆóÔóÔ 1
*These items will not be shown by default. To show these items, navigate to Settings - Display - Display of song titles
and select “Extended”.
The display panel displays the following information:
Number Item Description
1Title Display the title of the music file.
2Music File Source
: Displays when streaming music files over the Digital Music
Library or USB drives.
: Displays when streaming music files on the network.
3Music File Information Displays the format and sampling rate of the music file.
4Track Number
Displays the number of the track currently playing. Regardless
of how many music files are available, only the last two digits of
the track number will be displayed. For example, if track 121 is
playing, this will show “21”.
5Repeat/Shuffle
: Repeats playback of all music files while this is displayed.
: Shuffles playback of all music files while this is displayed.
You can switch between repeat or shuffle by pressing the Up
button while playback is suspended.
13
Chapter 3 Basic Usage
Number Item Description
6Playback/Suspension : Appears while playing a music file.
: Appears while playback is suspended.
7Remaining Time/Song Time
Passed
You can switch the display option by pressing the Down button
while playback is suspended.
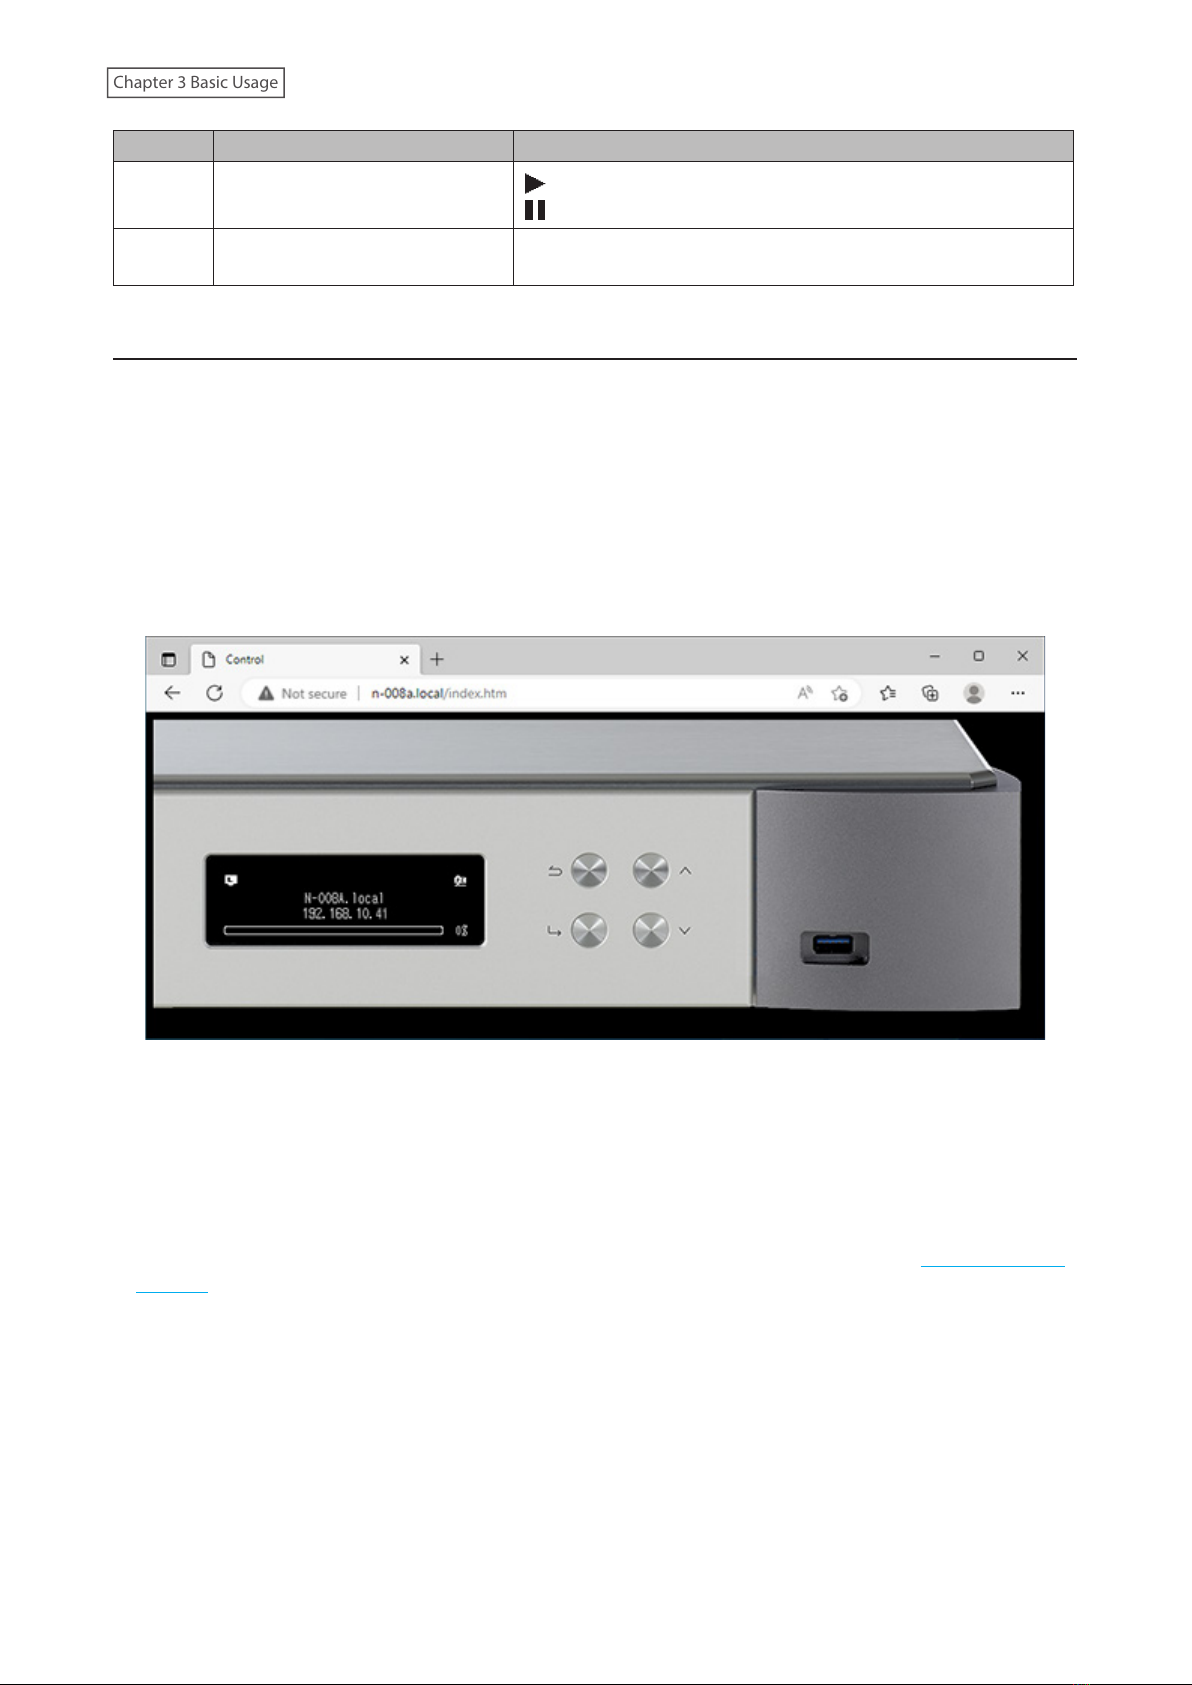
Remotely Operating the Digital Music Library
To remotely operate the Digital Music Library using a web browser, navigate to Support - WebRemote, then
select “On”. After setting “WebRemote” to “On”, enter either the Digital Music Library’s IP address or friendly name
(hostname) into the browser’s address bar and press the Enter key. The page below will then open. You can now
operate the Digital Music Library remotely by clicking or tapping the buttons on the web page. As the display
changes on the web browser, the Digital Music Library’s display will change accordingly to match. You can still
manually operate the Digital Music Library using its physical buttons while WebRemote is enabled.
While “WebRemote” is enabled, the “Network”, “Drive”, and “Initialize Settings” options will not appear on the
“Settings”page to ensure that no one but you can change or utilize these settings. To display these settings, disable
“WebRemote”.
Please note that not all features of the Digital Music Library will be available from a web browser.
Notes:
• To easily access the Digital Music Library via a web browser for remote operation, we recommend creating a
browser bookmark or a shortcut on the home screen. On a mobile device, opening the shortcut allows you to
remotely operate the Digital Music Library in full screen.
• If the Digital Music Library’s IP address changes, you will not be able to remotely operate the Digital Music Library
through the bookmark or the home screen shortcut. In such a case, access the Digital Music Library through the
web browser via its new IP address and create the bookmark or shortcut again. To keep using the same bookmark
or shortcut, we recommend setting a static IP address for the Digital Music Library. Refer to the “Changing the IP
Address” section in chapter 4 for the procedure to configure a static IP address for the Digital Music Library.
• When you click or tap the Digital Music Library's display on the web browser, the display will be in full screen.
Click or tap the screen again to exit the full screen display.
14
Chapter 3 Basic Usage

Switching Between the Internal or External Clock Generator
By default, the internal clock generator of the Digital Music Library is the master clock generator. However, you can
use the external clock generator as the master clock generator by following the procedure below.
Before connecting or disconnecting the external clock generator, or pressing the Clock
Generator Select button, power off the Digital Music Library first as described in the procedure
below. If you do not follow the procedure, the Digital Music Library may stop working, and
malfunction of the unit may also result.
If the Digital Music Library stops working, power it off and configure the clock generator function by
referring to the procedure below. Unless the Digital Music Library has malfunctioned, it can continue to
be used as normal.
1 Power the Digital Music Library off.
To power the Digital Music Library off, press and hold down the power button.
2 To use the external clock generator, connect the clock generator.
To use the internal clock generator, disconnect the clock generator.
Clock Generator
10 MHz Output Connector
BNC Coaxial
Cable
BNC Coaxial
Cable
3 Press the Clock Generator Select Button.
To use the external clock generator, move the button to the unpressed position ( ).
To use the internal clock generator, move the button to the pressed position ( ).
15
Chapter 3 Basic Usage

4 Power the Digital Music Library On.
To power the Digital Music Library on, press the power button.
Note: The power LED will blink red if the clock generator has not been connected when the Clock Generator
Select Button is in the unpressed position. If this occurs, power off the Digital Music Library and connect the
clock generator, then try again.
Importing Music Files
Music files can be imported from a USB drive or a CD to the Digital Music Library.
Importing from USB Drives
To import music files from a connected USB drive, follow the procedure below.
1 Connect the USB drive that contains music files to the front USB port.
Notes:
• Use only the compatible USB drives listed on melco-audio.com.
• Connect only USB drives formatted using NTFS, FAT32, or exFAT.
2 Press the Up/Down buttons and select “Import”, then press the Menu/Enter button.
3 Wait until music importing is finished.
4 Press the Menu/Enter button.
5 Disconnect the USB drive.
16
Chapter 3 Basic Usage

Notes:
• If a filename or folder name starts with a period (.), the file or folder cannot be imported.
• If the Back button is pressed while importing, the import process will be cancelled after the Digital Music Library
finishes importing the current file. If the imported file size is large, the cancellation process may take a few
minutes to finish.
Import Destination Details
Imported music files will be stored in the“import” folder. There are two options to store the imported data in the
Digital Music Library. To change these options, navigate to Settings > Import from USB Drive and select “Into One
Folder” or “Into Folders by Date”.
• Into One Folder: If you select this option, data will be imported into the “all”folder within the “import” folder.
With this option, only files with changes will be imported to the Digital Music Library. Files with no changes from
the previous import session will not be imported.
• Into Folders by Date: If you select this option, a folder that contains the import date in the folder name will
be created within the“import” folder and all imported files will be stored in that folder. Even if the same data is
included in the USB drive, it will be copied to the Digital Music Library.
Importing from a Music CD
To import tracks from a music CD, follow the procedure below.
Notes:
• Importing tracks from a music CD requires an optical drive (not included). Use only the compatible optical
drives listed on melco-audio.com. Depending on the manufacture date, circumstances, and specifications of a
connected optical drive, it may not work even if the optical drive is listed as a compatible device.
• You can save the imported music files to the expansion drive. For more information about this setting, refer to the
“Importing Music Files to an Expansion Drive”section in chapter 4.
1 Connect an optical drive to the Digital Music Library.
2 Insert a music CD into the optical drive to import its tracks.
3 If the USB-DAC device is connected to the Digital Music Library, the following screen will be displayed. Press
the Up/Down buttons and select “Import”, then press the Menu/Enter button.
17
Chapter 3 Basic Usage
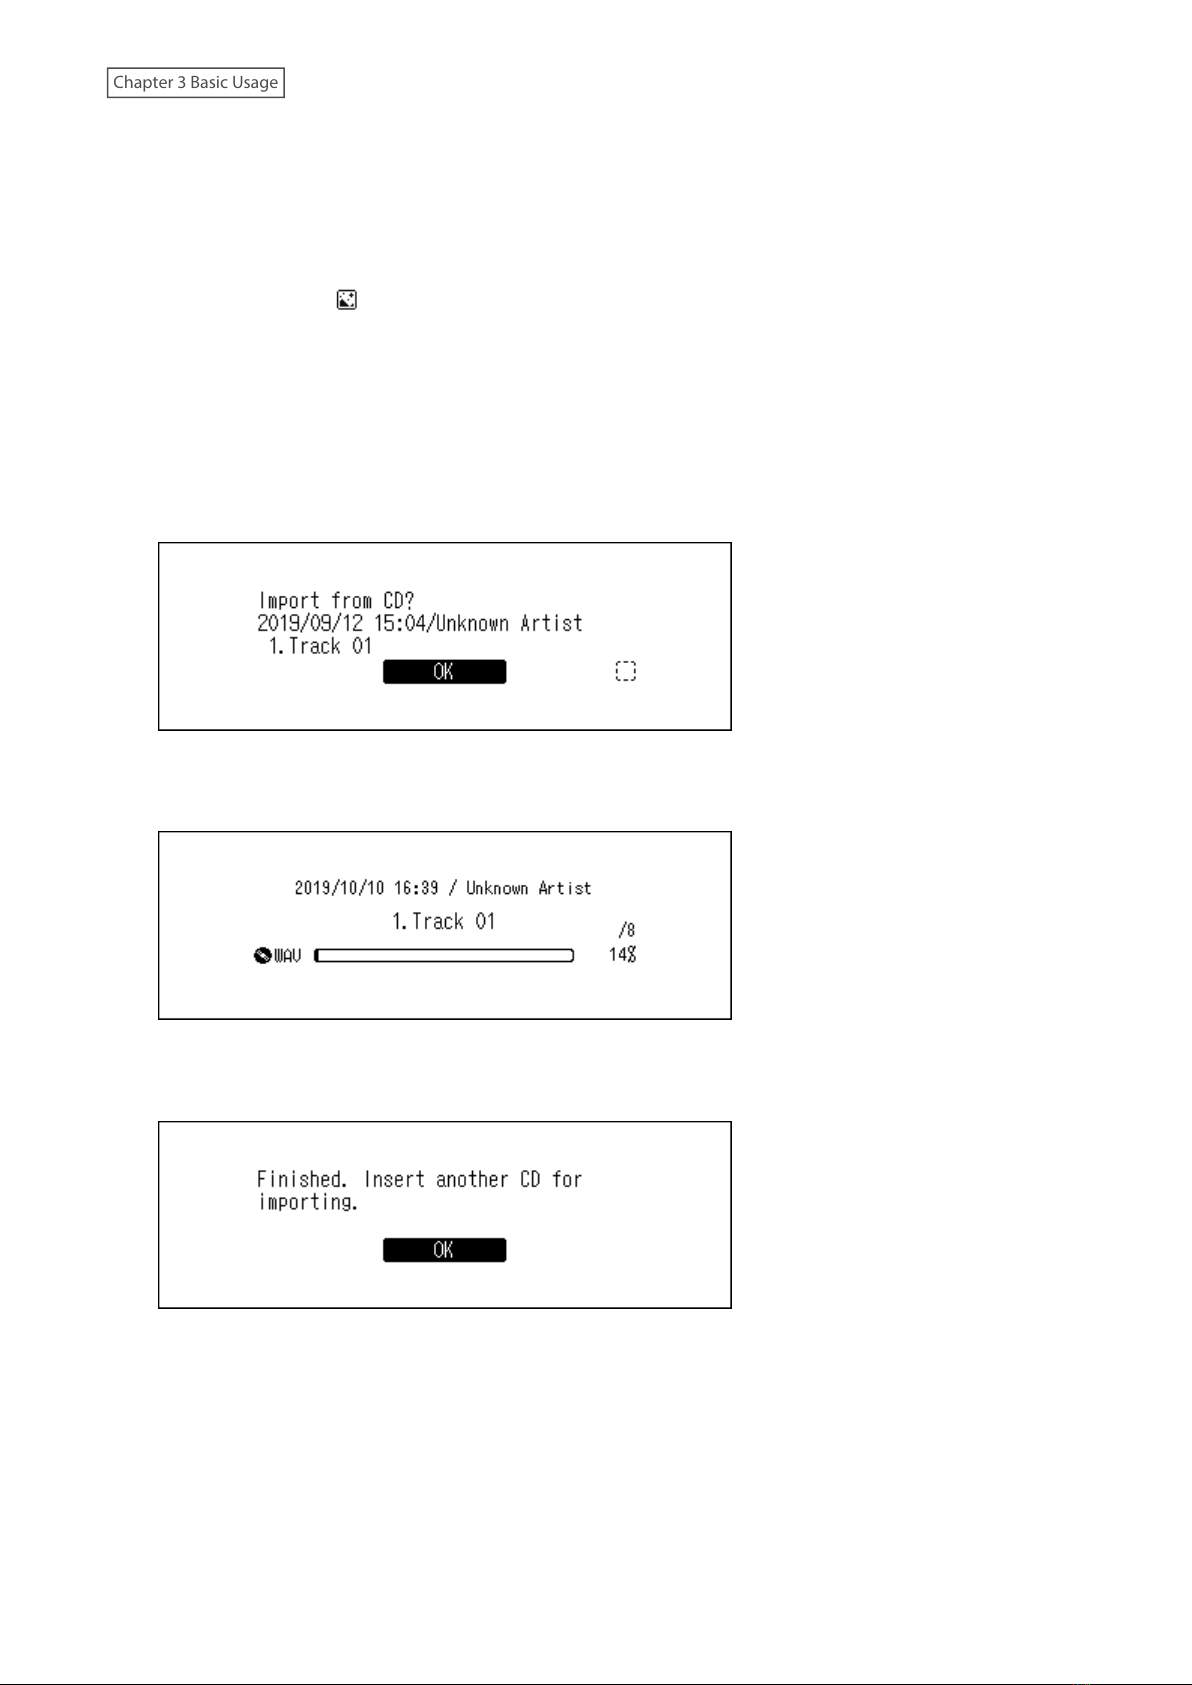
4 When the CD is detected, the Digital Music Library will try to get the album information automatically. When
the display changes from getting the music album information, press the Menu/Enter button.
If the Digital Music Library is connected to the Internet, music tracks will be imported using the acquired
album information.
If multiple titles are found, select the appropriate album title on the displayed window. Once you have selected
the album title, you can return to the previous window and select it again by pressing the Back button. The
album title with the “ ” symbol will contain the cover art.
If the Digital Music Library is not connected to the Internet, or if the CD information is not available from the
online music database, the album name and music title information will not be acquired. In such a case, the
import date will be used as the album name and the track number as the filename.
Note: If the Digital Music Library cannot get the music album information while connected to the Internet,
check your device’s security settings or security software to make sure that the Digital Music Library has
permission to access the Internet.
5 Check the imported tracks using the Up/Down buttons and press the Menu/Enter button.
6 The import process will start. The album title, artist, title of the music file, and format information will be
displayed.
After importing finishes, the disc tray of the optical drive will open automatically.
7 Press the Menu/Enter button.
To import tracks from another CD, repeat the process from step 2 above. If you have finished importing, press the
Down button or the Back button.
Import Destination Details
Imported tracks will be stored in the “import_CD” folder. If importing from a non-music CD, the imported data will
be stored in the“import” folder, not the “import_CD” folder.
18
Chapter 3 Basic Usage

Imported tracks can be moved, copied, and shared on a network, but the cover art file (folder.jpg) cannot be viewed
by another device or copied to another location outside the “Internal” folder. If you want to move or copy the
“import_CD” folder to another device and it contains a cover art file, remove the file first.
To stop acquiring the cover art files when importing music file, navigate to Settings > USB-CD Drive > Gracenote
Coverart and select “Off”.
File Format of Imported Music Files
When importing music files from a CD, they will be saved as WAV files by default. They can be changed to FLAC files,
and FLAC compression levels are changeable as well. Available compression levels are described in the“Menu List”
section in chapter 5.
Changing the Cover Art
The cover art file (folder.jpg) is stored in the“import_CD” folder. To change the cover art, replace the current cover
art file with a new one. If the old cover art is displayed from a controller app, refresh the content on the controller
app to apply any changes. If the old cover art is still displayed, rescan the music database by navigating to Settings >
Music Database > Rescan Songs and Playlists on the Digital Music Library.
Importing Files from a Computer
To import music files from a computer, follow the procedure below.
Windows
1 From “Network” of Windows Explorer, click the Digital Music Library’s IP address or friendly name (hostname).
If you cannot find it, enter“\\” and the Digital Music Library’s IP address or friendly name (hostname) into the
address bar of Windows Explorer, then press the Enter key. (You can also enter them into the Run dialog box,
which can be opened by pressing the Windows logo key + R.)
2 If the credential window appears on a Windows computer, enter “nobody” for both the username and
password, then click OK.
19
Chapter 3 Basic Usage
Other manuals for N1 Series
3
Table of contents
Other Melco MP3 Player manuals


 Specification sheet")


