Gemini MPX-40 User manual

MPX-40
PPRROOFFEESSSSIIOONNAALL EEFFXX CCDD//MMPP33 PPLLAAYYEERR
PROFESSIONELLER CD/MP3-PLAYER MIT EFX
REPRODUCTOR PROFESIONAL EFX DE CD/MP3
LECTEUR CD/MP3 PROFESSIONNEL AVEC EFX
In the USA: If you experience problems with this unit, please go to http://www.geminidj.com/support.html or call 1-732-346-0061 for Gemini Customer Service. Do not attempt to return this
equipment to your dealer. Gemini stands behind their products with an industry-leading 3 year limited warranty on all audio products. For larger images & detailed specs visit our website @
http://www.geminidj.com. WE ARE NOT RESPONSIBLE FOR TYPOGRAPHICAL ERRORS OR OMISSIONS. WE RESERVE THE RIGHT TO CHANGE WITHOUT NOT ICE. Parts of the design of
this product may be protected by worldwide patents. Information in this manual is subject to change without notice and does not represent a commitment on the part of the vendor. Gemini
Sound Products Corp. shall not be liable for any loss or damage whatsoever arising from the use of information or any error contained in this manual. No part of this manual may be reproduced,
stored in a retrieval system or transmitted, in any form or by any means, electronic, electrical, mechanical, optical, chemical, including photocopying and recording, for any purpose without the
express written permission of Gemini Sound Products Corp. It is recommended that all maintenance and service on this product is performed by Gemini Sound Products Corp. or its authorized
agents. Gemini Sound Products Corp. will not accept liability for loss or damage caused by maintenance or repair performed by unauthorized personnel.
USA:
Gemini Sound Products Corp.
Worldwide Headquarters
1 Mayfield Ave
Edison, New Jersey 08837
Ph: 732.346.0061
Fax: 732.346.0065
Germany:
Gemini Sound
Products GmbH
Liebigstrasse 16
85757 Karlsfeld
Ph: + 49 8131 39171-0
Fax: + 49 8131 39171-9
Spain:
Gemini Sound Products S.A.
Caspe 172 , 1º A
08013 ˆ BARCELONA, Spain
Ph: + 34 93 436 37 00
Fax: + 34 93 347 69 61
UK:
Gemini Sound Products LTD
44 The Brambles Enterprise Centre
Waterberry Drive,
Waterlooville PO7 7TH
Ph: +44 (0)87 087 00880
Fax: +44 (0)87 087 00990
France:
GSL France
1, Allée d' Effiat,
Parc de l'événement
F-91160 Longjumeau
Ph: + 33 1 69 79 97 70
Fax: + 33 1 69 79 97 80
Worldwide Offices

2
CAUTION: This product satisfies FCC regulations when shielded
cables and connectors are used to connect the unit to other equip-
ment. To prevent electromagnetic interference with electric appli-
ances such as radios and televisions, use shielded cables and connec-
tors for connections.
The exclamation point within an equilateral triangle is intended to
alert the user to the presence of important operating and mainte-
nance (servicing) instructions in the literature accompanying the
appliance.
The lightning flash with arrowhead symbol, within an equilateral
triangle, is intended to alert the user to the presence of uninsulated
"dangerous voltage" within the product's enclosure that may be of
sufficient magnitude to constitute a risk of electric shock to persons.
READ INSTRUCTIONS: All the safety and operating instruc-
tions should be read before the product is operated.
RETAIN INSTRUCTIONS: The safety and operating instruc-
tions should be retained for future reference.
HEED WARNINGS: All warnings on the product and in the oper-
ating instructions should be adhered to.
FOLLOW INSTRUCTIONS: All operating and use instructions
should be followed.
CLEANING: The product should be cleaned only with a polishing
cloth or a soft dry cloth. Never clean with furniture wax, benzine,
insecticides or other volatile liquids since they may corrode the cab-
inet.
ATTACHMENTS: Do not use attachments not recommended by
the product manufacturer as they may cause hazards.
WATER & MOISTURE: Do not use this product near water, for
example, near a bathtub, wash bowl, kitchen sink, or laundry tub; in
a wet basement; or near a swimming pool; and the like.
ACCESSORIES: Do not place this product on an unstable cart,
stand, tripod, bracket, or table. The product may fall, causing serious
injury to a child or adult, and serious damage to the product. Use
only with a cart, stand, tripod, bracket, or table recommended by the
manufacturer, or sold with the product. Any mounting of the prod-
uct should follow the manufacturer's instructions, and should use a
mounting accessory recommended by the manufacturer.
CART: A product and cart combination should be moved with care.
Quick stops, excessive force, and uneven surfaces may cause the
product and cart combination to overturn. SEE FIGURE A.
VENTILATION: Slots and openings in the cabinet are provided
for ventilation and to ensure reliable operation of the product and
to protect it from overheating, and these openings must not be
blocked or covered. The openings should never be blocked by plac-
ing the product on a bed, sofa, rug, or other similar surface. This
product should not be placed in a built-in installation such as a book-
case or rack unless proper ventilation is provided or the manufactur-
er's instructions have been adhered to.
POWER SOURCES: This product should be operated only from
the type of power source indicated on the marking label. If you are
not sure of the type of power supply to your home, consult your
product dealer or local power company.
LOCATION: The appliance should be installed in a stable location.
NON-USE PERIODS: The power cord of the appliance should
be unplugged from the outlet when left unused for a long period of
time.
GROUNDING OR POLARIZATION:
- If this product is equipped with a polarized alternating current
line plug (a plug having one blade wider than the other), it will fit
into the outlet only one way. This is a safety feature. If you are
unable to insert the plug fully into the outlet, try reversing the plug.
If the plug should still fail to fit, contact your electrician to replace
your obsolete outlet. Do not defeat the safety purpose of the polar-
ized plug.
- If this product is equipped with a three-wire grounding type plug,
a plug having a third (grounding) pin, it will only fit into a ground-
ing type power outlet. This is a safety feature. If you are unable to
insert the plug into the outlet, contact your electrician to replace your
obsolete outlet. Do not defeat the safety purpose of the grounding
type plug.
POWER-CORD PROTECTION: Power-supply cords should be
routed so that they are not likely to be walked on or pinched by items
placed upon or against them, paying particular attention to cords at
plugs, convenience receptacles, and the point where they exit from
the product.
OUTDOOR ANTENNA GROUNDING: If an outside antenna
or cable system is connected to the product, be sure the antenna or
cable system is grounded so as to provide some protection against
voltage surges and built-up static charges. Article 810 of the
National Electrical Code, ANSI/NFPA 70, provides information
with regard to proper grounding of the mast and supporting struc-
ture, grounding of the lead-in wire to an antenna discharge unit, size
of grounding conductors, location of antenna-discharge unit, con-
nection to grounding electrodes, and requirements for the ground-
ing electrode. SEE FIGURE B.
LIGHTNING: For added protection for this product during a
lightning storm, or when it is left unattended and unused for long
periods of time, unplug it from the wall outlet and disconnect the
antenna or cable system. This will prevent damage to the product
due to lightning and power-line surges.
POWER LINES: An outside antenna system should not be locat-
ed in the vicinity of overhead power lines or other electric light or
power circuits, or where it can fall into such power lines or circuits.
When installing an outside antenna system, extreme care should be
taken to keep from touching such power lines or circuits as contact
with them might be fatal.
OVERLOADING: Do not overload wall outlets, extension cords,
or integral convenience receptacles as this can result in a risk of fire
or electric shock.
OBJECT & LIQUID ENTRY: Never push objects of any kind
into this product through openings as they may touch dangerous
voltage points or short-out parts that could result in a fire or electric
shock. Never spill liquid of any kind on the product.
SERVICING: Do not attempt to service this product yourself as
opening or removing covers may expose you to dangerous voltage or
other hazards. Refer all servicing to qualified service personnel.
DAMAGE REQUIRING SERVICE: Unplug this product from
the wall outlet and refer servicing to qualified service personnel
under the following conditions:
- When the power-supply cord or plug is damaged.
- If liquid has been spilled, or objects have fallen into the product.
- If the product has been exposed to rain or water.
- If the product does not operate normally by following the oper-
ating instructions. Adjust only those controls that are covered by the
operating instructions as an improper adjustment of other controls
may result in damage and will often require extensive work by a qual-
ified technician to restore the product to its normal operation.
- If the product has been dropped or damaged in any way.
- When the product exhibits a distinct change in performance, this
indicates a need for service.
REPLACEMENT PARTS: When replacement parts are required,
CAUTION
PLEASE READ BEFORE USING APPLIANCE,
IMPORTANT WARNING & SAFETY INSTRUCTIONS!
RISK OF ELECTRICAL SHOCK DO NOT OPEN!

58@
31
31. Relay
4

MPX-40 PROFESSIONAL EFX CD PLAYER
INTRODUCTION:
Congratulations on purchasing the GEMINIi MPX-40
PROFESSIONAL EFX MP3 CD PLAYER. This state of the art pro-
fessional CD player is backed by a ONE year warranty, and a 90 day
warranty on lasers. Prior to use, we suggest that you carefully read all
the instructions.
FEATURES:
- Audio CD, MP3, CD-R, & CD-RW compatible
- Slot-loading CD mechanism
-Full MP3 File and Folder Search
- Disc identification system for memorizing cue points
- Touch-sensitive jog wheel
- 3 fly cues & 2 eight second sampler banks
- 10 sec. Anti-shockTM protection using RAM buffer memory
- Seamless loop with reloop & B-edit
- Key lock & BPM counter
- Pitch bend via jog wheel or buttons
- Variable pitch slide control with ranges of 4%, 8%, 16%, 100%
- Adjustable brake control & reverse
- +10 track selection
- Dual jog mode function
- Single/continuous play modes
- Three time display modes
- Large blue backlit LCD display
- Coaxial RCA digital output
- Sleep mode
SAFETY CERTIFICATIONS:
Laser Diode Properties
Material: Ga - Al - As
Wavelength: 755 - 815 nm (25° C)
Laser Output: Continuous Wave, max. 0.5mW
CAUTIONS:
1. Do not use this CD Player at temperatures below 41°F/5°C or
higher than 95°F/35°C.
2. The apparatus should not be exposed to dripping or splashing &
no objects filled with liquids such as vases should be placed on the
apparatus. Place the unit in a clean & dry location.
3. Do not place the unit in an unstable location.
4. When disconnecting the power cord from an AC outlet, always
grasp it by the plug. Never pull the power cord.
5. To prevent electric shock, do not remove the cover or the bottom
screws. There are no user serviceable parts inside. Please refer serv-
icing to a qualified technician.
6. Do not use chemical solvents to clean the unit.
7. Keep this manual in a safe place for future reference.
8. In the USA ~ if you experience problems with this unit call
GEMINI CUSTOMER SERVICE at: 1 (732) 346-0061 or visit
HTTP://WWW.GEMINIDJ.COM/SUPPORT.HTML. Do not attempt to
return this equipment to your dealer.
LINE VOLTAGE SELECTION:
Model MPX-40 is a dual voltage units. It will operate
at 115 V or 230 V. To set the proper voltage, follow these
steps:
1. Place the head of a screwdriver in the groove of the VOLTAGE
SELECTOR SWITCH (1) found on the rear panel.
2. Flip the switch to 115 V or 230 V.
3. Do not force or twist the switch. Excessive force may cause
damage. If the switch does not move smoothly, contact a qual-
ified technician.
CONNECTIONS:
1. Before making any connections, please make sure the POWER
SWITCH (4) is in the OFF position. All connections are located on the
rear panel of the CD player. Please refer to the diagram of this
model on page 3.
2. Included with your MPX-40 is a POWER CORD (2).
Plug one end of the power cord in to the AC IN(3). Plug
the other end in to the nearest available power output.
3. Plug one end of a set of RCA cable connectors into the RCA
OUTLET (5).
4. Plug the other end of the RCA connectors into any avail-
able line level input jacks on your mixer. If you are playing
the MPX-40 through a receiver, you can plug the RCA con-
nectors into the CD or AUX input jacks on your receiver. If
there are no CD or AUX inputs, use any line level (except
phono) inputs.
5. The DIGITAL OUT (6) jack is for connecting this unit to any
type of computer, DAT,MD,HARD DISC RECORDER, or any
other type of device that accepts digital signals.
FUNCTIONS:
1. POWER SWITCH:After making sure that the VOLTAGE SELECTOR
SWITCH (1), found on the rear panel, is properly set, plug the unit in
& press the POWER SWITCH (4) to ON. The unit will turn ON& the
blue LCD (16) screen will illuminate. Turn OFF the unit by pressing
the POWER SWITCH (4) to OFF to when not in use.
2. DISC INSLOT:The DISC IN
SLOT (7) is where the CD is held.
When a disc is in the slot, the
blue LED & bar will be illuminated above the slot & the LCD (16)
will show the total tracks & time on the disc. When a CD is not in
the unit, the LCD (16) will show NODISC.
3. STOP/EJECT:Press STOP/EJECT (10) once to stop, twice
&/or hold to eject the CD.
4. CUE:The CUE (9) button is used to store the exact moment
at which a track will begin playing. Use the CUE (9) button to
aid in program mixing. While the unit is in the play mode, & after
memorizing the cue point, pressing CUE (9) will cause the CD play-
er to enter pause mode at the memorized cue point. Holding
down CUE (9) changes the cue function to preview (allowing
you to hear the music play from the cue point). Releasing CUE (9)
returns you to the preset cue point in pause mode. If a cue point is
not memorized, pressing CUE (9) in play mode will not begin cue
selection.
5. PLAY/PAUSE:Each press of the PLAY/PAUSE (8) causes the oper-
ation to change from play mode to pause mode or vice versa.
6. LCD: The LIQUID CRYSTAL DISPLAY (LCD (16)) shows the track
numbers, play mode, pause mode, playback display, loops, tempo, &
pitch. The playback display shows 3 different time displays the time
elapsed, the total time remaining, & the track time remaining until
play ends. The playback display bar flashes slowly when the track has
30 seconds left. The playback display bar flashes quickly when the
track has 15 seconds left.
7. TRACK SKIP +10: The TRACK SKIP +10 (15) rotary control
lets you select the track to play. Push TRACK SKIP +10 (15) to
advance through the track list by increments of ten.
8. JOG MODE:The JOG MODE (21) button is used to con-
vert the JOG WHEEL (22) from pitch bend to fast
forward/rewind. When deactivated movements of the JOG
WHEEL (22) will bend the pitch of a playing audio track for precise
beat adjustments when mixing. Press the JOG MODE (21) button &
then use the JOG WHEEL (22) to move forward or reverse while in
play mode. Use the JOG MODE (21) button in pause mode & the unit
will enter into stutter mode. Move the JOG WHEEL (22) clockwise to
fast forward. Move the JOG WHEEL (22) counter clockwise to
rewind.
9. JOG WHEEL:The JOG WHEEL (22) has multiple
functions:
Use the JOG WHEEL (22) to bend the pitch for
precise synchronization in play mode during a mix.
The JOG WHEEL (22) is also used for frame accu-
rate positioning in pause mode. This positioning on
the track may then be memorized as a point of CUE/RECALL (9).
You will notice that the unit will enter into stutter mode when mak-
ing your adjustments in pause mode. See the CUE section for more
information.
In conjunction with the JOG MODE (21) button, the JOG
WHEEL (22) is used for fast forward/rewind. See JOG MODE
4

(21) for more information.
Both the MPX-4 have a touch sensitive JOG WHEEL (22) & will
simulate scratchin with a record on a turntable. Use the JOG
WHEEL (22) to create precise cuts, scratches, backspins, & more.
10. SINGLE: Pressin the SINGLE (24) button activates the
SINGLE function. In SINGLE mode, the CD will play throu h
once & then stop. In pause, SINGLE (24) mode also scans throu h a
track to the point where the music be ins. This feature allows you to
start play immediately at the be innin of the music without any
blank space (which exists at the be innin of every track).
Pressin SINGLE a second time activates the CONTINUOUS function
causin the unit to play continuously (after the last track, the
unit will return to the first track of the disc & continue to play).
CONTINUOUS & SINGLE functions appear in the display to indicate
which mode the unit is in. When deactivated, no play function will
appear in the LCD (16). See LCD.
11. TIME: For CD(s) the TIME (25) button switches the time
display between the 3 available choices listed under (16):
- Time elapsed on the track
- Total time remainin on the disc
- Time remainin on the track.
12. KEY: Pressin the KEY (26) button activates the KEY LOCK
function. With this feature en a ed, usin the PITCH SLIDE
CONTROL (30) will only modify the tempo of the track playin ,
without chan in the key or tone of the track playin .
13. BPM: Use the BPM (27) button to count the beats per
minute on a track. This feature will allow you to beat match
faster & easier. Press the BPM (27) button once to activate the BPM
(27); under the icon for PITCH in the LCD (16) BPM info will
appear. Press the button a ain to deactivate the BPM (27), the LCD
(16) will hide the BPM info under the icon for PITCH.
14. LOOP IN: Pressin LOOP IN (17) while a track is playin
will enter a loop point into the memory, & the LOOP IN’s
reen LED will blink rapidly while memorizin the loop entry point.
This is the first step in creatin a SEAMLESS LOOP.
15. LOOP OUT: After a loop entry point is memorized, pressin
LOOP OUT (18) in play mode will complete the loop with
an exit point. This will repeat the section between the loop’s entry
point, pro rammed with pressin LOOP IN (17), & a second exit
loop point, when the LOOP OUT (18) button is pressed. Press LOOP
OUT (18) a ain to stop the loop from repeatin & continue play
from the point where the loop ends.
16. RELOOP: Press RELOOP (19) for the unit to return to the
previously set loop. Press RELOOP (19) repeatedly for stutterin
the loop entry point. The RELOOP (19) function automatically
returns the music to the loop point & will play the loop until it is
released with LOOP OUT (18).
17. B-EDIT: Press B-EDIT (20) to edit the SEAMLESS LOOP.
This feature allows you to adjust the exit point saved in your
LOOP OUT (18) settin with the use of the JOG WHEEL (22). SEE
SEAMLESS LOOP.
18. PITCH: Pressin PITCH (28) enable you to select pitch
levels ran in from 4%, 8%, 16%, & 100%. Press the 4%
& 16% (PITCH OFF) to ether to turn off the PITCH
CONTROL SLIDE (30). Press 4%, 8%, & 16%, simultaneously
to select the 100% pitch settin .
19. PITCH BEND: Pushin the PITCH BEND (29) buttons
will automatically raise the pitch up to +4% or lower the
pitch down to -4% from the existin pitch settin . Releasin the
PITCH BEND (29) buttons will return the pitch to the ori inal pitch
settin . You can use the PITCH BEND (29) to match beats when mixin
from one son to another.
20. PITCH CONTROL SLIDE: Movin the PITCH CONTROL SLIDE
(30) up or down will lower or raise the pitch percenta e up to the
selected PITCH (28) settin .
21. FILE/FOLDER SEARCH: Use the FILE/FOLDER SEARCH
(23) rotary control in conjunction with the LCD Screen (16)
to find MP3 files on a CD. By default, upon power up the unit
is in FILE mode, which which allows you to browse files just like
usin an normal Audio CD. If you press down the FILE/FOLDER
SEARCH (23) rotary control.once, this enters FOLDER mode, where
turnin the control allows you to browse all MP3 folders on a cd. By
pressin down the control once a ain, this exits FOLDER. mode, and
allows you to once a ain look throu h the son s in a chosen
folder.To select a son within the folder, use the Track Knob (15)
22. REVERSE: The REVERSE (11) button simply plays the
track in reverse.
23. MEMO/STORE: The MEMO/STORE (12) button allows
you to be in storin memory in your CUE POINTS (13) &
SAMPLER (14).
24. SAMPLER: Use the SAMPLER (14) button(s) to play a
section of a track, stored in a sample memory bank, over
the track playin to provide an extra layer to your mix. You may store
2 samples in the SAMPLER (14) button(s). Once a sample is stored
the respective LED will remain lit indicatin that the sample is ready
to be used at the press of the button(s).
25. CUE POINTS: There are 3 CUE POINTS (13) that may be
created on the fly. You may create an entry point in a track
from which you will be in play instantly. By pressin the cue
point(s) you may jump to different sections of a son or a
CD without any breaks. This feature helps you eliminate
pauses involved in track search &/or play various points of a son
to shorten or enhance a mix.
OPERATIONS:
1. Place a CD in the DISC IN SLOT (7) & push it in so the unit
accepts the CD. The disc will enter into the unit & be in to read.
2. Adjust the TRACK SKIP +1 (15) rotary control to select the track
you want to play for re ular CD(s).
3. Press the PLAY/PAUSE (8) button & the unit will instantly play.
SAMPLER:
To store a sample, first you must press MEMO/STORE (12), the
blue MEMO/STORE (12) LED will be lit indicatin that the unit is
ready for sample stora e. When the track has reached the desired
point at which you would like the sample to be in, select a SAMPLER
(14) button where you would like the sample to be stored. Press the
SAMPLER (14) button. The reen SAMPLER (14) LED will blink indicatin
that the MEMO/STORE (12) is actively recordin the sample.
When the desired selection has reached the point at which you want
the sample to end press the same SAMPLER (14) button you have
chosen to save the sample a ain to end recordin . The reen
SAMPLER (14) LED will remain lit once you have ended the recordin .
The sample is now stored & ready for play. You may press the
SAMPLER (14) button to layer the sample over any son . While the
sample is playin , the reen SAMPLER (14) LED will blink.
To stop a sample from playin , press the SAMPLER (14) button
a ain while the sample is playin to cut it short. If you are not satisfied
with the recordin of the sample or its location, simply press the
MEMO/STORE (12) button & follow the sampler instructions from
the be innin .
CUE POINTS:
To use the CUE POINTS (13), you must first pro ram the entry
point. Press the MEMO/STORE (12) button first to be in storin
your CUE POINTS (13). The MEMO/STORE (12) LED will illuminate
to indicate that the unit is ready for cue stora e. Select a location
to store your CUE POINTS (13) by choosin one of the 3 CUE
POINTS (13) buttons.
When the track reaches the point at which you would like your cue
to be in, press a CUE POINT (13) button. The CUE POINT (13) LED
will blink when the cue selection has been stored. Press the CUE
POINT (13) button to start from that point in the son at any
moment durin play & the unit will automatically be in playin from
that point. The CUE POINT (13) LED will continue blinkin durin
play to indicate that it is in use. When the CUE POINT (13) is no
lon er in use, the CUE POINT (13) LED will remain on to indicate
that this cue point is still stored in that location.
To rerecord a CUE POINT (13), repeat these instructions. By selectin
aCUE POINT (13) that already has stored information, you will
instantly overwrite this information.
CUE:
To use CUE (9) you must first find the point where you would like
to be in play. Place the track in pause mode. This will activate the
stutter mode. Then use the JOG WHEEL (22) for fast, precise searchin .
SEE JOG WHEEL (22) for more info.
Once you have found the point at which you would like to be in
playin , do not further adjust the JOG WHEEL (22). Then press
PLAY/PAUSE (8). Then CUE (9) LED will blink. Your Cue is now set.
MPX-40
5
NOTE: The 100% Pitch setting is fo egula CD’s
and will not wo k with MP3 CD files.
Note: STORE AND RECALL is only
available fo egula CD’s not MP3 discs

Press CUE (9) to pause the song at your point of cue. Press & hold
the CUE (9) button to begin Cue preview, which will allow you to
judge whether the point of cue you have loaded is satisfactory.
If you are not satisfied with your point of cue, enage PAUSE ( ) &
use the JOG WHEEL (22) to find the exact point you wish to begin
play. Rapidly press PLAY PAUSE ( ) twice to enter & exit play mode.
You will be in pause mode. The CUE (9) LED will blink. Repeat the
steps for Cue preview, to make sure your new cue point is satisfactory.
When you are satisfied with your point of cue, leave the CUE (9)
button alone, the CUE (9) LED will remain on to indicate that the
point of cue is stored & ready to be used.
CUE IDENTIFICATION:
The MPX-40 have the ability to store one cue point per track in the
internal memory. This enables the DJ to scan quickly to a starting
point for easier mixes during a live session.
To store this cue point follow the steps to store a cue point.
Once you are satisfied with your cue point, press & hold the
MEMO STORE (12) button for two seconds in order to store this cue
point. If you are not satisfied with this cue point repeat the steps to
store a cue point.
Your cue is now saved & can be recalled at any moment long after
you have stopped playing with this CD. You will notice the LCD (16)
will flash with the cue point memory position once this cue point has
been saved successfully.
The cue point has now been stored in the memory of the MPX-40
and can be recalled at any moment. You will notice the AUTO CUE
LED blinking indicating that the MPX-40 recognize a stored cue
point on the CD. Simply scroll to any track that has a cue point
stored. Press and hold the Folder/Recall Cue (23) knob untill the
point has appeared on the LCD screen. Press play & the song will
start from the stored cue point.
SEAMLESS LOOP:
Press the LOOP IN (17) button to enter an entry point into
the memory, & the LOOP IN's (17) green LED will blink rapidly
while memorizing the loop entry point into the memory.
After an entry loop point is memorized, press LOOP OUT (1 ) in
play mode to complete the loop. The unit will automatically repeat
the section between the loop's entry point, programmed with the
pressing of the LOOP IN (17) button, & a second exit loop point,
when the LOOP OUT (1 ) button is pressed. The loop is now pro-
grammed
into the unit's memory.
While playing the loop, both the LOOP IN (17) & LOOP OUT (1 )
green LEDs will blink to indicate that the loop is in use. You will
notice the LCD (16) will also indicate that the LOOP is in use with a
blinking CUE-B icon that will remain steady once the loop has been
stopped.
Press the RELOOP (19) for the unit to return to the previously set
loop. Press the RELOOP (19) repeatedly for stuttering the loop entry
point. The RELOOP (19) function automatically returns the music to
the loop point & will play the loop until it is released with the LOOP
OUT (1 ) button.
Press the B-EDIT (20) button to edit the loop created by your
SEAMLESS LOOP. When pressing B-EDIT (20), the LCD (16) will
read the frame where the LOOP OUT (1 ) is set. You may adjust it
with the use of the JOG WHEEL (22), by turning the wheel left or
right examining frame by frame while the loop repeats itself. You
should be able to hear the difference in each frame until you are satisfied
with your loop exit point. Press B-EDIT (20) when you are satisfied
with your exit point & your loop will continue to play until you
press LOOP OUT (1 ).
To exit the loop & resume play, press LOOP OUT (1 ) to stop the
loop & continue play from the point where the loop ends.
SLEEP MODE:
The MPX-40 feature a default SLEEP mode that activates itself
when the unit recognizes that it has not been in use for some time.
This feature simply shuts OFF the laser to increase the longevity of
the unit’s playing capabilities. You will notice the LCD (16) reads
SLEEP when this mode is activated. To deactivate this default mode,
begin play & the unit will “wake up” to play music once again.
RELAY START JACK (31): This jack makes it possible to connect
two MPX-40’s together, so that when one unit finishes playing,
the opposite unit automatically starts playback. For normal use,
leave this jack disconnected.
TROUBLESHOOTING:
· If the disk will not play, check to see if the disc was loaded correctly
(label side up). Also check the disc for excessive dirt, scratches,
etc.
· If the disc turns but there is no sound, check the cable connections.
If they are okay, check your amplifier or receiver.
· If the CD skips, check the CD for dirt or scratches. Do not
assume that the CD player is defective. Many CDs are recorded out
of spec & will skip on most or all CD players. Before sending the
unit in for repair, try playing a CD that you are sure plays properly.
SPECIFICATIONS:
GENERAL:
Type........................................Single Mechanism Compact Disc Player
Disc Type...................................Standard Compact discs (12cm, cm)
Time Display.............Track Elapsed, Track Remain, or Total Remain
Variable Pitch..........± 4%, ± %, ± 16%, + 100% Slider with Resume
Switch
Pitch Bend......................................................................± 4% Maximum
Instant Start..........................................................Within 0.015 seconds
Track Selection..............................................................1 to 99 Tracks
Dimensions...................................... 1/2" W x 3 3/4" H x 12 1/2" D
................................................................................(216 x 95 x 320 mm)
Weight.............................................................Player Unit 6.62 lbs (3 kg)
AUDIO SECTION:
Audio Types..............................................................................CD, MP3
Quantization..........................1 Bit Linear/Channel, 3 Beam Laser
MP3/CD Bit Rate...............................................................32-320KBPS
Oversampling Rate...................................................................... Times
Sampling Frequency...................................................................44.1 kHz
Frequency Response.....................................................20 Hz to 20 kHz
Total Harmonic Distortion.......................................Less Than 0.05%
Signal to Noise Ratio.......................................................................90 dB
Dynamic Range...........................................................................< 0 dB
Channel Separation........................................................... dB (1 kHz)
Output Level..................................................................1.3 Volts R.M.S.
Power Supply..................................................AC 115/230 V, 60/50 Hz
SPECIFICATIONS SUBJECT TO CHANGE WITHOUT NOTIFICATION
FOR IMPROVEMENT.
NOTES:
_______________________________________________________________________________________________________________________
_______________________________________________________________________________________________________________________
_______________________________________________________________________________________________________________________
_______________________________________________________________________________________________________________________
6

ATENCIÓN: Este producto cumple con la normativa legal si se
utilizan cables y conectores blindados para conectar la unidad a otro
equipo. Para evitar interferencias electromagnéticas con otros
aparatos eléctricos, como radios y televisores, deben emplearse
cables y conectores blindados.
Los signos de exclamación dentro de un triángulo que puedan
aparecer en la documentación que acompaña a la unidad pretenden
alertar al usuario de instrucciones de operación o mantenimiento
importantes.
El signo de un rayo dentro de un triángulo pretende alertar al
usuario de la presencia de "voltaje peligroso" no aislado en el inte-
rior de la unidad, que podría ser de suficiente intensidad como para
constituir riesgo de descarga eléctrica.
LEA LAS INSTRUCCIONES: Deben leerse todas las indica-
ciones de uso y seguridad antes de usar este producto.
CONSERVE LAS INSTRUCCIONES: Las instrucciones de
uso y seguridad deben conservarse para referencias futuras.
ATIENDA A LAS ADVERTENCIAS: Deben seguirse todas las
advertencias sobre este producto que figuran en el manual de
instrucciones.
SIGA LAS INSTRUCCIONES: Deben seguirse todas las
instrucciones del manual.
LIMPIEZA: Este producto debe limpiarse con una mopa suave o
con un paño seco. Nunca utilice cera para muebles, gasolina, insecti-
cidas u otros líquidos volátiles, ya que podrían corroer la carcasa.
COMPLEMENTOS: No utilice accesorios que no estén
recomendados por el fabricante, pues podrían dañar la unidad.
AGUA Y HUMEDAD: No use este producto cerca de medios
acuáticos, como una bañera, un cubo de agua, un fregadero o un
lavadero; tampoco en un sótano húmedo, ni cerca de una piscina o
similar.
ACCESORIOS: No coloque el producto sobre un carrito,
soporte, trípode, brazo o mesa. Podría caer y causar graves daños a
un niño o adulto, así como a la propia unidad. Úsese sólo con un car-
rito, soporte, trípode, brazo o mesa recomendado por el fabricante.
Al montar la unidad deben seguirse siempre las instrucciones y
emplearse accesorios recomendados por el fabricante.
CARRITO: Si el producto va sobre un carrito, debe moverse el
conjunto con cuidado. Detenciones bruscas, una fuerza excesiva o
superficies inadecuadas pueden provocar la caída de todo el conjun-
to. VÉASE FIGURA A.
VENTILACIÓN: Las aperturas y ranuras de la carcasa están dis-
eñadas para la ventilación, aseguran un manejo fiable y lo protegen
de cualquier sobrecalentamiento, por tanto, nunca deben cubrirse ni
bloquearse. Estas aperturas no deben taparse colocando el producto
sobre un sofá, una cama, una alfombra o superficies similares. Nunca
debe colocarse en una estructura prefabricada, como una caja o un
rack, a menos que tengan la ventilación adecuada o lo permitan las
instrucciones del fabricante.
FUENTES DE ALIMENTACIÓN: Esta unidad debe utilizarse
exclusivamente con el tipo de suministro eléctrico indicado en la eti-
queta correspondiente. Consúltelo antes de enchufar el producto si
no está seguro del tipo de suministro del lugar donde lo va a usar.
UBICACIÓN: Este aparato debe colocarse en una ubicación
estable.
PERIODOS SIN USARLO: Si no se va a usar la unidad durante
un tiempo prolongado, desenchúfelo de la corriente eléctrica.
TOMA DE TIERRA O POLARIZACIÓN:
- Si este producto lleva una clavija de corriente alterna polarizada
(con un pivote más grueso que otro, tipo inglés), sólo entrará en una
posición. Es una medida de seguridad. Si no puede introducir la cla-
vija en el enchufe, gírela. En ningún caso debe forzarse. Si sigue sin
entrar, un electricista debería cambiar el enchufe.
- Si la unidad lleva una clavija con tres pivotes (el tercero corres-
ponde a la toma de tierra), sólo entrará en un tipo de enchufe. Se
trata de una medida de seguridad. Si el enchufe y la clavija no son
compatibles, un electricista deberá cambiar el enchufe. En ningún
caso deberá forzarse.
PROTECCIÓN DEL CABLE DE CORRIENTE: Los cables
de corriente deben protegerse para que nadie los pise ni corran el
riesgo de pinzarse por elementos colocados encima o que los apri-
sionen. Debe prestarse especial atención al cable, al enchufe, a los
extensores de cable y al punto por donde el cable sale de la unidad.
TIERRA DE LA ANTENA EXTERIOR: Si el producto lleva
conectada una antena exterior o sistema de cables, asegúrese de que
cuenta con la toma de tierra correspondiente, a fin de proteger la
unidad de variaciones de voltaje y cargas de electricidad estática.
Existe documentación oficial acerca de la correcta utilización de la
toma de tierra y de las medidas de seguridad pertinentes, conexión
de los electrodos de descarga y sus requisitos. VÉASE FIGURA B.
RAYOS: Como protección adicional del producto durante una tor-
menta eléctrica, o durante periodos prolongados sin usarlo, des-
enchúfelo de la corriente y desconecte la antena o sistema de cables.
De este modo se protegerá el producto de los daños que pueda pro-
ducir la caída de un rayo o las fluctuaciones de la red eléctrica.
LÍNEAS ELÉCTRICAS: Nunca debe situarse un sistema de
antena cerca de líneas eléctricas u otros circuitos de corriente.
Tampoco debe colocarse en lugares donde pueda caer sobre dichos
circuitos eléctricos. Al instalar un sistema de antenización exterior,
debe tomarse la extrema precaución de no tocar dichas líneas eléctri-
cas, pues el más mínimo contacto puede ser mortal.
SOBRECARGA: No sobrecargue los enchufes de la pared con
ladrones o instalando enchufes múltiples, pues correría el riesgo de
electrocución o incendio.
ENTRADA DE OBJETOS O LÍQUIDOS: Nunca introduzca
objetos de ningún tipo en el interior del producto, pues podrían tocar
una parte eléctrica y cortocircuitar el aparato, lo que resultaría en un
incendio o descarga eléctrica. No verter nunca ningún líquido sobre
el producto.
REPARACIÓN: No intente reparar el producto por cuenta
propia, ya que abrir o retirar la carcasa le expondría a un voltaje peli-
groso u otros peligros. Diríjase siempre a un centro de servicio téc-
nico autorizado.
DAÑOS QUE REQUIEREN REPARACIÓN: Desenchufe el
aparato de la corriente y diríjase a un servicio técnico autorizado si
se da alguna de las siguientes situaciones:
- El cable de alimentación o la clavija están dañados.
- Se ha vertido líquido o ha caído algún objeto sobre la unidad.
- El aparato se ha expuesto a la lluvia o a salpicaduras.
- La unidad se ha caído al suelo o dañado de algún modo.
- El aparato no funciona con normalidad, ni aun siguiendo las
instrucciones. Ajuste sólo los mandos que se indican en las instruc-
ciones, ja que la manipulación inadecuada de otros controles podría
dañar la unidad y requeriría un mayor trabajo de un técnico para
restablecer su funcionamiento normal.
- Si el producto muestra anomalías en su funcionamiento, necesita
revisión por parte de un servicio técnico autorizado.
RECAMBIOS: Cuando se necesite alguna pieza de recambio,
asegúrese de que el servicio técnico utilice piezas originales autori-
zadas o que tengan las mismas características que las originales. Los
reemplazos no autorizados pueden causar descargas eléctricas,
incendios u otros daños.
COMPROBACIÓN DE SEGURIDAD: Tras la reparación,
solicite al técnico que efectúe las comprobaciones de seguridad nece-
sarias para determinar que el producto se encuentra en las condi-
ciones adecuadas para su funcionamiento.
MONTAJE EN UNA PARED O TECHO: Este producto
nunca debe montarse en una pared o en el techo.
CALOR: Este producto debe alejarse de fuentes de calor, como
radiadores, estufas u otros aparatos que irradien calor, incluyendo
amplificadores.
ATENCIÓN
LEER ANTES DE USAR EL APARATO.
¡AVISOS E INSTRUCCIONES DE SEGURIDAD!
RIESGO DE ELECTROCUCIÓN ¡NO ABRIR!
7

58@(8b,±8´b±bbÍO8YC(8b+Áb±±bbÍO8Y±C±¼8(8b,±8´b±COÁYOb´¼8ÁY8Y¡CCO8FbYbOÍÍb¼bÊbO|Ánb´¼±8Y´´´b´¼9Y8±b´Yb--¡´Y´¼±FÁY±b´8Á¼±Í8Y´YbO8Y88´±Çbb±9bO8FbÊ8Y8¼8YbOÁ8Y´¡bb¼´´Á´¼±8Y´U-Y8Y(4~sÎ8FbYbO±±b¼b8Fb´*Ï8Á8,8±b¼8Yb8±8¼8¡+bbO¼±YbǼ8bÀ¡8FbYbO±±b¼b½¡¼±8Y8Yb±±b¼bs¡¼YbObYYp¡+8Y8*ϸ¡+8Y8t¼8·¡*8Á±8Yb¼±8Y8Ybg¡(8ʹ(8Á´8¡ÁbΡ+¼¹bO¼¡*bÇb±´bÀ¡b¹+¼±b½¡Áb(¼´s¡+8b±p¡,±8O+¤Î¸¡(8¼88·¡~g¡~ Á¼¡*b¹+¼Á¼¼b±ÀΡ~Y¼À¡tYbÀÀ¡t~3|bbÀ½¡Yb±¹*bO8ÁbÀs¡+tbÀp¡,bÀ¸¡bÊÀ·¡(Àg¡+bbO¼±Yb(¼O|À¡(¼O|bY½Î¡¼±Yb(¼O|b´Í8Fb¼±C
31
4
31. Relay

LECTOR DE CD EFX PROFESIONAL MPX-40
INTRODUCCIÓN:
¡Enhorabuena! Ha adquirido el LECTOR DE CD YMP3
PROFESIONAL GEMINI MPX-40 EFX. Este reproductor de CD
profesional de última generación está respaldado por una garantía de
UNaño. Antes de usar la unidad, le recomendamos que lea detenida-
mente las instrucciones.
CARACTERÍSTICAS:
- Compatible con Audio CD, MP3, CD-R, y CD-RW
- Mecanismo de carga frontal de CDs
- Búsqueda de archivos y carpetas MP3
- Sistema de identificación de discos para memorizar puntos de Cue
- Rueda Jog Wheel sensible al tacto
- 3 puntos de Cue al vuelo y 2 bancos de sampleo de 8 segundos
- Protección Anti-ShockTM de 10 seg. mediante memoria RAM
- Loop imperceptible con reloop y edición del punto B
- Key lock y contador de BPM
- Pitch bend controlable por botones o Jog Wheel
- Control deslizable de pitch ajustable a rangos del 4, 8, 16 y 100%
- Control ajustable de freno y reverso
- Selección de 10 en 10 pistas
- Modo de jog dual
- Modos de reproducción single y continuo
- Tres modos de visualización del tiempo
- Gran display LCD retroiluminado
- Salida digital RCA coaxial
- Modo sleep
CERTIFICACIONES DE SEGURIDAD:
Propiedades del diodo láser
Material: Ga - Al - As
Longitud de onda: 755 - 815 nm (25° C)
Salida del láser: Onda continua, máx. 0.5mW
PRECAUCIONES:
1. No utilizar este lector de CD a temperaturas inferiores a 5°C o
superiores a 35°C.
2. Este aparato no debe exponerse a goteos ni salpicaduras, ni a la
caída de objetos llenos de líquido, como vasos o botellas. Sitúe la
unidad en un lugar limpio y seco.
3. No coloque la unidad sobre una superficie inestable.
4. Desenchufe la unidad extrayendo la clavija del enchufe, nunca
tirando del cable.
5. Para evitar el riesgo de electrocución, no retire la carcasa ni los
tornillos de la parte inferior. Las partes internas del aparato no están
pensadas para que las manipule el usuario final. Diríjase siempre a un
servicio técnico autorizado.
6. No emplee disolventes químicos para limpiar la unidad.
7. Conserve este manual para futuras consultas.
8. En EEUU: si encuentra problemas con esta unidad, llame a
GEMINI CUSTOMER SERVICE:1 (732) 346-0061 o visite
HTTP://WWW.GEMINIDJ.COM/SUPPORT.HTML. No intente devolver
este equipo a su vendedor.
SELECCIÓN DE VOLTAJE:
El modelo MPX-40 es una unidad de voltaje dual. Funciona tanto a
115 V como a 230 V. Para seleccionar el voltaje, siga
estos pasos:
1. Introduzca un destornillador por el agujero VOLTAGE
SELECTOR SWITCH (1), localizado en el panel trasero.
2. Gire el selector a 115 V o 230 V.
3. Nunca fuerce el selector. Aplicar excesiva fuerza puede dañar la
unidad. Si el selector no cambia con suavidad, contacte con un
técnico autorizado.
CONEXIONES:
1. Antes de realizar cualquier conexión, asegúrese de que el
INTERRUPTOR DE CORRIENTE (4) está en posición OFF. Todas las
conexiones se encuentran en el panel trasero del lector de CD.
Consulte el diagrama de este modelo en la página 3.
2. Junto con el MPX-40 se suministra un CABLE DE CORRIENTE
(2). Conecte un extremo a la entrada AC IN(3). El otro
extremo debe conectarse a cualquier enchufe doméstico.
3. Conecte un extremo de los cables RCA a la SALIDA
RCA (5).
4. Conecte el otro extremo del cable RCA a cualquier entrada de
línea de su mezclador. Si está usando el MPX-40 a través de
un receptor o equipo de sonido, puede conectar el cable
RCA a las entradas de CD o AUX. Si éstas no existieran,
servirá cualquier entrada de línea (excepto phono).
5. La salida DIGITAL OUT (6) es para conectar la unidad a
cualquier ORDENADOR,DAT,MD,GRABADOR DE DISCO
DURO, u otro tipo de aparato que acepte señal digital.
FUNCIONES:
1. INTERRUPTOR DE ENCENDIDO:Tras asegurarse de que el
SELECTOR DE VOLTAJE (1), está en su posición correcta, enchufe la
unidad a la corriente y encienda la unidad pulsando el BOTÓN DE
ENCENDIDO (4). La unidad se pondrá en marcha y la pantalla LCD
azul (16) se iluminará. Para apagar la unidad, presione de nuevo el
BOTÓN DE ENCENDIDO (4) cuando la unidad no esté en uso.
2. RANURA DE ENTRADA:La RANURA DE ENTRADA (7) es por
donde se introduce el CD.
Cuando hay un disco dentro, los
LED azules y la barra de la parte
superior de la ranura se ilumi-
narán, y la pantalla LCD (16) mostrará el total de pistas y el tiempo
total del CD. Cuando la unidad no tenga ningún CD, la pantalla LCD
(16) mostrará NODISC.
3. STOP/EJECT:Pulse STOP/EJECT (10) una vez para parar, y dos
veces (o una pulsación sostenida) para extraer el CD.
4. CUE:El botón CUE (9) se utiliza para definir el momento
exacto en que una pista comenzará a reproducirse. Use el
botón CUE (9) para ayudarse en las mezclas programadas.
Mientras la unidad está en modo de reproducción, y después de
haber memorizado el punto de cue (o punto de corte), pulsar
CUE (9) hará que el lector de CD entre en modo de pausa y se
sitúe en el punto de cue memorizado. Pulsando CUE (9) sin soltarlo
cambia la función a preescucha (y reproduce a partir del punto de
cue mientras sostenga el botón pulsado). Al soltar CUE (9), se regre-
sará al modo de pausa en el punto de cue fijado. Si no se ha memo-
rizado ningún punto de cue, pulsar el botón durante la reproducción
no comenzará a reproducir ninguna selección de Cue.
5. PLAY/PAUSE: Cada pulsación de PLAY/PAUSE (8) hace que la
operación cambie de modo reproducción a pausa o viceversa.
6. LCD: El DISPLAY DE CRISTA LÍQUIDO (LCD (16)) muestra el
número de pista, el modo de reproducción, el modo de pausa, el
tiempo, los loops, el tempo y el pitch. El indicador del tiempo de
reproducción muestra tres medidas distintas: el tiempo transcurrido
(elapsed), el que queda de pista (remain) y el total restante. La barra
de reproducción parpadea lentamente cuando quedan 30 segundos
de pista, y rápidamente cuando sólo quedan 15 segundos.
7. TRACK SKIP +10: El control rotatorio TRACK SKIP +10 (15)
permite seleccionar la pista a reproducir. Pulse TRACK SKIP
+10 (15) para avanzar de diez en diez pistas.
8. JOG MODE:El botón JOG MODE (21) se usa para con-
vertir la rueda JOG WHEEL (22) de pitch bend a
avance/retroceso rápido. Cuando se desactivan los
movimientos de la JOG WHEEL (22), ésta modificará el
pitch de la pista en reproducción para realizar los ajustes precisos
necesarios y acompasar dos pistas en una mezcla. Pulse el botón JOG
MODE (21) y utilice la JOG WHEEL (22) para avanzar o retroceder en
una pista mientras se está reproduciendo. Use el botón JOG MODE
(21) en modo pausa y la unidad entrará en modo tartamudo. Mueva la
JOG WHEEL (22) en el sentido de las agujas del reloj para avanzar
rápido, y en el sentido contrario para retroceder.
9. JOG WHEEL:La rueda superior JOG WHEEL (22)
tiene múltiples funciones:
Use la JOG WHEEL (22) para modificar el pitch y
lconseguir un acompasamiento preciso durante una
mezcla.
La JOG WHEEL (22) se usa también para posi-
cionarse en el frame deseado durante el modo pausa. Este posi-
cionamiento en una pista puede entonces memorizarse como punto
de CUE/RECALL (9). Notará que la unidad entra en modo tartamudo
cuando se realizan los ajustes en modo pausa. Vea la sección CUE
para más información.
Junto con el botón JOG MODE (21), la JOG WHEEL (22) se
9

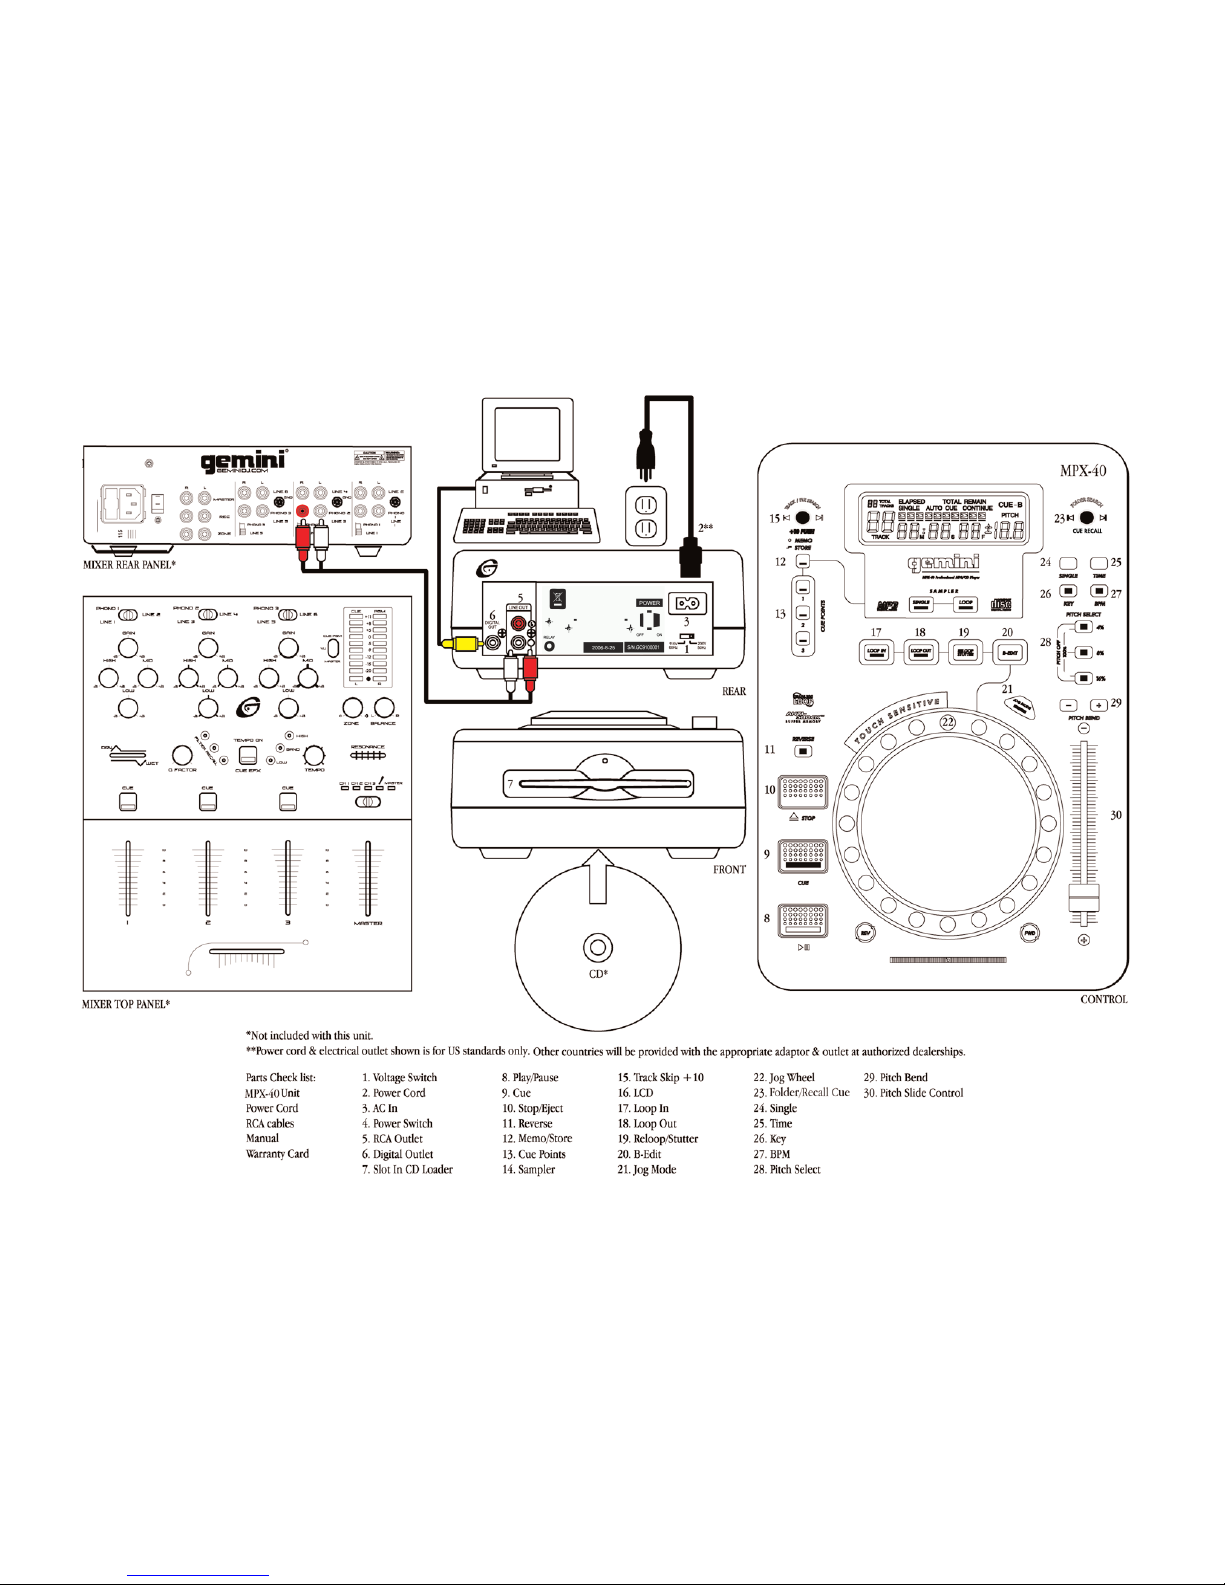
(utiliza para avanzar o retroceder con rapidez. Vea JOG MODE (21)
para más información.
La JOGWHEEL (22) de la unidad MPX 40 es sensible al tacto y simular
á el scratching de un vinilo en un plato. Utilice la JOG WHEEL
(22) para realizar cortes precisos, scratches, giros atrás, etc.
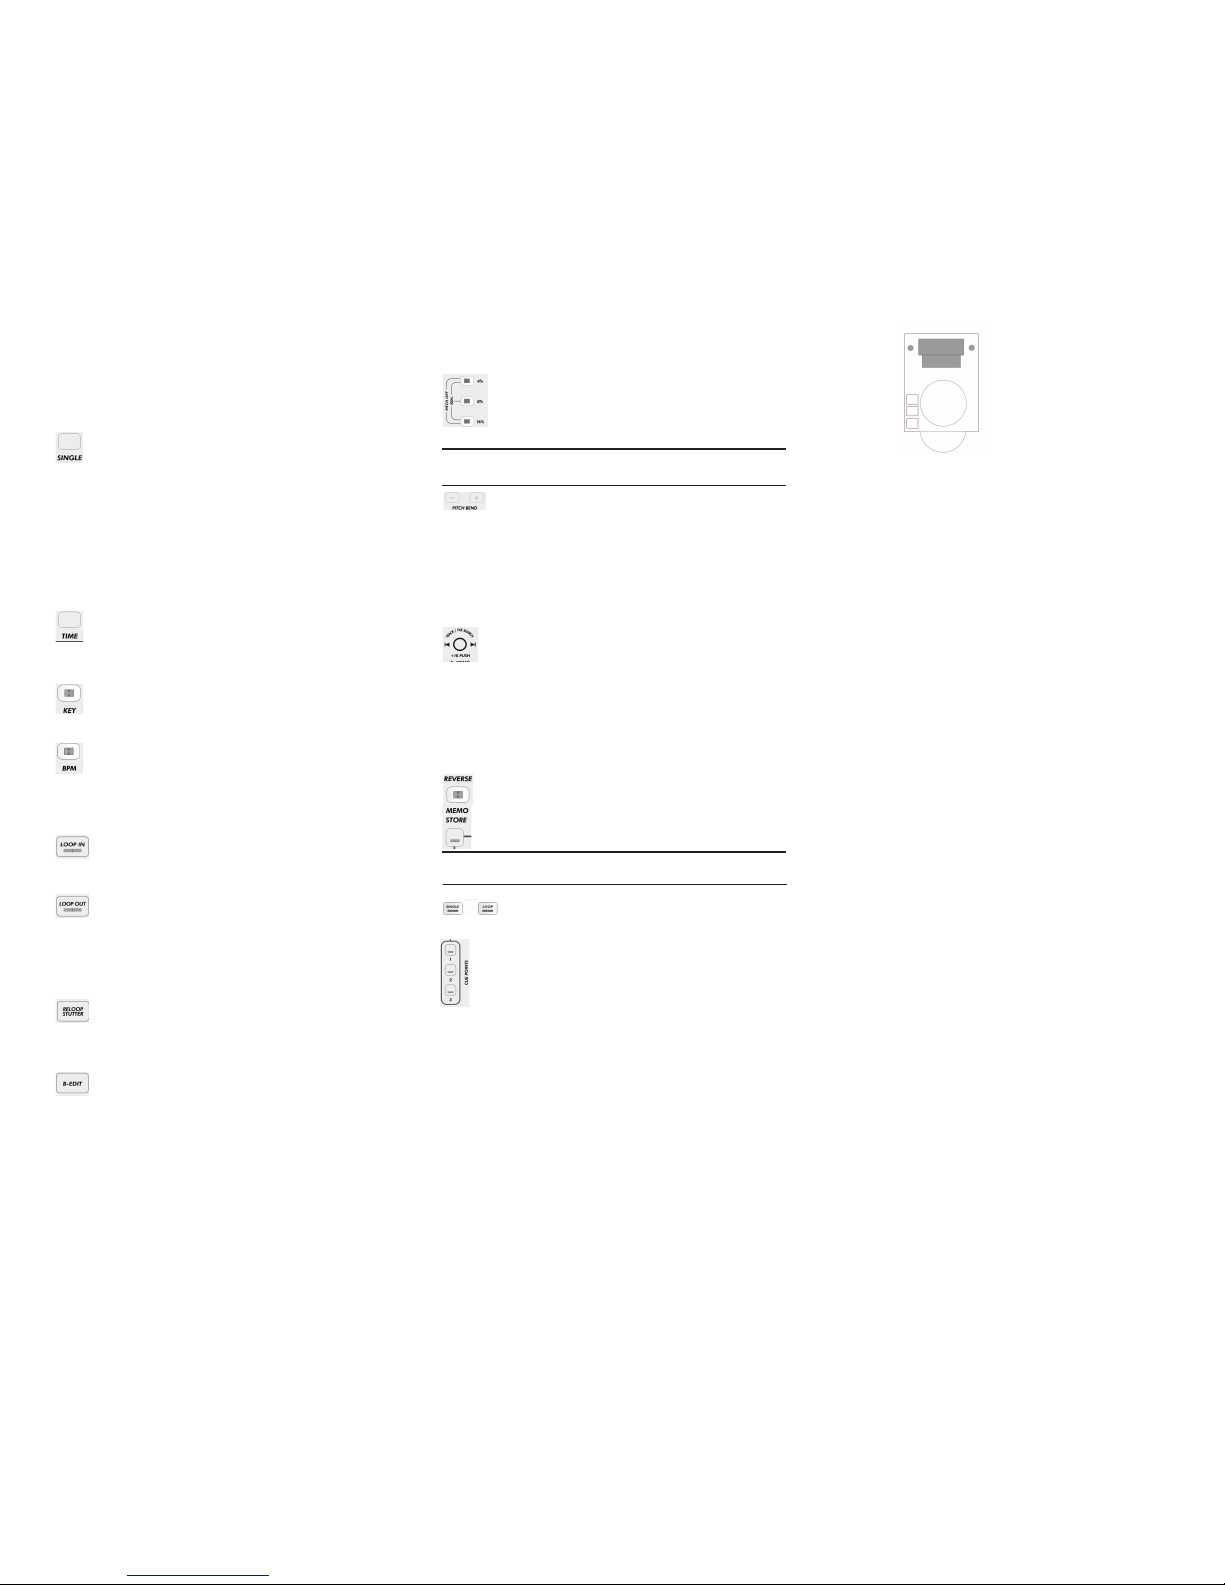
10. SINGLE: El botón SINGLE (24) activa la función SINGLE.
En modo SINGLE, el CD reproducirá la pista una vez y se
detendrá. En pausa, el modo SINGLE (24) también escanea la pista
para situarse justo en el puinto donde empieza a sonar. Esta caracter
ística permite comenzar a reproducir la música sin que se oiga
ningún silencio inicial (presente al principio de todas las pistas).
Pulsar SINGLE una segunda vez activa la función CONTINUOUS,
para que la unidad reproduzca continuamente (al final de la última
pista, la unidad volverá a la primera canción y comenzará de nuevo).
Las funciones CONTINUOUS y SINGLE aparecen en la pantalla para
indicar cuál está activa. Si se desactiva, la pantalla LCD (16) no la
mostrará. Véase LCD.
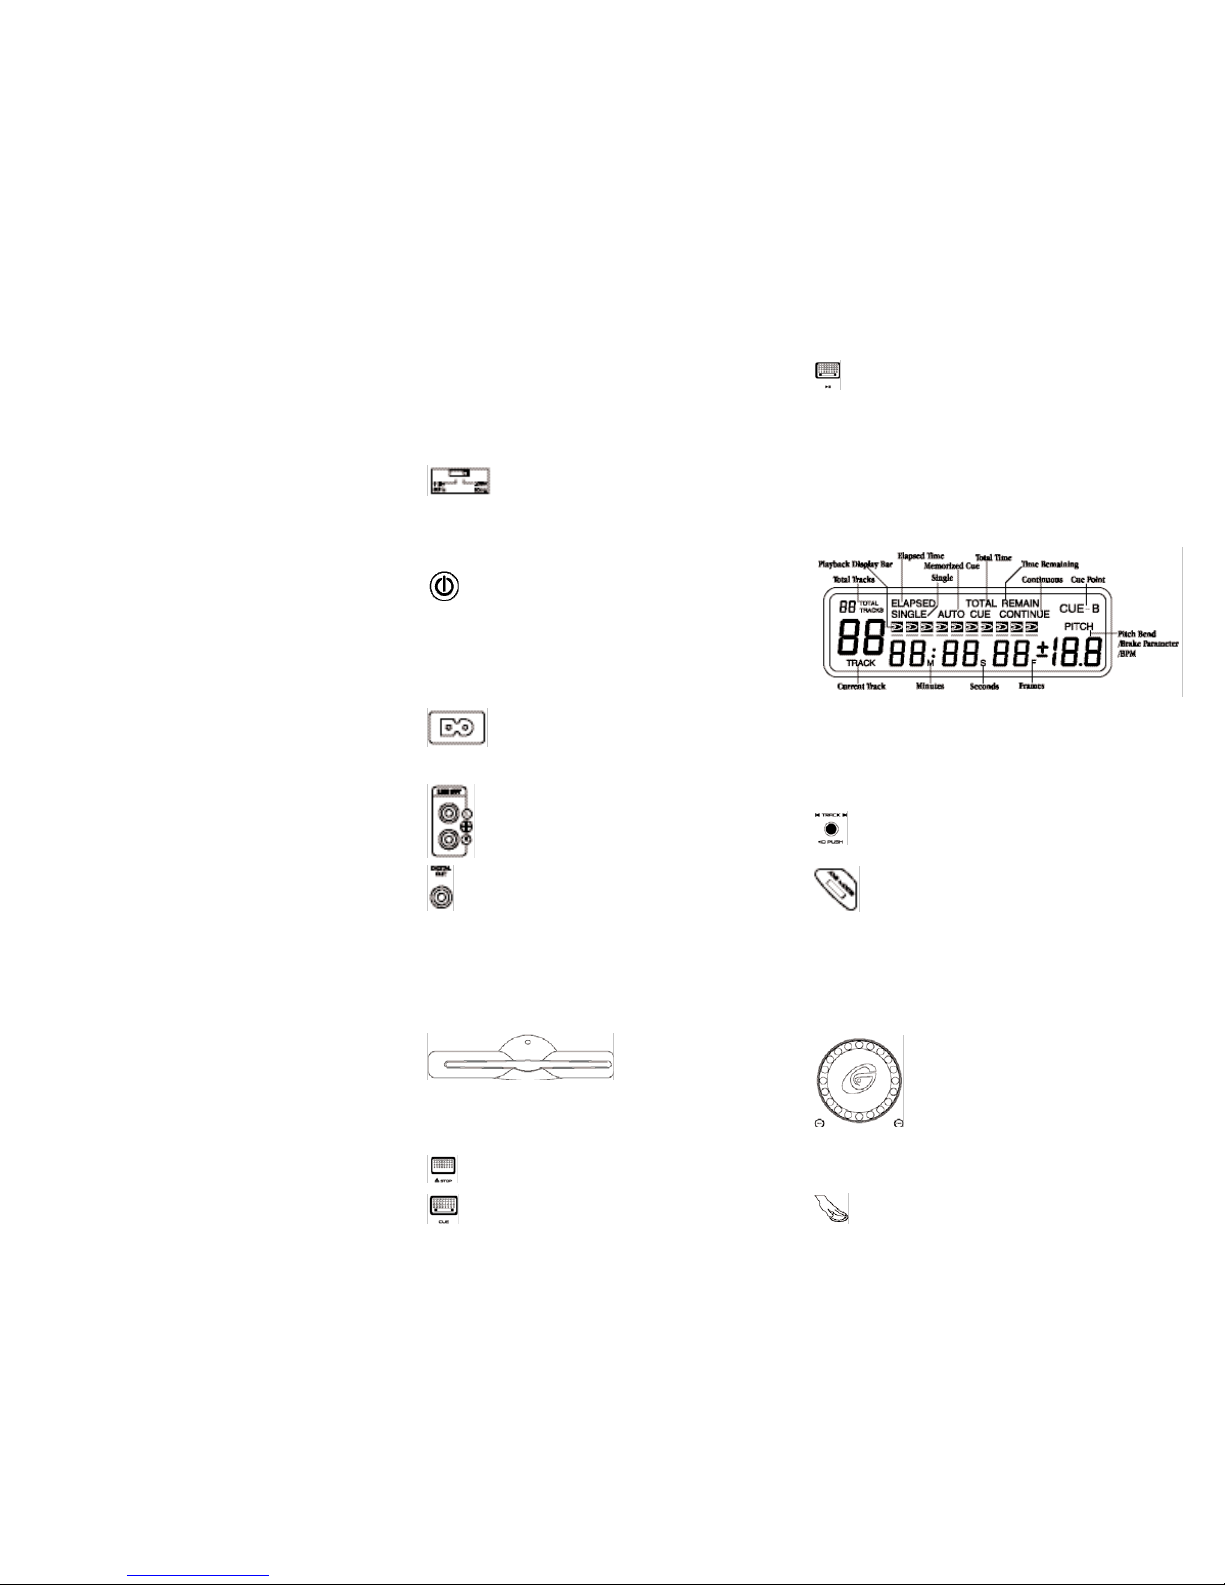
11. TIME: El botón TIME (2 ) cambia la indicación del tiempo
entre las tres opciones expresadas en el apartado LCD (16):
- Tiempo transcurrido de pista
- Tiempo total que queda del disco
- Tiempo que queda de pista.
12. KEY: El botón KEY (26) activa la función KEY LOCK (bloqueo
del tono). Con esta función activada, el CONTROL DE
PITCH DESLIZABLE (30) sólo modificará el tempo de la pista,
sin cambiar la clave o el tono de la pista en reproducción.
13. BPM: El botón BPM (27) cuenta los beats por minuto de
la pista. Esta característica permite acompasar dos pistas con
mayor facilidad y rapidez. Pulse el botón BPM (27) una vez para
activar el contador; la información aparecerá bajo el icono del PITCH
de la pantalla LCD (16). Pulse el botón de nuevo para desactivar la
función, y la pantalla LCD (16) ocultará la información del BPM.
14. LOOP IN: Pulsar LOOP IN (17) durante la reproducción de
una pista marcará el punto inicial de un bucle (loop), y el LED
verde de LOOP IN parpadeará rápidamente para indicar que ha memorizado
el primer punto de un LOOP INAPRECIABLE.
1 . LOOP OUT: Tras memorizar el punto inicial del loop, pulsar
LOOP OUT (18) durante la reproducción completará el
bucle dándole un punto de salida, y repetirá el fragmento seleccionado
indefinidamente. Pulse de nuevo LOOP OUT (18) para detener la
repetición y volver a la reproducción normal al llegar al fin del loop.
16. RELOOP: Pulsando RELOOP (19), la unidad volverá a
reproducir el loop previamente marcado. Pulse RELOOP (19)
repetidamente para repetir tartamudeando el punto de entrada del
loop como si fuera un sampler. La función RELOOP (19) lleva
automáticamente la música al punto del loop y repetirá el bucle
infinitamente hasta que se libere mediante LOOP OUT (18).
17. B EDIT: Pulse B EDIT (20) para editar el LOOP
INAPRECIABLE. Esta función permite ajustar el punto de salida
memorizado con LOOP OUT (18), a través de la JOG WHEEL (22).
VÉASE SEAMLESS LOOP (LOOP INAPRECIABLE).
18. PITCH: Los botones Pitch (28) permiten seleccionar los rangos
del control del pitch entre ±4%, ±8%, ±16%, y ±100%. Pulse los
botones del 4% y el 16% (PITCH OFF) para desactival el
CONTROL DE PITCH DESLIZABLE (30). Pulse 4%, 8% y
16% simultáneamente para seleccionar el rango de pitch
de ±100%.
19. PITCH BEND: Mediante los botones PITCH BEND
(29) se sube el pitch automáticamente hasta un +4% o se
disminuye hasta -4%, a partir del pitch que haya en reproducción.
Soltando los botones PITCH BEND (29) se regresa al pitch que estaba
sonando. Puede usarse el PITCH BEND (29) para acompasar dos
pistas durante una mezcla.
20. CONTROL DE PITCH DESLIZABLE: Subir o bajar el CONTROL
DE PITCH DESLIZABLE (30) disminuirá o incrementará el porcentaje
del pitch hasta el máximo o el mínimo preestablecido por
el usuario mediante los botones PITCH (28).
21. FILE/FOLDER SEARCH: Use el control rotatorio
FILE/FOLDER SEARCH (23) para buscar, a través de la pantalla
LCD (16), los archivos MP3 de un CD. Por defecto, al
encender la unidad, este control está fijado en FILE (archivo), lo que
permite buscar los archivos MP3 como si se tratara de un CD Audio
normal. Pulsando de nuevo FILE/FOLDER SEARCH (23), se establecer
á el modo FOLDER (carpeta), para seleccionar la carpeta deseada
de un CD con archivos MP3 clasificados por carpetas. Pulsando de
nuevo se selecciona la carpeta y se pasa al modo de búsqueda de los
archivos que hay dentro de ella. Para seleccionar canciones en carpetas,
use el botón (1 )
22. REVERSE: El botón REVERSE (11) simplemente reproduce
la pista al revés.
23. MEMO/STORE: El botón MEMO/STORE (12) permite
comenzar a almacenar en la memoria los PUNTOS DE CUE
(13) y los SAMPLES (14).
24. SAMPLER: Use el/los boton(es) del SAMPLER (14)
para reproducir, sobre la música que suena, una sección
de una pista guardada en un banco de memoria de samples. Esto
proporciona una capa extra a la mezcla. Puede guardar dos samples
con los botones del SAMPLER (14). Una vez guardado, el LED correspondiente
permanecerá encendido para indicar que está a punto
para ser lanzado al pulsar el botón.
2 . CUE POINTS (PUNTOS DE CUE): Pueden crearse hasta
tres PUNTOS DE CUE (13) al vuelo. Puede crear un punto de
entrada en una pista para que empiece instantaneamente
desde ahí cuando lo desee. Al pulsar los botones de puntos de
cue (o puntos de corte), la reproducción saltará de inmediato
al punto de la pista o del CD marcado previamente sin silencio
intermedio. Esta función le ayuda a eliminar las pausas que implica
el pasar de una pista a otra o pasar de un punto a otro de una canci
ón, lo que facilita el cambio de pistas dentro del mismo CD sin
tener que poner otra canción de otro disco entre una y otra.
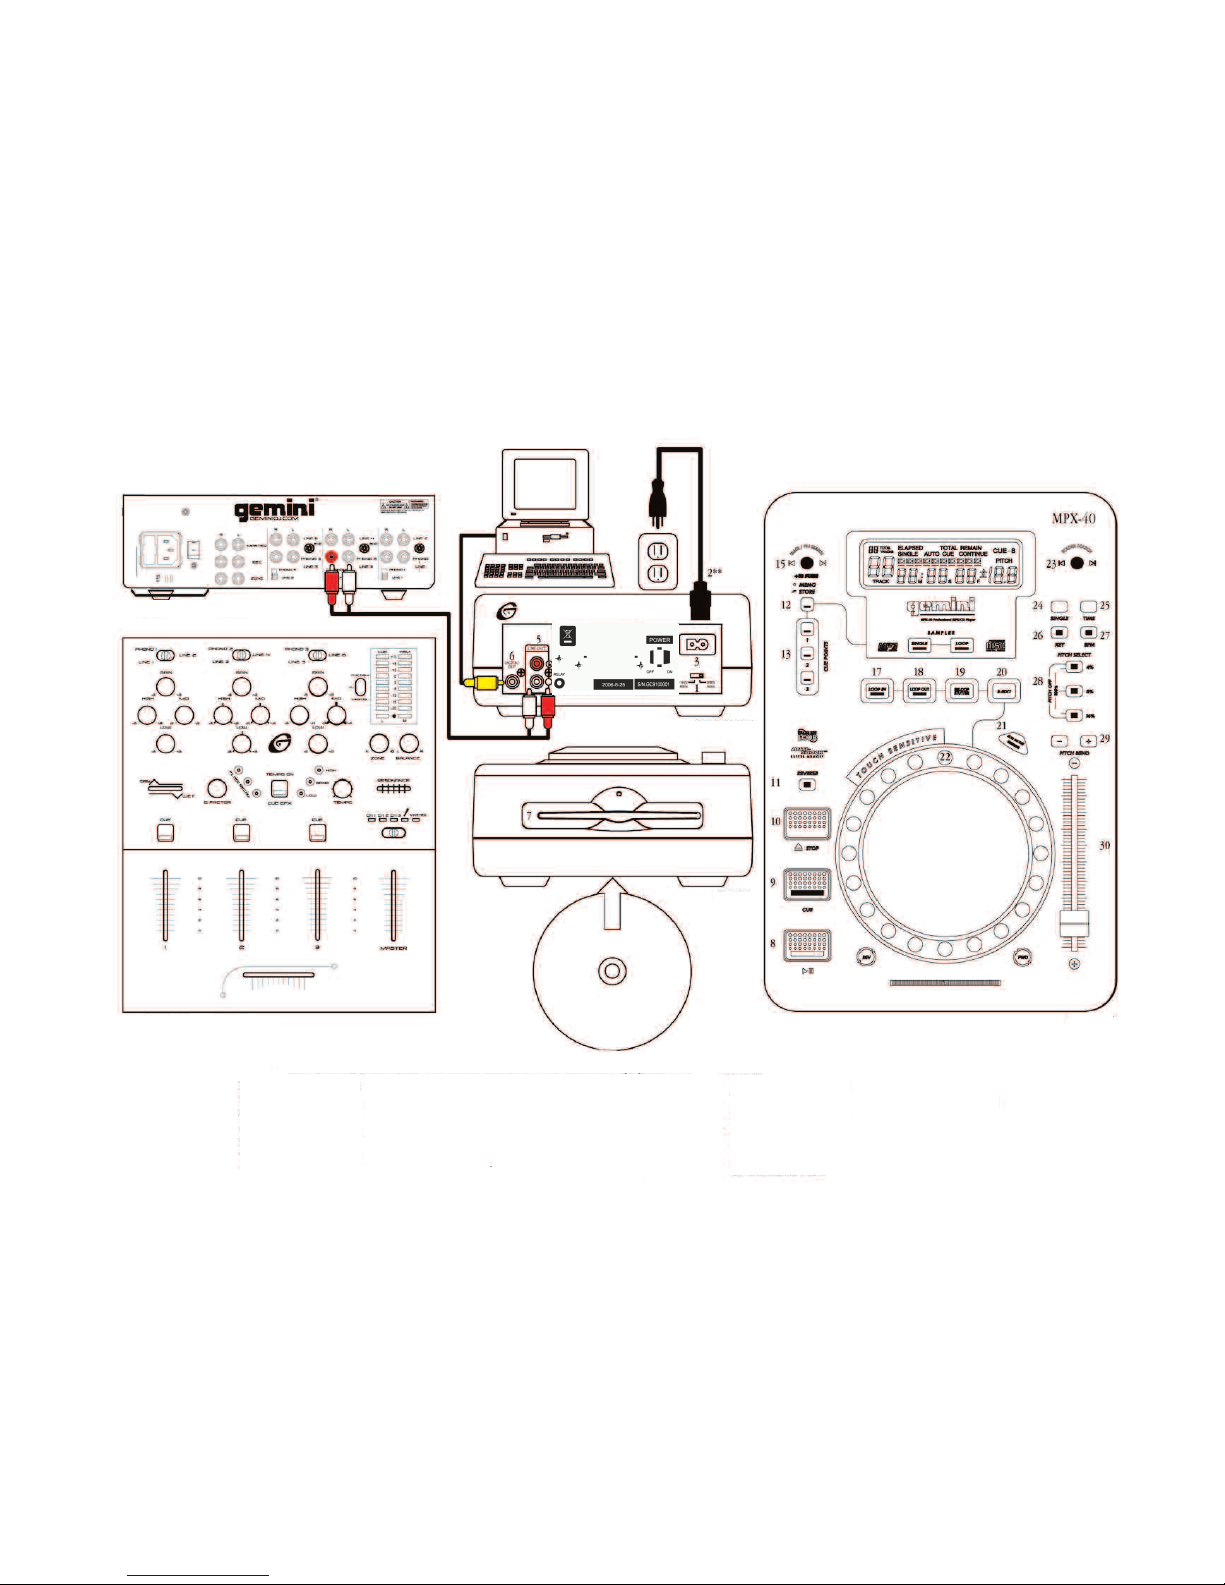
UTILIZACIÓN:
1. Introduzca un CD en la RANURA DE ENTRADA (7) y acompáñelo
con la mano hasta que la unidad acepte el disco. El CD entrará y la
unidad comenzará a leerlo.
2. Para CDs de audio, acceda a la pista que desea reproducir mediante
el control rotatorio TRACK SKIP +10 (1 ).
3. Pulse el botón PLAY/PAUSE (8) y la unidad comenzará a reproducir
el sonido inmediatamente.
SAMPLER:
Para almacenar un sample, debe pulsar primero MEMO/STORE
(12). El LED azul de MEMO/STORE (12) se iluminará, lo que indica
que la unidad está preparada para almacenar el sample. Cuando la
pista haya alcanzado el punto deseado de inicio del sample, seleccione
el botón del Sampler (14) en el que desee que se almacene.
Pulse el botón SAMPLER (14). El LED verde de SAMPLER (14)
parpadeará para indicar que MEMO/STORE (12) está grabando activamente.
Cuando haya llegado al punto deseado de fin de sample, presione de
nuevo el botón SAMPLER (14) elegido para detener la grabación y
guardar el fragmento. El LED de SAMPLER (14) se quedará iluminado.
Ahora el sample está listo para ser disparado en cualquier
momento, como capa adicional sobre cualquier pista. Mientras el
sample se esté reproduciendo, el LED verde parpadeará.
Para detener la reproducción de un sample, pulse de nuevo el botón
SAMPLER (14) para pararlo de inmediato. Si no ha quedado satisfecho
con la grabación del sample, simplemente pulse de nuevo
MEMO/STORE (12) y siga las instrucciones de almacenamiento de
un sample desde el principio.
PUNTOS DE CUE:
Para usar los CUE POINTS (PUNTOS DE CUE) (13), primero debe
programar el punto de entrada. Pulse el botón MEMO/STORE (12)
para comenzar a almacenar sus PUNTOS DE CUE (13). El LED de
MEMO/STORE (12) se iluminará para indicar que la unidad está a
punto para almacenar el punto de corte. Seleccione a qué botón asignar
áelPUNTO DE CUE (13) eligiendo uno de los tres botones de la
zona CUE POINTS (13).Cuando la pista llegue al punto deseado en que
usted desee que comience el corte, pulse uno de los botones de la zona CUE
POINTS (13). El LED del PUNTO DE CUE (13) pulsado parpadeará cuando la
selección del cue se haya almacenado. Pulse el botón CUE POINT
(13) para comenzar desde ese punto de la canción en cualquier
momento de la reproducción y la unidad comenzará automática e
instantáneamente a reproducir desde ese punto. El LED del PUNTO
DE CUE (13) seguirá parpadeando durante la reproducción para
indicar que está en uso. Cuando deje de reproducirse, el LED se
quedará encendido para indicar que contiene un punto de corte
memorizado.Para volver a grabar un PUNTO DE CUE (13),
repita estas instrucciones. Seleccionando un botón que ya contenga
un punto memorizado,la nueva información sobreescribirá a la existente.
CUE:
Para usar la función CUE (9), primero debe hallar el punto donde
desee que comience a reproducirse la pista. Sitúese en pausa, lo que
activará el modo tartamudo. Ahora utilice la JOG WHEEL (22) para
buscar de forma rápida y precisa el punto exacto. VÉASE JOG
WHEEL (22) para más información.
Una vez encontrado el punto deseado de inicio de la pista, deje de
MPX-40
10
NOTE: el ajuste de Pitch del 100 es para el CD
regular y no trabajará con archivos de CD MP3.
Note: STORE Y RECALL es sólo
disponible para el CD regular no discos de MP3

Pulse CUE (9) para pausar la canción y situarla en el punto de Cue
previamente memorizado. Pulse y mantenga pulsado el botón CUE
(9) para iniciar la preescucha del Cue, lo que le permitirá juzgar si el
punto exacto memorizado es el correcto.
Si no está satisfecho con su punto de Cue, vuelva a pulsar P USE (8)
y ajuste de nuevo con la JOG WHEEL (22), hasta encontrar el punto
exacto en que desea que se inicie la pista. Pulse rápidamente
PL Y/P USE (8) dos veces para entrar y salir del modo de reproducción.
Se encontrará en modo pausa. El LED de CUE (9) parpadeará.
Repita los pasos de preescucha del Cue para asegurarse de que su
nuevo punto memorizado es satisfactorio.
Si está satisfecho con el punto de Cue puede soltar el botón CUE
(9) y su LED quedará encendido para indicar que está memorizado
y listo para su uso.
IDENTIFIC CIÓN DEL CUE:
La unidad MPX-40 tiene la capacidad de almacenar un punto de
Cue por pista en su memoria interna. Esto permite al DJ dirigirse
con rapidez a un punto de otra pista del disco y realizar sus mezclas
con más facilidad.
Para almacenar este punto de Cue, siga los pasos iniciales de memo-
rización
de un punto de Cue.
Cuando esté satisfecho con el punto de Cue exacto -de la canción
que no vaya a reproducir de inmediato-, pulse y mantenga durante
dos segundos el botón MEMO/STORE (12) para memorizar este
punto de Cue. Si no ha quedado satisfecho con el punto exacto de
corte, repita los pasos iniciales de memorización de un punto de Cue.
Su punto de Cue ha quedado guardado y se podrá recuperar en
cualquier momento, incluso después de haber dejado de reproducir
ese CD. Fíjese que el LED de UTO CUE centelleará en la pantalla
LCD (16) cuando este punto de Cue se haya guardado con éxito.
Ahora el punto de Cue ha quedado almacenado en la memoria del
MPX-40 y puede recuperarse en cualquier momento. El LED de
UTO CUE parpadeante indicará que el MPX-40 ha reconocido un
punto de Cue memorizado en el CD. Simplemente sitúese en la pista
que tenga el punto memorizado. Pulse y sostenga FOLDER/REC LL
CUE (23) hasta que el punto aparezca en la pantalla LCD. Pulse Play
y la canción comenzará a sonar desde el punto almacenado.
SE MLESS LOOP (LOOP IMPERCEPTIBLE):
Pulse el botón LOOP IN (17) para fijar un punto de entrada
en la memoria, y el LED verde de LOOP IN (17) parpadeará
rápidamente mientras esté memorizando el punto inicial del loop.
Tras memorizar el punto de entrada, pulse LOOP OUT (18) durante
la reproducción para completar el bucle. La unidad comenzará
automáticamente a repetir la sección fijada entre el punto de entrada
del loop (loop in) y el de salida (loop out).
Al reproducir el loop, tanto el botón LOOP IN (17) como LOOP
OUT (18) parpadearán para indicar que el loop está en uso. Notará
que la pantalla también indica que el LOOP está activo mediante el
icono CUE-B parpadeando, que se quedará fijo cuando se haya salido
del bucle.
Pulse RELOOP (19) para que la unidad vuelva a reproducir el loop
previamente definido. Si pulsa RELOOP (19) repetidamente logrará
un efecto tartamudeo con el punto de inicio del loop. La función
RELOOP (19) devuelve la música automáticamente al punto inicial
del bucle y lo repetirá indefinidamente hasta que el usuario decida
salir de él mediante el botón LOOP OUT (18).
Pulse el botón B-EDIT (20) para editar el LOOP IMPERCEPTIBLE
que ha creado. Al pulsarlo, la pantalla LCD (16) leerá el frame en que
se ha fijado el LOOP OUT (18). Puede ajustar este punto con la JOG
WHEEL (22), examinando frame por frame el lugar en que el loop se
repite. Debería poder notar la diferencia en cada frame hasta que
quede satisfecho con su punto de salida del bucle. Pulse B-EDIT (20)
para salir del modo de edición y seguir repitiendo el loop hasta liberarlo
mediante LOOP OUT (18).
Con LOOP OUT (18) se sale del modo de repetición y, al final del
fragmento de loop, la pista seguirá sonando con normalidad.
SLEEP MODE (MODO DE ESPER ):
El MPX-40 tiene un modo SLEEP de espera que se activa solo si
reconoce que no se ha usado la unidad durante un tiempo. Lo que
hace es apagar el láser para alargar la vida del aparato. Verá que en la
pantalla aparece la palabra SLEEP cuando se activa este modo. Para
desactivarlo, sólo debe comenzar a usarla y la unidad "despertará".
REL Y ST RT(31): REL Y ST RT hace posible de unirse
dos MPX--40 juntos, de modo que cuando una unidad termina de
Tocar,la unidad de enfrente automáticamente comienza la repetición.
Para uso normal,deje este gato desconectado.
SOLUCIÓN DE PROBLEM S:
· Si el disco no se reproduce, compruebe que lo ha introducido correcta-
mente
(la parte impresa hacia arriba). Compruebe también que
el CD no está sucio ni rayado.
· Si el disco gira pero no se oye sonido, compruebe los cables.
Si están bien puestos, compruebe el amplificador o el receptor.
· Si el disco salta, compruebe la superficie óptica del CD. No presuponga
que el lector de CD está defectuoso. Muchos CDs se graban
incumpliendo las normativas y dan problemas en algunos lectores.
Antes de enviar la unidad a un servicio técnico, intente reproducir
un CD que sepa seguro que se reproduce correctamente.
ESPECIFIC CIONES:
GENER LES:
Tipo................Reproductor de Compact Disc de un solo mecanismo
Tipo de disco..........................Compact Discs estándar (12cm, 8cm)
Medida de tiempo:Transcurrido/restante de pista o total restante
Pitch Variable...................Deslizador de ±4%, ±8%, ±16% o ±100%
Pitch Bend......................................................................±4% Máximo
Reproducción instantánea.................................En 0,01 segundos
Selección de pistas..............................................................1 a 99 Pistas
Dimensiones................................................(216 x 9 x 320 mm)
Peso...................................................................................................3 kg
SECIÓN DE UDIO:
Tipos de Audio....................................................................CD, MP3
Cuantización..........................1 Bit Lineal/Canal, Láser de 3 Rayos
MP3/CD Bit Rate...............................................................32-320KBPS
Tasa de Oversampling................................................................8 Veces
Frecuencia de Muestreo............................................................44.1 kHz
Respuesta de Frecuencia..............................................20 Hz to 20 kHz
Distorsión Armónica Total.......................................Menos de 0.0 %
Relación señal/ruido.......................................................................90 dB
Rango dinámico...........................................................................< 80 dB
Separación de canales.......................................................88 dB (1 kHz)
Nivel de salida.............................................................1,3 Voltios R.M.S.
Voltaje eléctrico............................................AC 11 /230 V, 60/ 0 Hz
EST S ESPECIFIC CIONES ESTÁN SUJET S C MBIO POR MEJOR
SIN PREVIO VISO.
NOTES:
_______________________________________________________________________________________________________________________
_______________________________________________________________________________________________________________________
_______________________________________________________________________________________________________________________
_______________________________________________________________________________________________________________________
11

VORSICHT: Dieses Produkt erfüllt die FCC-Regeln, wenn Sie zum
Anschluss abgeschirmte Kabel und Stecker verwenden, um es mit anderen
Geräten zu verbinden. Auch um elektromagnetische Störungen anderer
elektrischer Geräte wie Radios oder Fernseher zu vermeiden, benutzen Sie
abgeschirmte Kabel und Stecker für die Verbindungen.
Das Ausrufezeichen im gleichseitigen Dreieck weißt Sie in der
Bedienungsanleitung auf wichtige Bedienungsanweisungen und Wartungs-
/Serviceanweisungen hin.
Das Blitzsymbol im gleichseitigen Dreieck dient dazu, den Benutzer vor
gefährlichen Spannungen an nicht isolierten Stellen im Gehäuse zu war-
nen, die so groß sind, dass Sie eine Gefahr für den Benutzer darstellen.
ANWEISUNGEN LESEN: Lesen Sie alle Sicherheits- und
Bedienungsanweisungen, bevor Sie mit dem Produkt arbeiten.
AUFBEWAHRUNGSHINWEIS: Bewahren Sie alle Sicherheits- und
Bedienungsanweisungen gut auf.
WARNHINWEISE: Alle Warnhinweise für das Produkt und die
Bedienungsanweisungen müssen genau eingehalten werden.
ANWEISUNGEN BEFOLGEN: Alle Anweisungen zum Betrieb des Produkts
sollten befolgt werden.
REINIGUNG: Das Produkt sollte nur mit einem Polier- oder einem
weichen trockenen Tuch gereinigt werden. Benutzen Sie dazu niemals
Möbelwachs, Benzine, Insektenmittel oder andere flüchtige
Reinigungsmittel, denn Sie könnten zur Korrosion des Gehäuses führen.
ERWEITERUNGEN: Benutzen Sie keine Erweiterungen, die nicht vom
Hersteller empfohlen sind, da sie zu Risiken führen könnten.
WASSER&FEUCHTIGKEIT: Benutzen Sie dieses Produkt nicht in der Nähe
von Wasser, z. B. in der Nähe einer Badewanne, einer Waschschüssel, eines
Küchenspülbeckens eines Waschbeckens, in einem feuchten Keller, einem
Schwimmbecken oder an ähnlichen Orten.
ZUBEHÖR: Stellen Sie das Produkt nicht auf eine wackelige und labile
Unterlage. Das Produkt könnte herunterfallen und dabei Kinder oder
Erwachsene verletzen, wie auch selber beschädigt werden. Stellen Sie das
Produkt nur auf vom Hersteller empfohlene oder verkaufte Unterlagen.
Jede Befestigung und Montage des Produkts sollte nach den Anweisungen
des Herstellers ausgeführt werden. Nutzen Sie dazu ein vom Hersteller
empfohlenes Montageset.
MOBILE UNTERLAGEN: Bewegen Sie eine Kombination aus dem Produkt
und einer mobilen Unterlage mit Vorsicht. Schnelles Anhalten, zu viel
Schub oder unebene Böden können dazu führen, dass sich Produkt und
mobile Unterlage überschlagen (SIEHE BILD A).
BELÜFTUNG: Schlitze und Öffnungen im Gehäuse sind für die Belüftung
vorgesehen. Sie stellen den zuverlässigen Betrieb des Produkts sicher und
schützen es vor Überhitzung. Diese Öffnungen dürfen nicht verschlossen,
blockiert oder bedeckt werden. Stellen Sie deswegen das Produkt niemals
auf ein Bett, ein Sofa, einen Teppich oder Stellen mit ähnlicher Oberfläche.
Wenn Sie dieses Produkt in einer festen Installation wie z. B. in einem Regal
oder einem Rack einbauen, sorgen Sie für ausreichende Belüftung oder
sorgen Sie dafür, dass die Bestimmungen des Herstellers genau eingehal-
ten werden.
STROMANSCHLUSS: Dieses Produkt darf nur mit dem auf dem Gerät
angegebenen Strom betrieben werden. Wenn Sie sich nicht sicher sind,
welche Stromart Sie bei sich zuhause haben, fragen Sie den Verkäufer des
Geräts oder Ihren Stromversorger.
AUFSTELLUNGSORT: Stellen Sie das Gerät an einem festen Ort auf.
ZEITEN DES NICHTGEBRAUCHS: Ziehen Sie das Stromkabel aus dem
Gerät heraus, wenn Sie es für eine längere Zeit nicht gebrauchen.
ERDUNG ODER POLUNG:
- Wenn dieses Produkt mit einem gepolten Wechselstromstecker (Ein
Stecker mit einem Kontakt mehr als andere Stecker) ausgestattet ist, passt
dieser nur in einer bestimmten Richtung in die Steckdose und ist ein
besonderes Sicherheitsmerkmal. Sollten Sie den Stecker nicht komplett in
die Steckdose stecken können, versuchen Sie ihn andersherum einzusteck-
en. Sollte der Stecker auch dann noch nicht in die Steckdose passen, beauf-
tragen Sie einen Elektriker, um diese veraltete Steckdose auszutauschen.
- Wenn dieses Produkt mit einem geerdeten dreipoligen Stecker ausges-
tattet ist, hat der Stecker einen dritten (Erdungs-)Kontakt und passt nur in
eine Steckdose mit entsprechender Erdung. Auch das ist ein
Sicherheitsmerkmal. Sollte der Stecker nicht in die Steckdose passen,
beauftragen Sie einen Elektriker, um diese veraltete Steckdose auszu-
tauschen.
SCHUTZ DES STROMKABELS: Stromkabel sollten so verlegt werden, dass
man nicht auf sie treten kann noch dass sie von darauf stehenden oder
gegen sie stoßenden Gegenständen gequetscht werden. Achten Sie beson-
ders auf Kanten, Sicherung, Stecker und Buchsen.
AUSSENANTENNENERDUNG: Wenn Sie eine Außenantenne oder ein
Radio-/Fernsehkabelsignal an das Produkt anschließen, achten Sie darauf,
dass die Antenne oder das Kabel geerdet sind, um dafür zu sorgen, dass
Überspannungen und elektrostatische Aufladungen nicht auftreten kön-
nen. Im Artikel 810 des National Electrical Code, ANSI/NFPA 70, finden Sie
Informationen über die richtige Erdung des Antennenmasts und weitere
Informationen zu diesem Thema. (SIEHE AUCH ABBILDUNG B).
GEWITTER: Trennen Sie das Produkt während eines Gewitters oder wenn
es unbeaufsichtigt ist oder wenn es für eine lange Zeit nicht benutzt wird
durch Ziehen des Stromkabels vom Stromnetz. Trennen Sie auch die
Verbindung zu einer Antenne oder Radio-/Fernsehkabeln. Dadurch vermei-
den Sie Beschädigungen des Produkts durch Blitze oder Überspannungen.
STROM- UND ÜBERLANDLEITUNGEN: Stellen Sie eine Außenantenne
nicht in der Nähe von Überlandleitungen, elektrischen Licht- oder
Stromkreisen oder an Stellen, wo sie in eine solche Leitung fallen könnte
auf. Wenn Sie eine Außenantenne aufstellen, achten Sie besonders darauf,
dass Sie auf keinen Fall irgendwelche Stromleitungen berührt. Das kann zu
gefährlichen Auswirkungen führen.
ÜBERLASTUNG: Überlasten Sie keine Steckdosen, Verlängerungskabel
oder Sicherungen. Das kann zu Bränden oder elektrischen Schlägen
führen.
EINDRINGEN VON GEGENSTÄNDEN ODER FLÜSSIGKEIT: Führen Sie
niemals irgendwelche Gegenstände durch Öffnungen in das Produkt ein.
Sie könnten mit Strom führenden Stellen in Verbindung kommen oder
Kurzschlüsse verursachen, die zu Bränden oder elektrischen Schlägen
führen können. Gießen Sie niemals irgendwelche Flüssigkeiten auf oder in
das Produkt.
SERVICE: Versuchen Sie nicht, das Produkt selber zu reparieren. Durch
das Öffnen des Gehäuses oder Entfernen von Schrauben können Sie mit
gefährlichen Spannungen oder anderen Risiken in Kontakt kommen.
Beauftragen Sie im Reparaturfall nur qualifiziertes Servicepersonal.
WANN SERVICE NÖTIG IST: Unter den folgenden Bedingungen ziehen
Sie auf jeden Fall das Stromkabel aus der Steckdose und beauftragen Sie
für eine Reparatur nur qualifiziertes Servicepersonal:
- Wenn das Stromkabel defekt ist.
- Wenn Flüssigkeit auf oder in das Produkt gelaufen ist oder Gegenstände
in das Produkt gefallen sind.
- Wenn das Produkt Regen oder Wasser ausgesetzt war.
- Wenn das Produkt trotz Befolgen der Bedienungsanweisungen nicht
normal arbeitet. Stellen Sie dabei das Produkt nur nach den Anweisungen
der Bedienungsanleitung ein, andere Einstellungen können das Produkt
beschädigen und den aufwändigen Einsatz von Technikern für die
Wiederherstellung erfordern.
- Wenn das Produkt hingefallen oder auf andere Art und Weise beschädigt
ist.
- Wenn das Produkt eine eindeutige Veränderung im Betrieb zeigt.
ERSATZTEILE: Wenn Ihr Produkt Ersatzteile benötigt, achten Sie darauf,
dass der Servicetechniker nur vom Hersteller erlaubte Ersatzteile oder
Ersatzteile, die die gleichen Eigenschaften wie die originalen Teile
aufweisen, einsetzt. Falsche Ersatzteile können zu Bränden, elektrischen
Schlägen oder anderen Risiken führen.
SICHERHEITSTEST: Bevor der Service oder eine Reparatur für dieses
Produkt beendet sind, beauftragen Sie den Servicetechniker, einen
Servicetest durchzuführen, um sicher zu stellen, dass das Produkt einwand-
frei funktioniert.
WAND- ODER DECKENMONTAGE: Das Produkt sollte nicht an einer
Wand oder der Decke montiert werden.
HITZE: Stellen Sie das Produkt nicht in die Nähe von Wärmequellen wie
Radiatoren, Wärmespeichern, Öfen oder anderen Produkten (auch
Verstärker), die Hitze erzeugen.
ACHTUNG!
BITTE UNBEDINGT VOR BENUTZUNG DES GERÄTS LESEN!
WICHTIGE HINWEISE UND SICHERHEITSANWEISUNGEN
GEFAHR EINES ELEKTRISCHEN SCHLAGS. GERÄT NICHT ÖFFNEN!
12

31
4
31. Relay

MPX-40 PROFESSIONELLER CD PLAYER
EINFÜHRUNG:
Wir beglückwünschen Sie zum Erwerb des professionellen CD
Players Gemini MPX-40. Dieser State-of-the-art CD Player ist mit
einer 1 Jahresgarantie versehen. Die Lasereinheit verfügt über eine
1 Jahresgarantie*. Bitte lesen Sie vor dem ersten Einsatz aufmerk-
sam die Bedienungsanleitung.
AUSSTATTUNG:
- Spielt Audio-CDs, MP3s, CD-R & CD-RW
- Slot-IN CD Laufwerk
- Direktauswahl von MP3-Titeln und Ordnern
- Medienerkennung zum Abspeichern von Cue Punkten
- Berührungsempfindliches Jog-Wheel
- 3 Fly Cues und 2 x 8 Sekunden Sampler Bänke
- 10 sec. Anti-Shock-RAM-Speicher
- Seamless Loop mit Reloop & B-Edit
- Key lock & BPM Counter
- Pitch Bend über Jog-Wheel oder Tasten
- Variabler Pitch-Fader mit 4 %, 8 %, 16 % oder 100 %
- +10 Titelwahl
- Jog-Wheel mit Doppelfunktion
- Single/Continuous Play
- Drei Zeitanzeigemodi
- Große hintergrundbeleuchtete LCD Anzeige
- Koaxialer Cinch-Digitalausgang
- Sleep Modus
SICHERHEITSHINWEIS:
Laserdiode Eigenschaften
Material: Ga - Al - As
Wellenlänge: 755 - 815 nm (25° C)
Laserausgang: Continuous Wave, max. 0,5 mW
VORSICHTSMASSNAHMEN
1. Setzen Sie diesen CD-Player nur in einem Temperaturbereich von
5° C bis 35° C ein.
2. Das Gerät sollte an einem sauberen und trockenen Platz stehen
und keiner Feuchtigkeit, Tropfen oder Spritzern ausgesetzt werden.
Stellen Sie keine mit Flüssigkeiten gefüllten Gegenstände auf das
Gerät.
3. Stellen Sie das Gerät nicht auf einen wackeligen Untergrund.
4. Wenn Sie das Netzkabel aus der Steckdose entfernen, ziehen Sie
niemals am Kabel, sondern nur am Stecker.
5. Das Gerät nicht öffnen, um einen elektrischen Schock zu vermei-
den. Es enthält keine vom Anwender ersetzbaren Teile. Die Wartung
darf nur von befähigten Wartungstechnikern durchgeführt werden.
6. Verwenden Sie zur Reinigung des Geräts keine Chemikalien.
7. Bewahren Sie die Bedienungsanleitung an einem sicheren Platz
auf.
8. Vorgehen im Falle einer Beanstandung: Bitte setzen Sie sich mit
Ihrem GEMINI Vertragshändler in Verbindung.
SPANNUNGSWAHL:
Der MPX-40 kann sowohl mit 115 V oder 230 V arbeiten. Um die
richtige Spannung einzustellen, befolgen Sie diese Schritte:
1. Platzieren Sie die Spitze eines Schraubendrehers in der
Mulde des rückseitigen SPANNUNGSWAHLSCHATERS (1).
2. Schieben Sie den Schalter auf 115 V oder 230 V.
3. Üben Sie keinen Druck auf den Schalter aus oder verdrehen ihn,
um Beschädigungen zu vermeiden. Falls der Schalter sich nicht leicht
bewegen lässt, kontaktieren Sie einen qualifizierten Servicetechniker.
ANSCHLIESSEN:
1. Stellen Sie sicher, dass der NETZSCHALTER (4) auf OFF
steht, bevor Sie das Gerät anschließen. Alle Anschlüsse finden
Sie auf der Rückseite des CD-Players, wie im Diagramm auf Seite 3
dargestellt.
2. Der MPX-40 wird mit einem passenden NETZKABEL
(2) geliefert. Stecken Sie das eine Ende in die
NETZBUCHSE (3), das andere in die nächste Steckdose.
3. Schließen Sie ein Cinch-Kabel an die Cinch-Ausgänge (5) an.
4. Das andere Ende des Cinch-Kabels verbinden Sie mit
einem freien Line-Eingang an Ihrem Mixer. Wenn Sie den
MPX-40 an einem Receiver betreiben möchten, können Sie
das Cinch-Kabel mit den CD- oder AUX-Eingängen
verbinden. Alternativ verwenden Sie andere Line-Eingänge,
jedoch nicht die Phono-Eingänge.
5. Über den DIGITALAUSGANG (6) verbinden Sie das Gerät mit
einem COMPUTER,DAT,MD,FESTPLATTEN REKORDER
oder anderen Geräten, die digitale Signale akzeptieren.
FUNKTIONEN:
1. NETZSCHALTER:Nach Überprüfung der richtigen Einstellung
des SPANNUNGSWAHLSCHALTERS (1) schließen Sie das Gerät an und
drücken den NETZSCHALTER (4) auf ON. Das Gerät schaltet sich
EIN und die blaue LCD-Anzeige (16) leuchtet auf. Wenn Sie den
NETZSCHALTER (4) auf OFF stellen, schaltet sich das Gerät aus.
2. CD-EINZUG:Über den CD-EINZUG (7) wird die CD geladen.
Die blaue LED und der
Leuchtstreifen oberhalb des
Einzugs leuchten auf. Die LCD-
Anzeige (16) stellt Gesamttitel und Zeit dar. Ist keine CD im Gerät,
zeigt die LCD-Anzeige (16) NODISC.
3. STOP/EJECT:Drücken Sie STOP/EJECT (10) einmal zum
Stoppen, zweimal oder gedrückt halten zum Auswerfen der
CD.
4. CUE:Mit der CUE (9) Taste können Sie den Punkt speich-
ern, an dem ein Titel mit der Wiedergabe beginnt. Benutzen
Sie die CUE (9) Taste als Hilfe beim Mixen Ihres Programms. Wenn
sich das Gerät im Play-Modus befindet und ein Cue-Punkt gespe-
ichert wurde, bewirkt ein Druck auf die CUE (9) Taste, dass der
Player am gespeicherten Cue-Punkt in den Pause-Modus wechselt.
Halten Sie die CUE (9) Taste gedrückt, um in die Preview-Funktion
zu gelangen, die es Ihnen erlaubt, die Musikwiedergabe ab dem
Cue-Punkt vorzuhören. Wenn Sie die CUE (9) Taste wieder
loslassen, kehrt das Gerät zum gespeicherten Cue-Punkt im Pause-
Modus zurück. Ist kein Cue-Punkt gespeichert, hat das Drücken der
CUE (9) Taste im Play-Modus keine Auswirkungen.
5. PLAY/PAUSE:Jeder Druck der PLAY/PAUSE (8) Taste wechselt
vom Play- in den Pause-Modus und wieder zurück.
6. LCD: Die FLÜSSIGKRISTALLANZEIGE (LCD (16)) stellt die
Titelnummern, Play-Modus, Pause-Modus, Wiedergabeanzeige,
Loops, Tempo und Pitch dar. Die Wiedergabeanzeige informiert
über 3 verschiedene Zeitdarstellungen: abgelaufene Spielzeit des
Titels, verbleibende Spielzeit der CD und verbleibende Spielzeit des
Titels. Die Wiedergabeanzeige blinkt langsam, wenn der Titel noch
30 Sekunden Restspielzeit hat. Bei 15 Sekunden blinkt er schneller.
7. TRACK SKIP +10: Der TRACK SKIP +10 (15) Regler hilft bei
der Wahl des gewünschten Titels. Drücken von TRACK SKIP
+10 (15) durchläuft die Titelliste in 10er-Schritten.
8. JOG MODUS:Mit der JOG MODE (21) Taste schalten Sie
das JOG WHEEL (22) zwischen Pitch Bend und schnellem
Vor-/Rücklauf um. Im ausgeschalteten Zustand ändern
Bewegungen des JOG WHEELS (22) den Pitch des abgespielten Titels
und ermöglichen präzise Tempoeinstellung zum Mixen. Drücken Sie
die JOG MODE (21) Taste und nutzen Sie das JOG WHEEL (22) im
Play-Modus, um schnell vor- oder zurückzuspulen. Im Pause-Modus
wechselt das Gerät nach drücken der JOG MODE (21) Taste in den
Stutter-Modus. Drehen Sie das JOG WHEEL (22) im Uhrzeigersinn
zum Vorspulen und gegen den Uhrzeigersinn zum Zurückspulen.
9. JOG WHEEL:Das JOG WHEEL (22) hat ver-
schiedene Funktionen: Setzen Sie das JOG WHEEL
(22) zur Veränderung des Pitch zur perfekten
Synchronisation der Wiedergabe in einem Mix ein.
Ebenso können Sie das JOG WHEEL (22) zur
Frame genauen Positionierung im Pause-Modus
verwenden. Diese Position kann optional als CUE/RECALL (9)
gespeichert werden. Sie werden bemerken, dass das Gerät in den
Stutter-Modus wechselt, wenn Sie Einstellungen im Pause-Modus
vornehmen. Lesen Sie CUE für weitere Informationen.
Im Zusammenspiel mit der JOG MODE (21) Taste kann das JOG
WHEEL (22) zum schnellen Vor- oder Zurückspulen genutzt
werden. Lesen Sie JOGMODUS(21) für weitere Informationen.
14

Der MPX-40 bietet Ihnen nicht nur ein berührungsempfin liches
JOG WHEEL (22) son ern simuliert amit auch as Scratchen mit
einer Platte auf einem Plattenspieler. Benutzen Sie as JOG WHEEL
(22), um präzise Cuts, Scratches, Backspins un mehr zu erzeugen.
10. SINGLE: Durch Drücken er SINGLE (24) Taste aktivieren
Sie ie SINGLE Funktion. Im SINGLE Mo us wir ie CD
komplett abgespielt un stoppt ann. Ist as Gerät im Pause-Mo us,
wir er Titel im SINGLE (24) Mo us urchsucht, um en Beginn er
Musik zu fin en. Da urch können Sie einen Titel sofort starten ohne
ass eine Pause entsteht, ie am Anfang je es Titels existiert.
Wenn Sie SINGLE ein zweites Mal rücken, wir CONTINUOUS
aktiviert, so ass eine CD am En e wie er von vorne beginnt.
CONTINUOUS & SINGLE Der Status ieser Funktion wir in er
LCD-Anzeige argestellt. Ist sie eaktiviert, wir im LCD (16) keine
Play-Funktion angezeigt. Siehe LCD.
11. ZEIT NZEIGE: Mit er TIME (25) Taste schalten Sie zwischen
en rei Zeitanzeigemo i um, ie in er LCD (16)
Anzeige argestellt wer en:
- abgelaufene Spielzeit es Titels
- verbleiben e Spielzeit er CD
- verbleiben e Spielzeit es Titels
12. KEY: Drücken Sie ie KEY (26) Taste, um ie KEY LOCK
Funktion zu aktivieren. Ist iese eingeschaltet, än ert er
PITCH F DER (30) nur as Tempo eines Titels, ohne je och ie
Tonhöhe es gera e spielen en Titels zu än ern.
13. BPM: Mit er BPM (27) Taste können Sie ie Beats pro
Minute (Geschwin igkeit) eines Titels herausfin en. Da urch
können Sie zwei Titel viel schneller un einfacher im Tempo
aneinan er anpassen. Drücken Sie ie BPM (27) Taste einmal zum
Aktivieren un in er LCD (16) Anzeige wir unterhalb er PITCH
Anzeige ie BPM Info argestellt. Erneutes Drücken er Taste
schaltet ie Funktion wie er aus.
14. LOOP IN: Wenn Sie bei laufen er Wie ergabe LOOP IN
(17) rücken, wir ein Loopstartpunkt gespeichert un ie
grüne LOOP IN LED blinkt währen es Speicherns schnell. Dies ist
er erste Schritt, um einen SE MLESS LOOP festzulegen.
15. LOOP OUT: Nach em Sie einen Loopstartpunkt bestimmt
haben, rücken Sie bei laufen er Wie ergabe LOOP OUT (18),
um einen Loopen punkt festzulegen. Jetzt wir er Abschnitt zwischen
Loopstart- un Loopen punkt so lange wie erholt, bis Sie
urch erneutes Drücken er LOOP OUT (18) Taste ie Schleife verlassen
un en Titel weiter wie ergeben.
16. RELOOP: Drücken Sie RELOOP (19) un as Gerät kehrt
zum vorher gesetzten Loop zurück. Mehrfaches Drücken
verursacht ein Stottern zu Beginn es Loops. Die RELOOP (19)
Funktion spielt automatisch en urch en Loop bestimmten
Abschnitt ab, bis as urch LOOP OUT (18) been et wir .
17. B-EDIT: Drücken Sie zum E itieren es SE MLESS LOOPS
B-EDIT (20). Damit können Sie en En punkt es Loops mit
em JOG WHEEL (22) verän ern. SIEHE SE MLESS LOOP.
18. PITCH: Drücken Sie PITCH (28), um en Pitch-
Bereich 4 %, 8 %, 16 % o er 100 % zu wählen.
Gleichzeitiges Drücken von 4 % & 16 % (PITCH OFF)
eaktiviert en PITCH CONTROL F DER (30). Durch
gleichzeitiges Drücken von 4 %, 8 % & 16 %, wählen Sie 100 % Pitch.
19. PITCH BEND: Drücken Sie ie PITCH BEND (29)
Tasten, um as Tempo automatisch zusätzlich zum
gewählten Pitch um +4% zu erhöhen o er um -4% zu vermin ern.
Wenn Sie ie PITCH BEND (29) Tasten loslassen, kehrt as Gerät
zum ursprünglichen Pitch zurück. Sie können mit PITCH BEND (29)
Beats übereinan erlegen, wenn Sie von einem auf einen an eren
Titel mixen.
20. PITCH CONTROL F DER: Bewegen Sie en PITCH CONTROL
F DER(30) nach oben o er unten un verän ern Sie so en Pitch
prozentual in Abhängigkeit er gewählten PITCH (28) Einstellung.
21. D TEI/ORDNER SUCHE: Sie können mit em
FILE/FOLDER SE RCH (23) Regler im Zusammenspiel mit
er LCD Anzeige (16) MP3-Dateien auf einer CD fin en.
Nach em Einschalten befin et sich as Gerät stan ar mäßig im
DATEI-Mo us, in em Sie urch ie Dateien navigieren können, wie
bei einer normalen Au io-CD. Drücken es FILE/FOLDER SE RCH
(23) Reglers aktiviert en ORDNER-Mo us, so ass Sie alle auf er
CD enthaltenen Or ner urchsuchen können. Ein erneuter Druck
auf en Regler eaktiviert en ORDNER Mo us, so ass Sie ie
Dateien in iesem Or ner urchsehen können.Um einen Song in
einem Or ner auszuwählen, benutzen Sie en Titel Knopf (15)
22. REVERSE: Mit er REVERSE (11) Taste wir er Titel einfach
rückwärts abgespielt.
23. MEMO/STORE: Mit er MEMO/STORE (12) Taste wer en
CUE- PUNKTE (13) un S MPLES (14) abgespeichert.
24. S MPLER: Mit er S MPLER (14) Taste(n) können Sie
ein in einer Samplebank gespeichertes Sample zusätzlich
zum laufen en Titel wie ergeben. Sie können bis zu 2 Samples auf
en S MPLER (14) Tasten ablegen. Ist ein Sample gespeichert,
leuchtet ie zugehörige LED un zeigt, ass ieses Sample mit
einem Druck er Taste abgespielt wer en kann.
25. CUE PUNKTE: Sie können bis zu 3 CUE PUNKTE (13) im
Betrieb setzen. Vielleicht wollen Sie einen Startpunkt für
einen Titel setzen, von em Sie sofort starten können. Durch
Anwahl er Cue-Punkte können Sie verschie ene Bereiche
eines Titels o er einer CD ohne Unterbrechung ansteuern.
Da urch wer en Pausen urch Titelsuche o er bestimmter Bereiche
vermin ert un es ist möglich, verschie ene Versionen zum
Verkürzen o er Verlängern Ihres Mixes zu erstellen.
BEDIENUNG:
1. Führen Sie eine CD mit wenig Druck in en CD-EINZUG (7), bis
ieser ie CD einzieht un as Gerät sie zu lesen beginnt.
2. Wählen Sie mit em TR CK SKIP +10 (15) Regler en gewünschten
Titel (für normale CDs).
3. Drücken Sie PLAY/PAUSE (8) un ie Wie ergabe startet.
S MPLER:
Um ein Sample abzuspeichern, rücken Sie zuerst MEMO/STORE
(12) un ie blaue MEMO/STORE (12) LED leuchtet auf, um
anzuzeigen, ass as Gerät jetzt bereit zum Speichern von Samples
ist. Hat er Titel ie Stelle erreicht, an er as Sample aufgenommen
wer en soll, rücken Sie ie gewünschte S MPLER (14) Taste. Die
grüne S MPLER (14) LED zeigt urch Blinken an, ass gera e ein
Sample aufgenommen wir .
Haben Sie en Punkt erreicht, an em as Sample en en soll,
rücken Sie erneut ie gleiche S MPLER (14) Taste. Die grüne
S MPLER (14) LED hört auf zu blinken un leuchtet nach em
En e er Aufnahme. Das Sample ist nun abgespeichert un kann
abgespielt wer en. Wenn Sie ie S MPLER (14) Taste rücken, können
Sie as aufgenommene Sample über en laufen en Titel spielen
un ie grüne SAMPLER (14) LED blinkt.
Um ie Wie ergabe eines Samples anzuhalten, rücken Sie ie
S MPLER (14) Taste erneut un ie Wie ergabe hört sofort auf.
Wenn Sie mit em aufgenommenen Sample o er seiner Position
nicht zufrie en sin , rücken Sie erneut ie MEMO/STORE (12)
Taste un folgen en Anweisungen von Beginn an.
CUE PUNKTE:
Um CUE PUNKTE (13) zu nutzen, müssen Sie zuerst en
Startpunkt programmieren. Drücken Sie ie MEMO/STORE (12)
Taste zum Speichern er CUE PUNKTE (13). Die leuchten e
MEMO/STORE (12) LED zeigt, ass as Gerät jetzt zum Speichern
von Cue-Punkten bereit ist. Wählen Sie eine er 3 CUE PUNKT (13)
Tasten als Speicherort.
Hat er Titel ie Stelle erreicht, wo Sie en Cue setzen wollen,
rücken Sie eine CUE PUNKT (13) Taste un ie CUE PUNKT(13)
LED beginnt zu blinken, wenn er Punkt gespeichert wur e.
Drücken Sie ie CUE PUNKT (13) Taste un as Gerät startet je erzeit
währen er Wie ergabe von iesem Punkt. Die CUE PUNKT
(13) LED zeigt urch Blinken an, ass er Punkt in Nutzung ist.
Wir er CUE PUNKT (13) nicht mehr genutzt, leuchtet ie CUE
PUNKT (13) LED un zeigt, ass hier ein Cue-Punkt gespeichert ist.
Um einen CUE PUNKT (13) zu speichern, wie erholen Sie iese
Schritte. Wenn Sie einen CUE PUNKT (13) wählen, er schon
Informationen gespeichert hat, wer en iese überschrieben.
CUE:
Um en CUE (9) zu nutzen, müssen Sie zuerst en Punkt fin en,
von welchem ie Wie ergabe starten soll.Wechseln Sie in en Pause-
Mo us, wo urch Stutter aktiviert wir . Jetzt können Sie mit em JOG
WHEEL (22) en Punkt schnell un präzise suchen, wie im Bereich
JOG WHEEL (22) beschrieben.
Haben Sie en Punkt gefun en, an em ie Wie ergabe starten
soll, been en Sie ie Suche mit em JOG WHEEL (22) un rücken
ie PL Y/P USE (8) Taste. Die CUE (9) LED blinkt un er Cue ist
im Gerät gespeichert.
Drücken Sie CUE (9), um en Titel am gewählten Cue anzuhalten.
MPX-40
15
BEMERKEN SIE: Die Wurf-Einstellung von 100 % ist für die regelmäßige CD
und wird mit MP3 CD-Dateien nicht arbeiten.
Bemer en Sie:STORE, UND RECALL ist nur
verfügbar für die regelmäßige CD nicht MP3 Scheiben

so zu überprüfen, ob Sie mit em gespeicherten Punkt zufrie en
sin .
Sin Sie mit em gespeicherten Cue-Punkt nicht zufrie en, rücken
Sie PAUSE (8) un suchen mit em JOG WHEEL (22) einen
an eren Punkt. Drücken Sie zwei mal kurz hintereinan er
PLAY/PAUSE (8) zum Bestätigen un um en Play-Mo us zu verlassen.
Sie befin en sich jetzt im Pause-Mo us un ie CUE (9) LED
blinkt. Wie erholen Sie ie Schritte zum Vorhören es Punkts, um
zu überprüfen, ob Sie mit em neuen Punkt zufrie en sin . Die CUE
(9) LED leuchtet un zeigt, ass er Cue-Punkt gespeichert un ein-
satzbereit
ist.
CUE ERKENNUNG
Der MPX-40 kann einen Cue-Punkt pro Titel in seinem internen
Speicher festhalten. So können Sie währen einer Live-Session
schnell zu en gewünschten Startpunkten springen.
Sin Sie mit em Cue-Punkt zufrie en, halten Sie ie
MEMO/STORE (12) Taste für 2 Sekun en ge rückt, um iesen
abzuspeichern. Sin Sie mit em Punkt nicht zufrie en, wie erholen
Sie ie Schritte zum Abspeichern eines Cue-Punkts.
Ihr Punkt ist jetzt gespeichert un kann je erzeit aufgerufen wer en,
ganz gleich, wie lange Sie ie CD nicht mehr gespielt haben. Die
AUTO CUE LED blinkt, um anzuzeigen, ass ein Cue-Punkt erfolgreich
gespeichert. Wenn Sie eine CD einlegen, für ie ein Cue-
Punkt gespeichert ist, blinkt ie AUTO CUE LED ebenfalls, um
asnzuzeigen, ass er MPX-40 iesen erkannt hat. Springen Sie zu
einem Titel mit einem gespeicherten Cue-Punkt. Halten Sie en
Fol er/Recall Cue (23) Knopf so lange ge rückt, bis er Punkt in
er LCD Anzeige sichtbar wir . Drücken Sie Play un er Titel
startet vom gespeicherten Cue-Punkt.
SEAMLESS LOOP
Mit em Drücken er LOOP IN (17) Taste speichern Sie
en Startpunkt es Loops un ie grüne LOOP IN (17) LED
blinkt, währen er Loopstartpunkt gespeichert wir .
Nach em er Startpunkt gespeichert ist rücken Sie im Play-
Mo us LOOP OUT (18), um en Loop zu komplettieren. Der MPX-
40 wie erholt jetzt automatisch en Abschnitt zwischen Start- un
En punkt, ie Sie urch Drücken er LOOP IN (17) un LOOP OUT
(18) Taste efiniert haben. Der Loop ist nun im Speicher es Geräts
programmiert.
Währen er Loop abgespielt wir , blinken ie grünen LOOP IN
(17) & LOOP OUT (18) LEDs un zeigen, ass er Loop gera e
genutzt wir . In er LCD (16) Anzeige blinkt gleichzeitig as CUEB
Zeichen solange, bis er Loop gestoppt wir .
Durch Drücken er RELOOP (19) Taste gelangen sie zum vorher
gesetzten Loop. Mehrmaliges Drücken verursacht eine Art Stottern
zu Beginn es Loops (stutter). Mit RELOOP (19) kehren Sie automatisch
zum Looppunkt zurück. Der Loop spielt so lange, bis ie LOOP
OUT (18) Taste ge rückt wir .
Um en SEAMLESS LOOP zu e itieren, rücken Sie ie B-EDIT (20)
Taste, worauf in er LCD (16) Anzeige er Frame es LOOP OUT
(18) gezeigt wir . Sie können Ihn mit em JOG WHEEL (22) Framege-
nau
nach links o er rechts verschieben, währen er Loop wie erholt
wir . So können Sie bei je em Durchlauf es Loops hören, ob
er richtig gesetzt ist. Drücken Sie B-EDIT (20), wenn Sie mit em
En punkt zufrie en sin un er Loop wir solange abgespielt, bis
Sie LOOP OUT (18) rücken.
Um en Loop zu verlassen un zur normalen Wie ergabe zurück-
zukehren,
rücken Sie LOOP OUT (18), um en Loop nicht mehr
wie erzugeben.
SLEEP MODUS
Der MPX-40 verfügt über einen SLEEP Mo us, er sich nach einer
gewissen Zeit aktiviert, wenn as Gerät nicht benutzt wur e.
Da urch wir er Laser es Geräts AUSGESCHALTET, um ie
Lebens auer zu erhöhen. Ist ieser Mo us aktiv, zeigt ie LCD
Anzeige (16) SLEEP . Um en Mo us zu verlassen, rücken Sie Play
un er MPX-40 “wacht” einfach wie er auf.
GEBEN SIE ANFANG-WAGENHEBER (31) WEITER Dieser Wagenheber
macht es möglich in Verbin ung zu stehen
zwei zusammen, so ass, wenn eine Einheit fertig ist spielen ,
ie entgegengesetzte Einheit fängt automatisch Play-Back an. Für en
normalen Gebrauch, verlassen Sie iesen getrennten Wagenheber.
FEHLERBEHEBUNG
Wir eine CD nicht richtig abgespielt, überprüfen Sie, ob iese
mit er be ruckten Seite nach oben gela en wur e. Überprüfen Sie
ie CD auch auf starke Verschmutzung un Kratzer.
Wir ie CD abgespielt, aber Sie hören nichts, überprüfen Sie ie
Verbin ungskabel un en Verstärker, Mixer o er Reciever.
un Kratzer. Viele CDs entsprechen nicht en Normen un springen
auf fast allen an eren CD-Playern. Bevor Sie en CD-Player zur
Reparatur geben, überprüfen Sie essen Funktion mit einer CD, von
er Sie sicher wissen, ass sie ohne Probleme abspielt.
TECHNISCHE DATEN
ALLGEMEIN
Typ.................................................................................Single CD-Player
Disc Typ.....................................................Stan ar CDs (12 cm, 8 cm)
Zeitanzeige............Abgelaufen/Verbleiben Track, Verbleiben CD
Variabler Pitch...............................± 4 %,± 8 %,± 16 %,+ 100 % Fa er
mit
...............................................................................................Resume-Taste
Pitch Ben .....................................................................± 4 % Maximum
Sofortstart..............................................innerhalb von 0,015 Sekun en
Titelwahl...............................................................................1 bis 99 Titel
Abmessungen...........................................216 x 95 x 320 mm (BxHxT)
Gewicht................................................................................................3 kg
AUDIO SEKTION:
Au io Typen..............................................................................CD, MP3
Quantisierung..................................1 Bit Linear/Kanal, 3 Strahl Laser
MP3/CD Bit Rate..............................................................32-320 KBPS
Oversampling Rate..........................................................................8 fach
Sampling Rate.............................................................................44,1 kHz
Frequenzgang...............................................................20 Hz bis 20 kHz
Klirrfaktor..................................................................weniger als 0,05 %
Rauschspannungsabstan ..............................................................90 B
Dynamikumfang..........................................................................< 80 B
Kanaltrennung...................................................................88 B (1 kHz)
Ausgangspegel.................................................................1,3 Volt R.M.S.
Stromversorgung...........................................AC 115/230 V, 60/50 Hz
ÄNDERUNGEN AUF GRUND VON VERBESSERUNGEN JEDERZEIT
MÖGLICH.
*Es gelten die jeweiligen Gewährleistungsbestimmungen des Lan-
des, wo das Gerät erworben wurde.
NOTIZEN:
_______________________________________________________________________________________________________________________
_______________________________________________________________________________________________________________________
_______________________________________________________________________________________________________________________
_______________________________________________________________________________________________________________________
16

ATTENTION: Cet appareil répond aux certifications FCC lorsqu'il est con-
necté à d'autres appareils à l'aide de cordons blindés. Afin de prévenir tout
risque de parasites électromagnétiques avec un poste radio ou TV, veuillez
utiliser des cordons blindés.
Le point d'exclamation situé dans un triangle est destiné à attirer votre
attention durant l'utilisation de votre appareil ou d'un entretien péri-
odique de ce dernier. Vous en trouverez plusieurs dans le mode d'emploi
de l'appareil.
LIRE LES INSTRUCTIONS: Toutes les instructions et consignes d'utilisa-
tion doivent être lues avant l'utilisation de l'appareil.
CONSERVEZ LES INSTRUCTIONS: Nous vous recommandons de con-
server les instructions et consignes d'utilisation en cas de nécessité
ultérieure.
RESPECT DES CONDITIONS D'UTILISATION: Nous vous recomman-
dons de respecter les instructions d'utilisation.
SUIVRE LES INSTRUCTIONS D'UTILISATION: Nous vous recomman-
dons de respecter la chronologie des instructions d'utilisation.
NETTOYAGE: L'appareil doit être nettoyé avec un chiffon légèrement
humide. Ne pas utiliser de produits chimiques corrosifs & volatiles (cire,
essence, insecticide…) afin de ne pas endommager l'appareil.
CORDON: Ne pas utiliser de cordons non préconisés par le fabricant afin
de ne pas endommager l'appareil.
EAU & HUMIDITE: Ne pas utiliser l'appareil à proximité d'une source
d'eau (cuisine, salle de bain, lavabo…), ni dans un endroit sujet à l'humid-
ité (piscine…).
ACCESSOIRES: Ne pas installer cet appareil sur un support ou dans un
endroit instable. L'appareil pourrait tomber au risque de blesser une per-
sonne et être endommagé. Veiller à utiliser des accessoires (Pied, support,
crochet..) recommandés par le fournisseur ou vendu avec l'appareil. Tout
montage ou installation doit respecter les instructions du fabricant et utilis-
er des accessoires d'installation recommandés par le fabricant.
TRANSPORT SUR CHARIOT: Tout produit installé sur un chariot doit être
manipulé avec précaution. Un déplacement brusque ou trop rapide sur
une surface non plane pourrait entraîner la chute de l'ensemble et endom-
mager l'appareil. VOIR FIGURE A.
VENTILATION: Les ouvertures et ouïes d'aération situées sur l'appareil
permettent une ventilation optimale de ce dernier afin d'éviter toute sur-
chauffe. Ces ouvertures ne doivent jamais être obstruées. Ne pas placer
l'appareil sur un support souple risquant de bloquer les ouïes d'aération
(Lit, sofa, canapé…). Si l'appareil est intégré dans une installation ou dans
un rack, veillez à la ventilation et consultez le fabricant pour toute informa-
tion complémentaire.
ALIMENTATION: Veillez à respecter la tension d'alimentation située au dos
de l'appareil. Si vous n'êtes pas certain de la tension d'utilisation dans votre
pays, contactez votre revendeur.
EMPLACEMENT: Veillez à installer l'appareil sur un support stable.
PERIODE DE NON UTILISATION: Débranchez le cordon d'alimentation
de l'appareil en cas de non utilisation prolongée.
MISE A LA TERRE:
- Si l'appareil est équipé d'une alimentation à courant alternatif (Prise pos-
sédant un contact plus large que l'autre), celle-ci se connectera correcte-
ment à la prise uniquement si vous respectez le sens de branchement. Il
s'agit là d'une mesure de sécurité. Si vous n'arrivez pas à insérer la fiche
dans la prise, inversez la fiche. Si vous ne pouvez toujours pas insérer cette
dernière, contactez un électricien afin de remplacer votre prise électrique
qui est obsolète. Veillez à respecter cette consigne.
- Si l'appareil est équipé d'une fiche d'alimentation avec terre, veillez à la
connecter à une prise électrique équipée d'une connexion à la terre. Il s'ag-
it d'une mesure de sécurité. Si vous ne pouvez insérer la fiche dans la prise
électrique, contactez un électricien afin de remplacer votre prise électrique
qui est obsolète. Il est important de respecter cette mesure de sécurité.
INSTALLATION DU CORDON D'ALIMENTATION: Les cordons d'alimen-
tation doivent être déroulés et rangés proprement afin d'éviter de se pren-
dre les pieds dedans, en particulier les cordons reliés aux prises élec-
triques.
ANTENNE EXTERIEURE: Si vous reliez votre appareil à une antenne ou
un câble extérieur, assurez-vous de la présence d'une connexion à la terre
afin d'éviter les surtensions et les décharges d'électricité statique. L'article
810 du National Electrical Code, ANSI/NFPAS 70, précise toutes les infor-
mations nécessaires afin d'effectuer correctement le branchement à la terre
du pylône ou de la structure porteuse, la connexion du câble à l'antenne
de décharge, dimensions des connecteurs de mise à la terre, connexions
des électrodes, consignes de mise à la terre des électrodes. VOIR SCHÉMA B.
ORAGE/FOUDRE: En cas d'orage et de non utilisation prolongée,
débranchez le cordon d'alimentation, le câble d'antenne et les cordons
audio. Ceci afin d'éviter les dégâts occasionnés par la foudre et les sur-
charges électriques.
LIGNES ELECTRIQUES: Une antenne extérieure ne doit pas être située à
proximité immédiate de lignes électriques et/ou d'un transformateur élec-
trique, afin de ne pas tomber dessus en cas de chute. Lors de l'installation
d'une antenne extérieure, veillez à éviter tout contact avec des lignes élec-
triques : tout contact peut être fatal.
SURCHARGE: Ne surchargez pas les prises électriques, blocs multiprises &
rallonges en y connectant trop d'appareils. Ceci afin d'éviter tout risque de
surcharge électrique ou d'incendie (Surchauffe).
INSERTION D'OBJET & DE LIQUIDE: N'insérez pas d'objets dans les
fentes ou ouvertures de l'appareil afin d'éviter tout risque de choc élec-
trique et d'incendie. Ne jamais renverser de liquide sur l'appareil.
SERVICE APRES VENTE: N'essayez pas de réparer cet appareil ; en l'ou-
vrant ou en le démontant afin d'éviter tout risque de choc électrique. En
cas de problème, veuillez prendre contact avec votre revendeur.
PANNE/SITUATION NECESSITANT UN RETOUR EN SAV: Débranchez
l'appareil de la prise électrique, remettez le dans son emballage d'origine
et contactez votre revendeur en tenant compte des situations suivantes :
- Lorsque le cordon d'alimentation est endommagé.
- Si un liquide a été renversé dessus.
- Si l'appareil a été exposé à la pluie.
- Si l'appareil ne fonctionne pas correctement malgré le respect des
instructions d'utilisation. Ajustez uniquement les réglages préconisés dans
le mode d'emploi, toute manipulation ou réglage non conseillés dans ce
dernier peut endommager l'appareil et procurer plus de travail en cas d'in-
tervention SAV afin de remettre l'appareil en état de marche.
PIECES DE RECHANGE: Lorsque vous avez besoin de remplacer des
pièces de l'appareil, veillez à utiliser des pièces d'origine ou possédant des
caractéristiques identiques. L'utilisation de pièces non autorisées peut
endommager l'appareil : surchauffe, court-circuit, choc électrique…
CONTROLE DE SECURITE: Avant de récupérer votre appareil, assurez
vous que le SAV a effectué tous les contrôles de sécurité nécessaires afin de
vous restituer un appareil en état de marche.
INSTALLATION AU PLAFOND OU SUR UN MUR: Ce type d'installation
est déconseillé.
CHALEUR: Veillez à installer l'appareil loin de toute source de chaleur telle
que radiateur, réchaud ou tout autre appareil produisant de la chaleur.
ATTENTION
AVANT TOUTE UTILISATION DE L'APPAREIL, MERCI DE PRENDRE CON-
NAISSANCE DES INSTRUCTIONS D'UTILISATION & DE SECURITE!
RISQUE DE CHOC ÉLECTRIQUE, NE PAS OUVRIR!
17

31
4
31. Relay

MPX-40 LECTEUR CD PROFESSIONNEL AVEC EFFETS
INTRODUCTION:
Félicitations concernant l'achat du lecteur CD MP3 Gemini MPX-
40 avec effets. Cet appareil, doté des dernières évolutions tech-
nologiques, est couvert par une garantie de 1 années, à l'exception du
bloc optique garanti durant 1 an. Nous vous recommandons de lire
soigneusement l'ensemble des instructions qui suivent.
CARACTERISTIQUES:
- Compatible CD-Audio, CD MP3, CD-R & CD-RW
- Chargement slot-in avec led témoin
- Système d’accès aux fichiers & dossiers MP3
- Identification du CD pour mémorisation des points cue
- Molette tactile
- 3 points Cue instantanés & 2 samples mémorisables de 8 sec.
- Mémoire Anti-Shock (10 secondes)
- Boucle parfaite réglable (Modification du point de sortie)
- Master tempo & BPM
- Touches & molette de rattrapage de vitesse +/-
- Vitesse de lecture réglable: +/- 4-8-16-100%
- Fonction reverse & temps d'arrêt réglable
- Potentiomètre rotatif de sélection au delà de la plage 10
- Large molette à double usage (Recherche & calage +/-)
- Lecture simple ou continue
- 3 modes affichage temps
- Large écran bleu LCD
- Sortie numérique (RCA)
- Mode sleep (Arrêt automatique en cas de non utilisation prolongée)
SPECIFICATIONS TECHNIQUES:
Propriétés de la Diode Laser
Composants: Ga - Al - As
Longueur d'onde: 755 - 815 nm (25° C)
Niveau de sortie Laser: Onde continue, max. 0.5mW
MISES EN GARDE:
1. Ne pas utiliser cet appareil à des températures inférieures à
41°F/5°C et supérieures à 95°F/35°C.
2. Ne pas exposer cet appareil aux éclaboussures de tout type.
Gardez l'appareil dans un endroit propre & sec.
3. Ne pas installer l'appareil sur un support instable.
4. Lorsque vous débranchez le cordon d'alimentation, utilisez la prise
et ne tirez pas sur le cordon.
5. Afin d'éviter tout risque de choc électrique ne démontez pas l'ap-
pareil. Il n'y a pas de pièce remplaçable par l'utilisateur à l'intérieur.
Contactez votre revendeur ou notre service technique au 01 69 79 97
79 (Du lundi au vendredi de 14h à 17h).
6. Ne pas utiliser de solvants ou produits chimiques pour nettoyer
l'appareil.
7. Conservez ce mode d'emploi.
8. En cas de problème (Aux USA seulement), contactez le service
technique de Gemini au 1 732 738 9003 ou consultez notre site inter-
net à l'adresse suivante : HTTP://WWW.GEMINIDJ.COM/SUP-
PORT. Ne retournez pas cet appareil à votre revendeur.
SELECTION DE LA TENSION D’ALIMENTATION:
Le MPX-40 fonctionne sous deux tensions d'alimentation: 115V ou
230V. Veuillez respecter les instructions ci-après:
1.Utilisez un tournevis afin de positionner le
SELECTEUR DE TENSION (1).
2.Positionnez le sélecteur sur 115V ou 230V (France: 230V)
3.Ne pas forcer. Une force excessive endommagerait le commuta-
teur. Si ce dernier ne bouge pas, contactez votre revendeur.
CONNEXIONS:
1.Avant tout branchement, assurez vous que le COMMUTA-
TEUR DE MISE SOUS TENSION (4) est en position
OFF. Tous les branchements sont situés à l'arrière de l'appareil.
Consultez le schéma situé en page 3.
2.Le MPX-40 est livré avec un CORDON D'ALIMENTATION
(2). Branchez l'une des extrémités à l'embase AC IN (3). Reliez
l'autre extrémité à une prise électrique.
3.Connectez le cordon RCA aux CONNECTEURS
RCA (5).
4.Connectez l'extrémité libre du cordon RCA à une entrée niveau
ligne de votre console de mixage. Si vous branchez votre MPX-40 à
un amplificateur hi-fi, connectez le à une entrée CD ou
AUX. Si il n'y a pas d'entrée CD ou AUX, connectez-le à
n'importe quelle entrée de niveau ligne (Ne pas connecter
l'appareil à une entrée phono).
5.La SORTIE NUMERIQUE RCA (6) permet de relier votre
appareil à l'entrée d'un appareil numérique tel que: DAT, MD,
HD (Disque Dur)…
FONCTIONS:
1.INTERRUPTEUR DE MISE SOUS TENSION: Après avoir
commuté l'appareil sur la bonne TENSION D'ALIMENTA-
TION (1) et effectué l'ensemble des branchements, appuyez sur la
touche POWER (4). L'appareil s'allume et l'écran LCD (16) s'illu-
mine. Eteignez l'appareil en appuyant de nouveau sur la touche
POWER (4).
2. CHARGEMENT SLOT-IN:
le chargement du CD s'effectue
par la FENTE (7). Lorsqu'un
disque est inséré dans l'appareil, la led bleue s'allume, ainsi que le
barre située sur la fente & l'écran LCD (16) affiche le nombre total
de plages, ainsi que la durée total du CD. Lorsqu'il n'y a pas de CD
dans l'appareil,l'écran LCD (16) affichera NO DISC.
3. ARRET/EJECTION: Appuyez sur la touche
STOP/EJECT (10) une fois afin d'arrêter la lecture et deux
fois afin d'éjecter le CD.
4. CUE : Le point CUE permet de mémoriser un point de démarrage de lec-
ture précis (Très utile lors d'un mix). lorsque l'appareil est en mode lecture, et
après avoir mémorisé un point cue, le fait d'appuyer sur la touche CUE
(9) mettra l'appareil en mode pause au point cue mémorisé. En main-
tenant cette touche enfoncée, l'appareil commute en mode pré-écoute
et vous permet ainsi d'entendre la musique à partir de cet endroit. En
relâchant la touche CUE (9) vous revenez au point cue en mode pause. Si
vous n'avez pas mémorisé de point cue, le fait d'appuyez sur la touche CUE
(9) ne permet pas de démarrer la sélection d'un point cue.
5. PLAY/PAUSE:chaque pression sur la touche PLAY/PAUSE (8)
commute l'appareil en mode pause ou lecture et vice versa.
6. ECRAN LCD: L'écran LCD (16) affiche les informations suiv-
antes: nombre de plages, mode lecture, mode pause, lecture, boucle
parfaite, master tempo, réglages & réglage de vitesse. 3 modes d'af-
fichage temps sont disponibles : temps écoulé, temps total restant &
temps restant sur le plage en cours de lecture. Une barre permet de
visualiser la fin du morceau : la barre clignote lentement à 30 secon-
des, puis plus rapidement lorsqu'il ne reste que 15 secondes
7. RECHERCHE DE PLAGE +10 :Le potentiomètre rotatif
SAUT DE PLAGE +10 (15) permet de sélectionner le morceau.
Appuyez sur le potentiomètre rotatif SAUT DE PLAGE +10 (15)
puis tournez jusqu'à atteindre le morceau désiré (La recherche s'ef-
fectue par incrément de 10).
8. JOG MODE:La touche JOG MODE (21) permet de modifier
la fonction de la MOLETTE (22) de rattrapage (pitch bend +/-)
en mode recherche rapide avant/arrière. Vous pouvez ainsi vous déplacez
rapidement en avant ou en arrière. Pressez la touche JOG MODE (21) afin
d'utiliser la MOLETTE (22) en mode recherche rapide, avant ou arrière,
durant la lecture. Utilisez le JOG MODE (21) en mode pause et l'appareil se
mettra en mode stutter (lecture saccadée). Manipulez la MOLETTE (22)
dans le sens des aiguilles d'une montre afin d'effectuer une recherche rapide
en avant, et dans l'autre sens afin de l'effectuer en arrière.
9. MOLETTE:la MOLETTE (22) possède
plusieurs fonctions:
Utilisez la MOLETTE (22) en mode rattrapage
(pitch bend) pour rattraper un décalage durant le
mix. La molette permet aussi de se déplacer précisé-
ment, frame par frame, en mode pause afin de
mémoriser un point CUE/RECALL (9). Vous remarquerez que
l'appareil se commute en mode stutter (lecture saccadée) lorsque
vous effectuez une recherche précise en mode pause. Voir chapitre
POINTS CUE pour plus d'informations
La molette permet d'effectuer une recherche rapide à l'aide de la
touche JOG MODE (21). Voir section 8 pour plus d'informa-
tions.
19

Le MPX-4 possède une MOLETTE TACTILE (22) permettant de
simuler de façon r aliste les effets de scratch d’une platine vinyle. Utilisez la
MOLETTE (22) afin d’effectuer des scratches, passe-passe, cutscomme
avec une platine vinyle.
10. LECTURE SIMPLE: Pressez la touche SINGLE (24) pour activer
la fonction SINGLE. En mode SINGLE, le CD sera lu une fois
puis la lecture s arrêtera. En mode pause, la fonction SINGLE (24)
d tecte la première note du morceau. Cette fonction permet de d marrer
la lecture instantan ment, sans blanc de lecture (Pr sent au d but de
chaque morceau).
Pressez la touche SINGLE une seconde fois active la fonction
CONTINUOUS: à la fin du dernier morceau, l appareil revient au premier
morceau et reprend la lecture du CD.
Les fonctions LECTURE CONTINUE & SIMPLE apparaissent sur l cran
afin de pr ciser quel fonction est activ e. Lorsque elles sont d sactiv es,
auncue de ces fonctions n apparaît sur l cran LCD (16). Voir section
ECRAN LCD.
11.AFFICHAGE TEMPS: la touche TIME (25) permet de s lectionner
3 modes d’affichage du temps sur l’ cran LCD (16):
- Temps coul sur la plage en cours de lecture
- Temps restant sur la plage en cours de lecture
- Temps total restant sur le CD
12. KEY (MASTER TEMPO): la touche KEY (26) permet
d’activer la fonction MASTER TEMPO. Cette dernière, associ
e au REGLAGE DE VITESSE (30), permet de modifier la
vitesse de lecture sans changer la tonalit .
13. BPM (Battements Par Minute): Utilisez la touche BPM (27) afin
d’afficher le BPM de la plage en cours de lecture. Cette fonction permettra
d’affiner votre mix plus rapidement et plus facilement. Pressez
la touche BPM (27) une fois afin d’activer la fonction, le BPM s’affichera
alors sur l’ cran LCD (16) sous l’icône PITCH. Appuyez une nouvelle fois
sur la touche BPM (27) afin de d sactiver la fonction, l’information BPM
disparaît alors de l’ cran LCD (16).
14. LOOP IN (POINT DE DEPART DE LA BOUCLE): Pressez
la touche LOOP IN (17) durant la lecture afin de m moriser le point
de d part de votre boucle, la LED LOOP IN clignotera alors rapidement.
C est la première tape permettant la cr ation d’une BOUCLE PARFAITE.
15. LOOP OUT (POINT DE SORTIE DE LA BOUCLE):
Après avoir enregistr le point de d part, appuyez sur la
touche LOOP OUT (18) afin de m moriser le point de sortie. Le
passage s lectionn sera alors r p t tant que vous n’avez pas d cid
d’en sortir. Appuyez de nouveau sur la touche LOOP OUT (18) afin
de sortir de la boucle et la lecture continuera à partir de cet endroit.
16. RELOOP: Appuyez sur la touche RELOOP (19) afin de
retourner à la boucle d jà enregistr e. Appuyez rapidement sur cette
même touche afin de cr er un effet stutter (lecture saccad e) au point de
d part de la boucle. Cette fonction permet de re-jouer la boucle en cours de
lecture. Pour en sortir, il suffit d’appuyer sur la touche LOOP OUT (18).
17. B-EDIT (MODIFICATION DU POINT DE SORTIE DE
LA BOUCLE PARFAITE): Utilisez la touche B-EDIT (20) afin
d’ diter la boucle enregistr e. Cette fonction permet de modifier le
point de sortie enregistr avec la touche LOOP OUT (18) et la
MOLETTE (22). VOIR SECTION BOUCLE PARFAITE.
18. REGLAGE DE VITESSE: Appuyez sur la touche
PITCH (28) afin de s lectionner le r glage de vitesse; vous pouvez
choisir entre 4%, 8%, 16% & 100%. Appuyez sur les 2 boutons
4% & 16% (PITCH OFF) simultan ment afin d’ teindre
le REGLAGE DE VTESSE (30). Appuyez en même temps sur
les boutons 4%, 8% & 16% afin de s lectionner l’option 100%.
19. TOUCHES DE TRATTRAPAGE: Les touches +/-
PITCH BEND (29) permettent de baisser ou d’augmenter instantan ment
la vitesse de lecture de 4%. Dès que vous relâchez les boutons PITCH
BEND (29), vous revenez au r glage de vitesse effectu . Ces touches
PITCH BEND (29) permettent de corriger les d calages de vitesse lors d’un
mix.
20. REGLAGE DE VITESSE: Le POTENTIOMETRE DE
REGLAGE VITESSE (30) permet de modifier la vitesse de lecture, en
fonction du r glage effectu et de la plage de r glage utilis e (28).
21. RECHERCHE DOSSIER/FICHIER: Utilisez le potentiom
ètre rotatif FILE/FOLDER SEARCH (23) et l cran
LCD (16) pour acc der aux fichiers MP3. Par d faut, à l allumage
de l appareil ce dernier est en mode FILE, vous permettant de
balayer les dossiers comme sur un CD Audio normal. Si vous maintenez
enfonc le potentiomètre rotatif FILE/FOLDER SEARCH (23) en
appuyant une fois, vous rentrez en mode FOLDER/DOSSIER, permet
tant d acc der aux dossiers MP3 pr sents sur le cd. En pressant ce
même bouton une autre fois, vous sortez du mode FOLDER, vous
pouvez alors chercher votre morceau dans le dossier s lectionn ..Pour
s lectionner un morceau dans un dossier, utilisez le potentiomètre rotatif
Track Knob (15)
22. REVERSE: la touche REVERSE (11) permet de lire un
morceau à l’envers.
23. MEMO/STORE: La touche MEMO/STORE (12) vous permet
de mettre en m moire vos POINTS CUE (13) & SAMPLES
(ECHANTILLONS) (14).
24. SAMPLER: Utilisez les touches SAMPLES/ECHANTILLONS
(14) afin de jouer une partie d’un morceau stock en
m moire avec un accès instantan , en compl ment de la lecture normale du
cd ins r . Cela permet d’am liorer l’originalit de votre mix. Vous pouvez
sauvegarder jusqu’à 2 ECHANTILLONS (14) diff rents. Lorsqu’un
chantillon est stock dans une m moire, la LED de la touche s’allume,
vous n’avez plus qu’à appuyer dessus pour en lancer la lecture.
25. POINTS CUE: Il y a 3 points CUE (Points de d marrage)(
13) qui peuvent être cr s à la vol e. Vous pouvez
enregistr un point de d marrage pr cis dans un morceau. En
appuyant sur les diff rents points cue, vous pouvez d’un
morceau à d’autres, et ce instantan ment. Cette fonction permet
d’ viter les blancs en cas de recherche de plage sur le même disque
et de cr er un grand nombre d’effets en plein mix.
INSTRUCTIONS D'UTILISATION :
1.Placez un CD dans le fente DISC IN SLOT (7). Le disque est alors aval
par l’appareil et la lecture d marre.
2.S lectionnez la plage à lire à l’aide du potentiomètre rotatif TRACK
SKIP/+10 (15).
3.Appuyez sur la touche PLAY/PAUSE (8) afin de d marrer la lecture
instantan ment.
SAMPLER/ECHANTILLONNEUR:
Pour enregistrer un chantillon, appuyez sur la touche
MEMO/STORE (12), la LED bleue MEMO/STORE (12) s’allume
indiquant que l’appareil est prêt à enregistrer. Lorsque vous
avez atteint le point à partir duquel vous souhaitez d marrer votre
chantillon, s lectionnez l’une des deux touches SAMPLER (14)
pour le stocker. La LED verte SAMPLER (14) clignotera indiquant
que la fonction MEMO/STORE (12) enregistre un chantillon.
Lorsque vous arrivez au point où vous souhaitez arrêter la lecture
de l’ chantillon, appuyez sur ce même bouton (14). La LED verte de
SAMPLER (14) restera alors allum e indiquant qu’un chantillon y
est stock . L’ chantillon est maintenant enregistr et prêt à être jou .
Il vous suffit d’appuyer sur le bouton (14) de l’ chantillon que vous
souhaitez couter à tout moment durant la lecture d’un CD. Lorsque
l’ chantillon est lu, la LED SAMPLER (14) clignote.
Pour arrêter un chantillon, appuyez sur la touche SAMPLER (14)
en cours de lecture. Si l’enregistrement de ce dernier ne vous satisfait
pas, appuyez sur la touche MEMO/STORE (12), puis r p tez les
op rations pr c dentes depuis le d but.
POINTS CUE:
Pour utiliser les points CUE (13), vous devez d’abord enregistrer le
point de d marrage. Appuyez sur la touche MEMO/STORE(12)
afin de d marrer la sauvegarde des points CUE (13). La LED
MEMO/STORE (12) s’allume indiquant que la machine est prête
pour l’enregistrement des points CUE. S lectionnez l’un des 3
emplacements de point CUE (13). Lorsque vous arrivez à l’endroit
exact où vous souhaitez d marrer la lecture, appuyez sur l’un des
points CUE (13). La led de ce point CUE (13) se met alors à clignoter
indiquant qu’un point cue y est enregistr . Appuyez sur cette
même touche pour d marrer la lecture à partir de cet endroit. La
LED de ce point CUE (13) continue à clignoter puis restera allum e
lorsque la lecture normale reprendra indiquant ainsi q’un point cue y
est disponible.
Pour enregistrer de nouveaux points CUE (13), r p tez ces instructions.
Lorsque vous s lectionnez l’un des points CUE (13), vous
effacez automatiquement le point CUE pr c dent.
CUE:
Pour utiliser le point CUE (9), vous devez d’abord s lectionner
l’endroit à partir duquel vous souhaitez d marrer la lecture. Mettez
l’appareil en mode pause. Ceci activera la fonction stutter (Lecture
saccad e). Puis utilisez la MOLETTE (22) afin de trouver pr cis -
ment et rapidement l’endroit d sir pour d buter la lecture. Voir section
MOLETTE (22) pour plus d’informations.
Lorsque vous avez trouver le point de d marrage, ne touchez plus
à la MOLETTE (22). Puis appuyez sur la touche PLAY/PAUSE
MPX-40
20
NOTEZ : le cadre de Terrain de 100 % est pour le CD régulier
et ne travaillera pas avec les dossiers de CD MP3
Notez : STORE & RECALL est seulement
disponible pour le CD régulier pas les disques de MP3
Table of contents
Languages:
Other Gemini MP3 Player manuals