Members Mark G70201 Owner's manual

STOP
Do not return this product to the store. If you need help or require parts, call the Customer Care Hotline
1-833-454-0864
This manual must remain with the product at all times.
FOR OUTDOOR USE ONLY.
Manual Revision #: 10.13.2021
Member’s Mark
4 Burner Gas Griddle
Assembly Instructions & User Manual
Model G70201 / G70201-1

1-833-454-0864
2
IMPORTANT SAFETY
WARNINGS
WARNING
Failure to follow all of the
Manufacturer’s instructions could
result in hazardous res, explosions,
property damage, or serious
personal injury or even death.
Follow all leak check procedures
carefully prior to operation of griddle,
even if griddle was dealer assembled.
Do not try to light this griddle without
reading the Lighting Instructions
section of this manual.
CAUTION
Read and follow all safety
statements, assembly instructions,
use and care directions before
attempting to assemble and cook.
INSTALLER OR
ASSEMBLER/CONSUMER
This manual should be kept with the
Griddle at all times.
CAUTION
IN DIRECT SUN, AND IN OPERATION,
YOUR GRIDDLE’S STAINLESS
STEEL AND PAINTED STEEL PARTS
CAN BECOME VERY HOT.
DANGER
IF YOU SMELL GAS:
1. Shut o gas to the appliance.
2. Extinguish any open ame.
3. Open lid.
4. If odor continues, keep away
from the appliance and
immediately call your gas
supplier or your re department.
WARNING
1. Do not store or use gasoline or
other ammable liquids or vapors
in the vicinity of this or any other
appliance.
2. An LP cylinder not connected for use
shall not be stored in the vicinity of
this or any other appliance.
CAUTION
Some parts may contain sharp edges, especially as noted in the manual. Wear
protective gloves during assembly and usage of this appliance.
For residential use ONLY. Do not use for commercial cooking.
WARNING
Do not attempt to repair or alter the hose and regulator or valve assembly for any
assumed defect or for any type of retro t or conversion. Any modications to this
assembly will void your warranty and create the risk of a gas leak and re. Use only
authorized replacement parts supplied by the manufacturer, for your model.

1-833-454-0864
3
TABLE OF CONTENTS:
Installation / Additional warnings 4
Gas Hook-Ups and Warnings
LP cylinder requirements 5
LP cylinder removal, transport and storage 6
LP cylinder lling 7
Safety Hose and Regulator
Connecting regulator to LP cylinder 8
Regulator ow limiting device (Propane) 8
Resetting the regulator ow limiting feature 8
Leak Testing 9
Operation - Lighting Instructions 10
Leak Testing - Shut Down Procedure 11
Prevention
Burner Flame Check 12
Flash-Back Fires 12
Troubleshooting
Troubleshooting Chart 14
Seasoning Your Griddle 16
Care and Maintenance
Cleaning Your Griddle 18
Storing Your Griddle 20
Start Grilling
Griddle Cooking Methods 22
Assembly Instructions 25
Warranty and Service 40
CALIFORNIA PROPOSITION 65 WARNING
WARNING: This product can expose you to chemicals including lead and lead compounds,
which are known to the State of California to cause cancer and birth defects or other
reproductive harm. For more information go to www.P65Warnings.ca.gov
WARNING: CONTAINS LEAD. MAY BE HARMFUL IF EATEN OR CHEWED. COMPLIES
WITH FEDERAL STANDARDS. KEEP OUT OF REACH OF CHILDREN.

1-833-454-0864
4
Installation must conform with local codes or, in the absence of local codes, with either the National Fuel Gas
Code, ANSI Z223.1/NFPA 54, Natural Gas and Propane Installation Code, CSA B149.1, or Propane Storage and
Handling for Recreational Vehicles, ANSI A 119.2/NFPA 1192, and CSA Z240 RV Series, Recreational Vehicle
Code, as applicable.
INSTALLATION
SETTING UP YOUR GRIDDLE
• For Outdoor use only, in a well-ventilated area.
• Minimum clearance to adjacent combustible
materials.
• MUST have a clearance of 36˝ (91.44 cm) on all sides,
from a dwelling, walls, aluminum siding, windows, fencing
and any other combustible material.
• MUST NOT be under any overhang, siding, or other
combustible material.
• NOT FOR use on any boat or recreational vehicle.
• DO NOT use in enclosed spaces such as carport, garage,
porch or covered patio.
• DO NOT block ventilation holes in the sides or back of
griddle.
• AVOID set-up in windy locations.
Leveling your griddle will ensure proper flow of grease on the griddle top, into the grease catch.
a. Choose the griddle location.
b. Use a level to determine if any adjustments are required.
Where to Setup Your Griddle
Leveling Your Griddle

1-833-454-0864
5
c. Adjust the griddle top height by turning the leveling nut on the griddle feet, to ensure positive flow of grease to the
grease catch.
GAS HOOK-UP’S AND WARNINGS
(LP) Liquid Petroleum Gas
•LP gas is non-toxic, odorless and colorless when produced. for your safety, LP gas has been given an odor (similar
to rotten cabbage) so that it can be smelled.
•LP gas is highly flammable and may ignite unexpectedly when mixed with air.
LP Cylinder Requirements:
•Use LP cylinder only with these required measurements:
12”(30.5cm) (diameter) x 18” (45.7 cm) (tall) with 20 lb. (9 kg) capacity maximum.
•LP cylinders must be constructed and marked in accordance with specifications for LP cylinders of the U.S.
Department of Transportation (DOT) or the National Standard of Canada, CAN /CSA-B339, Cylinders spheres and
tubes for transportation of dangerous goods. See LP cylinder collar for marking.
LP Cylinder Valve Must Have:
•Shut-off valve with a correct cylinder valve output as specified in current
standards. ANS Z21.58-2018 / CSA 1.6-2018 Outdoor Cooking Gas
Appliances.
•Type 1 outlet compatible with regulator or grill. The type 1 valve is easily
recognized by the large external thread on the outside of the valve.
•Safety relief valve with direct connection to the vapor space of the cylinder.
•UL listed Overfill Protection Device (OPD). This OPD safety feature is
identified by a unique triangular hand wheel.
Use only LP cylinders equipped with this type of valve.
•A device for vapor withdrawal.
•A collar to protect the LP tank shut off valve.
•A ring on the bottom of the LP tank to secure it to the support assembly.
•Place dust cap on cylinder valve outlet whenever the cylinder is not in use. Only install the type of dust cap on the
cylinder valve outlet that is provided with the cylinder valve. Other types of caps or plugs may result in leakage of
propane.
Safety Relief Valve
Strap and Cap
Type 1 outlet with
thread on outside
OPD Hand Wheel
Leveling Your Griddle

1-833-454-0864
6
WARNING
Any attempt to connect a regulator to any connectors other than the mating TYPE -1 connector could result in res,
explosions, injuries, or property damage. Use only LP cylinders equipped with this type of valve.
DO NOT connect to a propane cylinder exceeding 9.1 kg capacity or use a cylinder with any other type of cylinder
valve connection device.
Before opening LP cylinder valve, check the coupling nut for tightness.
DANGER
•NEVER store a spare LP cylinder, empty or full, under or
near the appliance.
•Do not store objects or materials inside the griddle cart.
•If you see, smell or hear gas escaping, immediately get
away from the LP cylinder/appliance and call your re
department.
•Always turn cylinder valve o when the griddle is not in
use.
•Always handle the tank valve with the utmost care.
•Always keep the cylinder, in use, securely fastened in an
upright position.
•Never expose the cylinder to direct sunlight or excessive
heat.
•Never insert any kind of object into the valve outlet as this may cause damage to the Backcheck. A damaged
Backcheck can leak resulting in res, explosions, property damage, severe injuries or death.
•Do not store an LP cylinder in enclosed spaces such as a carport, garage, porch, covered patio or other
building. Make sure the storage area has a lot of ventilation.
•Do not store an LP cylinder in an area where children play.
LP CYLINDER REMOVAL, TRANSPORT AND STORAGE
Before Disconnecting the LP Cylinder:
1. Turn “OFF” all control knobs and close the LP cylinder valve.
2. Turn coupling nut counter clockwise by hand only - do not use tools to disconnect. Remove LP Cylinder.
3. Install safety cap onto LP cylinder valve. Always use cap supplied with tank valve.
WARNING
FAILURE TO USE SAFETY CAP AS DIRECTED, MAY RESULT IN SERIOUS PERSONAL INJURY AND/
OR PROPERTY DAMAGE.
WARNING
If storing the griddle indoors, leave the gas cylinder outdoors.
WARNING
When transporting and storing the cylinder, make sure it is in an upright position and not on its side. Do not smoke
around cylinder, especially when transporting in a vehicle.

1-833-454-0864
7
CAUTION
It is important to inspect the cylinder connection device. Check the propane tank valve rubber seal for cracks,
wear or deterioration prior to use. A damaged rubber seal can cause a gas leak, possibly resulting in an explosion,
re, or severe bodily harm. Do not use a propane tank with a damaged rubber seal.
DANGER
•NEVER store a spare LP cylinder under or near the appliance, or in an enclosed area.
•DO NOT store an LP tank in an area where children play.
•LP cylinder should only be stored outside and in a cool dry place.
•NEVER expose the cylinder to direct sunlight or excessive heat.
•If you see, smell or hear gas escaping, immediately get away from the LP cylinder/appliance and call your re
department.
WARNING
If the information above is not completely adhered to, a re/explosion causing death or serious injury may occur.
Any attempt to connect a regulator to any connections other than the included connector could result in res,
explosions, injuries, or property damage. Use only LP cylinders equipped with this type of valve.
LP CYLINDER FILLING
SAFETY HOSE AND REGULATOR
•Use only licensed and experienced dealers.
•Ensure that the dealer checks and tests the tank for leaks after filling.
•LP dealer must purge new cylinder before filling.
•Dealer should NEVER fill LP cylinder more than 80% of LP cylinder volume. Volume of propane in cylinder will
vary by temperature.
•Do not release liquid propane (LP) gas into the atmosphere. This is a hazardous practice.
•To remove gas from LP cylinder, contact an LP dealer or call a local fire department
for assistance.
Your griddle is designed to operate on LP gas at a pressure of 2.74Kpa (11” water column). A regulator pre-set to this
pressure is supplied with your Griddle.
SAFETY FEATURES of QCC-1 Quick Closing Coupling.
All models are designed to be used with an LP gas cylinder equipped with the
new QCC-1 Quick Closing Coupling system.
The QCC-1 System Incorporates SAFETY FEATURES required by the
Canadian Standards Steering Committee.
1. Gas will not flow until a positive connection has been made.
2. A thermal element will shut off the flow of gas between 240 degrees F and
300 degrees F. This may result in a melted regulator hose.
3. When activated, a Flow Limiting Device will limit the flow of gas to 10 cubic
feet per hour.
Nipple has to be centered
into the LP cylinder valve.
Regulator
Heat sensitive hand wheel
Nipple with flow limiting device

1-833-454-0864
8
SAFETY HOSE AND REGULATOR
DANGER
Do not insert any tool or foreign object into the valve outlet or safety relief valve. You may damage the valve and
cause a leak. Leaking propane may result in explosion, re, severe personal injury, or death.
Connecting Regulator to the LP Cylinder
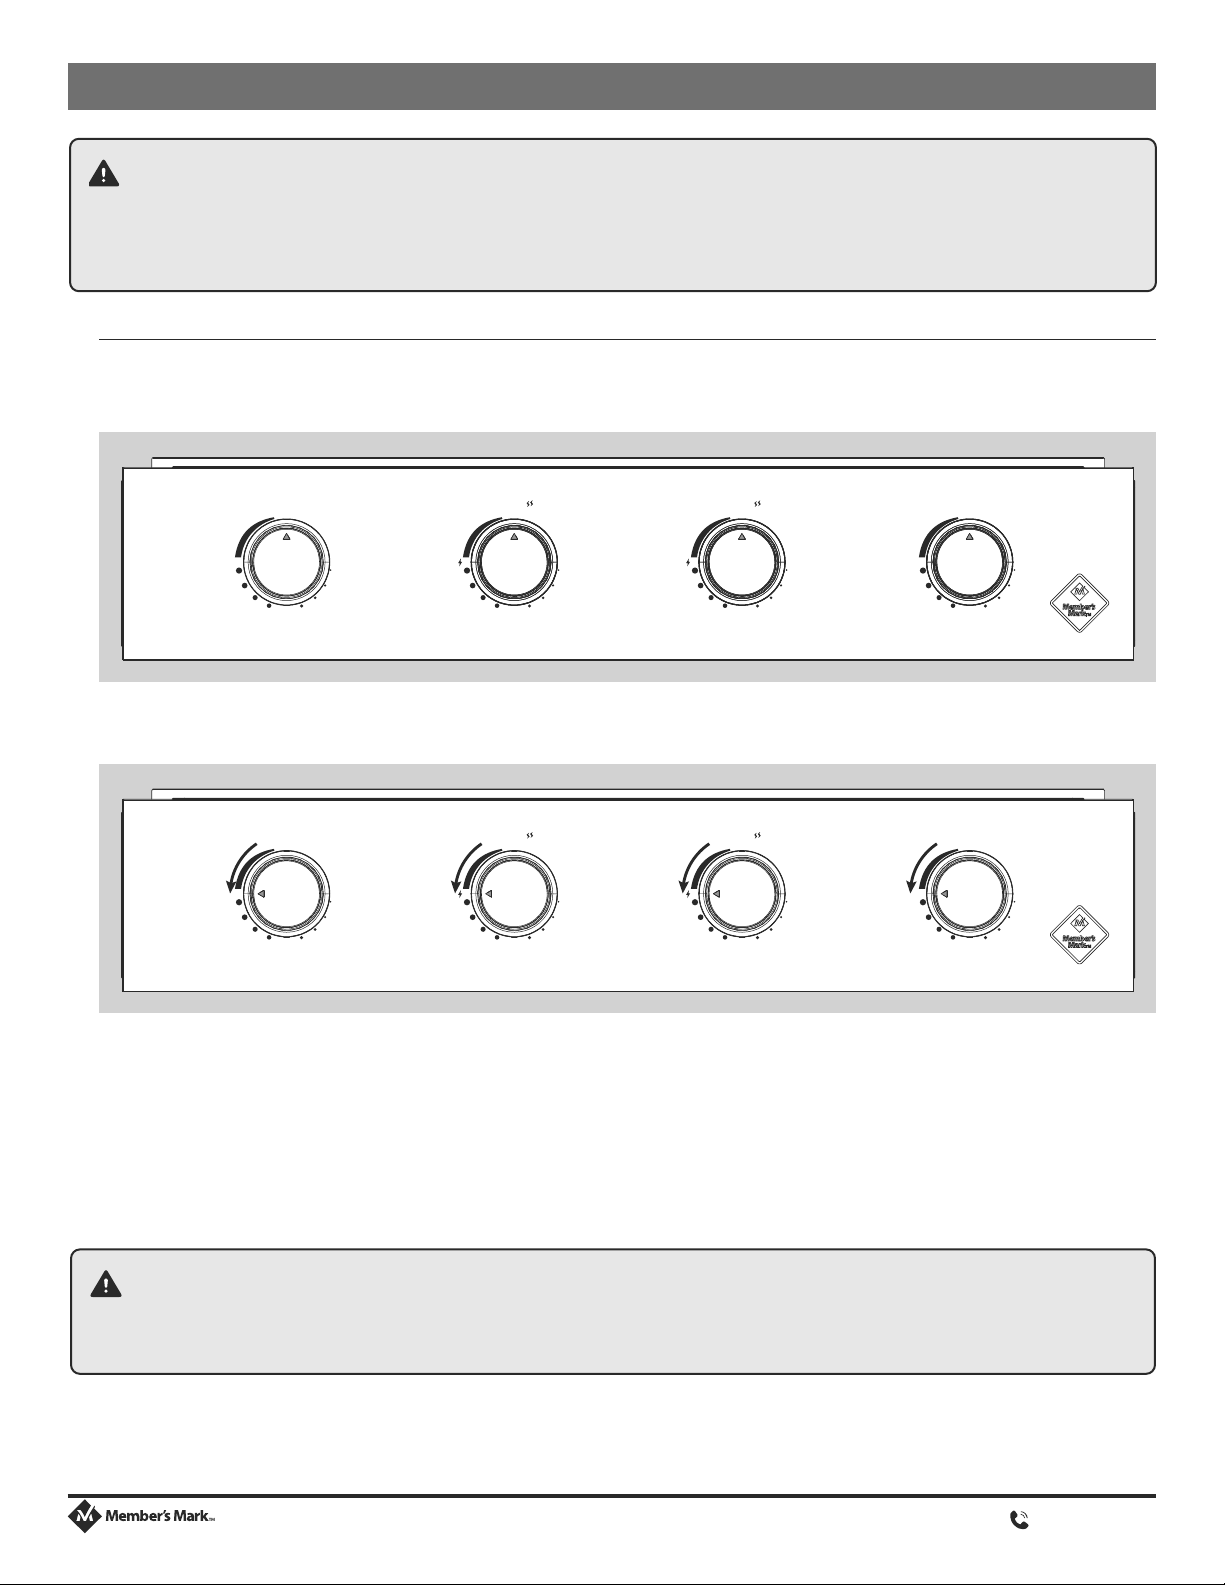
1. Turn all control knobs to the “OFF” position.
2. Turn LP cylinder “OFF” by turning hand-wheel clockwise to a full stop.
3. Remove the protective cap from LP cylinder valve. Always use cap and strap
supplied with valve.
4. Hold regulator and insert nipple into LP cylinder valve. Hand tighten the
coupling nut. Hold the regulator in a straight line with LP cylinder valve so as
not to cross-thread the connection.
5. Turn the coupling nut clockwise and tighten to a full stop. The regulator will
seal on the back-check feature in the LP cylinder valve, resulting in some
resistance.
NOTE: If you cannot complete the connection, disconnect regulator and repeat
steps 4 and 5. If you are still unable to complete the connection, DO NOT USE THIS REGULATOR!
Regulator Flow Limiting Device
If you are experiencing any of the following performance issues, you may have activated the flow limiting feature in your
regulator:
•Burners not getting hot enough
•Low or incomplete burner flames
•Low gas pressure
•Difficulty lighting all burners or burners not staying lit
Resetting the Regulator Flow Limiting feature
1. With all control knobs and the gas source in the “OFF” position.
2. Disconnect the regulator from the LP cylinder.
3. Turn all control knobs to the “HI” position, and let stand for 1-3 minutes, allowing all excess gas in the gas manifold
to dissipate.
4. Turn all control knobs to the “OFF” position.
5. Reconnect the hose and regulator to the LP cylinder - Do not cross thread the connection. Hand-tighten only.
6. Check all hose connections to ensure that a positive seal has been made.
7. Slowly open the LP cylinder shut-off valve.
NOTE: If the LP cylinder is opened too quickly, the flow limiting device in the regulator will activate, limiting the flow of
gas from the LP cylinder.
8. Wait approximately 5 seconds for the hose and regulator pressure to stabilize (to prevent the flow limiting device
eature from being re-activated).
9. Start with the middle two control knobs. Push in control knob to start gas flowing, then turn the control knob
counter-clockwise to activate starter.
10. Repeat step 9 for all remaining burners.
NOTE: Avoid activating the flow limiting feature by following the proper start up and shut down procedures and
performing a complete leak test and safety check to ensure that there are no leaks in the system, and that a positive
connection has been made between the gas source and manifold assembly.
Hold coupling nut
and regulator as
shown for proper
connection to
LP cylinder valve.
Shut off valve
Check
valve

1-833-454-0864
9
LEAK TESTING
A leak test is used to determine the integrity of a seal. Before using your gas griddle, perform a leak test on the
connection between the grill manifold, regulator and the gas cylinder to reduce the risk of serious bodily harm or death
from fire or explosion.
When to perform a leak test:
•After assembling your griddle and before lighting for the first time, even if
purchased fully assembled.
•Every time LP gas cylinder is refilled, exchanged or if any of the gas components
are disconnected or replaced.
•At least once per year or if your griddle has not been used for more than 60 days.
Although the gas connections on the griddle are leak tested prior to shipment,
a complete leak test must be performed at the installation site. Before each use,
check all gas connections for leaks using the procedures listed below:
1. Create a mixture of 50% water and 50% liquid dishwashing soap.
2. Turn all control knobs to “OFF”.
3. Ensure that the regulator is securely connected to LP cylinder.
4. Spray a water/soap solution on all connections.
5. Open LP cylinder valve by turning hand wheel counter-clockwise.
•If you hear a rushing sound, turn gas off immediately. There is a leak at the connection. CORRECT BEFORE
PROCEEDING.
•If “growing” bubbles appear, there is a leak. Close LP cylinder valve immediately and re-tighten connections.
If leaks cannot be stopped do not try to repair. Call for replacement parts. Order new parts by providing the
serial number, model number, name and part number of items required (see parts list) to a MEMBER’S MARK
BARBECUE CUSTOMER CARE AGENT 1-833-454-0864.
6. Always close LP cylinder valve after performing leak test by turning hand wheel clockwise.
• Do not smoke during leak test.
• Do not use an open flame to check for gas leaks.
• The Griddle must be leak tested outdoors in a well ventilated area, away from ignition sources such as gas fired
electrical appliances.
ATTENTION
Leak Test must be repeated each time the LP cylinder is exchanged or relled.
ATTENTION
If there is excessive abrasion or wear, or the hose is cut, the hose and regulator must be replaced. Prior to operation.
WARNING
This Member’s Mark Griddle is sold propane ready, and is not convertible to natural gas. Any attempt to convert this
griddle to natural gas will void the manufacturers warranty.

1-833-454-0864
10
Lighting Burners
1. Turn all burner control knobs “OFF”. (Push in and turn the knobs clockwise to confirm “OFF” position.)
2. Open LP tank SLOWLY. Turn counter clockwise to open. Wait 5 seconds for pressure to stabilize.
3. Push-in control knob to start gas flowing, then turn control knob counter-clockwise to “HI” position to activate
starter.
4. Check that the burner is lit. Repeat STEP 3 if necessary.
5. Repeat step 3 for all remaining control knobs
6. Check that all burners are lit.
If the burners fail to light properly within 3-5 seconds, turn the burner control knob “OFF”. Also turn off the LP cylinder
valve. Wait five minutes before attempting to light the burner again. This will allow time for released gas to dissipate.
LIGHTING INSTRUCTIONS
WARNING
Never stand with your head directly over the griddle when preparing to light the main burners, to prevent possible
bodily injury.
WARNING
Before you light this griddle, turn all control knobs to the “OFF” position and close the LP Cyclinder.
Failure to follow proper lighting sequence will activate the regulators “FLOW LIMITING DEVICE” feature,
and require a reset (See page 8).
OFF
HI LOW
OFF
HI LOW
OFF
HI LOW
OFF
HI LOW
Lighting Instructions
1. Read instructions before lighting.
2. Make sure all control knobs are in the "OFF" position.
3. Turn ON gas valve from LP tank.
4. The IGNITION BURNERS are the middle two control knobs.
Light them first. Press and turn them slowly to "HI".
5. If ignition does NOT occur in 5 seconds, turn the
burner controls off, wait 5 minutes, and repeat
the lighting procecure.
6. Once the IGNITION BURNERS are lit, you
may light other burners.
Just press and turn the control knob to "HI".
7. To turn burners off, turn the control knobs
clockwise until they lock in the "OFF"
position.
IGNITION
BURNER
IGNITION
BURNER
OFF
HI LOW
OFF
HI LOW
OFF
HI LOW
OFF
HI LOW

1-833-454-0864
11
OFF
HI LOW
OFF
HI LOW
OFF
HI LOW
OFF
HI LOW
Lighting Instructions
1. Read instructions before lighting.
2. Make sure all control knobs are in the "OFF" position.
3. Turn ON gas valve from LP tank.
4. The IGNITION BURNERS are the middle two control knobs.
Light them first. Press and turn them slowly to "HI".
5. If ignition does NOT occur in 5 seconds, turn the
burner controls off, wait 5 minutes, and repeat
the lighting procecure.
6. Once the IGNITION BURNERS are lit, you
may light other burners.
Just press and turn the control knob to "HI".
7. To turn burners off, turn the control knobs
clockwise until they lock in the "OFF"
position.
IGNITION
BURNER
IGNITION
BURNER
Match-Lighting — Burners
Repeat STEPS 1-2 “Lighting Burners” above.
3. To match light: push in and turn the far right control knob
counter clockwise to the “MAX” position.
4. Immediately strike a match or use a butane lighter, and
position through the lighting hole on the right side of the
firebox. Check to ensure that the burner is lit.
5. Repeat step 3 and 4 to light the remaining.
Shut Down Procedure
1. Push in and turn each control knob CLOCKWISE to the “OFF” position ( See image A ).
2. Turn LP Cylinder shut-off valve clockwise to close ( See image B ).
LIGHTING INSTRUCTIONS
B
CAUTION
If the ignition does NOT occur in 5 seconds, turn the control knobs “OFF”, wait 5 minutes and repeat the lighting
procedure. If the burner does not ignite with the controls on, gas will continue to ow out of the burner and could
accidentally ignite with risk of injury. Turn control knobs and gas source “OFF” before attempting to re-light.
ATTENTION
Always preheat griddle before starting to cook. Light all burners and adjust them to the “MAX” position for 10
minutes. Following preheat; adjust the controls to appropriate setting.
A

1-833-454-0864
12
PREVENTION
ATTENTION
Once lit, conrm that the burner is properly lit and that the ame pattern is as desired. If the ame pattern is other
than normal, consult the troubleshooting guide for corrective action.
Burner Flame Check
The burner flame pattern is the key indicator of proper or improper
function within the firebox. When the burners are performing correctly,
you will see a specific flame pattern. All burner ports should be
2.5cm/1” flame on “MAX” with orange tips, light blue center, with dark
blue flame at the base of the burner port (See image C). Refer to the
troubleshooting steps.
Light the burners and rotate the knobs from “MAX” to “MIN”. You
should see a smaller flame in low position than seen on high. Perform
burner flame check by looking below the griddle top on the side of the
unit to view the burners below. Always check the flame before each
use. If there is a sudden drop or low flame issue, please refer to the
troubleshooting section.
Flash-Back Fires
A flash-back fire occurs when a blockage in the venturi tubes caused by spiders, insects, and nests block the flow of
gas, forcing it back towards the control panel and control knob. The ignited gas, if not detected, can cause a fire to
burn in this area. If you experience any of the characteristics of a flash-back fire, close the LP cylinder shut-off
immediately. Follow the burner cleaning procedure outlined in the maintenance section of this manual.
MAX
MIN
C

1-833-454-0864
13
PREVENTION
WARNING
At rst sight of yellow, unruly ames, or poorly lit burners, shut down your griddle and remove and clear
obstructions, like insect webs, from your burners and valve gas jet.
Characteristics of A Flash-Back Fire
• A fire burning between the firebox and control panel, usually accompanied by HOT OR MELTING CONTROL
KNOBS.
• Burners may burn with LARGE YELLOW FLAMES.
• Burners may not light.
Prevent Flash-Back Fire
1. After lighting, check for normal burner flames.
2. If irregular flames are found, shut down immediately, and perform maintenance on burners,
to remove blockages.
3. If knobs appear hot, shut down immediately, and perform maintenance on burners,
to remove blockages.
4. Clean tip of valve gas jet to remove any build-up or blockages.
For Your Safety
• DO NOT throw water on a fire.
• DO keep baking soda handy to extinguish a fire.
• DO follow all warnings and safety checks outlined in this MANUAL.
• DO protect your family and home by performing the cleaning and maintenance steps outlined in this
manual.

1-833-454-0864
14
TROUBLESHOOTING
PROBLEM POSSIBLE CAUSES SOLUTION
Burner will not light
(can ignite with a
match)
Electrode misaligned Electrode should be positioned 1/8" to 1/4"
away from the burner tube.
Electrode ceramic piece is damaged Replace electrode.
Faulty Ignition Contact Customer Support 1-833-454-0864
Burner will not light
(cannot ignite with a
match)
Burners are not properly seated over valve
orices. Gas not safely entering burner tube.
Check burners to ensure that they are seated
on the valves correctly.
Positive connection not made between
Regulator and Propane tank
Check all connections between the regulator
and propane tank. Ensure a proper seal
before retrying.
Low or out of propane Change propane tank and try again.
Burner ames are
yellow or irregular
Blockage in the burner venturi, disrupting the air/
gas mixture in the burner.
Clean the burner to remove any obstructions,
including but not limited to spider webs. If
your burners have bug shields, clean any
spider webs, soot, or debris o the bug shield.
Fire behind control
panel- Hot or melting
control knobs
Blockage in the Burner venturi, not allowing
propane to ow through the burner, forcing
ame back towards the control panel. (Flash-
back Fire)
Clean the burner to remove any obstructions
including spider webs.
Burner is improperly seated on gas valve. Check burners to ensure that they are seated
on the valves correctly.
Low heat, Low
flame or incomplete
flame and difficulty
lighting both burners
(assuming burners
and venturi tubes
are free and clear of
blockages)
All griddle regulators contain a flow limiting
device for consumer safety. This device
measures the amount of propane going through
the regulator to ensure the levels are safe. If
the flow rate through the regulator is too high (a
symptom of a large leak), the flow limiting device
will be triggered, restricting the flow of propane
to reduce the chance of a dangerous fire. This
safety system can accidentally be tripped by
opening a control knob too quickly or connecting
the propane tank when a burner control knob
has been left open.
This safety system can be reset by moving
the burner knobs to the off position and
disconnecting the propane cylinder from the
regulator. Wait five minutes to allow the gas
to dissipate. Ensure control knobs are OFF
before reconnecting the propane cylinder
to the regulator. Follow proper lighting
procedure.
LP gas cylinder is empty or low Refill or replace the propane tank.
Regulator stuck in safety position. Reset the safety by closing both control
knobs, removing the propane cylinder and
pressure regulator. Check connections for
damages, before reconnecting the pressure
regulator and propane cylinder. Follow proper
lighting procedure.
Flame blows out on
“LOW”
Flow limiting device in regulator has been
activated either due to a leak or improper
lighting.
Perform a leak test before resetting the
pressure regulator.
Low or out of propane. Replace propane cylinder.
High wind condition Adjust griddle to shield from wind.
Burner is improperly seated on gas jet. Ensure burners are correctly assembled and
seated on the gas valves.

1-833-454-0864
15
TROUBLESHOOTING
CAUTION
Always allow sucient time for the griddle to cool before handling or cleaning any of its parts.
WARNING:
Heed the warnings in this manual. Always perform a leak test, every time you rell or change your gas tank.
Never leave your propane tank open while not in use. Never leave the control knobs on while not in use.
PROBLEM POSSIBLE CAUSES SOLUTION
Decreasing heat,
“popping sound”
Out of propane. Refill or replace the propane tank.
Burner and/or burner tubes are blocked. Clean burners.
Regulator flow limiting device activated either
by improper lighting, opening control knobs
too quickly, or a poor connection between the
griddle and tank.
Reset the pressure regulator.
Humming noise
coming from
regulator
Cylinder valve opened too quickly. N/A
This is not a defect. It is caused by internal
vibrations in the regulator and does not affect
performance or safety of the gas grill.

1-833-454-0864
16
Lighting Instructions
1. Read instructions before lighting.
2. Make sure all control knobs are in the "OFF" position.
3. Turn ON gas valve from LP tank.
4. The IGNITION BURNERS are the middle two control knobs.
Light them first. Press and turn them slowly to "HI".
5. If ignition does NOT occur in 5 seconds, turn the
burner controls off, wait 5 minutes, and repeat
the lighting procecure.
6. Once the IGNITION BURNERS are lit, you
may light other burners.
Just press and turn the control knob to "HI".
7. To turn burners off, turn the control knobs
clockwise until they lock in the "OFF"
position.
IGNITION
BURNER
IGNITION
BURNER
OFF
HI LOW
OFF
HI LOW
OFF
HI LOW
OFF
HI LOW
SEASONING AND GRIDDLE CARE
Seasoning Your Griddle
Seasoning your griddle top improves the cooking performance, creates a non-stick surface for cooking, prevents
damage and deterioration due to moisture and humidity, and extends the life of your griddle.
First Use Process
GRIDDLE COOKING SURFACE: Member’s Mark Griddles are pre-treated with cooking oil to prevent rust and damage
during shipping. For first time use, wash griddle with hot, soapy water.
THIS IS THE ONLY TIME YOU SHOULD USE SOAP ON THE GRIDDLE COOKING SURFACE. Rinse and dry
completely. Proceed with seasoning instructions.
How to Season
1. Clean the griddle top with a damp cloth to remove any dust/dirt.
2. Apply oil to the griddle top, sides and corners. Use a paper towel to coat surface thoroughly.
3. Light the griddle and set control knobs to the “HI” setting.
4. Heat the oil to its smoke point. You will notice the griddle top changing color.
5. When the oil stops smoking, repeat steps 2 to 4, about 5 times, until the griddle surface becomes dark.
What is seasoning?
Seasoning is the process of applying multiple coatings of oil to the griddle surface, heating to a high
temperature, to bake the oil into the griddle top, creating a slick, non-stick surface, that is blackened and
protected from rust and oxidization.
20 ~ 25 MIN

1-833-454-0864
17
SEASONING AND GRIDDLE CARE
Oil’s For Seasoning
a. Vegetable oil
b. Vegetable shortening
c. Canola oil
d. Flax oil
e. Olive oil - Not ideal. Burns off at lower temperatures than the other options above.
DO NOT USE SOAP on the griddle surface, this will destroy the seasoning.
NOTE
With continued use of your griddle, the seasoning bond will get better and better. Applying a coating of oil at the
start and nish of each cook, will help to maintain seasoning. Never use soap to clean the griddle, this will destroy
the seasoning. Never pour cold water on the surface, as this can cause the griddle top surface to warp.

1-833-454-0864
18
CARE AND MAINTENANCE
Griddle Cleaning Tools
You will need:
Cleaning Your Griddle
At the end of every cook, and before storing your griddle, you should scrape off any remaining debris left over from
cooking, before re-seasoning with a coat of oil. For hard to remove grease, you can use a small amount of water and
your scraper.
Once the griddle top is reasonably clean, scraped and dry, apply a thin coat of oil to maintain the seasoning bond and
prevent rust.
Griddle Surface Rust
The appearance of rust spots on the griddle top, is an indication that the protective seasoning has worn off and must be
repeated.
Begin by dampening the surface with water. With protective gloves and steel wool or a grill stone, scrub the areas of
concern until the rust has been lifted from the surface. Rinse the surface thoroughly. Be careful not to overflow the
grease catch. Wipe the griddle surface with a cloth to dry and remove any debris, before re-seasoning 3-5X.
For seasoning steps, follow the Seasoning and Griddle Care instructions. (Page 16.)
Grease Catch
Remove and clean the grease catch AFTER EVERY USE to
prevent possible spillage, grease fires and hot grease splatters.
When the griddle top and grease catch have FULLY COOLED,
remove the grease catch and dump the contents into a disposable
container, and then into the trash. Alternatively, you can place the
disposable container into the fridge for the oil to solidify, before
throwing into the trash.
• PROTECTIVE GLOVES
• CLOTH/ PAPER TOWELS
• STEEL WOOL/ GRILL STONE
• SCRAPER
• LONG HANDLE TONGS
• WATER BOTTLE
• OIL BOTTLE

1-833-454-0864
19
Burners & Firebox Maintenance
Although your griddle’s firebox is fully protected from grease and other build-up that can accumulate during cooking,
regular checks of the burners and electrodes are still required to ensure proper performance, safety and a longevity of
your parts.
Burners
Once a season the griddle top should be removed to perform a maintenance and safety check on the burners.
1. Remove griddle top. Place on flat surface, right side up.
2. Remove hitch pins/screws to free the burners. Use WD40 and
a screwdriver/pliers to make this removal easier.
3. Remove burners
4. Use a flexible venturi brush to clean the interior of the burners.
Ensure you enter the burner far enough to remove any spider
webs and nests that may be present.
5. Use a wire oo paper clip to clean any blocked burner port
holes. Do not use anything that can damage or enlarge port
holes.
6. Brush away any rust or corrosion from the burners surface, and wipe clean with a damp cloth. Dry the burners.
7. Re-install the burners. Ensure that the burners are properly seated on the valve gas jet before assembling
hardware.
CARE AND MAINTENANCE
NOTE
Before reinstalling burners, use a cotton swab to clean the valve gas jet.

1-833-454-0864
20
CAUTION
Only cover the griddle top when unit has fully cooled.
CARE AND MAINTENANCE
Cleaning Exterior Parts
Routine cleaning of exterior surfaces is necessary to remove contaminants, rust and avoid permanent damage.
• DO remove dirt and contamination immediately to avoid permanent damage to stainless-steel and painted
surfaces.
• DO wipe down all surfaces frequently with a basic vinegar and water solution, or basic warm water and detergent.
• DO RINSE OFF all cleaners, with clean warm water, and dry completely with a soft or microfiber cloth.
• DO NOT use any chloride-containing detergents, abrasive cleaners, bleach or other chemical cleaners as they may
permanently damage painted surfaces.
Storing Your Griddle
• If possible, always store in a cool, dry location.
• If storing with the LP cylinder, store outdoors in a well-ventilated area.
• If storing for long periods of time, make sure that the griddle top is fully seasoned and protected.
• Always cover your Griddle with the included all-weather grill cover, to protect from all elements.
This manual suits for next models
1
Table of contents
Other Members Mark Griddle manuals
Popular Griddle manuals by other brands

Blue Seal
Blue Seal Evolution EP514 Service manual

Saturn
Saturn ESG-24 owner's manual

Black Stone
Black Stone 1833 owner's manual

Blue Seal
Blue Seal Evolution G55T Installation and operation manual

Dash
Dash DMG8100 instruction manual

Lang
Lang CLGPB-48A-E Installation, operation, maintenance, & troubleshooting