MEMBERS PARK M3207ALP User manual

Manual#P80109005L -Date:2007/05/08
NaturalGas(NG)Grill
ModelM3207ANG
OPERATOR'SMANUAL
LiquidPropane Gas(LPG)
Grill
ModelM3207ALP
WARNING
! !
Failuretocomplywiththeseinstructionscould
resultinafireorexplosion thatcouldcause
seriousbodilyinjury,deathorproperty
damage.
Beforeusing thisgrillread all instructions
and performall gasleak-check procedureseven
ifthe productwaspre-assembled bythe retailer
ormanufacturer.
Useyourgrillatleast3feetaway from
anywall orsurface. Useyourgrill atleast
3feetaway fromcombustibleobjectsthatcan
melt orcatchfire(suchasvinylorwood siding,
fencesand overhangs)orsourcesofignition
including pilotlightson waterheaters and
liveelectricalappliances.
THISGAS APPLIANCEISDESIGNEDFOR
OUTDOORUSEONLY.
Combustionbyproductsproducedwhenusingthis
productcontainchemicalsknowntothe Stateof
Californiatocausecancer,birthdefects,orother
reproductiveharm.
Thisproductcontainschemicalsknownto
theStateofCalifornia tocausecancer,birth
defects,orotherreproductiveharm.
Ÿ
Ÿ
Ÿ
Ÿ
Ÿ
Ÿ
Ÿ
NOTETOASSEMBLER/INSTALLER:
Leavethismanualwiththeconsumer.
NOTETOCONSUMER:
Keepthismanualforfuturereference.
RECORDYOURSERIAL# __________________
(seesilverCSAlabelonmainbodyofgrill)
IMPORTANT:
Ÿ
Grill Information Center:
Call usfirst ifyou haveanyproblemwith
thisproduct. Wecan helpyou withques-
tionsabout assemblyand operation orif
therearedamagedormissingpartswhen
youunpackthisunitfromtheshippingbox.
Pleasecall beforereturning tothe store.
1-800-770-9769
8am-4:30pmCST,MondaythroughFriday
Ÿ

WARNING
! !
DonotstorespareLPcylinder
within10feet(3m)ofthisappliance.
Donotstoreoruse gasolineor
otherflammableliquidsand
vaporswithin25 feet(8m)ofthis
appliance.
Whencookingwithoil/grease,do
notallowtheoil/grease toget
hotter350°F(177°C)
Donotleaveoil/grease unattended.
3.
1.
2.
4.
WARNING
! !
LPGgrillmodelsmustbeusedwithLiquid
PropaneGasand the regulatorassembly
supplied.NaturalGasmodelsmustbe used
withNaturalGasonly.Anyattempttoconvert
thegrill fromone fueltype toanotheris
extremelyhazardousand will voidthe
warranty.
Neveruseyourgasgrillinagarage,porch,shed,
breezewayoranyotherenclosedarea.
Never obstructtheflow ofventilation airaround
yourgasgrill housing.
Never disconnectthe gasregulatororanygas
fitting whileyourgrill islit.Alitgrill can ignite
leaking gasand causeafireorexplosion which
couldresultin propertydamage,personalinjury
ordeath.
Keep gasregulatorhoseawayfromhotgrill
surfacesand dripping grease.Avoidunnecessary
twisting ofhose.Visuallyinspecthoseprior
toeachuseforcuts,cracks,excessivewear
orotherdamage.Ifthehoseappears damaged
do notusethe gasgrill.Call:1-800-770-9769
foran authorized replacementhose.
•
•
•
•
•
TheGreaseDrainingTraymustbevisually
inspectedbeforeeachgrilluse.Remove
anygreaseandwashGreaseDraining
Traywithamildsoapandwarmwater
solution. Failuretocomplywiththese
instructionscouldresultinagrease
fireorexplosionthatcouldcause
seriousbodilyinjury,deathorproperty
damage.
WARNING
! !
2
Leakinggas maycause afireor
explosionwhichcouldresultinproperty
damage,personalinjuryordeath.
DANGER
!!
1.
2
3.
4.
Ifyousmell gas:
Shutoff gas totheappliance.
Extinguishanyopenflame.
Openlid.
Ifodorcontinues,keepawayfrom
theappliance andimmediatelycall
yourgas supplieroryourfire
department.
Donotstoreoruse gasolineor
otherflammableliquidsorvaporsin
thevicinityofthisoranyother
appliances.
AnLPcylindernotconnectedfor
use shall notbestoredinthevicin-
ityofthisoranyotherappliance.
1.
2.
WARNING
! !
TableofContents
PrimarySafetyWarnings...........................1-3
Pre-AssemblyInstructions..............................3
PartDiagramsandLists........................4-10
AssemblyInstructions.............................11-16
Use&CareInstructions:
•GasSafetyand LeakTests...........17-20
•Lighting Instructions............................21-22
•Troubleshooting..........................................22
•Rotisserie Instruction...........................23-25
•Cleaning andMaintenance................26-27
•CookingGuide...................................A1-A3
•FrequentlyAsked Questions............A4-A5
WarrantyTerms...........................BackCover
Neveruse charcoalinthisgas grill.
Failuretocomplywiththeseinstructions
couldresultinagreasefireorexplosion
thatcouldcauseseriousbodilyinjury,death
orpropertydamage.
WARNING
! !

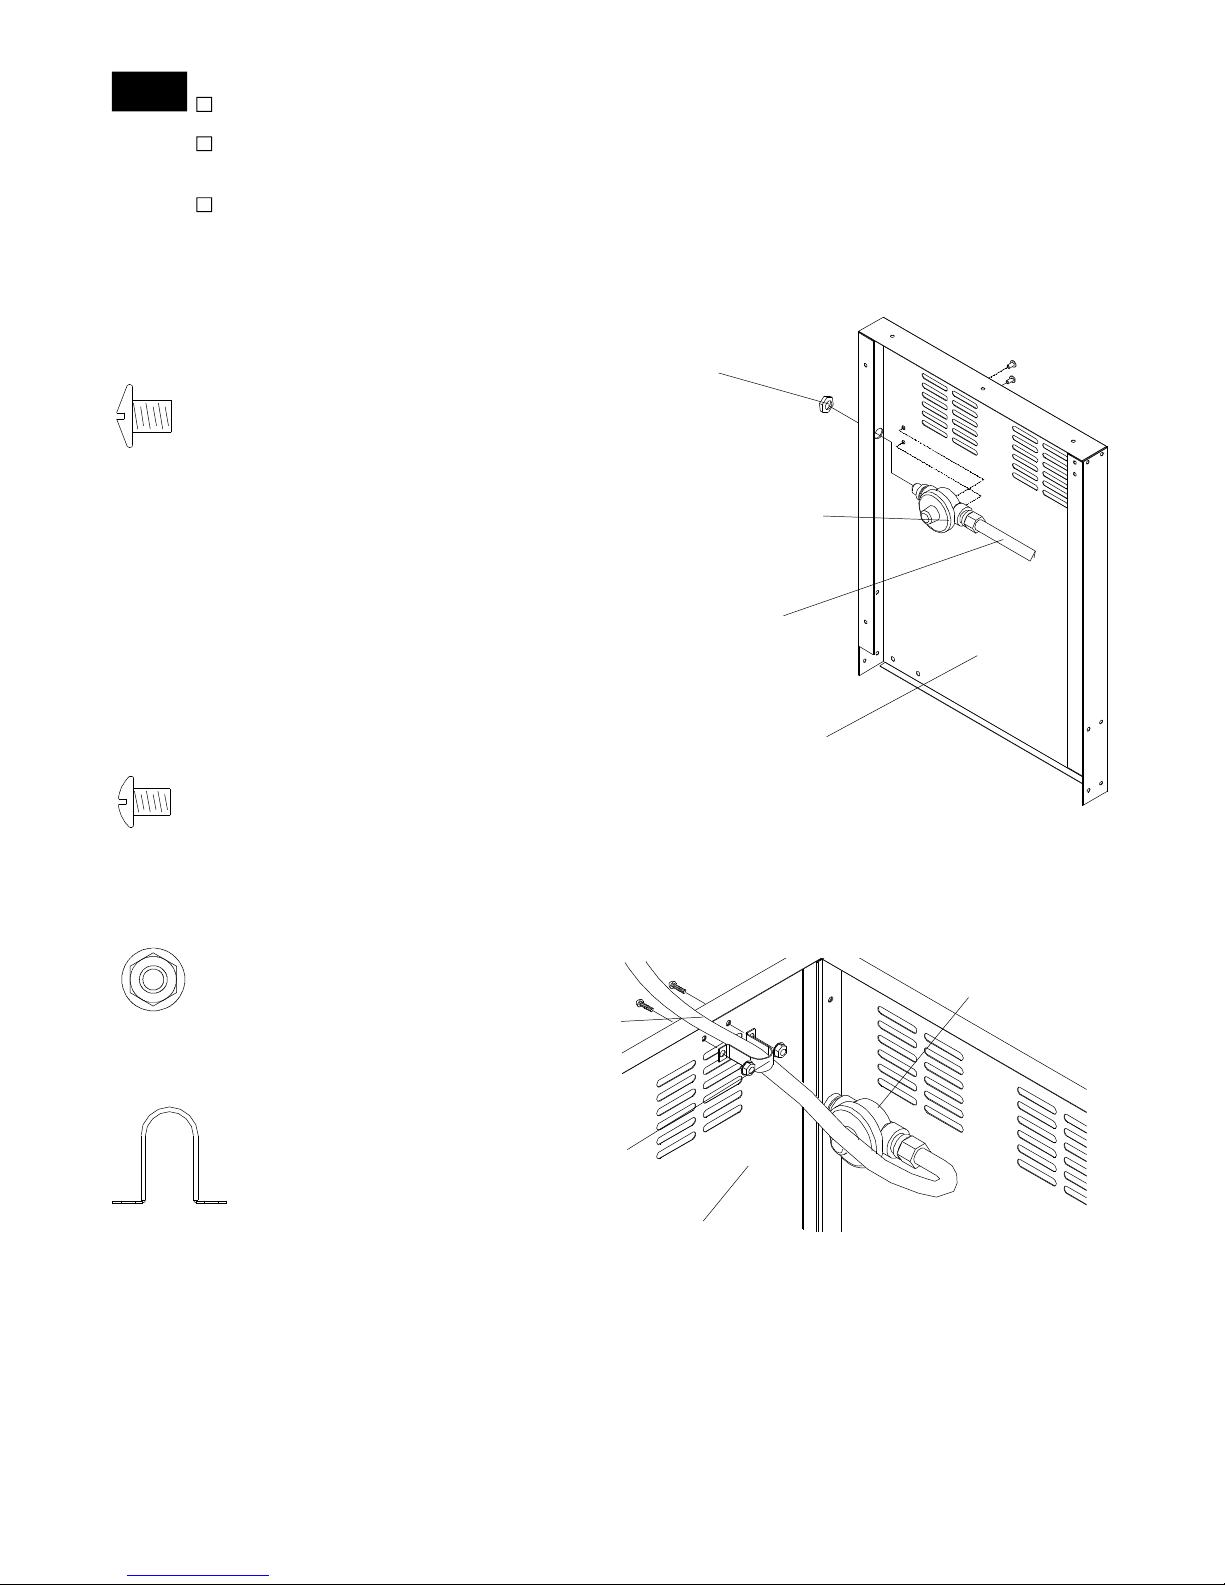
Pre-AssemblyInstructionsForYourSafety
WARNING
! !
Forsafeoperation ensuretheGas ValveAssem-
blyOrificeisinsidetheBurnerTubebeforeusing
yourgrill.See figure.IftheOrificeisnotinside
theBurnerTube,lighting theBurnermaycause
explosion and/orfireresulting inseriousbodily
injuryand/orpropertydamage.
Orifice BurnerTube
GasValveAssembly
ToolsRequiredforAssembly include:
protectiveworkgloves
protectiveeyewear
Whileit ispossibleforone person tounpack thisgas
grill,obtainassistancefromanotherperson when
handling thelargepieces.
UsetheHardwareand Part Diagramstoensureall
itemsareincludedand freeofdamage.
Donotassembleoroperatethegrill ifitappears
damaged.If therearedamaged ormissingparts
whenyou unpack theshipping boxoryou have
questions during the assemblyprocess,callthe:
Toexpeditethe assemblyprocess followthese
generalguidelines:
•
•
GrillInformationCenter1-800-770-9769
8am-4:30pmCST,MondaythroughFriday
•
Grill Installation Codes
Theinstallation mustconformwithlocalcodesor,inthe
absenceoflocalcodes,witheitherthe NationalFuel
Gas Code,ANSIZ223.1/NFPA54,NaturalGas and
Propane Installation Code,CSA B149.1, or Propane
Storage and Handling Code,B149.2.
Spidersand small insectscanspinwebsand
nestinthegrill BurnerTubes during transitand
warehousing which canleadtoagas flow
obstruction resulting inafireinand around the
BurnerTubes.Thistypeof"FLASHBACK FIRE"
cancause seriousgrill damageand createan
unsafeoperating condition fortheuser.
Toreduce thechance ofFLASHBACK
FIREyou mustcleantheBurner Tubes
as followsbefore initialuse.
Alsodo thisatleastonceamonthinsummer
and fall orwheneverspidersareactiveinyour
area,and ifyourgrill has notbeenusedforan
extendedperiod oftime.
WARNING
! !
Failuretocomplywiththeseinstructionscould
resultinafireorexplosionthatcouldcause
seriousbodilyinjury,deathorpropertydamage.
METHOD 1:Bend astiff wireorwirecoat
hangerintoasmall hook as shownand run
thehook through theBurnerTubeand inside
theBurnerseveraltimes toremovedebris.
METHOD 2:Use abottlebrushwithaflexible
handleand run thebrushthrough theBurner
Tubeand insidetheBurnerseveraltimes to
removeanydebris.
METHOD 3:Use anairhose toforceair
through each BurnerTube.Theforcedair
shouldpass debrisorobstructionsthrough
theBurnerand outthePorts.
TOCLEAN BURNERTUBE,INSERTHOOK
HERE
9Burner
Foot
Carefullylift eachBurnerupandaway fromthe
GasValveOrifice.
Removethescrewfromtherearofeach
BurnerusingaPhillipsHeadScrewdriver.
Check andcleanBurner/VenturiTubesforinsects
andinsectnests.Aclogged tube canleadtoafire
beneaththegrill.
Refertothefigurebelowand performoneof
these 3cleaning methods:
1.
2.
3.
4.
PhillipsHeadScrewdriver
3
4
HardwarePack PartsList forModelsM3207ALP&M3207ANG
PART# PARTDESCRIPTION QTYPURPOSEOFPART
P06002016A HardwarePack 1 Foruseinassembly(ForLPGmodelonly)
P06002017A HardwarePack 1 Foruseinassembly(ForNGmodelonly)
S112G03061 PhillipsHeadScrew3/16"x3/8" 4 AttachesCart RearPanelandCart Side Panels
P00201001C DoorHandle 2 AttachestoDoors
4
AttachesCart SpiceBasket toCartBottomShelf
(ForLPGmodelonly)
8AttachesCart SpiceBasketstoCart BottomShelf
(ForNGmodelonly)
S112G03061 PhillipsHeadScrew3/16"x3/8" 2 AttachesUpperDoorSupport Bracket toLeft and
Right Cart Side Panel
S112G04191 PhillipsHeadScrew1/4"x1-3/16" 4 AttachesGrill BowltoCart
S112G04081 PhillipsHeadScrew1/4"x1/2" 8 AttachesSideShelf BracketstoBowlPanels
S112G04081 PhillipsHeadScrew1/4"x1/2" 8
S313G04081 FlangeNut 1/4" 8
S112G03061 PhillipsHeadScrew3/16"x3/8" 4
S313G03061 FlangeNut 3/16" 4
P05536001A HoseHolder 2
S112G03061 PhillipsHeadScrew3/16"x3/8" 2
S313G03061 FlangeNut 3/16" 2
P05536001A HoseHolder 1
S112G03041 PhillipsHeadScrew3/16"x1/4" 2 AttachesNGRegulatorAssemblytoRight Cart
Panel(ForNGmodelonly)
S233G05461 Wing Bolt 5/16"x4-1/2" 1
S303G0504D SpecialNut 5/16" 1
S112G03041 PhillipsHeadScrew3/16"x1/4" 4 AttachesDoorHandlestoDoors
AttachesLeft Side Shelf andSide BurnerFrameto
BowlPanels
AttachesRegulatorAssemblytoCart RearPanel
(ForLPGmodelonly)
S172M04101 Self-TappingScrewM4x10
AlreadyinstalledintheCartBottomShelf
AttachesRegulatorAssemblytoCart RearPanel
(ForNGmodelonly)
SecuresGasTank
PreassembledintheDoorHandle
5
Hardwarealreadyinstalled inthe Cart BottomShelf
HardwarePack forModelsM3207ALP&M3207ANG
PhillipsHeadScrew
3/16"x1/4"
Qty.2(NGmodel)
Part#S112G03041
Self-TappingScrew
M4x10
Qty.4(LPGmodel)
Qty.8(NGmodel)
Part#S172M04101
PhillipsHeadScrew
1/4"x1/2"
Qty.16
Part#S112G04081
FlangeNut3/16"
Qty.4(LPGmodel)
Qty.2(NGmodel)
Part#S313G03061
PhillipsHeadScrew
3/16"x3/8"
Qty.10 (LPGmodel)
Qty.8(NGmodel)
Part#S112G03061
PhillipsHeadScrew
1/4"x1-3/16"
Qty.4
Part#S112G04191
FlangeNut1/4"
Qty.8
Part#S313G04081
HoseHolder
Qty.2(LPGmodel)
Qty.1(NGmodel)
Part#P05536001A
Scale1:2
DoorHandle
Qty.2
Part#P00201001C
*OneBattery/AA includedintheHardwarePack.
Hardwarealreadyinstalled inthe Cart BottomShelf
SpecialNut5/16”
Qty.1
Part. #S303G0504D
Scale1:2
PhillipsHeadScrew
3/16"x1/4"
Qty.4
Part#S112G03041
Wing Bolt5/16"x4-1/2"
Qty.1
Part#S233G05461
Scale1:2
Preassembled inthe DoorHandle
PartsDiagramforModelsM3207ALP&M3207ANGPartsDiagramforModelsM3207ALP&M3207ANG
11
13
5
8
3
9
10
12
6
4
1
14
7
2
26
18
47
71
78
81
73
77
72
82
83 88
79
84 80
31
39
19
63
58
61
65
35
36
38
37
40
34
75
73
74
66
86
(LPGOnly)
76 74
67
89
55
33
93
57
56
28
30
51
52
32
29
62
92
68(NGOnly)
16
60
87 17
59
85 90
91
45
50 46
44
48 49
27
54
43 42
41 53
16
15 17
70
69
23 21
25
24
20
22
64
18
94
68
6

7
PartsList forModelsM3207ALP&M3207ANG
KEY DESCRIPTION PART# QTY
1LidAssembly Y0110045 1
2Temperature Gauge P00601061A 1
3 LidHandle P00205069B 1
4ProtectivePad P05518002I 4
5Cooking Rack/Secondary P01516003A 1
6Cooking Grid P01604014A 2
7Cooking Grid P01604015A 1
8Burner/Main P02008024A 3
9InfraredBurner P02005004A 1
10 InfraredBurner ElectrodeAssembly Y0320011 1
11 SavorPlates® P01708007B 3
12 SavorPlates®Bracket, Front P03328015A 3
13 SavorPlates®Bracket, Rear P03328017A 3
14 BurnerBracket P0220313HD 1
15 Side Shelf, Left P01106005A 1
16 Side Shelf Bracket, Left Front/Right Rear P01204005B 2
17 Side Shelf Bracket, Right Front/Left Rear P01206005B 2
18 Grill Bowl P0071335SC 1
19 GreaseDrainingPlate P06902009C 2
20 Back Burner WindShield P06905046E 1
21 Back Burner Frame P02011054C 1
22 Back Burner P02007016D 1
23 Back Burner Electrode P02610005B 1
Back Burner Orifice(LPG only) P06527003A 1
Back Burner Orifice(NG only) P06527004A 1
25 Back Burner ExtensionTube P03717031B 1
26 BurnerHeat Shield P07523003A 1
27 LidHinge P05501020A 2
28 GasCollectorBoxwithElectrode P02609002B 3
29 ElectricWire Set P02615091A 1
30 ElectricWire, 5-contact P02615097A 1
GasValve/ManifoldAssembly(LPG only) Y0060380 1
GasValve/ManifoldAssembly(NG only) Y0060381 1
32 GasFitting P03906003A1
33 ControlPanel, Upper P02909198S 1
34 ControlPanel, Extension P02909401S 1
ControlPanel, (LPG only) P02909301A 1
ControlPanel, (NG only) P02909311F 1
36 ControlKnobSeat P03415014S 5
37 ControlKnobSpring P05504021A 5
38 ControlKnobforMainBurner P03411403S 3
39 ControlKnobforBack/Infrared Burner P03411413S 2
24
31
35
8
PartsList forModelsM3207ALP&M3207ANG
KEY DESCRIPTION PART# QTY
40 ElectricIgnitor, 5-port P02502218C 1
41 SideBurnerLid P01127004B 1
42 SideBurnerFrame P01104010A 1
43 SideBurnerBody P02301015B 1
44 SideBurnerPot Support P00805010A 1
45 SideBurner P02002012A 1
46 SideBurnerElectrode P02614007C 1
47 ControlKnob forSideBurner P03401043S 1
48 ControlKnob Spring P05504021A 1
49 SideBurnerControlKnobSeat P03408053S 1
SideBurnerGasValve(LPG only) Y0060300 1
SideBurnerGasValve(NG only) Y0060301 1
51 SideBurnerConnection Hose, Socket P03705048K 1
52 SideBurnerConnection Hose, Plug P03705049H 1
53 SideBurnerExtension HoseBracket P03327028Q 1
54 SideBurnerBracket P03327029S 1
55 GreaseTray P02705205B 1
56 GreaseTrayHandle P00213008B 1
57 GreaseTrayHeat Shield P06903048B 1
58 Bowl Support Bracket, Left P01301007B 1
59 Bowl Support Bracket, Right P01302007B 1
60 Cart RearPanel, Upper P06906024C 1
61 DoorHinge Bracket, Left Upper P03302021A 1
62 DoorHinge Bracket, Right Upper P03302022A 1
63 Cart Side Panel, Left P07602017A 1
Cart Side Panel, Right (LPG only) P07603024A 1
Cart Side Panel, Right (NG only) P07603025A 1
65 DoorBracket P01316006B 1
66 DoorMagnet P05523004K 4
67 Cart RearPanel P07701064A 1
Cart BottomShelf (LPG only) P01008009C 1
Cart BottomShelf (NG only) P01008010C 1
69 GreaseTrayHeat Shield,Upper P06903049A 1
70 GreaseTrayHeat Shield,Lower P06903050M 1
71 Caster Seat, Left Front/Right Rear P05327035W 2
72 Caster Seat, Right Front/Left Rear P05327036W 2
73 Cart PanelBracket-A, Left Front/Right Rear P03342001A 2
74 Cart PanelBracket-A, Right Front/Left Rear P03342002A 2
75 Cart PanelBracket-B, Left Front P03342003A 1
76 Cart PanelBracket-B, Left Rear P03342004A 1
77 Cart PanelBracket-B, Right Front P03342005A 1
50
68
64

Important: Use onlyGrand Hall certifiedreplacementparts. Theuse ofanypart thatisnotafactory
authorizedpart canbedangerousand will alsovoidyourproductwarranty.KeepthisOperator'sManual
forconvenientreferraland forpart replacement.
ToOrderGrand Hall CertifiedReplacementParts,Call 1-800-770-9769
To obtainthecorrectreplacementpartsforyourelectricgrill,please refertothepart numbersinthisparts
list. Thefollowing information isrequiredtoensureyou receivethecorrectparts:
1.Modeland SerialNumber(see ULlabelon grill)
2.Part Number
3.Part Description
4.Quantityofpartsneeded
9
PartsList forModelsM3207ALP&M3207ANG
KEY DESCRIPTION PART# QTY
78 Cart Panel Bracket-B, Right Rear P03342006A 1
79 DoorHingeBracket, Left Lower P03302023A 1
80 DoorHingeBracket, Right Lower P03302024A 1
81 Caster, 2.5in., withBrake P05110006D 4
82 DoorHandle P00201001C 2
83 Door, Left P04302036A 1
84 Door, Right P04303036A 1
85 RegulatorwithHose(LPG) P03601004A 1
86 LightingStick P05507031E 1
HoseHolder(LPG) P05536001A 2
HoseHolder(NG) P05536001A 1
88 DoorGuidePlate P05510019A 1
Cart SpiceBasket (LPGonly) P05204005B 1
Cart SpiceBasket (NG) P05204005B 2
90 RegulatorAssembly/ NG Y0080007 1
91 Side BurnerExtensionHose/ NG P03705028F 1
92 Hose, 12ft. / NG P03703001A 1
93 NamePlate P00414005Q 1
94 Weight P05344003Q 2
Grill Cover P07007018A 1
Rotisserie Assembly Y0250089 1
HardwarePack (LPG) P06002016A 1
HardwarePack (NG) P06002017A 1
Operator'sManual P80109005L 1
89
87
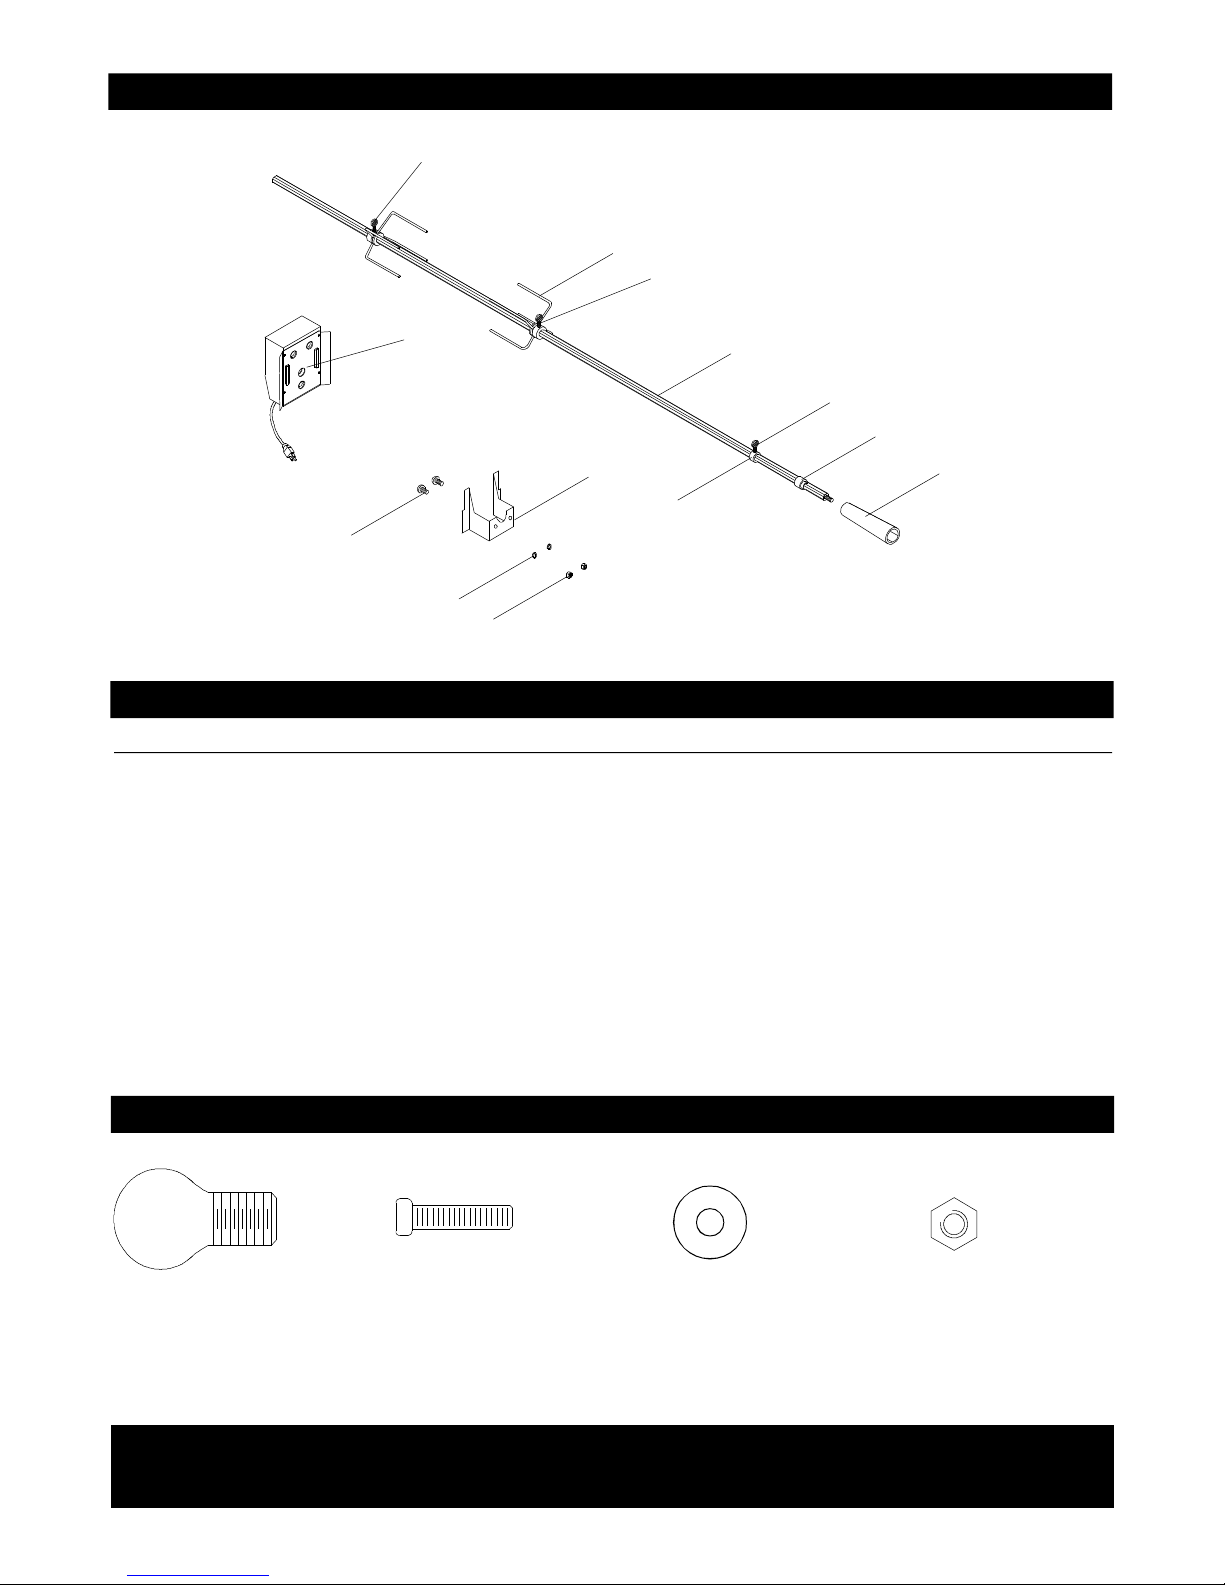
Y0250089 RotisserieAssemblyPartsDiagram
GrillInformationCenter:Ifyouhavequestionsaboutassemblyorgrilloperation,or
iftherearedamaged ormissing partswhen youunpack thisunitfromthe shippingbox,call us
8:00am-4:30pmCST,MondaythroughFridayat:1-800-770-9769
Rot. Screw#10-24x3/4"
UNC
Qty.2
Part#S112G10124
Rot. Thumbscrew
3/8"x1/2"
Qty.3
Part#S196G06084
Rot. Washer
Qty.2
Part#
S411G03084
Rot. Nut#10-24
Qty.2
Part#S362G10124
Y0250089 RotisserieAssemblyPartsList
KEY PART#
DESCRIPTION QTY
Rot.Handle
Rot.Bushing
Rot. Thumbscrew3/8"x1/2"
Rot.Collar
Rot. Spit
Rot. Holding Fork
Rot. MotorBracket
Rot.Motor/AC
Rot. Screw#10-24x3/4"UNC
Rot. Washer
Rot. Nut#10-24
1.
2.
3.
4.
5.
6.
7.
8.
9.
10.
11.
1
1
3
1
1
2
1
1
2
2
2
P05508004E
P05508092F
S196G06084
P05508091F
P05508146F
P05508090F
P03307028A
P07101008B
S112G10124
S411G03084
S362G10124
HardwareforRotisserie
9
10 11
7
4
8
3
3
6
3
2
1
5
10
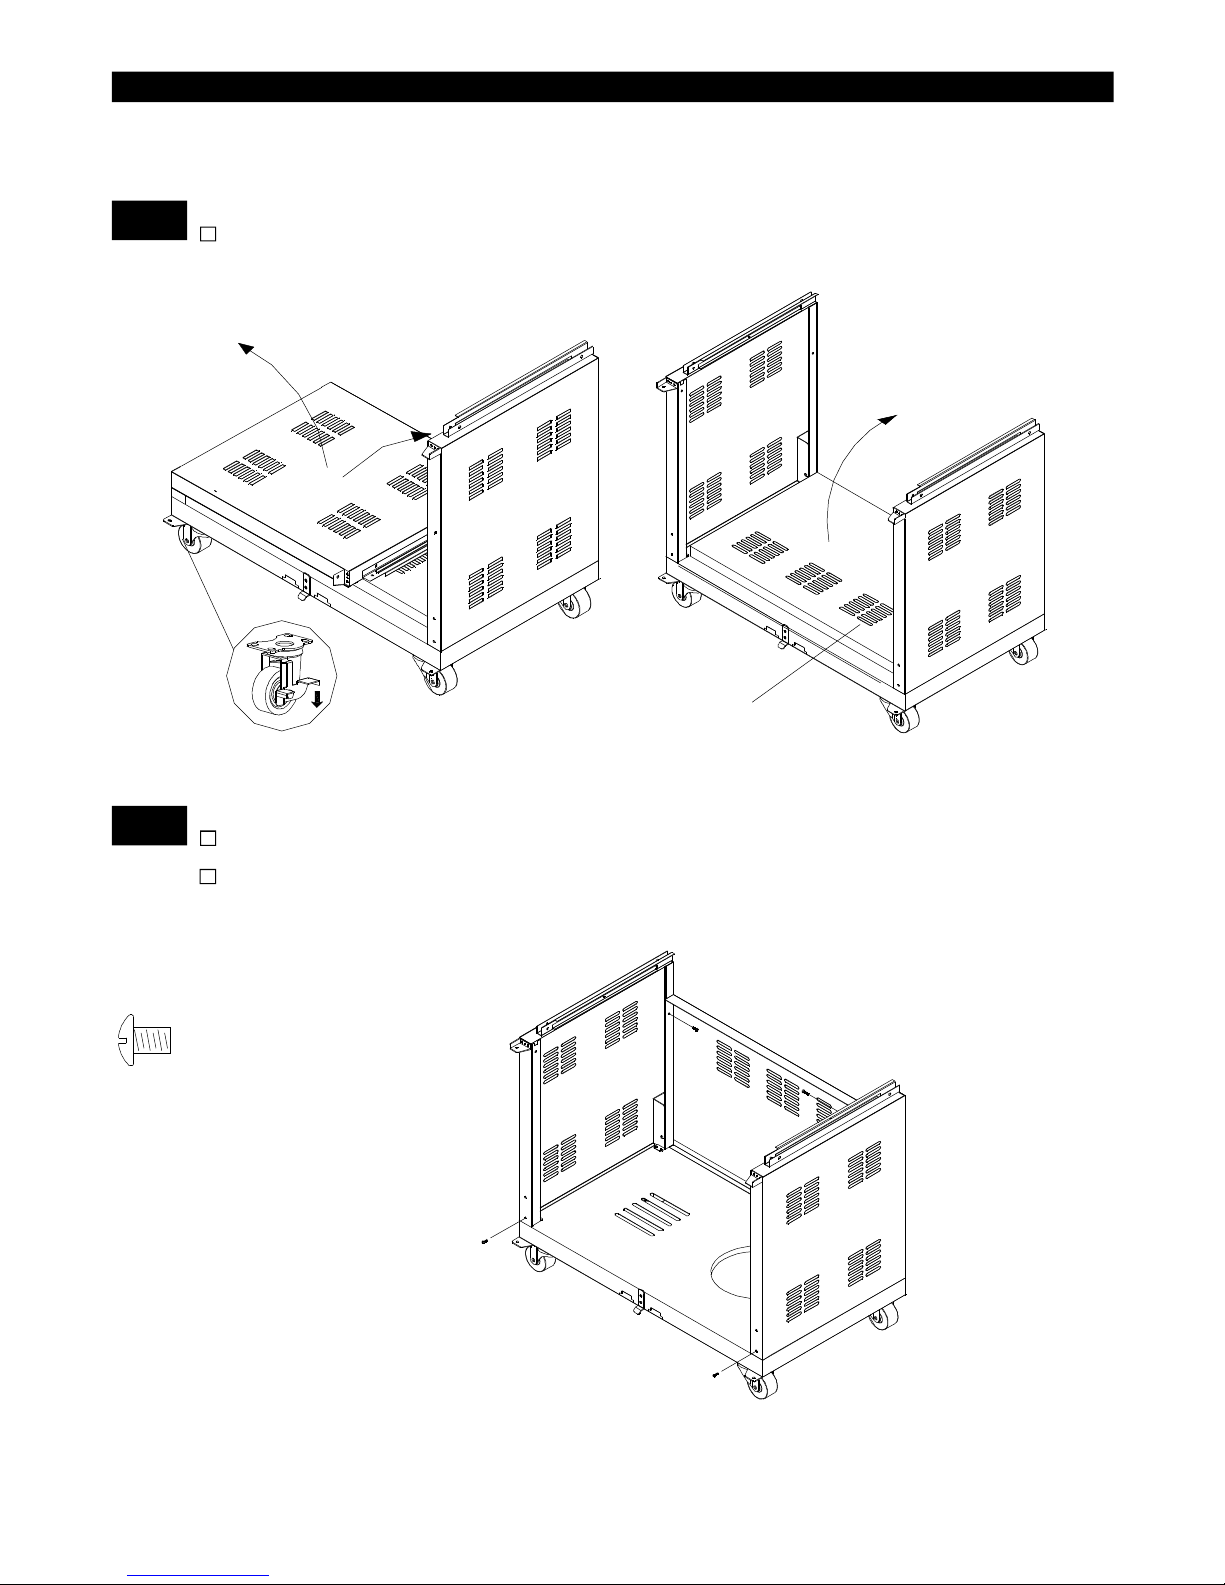
AssemblyInstructions
Removeall packedcomponents.Use thepartslisttocheck thatall necessarypartshavebeenincluded.
Assemblethegas grill on aprotectiveworksurfacetoavoidscratching grill surfaces.Inspectyourgrill fordamage
as you proceed.Donotassembleoroperateyourgrill ifitappearsdamaged.
PhillipsHeadScrew
3/16"x3/8"
Qty.4
Part#S112G03061
Secure theCartRearPanelbetweentheCart SidePanelsusing
2of3/16"x3/8"PhillipsHeadScrews.
SecuretheCart SidePanel,Left/Rightusing 2of3/16"x3/8"
PhillipsHead Screws.
2Install CartRear Paneland CartSidePanels
UnfoldtheCart SidePanel,Right, Cart SidePanel,Left and Cart
RearPanel.
1AssembleCart
11
CartRearPanel

Self-TappingScrew
M4x10
Qty.4 (ForLPGonly)
Qty.8 (ForNGonly)
Part#S172M04101
PhillipsHeadScrew
3/16"x1/4"
Qty.4
Part#S112G03041
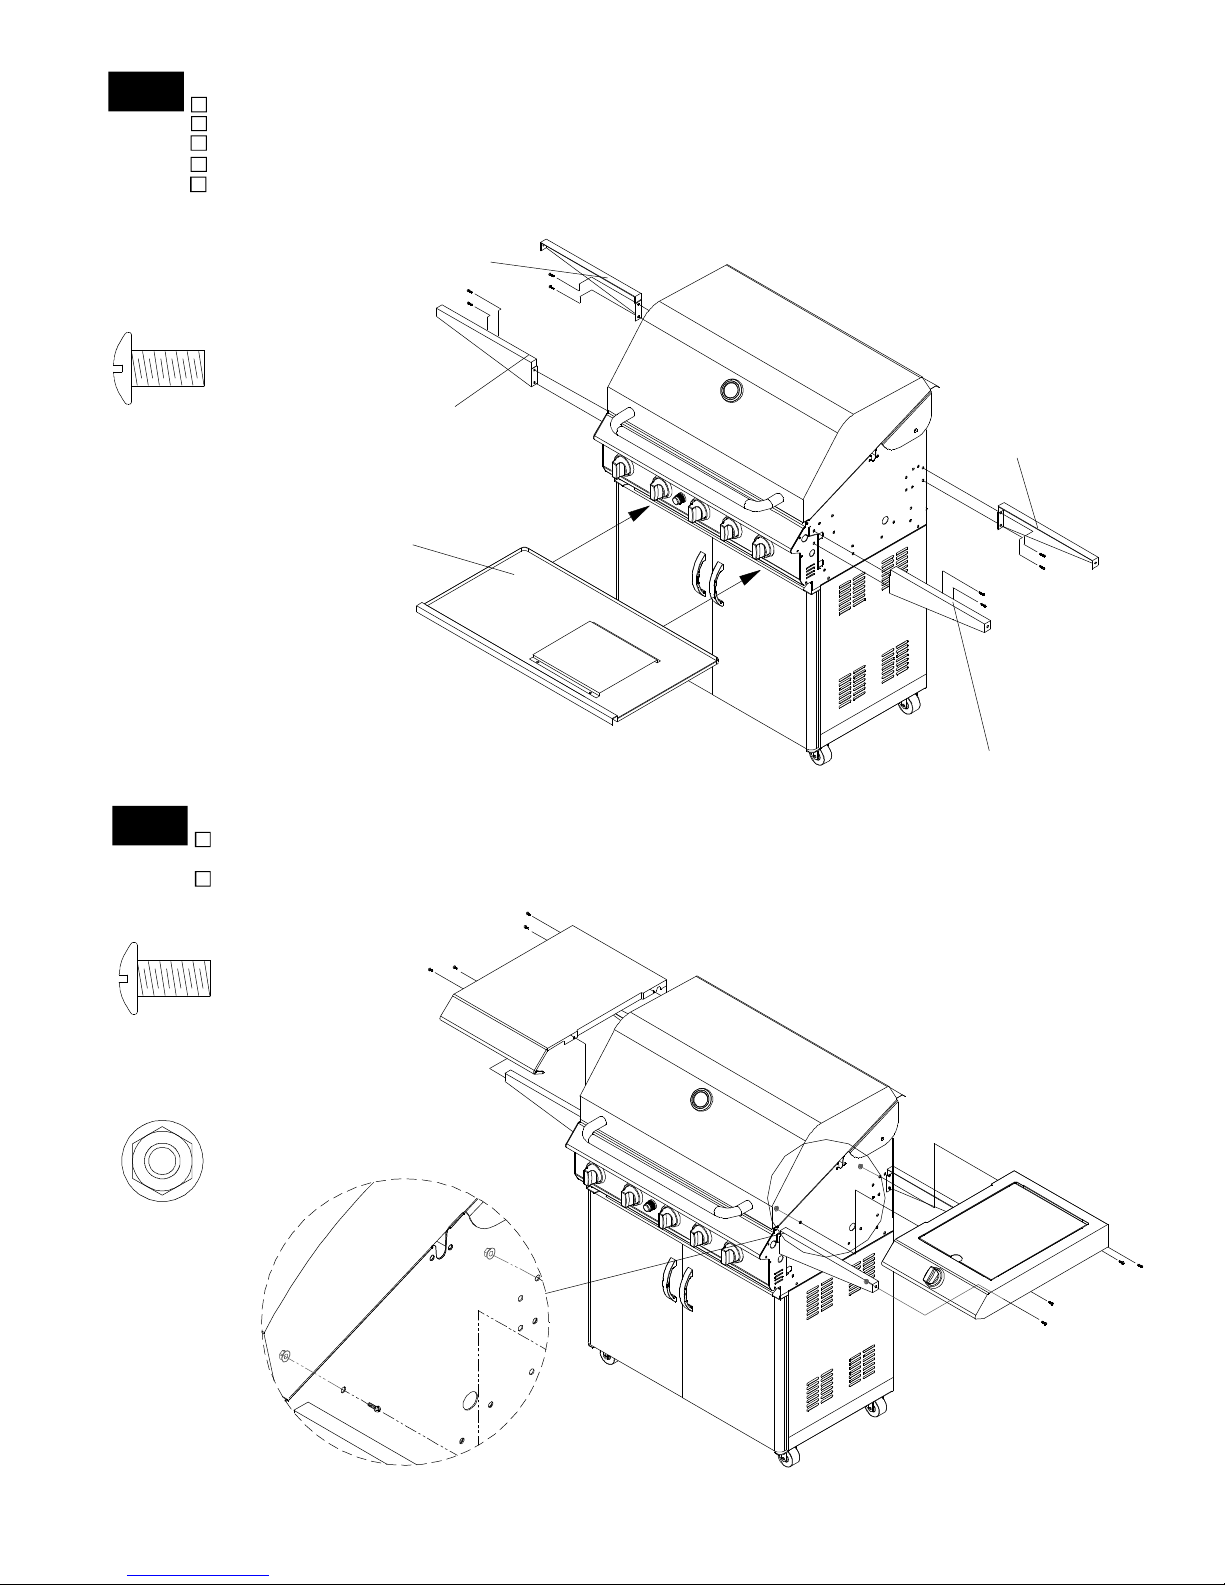
Intall theDoorHandles toDoorsusing 4of3/16"x1/4"Phillips
HeadScrews.
Install theCart SpiceBaskettoCart BottomShelfusing
4ofM4x10 Self-Tapping Screw.
3Install DoorHandles,CartSpice Basketand Door(two Bas-
ketsforNGmodel)
PhillipsHeadScrew
1/4"x1-3/16"
Qty.4
Part#S112G04191
5
4Install DoorBracketand Grill Bowl
PhillipsHeadScrew
3/16"x3/8"
Qty.2
Part#S112G03061
Removecooking componentsfromGrill Head.Withan
assistant,lift and position Grill Headon theCart. Tighten
securelyusing 4of1/4”x1-3/16”PhillipsHeadScrews.
Install theDoorBracketbetweentheLeft and RightCart
SidePanelusing 2of3/16”x3/8”PhillipsHeadScrews.
DoorHandle
Qty.2
Part#P00201001C
Insert BottomLeft DoorHingeintoBottomLeft DoorHinge
Bracket. Thenalign Top DoorHingeand insert intothehole
on Top LeftDoorHingeBracket.
Repeatbothsteps forRightDoor.
12
Attach theSideShelf Bracket (RR) totheRear of RightBowlPanel.
Attach theSideShelf Bracket (RF)totheFront of Right BowlPanel.
Tightensecurelybyusing 1/4”x1/2”PhillipsHeadScrews.
RepeatforLeft SideShelfBracketsinstalling.
Fromthefrontofthegrill,slidetheGrease Traysidetabsoverthe
side railsunderneaththe GrillBowl.
5Install SideShelfBrackets
PhillipsHeadScrew
1/4"x1/2"
Qty.8
Part#S112G04081
SideShelfBracket,(LF) SideShelf Bracket, (RR)
SideShelfBracket, (RF)
SideShelfBracket,(LR)
GreaseTray
FlangeNut1/4"
Qty.8
Part#S313G04081
PlacetheSideShelfovertheLeft SideShelfBracketsand
SideBurnerFrameovertheRightSideShelfBrackets.
Tightensecurelybyusing Screwsand Nutsprovided.
6Install Left SideShelfand RightSideBurner Frame
PhillipsHeadScrew
1/4"x1/2"
Qty.8
Part#S112G04081
13
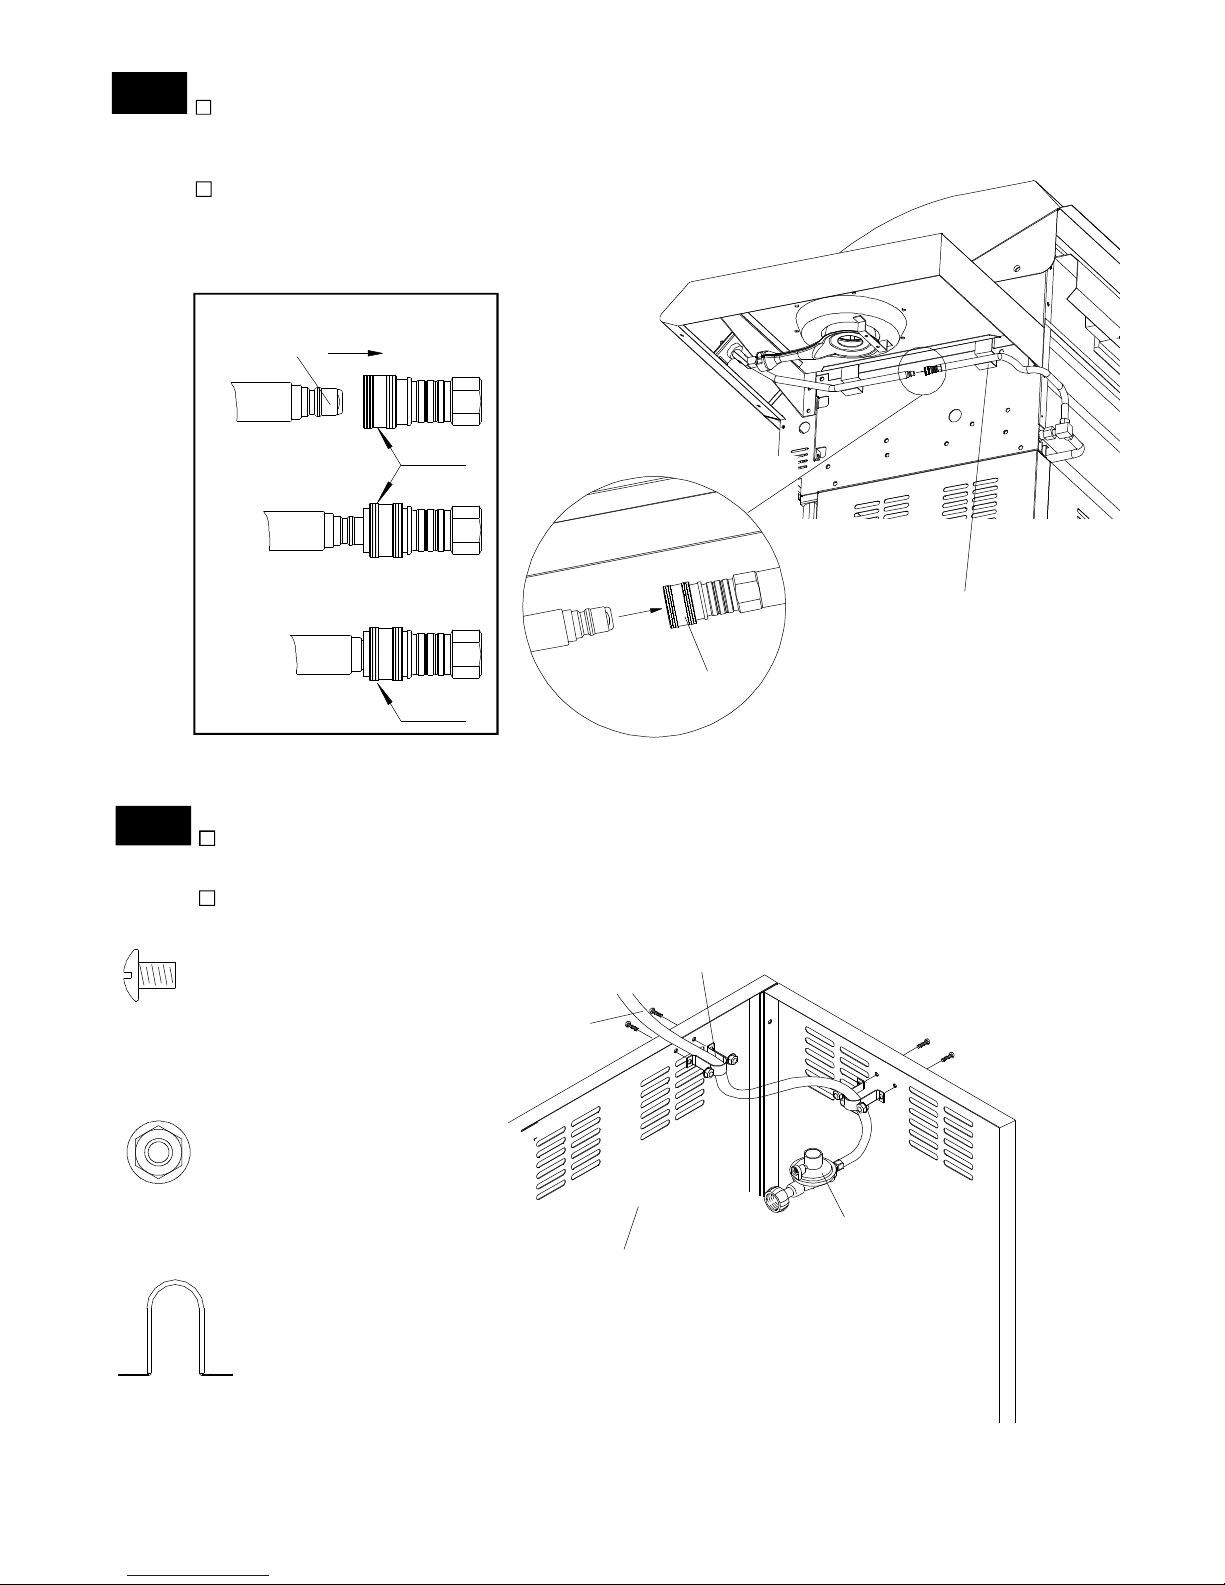
Pushback SleeveoftheSocket. See FigureA.
Insert Plug thenreleaseSleeve.See FigureB.
PushPlug untilsleevesnapsforwardlocking the
Plug intotheSocket. See FigureC.
Pushthe SideBurnerHose intohose holder.
7Install SideBurner Connection Hose
Socket
Plug
Figure A
Figure B
Figure C
SLEEVE
SLEEVE
SOCKET
Hose Holder
Sleeve
PLUG
PlacetheLPGRegulatorinsidethecart through the
opening aboveCart RearPanel.Fixthehose ofLPG
RegulatorbyHose HolderontoCartRearPanel.
Tightensecurelybyusing Screwsand Nutsprovided.
8-1 InstallRegulatorAssembly(ForLPGmodelonly)
HoseHolder
Qty.2
Part#P05536001A
Scale1:2
FlangeNut3/16"
Qty.4
Part#S313G03061
PhillipsHeadScrew
3/16"x3/8"
Qty.4
Part#S112G03061
14
LPGRegulator
CartRearPanel
Hose
Hose
Holder
HoseHolder
Qty.1
Part#P05536001A
Scale1:2
FlangeNut3/16"
Qty.2
Part#S313G03061
PhillipsHeadScrew
3/16"x3/8"
Qty.2
Part#S112G03061
Figure 2
NaturalGasRegulator
Connection Hose
CartSidePanel, Right
BrassNut
Figure 1
Install NGRegulatorAssemblytoRightCart SidePanel
using 2of3/16”x1/4”PhillipsHeadScrews.
PlacetheNG regulatorintotheholeon RightCart Side
Panel.Tightensecurelyusing Brass Nutfound intheNG
Regulator.See Fig.1.
Fixthehose ofNG RegulatorontoCart RearPanel.Tighten
securelybyusing Screwsand Nutsprovided.See Fig.2.
InstallRegulatorAssembly(ForNGmodelonly)
8-2
PhillipsHeadScrew
3/16"x1/4"
Qty.2
Part#S112G03041
15
NGRegulator
Hose
Holder
Hose
CartRearPanel
Failureto readandfollow theUseand Care
Instructionscouldresultinafireorexplosion
thatcouldcauseseriousbodilyinjury,deathor
propertydamage.
WARNING !!
FinalGrill AssemblyStep
Whenyou have finishedassembling your
grill besure thatall screwsare tightened
forsafeoperation ofyourgrill.
Besureall ControlKnobsaresetto
"OFF"and opentheGrill Lid.
Haveyourassistantstand behind tothe
rightofthegrill and look towardthefront
ofthegrill bowl. Never putyourface
insidetheGrill Head.
TurntheControlKnob ofMainBurners
toIGN and pushinand haveassistant
watch forabluesparkwithineach Gas
CollectorBox.Ifasparkispresentthe
ElectrodeTipsareproperlypositioned.
Ifno sparkisseen,theSparkGap
needstobeadjustedas follows:
•
•
•
Using anadjustablewrench,loosenthe
InsideNutuntil theGas CollectorBoxcan
beturnedupward.
IfthegapbetweentheSparkElec-
trodeTipand Receiverismorethan
3/16"use long nose plierstogently
squeeze theGas CollectorBoxto
narrowgap.
ReturntheGas CollectorBoxtoits
originalposition,securetheInsideNut
and trytheElectrodeCheck again.Ifno
"clicking"sound isheard:
AA Batterymaybeinstalledback-
wards.
Electricwiresmay be loose.Remove
theAABatteryand inspecttheIgnitor
Junction Boxfound behind theControl
Paneland reconnectanyloose wires.
SideBurner ElectrodeCheck
11 Opensideburnerlid.Removeplastic
shipping band fromburnerand pot
support.
Pushand turnsideburnerControlKnob
toHIGH.Look forsparkbetweentipof
electrodeand burner.
Ifyou don'tsee asparkfromsideburnerelec-
trode,adjustgapbetweenelectrodeand
burnersurfaceto3/16 in.
SparkElectrodeTip
SparkReceiver
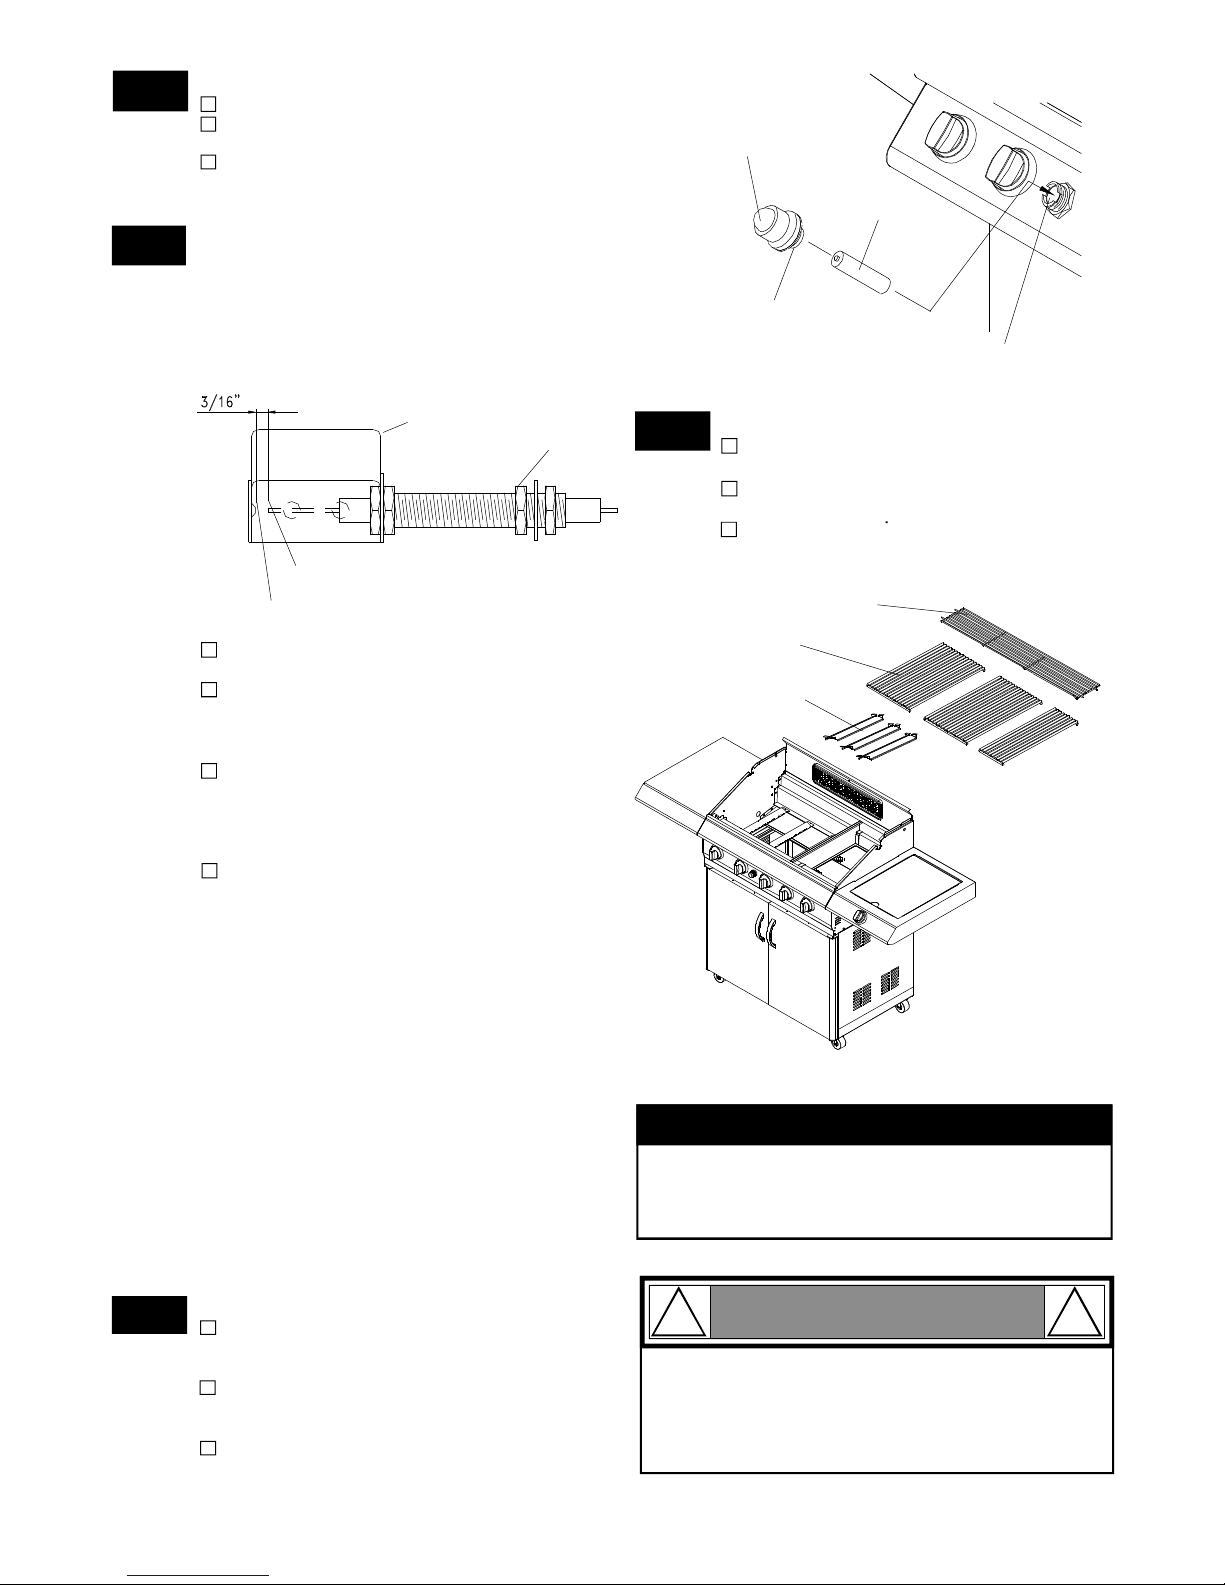
InsideNut 12 Place the SavorPlates®above the
Burners.
PlacetheCooking Gridson theledge
abovetheSavorPlates®.
PlacetheSecondaryCooking Rack on
theslotson eithersideoftheGrill
Bowl.
SavorPlates
Cooking Grids
SecondaryCooking Rack
®
-
-
Install IgnitorBattery
9UnscrewIgnitorCapfromControlPanel.
PlacesuppliedAA batteryintotheIgnitor
Slotwithpositivepolefacing you.
Position theCapand Spring overtheAA
batteryand tightenontoControlPanel.
Withtheassistance ofanother person,
perform thisElectrodeCheck before
proceeding.
10
Thistestwillensurethatthe SparkElectrode Tips
areproperlypositionedsoyourgrilllightseasily
andproperly. IgnitorSlot
AABattery
IgnitorCap
+_
Spring
SparkGap GasCollectorBox Install Cooking Components
16

USE AND CAREINSTRUCTIONS
CORRECTLPGASTANK USE
LPGasgrillmodelsaredesignedforusewitha
standard20lb.LiquidPropane Gas(LPGas)tank,
notincluded withgrill. Never connectyourgasgrillto
an LPGastankthatexceeds thiscapacity.Atankof
approximately12inchesindiameterby18-1/2inches
highisthe maximumsizeLPGastanktouse. You
mustusean "OPD"gastankwhichoffersalisted
Overfill PreventionDevice. Thissafetyfeature
preventstankfrombeingoverfilled whichcan cause
malfunctionofLPGastank,regulatorand/orgrill.
Never connectan unregulated LPgastanktoyour
gasgrill. Thegasregulatorassemblysuppliedwith
yourgasgrillisadjusted tohavean outletpressure
of11"watercolumn(W.C.)forconnectiontoanLP
gastank.Onlyusetheregulatorandhoseassembly
supplied withyourgasgrill. Replacementregulators
andhoseassembliesmustbethosespecifiedby
theManufacturer.
Have yourLPGasdealercheckthereleasevalve
aftereveryfillingtoensureitremains freeofdefects.
Always keepLPGastankinuprightposition.
DonotsubjecttheLPGastanktoexcessive heat.
Neverstorean LPGastankindoors.If youstore
yourgasgrillinthe garage always disconnectthe
LPGastankfirstandstoreit safelyoutside.
LPGastanksmustbestored outdoorsinawell-
ventilated areaandoutofthe reachofchildren.
Disconnected LPGastanks mustnotbestoredina
building,garageoranyotherenclosed area.
The regulatorandhoseassemblycan be seen after
openingthe doors(ifapplicable)andmustbe
inspectedbeforeeachuseofthe grill. Ifthereis
excessiveabrasionorwearorif thehoseiscut,it
mustbe replaced priortousingthe grillagain.
Never lightyourgasgrillwiththelidclosedor
beforecheckingtoensurethe burnertubesarefully
seated overthe gasvalve orifices.
Never allowchildrentooperateyourgrill.Donot
allowchildrenorpetstoplaynearyourgrill.
Use ofalcoholordrugsmayimpairtheabilityto
assembleand operatetheappliance.
Keepfireextinguisherreadilyaccessible.Inthe
eventofaoil/grease fire,do notattemptto
extinguishwithwater. Use typeBextinguisher
orsmotherwithdirt, sand orbaking soda.
Intheeventofrain,coverthegrill and turnoff
theburnerand gas supply.
Use yourgrill on alevel,stablesurfaceinan
area clearofcombustiblematerials.
Donotleavegrill unattendedwheninuse.
Donotmovetheappliancewheninuse.
Allowthegrill tocoolbeforemoving orstoring.
Donotuse yourgrill as aheater.
Thisgrill isnotintendedtobeinstalledin
oron recreationalvehicles and/orboats.
Neveruse charcoalinthisgas grill.
17
The LPGastankmustbe constructedandmarked
inaccordance withtheSpecifications forLP-Gas
CylindersoftheU.S.DepartmentofTransportation
(D.O.T.)orthe NationalStandardofCanada,CAN/
CSA-B339,Cylinders,SpheresandTubesforTrans-
portationofDangerousGoods;andCommission,
as applicable.
The LPGastankmusthaveashutoffvalve,
terminatinginanLPGassupplytankvalve outlet,
thatiscompatiblewithaType1tankconnection
device.The LPGastankmustalso haveasafety
reliefdevice thathasadirectconnectionwiththe
vaporspace ofthetank.
The tanksupplysystemmustbe arranged for
vaporwithdrawal.
The LPGastankusedmusthaveacollar
toprotectthetankvalve.
•
•
•
WARNING
!!
Use yourgrill atleast3feetawayfromany
Use yourgrill atleast 3feet
away fromcombustibleobjectsthatcanmelt
orcatch fire(such as vinylorwood siding,
fences and overhangs)orsources ofignition
including pilotlightson waterheatersand live
electricalappliances.
Never use yourgas grill inagarage,porch,shed,
breezewayoranyotherenclosedarea.
Never obstructtheflowofventilation airaround
yourgas grill housing.
wall orsurface.
WARNING !!
DonotstoreaspareLP-Gastank underornear
thisappliance.
Neverfillthetankbeyond80percentfull; and
Ifthe information in"(a)"and"(b)"isnotfollowed
exactly,afirecausingdeathorseriousinjurymay
occur.
A.
B.
C.
18
USE AND CAREINSTRUCTIONS
NOTEaboutLPGas TankExchangePrograms
Manyretailersthatsell grillsofferyou theoption of
replacing youremptyLPGas tank through anex-
change service.Useonlythosereputableexchange
companiesthatinspect,precisionfill,testandcertify
theirtanks.Exchangeyourtank onlyforanOPD safety
feature-equippedtank as describedintheLPGastank
sectionofthismanual.
Ÿ
How toLeak TestyourLPGas Tank
LPGas Modelonly:
Secure a20lb LPGas TanktoGas Grill
Ifgrowingbubbles appeardo notuseormove
theLPGastank.ContactanLPGasSupplier
oryourfiredepartment!
WARNING
!!
Use acleanpaintbrushand a50/50 mildsoapand
watersolution.
BrushsoapysolutionontoLPGastank inthe
areasindicatedbythearrows.Seediagram.
Ifgrowingbubbles appeardo notuseormovethe
LPGastank.Callan LPGasSupplieroryourFire
Department.
Allleaktestsmustberepeated each timeyourLP
Gastank isexchangedorrefilled.
Whencheckingforgas leaksdonotsmoke.
Donotusean openflametocheckforgas leaks.
Yourgrillmustbeleaktested outdoorsinawell-
ventilated area,awayfromignitionsources such as
gasfiredorelectricalappliances.Duringthe leak test,
keepyourgrillaway fromopenflamesorsparks.
Donotusehouseholdcleaningagents.Damage to
gas assemblycomponentscanresult.
Ÿ
Ÿ
Ÿ
Ÿ
Ÿ
Ÿ
Ÿ
Foryoursafety:
Leaktestnewand exchangedLPGas tanksBEFORE
connecting onetoyourgrill.
Alwayskeepnewand exchangedLPGas tanksinan
uprightpositionduringuse,transitorstorage.
TurnyourLPGas Tank Valveclockwise tothe
closedorOFF positon.
PlaceLPGas tank intotank holeon bottomshelf
Install thetank sotheTank Valvefaces therear
rightcornerofcabinet.
ScrewtheWing Boltintosecurethegas tank.
SpecialNut5/16”
Qty.1
Part. #S303G0504D
Scale1:2
Wing Bolt5/16”x4-1/2”
Qty.1
Part. #S233G05461
Scale1:2

USE AND CAREINSTRUCTIONS
Checkall connectionsforLPGasLeaks
Never testforleakswithaflame.Priortofirstuse,
atthebeginningofeachseason,oreverytime
yourLPGastankischanged,youmustcheckfor
gasleaks.Followthesethreesteps:
Makeasoapsolution bymixing onepart liquid
detergentand onepart water.
Turnthegrill ControlKnobstothefull OFF
position,thenturnthegas ON atsource.
Applythesoapsolution toall gas connections
indicatedbythearrows.Seediagram.If
bubbles appearinthesoapsolution the
connectionsarenotproperlysealed.Check
each fitting and tightenorrepairas necessary.
GasValve/Manifold Assembly
RegulatorwithHose(LPG)
LPGasTank
Ifyou haveagas leakthatcannotberepairedby
tightening,turnoff thegas atthesource,disconnect
fuellinefromyourgrill and call 1-800-770-9769
oryourgas supplierforrepairassistance.
Neverdisconnectthegasregulatororanygas
fitting whileyourgrill islit. Alitgrill canignite
leaking gas and cause afireorexplosion which
couldresultinpropertydamage,personalinjury
ordeath.
WARNING
! !
LPGasModelonly:
ConnectRegulatorwithHosetoyourLPGTank
Turnall BurnerValves totheOFFposition.
Inspectthevalveconnection port and regulator
assemblyfordamageordebris.Removeany
debris.Neveruse damagedorplugged
equipment.
Connecttheregulatorassemblytothetank valve
and HAND TIGHTENnutclockwise toafull stop.
DO NOTuse awrench totightenbecause itcould
damagetheQuick Coupling Nutand resultina
hazardouscondition.
Openthetank valve1/4to1/2(counterclockwise)
and use asoapywatersolution tocheck all
connectionsforleaksbeforeattempting tolight
yourgrill.See "Checking forLP Gas Leaks".If
aleakisfound,turnthetank valveoff and do not
use yourgrill until theleakisrepaired.
Type1connectionper
ANSIZ21.58a-2006
Quick
Coupling Nut
CAUTION: Whentheapplianceisnotinuse thegas
mustbeturnedoff atthetank.
Beforeusingthisgasappliance read all
instructionsand performall gas leak-check
proceduresevenif theproductwas
pre-assembledbytheretailerormanufacturer.
WARNING
! !
Disconnecting ALiquid PropaneGas (LPG)
TankFromYourGrill
MakesuretheBurnerValves and LPGas tank valve
areoff. (Turnclockwise toclose.)
Detach thehose and regulatorassemblyfromthe
LPGas tank valvebyturning theQuick Coupling
Nutcounterclockwise.
19

20
USE AND CAREINSTRUCTIONS
NaturalGas Modelonly:
Connecting NaturalGas ToYourGrill
WARNING !!
Figure 1
Figure 2
GasSupply
InsideWall
OutsideWall
MaleFitting
ToGrill
Locking
ShutOff
ShutOff
Quick
Disconnect
Yournaturalgas grill isdesignedtooperateon
naturalgas only,atapressureof4"watercolumn
(W.C.) withnaturalgas regulator. Thegas pressure
Regulatorsuppliedwiththisappliancemustbe
used.ThisRegulatorissetforanoutletpressure
of4"W.C.
Install aShutoff Valveatthegas supplysource
outdoorsatapointafterthegas pipeexitsthe
outsidewall and beforethequick-disconnecthose.
Orinstall itatthepointbeforethegas linepiping
Pipesealing compound orpipethreadtape
resistanttotheaction ofnaturalgas mustbeused
on all malepipethreadconnections.
Disconnectyourgas grill fromfuelsourcewhenthe
gas supplyisbeing testedathigh pressures.This
gas grill and itsindividualshutoff valvemustbe
disconnectedfromthegas supplypipesystem
during anypressuretesting ofthatsystemat
pressureinexcess of1/2psi(3.5kpa).
Turnoff yourgas grill whenthegas supplyisbeing
testedatlowpressures.Thegrill mustbeisolated
fromthegas supplypipesystembyclosing its
individualmanualshutoff valveduring anypressure
testing ofthegas supplypipesystematpressures
equaltoorless than1/2psi(3.5kpa).
NaturalGasSafetyInstructions
ConnecttheSwivelnutofthe 12'NaturalGas
Hose tothehorizontalfittingofNG Regulator
asshownin Fig.1.Connecttheotherhose
end(maleplug)tothegas supplylinefrom
house.Also,readand followallnaturalgas
safetyinstructions below.
enterstheground.See Fig.2.
Ifyou haveagas leakthatcannotberepaired
bytightening,turnoffthegasatthesource,
disconnectfuelline fromyourgrillandcall
1-800-770-9769 oryourgas supplierforrepair
assistance.
Check all connectionsforNGLeaks
Never testforleakswithaflame.Priortofirstuse,
atthebeginningofeach season,youmustcheck
forgasleaks.Followthesethreesteps:
Makeasoapsolution bymixing onepart liquid
detergentand onepart water.
Turnthegrill ControlKnobstothefull OFF
position,thenturnthegasONatsource.
Applythesoapsolution toall gasconnections
indicatedbythearrows.See Fig.3.Ifbubbles
appearinthesoapsolution theconnections
arenotproperlysealed.Check each fitting and
tightenorrepairas necessary.
Figure 3
Horizontalfitting Hose,12 ft./ NGSwivel nut
NGRegulator Hose,12 ft./ NG
GasValve/Manifold Assembly
This manual suits for next models
1
Table of contents
Popular Grill manuals by other brands


Trisa electronics
Trisa electronics 7580.75 Instructions for use

Hamilton Beach
Hamilton Beach HealthSmart 25219 instruction manual

Cuizen
Cuizen RAC-1712 instruction manual

Bourgini
Bourgini 11.4117.00.00 instructions

Weber
Weber GENESIS II owner's manual

Outdoor Gourmet
Outdoor Gourmet GR2215120-OG-00 Assembly instructions & user manual