Merax WQP6-8411 User manual

DISHWASHER INSTRUCTION MANUAL
MODELS:WQP6-8411(S) Important safety informationPlease read this instruction carefully before using and keep it safe.This product complies with the standard EN 60355-1: 2012+A11+A13+A1+A2+A14EN 60335-2-5: 2015+A11

A-01A-04A-04A-05B-01C-03C-06C-04C-01Important Safety Instruction CONTENTSTechnical InformationInstallation InstructionMaintenanceProduct overviewOperating InstructionUtensils WashTroubleshooting TipsAfter sales serviceC-08Circuit diagram

A-01Important Safety Instruction !WarningThere are some important safety instructions in this manual, Please read carefully beforeinstalling and using ,The dishwasher will be damaged or the user will be injured when the operation is wrong.This appliance is intended to be used in household and similar applications such as: – staff kitchen areas in shops, offices and other working environments; – farm houses; – by clients in hotels, motels and other residential type environments; – bed and breakfast type environments.. And the dishwasher can only be used to wash household utensils.Please contact the after-sales sevice department immediately if the appliance breaks down. Do not reassembly or fix the appliance by youself.Please contact the after-sales sevice department or the maintenance department that vendorassigned for fixing or displacing if the power cord is damaged.The power source of dishwasher has to adopt earth line for safe. This adoption will protect the person maximumly, who is shocked by leakage.Disconnect the power cord atstormy.After installation, please make sure the connection of water and power well connected before using.The installation position of drainage pipe could not exceed 40cm higher than the top of theappliance, which will cause poor drainage, electrical leakage and water leakage.Knives and other utensils with sharp points must be loaded in the basket with their points down or placed in a horizontal position.This dishwasher is an automatic appliance, do not add water manually when the appliance is working. It will cause overflow and dangerous.Do not move or clean appliance when it is working. It might cause electrical or water leakage.Do not open the door during operation as the steam will hurt you. If it is necessary to load or unload some utensils, please push pause button and wait 10 seconds, then open the door slightly and wait for the steam dissipate completely, then open the door and move your utensils.Please use specialized detergents. Do not use washing-up liquid, washing powder, hand sensitizer soup or others detergents that not specialized for dishwasher.There are some cable ties on the drainage pipe and power cord, please use falt scissor to cut the ties. Sharp scissor might burst the pipe and cord and cause leakage.Do not try to use this appliance in damp place. High humidity will make the appliance rust, even leakage.●●●●●●●●●●●●●

A-02●Please keep the appliance at room temperature for 8 hours after receiving the product in winter, To aviod the droplets appearing on the surface of the glass, and it may damage the appliance.The appliance is to be connected to the water mains using new hose sets and that old hose-sets should not be reused.During installation, the power supply must not be excessively or dangerously bent or flattened.Please use flat scissors to cut the tie of water pipes and power lines when unpacking boxes.Position the appliance in the desired location. Confirm that the machine has been leveled.Please don't put anything else on either side, The openings must not be obstructed by a carpet.Please use cold water or warm water not exceeding 120℉.This appliance is not intended for use by persons (including children) with reduced physical, sensory or mental capabilities, or lack of experience and knowledge, unless they have been given supervision or instruction concerning use of the appliance by a person responsible for their safety. Children should be supervised to ensure that they do not play with the appliance.If the supply cord is damaged, it must be replaced by the manufacturer, its service agent or similarly qualified persons in order to avoid a hazard.The door should not be left in the open position since this could present a tripping hazardPlease keep kids stay away from the dishwasher, especially when the door open.After using the appliance, please cut off the power and water●●●●●●●●●●●The specialized detergent should be put on the place where kids can not reach. because the detergents are contains acidoid and alkaline, which are really dangerous to kids.Utensils will be hot after washing, please take it out after 30 minutes.●●

This appliance must be grounded. In the event of a malfunction or breakdown, grounding will reduce the risk of an electric shock by providing a path of least resistance of electric current. This appliance is equipped with a cord having an equipment-grounding conductor and a grounding plug. The plug must be plugged into an appropriate outlet that is installed and grounded in accordance with all local codes and ordinances.Improper connection of the equipment-grounding conductor can result in a risk of electric shock. Check with a qualified electrician or service representative if you are in doubt whether the appliance is properly grounded. Do not modify the plug provided with the appliance; If it will notfit the outlet. have a proper outlet installed by a qualified electrician.Please do not use power strip.Grounding instructionA-03WARNING : When using your dishwasher, follow basic precautions, including the following:a) Read all instructions before using the dishwasher.b) Use the dishwasher only for its intended function.c) Use only detergents or wetting agents recommended for use in a dishwasher and keep them out of the reach of children.d) When loading items to be washed:1) Locate sharp items so that they are not likely to damage the door seal; 2) Load sharp knives with the handles up to reduce the risk of cut-type injuries.e) Do not wash plastic items unless they are marked ″dishwasher safe″ or the equivalent. For plastic items not so marked, check the manufacturer's recommendations.f) Do not touch the heating element during or immediately after use.g) Do not operate your dishwasher unless all enclosure panels are properly in place.h) Do not tamper with controls.i) Do not abuse, sit on, or stand on the door or dish rack of the dishwasher.j) To reduce the risk of injury, do not allow children to play in or on a dishwasher.k) Under certain conditions, hydrogen gas might be produced in a hot-water system that has not been used for two weeks or more. HYDROGEN GAS IS EXPLOSIVE. If the hot-water system has not been used for such a period, before using the dishwasher turn on all hot-water faucets and let the water flow from each for several minutes. This will release any accumulated hydrogen gas. As the gas is flammable, do not smoke or use an open flame during this time.l) Remove the door to the washing compartment when removing an old dishwasher fromservice or discarding it.

A-04Product overviewTechnical DataParts of DishwasherAccessoriesNameQuantityNameQuantityComplete applianceBasketCutlery basketInlet hoseDrain hoseScrewsClamping bandUser instruction11111213Outline sizeWater pressureControl modeNominal voltageFrequencyWaterproofRated powerCapacityW550XH450XD500mm 0.4-10 barAutomatic220-240V~50HzIPX11380W6 Place settingsExecutive standardsEN 60335-1: 2012+A11+A13+A1+A2+A14EN 60335-2-5: 2015+A11Inner doorDispenserAssembled filterSpray arm
Shell
Panel
Baseboard
Water softenerNOTE:Due to the continuous improvement of products, such as the technical parameters in this manual are modified with out prior notice.Bottom seal of doorBasketCutlery basketCup holder
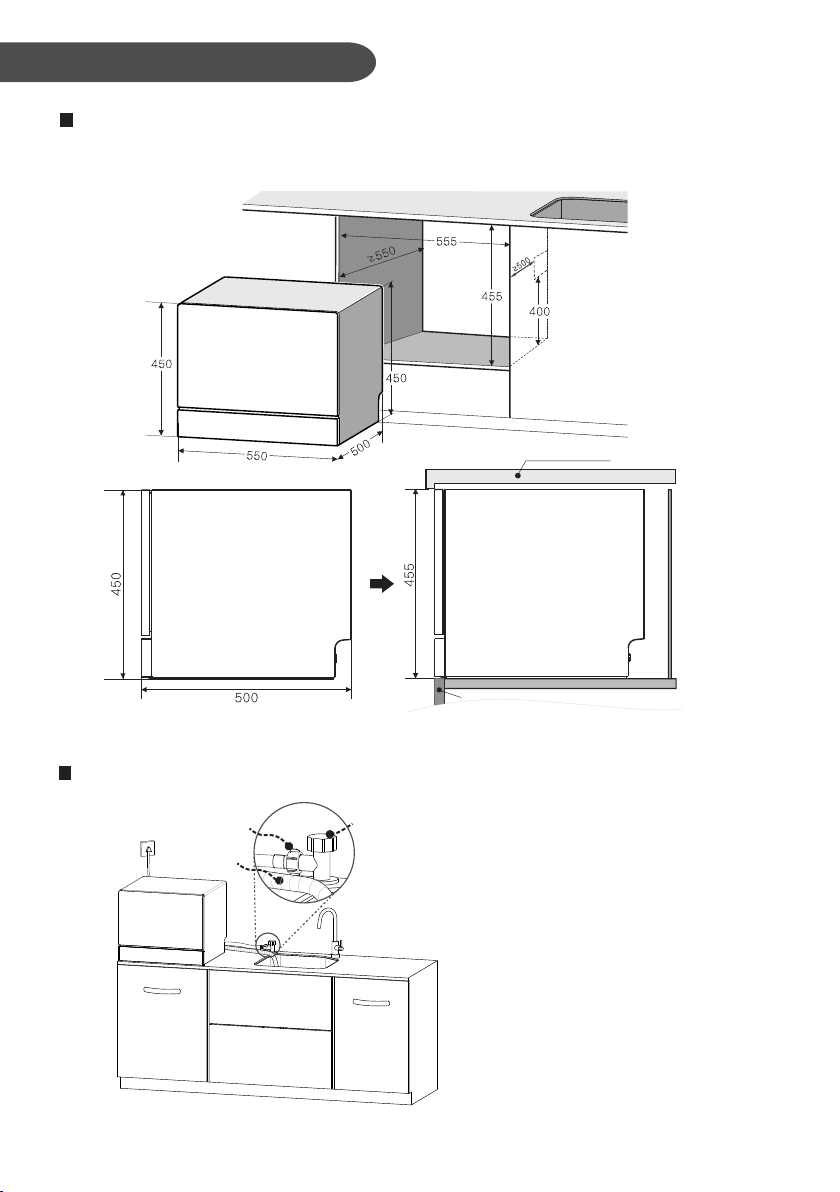
A-05Installation diagram:(unit:mm)The direction of perforation(60*60) according to the position of the sewerTable layout diagramWater valveInlet hoseDrain hoseDishwashersinkThe counterDishwasher sideDishwasher sideCupboard doorInstallation Instruction

ConnectWater hoseAngel valveInlet valve(Back Diagram)Inlet hoseNOTE: The inlet pipe can not be recycled. Do not use the old inlet pipe in installation.Connect inlet hoseInlet hose connectionTable layout diagram: Running water inlet1. Connect the drain and drain port2. Connect the inlet pipe to inlet valve.A-06

A-07Drain hoseClamping band(Back Diagram) CounterSewerDrain hoseDrain hose connectionAfter the machine is fixed to the kitchen cabinet, the power cord, inlet pipe and the drain pipe should go through the reserved entrance and exit hole.1. Connect the drain pipe to the drain port.(The heigh of the drain pipe hanging must not be over 40cm above the top of the machine.)2. Connect the intake pipe to the reserved intake port and ensure that there is no drop leakage.3. Ensure that the power outlet is well grounded and connected to the power supply.Note: 1. The drain pipe can not be folded, if extention is needed, do notexceed 5 meters, otherwise may affect the washing effect;2. The water inlet pipe, drain pipe and power outlet must be installed inthe cabinet adjacent to the dishwasher and cannot be installed directlybehind the appliance.Warning: Power outlet must be well grounded !
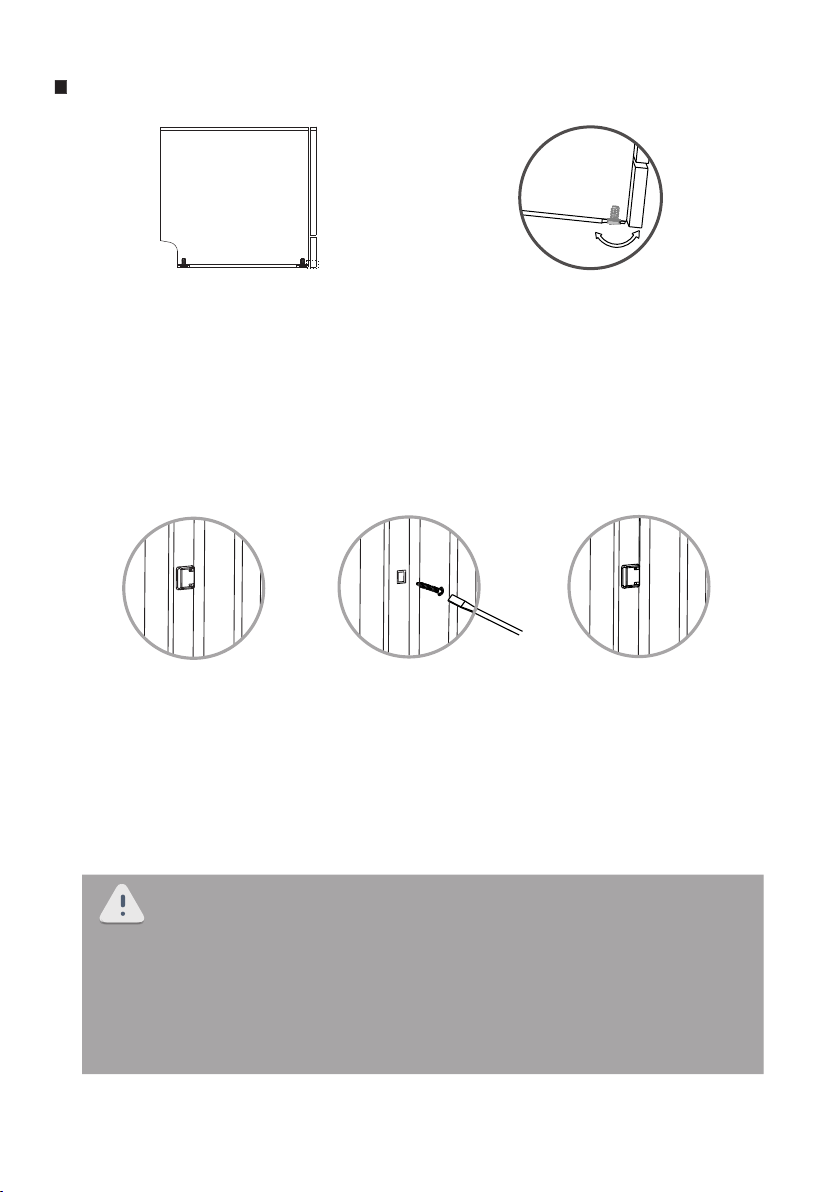
You should check these items after installation finished: Bottom vent(550X50)1. If the appliance is situated securely on the floor and screwed up.2. Ensure that the protective conductor system of the domestic supply hasbeen correctly installed and the power is supplying.3. If the inlet pipe and drain pipe have been connected with appliance.4. Take the package out from appliance.A-08Stay and place dishwasher1. Ensure that the appliance is situated securely on the floor; otherwise it will cause overflow and electric leakage2. If the dishwasher can not be placed vertically, you can adjust the adjustablefoot to make it balance.3. If it is a build-in dishwasher, please screwed two sides of machine after itis balanced.4.There is no need to screw the countertop freely, but the side safety caps must be covered.5.Embedded-installed,Fix the screw thought the machine’s internal hole into the cabinet board;6.Put on the side safety caps.1. After installation,please retain all documents and components forlater useor for the subsequent owner.2. When the first time that water in, the water in appliance turns yellowwhich is normal; It is because the water softener in water for a long time.Please feel free to use.3. Every appliance have passed the water test in factory. It is normal if youfound some water leave in appliance. Please feel free to use it.TIPS:
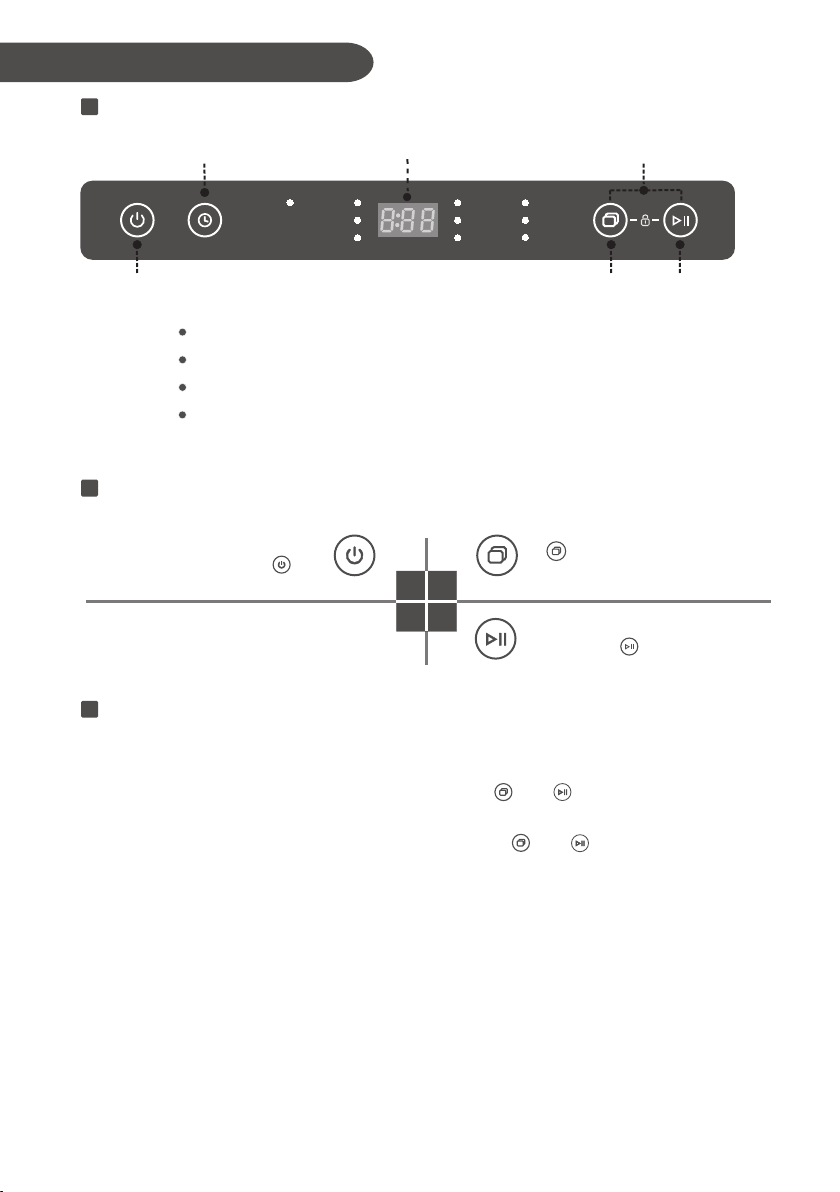
B-01Operating InstructionControl panelDisplayChild Lock LightRinse aid refill indicatorDisplay“Check Water Supply”Salt refill indicator1423Operate the dishwasherStart wash programme by pressing button.The indicator lamps flash,it means the dishwasheris working.Change wash programme with button. Please select a suitable programme .Close the door of the dishwasher and start the appliance by pressing for one second, It means button lock. You can secure your appliance from being unintentionallythe programme terminated (e.g. improper operation by children). Activating the button lock: Hold down the button and for 3 seconds until “Lock”is indicated on the digital display.Deactivating the button lock: Hold down the button and for 3 seconds untilthe display “Lock” goes out. Child lockEcoIntensiveNormalEcoGlassFruitSaltLockRinserFaucetRapid
Power
Delay start
ProgramStart/Pause
Child lockSaltLockRinserFaucet
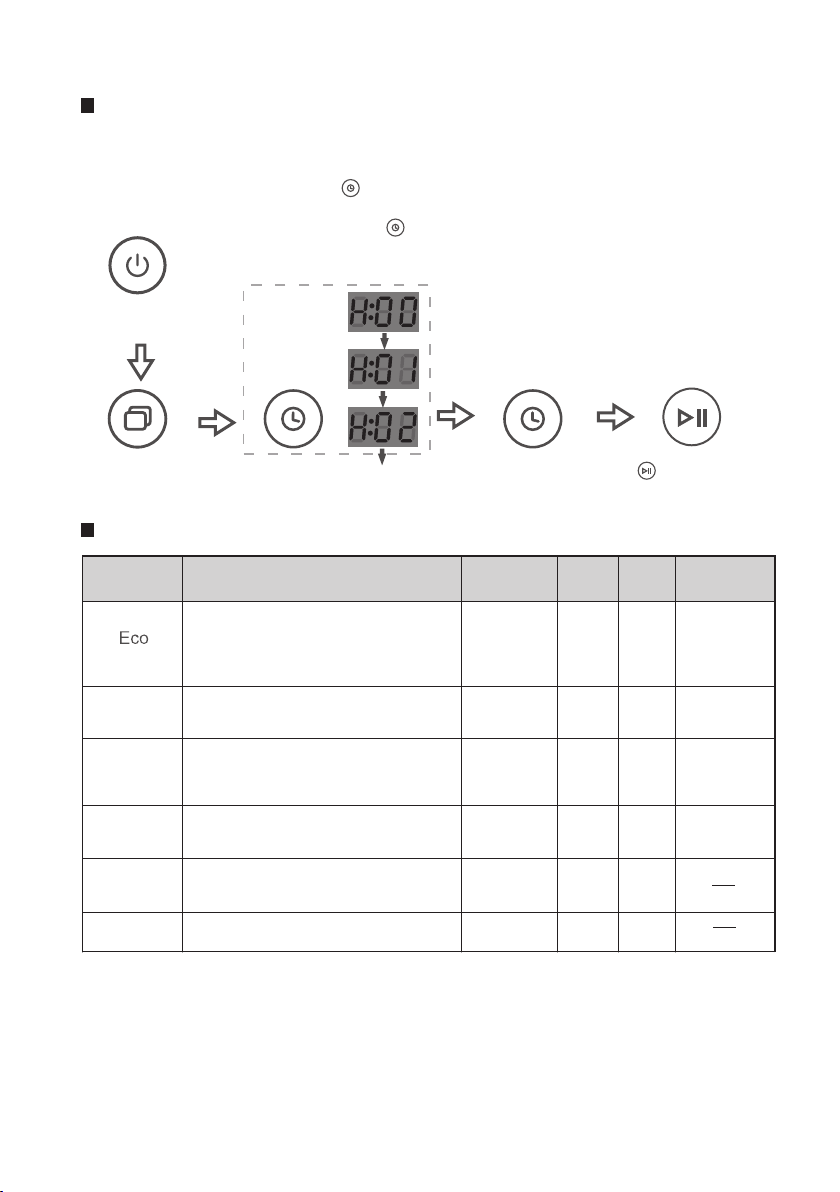
B-02You can delay the start of the programme by up to 24 hours. Delay start Overview of programs*Notes:Please don't overuse the detergent. Excessive detergent will not only produce a lot of bubbles, but also affect the cleaning effect. The actual runtime of each program is possibly different from the preset time cycle due to the water temperature, the amount of utensils, the type of soiling and the recovery of water softening. It is a normal condition, please use it with confidence.The display shows the delay timeif no operations during this time for3 seconds. Steps: Select suitable programmeStart the applianceCyclic displayDelay startPress button, the display repeatetedlyshows H:00 H:01...H:24. Select delay start time. If press for 3 seconds, the screen will be reset to H:00, which means no preselection.Press button to delay the start of the programmeApply to those who do not have dry knot, sticky stain, short placement ofutensils This program is suitable for fragile and sensitive to temperature of plastic, glass, etcRapid Glass NormalIntensiveEnergy savingProgramCycle Selection InformationRunning Time (min)Energy (kWh)Water (L)Detergent Powder (g)For the heaviest soiled loads, such as pots,pans casserole dishes and dishes that have been sitting with dried food on them for a while.This program consumes less time and energy. It is suitable for small quantity dishes which are easy to wash.This program is more reasonable in items of energy consumption compared with other programs. We suggest using this program for utensils without heavy oil and hard to wash. 601759025175141414140.751.00.550.550.728.510.58.56.59.0Fruit This program is suitable for fruits and vegetables150.123.5

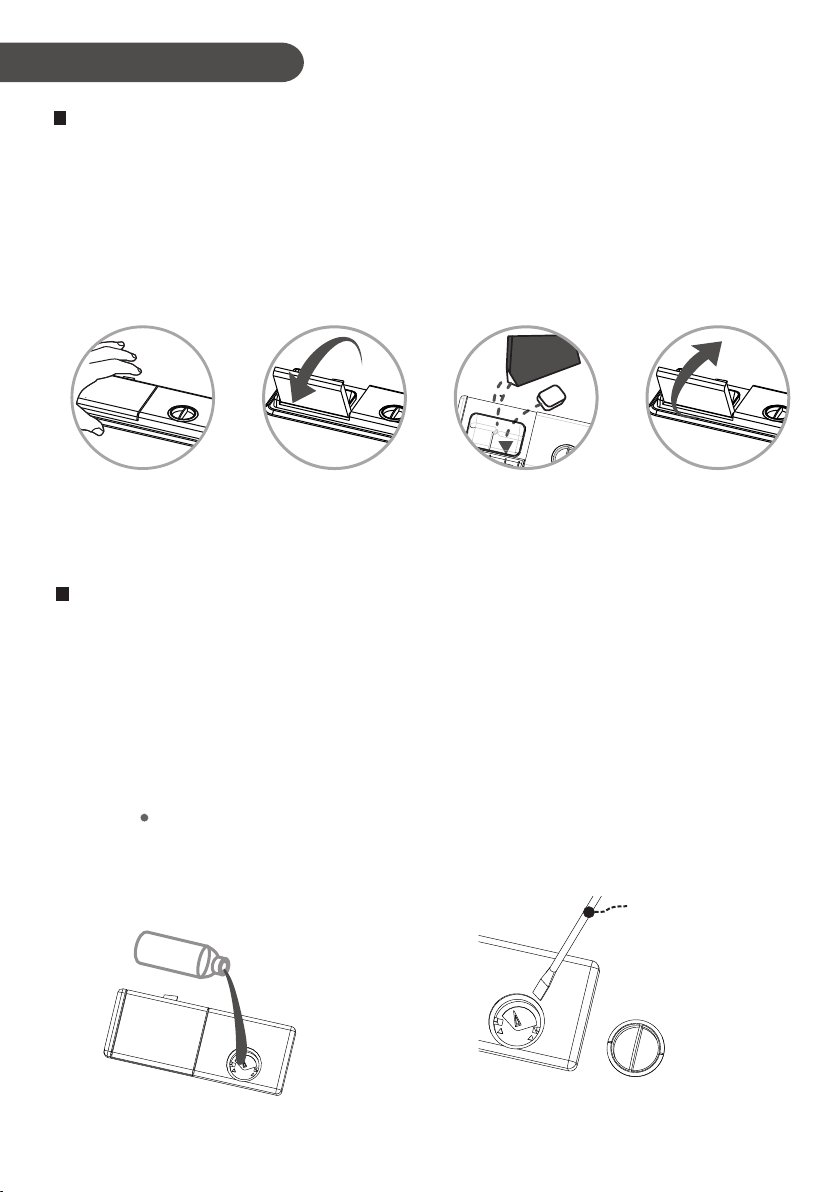
Water softener settingB-03Water softener1. Water softener is used to soften water, reduce limescale and ensure utensils as bright as new. It is especially suitable for areas with higher water hardness.2. Ask your local water utility company for the water hardness value of tap water Hardness settingoptions0-9091-200201-300301-400401-500more than 500H1H2H3H4(Default)H5H6Making setting reference table according to the hardness of local tap waterWater hardness (ppm)Water softener is used to soften water, reduce limescale and ensure utensils asbright as new. It is especially suitable for areas with higher water hardness.Adding tips:1.Turn anticlockwise and lift up water softener lid.2.Fill it up with salt(approx.400-500g). Please fill with some fresh water when switching on the appliance for the first time.3.Turn the lid clockwise and fasten it tightly; . Using special saltTips: Salt must be added before washing fo the first time. It is areusable consumable. As soon as the “Salt”light is lit on the display, salt should be topped up. Please run the “Rapid”program after adding salt to ensure spilled salt and over run salt solution are immediately washed out. After adding plenty of special salt, “Salt”indicator won’t be off immediately. Tips: When is H1 , the softener is not working , the‘salt’is lits out.1.When the dooris closed, pressthe power supplybutton.2.With in 60 secondsafter starting up,press button forfive seconds to entersetting mode4.Change and select suitble setting with button. If user did not press button for 5 seconds, the appliance willexit the setting mode and bein standby state. The chosensetting has been stored.SaltRinser3.Indicator“Salt”and“Rinser”light up which indicates the appliance has been insetting mode.
FunctionSpecial dishwasher detergent will remove oil and food residues. It is necessaryevery time you use the appliance. detergent dosage depends on the amount ofand type of siiling. Full load with heavy soiling , use 14g .1C-01Adding tipsPress convex buttonon the detergentpowder/tablet feeder1.2.The flap will spring open.3.Add the requiredamount of detergent4. Close the flapA:powder B:tablet
13A
A
A
B
B
B
Adjust setting based on use. Default setting is 3 . Large value means increasing dosage, and viceversa.If you feel surface is greasy, pleaselower setting and wash again.Rinse aid is necessary when you use dishwasher for the first time. It is a reusable consumable. As soon as" " indicator is lit on display, rinse aid should be topped up.Wipe up any spillswith a clothslot type screwdriverUtensils WashDetergentRinse aidFunctionHelp to dry and shine crockery, make it as good as newAdding tipsRinser

C-02Loading the basketDishwasher-proof utensils: and Ceramic tableware , GlasswareStainless steel tablewareUtensils notes:Utensils selection1. Precious metal, aluminium and colored glaze utensils may turn cloudy after beingwashed in a dishwasher.2. Cutlery made of bamboo or wood: It may come loose orcrack at high temperatures.3. Plastics items: Please see manufacturer’s instructions for plastics cutlery or itemswith plastics parts, because these items may come loose or crack at high temperature.4. Cleaning cloth: Cleaning cloth may cause dishwasher fault.5. Cast iron items: Cast iron items may rust after being washed in a dishwasher.Tableware placement attention1. Remove large food remnants such as bones or leaves;2. All utensils with dirt should be face down. If their opening face or closing face downwill leave the water on the top. Melamine Dessert PlateCupGlassMugDessert PlateMelamine BowlSoup PlateSaucerDessert BowlServing Spoon Tea SpoonSoup SpoonKnifeForkDessert SpoonDinner PlateOval PlatterServing ForkSmall Pot
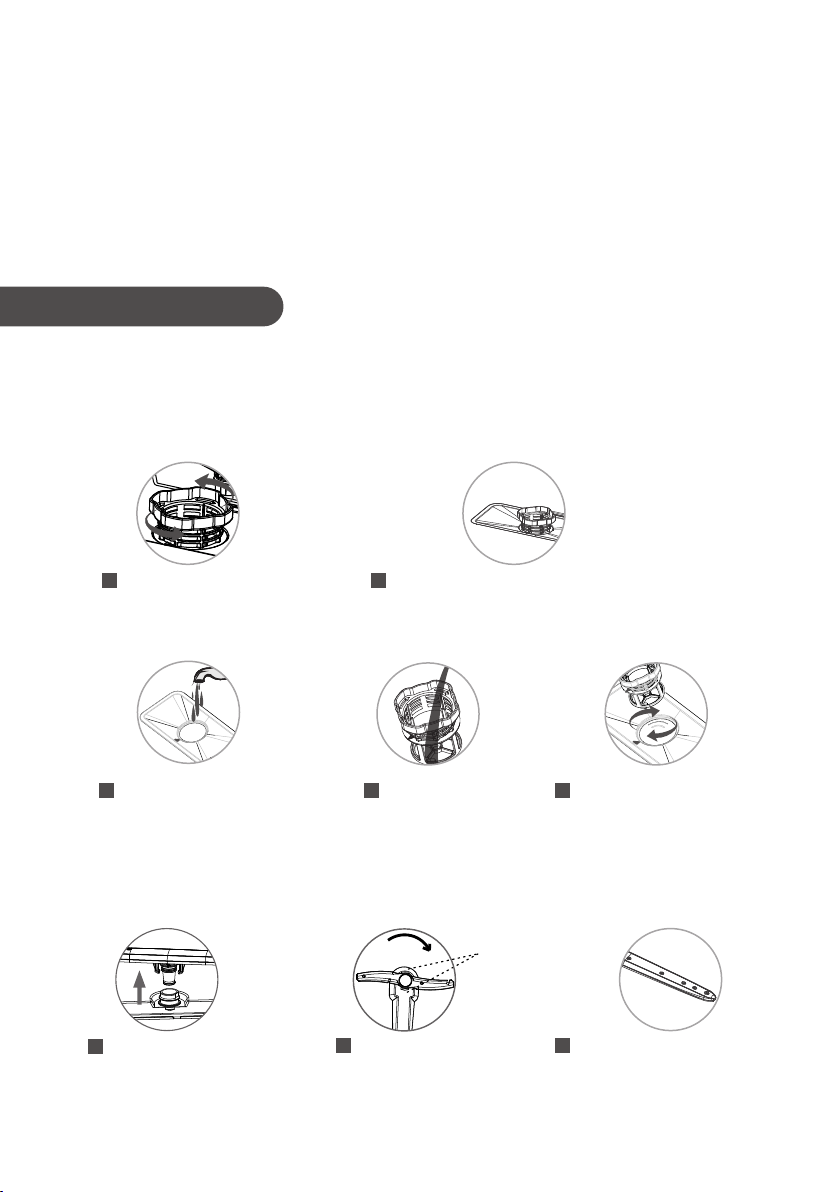
1. Take filtration system out .2. Flush3. Spray arms cleaning Turn the cylinder filterout with anticlockwiseA Take the stainless steel filterout in the same time.BAFlush cylinderfilter and filternet.BYou can put the filter backafter cleaned. The cylinderfilter should be assemblewith clockwise until thetriangle mark of filter, filter net and stainless steelin the same time.CAC-033. Utensils are secure and cannot tip over, one place for one utensil.4. Do not let the utensils out of basket to obstruct rotation of spray arms.5. The small size of utensils might drop out from the basket and obstruct the sprayarms rotation, Please do not put these small items in the appliance.6. When pushing basket back, do not let the sharp parts of utensils cut the seal.7. The top coat of basket can not be scratched, or it will be rusted.8. Place cutlery, always unsorted with the tips face down, in the cutlery basket.TIPS:Flip the spray arm after pushed basket, to check if the spray arm still can be rotates. MaintenanceAfter appliance ran a while, there will be some residue and other things left in it. Please clean it when you see the residue and things, also clean the appliance immediately.Use flowing water to flush filter assembly.Do not use steel woolor iron brush, it will cause the filter rust.Pull the main basket out of appliance, and lift the lower spray arm a little bit for loss the clips.Check if the spray arms blocked. If it does, please use a thin wire to pull the blockages out or flush thehole with water.BTop spray armretainerTurn the top spray arm retainer clockwise.C
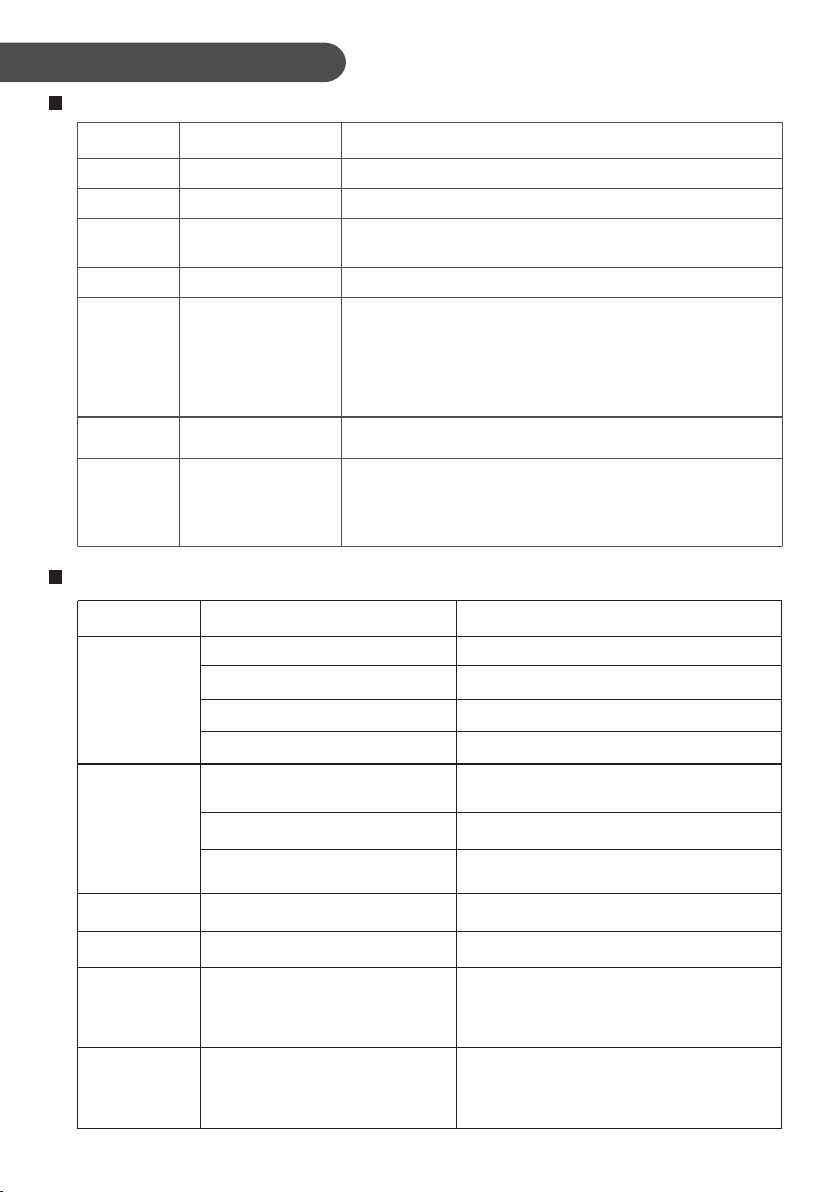
C-04Troubleshooting TipsError code listE01Error code E02E03E04CauseRemedyE051.ean the appliance about 30°to 45°to pour out the water in Lthe bottom plate,2.Check if the drainage pipe is placed too high,3.Check if the pipe be tired a knot, blocked or pressed,4.Check if the appliance be placed right5.Exclude above cause, try to restart the appliance again. Please contact the after-sales service department.E06E10Water inflow abnormal1.The tap was not fully opened.2.Small inflow and low water pressure.3.Start-up multiple times in case of water shortage.4.Please contact the after-sales service department.Thermistor short circuit Thermistor open circuit Please contact the after-sales service department The machine is not heated 1. Please make sure the utensils be placed correctly. Water willbe lack if it is in the plate/bow.2. Please contact the after-sales service departmentInlet valve failure Overflow Heating functionabnormal Please contact the after-sales service department Please contact the after-sales service department Please contact the after-sales service department TroubleshootingCause ProblemRemedy Utensils is wet1.Out os rinse aid or it is not enough2.Utensils be piled up and without lean 3.The washing process is still runningAdd more rinse aid and turn the gear to maximumRefer to utensils place rule Wait until process finishedThe wash mode doesn't has drying function2.Put too much washing power3.Used low-quality washing powerThe washing powder and washing tablet have not been cleaned up1.The holes of spray arm been blocked, the washing powder can not be fiushed outThere's no rinse aid in the containerIt's normal and it won't impact the utensil.Add rinse aidToo many drops inthe inner of linerSome drops in the inner of linerClean the holes of spary arms and run the quick wash mode again to clean the utensil
Run the quick wash mode again and put moderate washing powder as instruction next tim
Use specialized washing powder and washing tablet with quick wash mode to wash the utensil again
4.Programme selected without dryingAppliance makes the noise as blowing something when is plugging. And thedispaly shows “FAN”.The air renewal system is workingIt's normal situationDidn't use speciallized washing powderor put too much washing powder in it.
If there's not much foam,you can open the door and let the foam come less and less; If there's too much foam,you can remove it with tools. At last,restart any programme about 3minutes. Redo this again and again until the foam is disappear
Some foam in the liner
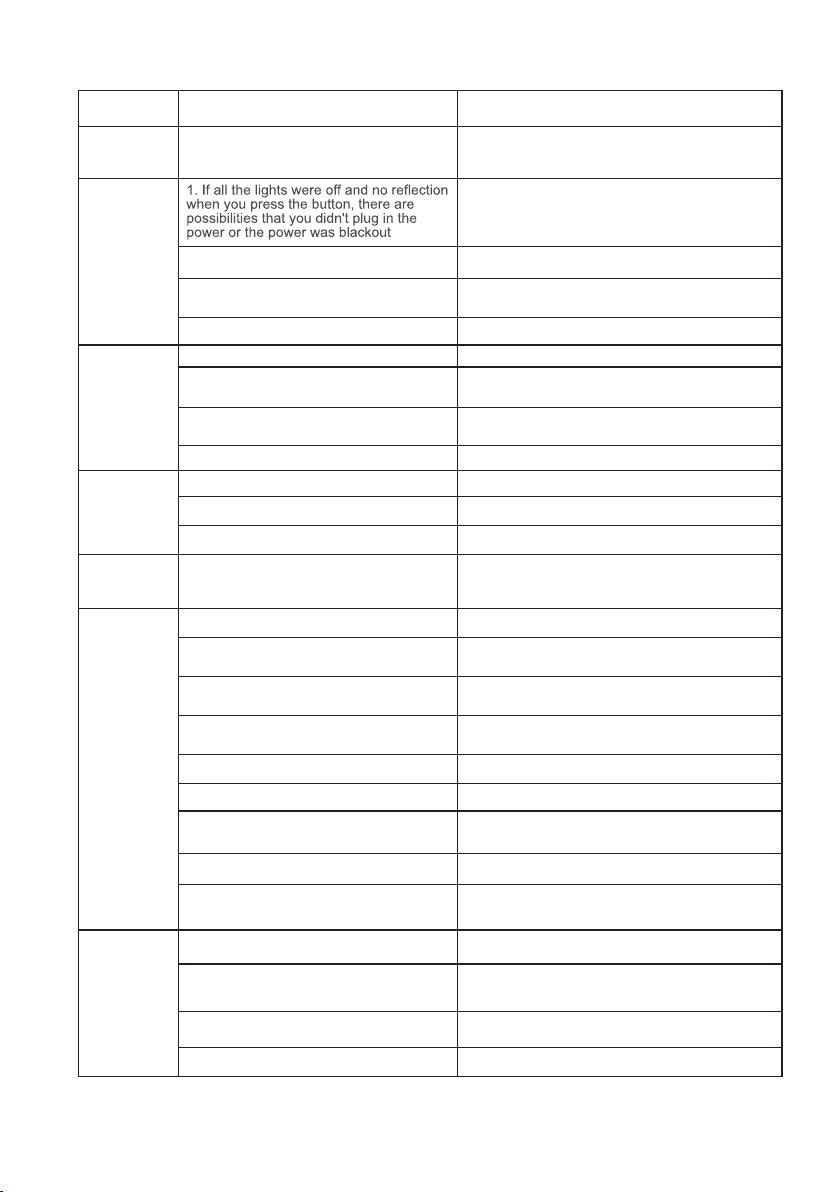
1C-05Cause ProblemRemedy There are some dirt in groove, which stuck the door.1.Have not closed the door1.Check if the water supply have problem1.utensils be piled up and without lean4.Do not install the filter in right position and the food remnants get in it
9.Some food remnants are too hard to wash
2.power or the power was blackout2.There are greasy dirt or water on the glass and hand2.The flowmeter is broken2.Do not chose the right programme of washing5.The spray arms were blocked7.Some food remnants are sticking on the utensil3.All the light are on, it might on the childproof locking mode3.All the light are on, it might on the childproof locking mode3.The filling valve is broken3.Do not use pecialized washing powder or put too little of washing power.6.The spray arms are stuck8.Black out when the appliance is working
4.The time that touch power icon is too short.4.PCB lock of door is brokenPlace the utensil in improper way ,some utensils is obstructing the spray arms; or some utensils are crashing each other.
Clean the groovePlease plug the power in and make sure the power have no issueclose the door .Make sure the water supply have no problemRefer to utensils place ruleRe-install the filter in rightposition Suggest wash utensil with steel wool before put it in appliance to washclean the glass ang hand ,make sure they are dry
Please contact the after sales service departmentPlease chose the right programme of washingClean the inner part of spray armsSoak the utensil for a while before washing
Clean plug the power in and make sure they are dry.Unlock the childproof lockUnlock the childproof lockPlease contact the after sales service departmentUse specialized washing powder and put enough of it before washingCheck if the spray arm is stuck by the utensilRestart the washing programmePress the power icon for 1 secondPlease contact the after sales service departmentUnload the dishwasher and replace the utensils in proper way
It is hard to open the door
Have no reflection when pressing power button Have no reflection when pressing any button except the power botton. The water light in control panel is lighting when water comes in Have crashing noise when it is working There utensil was not cleaned up
1.The position of drainage pipe is too high 3.Drainage pump is broken4.The filling valve is broken2.The drainage pipe is tied,blocked or pressed by something heavy
Refer to drainage pipe installation Please contact the after-sales service departmentPlease contact the after-sales service departmentUntie the pipe and remove the heavy thing
A lot of water were left in appliance when is not workingIf the solutions above can not fix the problems, please stop to use appliance immediately and cut off the power and water supply. Please contact the after-sales department.

C-06*Provide valid vouchers for purchasing products during the warranty period: Invoice or product SN code.*Free warranty within 12 months based on the date of SN code of the product leaving the factory.*The following conditions do not fall within the scope of free maintenance during the warranty period, :1、Damage caused by improper use and maintenance of users;2、Failure to produce valid vouchers (neither invoices nor product SN codes), unclear valid vouchers, unable to confirm or altered;3、Damage caused by irresistible natural disasters (typhoons, snow disasters, hail, earthquakes, debris flows, etc.。)4、Repair by an unqualified third party.Warranty requirementsAfter sales service1Maintenance record card2Maintenance frequency Fault phenomenon Maintenance record Maintenance date Signature of maintenance personnel 12354Note: After maintenance, the maintenance staff need to make a record of the maintenance status, for offer you a better service in the future.

The presence of this logo on the product means that the disposal of the device is governed by directive 2012/19/EU dated July 4, 2012 on waste electrical and electronic equipment(WEEE). Any hazardous substance contained in electrical or electronic equipment can have a potential impact on the environment and health during its recycling.Consequently, at the end of the useful life of the device, it must not be disposed of with unsorted municipal waste.Your role as an end consumer is essential in terms of reuse, recycling and obtaining other types of value creation from this product. You have the choice of different collection and exchange systems organized by local authorities (recycling centers) and distributors. It is your duty to make use of these possibilities.C-07
This manual suits for next models
1
Table of contents
Other Merax Dishwasher manuals


