Mercury RV Duoetto HCE-10 User manual

Mercury RV Water Heaters
Duoetto
HCE-10
Dual Voltage 12VDC/240VAC
www.ausj.com.au
P.O. Box 777, Leichhardt, NSW 2040
Thank you for your purchase of the Duoetto Dual Voltage Water Heater! This device is approved to
European Quality Standards, CE, as well as AS/NZS 60335.2.21 : 2002 A1-3. The Duoetto is a simple
system with high quality parts designed to meet your needs. Please read the instruction manual for
maintenance and correct installation and operation of the Duoetto.
Should any fittings be required for your installation, we have a range which can be viewed on our
website. A sample elbow fitting has been included with your purchase.
1. Product Features
Intelligent
The Duoetto has an advanced thermostat. This thermostat allows the water temperature to be set
between 30°C and 75°C. It will sustain the set temperature when in operation.
Durable and Elegant
The exterior shell is made of high quality plastics and is both elegant and durable. The tank inside is
made of high-quality 304 food grade stainless steel.
Environment Friendly and Efficient
High-Density non-fluorine thermal layer provides excellent heat preservation, saving electricity
through maintaining the temperature.
Multi-Functional Protection
Creepage proof, over-temperature proof, dry burning proof and over pressure protection all work in
sync to make this a reliable and safe water heating option.
MODEL: HCE-10, HCE-5
Electric Storage Water Heater
2. Accessories and Data
The following accessories should be included with your unit.
No.
Item
Quantity
1
Duoetto Water Heater
1
2
Self-Tap Screws
4
3
Combined Pressure Relief Valve
1
4
Owner’s Manual
1
5
Hose
1
6
DVD
1
3. List of Technical Parameters
Feature
HCE-10
HCE-5
AC240v
DC12v
AC240v
DC12v
Rated Capacity(L)
10L
5L
Rated Voltage(V)
220~V
12v-24v
220~V
12v-24v
Rated Power(W)
1000W
300W
1000W
180W
Rated Current(A)
4.6A
25A
4.6A
25A
Rated Tank
Pressure(Mpa)
0.6Mpa
0.6Mpa
Net Weight(Kg)
5kg
4kg
Gross Weight(Kg)
5.5kg
5kg
Dimensions(mm)
425x235x235mm
210x220x265mm
Mounting Mode
Horizontal
Horizontal
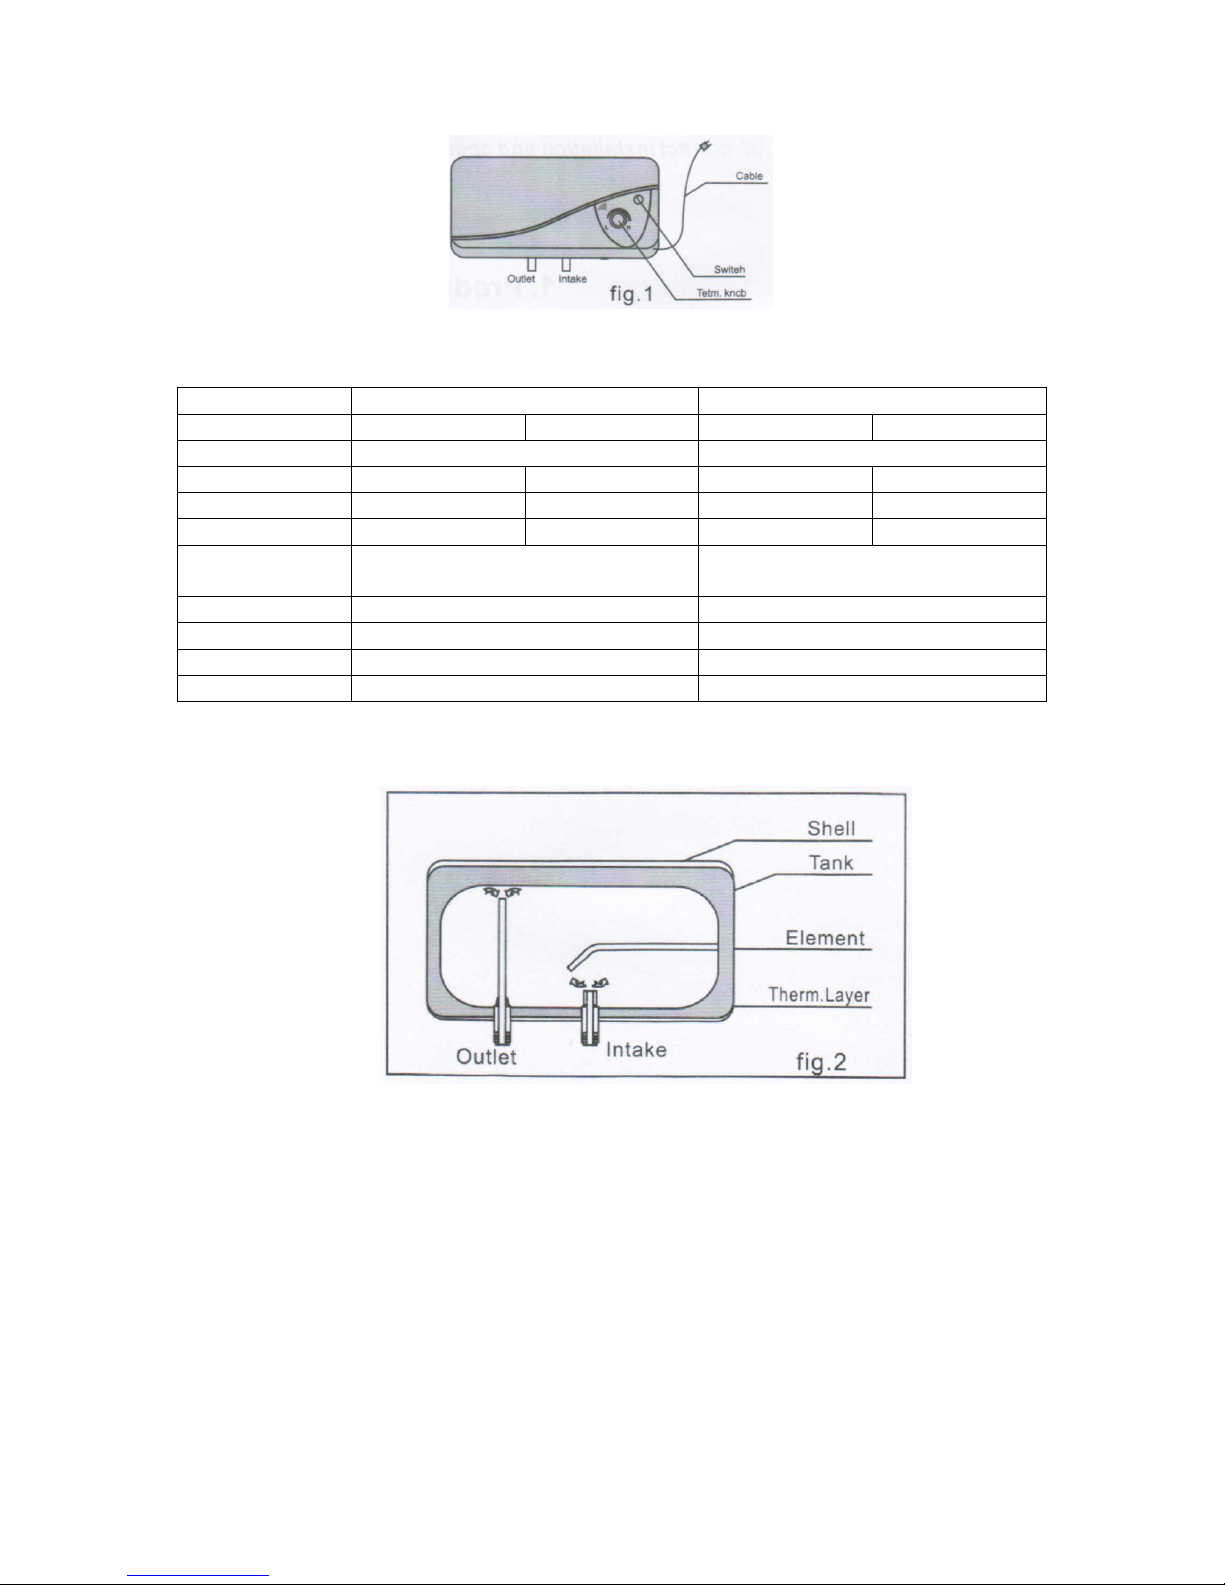
4. Waterflow Scheme
5. Safety Cautions
Electrical safety requires that this unit be earthed according to the working rules of installations of
electrical goods.
The location this Duoetto water heater is installed in should be able to support the weight of the
water system when it is full of water (Approx. 15kg).
The Duoetto must be filled with water before given power during the first use. The Duoetto is not
allowed to heater without water (run dry).
Ensure that the electrical installation has wiring sufficient for the Duoetto unit.
The power socket must have reliable earthing.

Don’t handle the plug with a wet hand.
Do not operate this device if the cord, feed or plug is damaged in any fashion.
Don’t replace the safety valve with any unauthorized products.
The blowdown hose on the outlet of the pressure relief valve should be kept downward and open to
the air. Water release from the hose is normal due to pressure within the tank, do not block this
hose.
6. Installation
Installation is the responsibility of the buyer and the manufacturer does not bear the responsibility
for any damages caused by incorrect installation, damage due to poor quality plumbing and parts,
non-standard water or not following these instructions.
Mounting the Heater
-Drill 2 holes on a firm wall. Distance between the two holes is 200mm for the HCE-10
Duoetto and 100mm for the HCE-5 Aqueous. (Shown in Fig 3)
-Screw the hooks on until they are tight, keep the hooks upward. (Shown in Fig 4)
-Hang the heater on the hooks. (Shown in Fig 5)
-Having a strap supporting the heater is also advisable.
It is recommended that the Duoetto water heater be as close as possible to the place of use to
reduce loss of heat in piping.
It is also recommended to fit a strap around the Duoetto to add strength to the mounting.
Warning: The wall must be strong enough to support the Duoetto’s weight filled with water
(Approx. 15kg).
Pipe Connection

-Screw the pressure relief safety valve onto the inlet, with the arrow on the valve pointing
upward toward the water heater. Do not remove the small screw on the pressure relief
valve.
-Connect the inlet to the water supply. (Fig 6)
During operation you may observe a small leak of water from the drainage hose connected to the
pressure relief valve, this is normal due to the expansion of water while heating.
Notices:
-No responsibility is taken by the manufacturer for damage caused to the unit when not using
the supplied pressure relief valve.
-If the water pressure exceeds 0.6Mpa a pressure reducing valve must be used.
Use of the Duoetto
-Open the outlet and inlet pipelines until water flows out normally, demonstrating that the
inlet and outlet works normally and the heater is full of water.
-Close the outlet valve.
-Check all joints to see if there is any leakage.
-When first using the water heater, ensure that the Duoetto Water Weater is filled with
water and that water flows from the outlet and only then introduce any power to the
system.
Power Connection
Before introducing any power to the Duoetto Water Heater make sure the water heater is filled
with water.
240V Installation
1. Power supplies must be on a network with an alternating current of 50 Hz 240V.
2. The water heater is equipped with a regular cord and power plug.
3. The socket should be grounded and protected from moisture.

4. The device must maintain circuit breaker protection.
12V Installation
All appliance installations should be only carried out by a qualified individual.
1. Connect the red 5mm large wire directly to house battery or another suitable power source.
2. Connect the black 5mm large ground wire to an earth point or a negative battery terminal.
3. Connect the small black ground wire to an earth point and the small red wire to a switched
power source.
Important: To avoid draining the engine crank battery, the red small positive wire must be
connected to a switch or an ignition source. (Applicable for the HCE-10/12V Type Only).
7. Methods of Usage
Heat Up
-Plug in the Duoetto after making sure it is filled with water.
-Turn the thermostat to the desired temperature and switch the heater on. Indicator lights
indicate the heater is functioning.
-Water temperature is adjustable from 30°C to 75°C.
-The Duoetto Water Heater is auto thermostatic. It automatically cycles on and off when it
reaches the set temperature.
On/Off Switch: Controls 240VAC heating. When it switches on, the 12V heating will not work. The
Duoetto will be heating on 240VAC power. The red light will not turn off even when the heater stops
heating.
DC LED: A light indicates 12V heating. It will turn off when the heater is being powered by 240VAC.
Thermostat: The thermostat controls both 12V and 240V heating, it controls the DC LED but not the
AC light.
Over Temperature Protection
This protects the Duoetto Water Heater from overheating. It disconnects a heating element from the
network at temperatures in excess of 85°C. Safety systems cannot automatically reset. Refer to
maintenance for resetting.
Over Pressure Protection
When the internal pressure is higher than the rated tank pressure the safety valve will automatically
release pressure. It is normal that water is blown down from the pressure relief outlet.
8. Maintenance
Note: Regular maintenance service is not included in the guarantee certificates of the manufacturer
or seller.
To clean the shell of the Duoetto Water Heater, do not spray water directly onto it. After the power
is disconnected, use a soft wet cloth to clean it, drying with a dry cloth afterward. Keep the water
heater shell dry and clean.
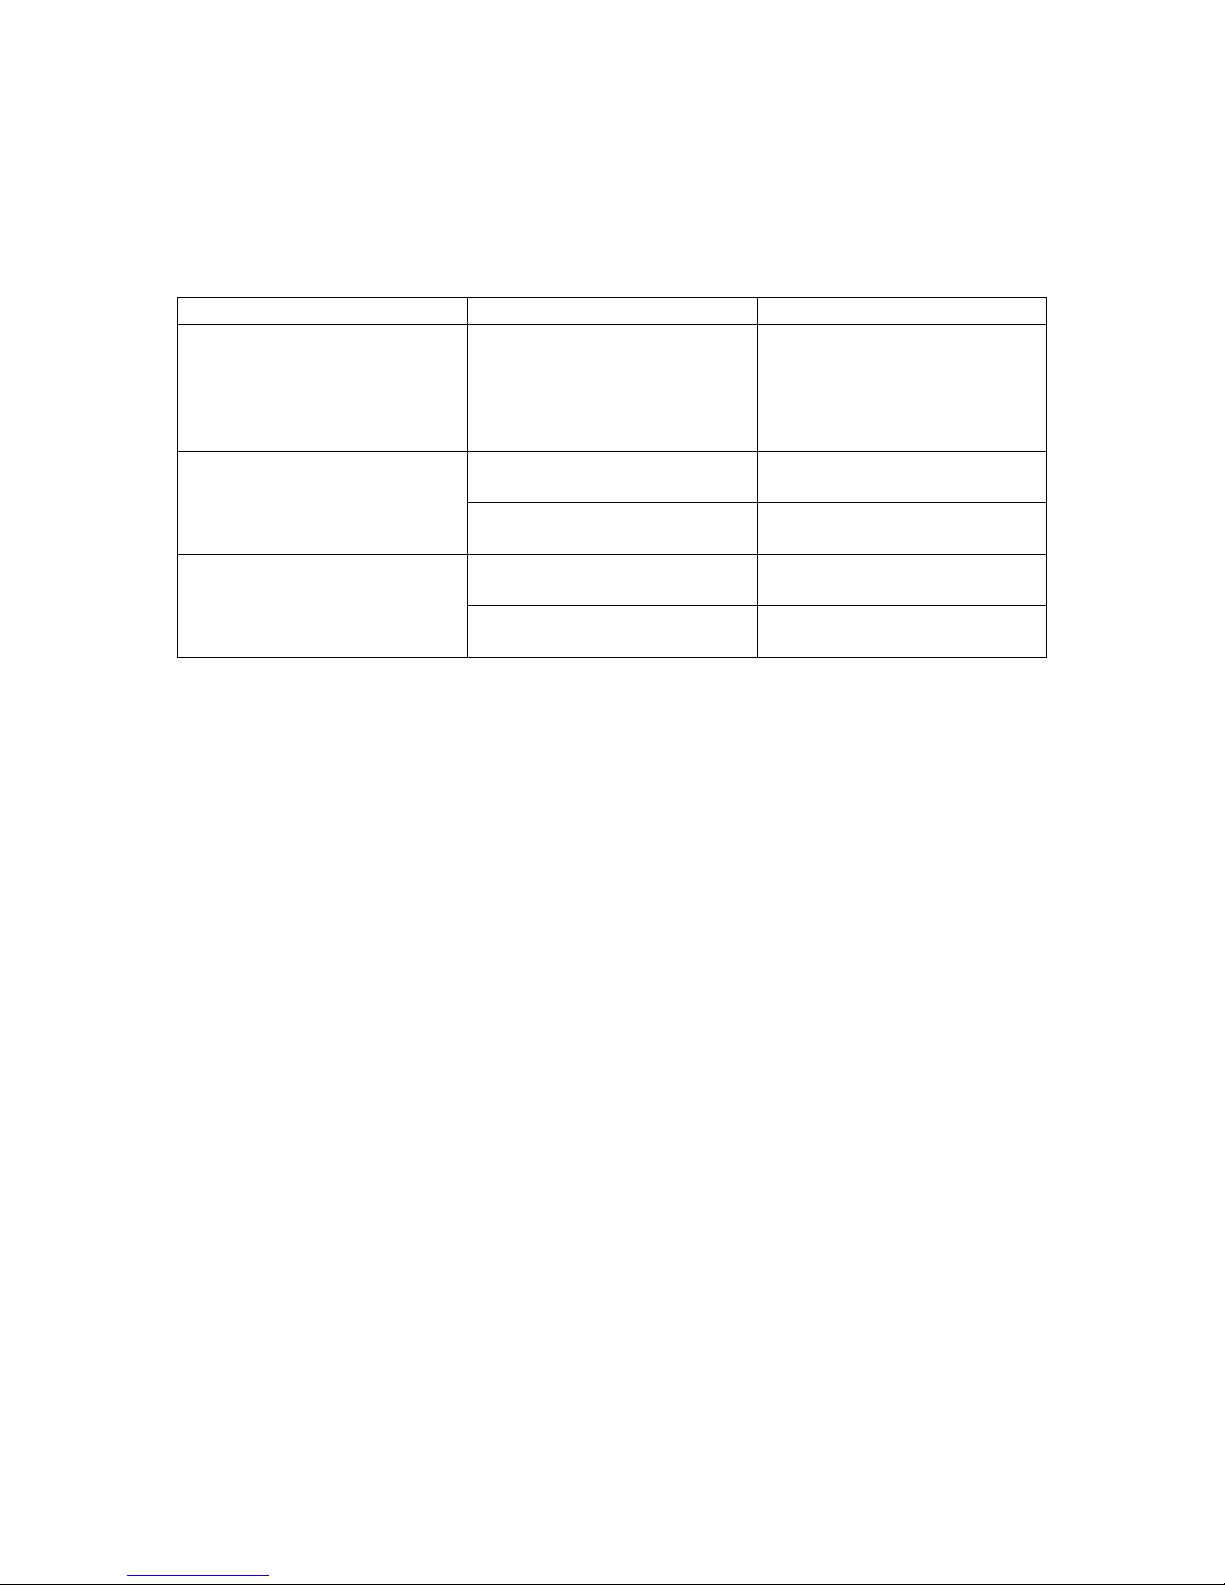
9. Troubleshooting
Problem
Possible Cause
Possible Resolution
The pressure of the hot water
from the Duoetto has
decreased. The cold water
pressure remains the same
however.
Contamination of the inlet
aperture or the safety valve.
Try removing the valve and
washing it out in clean, pure
water.
Time to heat the water has
increased.
The heating element may be
covered in scum.
Clean the heating element.
The electric system may have
reduced in quality.
Service the electrical system.
The over-temperature
protector is triggered during
operation
The temperature is close to its
limit.
Turn the thermostat to a lower
temperature.
The tube of the thermostat has
become covered with scum.
Clear the tube of scum.
Warnings:
Water Heaters using 240VAC must use a reliable grounding socket.
If you find any earth failure or abnormality, stop using the water heater immediately, unplug the
heater and contact your supplier for service.
10. Guarantee Certificates
- The guarantee on this water heater is 12 months’ supply of parts within Australia (from the date of
sale).
- Supply of spare parts is carried out free of charge within the warranty period.
Note: Infringement of the instruction manual procedures cancels the warranty period and any
complaints will not be accepted.
11. CIRCUIT DIAGRAM
Only install your appliance in accordance with any state or territory regulations with a qualified
installer.


12. 12V Cable Length and Current Capacity Guide
Current, Length (Twin) to area (sq mm)
12.6VDC, current carrying capacity(CCC)(top) then follows 5% volt drop to 70 sq mm.

Please fill in all details correctly.
Retain this card with original purchase invoice for any future warranty claim.
Please note in the event of this document and the original purchase invoice not being provided,
warranty will commence from the date of manufacture.
Owner’s Details:
Surname…………………………………………………………………………….. Initial…………………………………………………
Address………………………………………………………………………………………………………………………………………………
…………………………………………………………………………………………………………………………………………………………..
Date of Purchase………………………. Purchased from…………………………………………………………………….……..
Model………………………………….. Serial Number…………………………………………………………………………………..
Installer’s Details
Date of Installation………………………………….. Installer’s Name…………………………………………………………….
Address……………………………………………………………………………………………………………………………………………..
Installer’s Signature…………………………………………….....
Table of contents
Popular Water Heater manuals by other brands

Mex
Mex CODE 35E instruction manual

Bosch
Bosch AQUASTAR 125B LPL operati Installation and operating instructions

A.O. Smith
A.O. Smith 300 Series instruction manual

Rheem
Rheem 511161 Owner's guide and installation instructions

EcoWater
EcoWater series 1000 ss manual

Coleman
Coleman 2300 Series Instructions for use


Siemens
Siemens DE 527 Series operating instructions

Siemens
Siemens 9001071760 operating instructions

Noritz
Noritz NR83-DVC owner's guide

Atlantic
Atlantic Ingenio VM 050 D400-3-E instruction manual

Navien
Navien NR-180A installation manual

American Water Heater
American Water Heater 300 Series instruction manual