Merging VCube User manual
USER MANUAL
User Manual

No part of this documentation may be reproduced in any form whatsoever or be stored in any
data retrieval system without prior written permission of the copyright owners.
This documentation is supplied on an as-is basis. Information contained within this documenta-
tion is subject to change at any time without notice and must not be relied upon.
All company and product names are ™ or Registered Trademarks ® of their respective owners.
Windows Vista, Windows XP and Windows 2000 are trademarks of Microsoft Corporation.
Dolby E functionality is being provided by SurCode for Dolby E.
SurCode for Dolby E. is manufactured under license from Dolby Laboratories.
Confidential unpublished works. 2003-2012 Dolby Laboratories, Inc. All rights reserved.
SurCode is a trademark of Minnetonka Audio Software.
Merging Technologies makes no warranties express or implied regarding this software, its qual-
ity, performance, merchantability or fitness for a particular purpose. The software is supplied “as
is” you, the purchaser, are assuming the entire risk of the results of using this Merging Technolo-
gies software.
In no circumstances will Merging Technologies, its owners, directors, officers, employees or
agents be liable to you for any consequential, incidental or indirect loss or damages including
loss of time, loss of business, loss of profits, loss of data or similar resulting from the use of or
inability to use the Merging Technologies hardware and or software or for any defect in the
hardware software or documentation.
©Copyright Merging Technologies Inc. 2012. All rights reserved
Merging Technologies
Le Verney 4 1070 Puidoux Switzerland
Tel: +41 21 946 04 44 Fax: +41 21 946 04 45
www.merging.com

Contents : Page iii
Introduction 10
Thank you! 10
Overview 10
What is VCube? 10
Contacting Merging 11
International Office: 11
UK: 11
USA: 11
VCube Keys & Options 12
Installation 14
Early VCube Systems 14
VCube Concepts 14
Project 14
Composition 14
Track 14
Video Track Layer 14
Audio Track Layer 14
About This Manual 15
Assumptions 15
Conventions 15
Important Note 16
User Interface 17
Overview 17
Program Screen 18
Context Menus 19
Navigating the Interface 19
Zoom in the Timeline 20
Timeline 21
Synchronization 24
Requirements 24
Important Note 25
Quick Settings 26
Overview 26
Using Quick Settings 26
Quick SD Settings 27
Contents
Contents : Page iv
Quick HD Settings 29
Projects 31
Compositions 31
Composition File Tab Page 31
New Composition 33
Load Selective 33
Settings Imported With Composition 34
Import 35
Import Composition and Export Changes 35
Import Layer 35
Import Images Sequence 36
AAF 39
MXF 40
OMF 40
Media Management 43
Media File Browser 43
Drag & Drop 45
Media Handlers 46
QuickTime 46
MXF 47
MPEG 47
File Extensions Supported 48
Tracks and Layers 49
Video Tracks and Layers 50
Track and Layer Order 50
Audio Tracks and Layers 51
Tracks and Layers Created Automatically 51
Adding Tracks and Layers 51
Dolby E on the Timeline 51
Transport and Navigation 52
Navigation 52
Time Ruler 52
Zoom 52
Locators 52
Transport Control 55
Transport Control Bar 55
Transport Tool 56
Go To TimeCode 58
Recording and Acquisition 59
Recording 59
Virtual VTR 59
Record Settings Tab 61
Editing 65
Editing in the Timeline 65
Clips in a Composition 65
Selections and Groups 65

Contents : Page v
Nudge 66
Editing Functions 66
Trim 67
Edit Context Menu 68
Motion Rectangles (PiP) 70
Watermark and Text 73
Watermark 73
Text Clip 75
Generated Clips 78
Countdown Clip 78
Wipe Clip 80
Video Test Pattern Clip 81
Audio Tone clip 82
Conversion and Rendering 83
Export Composition 83
XML 83
Conversion, Rendering and Wrapping 83
Convert Media Files 83
Render Composition 90
Convert Still Images 91
Wrap Audio 92
Wrap Audio Dialog 93
Level Magic™, from Jünger Audio 98
Jünger Level Magic Expert Settings 98
Final Check Meter 100
MXFix™ (Batch Export, Re-Wrapping) 101
MXFix Quick Procedure 102
MXFix Folders dialog 103
MXFix Wrapper Dialog 104
Running MXFix 108
MXFix Web Monitor 109
Frame Rate Management 112
Control Settings Page 113
File Tab 114
VCube Compositions 115
Media File Browser 116
Locator Tab 116
View Tab 116
Clip Info 116
Video Clip 117
Audio Clip 120
Shortcut 123
Workspace 124
Edit 127
Main 127

Contents : Page vi
Clips 128
Layers 129
Tracks 130
Settings 131
Settings Page 131
Preset 131
Creating Global Presets 132
Format & Sync 133
Video I/O 138
Overlay 139
Preview 141
Composition 144
Buffer & Cache 147
User Interface 148
Encryption 149
Media Settings 150
Timeline 151
Video Engine 153
Audio Engine 154
Isis Controller 156
Tool Bar 157
Tools and Toolpickers 157
Applications 165
Non Compensated Telecine at 24 fps 165
24fps Composition Chasing other Timecodes 165
Using the Graphic Card S-Video Output 166
Remote Control 167
VCube Chasing Pyramix Via Virtual Transport in the Same PC (PyraCube) 167
VCube Chasing Pyramix Using Virtual Transport Via Network 168
Remote Control VCube with a Sony 9-pin Controller 170
Synchronizing VCube to a Sony 9-pin Chase Synchronizer 171
Sony P2 Protocol over IP 171
VCube Controlled by Sony 9-pin, Chasing an LTC Source 172
Synchronize VCube with an LTC Source 173
Synchronize VCube with a VITC Source 174
Machine Control 175
VCube Controlling & Chasing a Sony 9-pin 175
Menus 177
File 177
Edit 178
Selection 180
Zoom 180
Locator 181
Goto 182
Transport 183

Contents : Page vii
Overlay 183
Settings 184
User Interface 185
Help 187
Output View 188
Output Page Diagnostic Tools 188
System Tab 188
Buffer Tab 191
Playback Info Tab 191
Sync Status 194
Troubleshooting 197
Read Drops During Playback 197
Current FPS Reduced 197
Flickering Video Output 197
Matrox Parhelia Settings 197
Frozen Image on Matrox Parhelia Output 199
Poor HD Image Quality 200
Frame Shifting with Virtual Transport 200
Sony 9-pin Not Controlling VCube 201
Recorded Media Files have incorrect Timestamp 201
Video Playback is shifted 202
User Interface with ATI Graphic Card 203
NTSC Video Output Exhibits Some Dropped Frames with PAL Media Files 203
Apple Compatibility 2GB Limitation 204
Appendices 205
AJA Video Cards and Plugins 205
LH-i - SD-SDI/HD-SDI/HDMI/Analog 205
2K - SD-SDI/HD-SDI/ 2K/ Analog 210
Xena LHe - SD-SDI/HD-SDI/Analog 215
LSe - SD-SDI/Analog 220
VCube Hardware Sync Connections 223
USB Sync Board Option 223
External Connections 224
Driver Installation 224
Default Shortcuts 224
HDTV Recorded Media 231
SDTV Recorded Media 231
Video Formats and Bandwidth 232
Audio 238
PullUp - PullDown 238
Drop Frame 238
Video Codecs Supported 239
Frame Rates Supported 240
Interchange Protocols Supported 240
Resolutions Supported 241
Contents : 1 - viii
MJPEG Compression Ratios 243
Files Supported. 244
AVI 1, AVI 2 and AVI ref 245
MPEG Settings (MainConcept Encoder) 245
MPEG Overview 245
Export 247
Media Storage Requirements 261
Installation Examples 262
A Great Solution for Audio Post for Film 262
Basic VCube Operation 263
Pro Tools & VCube Operation 264
Pyramix, VCube and ProTools 265
Avid Unity and VCube 265
Fairlight Controlling a VCube 267
Fairlight DREAM/MFX3 267
Fairlight DREAM Satellite 267
Fairlight DREAM Station 267
Pro Tools and VCube 267
Pro Tools 6.4.1, Mac OS 10.3 and a KeySpan 267
Pro Tools HD 272
Sony 9-Pin RS422 Wiring Chart 275
Glossary 279
Index 287

:
: Page 9
Document revision-22
Date: 28th-November-2012

Introduction : Thank you! Page 10
Introduction
Thank you!
Congratulations on your purchase of the VCube HD Video System. More than just a powerful video solution,
VCube is part of a comprehensive range of Audio, Video and Show Control products, software and hardware. Wel-
come to the worldwide community of users who have already discovered the Merging Technologies advantage.
Note: IMPORTANT! - The first thing you need to do is register your software to acquire your
VCube key(s) and to be included in our user support list.
Please also subscribe to the User Forum at:
http://www.merging.com/forum/
Overview
What is VCube?
VCube is a hard-disk based video player / recorder system with real-time editing and resizing functions. It is
designed to be an easy to use, flexible, high quality, and reliable video file play out and capture device synchroniz-
able with any time reference standard. For example:
In Sound for Picture Post-Production, ADR etc.
Theatres
Theme Parks
Museums
Trade Shows
AV Presentations
Film Festivals
are just a few of the possible applications for VCube.
VCube can operate as a standalone unit, or as part of a multi-system network, fully integrated with Pyramix or
Ovation, over standard Ethernet networks.
Like Pyramix it offers sync to PAL, NTSC, 24fps Film and all the HDTV frame rates.
The Turnkey versions of VCube are also able to sync to a different TimeCode and reference than the internal frame
rate. This enables, for example, playing in 24 fps while syncing to a 25 fps TimeCode.
Pro versions of VCube can also be controlled via the 9-pin Sony (P2) protocol by any third-party DAW system, as
well as controlling any device equipped with 9-pin remote control for capture. VCube fully supports the Merging
Technologies Virtual Transport technology.
The integrated video editor with multi-track, multi-layer features enables the VCube user to remove, add or trim
Media Files imported from a Composition (VCube native Composition or OMF. AAF, and Apple XML are optional).
VCube is able to mix different video file formats at different resolutions and frame rates in the same Timeline. It is
only necessary to specify the output format. All video Clips are resized and the frame rate compensated as neces-
sary to this format in real time. Therefore it is possible to play out any video file at any frame rate in combination
with any other without rendering.
VCube is an open solution that can import OMF, AAF, Apple XML Compositions. VCube is also able to convert, and
render Media. A password protected watermark feature enables the administrator to tag both video and graphic
outputs. The administrator can also protect VCube settings and editing with a second password.
VCube will be your Swiss Army Knife for video !

Introduction : Contacting Merging Page 11
Contacting Merging
International Office:
Merging Technologies S.A.
Le Verney 4
CH-1070 Puidoux
Switzerland
Phone: +41 21 946 0444
Fax: +41 21 946 0445
UK:
Merging UK
St Clare House, St Clare Business Park
Holly Road, Hampton Hill
Middx UK
TW12 1QQ
Phone: +44 (0) 20 894 16547
Fax: +44 (0) 870 1231747
USA:
Merging USA (Independent Audio)
43 Deerfield Road
Portland,
ME 04101-1805
United States of America
Phone: +1 (207) 773 2424
Fax: +1 (207) 773 2422
For all documentation inquiries or suggestions for improvement:
http://www.merging.com

Introduction : VCube Keys & Options Page 12
VCube Keys & Options
VCube is currently supplied with RGBA, RGB, YUY2, DV25, MJPEG, codecs. DVCPRO (50), DVCPRO-HD (100),DNxHD
and IMX/MPEG2 are optional. OMF is provided as a Timeline exchange format. MXF, AAF, and Apple XML are
optional.
VCube Keys Description
VCube Enable VCube Software
VCube IO SD Composite
VCube IO SD SDI Enable Xena LS
VCube IO HD SDI Enable Xena LH
VCube IO HD SDI Dual-Link Enable Xena 2K
VCube IO HD SDI Dual-Link Ex
Vcube IO HD Telecine
VCube MPEG2-SD/D10/IMX (Sony XDCam SD) IMX / MPEG2 / MPEG1 support
VCube DVCPro DVCPRO 25 / 50 support
VCube InterChange - Final Cut Pro XML XML Timeline exchange
VCube InterChangeAAF AAF Timeline exchange
VCube HD 2K formats higher than 1280 x 720
VCube DVCPro HD DVCPRO 25 / 50 / 100
VCube MXF MXF file format support
VCube VC-3 (Avid DNxHD) DNxHD codec support
VCube MPEG2-HD (Sony XDCam HD)
Vcube AVC-Intra (Panasonic P2)
VCube SE (no cross-lock) VCube Without Mykerinos
VCube LE (no cross-lock, no media generation) Player only
VCube XE (no cross-lock) Player only
Machine Control Pro option for SE, LE, XE
Bi-Phase Pro option for Turnkey, SE, LE, XE
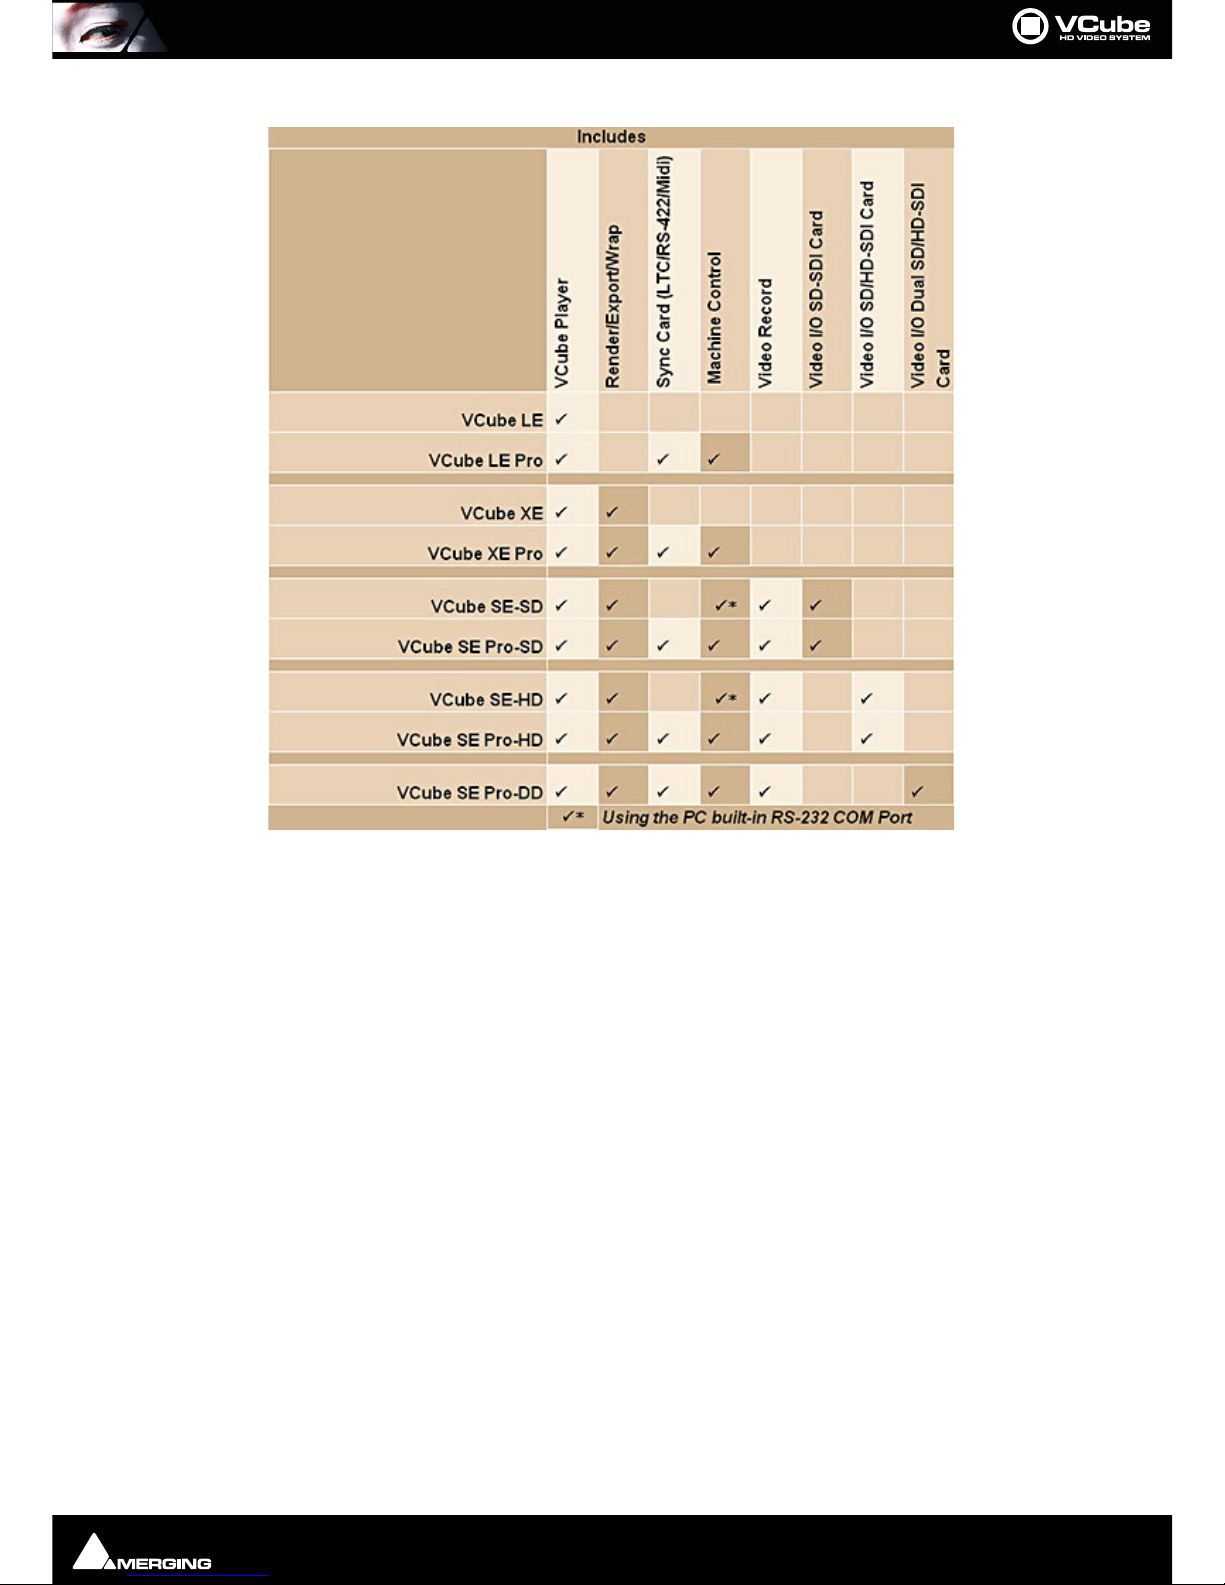
Introduction : VCube Keys & Options Page 13
VCube Versions

Introduction : Installation Page 14
Installation
Please see the VCube Installation Guide and the Installation Guides for any hardware you have purchased.
Early VCube Systems
Note: Early VCube systems may include AJA Xena LS, Xena HS or Canopus ADVX-1000 video
cards. These are no longer actively supported as of Version 2. If you have one of these cards you
may wish to contact your Merging Technologies sales partner to discuss a cross-grade solution.
VCube Concepts
Project
A Project is the top level of organization. Projects are saved with the file extension .VCube. A Project controls and
keeps track of all the various elements you are assembling at a given time. A Project always contains a Composi-
tion, viewed on the Timeline.
Composition
A Composition is any number of Clips complete with edits and fades, level settings etc. placed on a Layer in a
Track or tracks in a time relationship to each other and to the Timeline.
Track
In the Timeline Video and Audio assets are placed onto Layers within Tracks.
Video Track Layer
Video Track Layers behave in the same manner as layers in a non-linear video editor. I.e. video on the topmost
layer of the topmost track will hide concurrent video below it unless there is a compositing blend mode or
picture-in-picture mode in force.
Audio Track Layer
Audio Track Layers display the waveform for each channel in the audio media file. Thus a stereo audio track will
have two layers and a 5.1 will have six.
Introduction : About This Manual Page 15
About This Manual
Assumptions
This User Manual and the other documentation assume you are thoroughly familiar with PCs and Windows terms
and concepts. If the PC is new, please ensure the machine is working correctly before attempting to install VCube.
Note: Although VCube version 2 runs under the 32 bit versions of Windows XP, Windows Vista
and Windows 7, it does not support the “Aero” style transparency display features present in
Windows Vista and Windows 7. This will be turned off automatically for the duration of the
VCube session.
Conventions
Conventions used in this document:
Names found on screens and in menus are shown in bold. E.g. Information & Settings
Menu and sub-menu selections are shown like this:
User-Interface > Output > Show Buffer Tab
Which means:
Go to the User-Interface pull-down menu, mouse down to the Output sub-menu, mouse down to the Show Buf-
fer Tab entry and Click.
References to VCube Settings Tabs are shown thus:
Settings : Formats & Sync : Composition Video Format : Height
Which means:
In the Settings Page accessed via Settings > Show All Settings click on the Down Arrow and Click Format &
Sync to open the Tab. In the Composition Video Format Section the Height field is the one we are interested in.
Keyboard Shortcuts are shown thus: [Ctrl + Num 9].
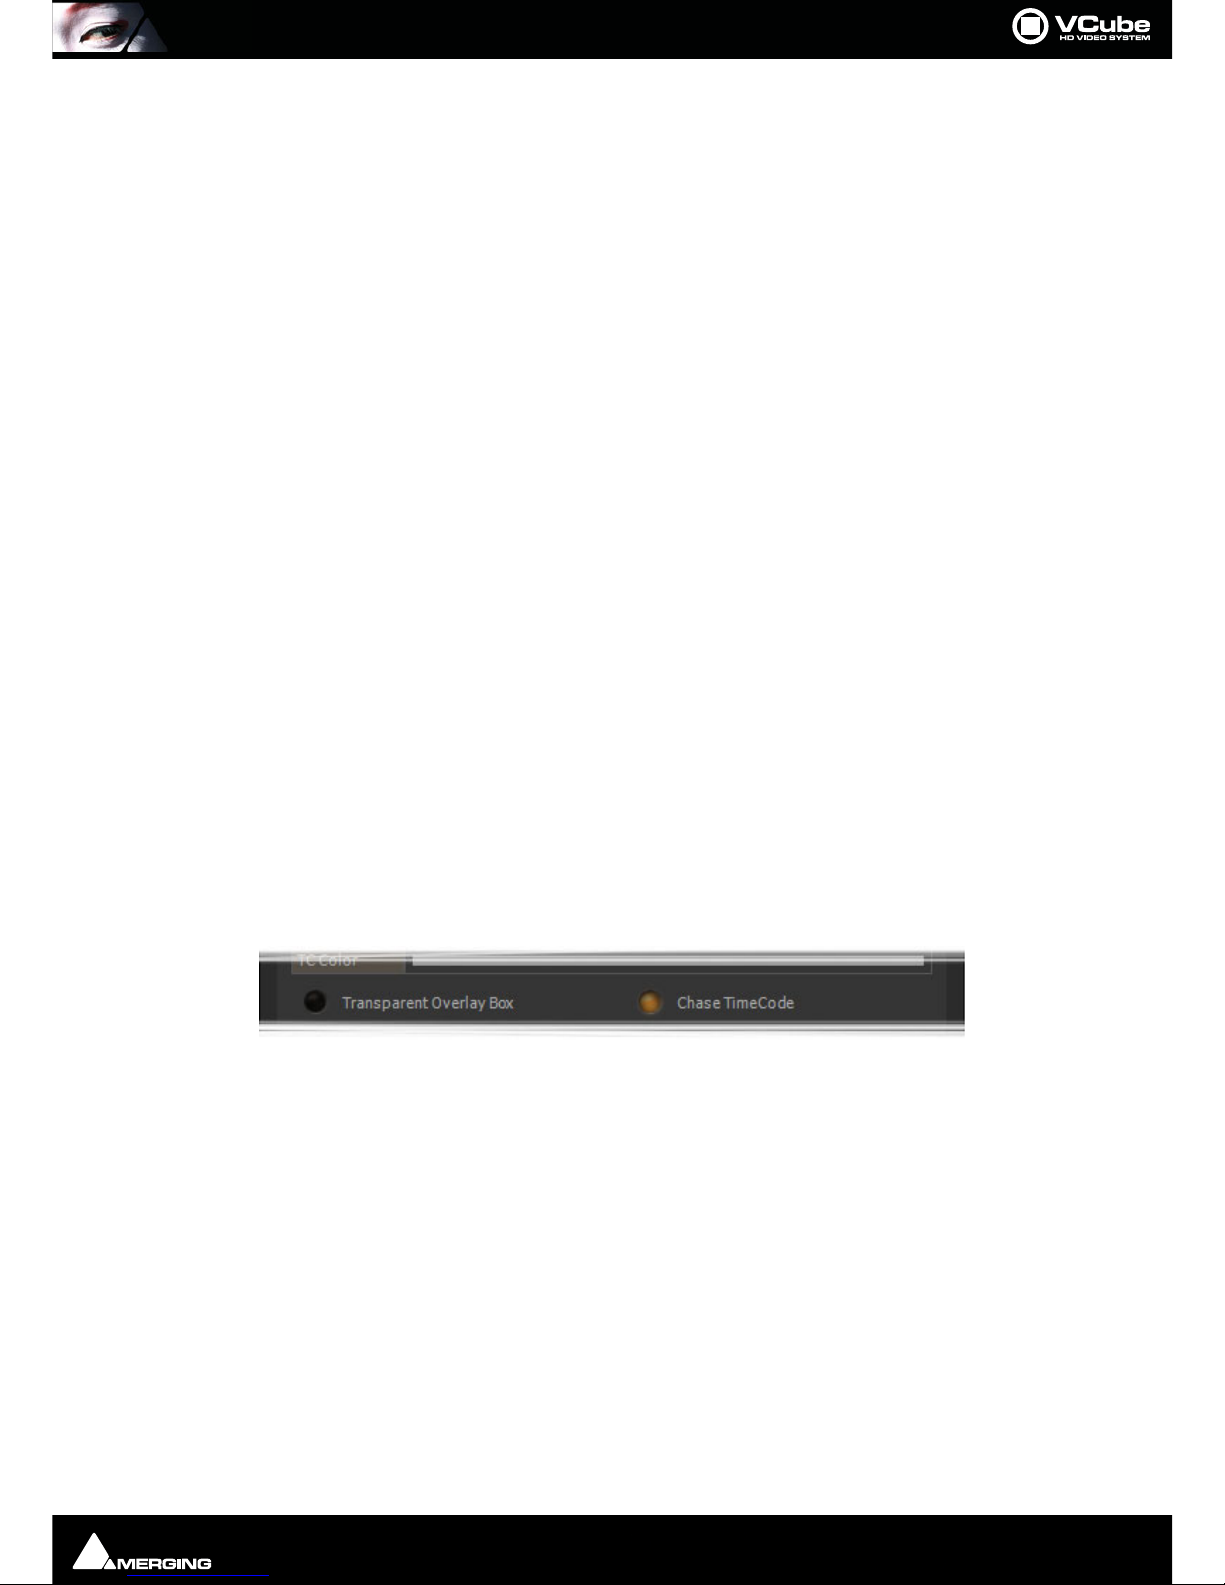
The VCube User Interface uses a number of buttons. These are dark when unchecked (inactive, not selected) and
orange when checked (active, selected) The state of these buttons is referred to as checked or unchecked.
In the screenshot above the Transparent Overlay Box is inactive (unchecked) and Chase TimeCode is active
(checked).
Documentation
Automatically installed with VCube and available under the Help menu or [F1], this manual is intended to be a
comprehensive reference source for all the standard features and functions in VCube.
To ensure the document is visible please uncheck TopMost in Settings > Show User Interface Tab : Display -
Manual Resize or use [Ctrl + Shift + Alt +P] to open the page.
All the documentation is in the Adobe Acrobat pdf format. (.pdf file extension)
In order to read the documentation you will need to have Adobe Acrobat Reader V5 or later installed on your
computer.
Other documentation can be found in the Windows Start menu in All Programs > VCube > Docs. Please check
for the most recent versions at:
http://www.merging.com
VCube button states

Introduction : Important Note Page 16
Note: All features described in the documentation are available in the Advanced Mode. If the
user-interface is set to Simple Mode some features may remain hidden or unavailable. To
change the UI Mode:
User Interface > WorkSpace > UIMode: Advanced [Alt + F3]
User Interface > WorkSpace > UIMode: Simple [Alt + F1]
Navigation
In electronic form, all the Contents and Index entries and Cross-references are hyperlinks. I.e. Clicking on them
will jump to the relevant item.
ToolTips
VCube software is equipped with ‘ToolTips’. Hovering the mouse cursor over a tool icon pops-up a box with the
name of the function and the keyboard shortcut (where applicable).
Support
If you cannot find an answer to a query in the documentation, please consult the on-line support at:
http://www.merging.com
where you will find answers to F.A.Q.s (Frequently Asked Questions) and further support.
Multiple Monitors
VCube supports 2 screen extended desktop operation. Depending on the Vcube version and the hardware avail-
able, analog and digital video outputs are available to feed monitors and or projectors.
Important Note
VCube is not only a very powerful video player/recorder, it is also a highly configurable one, the User Interface as
much as the Video and Audio. Therefore screenshots in this document may differ from what you see on screen.
PLEASE DO NOT PRINT THIS DOCUMENT UNLESS ABSOLUTELY NECESSARY
SAVE TREES AND INK BY USING THE HYPERLINKS

User Interface : Important Note Page 17
User Interface
Overview
VCube is organized with a Tabbed Page interface. Every Tab can be displayed in a broken away window, on top of
the Preview, if required, even while Preview is full screen. Classic pull-down menus complement this user inter-
face. In VCube there are usually at least three ways of accessing everything. E.g. Menu, Icon, Tab or Keyboard
Shortcut.
To display a Page Tab separately, Double-click on its Title Label. The floating Tab Page can now be Click-and-
dragged anywhere on the screen(s).
To restore the Tab Page to its default position, just Double-click again on the Title Label or use the close window
X icon.
To display an individual Tab separately, [Ctrl + Double-click] on its Title Label.
To restore to the default position, just Double-click on its Title Label or use the close window icon.
Individual Tabs can also be displayed separately by a Double-clicking on their Title Labels.
Color Picker
Several VCube Settings Tabs use a Color Picker.
Pick one of the standard colors by simply clicking on it.
Alternatively Click on Custom to edit the colors in the first row of the Color Picker.
Click in the bottom bar to choose a Hue value.
Finally, Click in the Saturation area to define the custom color.
User Interface : Program Screen Page 18
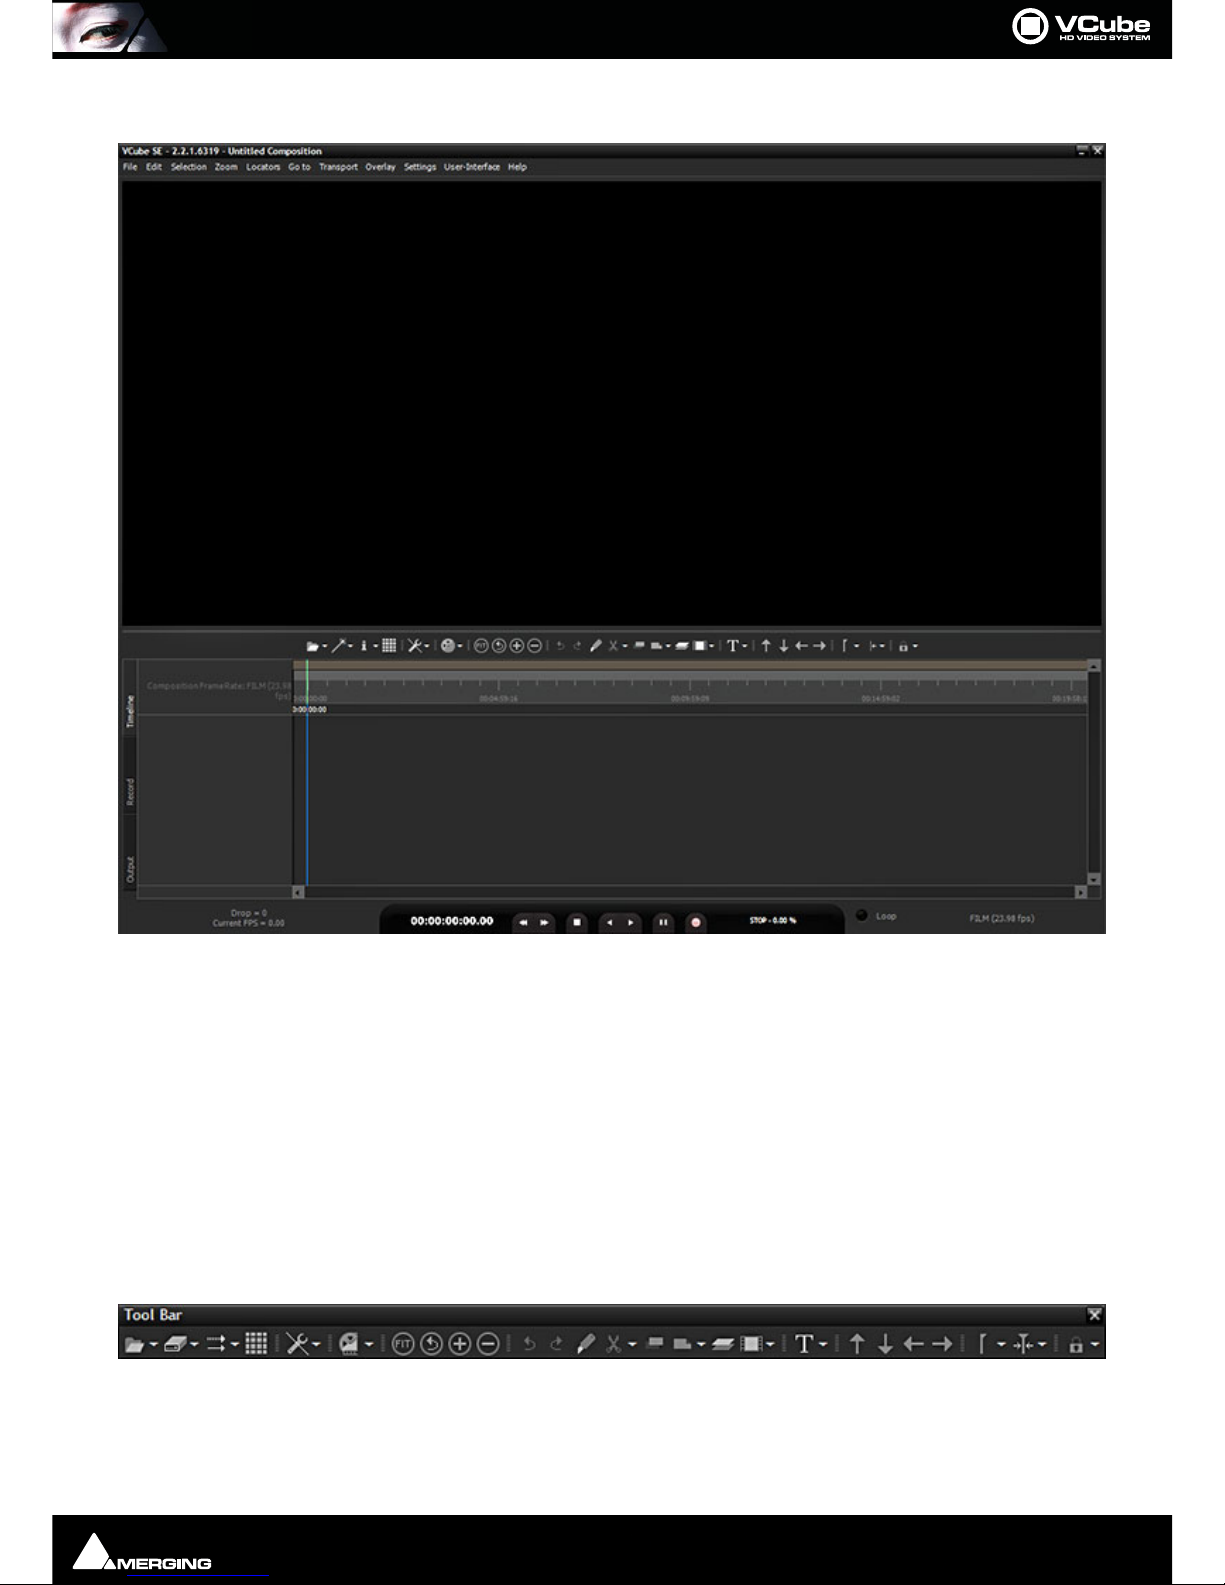
Program Screen
The main VCube screen appears when the program is launched. This screen is NOT resizable in the conventional
Windows manner and will occupy the whole screen area of one PC monitor unless Floating Window mode is
selected ([F4] toggles). It can also be minimized or closed with control boxes at top right.
Pull-down menus are at the top of the screen.
By default the entire upper panel is a Preview video monitor. Beneath this is the Toolbar and the Timeline panel
with the Locator Bar, Time Scale (plus optional Film Footage scale) and Range Bar at the top and the Transport
Control bar at the bottom.
The Timeline area is tabbed with Timeline, Record and Output Tabs available on the left.
The Toolbar can be made ‘floating’ by double-Clicking it. Double-Clicking the header of the floating Toolbar re-
docks it.
The splitter (dividing line) between the panels may be grabbed with the mouse and moved up or down, thereby
varying the space allocated to each panel.
VCube Program Screen
Floating Toolbar

User Interface : Program Screen Page 19
Context Menus
Right-click in the Preview pane or in the Timeline with the Cursor over the tracks to display contextual menus.
Note: The Timeline menu contents varies depending on circumstances.
Preview Context Menu
In Simple, Full Screen or Floating modes, several VCube functions can be accessed with a Right-Click on the pre-
view area :
Toggle Fullscreen Preview [F3] Toggles Preview Full Screen.
Toggle Floating Window [F4]Toggles the Preview window floating and hides the User Interface except
for broken away windows
Toggle Show/Hide Settings [F2]Toggles Control Settings Pages.
Toggle Burn-in Timecode [B] Toggles the Burnt-in TimeCode Counter Show/Hide
Toggle External TC [Alt + B] Toggles the External TimeCode Input display Show/Hide
Toggle Mask On/Off[M]Toggles the horizontal and vertical Masking On/Off
Navigating the Interface
Whilst it is perfectly possible to operate VCube without recourse to Keyboard Shortcuts we strongly advise learn-
ing at least the basics. Changing the layout of the User Interface during operation and opening and closing the
most common Pages and Folders is much more efficient this way rather than delving in menus. The following list
gives the most commonly used Interface functions, their shortcuts and menu entries :
Display Control Settings Pages [F2]User Interface > Toggle Show/Hide Settings
Displays the Settings and Control Pages on the right-hand side of the Preview pane. The Preview is resized to suit.
The width of the Control Settings Pages can be changed by clicking and dragging the separator.
Toggle Full Screen Preview [F3]User Interface > Toggle Full Screen preview
Toggle Floating Window [F4]User Interface > Toggle Floating Window
Makes the Preview window float and hides the User Interface except for broken away windows. You can choose
from
Refresh [F5]User Interface > Refresh
Toggle File Page [F6]User Interface > Settings Pages > Show File Page
Toggle Locator Page [F7]User Interface > Settings Pages > Show Locator Page
Toggle View Page [F8]User Interface > Settings Pages > Show View Page
Toggle Edit Page [F9]User Interface > Settings Pages > Show Edit Page
Open Settings Page [F10]User Interface > Settings Pages > Show Settings Page
Opens the Settings Page floating
Previous Settings Page [Home]User Interface > Settings Pages > Previous Settings
Page
Next Settings Page [End]User Interface > Settings Pages > Next Settings Page
Show Timeline in lower panel [F11] User Interface Show Timeline Page
Preview Context Menu

User Interface : Program Screen Page 20
Show Record Page in lower panel [F12]User Interface > Show Record Page
Toggle Transport Control Panel [T]User Interface > Toggle Transport Tool
Show Preset Tab [P]Settings > Show Preset Tab
Zoom in the Timeline
To change the Zoom level use [Alt + Mouse wheel] or [Alt + Click into the Time Ruler and Drag].
[Alt + Drag in the Timeline] Zooms to the Region selected.
Double-click on the Time Ruler acts as Zoom All and deselect selected clip(s).
Zoom All [Alt + 1]
Undo zoom [Alt + 2]
Zoom In [Alt + 3]
Zoom Out [Alt + 4]
Other manuals for VCube
1
Table of contents


