Meris LVX User manual


SECTION 1 PG. 1 - 2 OVERVIEW
- LVX
- Navigation Controllers (C1, C2, C3)
- Highlighted Features
- Back Connections
SECTION 2 PG. 2 PRESET PAGE
SECTION 3 PG. 3 EDITING (EDIT PAGE)
- EDIT PAGE - Navigation Controllers, Favorited Parameters
- UI Map in GRAPHIC VIEW
SECTION 4 PG. 5 SAVING (SAVE AS PAGE)
- SAVE AS PAGE - Navigation Controllers, Save, Quick Save
- Selecting Fields
- 2 FAVORITE PARAMETERS
- SAVE PRESET or CANCEL
- QUICK SAVE
SECTION 5 PG. 8 FAVORITES BANK
SECTION 6 PG. 9 MODIFIERS
SECTION 7 PG. 10 EXPRESSION
SECTION 8 PG. 11 LOOPER
SECTION 9 PG. 12 DELAY STRUCTURES
SECTION 10 PG. 13 CATEGORIES AND ELEMENTS
- Preamp Category
- Filter Category
- Pitch Category
- Modulation Category
TABLE OF CONTENTS


1
Make Room for New Memories.
LVX is what we’ve been dreaming of for many years. It is a Modular Delay System which breaks the paradigm of pre-set delay
types in favor of freedom and flexibility. The architecture of LVX allows ultimate creative freedom to design a custom delay,
exactly as you’ve dreamed of. We designed a completely new UI and experience from the ground up, to make a complex system
immediately intuitive to navigate. LVX is built of discrete processing elements and control signal generators that we call Modifiers.
They can be connected as desired for nearly infinite flexibility in crafting custom sounds. Experiencing the built in factory presets
will demonstrate a variety of examples of the power within LVX. The true creative potential of LVX will be revealed as you
discover all of the new ways to unveil your own vision.
01 - OVERVIEW
CANYONERO QUICKSTART GUIDE
99
PRESETS
MIDI
IN/OUT
LOOPER
STEREO
TUNER
PRECISION
MODULAR
LIMITLESS
TRUE
STEREO
PROCESSING
FIRST GLANCE
Canyonero is a modular delay system with pro audio heritage, advanced processing, and high performance signal paths.
Turn knob to navigate presets.
Push to edit preset parameters,
turn to navigate parameter pages.
Hold to enter save mode.
1.
2.
3.
4.
5.
6.
7.
THE NEW GENERATION OF PEDALS
*Download full PDF manual on product site.
Turn knob to edit current
parameter.
3 knobs are your navigation controllers.
Turn knob to edit favorite parameter.
CONTROLLER 1 (OR C1)
CONTROLLER 2 (OR C2)
CONTROLLER 3 (OR C3)
7 HIGHLIGHTED FEATURES
IS A MODULAR DELAY SYSTEM WITH PRO AUDIO HERITAGE,
ADVANCED PROCESSING, AND HIGH PERFORMANCE SIGNAL PATH
3 MAIN CONTROLLERS: C1, C2, C3
When using LVX, 3 knobs are your main navigation controllers: C1, C2, C3.
The other four knobs are your top level controls for TIME, FEEDBACK, MOD, and MIX.
CONTROLLER 1 (OR C1) CONTROLLER 2 (OR C2)
CONTROLLER 3 (OR C3)

2
02
BACK PANEL CONNECTIONS
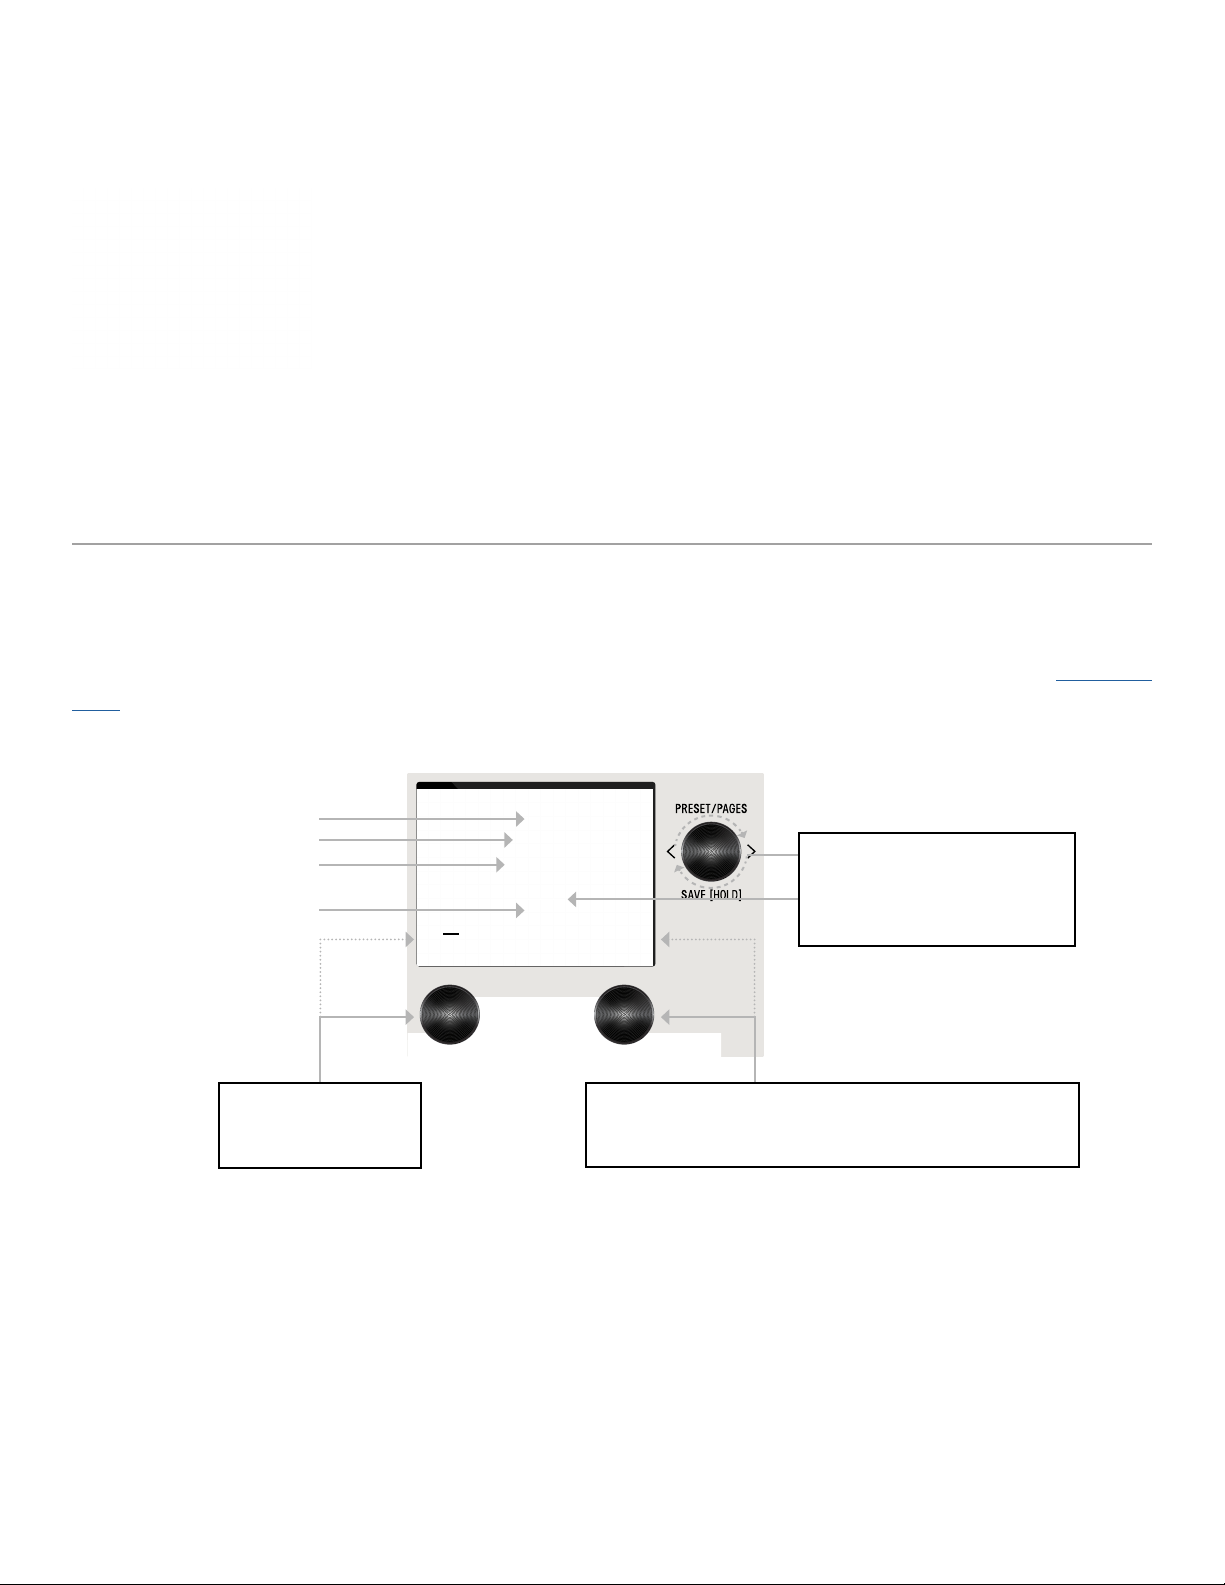
When you first power up LVX, you will enter the Preset Page. By default, LVX is shipped in “GRAPHIC VIEW”. In GRAPHIC VIEW,
3 knobs are your navigation controllers: C1, C2, C3. The Preset Page consists of a preset bubble that contain the name and num-
ber. 2 FAVORITE PARAMETERS are controlled by C1 and C2 (located directly above the controllers). (You can assign your favorite
parameters per preset, to either the L or R side. Changes of the 2 favorited parameters are located in the SAVE AS PAGE.
Details ahead.
CONTROLLER 2 (OR C2)
Turn C2 knob to edit
favorite parameter assigned
to the R side.
CONTROLLER 3 (OR C3)
Turn knob to navigate thru
1-99 presets (33 banks of 3).
- PRESET PAGE (GRAPHIC VIEW)
POWER SUPPLY
9VDC center-negative power and
at least 300mA of current to the
2.1mm power input required.
USB-C
Used to connect to computer
for firmware updates only.
EXPRESSION PEDAL JACK
realtime control of multiple
parameters simultaneously.
LINE/SYNTH LEVEL
Indicator LED is lit
when enabled.
5 PIN DIN MIDI I/O JACKS
CONTROLLER 1 (OR C1)
Turn C1 knob to edit favorite
parameter assigned
to the L side.
NOTE: GRAPHIC VIEW is designed to focus on 1 block and/or 1 parameter at a time per preset. (You have the option to switch to
“TEXT VIEW” in GLOBALS -> EDIT PAGE. Favorite Parameters are also available in TEXT VIEW.

3
03- EDITING (EDIT PAGE IN GRAPHIC VIEW)
EDIT PAGE
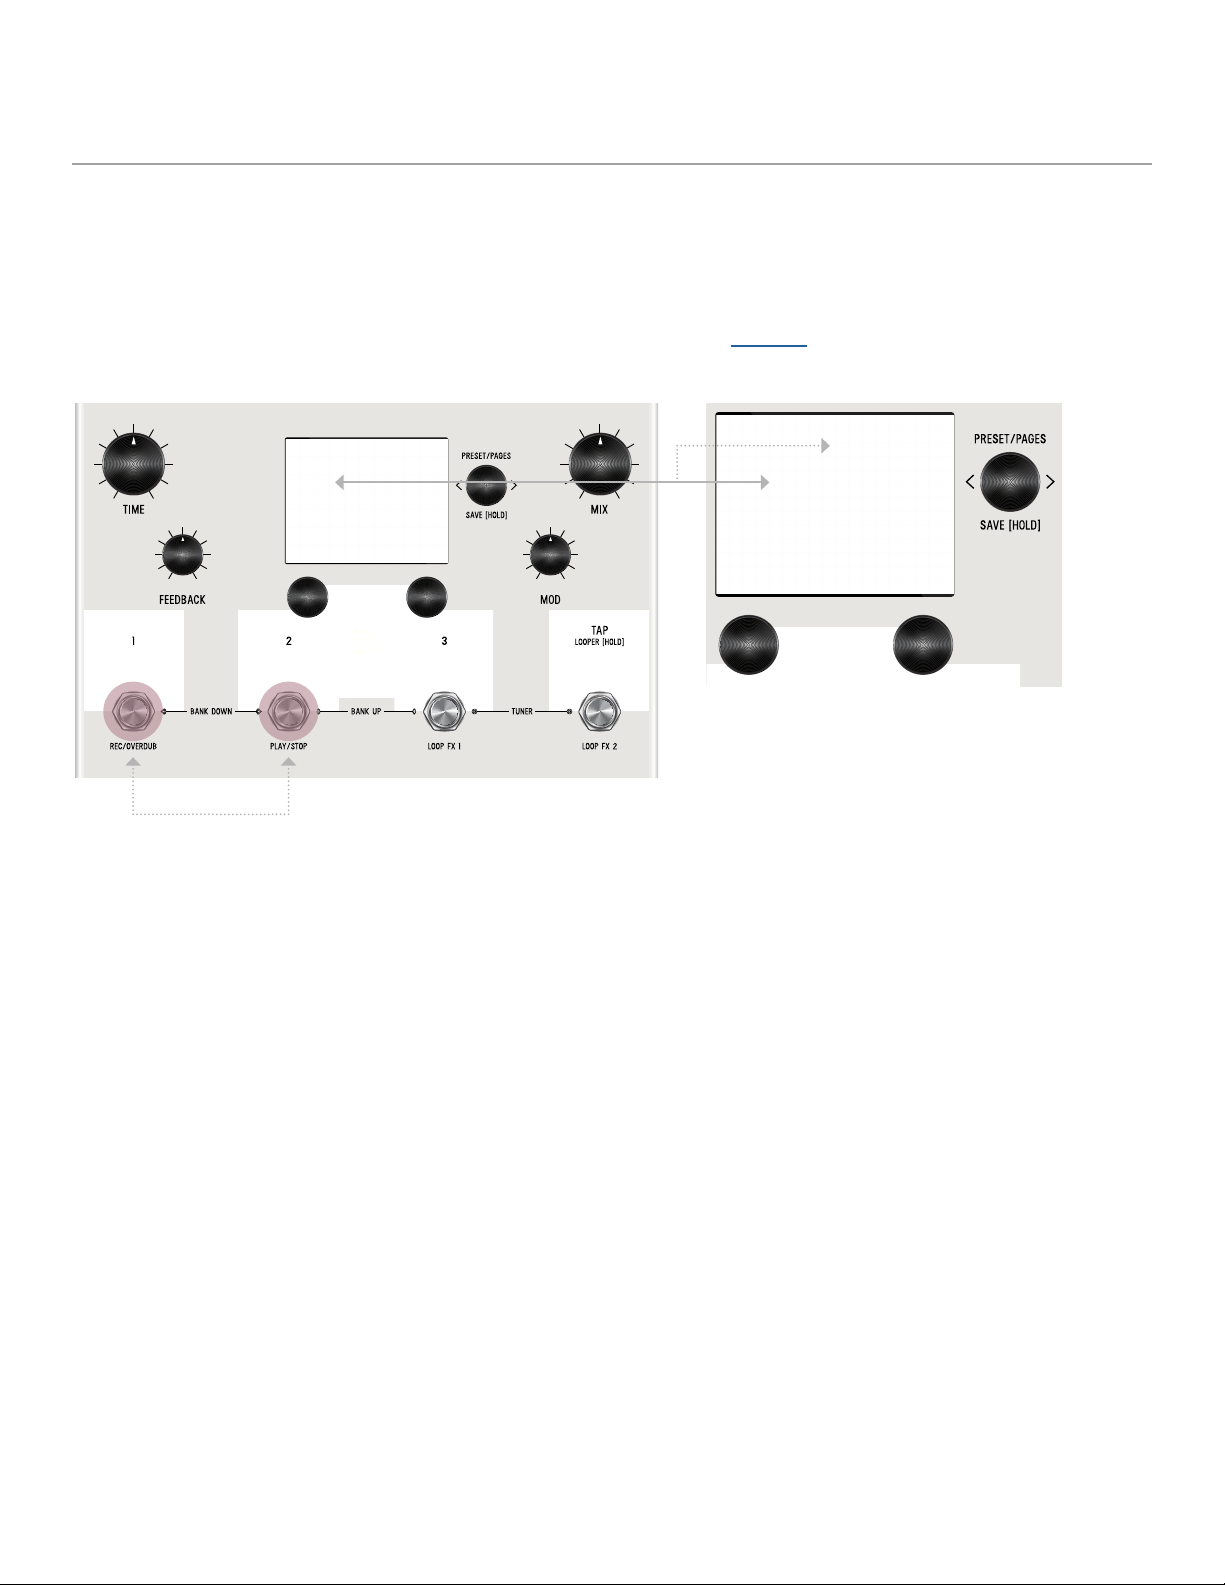
From the PRESET PAGE, push C3 to enter EDIT PAGES. The EDIT PAGE is where you select categories and change parameters
within each preset. The middle bubble is your category. Turn C3 to cycle through categories. Turn C1 knob to carousel through the
parameters. The colored bubble is your selected parameter within each category. Turn C2 to edit the selected parameter.
Turn C3 knob to cycle through blocks.
Colored sphere indicates
selected parameter
CONTROLLER 2 (OR C2)
Value of the selected (colored) parameter
(top L sphere). Turn C2 to change value.
CONTROLLER 1 (OR C1)
Turn C1 knob to carousel through the
parameters
Category

4
UI MAP - (IN GRAPHIC VIEW)
TACTILE PAGE
Preset Page - (Home)
From Preset Page, push C3 to
go to Edit Page. Turn C3 to
navigate thru 2nd level.
Tactile Page
Edit Pages - 2nd level
(software + bundle version)
Globals
From the PRESET PAGE (home), push C3 to navigate into the EDIT PAGES (2nd level). The 2nd level, consists of EDIT PAGES,
GLOBALS, SYSTEM INFO and TACTILE PAGE that wrap around when turning C3.
Turn knobs for TIME, FEEDBACK, MOD or MIX any time while editing, and the Tactile Pop-Up View (for detailed values) will
temporarily show. (You can also turn “OFF” or disable the Tactile Pop-Up View in Globals) To have the TACTILE PAGE in persistent
view, push C3 from PRESET PAGE, then turn C3 L from EDIT PAGE.
SYSTEM INFO
5
04- SAVING (SAVE AS PAGE IN GRAPHIC VIEW)
SAVE AS PAGE
CONTROLLER 3 (OR C3)
Once you enter this SAVE AS PAGE by
holding down C3 knob, turn C3 to skip to
each field
CONTROLLER 1 (OR C1)
Turn C1 knob to select.
Push C1 to skip to each field
Favorites (for Favorite Bank)
Preset Name
Preset Number
“Edited” icon displays when
any changes are made to a preset
CONTROLLER 2 (OR C2)
Turn C2 knob to edit selected field.
Push C2 to skip to character type for naming: letters, numbers, and symbols.
Once edits are made within a preset, hold down C3 knob to enter SAVE AS PAGE. Sphere will change color.
You can change the name, change the preset number, select/deselect if this is one of up to 3 favorite presets (for the FAVORITES
BANK located before Bank 1) and assign your 2 favorite parameters on either the L or R side of the screen (located directly above
C1 and C2).
The name edit field will always be selected first when you enter the SAVE AS PAGE. Use C3 to select fields. You can navigate
fields within the bubble and to the L and R parameter. The field selection order when turning C3 R starting from the name field is:
name -> number -> L favorite parameter -> R favorite parameter -> heart (for favorite bank).
GLOBALS
SELECTING FIELDS
Globals is located at the end of the Edit Page, after you cycle thru all categories. A shortcut to Globals is to start from Edit Page
and turn C3 L. Globals is before System Info. Globals carousels the same way as the Edit Page but will be colorized in solid gold.

6
2 FAVORITE PARAMETERS can be assigned to each preset. They are located on each side of the preset bubble, directly above C1
and C2. In the SAVE AS PAGE, turn C3 to select either the L or R field. The field will highlight as an outlined box AND a dot will
appear on either side of the preset bubble to indicate which side is selected. Turn C1 or C2 to change parameter. HOLD C3 to
save your assigned favorite parameter.
In the EDIT PAGE, if a parameter was assigned as a FAVORITE PARAMETER, a filled in L or R dot will appear to remind which side
it was assigned. Favorite parameters can also be quickly assigned to C1 or C2 in the EDIT PAGE. Simply hold C1 to assign the
current parameter to C1 or hold C2 to assign the current parameter to C2.
2 FAVORITE PARAMETERS (ASSIGNABLE TO EACH PRESET)

7
Any time edits are made, the “edited”
icon appears below the preset bubble.
For QUICK SAVE, hold the active/live LED button
Or hold active foot switch (below lit LED)
Hold down C3 knob again to save. Or QUICK SAVE.
To CANCEL a save, press any of the four footswitches. This will exit the SAVE AS PAGE without writing over your preset. If you
cancel, no edits are saved.
To QUICK SAVE without changing the name or favorite status, hold the active/lit LED button or foot switch directly below. The
completed save will return you to the PRESET PAGE and you’ll notice the “edited” glyph will have been removed.
SAVE PRESET OR CANCEL
QUICK SAVE
8
05- FAVORITES BANK
We created what we call the FAVORITES bank. The purpose of the FAVORITES BANK is to have a shortcut access to your top 3
favorite presets without the need navigate thru banks. The FAVORITES bank is located before bank 1. To jump to the
FAVORITES bank, HOLD 1+ 2footswitches. While the Favorites Bank is highlighted in the screen, use the 3 footswitches to
choose which favorite preset to jump to. To bank up, PRESS 2+ 3at the same time. To bank down, PRESS 1+ 2at the same
time. A total of 3 presets can be assigned to your FAVORITE BANK within the SAVE AS page.
HOLD 1+ 2footswitches to jump to FAVORITES bank.
Any preset that is favorited, includes a heart in the
preset bubble.

9
06- MODIFIERS
LVX has MODIFIERS which allow automatic control of your knobs. In Edit Page, turn C3 to MODIFIERS (named in middle bub-
ble). Choose parameters: LFOs, Envelope Generator, Sample and Hold and Sequencer. For MODIFIERS, you can set the speed, note
division, assignment, and the min and max knob scale values.
Breakdown of each Modifier and its parameters:
LFO A Modifier
Speed
Note Division
Shape
Ramp Up
Ramp Down
Triangle
Sine
Square
3 Steps Up
3 Steps Down
4 Steps Up
4 Steps Down
Assign
Minimum
Maximum
LFO B Modifier
Speed
Note Division
Shape
Ramp Up
Ramp Down
Triangle
Sine
Square
3 Steps Up
3 Steps Down
4 Steps Up
Steps Down
Assign
Minimum
Maximum

10
Envelope Modifier
Attack Time
Decay Time
Shape
Linear
Exponential
Clipped Attack
Assign
Minimum
Maximum
Sample & Hold Modifier
Speed
Note Division
Assign
Minimum
Maximum
Sequencer Modifier
Speed
Note Division
Assign
Step 1 - 16
07- EXPRESSION
An expression pedal on LVX works the same way as the Modifiers. Turn C3 to navigate to the Expression Pedal section, to get
ready to make our first assignment. You get six in total (labeled A through F).
Break down of the Expression Pedal Parameters:
Expression Assign A-F
Expression Minimum A-F
Expression Maximum A-F

11
LOOPER icon appears whenever
looper is engaged. LOOPER can
be engaged at any time.
08- LOOPER
LVX has an always available 60 second stereo looper. The looper has customizable footswitches and the loop itself can also be
moved, before the delays, after the delays, in the dry path, and even in the feedback of the delay lines. You also get a unique
warp control that scrubs through the current loop with the expression pedal.
To access the looper, Hold Tap to enable the controls. The looper icon appears in the bottom center of the screen to show the
looper is engaged and the footswitches are set to control the looper.
The looper footswitches record/overdub and play/stop footswitches work in the classic way. To record a loop press footswitch 1.
When you’ve finished playing your audio phrase and want to set a loop point press either Overdub (footswitch 1) or play (footswitch
2). Overdub will let you record over the top of your current loop. After the loop point is set, use footswitch 2 to start and stop
playback. The functions for footswitch 3 and 4 are assignable on the Looper page in Edit View. For footswitch 3 (Looper FX
1) you have the choice of Play Once, Retrigger, and Expression Pedal Warp. ‘Play Once’ restarts your loop and automatically stops
after the loop plays through once. ‘Retrigger’ restarts your loop and continuously plays your loop. Expression Pedal Warp stops
the normal playback of your looper and lets you scrub through the looped audio with your expression pedal. With the expression
pedal set to the heel position, you are at the start of your loop. With the expression pedal set to the toe position you are at the
end of your loop. The speed and position of your expression pedal will determine how you scrub through the audio; super fast,
super slow, forward and reverse. Have fun warping your loop and feeding into the delays.

12
09- DELAY STRUCTURES
The heart of LVX are the stereo delay lines. The first two delay parameters are Structure and Type. Structure reorganizes the
delay lines to add delay taps and filters, reverse the direction, and twist the delays into a dual poly structure adapted from our
Polymoon. The Type parameter changes the tonality and quality of the delay lines. Each type has its own built in modulation
controlled by the front panel’s MOD knob.
Breakdown of the Delay Structures and Types:
Delay Structures
Standard - Stereo Parallel Delay Lines
Parameters: Time, Left Note Division, Right Note Division, Feedback, Crossfeed, Mod
MultiTap - an 8 tap delay with 4 taps dedicated to each side. Taps 1-4 are connected to the left side of the delay. Taps 5-8 are
connected to the right side of the delay
Parameters: Time, Left Note Division, Right Note Division, Feedback, Crossfeed, Mod
Tap 1-8, Level 1-8, Pan 1-8
Multi Filter - the same delay structure as the MultiTap with a separate bandpass filter added at the output of each tap
Parameters: Time, Left Note Division, Right Note Division, Feedback, Crossfeed, Mod
Tap 1-8, Filter 1-8, Q 1-8, Level 1-8, Pan 1-8
Poly - Poly is a dual version of the Polymoon delay structure, each side of the delay gets processed by its own algorithm and
spread across the stereo spectrum independently
Parameters: Time, Left Note Division, Right Note Division, Feedback, Crossfeed, Mod, Dimension, Multiply, Level, Left Modulation,
Right Modulation
Reverse - Stereo Parallel Delays with Reverse playback
Parameters: Time, Left Note Division, Right Note Division, Feedback, Crossfeed, Mod
Delay Types
Digital - uncolored completely clean delay line, here the front panel mod knob ranges from slow and wide modulations at minimum,
to fast and narrow at maximum
BBD - analog flavored bucket brigade colored delay lines, here the mod knob adds depth to the classic lfo
Magnetic - tape flavored delay with a slight saturation and gentle degradation, here the mod knob increases the amount of wow
and flutter

13
R
I
G
H
T
O
U
T
P
U
T
L
E
F
T
O
U
T
P
U
T
R
I
G
H
T
I
N
P
U
T
L
E
F
T
I
N
P
U
T
MIX
MIX
FEEDBACK MIXER
FEEDBACK FEEDBACK
DELAY LINE DELAY LINE
FEEDBACK MIXER
MIX
PRE + DRY LOCATIONPRE + DRY LOCATION
PRE LOCATIONPRE LOCATION
FEEDBACK LOCATION
POST LOCATION POST LOCATION
FEEDBACK LOCATION
Visual diagram of the processing elements:
The processing elements are grouped into categories. The categories are: Dynamics, Preamp, Filter, Pitch, and Modulation.
Important: the Modulation Category is separate from the front panel Mod knob which directly controls the modulations built into the
delays. All the processing elements in LVX, with the exception of Poly Chorma, are stereo and can process the left and right audio
signal completely independently. The elements can be placed before the delay lines, after the delay lines, in the feedback of the
delay lines, as well as in the pre + dry path.
10- CATEGORIES AND ELEMENTS

14
Also shown in the above diagram is the Mixer for LVX. The Mixer is directly connected to the front panel mix knob. To adjust the
Dry and Wet Trim levels, use C3 to enter Edit View and page over to the MIX section.
The following is a breakdown of each Category and the processing Elements they contain:
Dynamics Category
Compressor - an upgraded fully adjustable stereo compressor adapted from Enzo. You can use the compressor like an audio micro-
scope to zoom into small details, or set more gently, the compressor can balance the levels of your delay creations.
Parameters: Threshold, Ratio, Gain, Attack, Release, Mix
Swell - a stereo exponential automatic volume swell to remove the attack of your audio. Swell works best in front of the delay
lines where it helps create dreamy pads of sounds
Parameters: Attack Time, Gain
Diffusion - Diffusion is a stereo pair of super short multitap delays used to smooth your sound and soften hard edged sounds. The
density control adds progressively more smearing of the audio and the low pass filter cuts highs to further soften your sound. Try
using Diffusion in the feedback location of your delays to progressively soften the sound with every repeat.
Parameters: Density, Low Pass Filter
Limiter - A completely unique stereo algorithm for the LVX, the Limiter hard limits your signal to the threshold. With a totally
different algorithm from the LVX’s compressor, the Limiter adds immediate and dramatic punch to your sound.
Parameters: Threshold, Gain, Release
Preamp Category
Volume Pedal - the volume pedal element on the LVX comes alive when connected to the modifiers. Try assigning an LFO to
control the Balance and provide continuously shifting panning of your delays.
Parameters: Level, Balance
Tube - the Tube Preamp provides a mid boost with controllable gain and level. Try pairing the Tube Preamp with the Magnetic
Delay type.
Parameters: Parameters: Gain, Level
Transistor - the Transistor Preamp emphasizes high frequencies, perfect for adding clarity to dull audio signals
Parameters: Parameters: Gain, Level
Op-Amp - the Op-Amp Preamp gives you a broadband boost with de-emphasized low end, a good all purpose preamp
Parameters: Parameters: Gain, Level
Drive - a dark and mellow overdrive to add crunch to your delay repeats
Parameters: Gain, Bass, Treble, Level
Bit Crusher - a stereo bit crusher adapted from Ottobit Jr., use the bit crusher to recreate the character of low sample rate vintage
digital delays
Parameters: Sample Rate, Bit Depth, Level

15
Filter Category
Ladder Filter - our unique stereo ladder filters adapted from the Enzo, use the Frequency parameter to set the center frequency for
both the left and right sides of the filter, use the Spread parameter to offset the center frequency on the right side. When the
Spread parameter is at zero, both sides of the filter are set to the same frequency.
Parameters: Frequency, Resonance, Topology, Spread
State Variable Filter - also adapted from Enzo, the State Variable filter offers another great flavor of creamy filtering to compliment
the Ladder Filter. Like the Ladder Filter, the Spread parameter offsets the right filter frequency.
Parameters: Frequency, Resonance, Topology, Spread
Comb Filter - a comb filter is a very short resonant delay that provides a series of notches across the frequency spectrum. The
Comb Filter is perfect for adding clanging robotic tones to your delay structures. Again the Spread parameter provides an offset
for the right channel filter.
Parameters: Depth (milliseconds), Resonance, Level, Spread
Pitch Category
Poly Chroma - LVX is a fully polyphonic chromatic pitch shifter. The only mono element, the Poly Chroma sums your stereo
channels together and perfectly shifts the audio no matter how complicated the chords.
Parameters: Pitch, Mix
Harmony - the first of 3 pitch shifters adapted from the Hedra, the Harmony element is a 2 voice diatonic pitch shifter with
independent pitch detection for each voice.
Parameters: Pitch Left, Pitch Right, Key, Scale, Glide, Mix
Micro Tune - also from the Hedra, Micro Tune element provides independent micro pitch adjustments to each side of the stereo
spectrum. The Micro Tune is perfect to add a similar detune effect as chorus without the regular pitch cycle of an LFO.
Parameters: Pitch Left, Pitch Right, Mix
Mono Chroma - the final element adapted from Hedra is the Mono Chroma. This element has independent tracking for each side of
the stereo spectrum, optimized for single note lead lines, the Mono Chroma provides extra crisp pitch shifting.
Parameters: Pitch Left, Pitch Right, Glide, Mix
Lo-Fi - this element is a dual version of the pitch shifter from the Ottobit Jr. The Lo-Fi element uses an early pitch shifting tech-
nique that creates modulated low fidelity voices.
Parameters: Pitch Left, Pitch Right, Mix
Modulation Category
Chorus - adapted from the multimode modulation block in the Polymoon, this element provides true stereo chorus. Try setting the
local Mix parameter to 100% for Vibrato.
Parameters: Speed, Depth, Mix
Flanger - also adapted from the Polymoon, this element is great for adding slow and cyclical peaking notches to the output of your
delay structures
Parameters: Speed, Depth, Feedback, Mix

16
Dynamic Flanger - envelope driven flanging from the PolyMoon, this element can provide a wide range of creative effects from
subtle double-tracking, wild pitch bends, and deep flanging that tears across the frequency spectrum.
Parameters: Attack Speed, Depth, Feedback, Direction, Mix
Cassette - the Cassette element provides the warbles and degradations of a failing reel of tape. Use the Highs and Lows controls
to narrow your frequency response and replicate a failing and badly calibrated tape playback system.
Parameters: Slip, Crinkle, Static, Highs, Lows, Mix
Ring Mod - the Ring Mod element completes the perfect trio of quintessential robotic effects along with the Bit Crush of the
Preamp Category and the Comb Filter of the Filter Category. The Ring Mod provides a wide range of frequencies and sounds great
in the feedback location of the delay structure where it progressively folds your audio with each repeat.
Try setting the Mix to 50% and the Frequency low to enter tremolo territory
Parameters: Frequency, Waveshape, Mix
Barberpole - another favorite from the Polymoon, you can use this stereo element to provide the illusion of endlessly spiraling
notches running across the frequency spectrum. Setting direction to both creates a dramatic stereo spread.
Parameters: Speed, Feedback, Direction (up, down, both)
Granulize - Granulize slices and repeats bite sized pieces of your audio. You can create multiple timbres from stuck buffer jitters
to resonant micro freeze buzzes. You can even control the direction of the grain playback. Try controlling the Size and Repeats
parameters with the Modifiers for evolving textures.
Parameters: Size, Repeats, Spread, Direction (fwd, rev)

17
11 - MIDI CC TABLE (PRELIMINARY)
control change lvx control receive value range
CC# 01 mix 0 to 127
CC# 02 dry trim 0 to 127
CC# 03 wet trim 0 to 127
CC# 04 expression pedal 0 to 127
CC# 05 preamp type 0 to 127
CC# 06 preamp loCation 0 to 127
CC# 07 preamp parameter 1 0 to 127
CC# 08 preamp parameter 2 0 to 127
CC# 09 preamp parameter 3 0 to 127
CC# 10 preamp parameter 4 0 to 127
CC# 11 preamp parameter 5 0 to 127
CC# 13 delay struCture 0 to 127
CC# 15 time 0 to 127
CC# 16 delay type 0 to 127
CC# 17 left note division 0 to 127
CC# 18 right note division 0 to 127
CC# 19 feedbaCk 0 to 127
CC# 20 Cross feedbaCk 0 to 127
CC# 21 delay mod 0 to 127
Table of contents
Other Meris Recording Equipment manuals


