Merits Pilot E603 User manual

E603


Read this manual before
using the Stairlift and
save for future reference.

This page intentionally left blank.

01
TABLE OF CONTENTS
0. IEC SYMBOLS ………...………………………………………….…………………2
1. DANGERS …………………..……………………..………...…….……………….3
2. WARNINGS …………………..……………………..…………….………………..3
3. CAUTIONS ………………….……………………………………………………...4
4. INTENDED USE ……………………….…………………….………………….…4
5. DESCRIPTION ……………………….…………………...…………………….…5
6. SPECIFICATIONS ………..…………….……………….…………………..….…6
7. OPERATION ………………..………………….………………………………......8
7.1 Power on the Stairlift…….….….…………………………….………………...…….…….....………8
7.2 Unfolding the Seat and the Footrest .……………….…………………………..…………………….8
7.3 Getting on the Seat…………………… ……………………………….……………….………….....9
7.4 Drive the Stairlift…………………..……………………….…………………………….………….10
7.5 Getting off the Seat …..…………………………..………………….……….…….…………..……10
7.6 Folding up the Footrest and the Seat…...…………..……………………………….………….……10
7.7 Remote Controller…………..………………...…………..………………………….……………...10
7.8 Hand Winding the Stairlift……………….…………………………….……………….…….…......11
7.9 Recharging the Battery………………………….………………………………………..………….11
8. TROUBLESHOOTING AND MAINTENANCE ….………....…………………...12
8.1 Troubleshooting…………...……………………………………………………………………...….12
8.2 Diagnostic Codes…………………………………………………………………...……….……….13
8.3 Maintenance…………………………………………...…………………………...……..………….14
Warranty ……………………....………………………………..………………….…15
Maintenance Record…………....………………………………..………………….….16

02
0. IEC SYMBOLS
Caution, Attention or Consult accompanying documents.
Consult Instructions for Use
Alternating Current
Direct Current
Type B Equipment
May contain substances that could be harmful to the
environment if disposed of in places (landfills) that are
not appropriate according to legislation.
Weight Capacity. DO NOT overload the Stairlift.
03
1. DANGERS
2. WARNINGS
The stairlift is designed to carry one person at a time. Do not attempt to carry
more than one person.
Do not allow children to play with the stairlift. It is recommended to remove
the key when children are present to prevent unauthorized use.
Ensure that your clothing is clear of the carriage and rail assemblies before
using the stairlift.
Always fasten seat belt while sitting.
DO NOT overload the stairlift. The total load limit is 158 kg (350 lbs) @ 45
or 137 kg (300 lbs)@55 . (According to ASME A18.1, no lift should be
installed to operate on a greater incline than 45 deg. as measured on the
mean.)
The Battery Charger must only be used in a dry environment.
Batteries containing in the stairlift are rechargeable and replaceable, but can
only be replaced by qualified personnel. DO NOT try to open or replace
them by yourself. The used Batteries must be disposed of in the proper
manner.

04
3. CAUTIONS
Turn off key switch and remove key when the stairlift is not to be used.
The ON/OFF switch must remain in the ON position to allow the batteries to charge
when not in use.
Maintain the battery in a full charged state for storing. Switch off the On/OFF switch
to prevent battery drain. Recharge the battery again monthly.
4. INTENDED USE
The Stair Lift System is a powered patient transport, also commonly known as
a Stairway Chairlift, or Stairlift. It is a motorized device intended for medical
purposes to assist transfers of patients, or mobility-impaired persons, up and
down flights of stairs. This stairlift can only be used on straight staircases inclined
between 25°~55°. It is designed to carry one person at a time and the maximum
weight capacity is 158kg (350lbs). Any other uses which this stairlift does not
intend for may cause serious injury or damage to personal property.
05
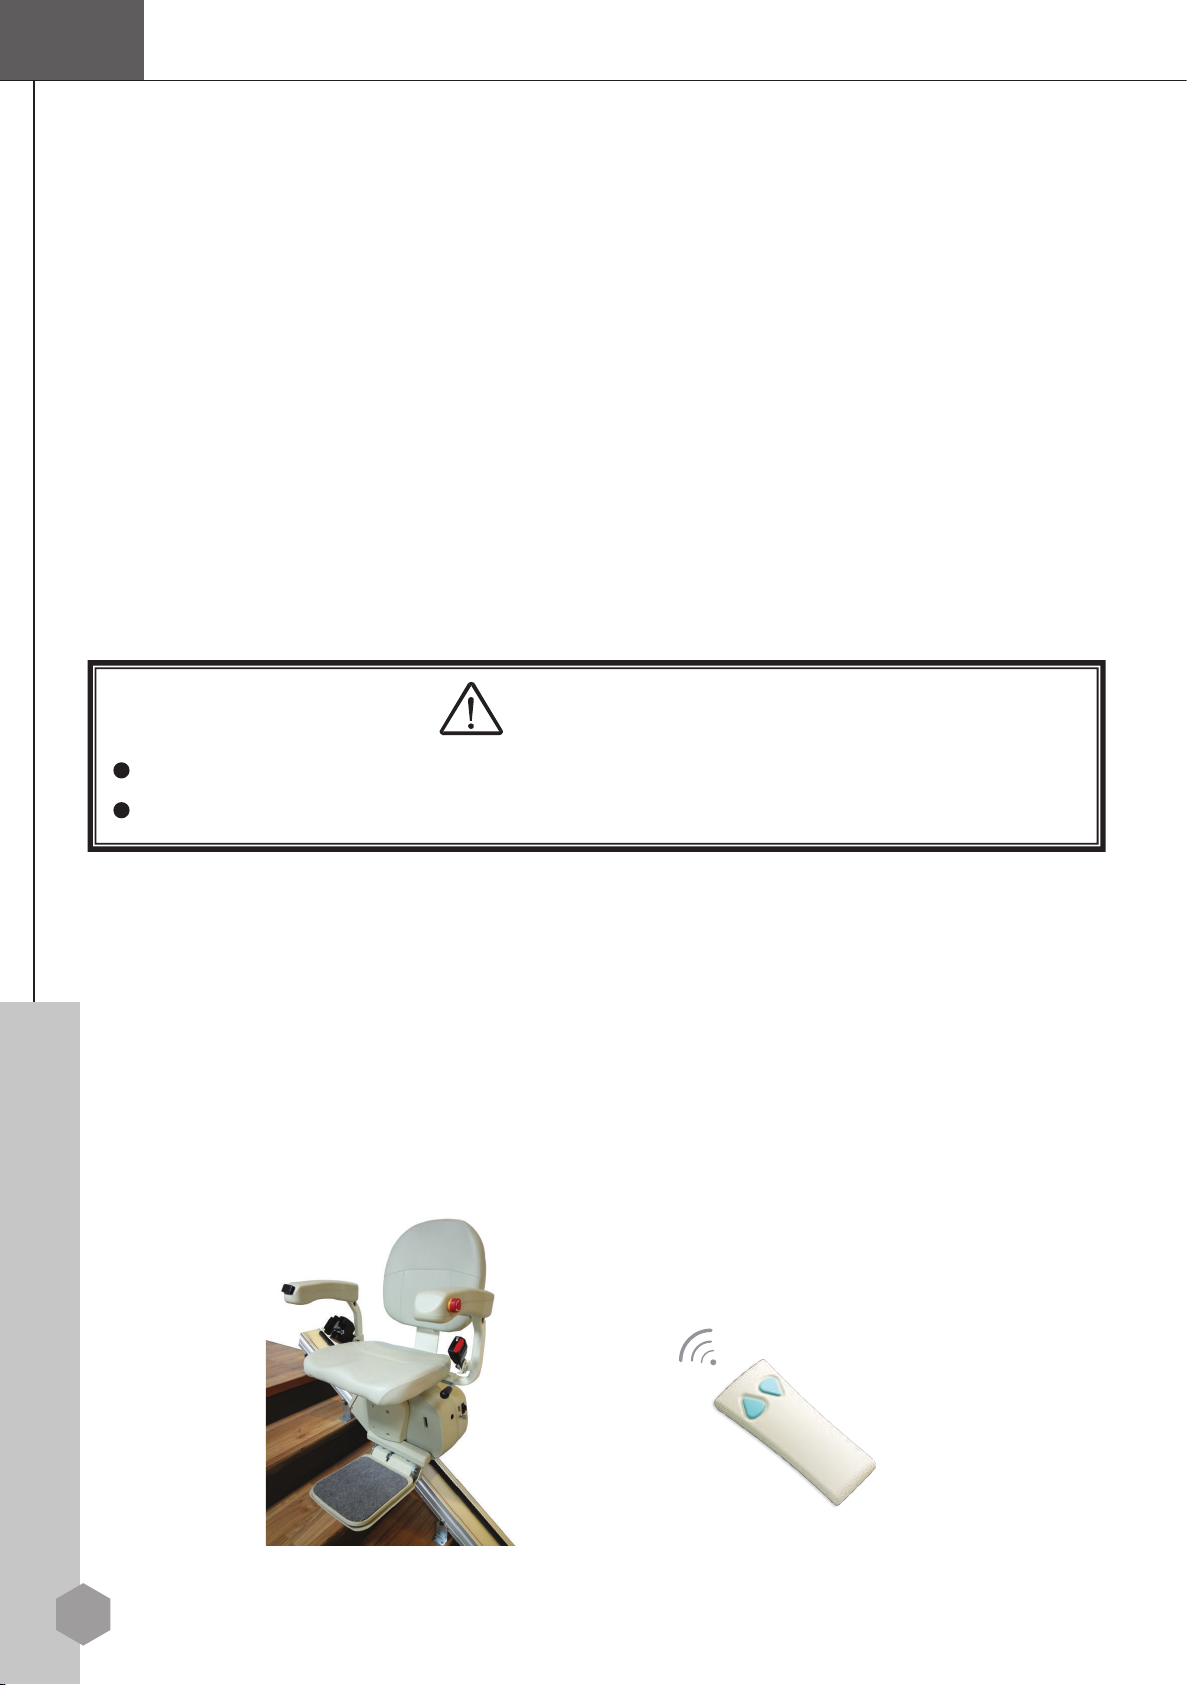
5. DESCRIPTION
Backrest
Armrest
Rail
Rocker Switch
Seat Belt
Folding Seat
Safety Edge
Folding Footrest Safety Edge
Carriage
On/Off Switch
Key Switch
Status Display
Swivel Seat Handle
The Stairlift consists of four parts: the carriage, the footrest, the seat, and the
rail. The stairlift is powered by the rechargeable batteries inside the carriage.
There are safety sensors on upper and lower covers and bottom of footrest.
These sensors will stop the unit if any obstruction is detected on the rail or
stairway. The footrest, the armrests and the seat can be folded up when not
in use to allow more space on the stairway. Pull the swivel handle up to
unlock the seat when you reach the top of the stairs. This will allow you to
get into or out of the seat at a convenient position. The rail has two charging
points at the top and bottom. The batteries will be recharged automatically
when the unit stops at these positions.
Emergency Stop
Button (optional)
06
6. SPECIFICATIONS
Dimensions:
Lighting Requirements - The stairway where the lift is installed shall have a minimum
of 50 lux lighting at each landing.
07
Technical Specs:
Load Capacity 158kg (350 lbs)@45° or 136kg (300 lbs)@55°
Range of Stair Angle
25°~55°
Note: According to ASME A18.1, no lift should be
installed to operate on a
g
reater incline than 45
deg. as measured on the mean.
Travel Speed 6 m/min. (20 ft/min)
Maximum Travel 9.75m (32 ft)
Drive System Rack and Pinion
Operator Control Constant-pressure type (rocker switch and remote
controller)
Operating Voltages 24VDC rechargeable batteries
Motor 1/2 HP, 24VDC
Brake (Optional) Electromagnetic brake
Charging
On the top or bottom stop of the rail.
Input: 115/230VAC, 50/60Hz.
Output: 24V 2A
Operating Ambient Temperature (Humidity)
5°C ~ 40°C ( 41°F ~ 104°F )
(up to 95% non-condensing)
(up to 2,000m in altitude)
Storage/ Transport Temperature (Humidity) (up to 95% non-condensing)
-10°C ~ 60°C ( 14°F ~ 140°F )

08
--
WARNING
Ensure the stairway is free from obstacles before operate the stairlift.
7. OPERATION
7.1 Power on the Stairlift
1. Switch the ON / OFF switch to the ON position. ( Under regular operating
conditions, the ON / OFF switch should remain ON at all times to allow the
batteries to recharge when not in use).
2. Insert the key and turn a quarter turn clockwise to the ON position. The status
display will indicate . If the display is not indicating , please check the
“Diagnostics” section on pages 11 and 15.
7.2 Unfolding the Seat and the Footrest
1. Fold down the footrest.
2. Fold down the seat.
3. Fold down the two armrests.

09
WARNING
Make sure the seat is locked before getting on and off the stairlift.
Avoid pressing on the rocker switch while getting on and off.
7.3 Getting on the Seat
1. Pull up the swivel handle to rotate the seat. (only upstairs)
2. Push down the swivel handle to lock the seat at 70° facing the staircase landing.
(only upstairs)
3. Sit down on the seat with your back against the backrest. Fasten the seat belt.
10
WARNING
Make sure the seat is locked before getting on and off the stairlift.
Avoid pressing on the rocker switch while getting on and off.
4. Pull up the swivel handle and then rotate the seat back to be parallel to the rail.
(only upstairs) Push down the swivel handle to lock the seat.
5. Put your feet on the footrest and place your arms on the armrests.
7.4 Driving the Stairlift
Press the UP/DOWN rocker switch located on the front of the right armrest to move
the stairlift in the desired direction. The stairlift will stop automatically when it
reaches the end of rail or the rocker switch is released.
7.5 Getting off the Seat
Swivel the seat as required. Unfasten the seat belt and get off the seat.
7.6 Folding up the Footrest and the Seat
The footrest, the armrests and the seat can be folded up when not in use to allow more
space on the stairway.
7.7 Remote Controller
There are two remote controllers allow you to “call” or “send” the stairlift. Point the
remote controller at the unit and press the button in the desired direction.
Note: The remote will not operate if the seat has been turned or the armrest on the
downstairs side has been folded up.
11
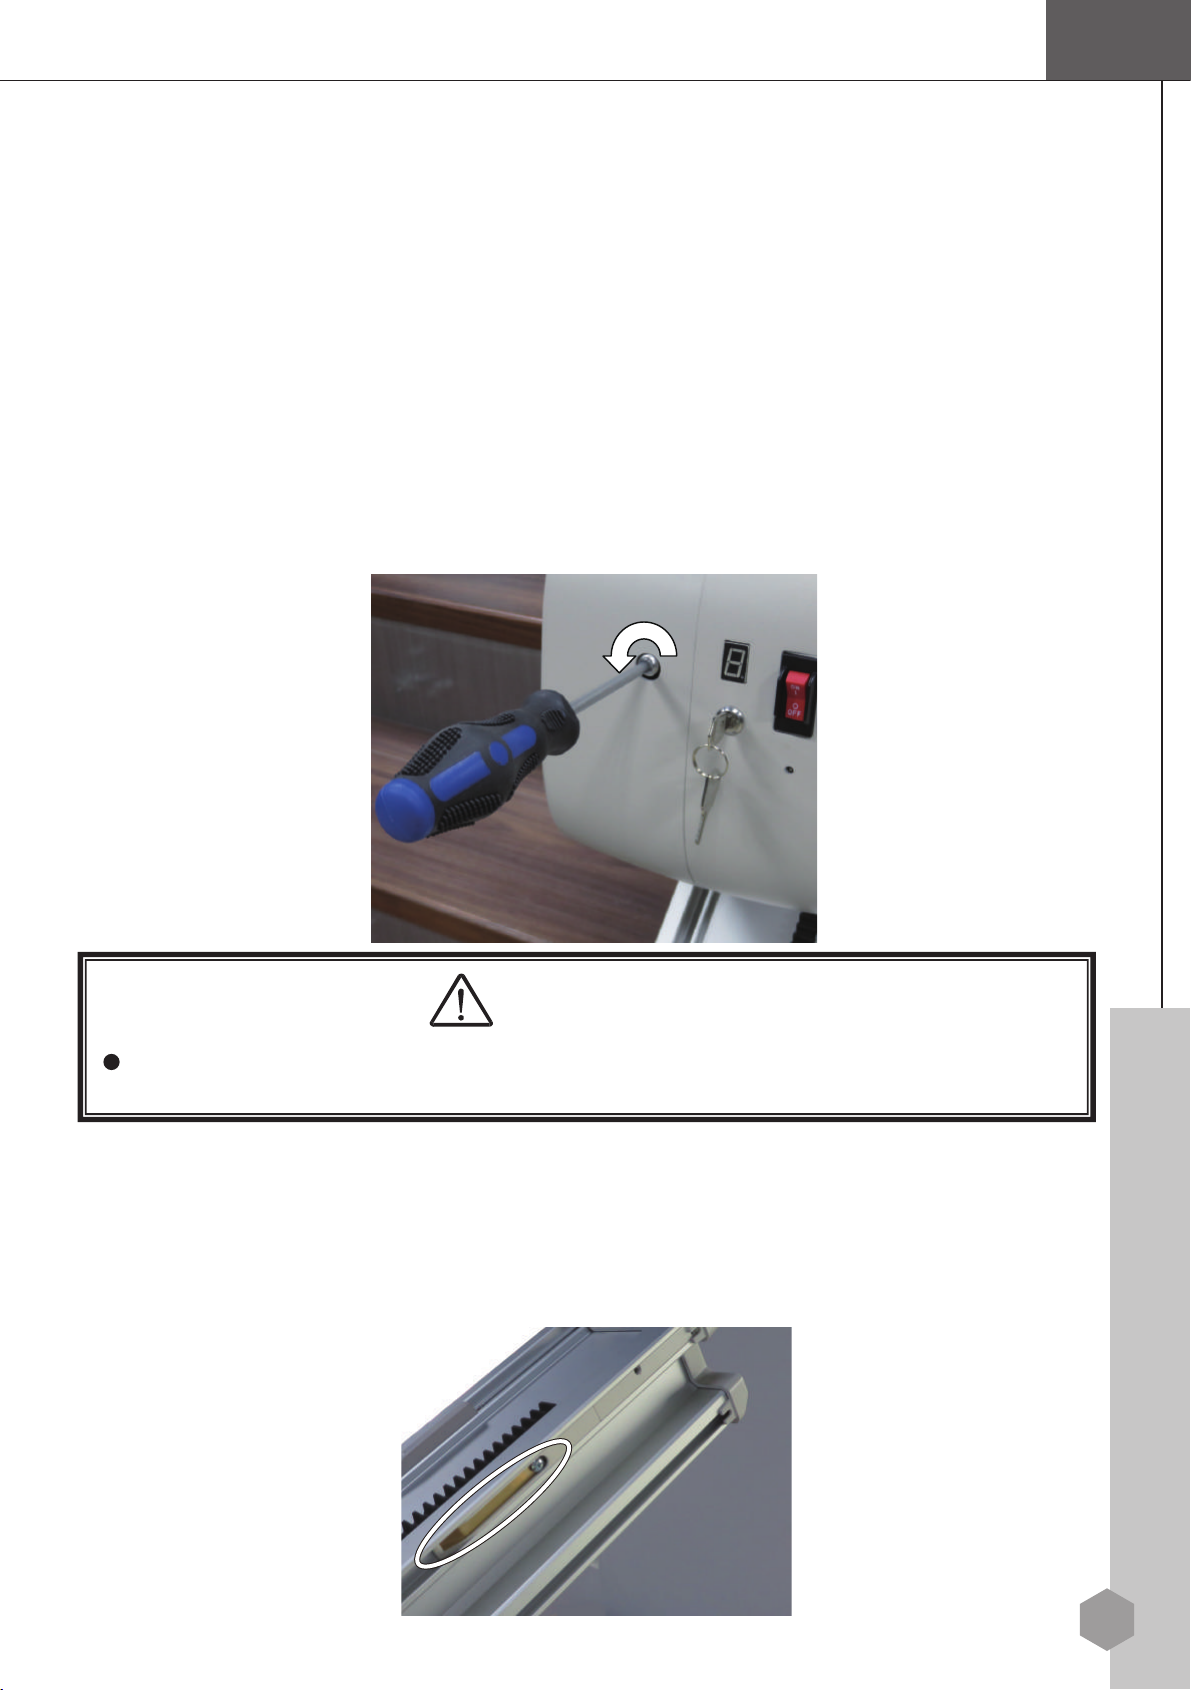
WARNING
Remove the hand crank before turn on the power.
7.8 Hand Winding the Stairlift
The hand winding feature should only be used to move the stairlift when there is a
power failure.
1. Turn off the ON/OFF switch.
2. Remove the rubber cover on the left side of the carriage, and then push the brake
lever upward to release the brake if required.
3. Remove the rubber cover next to the key switch. Insert the hand crank onto the
motor spindle.
4. Turn the hand crank counter-clockwise to lower the stairlift.
5. Remove the hand crank and push the brake lever downward to engage the brake if
required.
7.9 RECHARGING THE BATTERY
The charging points are located at top and down of the rail. The stairlift will stop
automatically at these points. The battery recharging will not start if the ON/OFF
switch is turned off.
Down

12
WARNING
Never try to repair the stairlift by yourself.
8. TROUBLESHOOTING AND MAINTENANCE
8.1 Troubleshooting
Check the basic items listed below if your stairlift does not work properly.
SYMPTOM PROBABLE CAUSE SOLUTION
Stairlift will not move. The status
display is off.
1. The ON/OFF switch is OFF.
2. The key switch is turned off.
1. Turn on the ON/OFF switch
and the key switch.
Stairlift will not move. The status
display indicates .
1. The swivel seat is not locked
in the right position.
2. The armrest is not folded down.
3. The Emergency Stop Button
has been pressed.
4. The final limit switch is
activated.
5. The over speed governor
(optional) is activated.
1. Rotate and lock the seat in the
right position.
2.Fold down the armrest.
3.Release the Emergency Stop
Button.
4. Contact your authorized
dealer.
5. Contact your authorized
dealer.
Stairlift will not move. The status
display indicates or .
1. The safety sensor is activated. 1. Remove the obstacle on the
rail or staircase.
Stairlift moves at half speed. The
status display indicates .
1. The battery voltage is low. 1. Move the stairlift to the
downstairs end and recharge
the battery.
2. Contact your authorized
dealer if the battery cannot be
recharged.
Stairlift emits beeping sound at
the end of the rail.
The status display indicates .
1. The batteries are not charging. 1. Check that the charger is
plugged in and charging.
Contact your authorized dealer if the stairlift still does not work after the basic items
have been checked.

13
8.2 Diagnostic Codes
Refer to the following table to help diagnose and correct any faults.
Cod
e
Status/Fault
Recommended
Corrective
Action
No display. Check
that
the key switch and
ON/OFF
switch
are
turne
d
on.
The stairlift is
read
y
to
u
s
e.
N
o action
requi
r
e
d
.
1. T
h
e swivel seat switch is activated.
2. The armrest switch is activated.
3. The Emergency Stop Button has been
pressed.
4. The final limit switch is activated.
5. The over speed governor (optional) is
activated.
1. Rotate and lock the seat in the right position.
2. Fold down the armrest.
3. Release the Emergency Stop Button.
4. Contact your authorized dealer.
5. Contact your authorized dealer.
Batteries are not
charging.
Check that the charger is
plugged in
and
c
h
arging.
Upper limit switch is
activated
.
You
have reached the upper
limit.
Run the unit in
the down
d
i
rect
ion.
Safety sensor in
u
p
direction is
activated.
Remove any obstacle that may
have
activated
the
switch.
Lower limit switch is
activated
.
You
have reached the lower
limit.
Run the unit in
the up
d
i
rect
ion.
Safety sensor in down direction is activated.
Remove any obstacle that may have activated the
switch.
Motor current limit is exceeded Contact your authorized dealer.
Main control board error. Switch off the key switch for 30 seconds and then
switch on again.
activated when power on. Release the switch or button. No action required.
Motor brake is not engaged. Push down the lever of motor brake.
The batteries voltage is too high. Switch off the key switch for 30 seconds and then
switch on a
g
ain.
The batteries voltage is too low.
Move the stairlift to the downstairs end and
recharge the battery. Contact your authorized
dealer if the battery cannot be recharged.
Rocker switch or remote controller is
14
8.3 Maintenance
You can clean the seat with a soft, damp cloth and possibly a mild detergent. The
dust particles can be removed using the vacuum cleaner. In addition to cleaning
the stairlift, regular maintenance is needed to keep your stairlift working properly.
We recommend to follow the maintenance schedule below to ensure your stairlift
will stay in optimal condition
Verification by
owne
r
Freq
uency
Check that the swivel seat switch and the armrest switch are
working.
Ensure the unit will not move until the swivel seat is locked in the right
position and the armrests are folded down.
Every
3
months
Check that the footrest and carriage sensors are
working.
Ensure the
unit stops when it contacts an
ob
stacle.
Every
3
months
Check that the emergency stop
button
is
working. (optional)
Ensure the unit stops immediately when the
button
is pressed.
Every
3
months
Verification by
technician
Freq
uency
Check the
operation
of the limit
switches.
E
n
sure
the unit stops at the required position at the top
and bottom
of
the stairway.
Every
6
months
Check the
operation
of the
over speed
governor
.(optional)
Every
6
months
Check the final stopping limit switch
Every
6
months
Lubricate the unit.
As
requ
ired

15
Warranty
We warrant the Stairlift to be free from defective workmanship and materials for a
period of 5 year on the motor & gear box and 2 years for other parts from the date of
purchase. The rechargeable battery is warranted for 90 days from date of purchase.
Check with your dealer for more details. This warranty is limited to the original
purchaser of the Stairlift. Any defective part or assembly will be repaired or replaced,
at the sole discretion and determination of the manufacturer, if the unit has been
properly operated during the warranty period. Normal maintenance items and
disposable components are not covered by this warranty. Shipping charges, if any,
shall be paid by the purchaser.
Note: There is no other express warranty. Implied warranties, including those of
merchantability and fitness for a particular purpose, are limited to the duration of the
express limited warranty and to the extent permitted by law and all implied warranties
are excluded. This warranty does not cover providing a loaner Stairlift, compensating
for costs incurred for Stairlift rental, or labor costs incurred in repairing or replacing
defective part(s)
INSTALLATION RECORDS
Customer Name:
Dealer Name:
Dealer Address:
Dealer TEL. No.:
Date of Installation:
Serial No. / Job No.:

16
Maintenance Record
Date
Reason for Call
Comments Deal
er
Table of contents
Popular Stairlift manuals by other brands

Handicare
Handicare Minivator Simplicity 950 Series user manual

vimec
vimec V65 B.I. Original instructions

BraunAbility
BraunAbility NL 2 Millennium Series Service manual

MediTek
MediTek D120 user guide

AmeriGlide
AmeriGlide HORIZON PLUS installation manual

Harmar Mobility
Harmar Mobility Vantage SL400 Installation and service manual


