Merloni FV 271 Instructions for and use User manual

Flush-mountable electric ventilated oven
Instructions for installation and use
FV 271
FV 242 D

2
1 These instructions are only for those countries
whose symbols appear in the booklet and on the
matriculation plate of the appliance.
2 Thisapplianceisintendedfornon-professional use
within the home.
3 This owner’s manual is for a class 1 appliance
(installed independently) or class 2 - sub-class 1
appliances (installed between two cabinets).
4 Before using your appliance, read your owner’s
manual carefully since it provides important
instructions for the safe installation, use and
maintenance of your cooker. Keep in a safe place
for future reference.
5When you have removed the packing, check that the
appliance is not damaged.If you have any doubts, do
not use the appliance, contact your nearest Ariston
Service Centre.Never leave the packing components
(plastic bags, foamed polystyrene, nails, etc.) within
thereachofchildrensince theyareasourceofpotential
danger.
6The appliance must be installed only by a qualified
person in compliance with the instructions provided.
The manufacturer declines all responsibility for
improper installation which may harm persons and
animals and damage property.
7The electrical safety of this appliance can only be
guaranteed if the cooker is correctly and efficiently
earthed, in compliance with current regulations on
electrical safety. Always ensure that the earthing is
efficient; if you have any doubts call in a qualified
electrician to check the system. The manufacturer
declines all responsibility for damage resulting from a
system which has not been earthed.
8Before connecting the appliance to the mains, check
that the specifications indicated on the rating plate (on
the appliance and/or packaging) correspond to those
of the electrical mains system of your home.
9The openings and slots used for ventilation and
dispersion of heat on the rear and below the control
panel must never be covered.
10 This appliance must be used for the purpose for which
it was expressly designed.Any other use (e.g.heating
rooms)is considered tobe improperand consequently
dangerous.Themanufacturer declines allresponsibility
for damage resulting from improper and irresponsible
use.
11 Anumber of fundamental rulesmustbe followedwhen
using electrical appliances. The following are of
particular importance:
ldo not touch appliance with wet or damp hands or
feet
ldo not use the appliance while bare-footed
ldo not use extension leads other than with the
utmost caution
ldo not pull the power supply cable or the appliance
itself to disconnect the plug from the socket.
ldo not expose the appliance to weather agents
(raing, sun, etc)
ldonotallowunsupervised childrenorinexperienced
persons to use the appliance.
12 Always switch off the electrical supply to the cooker
and allow it to cool down before carrying out any
cleaning operations etc.
13 In the case of faults and/or faulty operation, switch off
the electricity supply to the cooker and do not tamper
with it. For repairs call only an authorised after-sales
servicing centre and request the use of original spare
parts only.Failure to comply with the above may com-
promise the safety of the appliance.
14 Remember if you are discarding any domestic
appliance with which children etc. may play, make it
safe by removing the Mains Cable from it, after first
disconnecting the electricity supply. Remove glass
parts where possible, and consider sharp edges etc.
which may now be exposed.
15 Ovenglovesor similar protection shouldbe used when
moving containers in or out of hot ovens and care
should be taken to avoid contact with hot surfaces of
exposed skin on wrists or arms.
16 One of the commonest types of accident involving
cooking appliances is burns to tabies and young
children.These can occur by:
a) Touching hot parts
b) Being splashed with hot liquids
c) By pulling projecting pan handles and tipping hot
liquids over themselves
17 Please remember that a small child’s skin is far more
sensitive andthereforemoreeasily burnt thanan adult.
You are, therfore, strongly advised to keep babies and
young children well clear of this appliance during use
and whilst it is cooling down after use.
18 Never use flammable liquids such as alcohol or
gasoline, etc.near the appliance when it is in use.
19 Make sure the knobs are in the “•”/”O” position when
the appliance is not in use.
20 When you are using the grill or the oven, some parts
of the door can become very hot.Keep children away
from these.
21 Warning: open the door with care since if you are not
careful you may hurt yourself in the hinge area.
Important safety warnings
3
Installation instructions
Important: disconnect the oven from the electricity when
making any adjustment, maintenance operation, etc.
Unpacking
Remove the outer packing from the oven. Open the door
outwards and remove packing from the shelves.Take out
theplasticenvelopecontaining instructionbook,guarantee
card and 4 fixing screws.
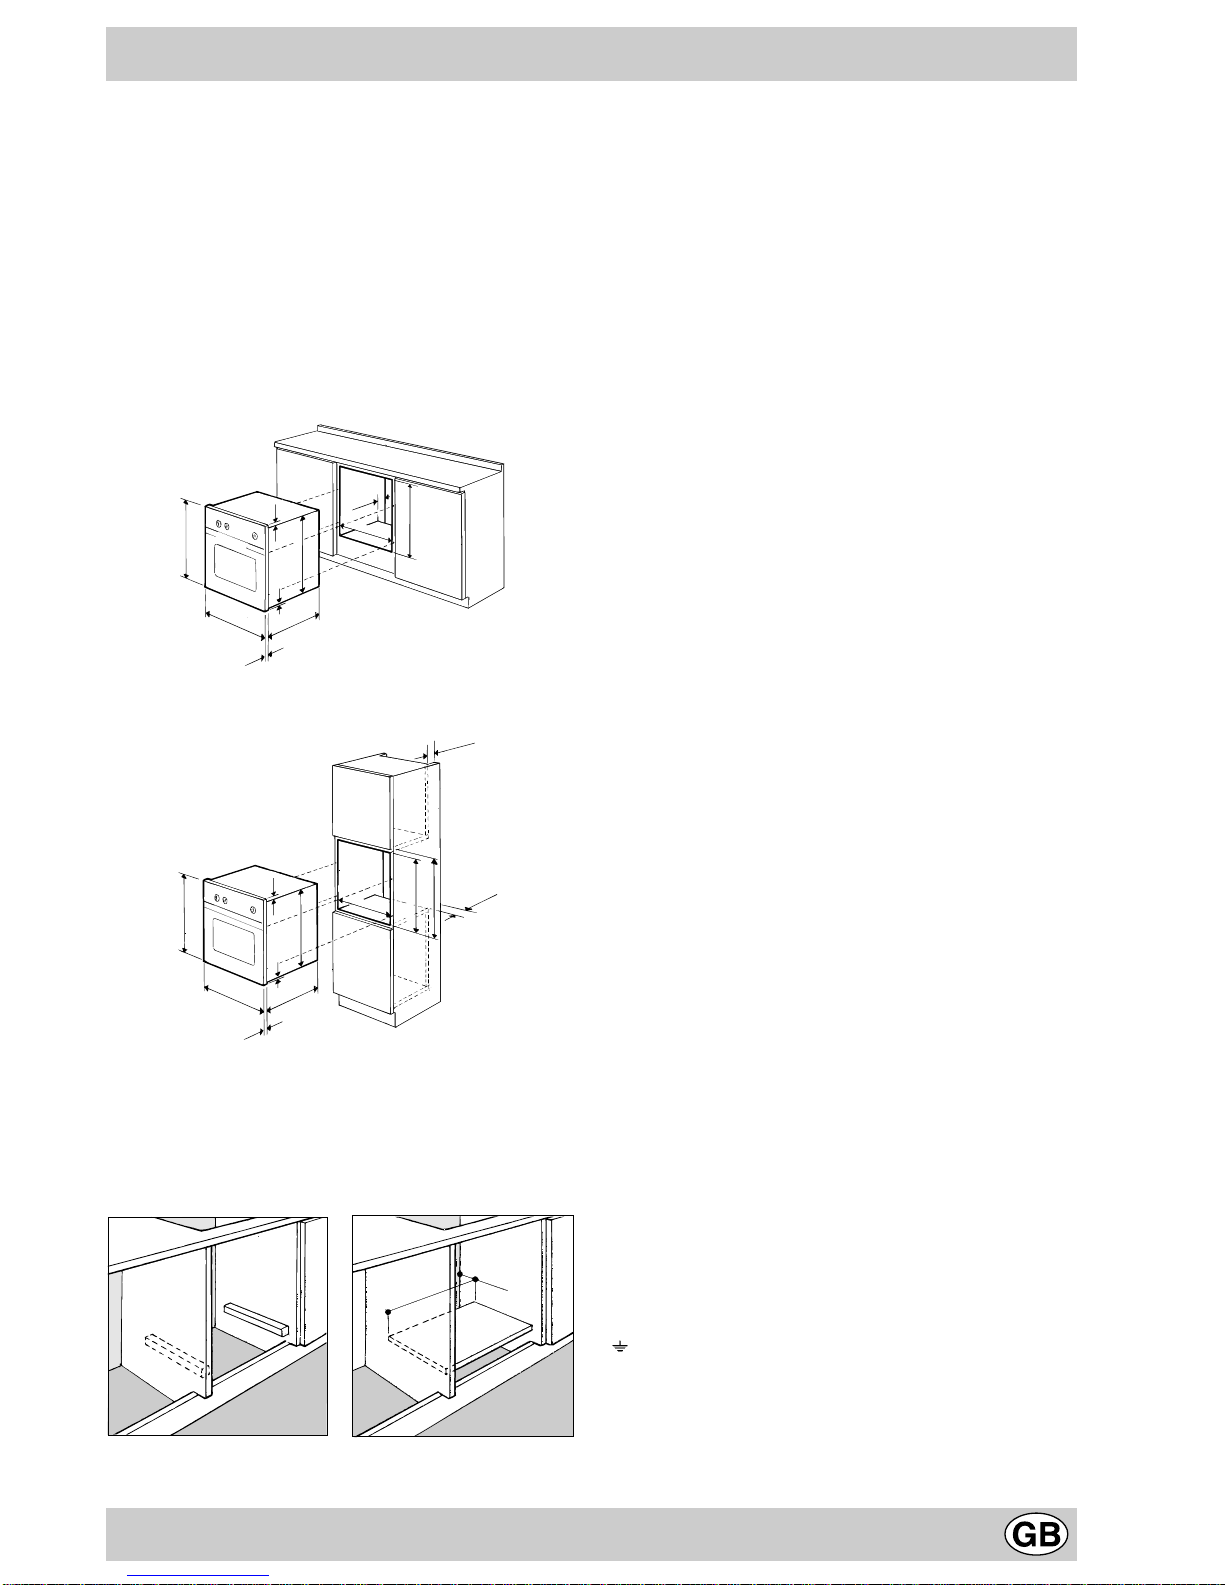
Installation
To ensure the good working order of a flush-mountable
appliance, the kitchen unit must be of a suitable size. In
figure you can find the required unit sizes for installing the
appliance under a worktop or in a column unit.
595 mm.
595 mm.
20 mm. 543 mm.
5 mm.
567 mm.
23 mm.
593 mm.
45 mm.
558 mm.
595 mm.
595 mm.
20 mm. 543 mm.
5 mm.
567 mm.
23 mm.
575-585 mm.
558 mm.
595 mm.
45 mm.
min.
45 mm.
min.
Toensure goodventilation,the backpanel ofthe unitmust
be removed. The oven should preferably be installed so
that it rests on two small wooden boards;should there be
a one-piece worktop, there must be a back opening of at
least 45 x 560 mm.
560 mm.
45 mm.
To secure the oven to the unit, open the oven door and fix
the oven with the four wooden screws into the 4 holes in
the outer frame.The panels of units next to the oven must
be heat resistant. In the case of veneered wood units,
glues must be resistant to temperatures of 100°C. In
compliance with safety regulations, once the appliance
has been fitted, there must be not contact with electrical
parts. All protective parts must be secured so that they
may only be removed with the use of tools.
Electrical connection
Ovenswith a three-pole powersupply cableare designed
tooperate with alternated current at the supply frequency
and voltage indicated on the data plate (at the bottom of
the oven dashboard).The earthing conductor of the cable
is the yellow-green conductor.
Two types of connection are provided:
Connection n° 1
Connecting the power supply cable to the mains.
Fit a normalized plug to the cable, which corresponds to
the load indicated on the data plate; if the cooker is
connected directly to the mains, an omnipolar circuit-
breaker with a minimum opening of 3 mm between the
contacts, suitable for the load indicated and complying
with current directives, must be installed between the
appliance and the mains (the earthing wire must not be
interrupted bythe circuit-breaker).Thepower supply cable
must be positioned so that it does not exceed room tem-
perature by 50°C at any point of its length.Before making
the connection check that:
lthe limiter valve and the home system can support
appliance load (see data plate);
lthe power supply system has an efficient earthing
connection which complies with the provisions of
current regulations and the law;
lthere is easy access to the socket or the omnipolar
circuit-breaker once the cooker has been installed.
N.B.: do not use reducers, adapters or shunts as these
could cause heating or burning.
Connection n° 2
Disposing of the plug.
WARNING: THIS APPLIANCE MUST BE EARTHED.
Ensure that before disposing of the plug itself, you make
thepinsunusableso thatitcannot be accidentallyinserted
intoa socket.Instructions forconnecting cableto an alter-
native plug:
Important: the wires in the mains lead are coloured in
accordance with the following code:
Green &Yellow -Earth
Blue -Neutral
Brown -Live
If the colours of the wires in the mains lead do not
correspond with the coloured markings identifying the
terminals in your plug, proceed as follows.
Connect Green & Yellow wire to terminal marked “E” or
or coloured Green or Green &Yellow.
Connect Brown wire to terminal marked “L” or coloured
Red.Connect Blue wiretoterminalmarked“N”orcoloured
Black.If a 13 amp plug (BS 1363) is used it must be fitted
with a 13 amp fuse.
A 15 amp plug must be protected by a 15 amp fuse, either
in the plug or adaptor or at the distribution board.If you
4
are in any doubt about the electrical supply to your
machine, consult a qualified electrician before use.
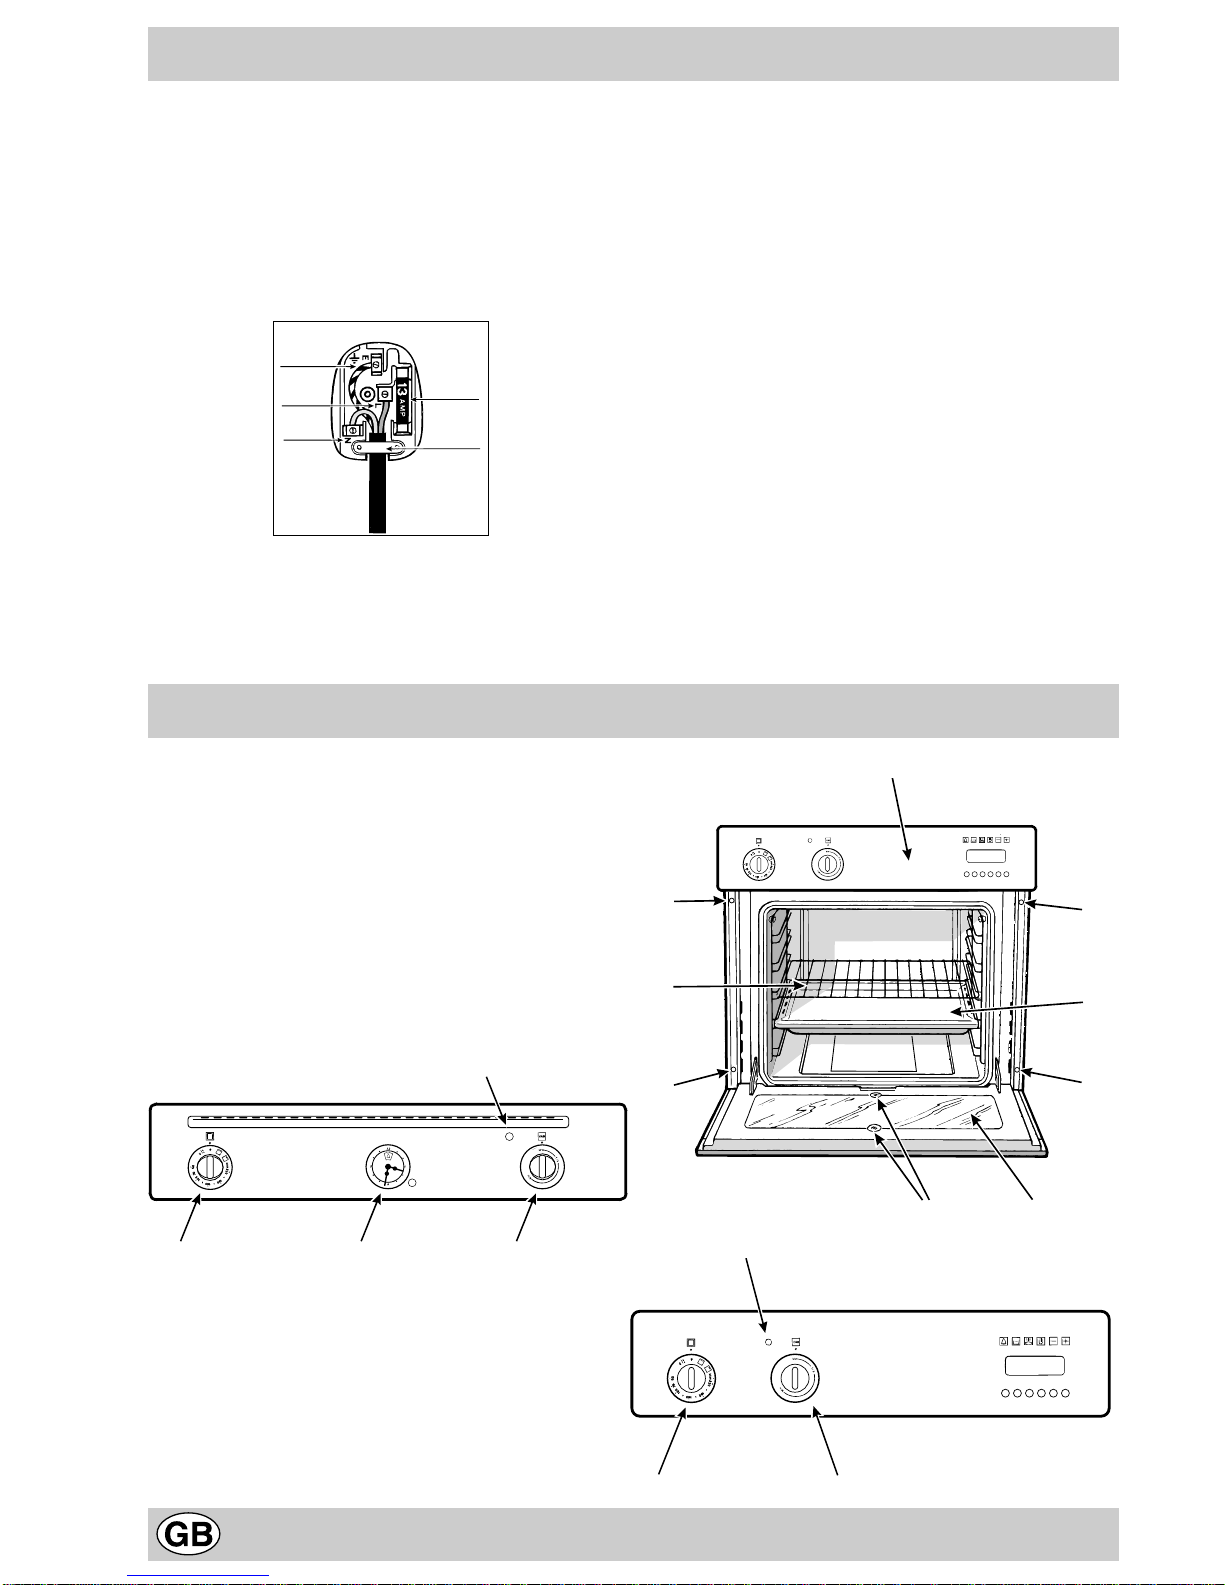
How to connect an alternative plug
The wires in this mains lead are coloured in accordance
with the following code:
BLUE “NEUTRAL”(N)
BROWN “LIVE” (L)
GREEN ANDYELLOW “EARTH” (E)
GREEN &
YELLOW
BROWN
BLUE
13 amp fuse
CROSS-BAR
CORD GRIP
Disposing of the appliance
When disposing of the appliance please remove the plug
by cutting the mains cable as close as possible to the
plug body and dispose of it as described above.
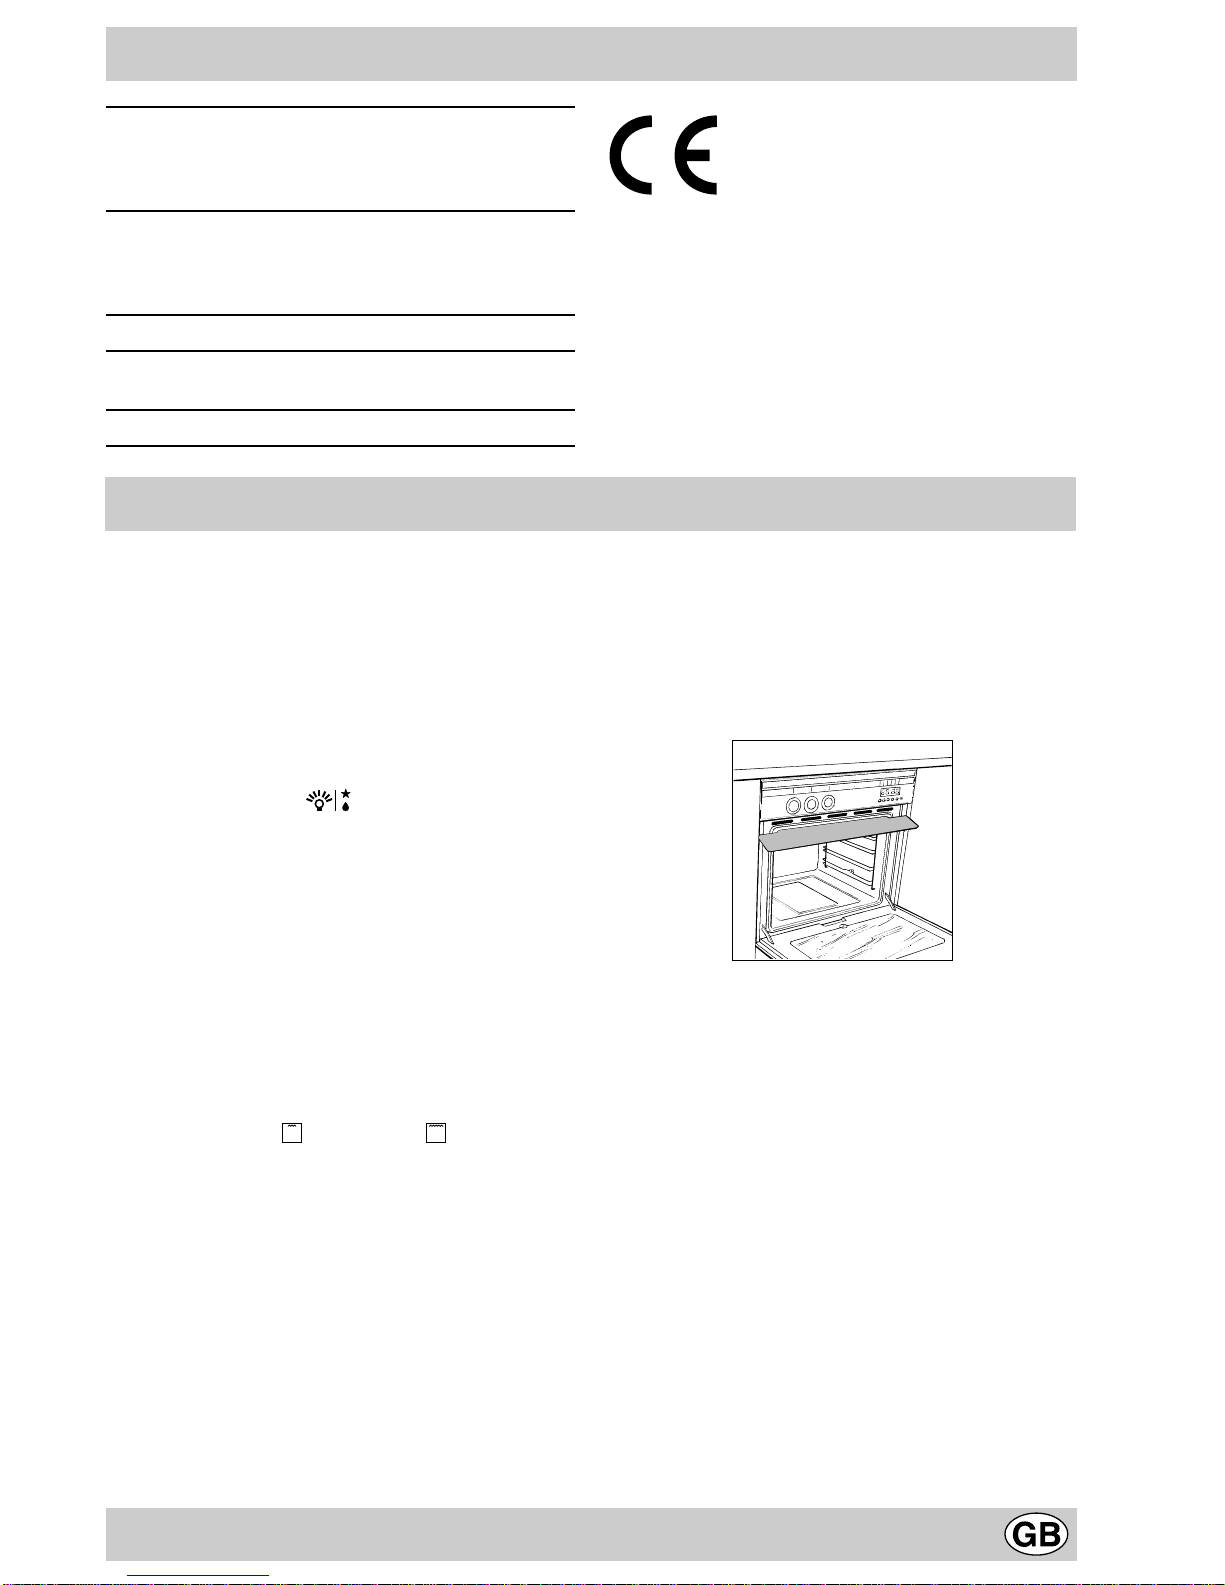
ADashboard
BGrill pan or hob
COven wire shelf
DHoles for fixing screws
EOven knob
FVariable grill knob
GTimer knob
HThermostat light
IOven door-glass
LOven door-glass support screws
Oven description
D
C
A
D
B
D
IL
D
E G F
H
H
EF
5
Dimensions of the electrical oven:
- width cm 40
- depth cm 39
- height cm 34
Consumption:
- to reach 200°C kWh 0,5
- to mantain 200°C for 1 hr kWh1,0
total consumption: kWh 1,5
Electric oven size 51 litres
Power supply voltage and frequency:230-240V~ 50Hz
Power: 2100 - 2200 W
Technical characteristics
This appliance conforms with the following European
Economic Community directives:
- 73/23/EECof 19/02/73 (LowVoltage) and subsequent
modifications;
- 89/336/EEC of 03/05/89 (Electromagnetic
Compatibility) and subsequent modifications;
- 93/68/EECof22/07/93 and subsequentmodifications.
Using the oven and grill
Thedifferentoperationsoftheoven howtheymaybe used:
1.Using the oven
2.Grilling
The oven control knob (E)
This knob is used to select the different operations of the
oven, ie. selecting the correct cooking temperatures for
the food to be cooked and control of the grill.
1. Using the oven
When the oven control knob is turned in a clockwise
direction to the symbol the fan and oven light will
comeon to assist in the defrosting offrozenfood.Rotating
further to the complete range of temperatures shown on
the dial you can choose which is most suitable for the
food you are going to cook.The temperature is reached
automatically and controlled by the oven thermostat.
Note:Whilstusing tagoven forconventionalcooking knob
(F)must be set with“MAX”in line withthe referencemark
on the control panel.
2. Use of the grill
Grilling may be carried out with a two stage heating
element situated in the top of the oven chamber. The
centre, or the complete area of the grill can be selected
byturningtheovencontrolknob(E)ina clockwisedirection
to align the symbols ( for the centre, for the comple-
te area) with the mark on the control panel.The variable
temperature control (F) is positioned to right of the oven
knob. This knob will provide varying grill temperatures
when rotated from “max” to“min” and may be adjusted to
vary the level of heat at any time during the grilling
operation.
To operate the grill
1. Turn the oven control knob (E) clockwise until the
required grilling symbol is in line with the mark on the
control panel.The element is now“on”.
2. The variable grill control (F) can now be operated to
select the required heat.
When utilizing the grill, place the rack at the lower levels
(see cooking table). To catch grease or fat and prevent
smoke, place a dripping-pan at the bottom rack level.
Grilling should normally becarried outwith the doorclosed
to obtain the best results and save energy (about 10%).
When this recommendation is not possible, a special
deflector is supplied, and this must be placed in position
to protect the controls from excessive heat. Below the
control panel at the door closure point, are two retaining
lugs for the deflector, the deflector should be placed in
position before grilling commences.
Caution:
1. When grilling using the heat deflector, the oven door
must remain fully open throughout the whole period of
grilling.
2. Thedeflector willbecome extremelyhot during grilling.
Allow time to cool in position before attempting to
remove.
Important: turn on the oven and grill for about 30 minutes
before usingthem forthe firsttime with theovendoor open
and air the room.The smell you may notice is due to the
evaporation of substances used to protect the oven and
grill between the time of production and installation of the
cooker.
Oven light
Turn the knob clockwise one‘click’and the oven lamp will
light up without heat.It illuminates the oven and remains
on whenever any electric oven heating element is used.
The red pilot lamp (H)
This lamp will glow when the oven is first switched “on”, it
willextinguishonce the correctoventemperature has been
reached.
6
Inner glass oven door (I)
Theoven is providedof aninnerglassthat can beremoved
unscrewing the two screws (L) that fix it to the door.This
glass must be replaced after cleaning and always be
in position when cooking.
Coolingfan
Afanhas beenincorporated to blow coolair through vents
in the front of the oven during cooking. If the oven is
operated for a long period, the air blowing through the
vents may become warm.
Oven door
Youcan buyaspecial kit toreduce door temperaturewhen
the oven is on and save energy. If there are little children
in the house, this kit is a must. The kit code number is
039888 or 039104 (for traditional models with plate-metal
door) and it may be purchased for installation from an
authorised dealeroraTechnicalAssistanceServicecentre
indicatedinthe list includedwiththe appliance documents.
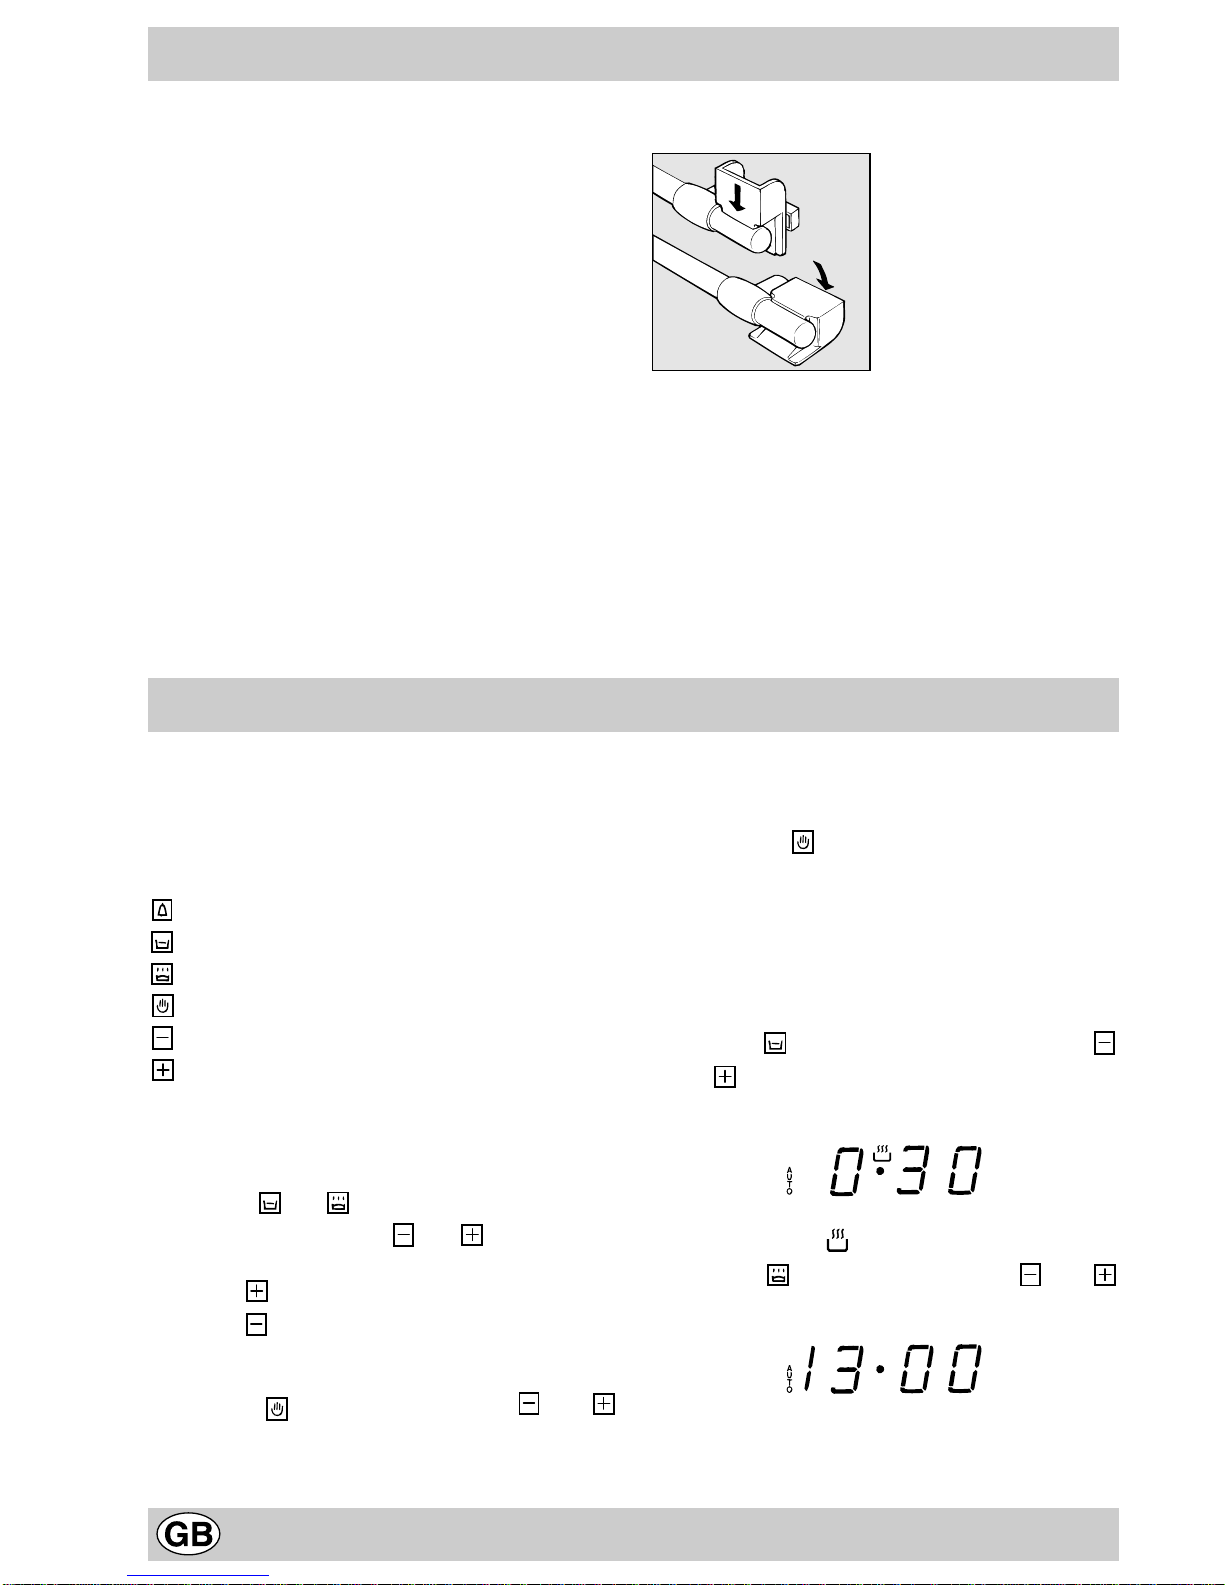
Oven handle
Important: the cooking steam leaves the oven from the
slots at the extreme right of the handle.Do not touchthis
part of the handle.For ovens with tubular handles, there
isa special protective devicewhich isfitted during cooking
to keep steam away from the front of the cooker.
1
2
Important
Do not place casseroles on the bottom tray of the oven.
These not only prevent uniform baking but the heating
element under the bottom tray will burn the food
underneath.In addition the casseroles preventpropoer air
circulation in ventilated ovens.Moreover, this bottom tray
is convex to ensure major resistance to deformations and
is therefore not a level surface.
Electronic Cooking Programmer
The programmer makes it possible to preset the oven and
the grill in terms of:
• delay start with a preset length of time for cooking;
• immediate start with a preset length of time for cooking;
• timer.
Buttonfunctions:
:Timer with hour and minutes;
: Length of cooking time;
: End cooking time;
:Manual change;
:Change time (backwards);
:Change time (forwards).
How to Reset the Digital Clock
Afterthe appliancehasbeenconnectedtothepowersource
or following a power outage, the clock display will begin to
blink and read:0:00
• Press the and buttons at the same time.Then
use (within 4 seconds) the and buttons to set
theexacttime.
Use the button to move the time forwards.
Use the button to move the time backwards.
The time can also be changed in the following two ways:
1. Repeat all of the foregoing steps.
2. Press the button, and then use the and
buttons to reset the time.
Manual Operation Mode for the Oven
After the time has been set, the programmer is automati-
cally set to manual mode.
Note: Press the button to return the oven to manual
mode after every "Automatic" cooking session.
Delayed StartTime with Preset Cooking Length
The length and the end cooking times must be set. Let us
suppose that the display shows 10:00.
1. Turn the oven control knob to the cooking setting and
temperature desired (example: convection oven at
200°C).
2. Press the and the use (within 4 seconds) the
and buttonsto set the lengthofthecookingtime. Let
us suppose that 30 minutes was set for the length of the
cooking time.In this case, the display will show:
Release the button, and within 4 seconds, the current time
will reappear with the symbol and "auto."
3. Press the button, and then use the and
buttons to set the end cooking time.Let us suppose that
it is 13:00

7
Country Style Clock and Timer
Timer Feature
The timer operates by counting down a given period of
time.This feature does not, however, turn the oven on or
off.It merely emits an acoustical alarm when the time has
run out.
How to Set the Timer
Turn the knob until the indicator is set on the length of
time desired (using the inside numbers).The time is
clearly visible through the transparent window on the
indicator itself.
The timer will begin to count down immediately.
The sound will stop automatically after approximately 2
minutes and the timer will be set to the symbol (clock
function).
To turn off the buzzer, or to use only the clock, set the
indicator on the symbol.
How to Set the Current Time
The oven must be connected to the power supply
Pull the knob and turn it in the clockwise direction to set
the time
N.B.: The clock is electric. Therefore, in the event of a
power outage, the clock will stop for the entire time the
oven remains withoutpower.When the power comesback
on, the clock must be reset to the current time
4. Release the button and the display will show the current
time within 4 seconds:
When "auto" is lighted, it indicates that the length and end
cooking time have been preset to operate in automatic
mode.At this point, the oven will turn on automatically at
12:30 in order to finish the cooking session within 30
minutes.When the oven is on, the symbol (cooking
pot) will appear on the display for the entire length of the
cooking process.The button can be pressed at any
time to display the setting for the length of the cooking
time, while the button can be pressed to display the
endcookingtime.
At the end of the cooking time, an acoustic signal will
sound. Press any button it turn it off (except the
and buttons).
Immediate Start Time with Preset Cooking Length
Whenonlythelength of the cookingtimeisset(points1and
2 of the paragraph entitled, "Delayed Start Time with Preset
Cooking Length"), the cooking session starts immediately.
Cancelling a Preset Cooking Time
Press the button, and use the button to set the time
to:
Then press the manual cooking mode button .
TimerFeature
The timer can be used to count down from a given length of
time.Thisfeaturedoesnot control when the ovencomes on
orturns off, but,rather,it only emitsanacoustic signalwhen
the preset time has run out.
Press the button, and the display will read:
Then use the and buttons to set the desired time.
Release the button, and the timer will start at that second.
The display will show the current time.
At the end of the preset time, an acoustic signal will sound,
which can be turned off by pressing any button (except the
and buttons), and the symbol will turn off.
Changingand Cancelling Settings
• Thesettingscanbechangedatanytime bypressingthe
corresponding button and using the or button.
• Whenthe lengthsettingforthecookingtimeis cancelled,
the end cooking time setting is also cancelled, and vice
versa.
• When in automatic cooking mode, the appliance will not
accept end cooking times prior to the start cooking time
proposed by the appliance itself.

8
N.B: the baking times indicated are approximate and may vary according to your personal taste and experience.
Practical advice for oven cooking
Foods Wt.
(Kg.) Cooking
position of
shelves from
bottom
Temperature
(°C) Variable grill Eating time
(min.) Cooking time
(min.)
Paste
Lasagne
Cannelloni
Tagliatelle
2,5
2,5
2,5
2
2
2
180
180
180
Max
Max
Max
-
-
-
65-70
65-70
65-70
Meat
Veal
Chicken
Turkey
Duck
Pork
Lamb
1,7
1,5
3,0
1,8
2,1
1,8
2
2
2
2
2
2
160
160
180
160
160
160
Max
Max
Max
Max
Max
Max
-
-
-
-
-
-
75-80
140-145
85-90
120-125
95-100
85-90
Fish
Mackerel
Dentex
Trout baked in paper
1,1
1,5
1,0
2
2
2
160
160
160
Max
Max
Max
-
-
-
50-55
55-60
35-40
Pizze and tarts
Napolitan pizza
Biscuits
Meringues
Chocolate cake
Yeast cakes
1,0
0,5
0,5
1,0
0,5
3
2
2
2
2
200
160
100
160
160
Max
Max
Max
Max
Max
15
10
10
10
10
30-35
30-35
60-70
45-50
30-40
Grill cooking
Toast
Pork chops
Mackerel
n°4
1,5
1,1
4
4
4
Max-Min
Max-Min
Max-Min
5
25
30
9
Ordinary maintenance and cleaning
Before each operation, disconnect the oven from the
electricity. To assure the long life of the oven, it must be
thoroughly cleaned frequently, keeping in mind that:
ltheenamelled partsarewashedwith warmwaterwithout
usinganyabrasivepowdersorcorrosivesubstancewhich
could ruin them;
ltheinsideof theovenshouldbecleanedfairlyoftenwhile
it is still warm using warm water and detergent, followed
by careful rinsing and drying;
lthe electric plates are cleaned with a damp cloth and
they should be lubricated with a little mineral oil while
they are still warm;
lStainless steel may become marked if it comes into
contact with very hard water or harsh detergents
(containing phosphorous) for long periods of time.After
cleaning, it is advisable to rinse thoroughly and dry. It is
also recommended to dry any water drops.
lin models with glass covers, the covers are cleaned with
hot water, and use of rough cloths or abrasives is to be
avoided.
N.B: avoidclosingthecover while the electric plates are
still warm.
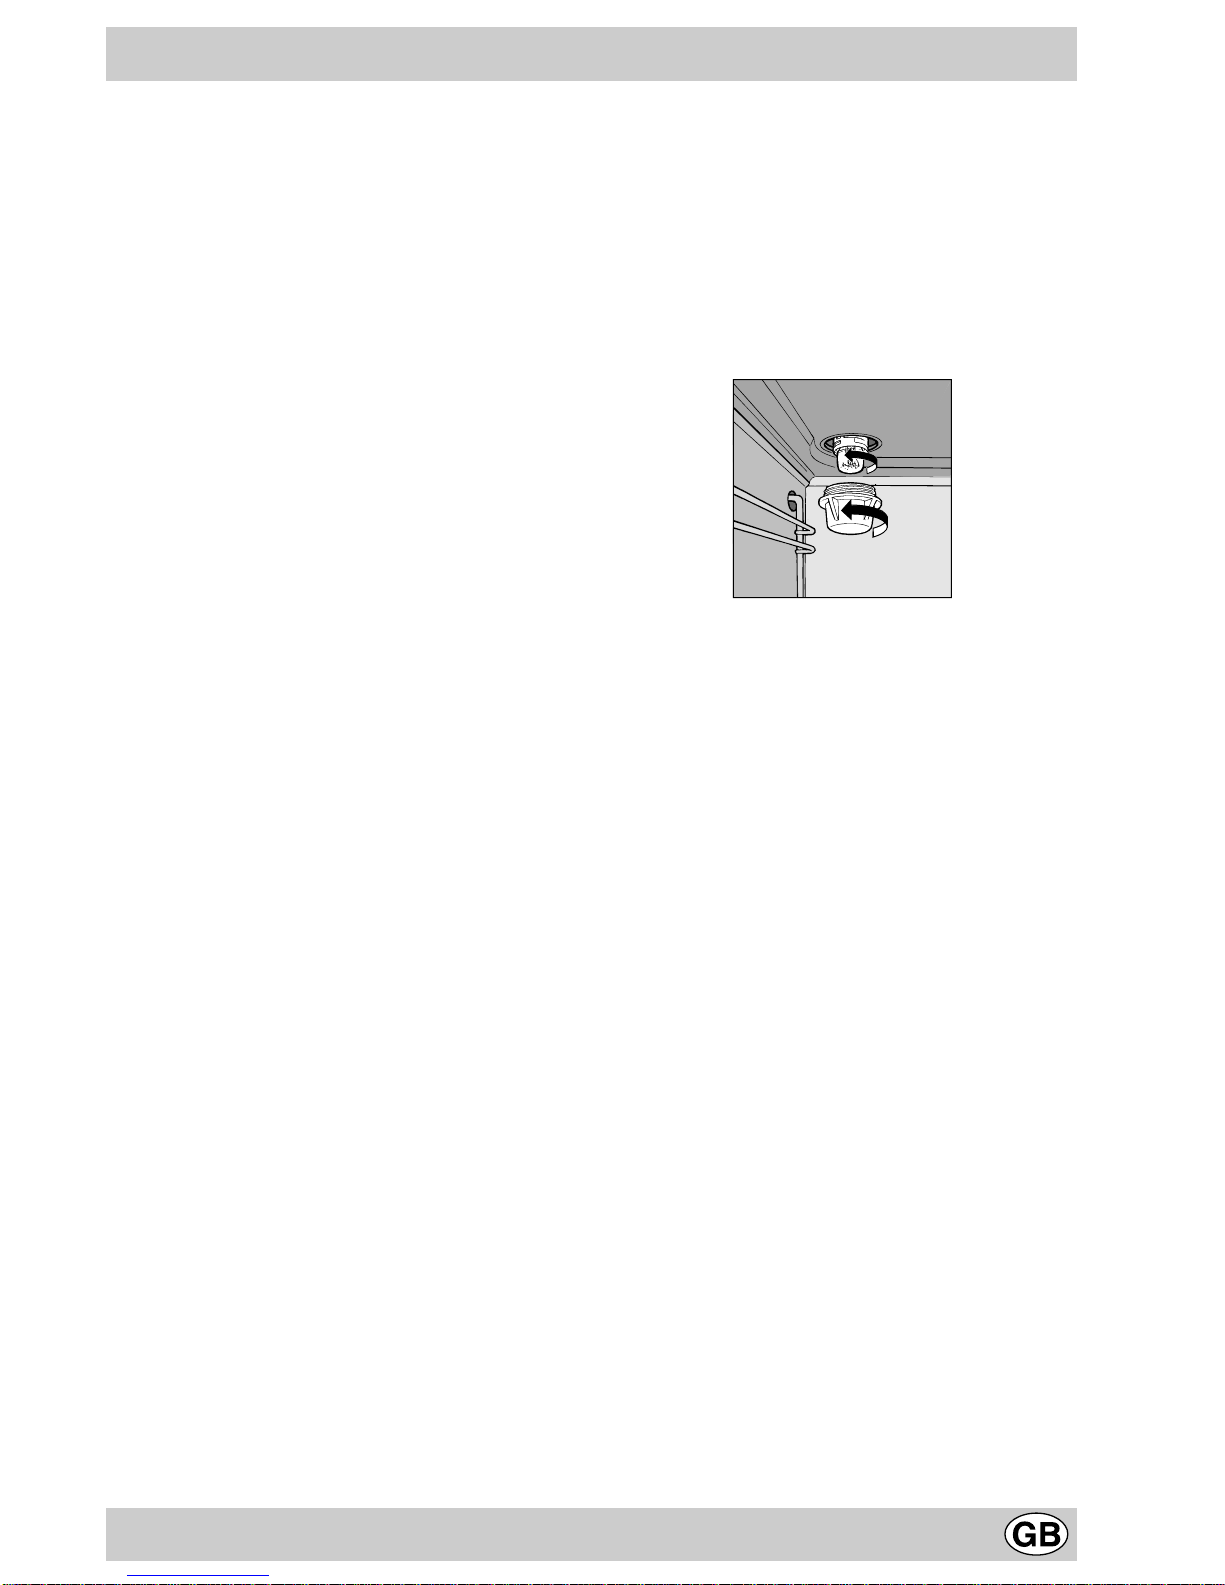
Replacing the oven lamp
lUnplug the oven from the mains;
lRemove the glass cover of the lamp-holder;
lRemove the lamp and replace with a lamp resistant to
high temperatures (300°C) with the following
characteristics:
-Voltage 230V
- Wattage 25W
- Type E14
lReplace the glass cover and connect the oven to the
mains.

10

11

viale Aristide Merloni, 47 - 60044 Fabriano
tel.0732/6611 - telex 560196 - fax 0732/662954
www.Merloni.com
Forno incasso multifunzione
05/98 - 195004527.09 Xerox Business Services - Docutech
This manual suits for next models
1
Table of contents
Other Merloni Oven manuals


