Merloni C 659 P X UK User manual

5-ring cooker with new "7 cuochi" oven
Instructions for installation and use
C 659 P X UK

2
1 This appliance is intended for non-professional use
within the home.
2 These instructions are only for those countries whose
symbolsappearinthebookletandontheserialno.plate
of the appliance.
3 Thisowner’smanualisforaclass1appliance(installed
independently) or class 2, sub-class 1 appliances
(installed between two cabinets).
4Before using your appliance, read the instructions in this
owner’smanualcarefullysinceitprovidesalltheinformation
you need toensure safe installation, useand maintenance.
Always keep this owner’s manual close to hand since you
may need to refer to it in the future.
5When you have removed the packing, check that the
appliance is not damaged. If you have any doubts, do not
usetheapplianceandcontact yournearestAriston Service
Centre.Neverleave the packingcomponents(plastic bags,
polystyrenefoam,nails,etc.)withinthereachofchildrensince
they are a source of potential danger.
6Theappliancemustbeinstalledonlybyaqualifiedtechnician
in compliance with the instructions provided. The
manufacturer declines all liability for improper installation,
whichmayresultinpersonalinjuryanddamagetoproperty.
7Theelectricalsafetyofthisappliancecanonlybeguaranteed
if it is correctly and efficiently earthed, in compliance with
regulations on electrical safety. Always ensure that the
earthingisefficient.Ifyouhaveanydoubts,contactaqualified
technician to check the system.The manufacturer declines
allliabilityfordamageresultingfromasystemwhichhasnot
beenearthed.
8Beforepluggingtheapplianceintothemains,checkthatthe
specifications indicated on the date plate (on the appliance
and/or packaging) correspond with those of the electrical
and gas systems in your home.s
9Checkthattheelectricalcapacityofthesystemandsockets
willsupportthemaximumpoweroftheappliance,asindicated
onthedataplate.Ifyouhaveanydoubts,contactaqualified
technician.
10 Anomnipolarswitchwithacontactopeningofatleast3mm
ormore isrequired forinstallation.
11 Ifthesocketandapplianceplugarenotcompatible,havethe
socketreplacedwithasuitablemodelbyaqualifiedtechnician,
who should also check that the cross-section of the socket
cable is sufficient for the power absorbed by the appliance.
The use of adaptors, multiple sockets and/or extensions, is
notrecommended.Iftheirusecannotbeavoided,remember
touseonlysingleormultipleadaptersandextensionswhich
complywithcurrentsafetyregulations.Inthesecases,never
exceed the maximum current capacity indicated on the
individual adaptor or extension and the maximum power
indicatedonthe multipleadapter.
12 Donotleavetheappliancepluggedinifitisnotinuse.Switch
off the main switch and gas supply when you are not using
theappliance.
13 The openings and slots used for ventilation and heat
dispersiononthebackandbelowthecontrolpanelmust
never be covered.
14 Theusermustnotreplacethesupplycableofthisappliance.
Alwayscontactanafter-salesservicecentrewhichhasbeen
authorised by the manufacturer if the cable has been
damagedorneeds replacement.
15 Thisappliancemustbeusedforthepurposeforwhichitwas
expressly designed. Any other use (e.g. heating rooms) is
consideredtobeimproperandconsequentlydangerous.The
manufacturer declines all liability for damage resulting from
improperand irresponsibleuse.
16 Anumberoffundamentalrulesmustbefollowedwhenusing
electrical appliances. The following are of particular
importance:
• Donot touch theappliance when yourhands orfeetare
wet.
• Donot usethe appliance barefooted.
• Donotuseextensions,butiftheyarenecessary,caution
must be exercised.
• Never pull the power supply cable or the appliance to
unplugthe applianceplug from themains.
• Neverleavetheapplianceexposedtoatmosphericagents
(rain, sun etc.).
• Donotallowchildrenorpersonswhoarenotfamiliarwith
theappliance touse it,without supervision.s
17 Alwaysunplugtheappliancefromthemainsorswitchoffthe
mainswitchbeforecleaningor carryingout maintenance.
18 Ifyouarenolongerusinganapplianceofthistype,remember
to make it unserviceable by unplugging the appliance from
the mains and cutting the supply cable. Also make all
potentially dangerous parts of the appliance safe, above all
for children who could play with the appliance.
19 Toavoidaccidentalspillagedonotusecookwarewithuneven
or deformed bottoms on the burners. Turn the handles of
pots and pans inwards to avoid knocking them over
accidentally.
20 Some parts of the appliance remain heated for a long time
after use.Make sure not to touch them.
21 Never use flammable liquids such as alcohol or gasoline,
etc.near the appliance when it is in use.
22 Whenusingsmallelectricappliancesnearthehob,keepthe
supply cord away from the hot parts.
23 Make sure the knobs are in the “•”/”o” position when the
appliance is not in use.s
24 Whentheapplianceisinuse,theheatingelementsand
some parts of the oven door become extremely hot.
Makesureyoudon'ttouchthemandkeepchildrenwell
away.
25 Gas appliances require regular air exchange to ensure
trouble-free performance. When installing the cooker,
follow the instructions provided in the paragraph on
“Positioning”the appliance.
26 If the cooker is placed on a pedestal, take the necessary
precautionstopreventthesamefromslidingoffthepedestal
itself.
27 Some of the models have a glass hob cover.This could
crack if overheated so make sure all the burners or elec-
tric hot plates are off before closing it.
To maintain the EFFICIENCY and SAFETY of this appliance, we recommend:
• call only the Service Centers authorized by the manufacturer
• always use original Spare Parts
Warning
3
The following instructions should be read by a qualified
techniciantoensurethattheapplianceisinstalled,regulated
andtechnicallyservicedcorrectlyincompliance with current
regulations.
Important: remember to unplug the appliance from the
mains before regulating the appliance or carrying out
any maintenance work.
Positioning
Important: this unit may be installed and used only in
permanentlyventilatedroomsaccordingtotheBritishStandards
Codes Of Practice:B.S.6172/B.S.5440, Par.2 and B.S.6891
CurrentEditions.Thefollowingrequirementsmustbeobserved:
a) Thecookershouldnotbeinstalledinabedsittingroomwith
a volume of less than 20m3. If it is installed in a room of
volumelessthan5m3anairventofeffectiveareaof110cm2
isrequired,ifitisinstalledinaroomofvolumebetween5m3
and10m3asupplementaryairventareaof50cm2isrequired,
ifthevolumeexceeds11m3noairventisrequired.However,
if the room has a door or a window which opens directly to
theoutside noair ventisrequired evenwhen thevolumeis
between 5m3and 11m3.
b) During prolonged use of the appliance you may consider it
necessary to open a window to the outside to improve
ventilation.
c) Ifthereareotherfuelburningappliancesinthesameroom,
B.S.5440 Part 2 Current Edition, should, be consulted to
determine therequisite airventrequirements.
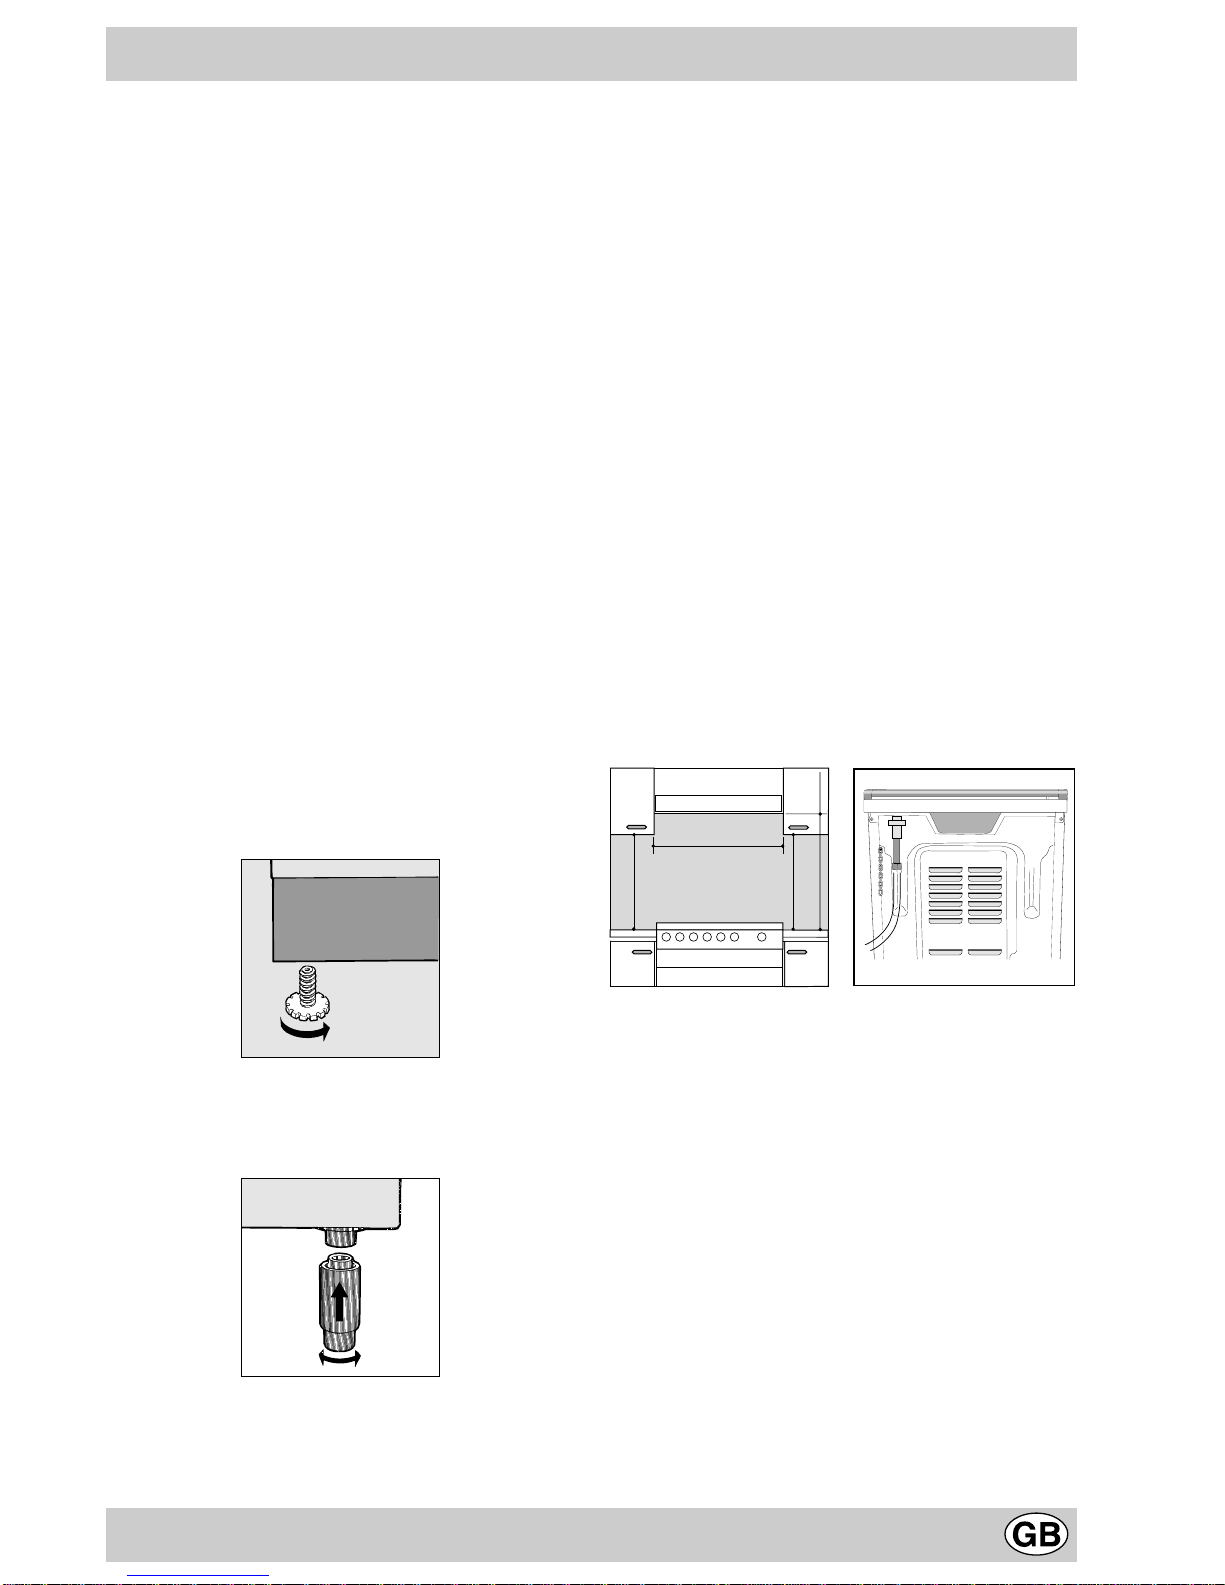
Levelling your appliance (only on a few models)
Yourcookerissuppliedwithfeetforlevellingtheappliance.If
necessary, these feet can be screwed into the housings in
the corners of the cooker base.
Mounting the legs (only on a few models)
Press-fit legs are supplied which fit under the base of your
cooker.
Installation of the cooker
The cooker is prepared with protection degree against
excessive heating of type X, the appliance can therefore be
installednexttocabinets,providedtheheightdoesnotexceed
thatofthehob.Ifthe cookerisplacedtouchingwallsorsides
of neighbouring cabinets, these must be capable of
withstandingatemperatureriseof 50°C aboveroomtempe-
rature. For a correct installation of the cooker the following
precautions must be followed:
a) The cooker may be located in a kitchen, a kitonen/diner
orbedsittingroom,butnotinabathroomorshowerroom.
b) The furniture units next to the cooker, that is higher than
theworkingboards,mustbeplacedatleast110mm from
the edge of the board. Curtains must not be fitted
immediately behind the cooker or within 110 mm.of the
sides of the cooker.
c) The hoods must be installed according to the
requirements in the hood handbook.
d) Wall cabinets may be fitted in line with the sides of the
baseunits,providingthattheloweredgeofthewallcabinet
isaminimumof420mm.abovetheworktop.Theminimum
distance combustible material kitchen units can be fitted
directly above the worktop is 700 mm (Fig.A).
e) Thewallincontactwiththebackof the cookermustbeof
flameproofmaterial.
f) The cooker is fitted with a safety chain that must be
attached to a hook, secured to the wall behind the
appliance.
Note: some models can have their gas connection
inverted.It is important to make sure the safety chain
is always situated on the side which corresponds to
the hose holder (Fig. B).
HOOD
420
Min.
min.
650
mm. with hood
min.
700
mm. without hood
mm.
600
Min. mm.
420
Min. mm.
Fig.A Fig.B
Gas connection
Thecookershouldbeconnectedtothegas-supplybyacorgi
registered installer. During installation of this product it is
essentialtofitan approvedgastaptoisolatethesupply from
theappliancefortheconvenienceofanysubsequentremoval
or servicing. Connection of the appliance to the gas mains
orliquidgasmustbecarriedoutaccordingtotheprescribed
regulation in force, and only after it is ascertained that it is
adaptable to the type of gas to be used. If not, follow the
instructions indicated in the paragraph headed “Adaptation
to different gas types”. In the case of connection to liquid
gas, by tank, use pressure regulators that conform to the
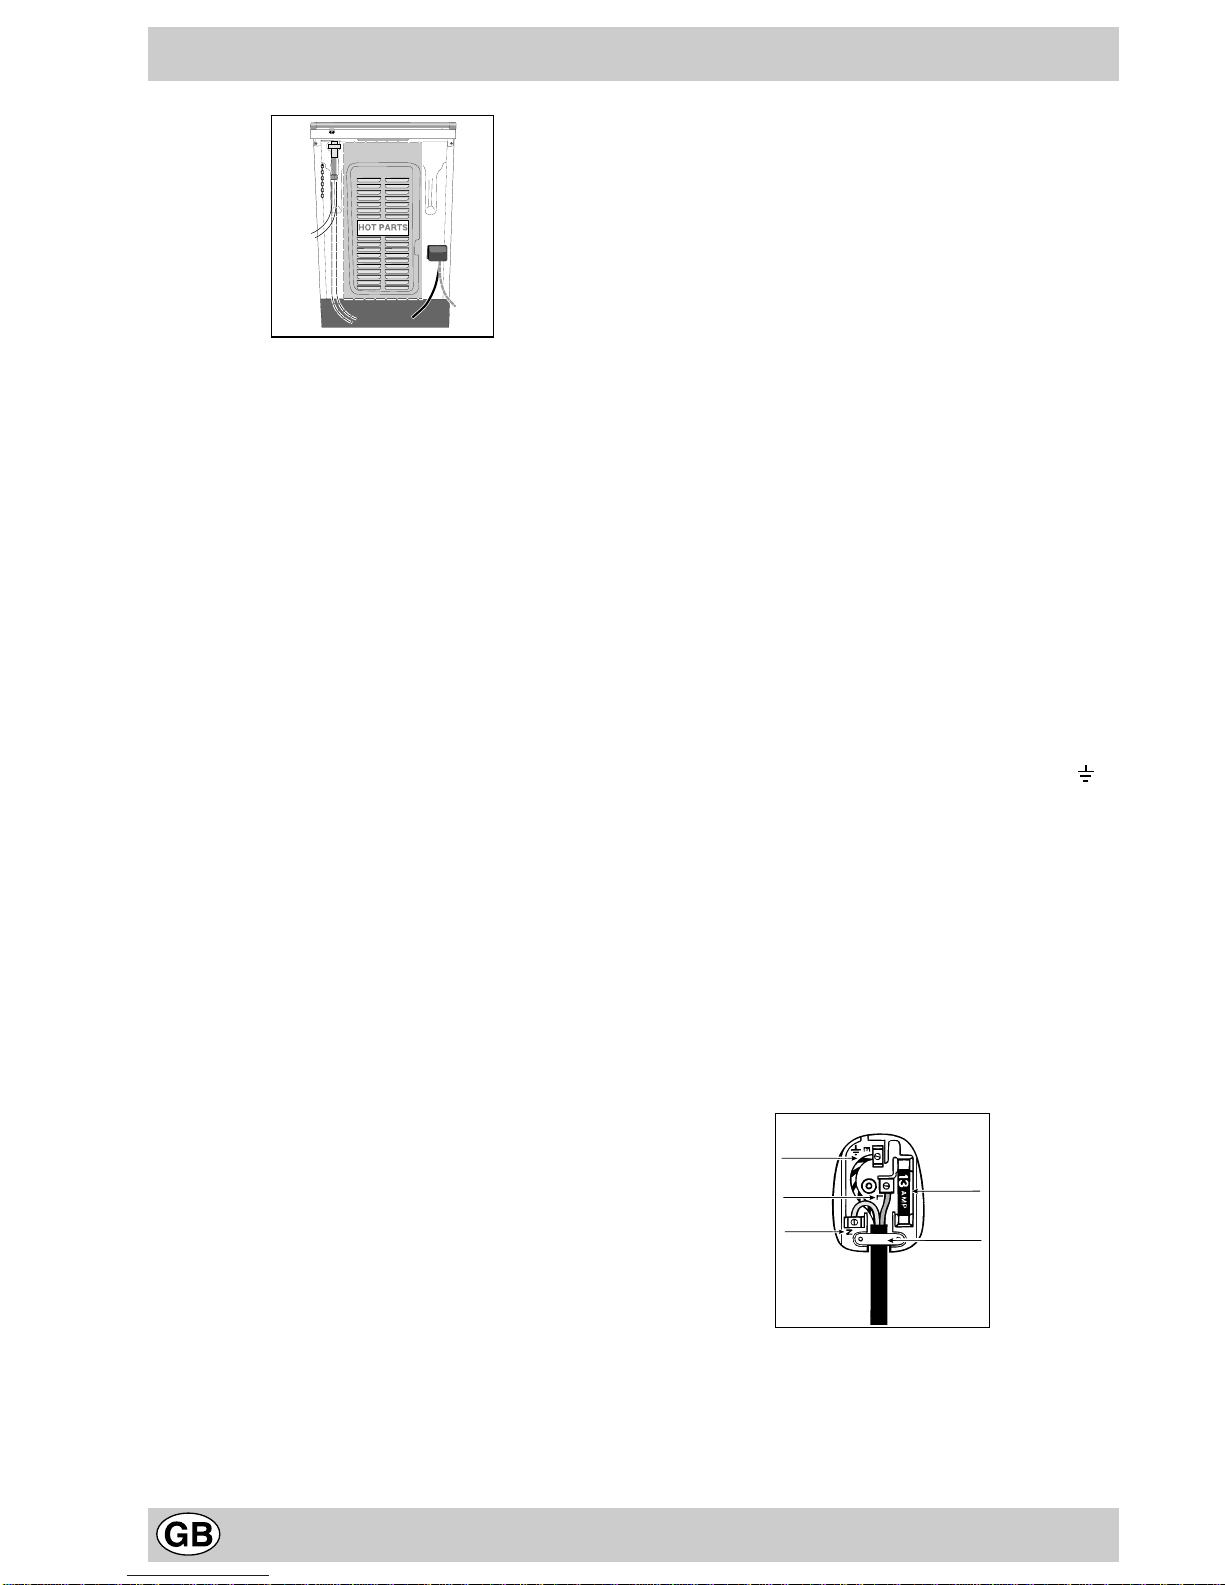
regulationinforce.Thegassupplymustbeconnectedtothe
left of the appliance. Be sure that the hose does not pass
through the rear of the cooker touching hot parts.
Installation
4
HOT PARTS
Important: make sure the supply pressure conforms with the
valuesshowninthetableentitled“Caracteristicsoftheburners
andnozzles”.Whenthecookerisinstalledbetweencabinets
(recessed), the gas connection must be effected by an
approved flexible hose with bayonet fitting
(BS 669 Current Edition).The gas inlet for the cookers is a
threaded G 1/2 gas female fitting.
Connecting the gas supply
To make the connection, a flexible hose should be used
corresponding to the current gas regulations which are:
•the hose must never be at any point in its lenght in contact
with the“hot”parts of the cooker;
•the hose must never be longer than 1,5 metre;
•the hose must not be subject to any tension or torsional
stress and it must not have any excessively narrow curves
orbottlenecks;
•the hose must be easy to inspect along its entire length to
check its condition;
•the hose must always be in good condition, never attempt
torepair.
Important: the installation must comply with gas safety
(installationanduse)regulations1984.Inallcasesfortheabove,
by low, a qualified, corgi approved engineer must be called for
installation.
Electrialconnection
Power supply voltage and frequency:230-240V a.c.50 Hz.
Note: the supply cable must be positioned so that it never
reachesatanypointa temperature50°Chigherthantheroom
temperature.Thecablemustberoutedawayfromtherearvents.
Should you require it, you may use a longer cable, however,
you must ensure that the cable supplied with the appliance is
replacedbyone ofthesamespecifications in accordancewith
currentstandards and legislation.
Yourapplianceissuppliedwitha13ampfusedplugthatcanbe
plugged into a 13 amp socket for immediate use.Before using
the appliance please read the instructions below.
WARNING -THIS APPLIANCE MUST BE EARTHED.
THE FOLLOWING OPERATIONS SHOULD BE CARRIED
OUT BY A QUALIFIED ELECTRICIAN.
Replacing the fuse:
Whenreplacingafaultyfuse,a13ampASTAapprovedfuseto
BS1362shouldalways be used, andthefusecoverre-fitted.If
the fuse cover is lost, the plug must not be used until a
replacementisobtained.
Replacement fuse covers:
If a replacement fuse cover is fitted, it must be of the correct
colourasindicatedbythecolouredmarkingorthecolourthatis
embossedinwordsonthebaseoftheplug.Replacementscan
be obtained directly from your nearest Service Depot.
Removing the plug:
If your appliance has a non-rewireable moulded plug and you
shouldwishto removeittoaddacableextensionortore-route
the mains cable through partitions, units etc., please ensure
thateither:
•the plug is replaced by a fused 13 amp re-wireable plug
bearing the BSI mark of approval.
or:
•themainscableis wired directlyintoa 13 ampcableoutlet,
controlledby a switch,(in compliancewith BS5733) which
is accessible without moving the appliance.
Please note: for appliances with a rating greater than 13 amp
(eg:electrichob,doubleovensandfreestandingelectriccookers
etc.) the mains cable must be wired into a cooker output point
with a rating of 45 amp.In this case the cable is not supplied.
Disposing of the plug:
Ensure that before disposing of the plug itself, you make the
pins unusable so that it cannot be accidentally inserted into a
socket.Instructionsforconnecting cableto an alternative plug:
Important: the wires in the mains lead are coloured in
accordance with the following code:
Green &Yellow - Earth
Blue - Neutral
Brown - Live
If the colours of the wires in the mains lead do not correspond
withthecolouredmarkingsidentifyingtheterminalsinyourplug,
proceed as follows:
Connect Green &Yellow wire to terminal marked“E”or or
coloured Green or Green &Yellow.
ConnectBrownwire toterminalmarked“L”orcoloured Red.
Connect Blue wire to terminal marked“N” or coloured Black.
If a 13 amp plug (BS 1363) is used it must be fitted with a 13
ampfuse.A 15 ampplugmustbeprotected bya 15 ampfuse,
either in the plug or adaptor or at the distribution board.If you
are in any doubt about the electrical supply to your machine,
consult a qualified electrician before use.
How to connect an alternative plug:
The wires in this mains lead are coloured in accordance with
thefollowingcode:
BLUE “NEUTRAL”(“N”)
BROWN “LIVE”(“L”)
GREEN ANDYELLOW “EARTH” (“E”)
GREEN &
YELLOW
BROWN
BLUE
13 amp fuse
CROSS-BAR
CORD GRIP
Disposing of the appliance
When disposing of the appliance please remove the plug by
cutting the mains cable as close as possible to the plug body
and dispose of it as described above.
Adapting the cooker to different types of gas
In order to adapt the cooker to a different type of gas with

5
respect to the gas for which it was produced (indicated on
the label attached to the lid), follow these steps:
a) replace the hose holder mounted on the appliance with
that supplied in the bag of“cooker accessories”.
Important: the hose holder for liquid gas is marked 8, the
hose holder for methane gas is marked 13. Always fit the
sealing gasket.
b) Replacing the burner nozzles on the hob:
•remove the grids and slide the burners from their
housings;
•unscrew the nozzles using a 7 mm socket spanner, and
replace them with nozzles for the new type of gas (see
table 1“Burner and nozzle characteristics”).
• replace all the components by repeating the steps in
reverse order.
c) Minimum regulation of the hob burners:
•
turn the tap to minimum;
• remove the knob and adjust the regulation screw, which
is positioned in or next to the tap pin, until the flame is
small but steady.
N.B.:inthe case ofliquidgas, the regulationscrewmust
be screwed in to the bottom.
• check that the flame does not turn off when you turn the
tap quickly from high to low.
d) Regulating the primary air of the burners:
The primary air of the burners requires no regulation.
Important
Oncompletionoftheoperation,replacetheoldratingsticker
with one indicating the new type of gas used.This sticker is
available from our Service Centres.
Note
Should the pressure of the gas used be different (or vary)
from the recommended pressure, it is necessary to fit a
suitablepressure regulator onto theinletpipeincompliance
with current National Regulations relative to “regulators for
channelledgas”.
Table 1 Liquid gas Natural gas
Burner Diameter
(mm) Thermal power
kW (p.c.s.*) By-Pass
1/100 Nozzle
1/100 Flow*
g/h Nozzle
1/100 Flow*
l/h
Nomin. Ridot. (mm) (mm) *** ** (mm)
Auxiliary
(Small) (A) 55 1,00 0,4 30 50 73 71 79 95
Triple Crown(TC) 130 3,25 1,5 63 91 236 232 133 309
Half Fish-Kettle
(SP) - 1,50 0,7 41 60 109 107 98 143
Supply
pressures
Nominal (mbar)
Minimum (mbar)
Maximum (mbar)
37 **
25 **
45 **
28-30 ***
20 ***
35 ***
20
17
25
* At 15°C and 1013 mbar- dry gas
** Propane P.C.S.= 50.37 MJ/kg
*** Butane P.C.S.= 49.47 MJ/kg
Natural P.C.S.= 37.78 MJ/m3
SP SP SP
TC A
C 659 P X UK
Burner and Nozzle Specifications

6
Technical Specifications
Inner Dimensions of the Oven: Width: 40 cm
Depth: 39 cm
Height: 34 cm
InnerVolume of the Oven: 53 Liters
Inner Dimensions of the FoodWarmer: Width: 43 cm
Depth: 43 cm
Height: 13.5 cm
Voltage and Frequency of Power Supply:
see data plate
Burners:
adaptable for use with all the types of gas indicated on
the data plate.
This appliance conforms with the following European
Economic Community directives:
- 73/23/EEC of 19/02/73(LowVoltage)and subsequent
modifications;
- 89/336/EEC of 03/05/89 (Electromagnetic
Compatibility) and subsequent modifications;
- 90/396/EEC of 29/06/90 (Gas) and subsequent
modifications (only for models which use gas);
- 93/68/EEC of22/07/93 andsubsequent modifications.
Mains frequency and voltage of the electric section and characteristics of the gas section
Model Gas section Electric section
Class Rated power
kW (1) Voltage
C 659 P X UK II2H3+ 8,75 (636 g/h - G30)
(625 g/h - G31) 240V~ 50Hz 2900W
(1) The values in g/h refer to the capacities with liquid gas (Butane, Propane).
7
CH
L M Q N
PO
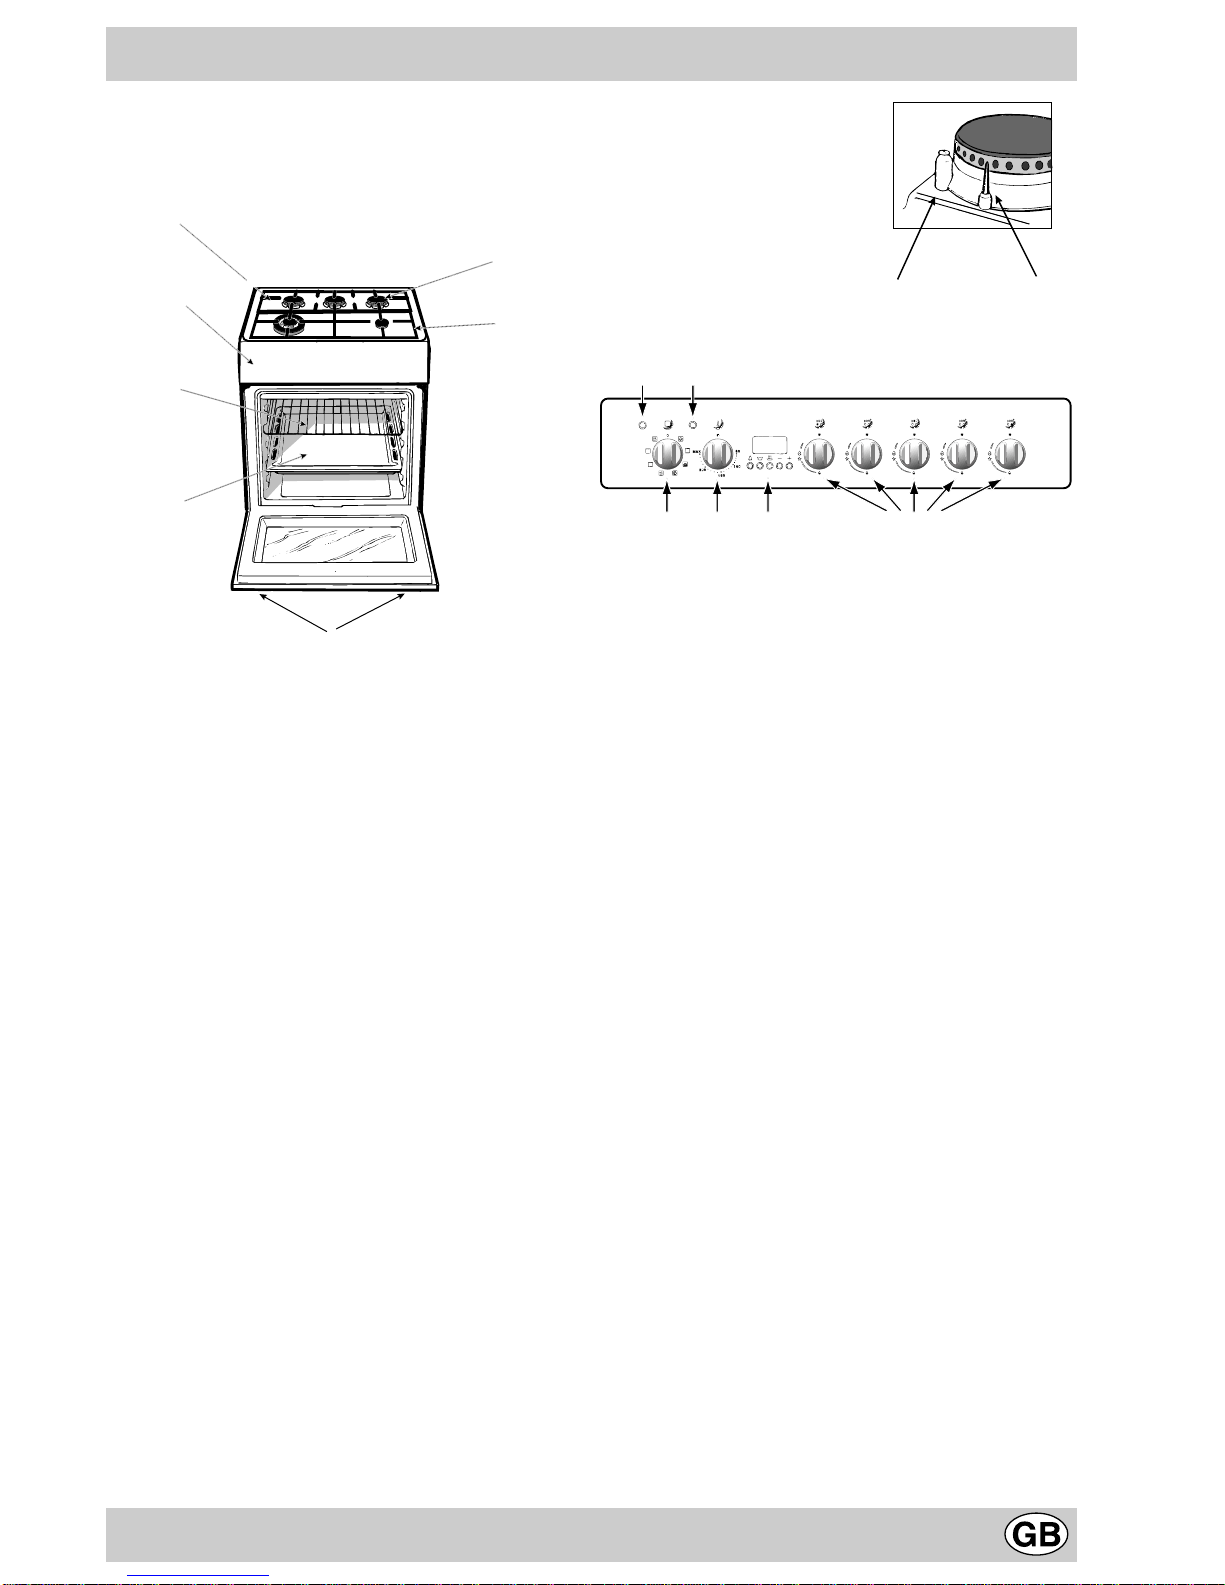
Cooker with the New "7 cuochi" Oven
ATray for Catching Overflows
BGas Burners
CElectronic Lighting Device
DTop Grate
EControl Panel
FAdjustable Feet or Legs
GDripping Pan or Baking Sheet
HFlame Failure Device for Cooktop Burners
KOven Racks
LSelector Knob
MThermostat Knob
NControl Knobs for Gas Burners on Hob
OThermostat Light
PGreen Light
QThe electronic cooking programmer
F
A
E
K
G
D
B
8
The various features of cooker are controlled through the
knobs and buttons located on the control panel
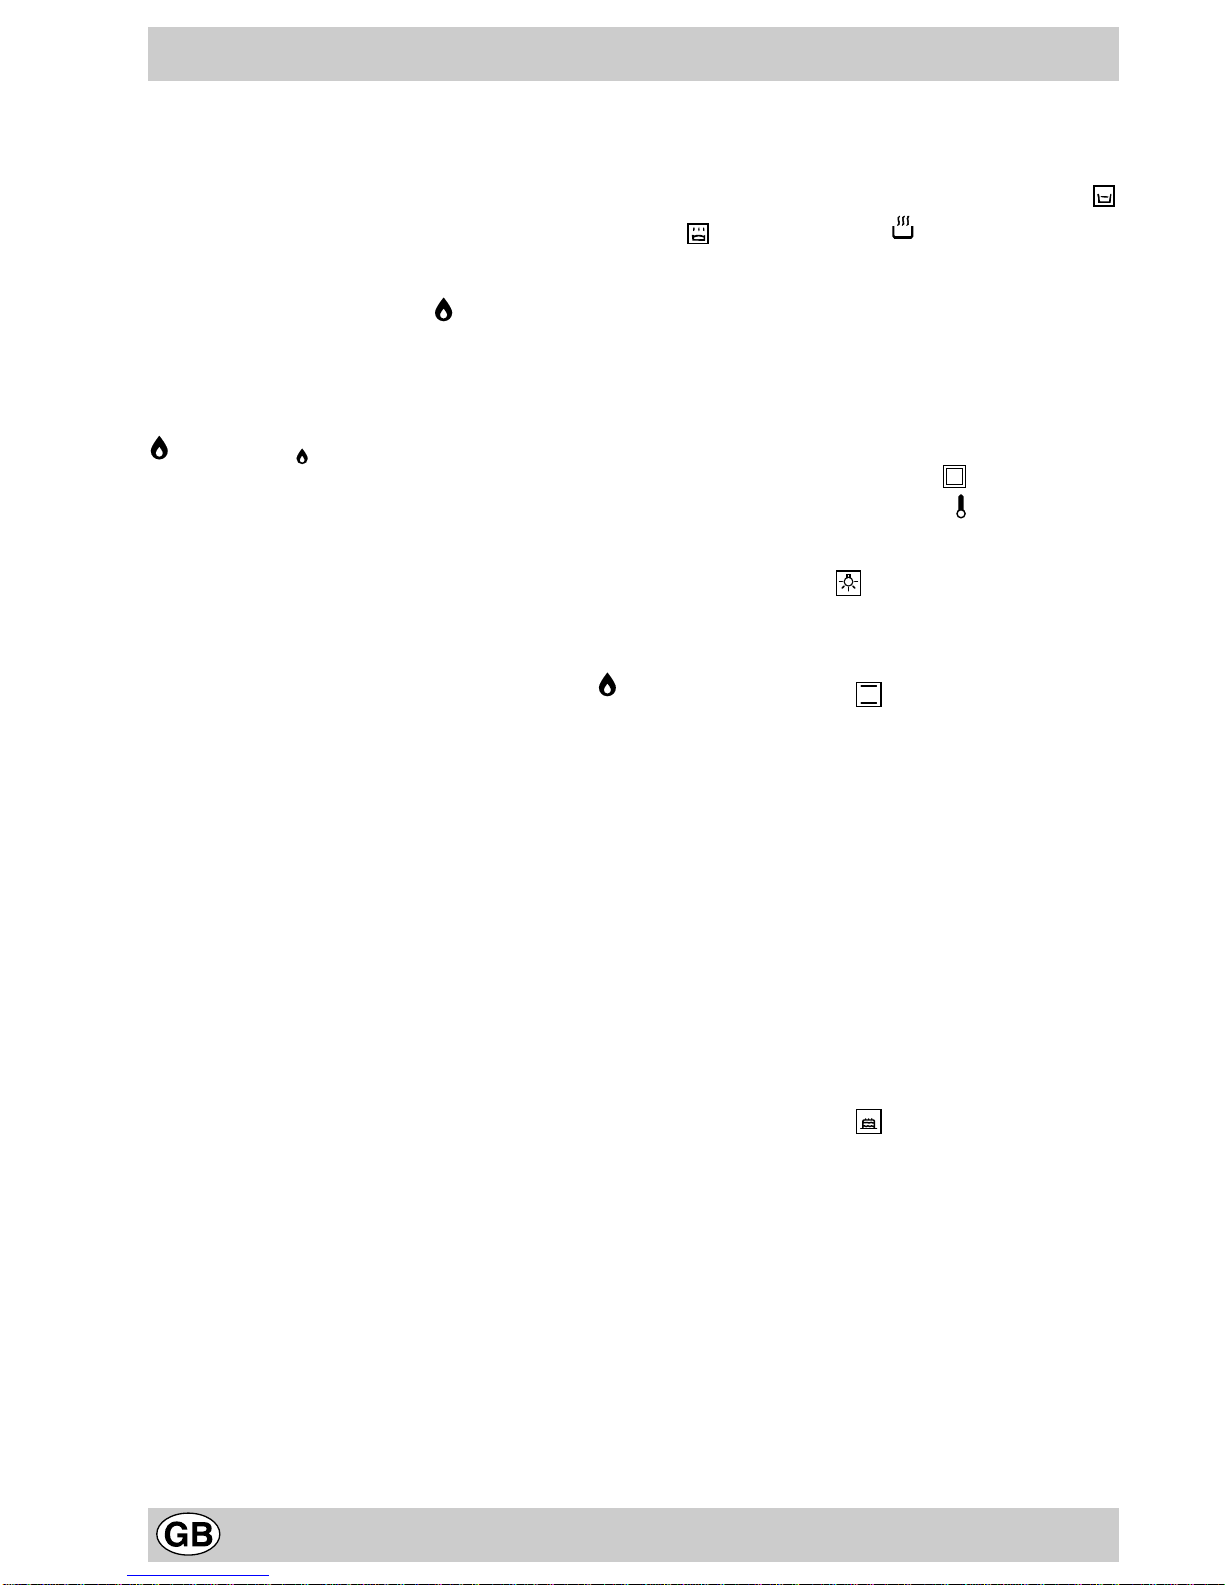
Control Knobs for the Gas Burners on the Hob (N)
The position of the gas burner controlled by each one of the
knobs is shown by a solid ring “•”. To light one of the burn-
ers, hold a lighted match or lighter near the burner and, at
thesametime,pressdownandturn thecorrespondingknob
counter clockwise to the maximum setting.Each burner
can be operated at its maximum, minimum or intermediate
power.Shown on the knob are the different symbols for off
“•” (theknobisonthissettingwhenthesymbolcorresponds
withthereferencemarkonthecontrolpanel),formaximum
and minimum .
To obtain these settings, turn the knob counter clockwise
withrespecttotheoffposition.Toturnoff the burner,turnthe
knob clockwise until it stops (corresponding again with the
“•”symbol).
Electronic Ignition for the Gas Cooktop
Some models are fitted with electronic ignition built inside
the knob;in such cases, the ignition device “C” is present.
To light a specific burner push the corresponding knob all
the way in and turn it counter-clockwise to maximum
keeping it pressed down until the burner lights.Important:
Should the burner flames accidentally go out, turn off
thecontrolknobandwaitatleast1minutebeforetrying
to relight.
Models with Flame Failure Device
These models are identified by the presence of a flame de-
tection device (see detail H).
Important: Sincethetopburnersareequippedwith asafety
device, after lighting the burner keep the knob pressed in
forabout 6 seconds toallowthegas topassuntilthesafety
thermocouple is heated.
Gas Cut Off (only a few models)
This cooker has a safety cut out feature which switches
off the burners when you close the cover.This device is
provided as a safety feature in case the cover is lowered
with the burners on.Always turn off the gas and allow the
burners to cool before closing the cover.Failure to follow
these instructions may cause the glass cover to shatter.
Keep the cover open when using the oven.
Attention: The first time you use the oven we recommend
that you set the thermostat on the highest setting and leave
the oven on for about a half of an hour with nothing in it.
Then, open the oven door and let the room air.The odour
thatisoftendetectedduringthisinitialuseisduetotheevapo-
rationofsubstancesusedtoprotecttheovenduring storage
and until it is installed.
Attention:Onlyusethebottomshelfoftheovenwhenusing
the rotisserie to cook (where present).For all other types of
cooking,neverusethebottomshelfandneverplaceanything
on the bottom of the oven when it is in operation because
thiscoulddamagetheenamel.Always place yourcookware
(dishes, aluminium foil, etc. etc.) on the grate provided with
the appliance inserted especially along the oven guides.
N.B.: Should the appliance be equipped with an electronic
programmer,to use theelectric oven,justpressbuttons
and at the same time (the symbol will appear on the
display) before selecting the desired cooking function.
The Oven Control Knobs
The
7 Cuochi
oven combines the advantages of traditional
convection ovens with those of the more modern forced air
ventilationmodels.Itisanextremelyversatileappliancethat
allows you to easily and safely choose between 7 different
cooking modes. The various features offered by the
“7 Cuochi”ovenare selected bymeansoftheknobslocated
on the control panel:
L - selector knob (identified by the symbol);
M- thermostat knob (identified by the symbol).
When the selector knob is on any other setting than that
identified by the “0”, symbol, the oven light turns on. The
settingidentified bythe symbolmakesit possibleto turn
theovenlightonwithout havinganyofthe ovenheatingele-
ments on.
1. Convection Mode
- Position of the“L”knob:
- Position of the “M” knob: between 50°C and Max
On this setting, the light comes on and the top and bottom
heatingelementsareactivated.Thisis theclassic,traditional
typeovenwhich Aristonhasperfected,withexceptionalheat
distribution and reduced energy consumption.The convec-
tionovenisstillunequalledwhenitcomestocookingdishes
madeupofseveralingredients,e.g.cabbagewithribs,stews,
etc. Excellent results are achieved when preparing meat-
based dishes as well (braised meats, stew, goulash, wild
game,hametc.)whichneedto cookslowlyandrequirebast-
ingortheaddition of liquid.It still remainsthebestsystemfor
cooking pastries and fruit in general.When cooking in con-
vection mode, only use one dripping-pan or cooking rack at
atime,otherwise theheat distributionwill beuneven.Select
from among the various rack heights based on whether the
dish needs more or less heat from the top or bottom.
2. Pastry Mode
- Position of the“L”knob:
- Position of the “M” knob:between 50° and Max
Thefanwill startandall ofthe heating elementswill turn on.
This provides a delicate heating process with a prevalence
of heat from the bottom.This mode is ideal for baking and
cookingdelicate foods- especially pastriesthat need torise
becausethe heat comingfrom the bottomhelps the leaven-
ing process.Some advice:
•Always preheat the oven;
•Never place more than one dish in the oven at a time;
•The rack (unless cooking directly on the dripping-pan)
should be used because it allows for better air circula-
tion; In any case, do not leave unused dripping-pans in
the oven;
•Position the rack at the third or second height from the
bottom in order to take full advantage of the heat rising
HowTo UseYour Appliance

9
from the bottom of the oven; Place the pastry pan in the
centre of the rack;
•Do not open the door when cooking pastries in order to
prevent rapid temperature changes that could impede
the cooking process and make the pastry drop.
3. Pizza Mode
- Position of the "L" knob:
- Position of the“M”knob:between 50°C and Max
The bottom and circular heating elements, as well as the
fan, will come on.This combination rapidly heats the oven
due to the large amount of power used by the appliance
(2900 W), which results in the production of considerable
heatcomingprevalentlyfrom the bottom and from forcedair
circulation. The pizza mode is ideal for foods which need
high temperatures to cook, like pizza and large roasts.Use
only one dripping-pan or rack at a time. However, if more
than one is used, they must be switched half way through
the cooking process.
4.Ventilation Mode
- Position of the “L”knob:
- Position of the “M”knob:between 50°C and Max
Both the heating elements and the fan will come on.Since
the heat remains constant and uniform throughout the oven
due to the fan at the bottom, the air cooks and browns food
uniformly over its entire surface. With this mode, you can
also cook various dishes at the same time, as long as their
respectivecookingtemperaturesarethesame.Amaximum
of 2 rack levels can be used at the same time, following the
instructions in the section entitled, "Cooking On MoreThan
One Rack".This cooking mode is ideal for au gratin dishes
or those which require an extended cooking time like lasa-
gneetc...
Moreover, theexcellentheatdistributionmakesitpossibleto
uselowertemperatureswhencookingroasts.Thisresultsin
less loss of juices, meat which is more tender and a de-
creaseinthelossofweightfortheroast.Theventilatedmode
is especially suited for cooking fish, which can be prepared
with the addition of a limited amount of condiments, thus
maintaining their flavour and appearance.Excellent results
can also be attained when cooking vegetable-based side
disheslikecabbage,beats,courgettes,aubergines,peppers,
etc.
Desserts:leavened cakes are also perfect for the ventilated
mode.Moreover, this mode can also be used to thaw white
or red meat, fish and bread by setting the temperature to
80°-100°C.To thaw more delicate foods, set the thermostat
to 50°C or use only the cold air circulation feature by setting
the thermostat to 0°C.
5.Grill
- Position of the “L”knob:
- Position of the “M” knob: Max
The central heating element of the grill will come on. The
incandescentheatingelementcooksfoodbymeansofther-
mal radiation directed downward. The extremely high and
directtemperature of the grill makesit possibletobrown the
surface of meats and roasts while locking in the juices to
keep them tender.The grill is also highly recommended for
dishes that require high temperature on the surface: beef
steaks, veal, entrecôte, filets, hamburger etc...
6.Double Grill
- Position of the “L”knob :
- Position of the“M” knob : Max
Thisoversizedgrill has a completely newdesign,increasing
cooking efficiency by 50%.The double grill also eliminates
pockets of unheated air in the corners of the oven.
7.Ventilated Double Grill
- Position of the “L”knob:
- Position of the“M” knob: between 50 and 200°C
This combination of features increases the effectiveness of
the unidirectional thermal radiation of the heating elements
through forced air circulation of the air throughout the oven.
This helps prevents foods from burning on the surface, al-
lowing the heat to penetrate into the food.Excellent results
areachievedwithkebabsmadewithmeatsandvegetables,
sausages,ribs,lamb chops,chicken,quail, pork chops,etc.
This mode is also ideal for cooking fish steaks, like sword-
fish, tuna, grouper etc.
Note:Allgrill modes (features5,6and 7) must be usedwith
the oven door closed.
Thermostat Light (O)
Thislightindicatesthattheovenisheating.When itturnsoff,
thetemperatureinsidetheovenhasreachedthesettingmade
with the thermostat knob.At this point, the light will turn on
andoff asthe oven maintains thetemperature ata constant
level.
Green Light (P)
This light comes on when any of the electrical heating ele-
ments in the oven have been turned on.
Practical Advice on Using the Burners
In order to obtain the best performance, keep in mind the
following:
•Use the appropriate cookware for each burner (see ta-
ble) so that the flames do not extend beyond the bottom
of the cookware;
•Only flat bottom cookware should be used;
•At the boiling point, turn the knob to minimum;
•Always use a lid with the cookware.
Burner ø Cookware diameter (cm)
Auxiliary (A) 10 - 14
Semi-Fischburner (SP) 16 - 20
Ultrarapid (UR) 24 - 26
N.B.Somemodelsareequippedwith2reductiongrids.These
grids should be used with the rear right and left “Half Fish-
Kettle”burners(Fig.A)andtheauxiliary burner (Fig.B) when
cookware with a diameter of less than 12 cm is used.
Fig.A Fig.B

10
3rd Oven Glass
Inordertofurtherdecreasethetemperatureoftheovendoor
andreduceenergyconsumption,asupplementalkithasbeen
made available. This kit should be installed if the oven is
used in the presence of small children.To install the protec-
tiveglassfortheovendoor(code053413),contactyournear-
estMerloni Eletrodomestici Service Centre indicatedonthe
list provided with the appliance.
Attention
Do not place cookware on the bottom of the oven because
this will result in uneven cooking as the bottom elements
wouldburnthefoodandthecookwareimpedepropercircu-
lation of the heated air.Furthermore, the curved surface of
the bottom (which ensures increased stiffness and resist-
ance to deformation) does not provide a stable support sur-
face.
Practical Advice on Using the Rear "Half Fish-Kettle"
Burners
Thethreerearburners,orHalfFish-Kettleburners,areeliptic
informandcanbeturned up to 90°.This makesthecooktop
more flexible in terms of how it can be used.
To rotate by 90° the “half fish-kettle” burners, proceed as
follows:
•Make sure that the burners are cool;
•Lift the burner completely out of its housing;
•Replace it in its housing in the position desired;
•Makesurethattheburnersarepositionedcorrectlybefore
use.
Inparticular, the three rear burnersmaybeusedtogetheror
separately with pots of different shapes and dimensions, as
follows:
• Singleburnerformediumsizecookware(diameterof
20-22 cm) (Fig. O).
• double burner as a “fish-kettle” for oval containers
and rectangular or square containers (minimum
dimensions18x28cm,maximum18x35cm)(Fig.P);
• triple burner or with the grill plate provided with the
appliance(Fig.Q).
Fig.O Fig.P
Fig.Q
Practical tips for the use of the grill plate
The instructions that follow are valid for the use of the grill
plate that is supplied with the appliance.
The preheating should be carried out with the command
knobs for the three burners in the maximum position .To
carryoutcooking,usethepositionindicatedinthetablebelow.
Food Weight Preheating
time in
minutes
Cooking
Kg knobs at
maximum Time in
minutes Knob
position
Pork chops
(3) 0,5-0,6 5 14-16 Minimum
Beef chops
(2) 0,5-0,6 5 12-14 Minimum
Sausages
(n°4) 0,4-0,5 5 16-18 Minimum
Meat
kabobs (3) 0,4-0,5 5 14-16 Minimum
Hamburge-
rs (3) 0,4-0,5 5 10-12 Minimum
Toast n°3 5 2-3 Maximum
Bread 3 slices 5 2-3 Maximum
Aubergines 3-4
slices 5 4-5 Maximum
Roast
tomatoes 4 slices 5 10-12 Minimum
Salmon 3 slices 5 5-7 Minimum
Chicken
breast (3) 0,4 5 6-8 Maximum
Note: cooking times are approximate and may vary in
accordance with personal tastes.
11
The electronic cooking programmer
This feature allows you to program the oven or the grill as
follows :
• delayed start for a specific length of time;
• immediate start for a specific length of time;
• timer.
ButtonFunctions:
:timer - hours and minutes;
: cooking time;
: end cooking time;
:set cooking time - backward;
:set cooking time - forward.
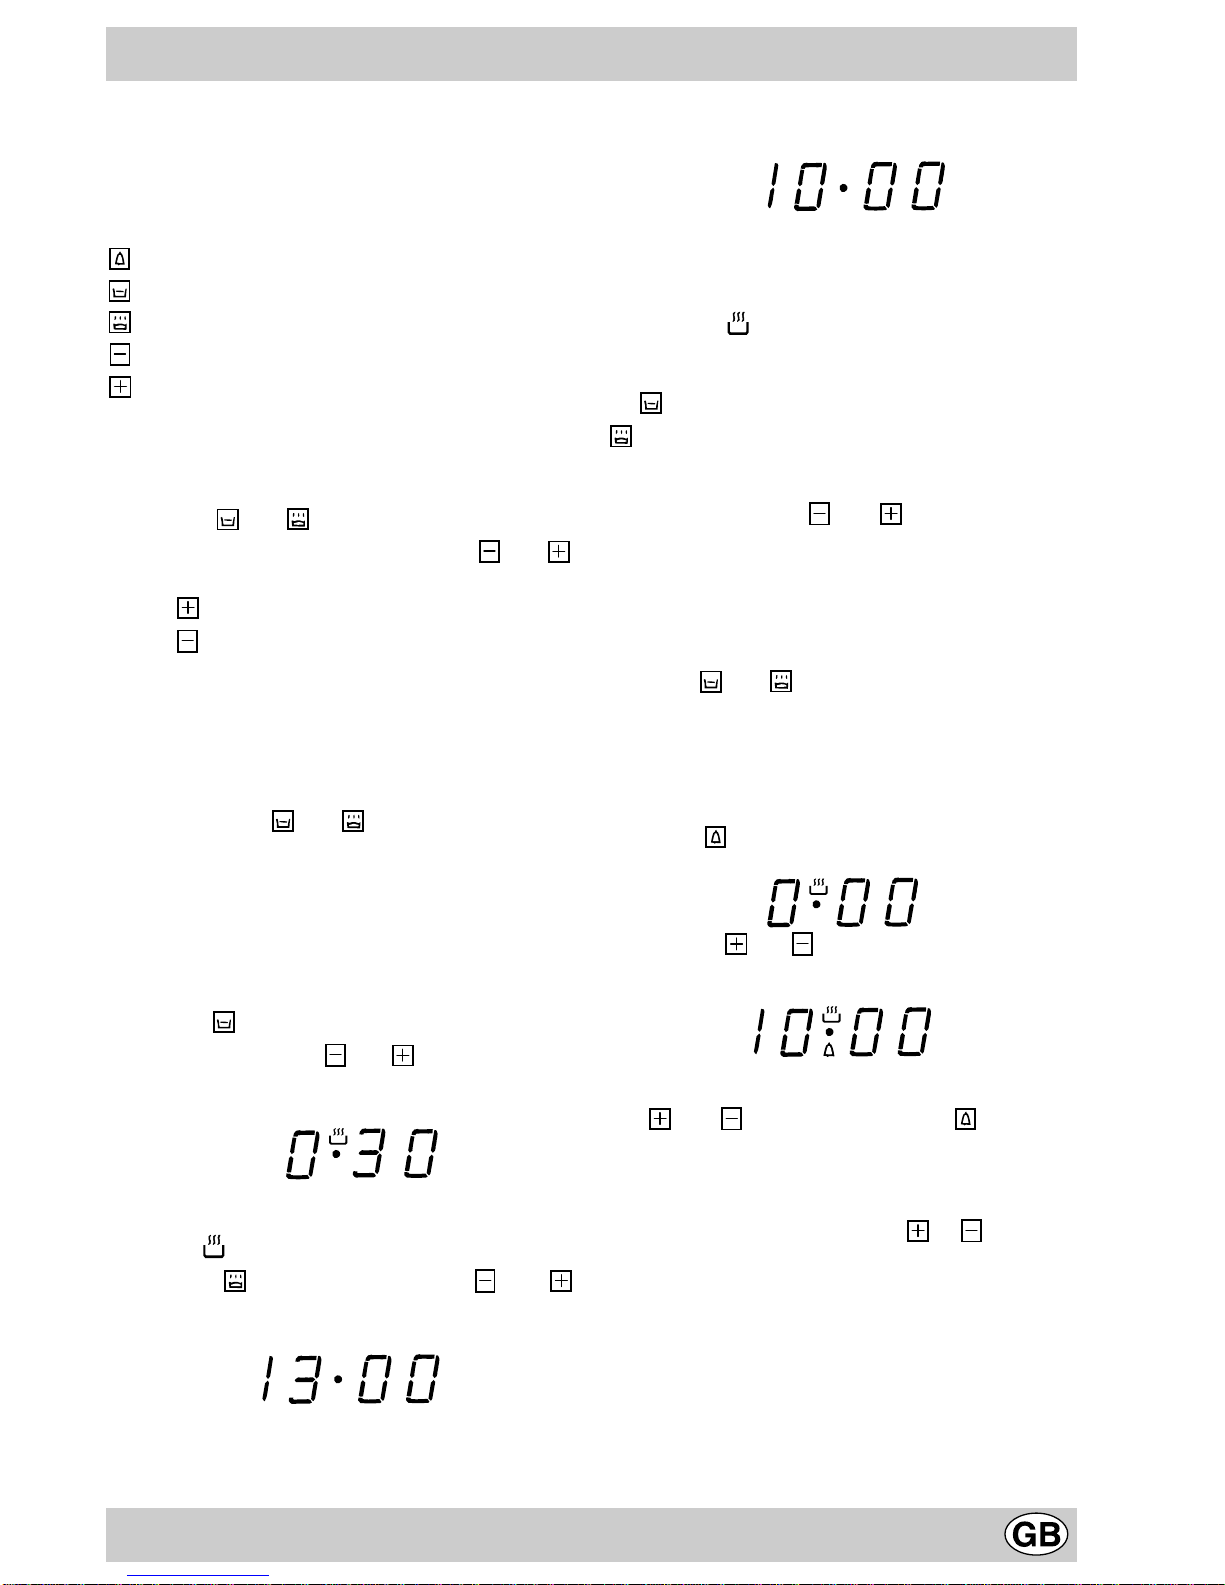
How to reset the digital clock.
Aftertheappliance hasbeenconnectedtothepowersupply,
or when the power has gone out, the clock display will
automatically reset to 0:00 and begin to blink.
• Press the and buttons consecutively and then
reset the time (within 4 seconds) using the and
buttons.
The button sets the time forward.
The button sets the time backward.
Wheneverthetimemustbereset,followthis sameprocedu-
re.
Manual Operation of the Oven
After resetting the time, the program automatically switches
to the manual mode.
Note: To reset the manual mode after each “automatic”
cooking, press the and buttons simultaneously.
Start delayed cooking with preset duration
The length of the cooking program as well as the time at
which the cooking program ends must be set.If we assume
that the time displayed on the timer is 10:00:
1. Turn the oven control knobs to the feature and tempera-
ture desired (e.g.conventional oven, 200°C);
2. Pressthe buttonandthensetthecookingtime(within
fourseconds)usingthe and buttons.Letussup-
pose that we set the cooking time at 30 minutes. The
display will read as follows:
A
After the button has been released, the current time will
bedisplayedagainafterapproximately4 seconds,along
with the symbol and the letter "A" (AUTO);
3. Press the button and then use the and
buttons to set the time for when the cooking program
should end.Let us suppose this time to be 1:00 p.m.
A
4. After the button has been released, the current time will
be displayed after approximately 4 seconds:
A
The letter "A" will light up reminding you that the length
and end cooking time were programmed in automatic
mode.At this point, the oven will turn on automatically at
12:30 and then turn off after 30 minutes.When the oven is
turned on, the symbol will be displayed for the entire
cooking time.At any time during the cooking process, the
length of the cooking time can be displayed by pressing
the button, and the end cooking time by pressing the
button.
After the cooking time has expired,the timer will ring
for several minutes;to turn it off,simply press any of
the buttons except the and buttons.
Immediate start with preset duration
By programming just the duration (points 1 and 2 of the
“Start delayed cooking with preset duration” section),
cooking will start up immediately.
To cancel a cooking schedule already programmed
Press the and buttons simultaneously.
Timer Feature
Thetimerfeatureallowsyoutoenteragivenamountoftime
fromwhichthe timerbeginstocountdown.Thisfeaturedoes
not turn the oven on or off;it merely sounds when the time
has expired.
When the button has been pressed, the display will
read as follows:
Then use the and buttons to set the desired time.
After the button has been released, the timer will start to
count down and the current time will be displayed.
Afterthetimehasexpired,anacousticalsignalwillbeemitted,
whichcanbeturnedoffbypressinganyofthebuttons(except
the and buttons) at this point the symbol will
also turn off.
Correction/Cancellation of Data
• Thedataenteredcanbechangedatanytimebypressing
the corresponding button and the or buttons.
• When the data for the length of the cooking time is
cancelled, the data for the end cooking time are also
cancelled automatically, and vice versa.
• If the oven has been programmed, it will not accept end
cooking times which are before the start of the cooking
process.

12
The7cuochiovenoffersa widerangeofalternativeswhich
allowyou to cookanytypeof foodinthe bestpossibleway.
The various features make it possible to select the level of
heatandtodirectit as youlike:fromthebottom,from above
or uniformly.With time you will learn to make the best use
of this versatile cooking appliance and the following direc-
tions are only a guideline which may be varied according
to your own personal experience.
Preheating
If the oven must be preheated (this is generally the case
when cooking leavened foods), the "pizza mode"
(setting three) can be used to reach the desired tempera-
tureasquicklyaspossiblein ordertosaveonenergy.Once
the food has been placed in the oven, the most appropri-
ate cooking mode can then be selected.
Cooking on MoreThan One Rack
If you have to cook on more than one rack at the same
time,use onlysetting 4, “ventilatedmode,”whichis the
only one that is appropriate for this type of cooking.The
rack heights used should be the three centre ones, as the
bottom and top racks receive too much direct heat, which
could burn more delicate foods.If three racks are used at
the same time, the food on the middle rack will take a little
longer to cook.Therefore, leave it in the oven for an addi-
tional few minutes. If you are preparing a complete meal
with all three racks at the same time, place the dish that
calls for a lower cooking temperature (generally pastries)
on the middle rack.
Using the grill
The7 cuochi oven offersyouthreedifferentgrilling modes.
Use setting 5 “The Grill,” for small portions. Although
electrical consumption is a mere 1200 W, it allows you to
grill small portions like toasted sandwiches, hotdogs, etc.,
to perfection.Position the food under the centre of the grill
becauseonly thecentralpart of thetop heatingelement is
turned on. Food placed in the corners will not cook prop-
erly.Setting 6 “The Double Grill”, allows you to grill
along the entire surface area of the grill. Use this mode
when you have food distributed uniformly throughout the
oven and you would like to brown the items uniformly.
Setting7 “The DoubleVentilated Grill”, isextremely
useful for grilling foods rapidly, as the distribution of heat
makesitpossiblenotonly to brownthesurface,butalsoto
cookthebottompart.Itcanalsobe used to grilllargepieces
of meat or fowl without a rotisserie.Moreover, it can also
beused for browningfoodsatthe endof the cookingproc-
ess.
Important: always use the grill with the oven door
closed.This will allow you both to attain excellent re-
sults and to save energy (about 10%). When using any
ofthethree grilling modes,it is recommendedthatthether-
mostat knob be turned to the highest setting, as it is the
most efficient way to use the grill (which utilizes infrared
rays). If necessary, however, the thermostat can be set to
lower temperatures by simply turning the knob to the de-
siredsetting. To preventfatand grease fromdrippingonto
the bottom of the oven, place the dripping-pan beneath
the rack used for grilling.
Baking Pastries
Whenbaking pastries,alwaysplace them inthe ovenafter
it has been preheated. Make sure you wait until the oven
has been preheated thoroughly (the red “O”light will turn
off). The temperature is normally around 160°C. Do not
open the door while the pastry is cooking in order to pre-
vent it from dropping. Batters must not be too runny, as
this will result in prolonged cooking times.In general:
Pastry is too dry
Increase the temperature by 10°C and reduce the
cooking time.
Pastry dropped
Use less liquid or lower the temperature by 10°C.
Pastry is too dark on top
Place it on a lower rack, lower the temperature, and
increase the cooking time.
Cooked well on the inside but sticky on the outside
Use less liquid, lower the temperature, and increase the
cooking time.
The pastry sticks to the pan
Grease the pan well and sprinkle it with a dusting of
flour.
I used more than one level and they are not all at
the same cooking point
Use a lower temperature setting. It is not necessary to
remove the food from all the racks at the same time.
Cooking Pizza
Forbestresults when cooking pizza,usesetting3 “The
Pizza Oven”:
•Preheat the oven for at least 15 minutes;
•Usealightaluminium pizza pan,placingitonthe broiler
supplied with the oven.If the dripping-pan is used, this
will extend the cooking time, making it difficult to get a
crispy crust;
•Donot open theovendoorfrequently while thepizza is
cooking;
•If the pizza has a lot of toppings (three of four), it is
recommended that the mozzarella cheese be placed
on top halfway through the cooking process.
Cooking Fish and Meat
Meat must weigh at least 1 Kg in order to prevent it from
drying out. When cooking white meat, fowl and fish, use
lowtemperaturesettings(150°C-175°C).Forredmeatthat
should be well done on the outside while tender and juicy
in the inside, it is a good idea to start with a high tempera-
Practical Cooking Advice
13
ture setting (200°C-220°C) for a short time, then turn the
oven down afterwards.In general, the larger the roast, the
lower the temperature setting.Place the meat on the cen-
tre of the rack and place the dripping pan beneath it to
catch the fat.Make sure that the rack is inserted so that it
is in the centre of the oven. If you would like to increase
the amount of heat from below, use the low rack heights.
Forsavouryroasts (especially duckand wildgame), dress
the meat with lard or bacon on the top.
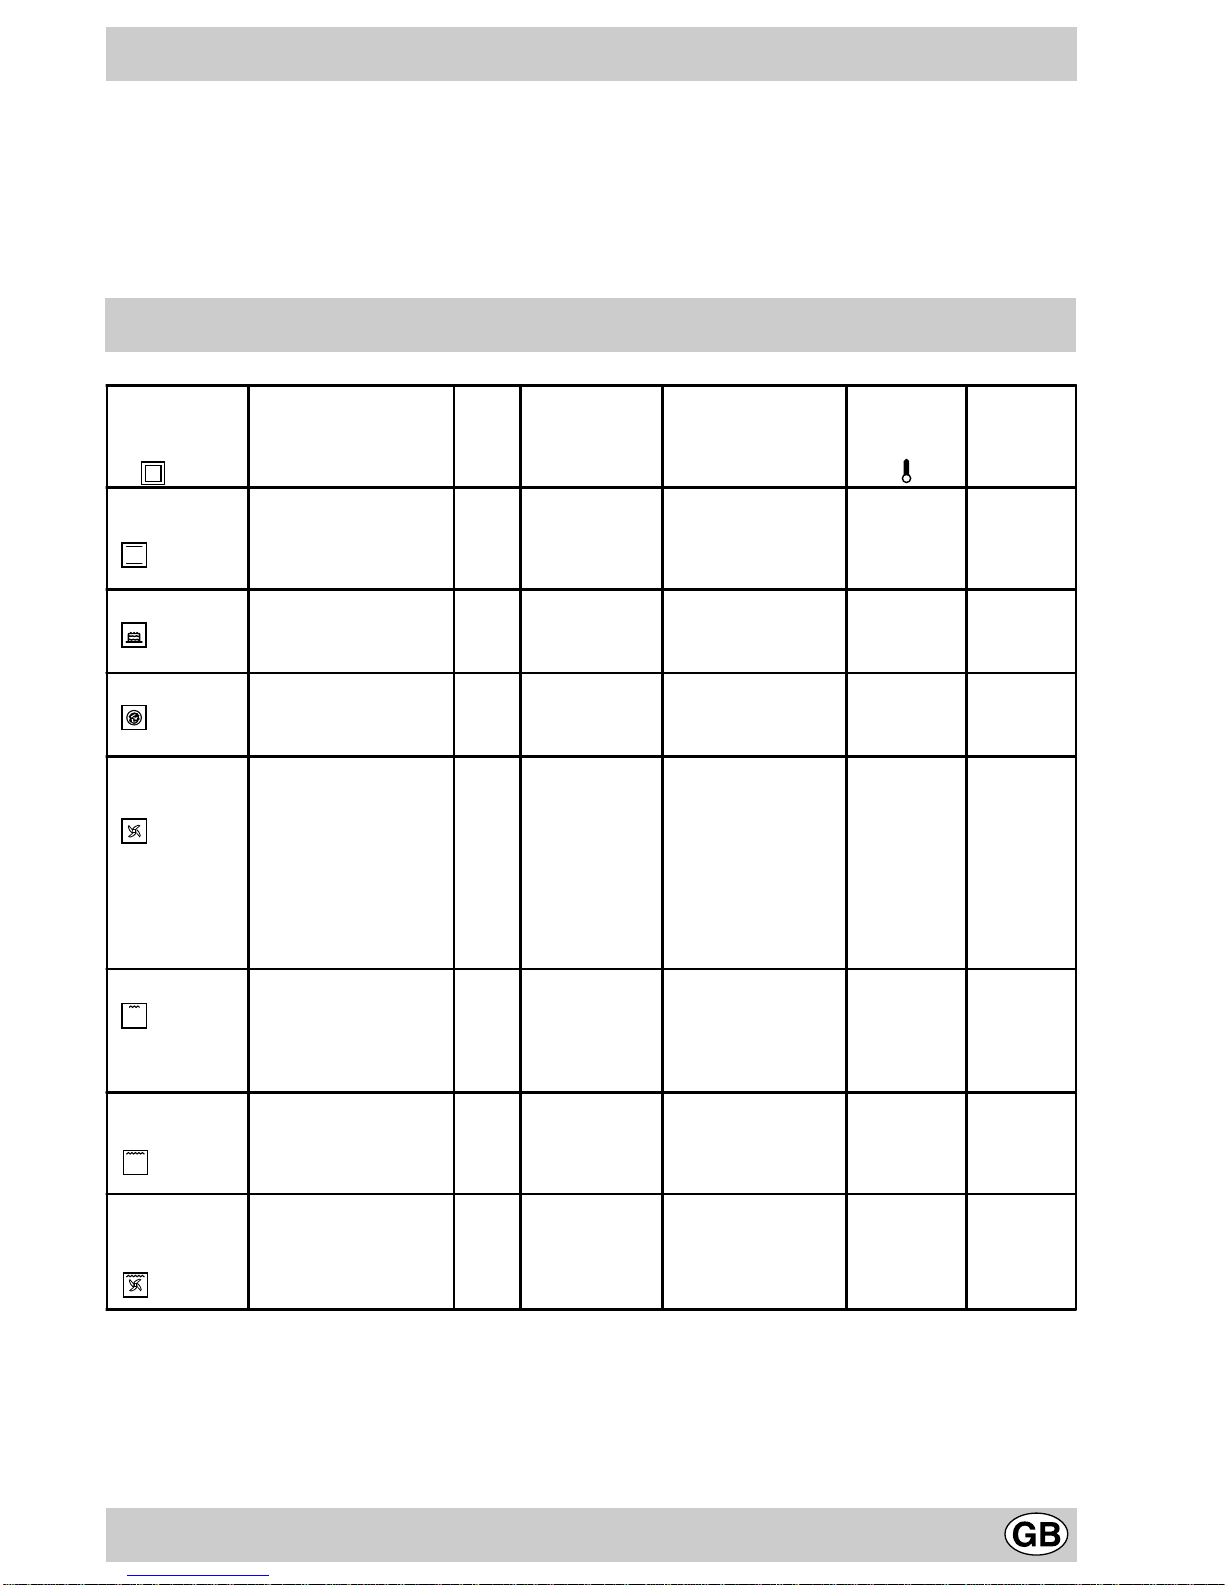
Practical Cooking Advice
Selection
Knob Setting Type of Food Wt.
(Kg) Rack Position
From Oven
Bottom
Preheating Time
(minutes) Thermostat
Knob
Setting
Cooking
Time
(minutes)
1 Convection
Mode Duck
Roast beef
Roast pork
Biscuits
1
1
1
-
3
3
3
3
15
15
15
15
200
200
200
160
65-75
70-75
70-80
15-20
2 Pastry Mode Cakes
Pies 0.5
13
2/3 15
15 180
180 20-30
45-50
3 Pizza Mode Pizza
Roast beef
Chicken
0.5
1
1
3
3
2/3
15
10
10
220
200
180
15-20
45-55
60-70
4 Ventilation
Mode Pizza (several levels)
Lasagne
Baked Tagliatelle
Baked Pasta
Lamb
Chicken
Mackerel
Sea Bream
Chocolate cake
1
1
1
1
1
1
1
1.5
1
2/3
3
3
3
2
3
2
2
3
15
10
10
10
10
15
10
10
10
220
180
180
180
180
200
180
180
160
15-20
30-35
20-30
20-30
40-45
60-70
50-55
55-60
50-60
5 Grill Mode Sole and squid
Calamari and shrimp
Kabobs
Cod fillets
Grilled vegetables
1
1
1
1
4
4
4
3-4
5
5
5
5
Max
Max
Max
Max
8
4
10
8-10
6 Double Grill
Mode Veal steaks
Chops
Hamburgers
Mackerel
1
1.5
1
1
4
4
3
4
5
5
5
5
Max
Max
Max
Max
15-20
25
7
20-25
7 Double Grill
Ventilation
Mode Grilled chicken
Stuffed cuttle-fish 1.5
1.5 2
25
5200
200 55-60
40-45
NB: cooking times are approximate and may vary according to personal taste.

14
Routine Maintenance and Cleaning
Before each operation, disconnect the cooker from
the electrical supply. To ensure that the appliance lasts
a long time, it must be thoroughly cleaned frequently,
keeping in mind that:
·The enamelled parts and the self-cleaning panels are
washed with warm water without using any abrasive
powders or corrosive substances which could ruin
them;
·The inside of the oven should be cleaned fairly often
while it is still warm, using warm water and detergent
followed by careful rinsing and drying;
·Theflame spreaders shouldbe washedfrequently with
hot water and detergent, taking care to eliminate any
scale;
·In cookers equipped with automatic lighting, the
terminal part of the electronic instant lighting devices
should be cleaned frequently and the gas outlet holes
on the flame spreaders should be checked to make
sure they are free of any obstructions;
·Stainless steel may become marked if it comes into
contact with very hard water or harsh detergents
(containingphosphorous) forlongperiods oftime.After
cleaning, it is advisable to rinse thoroughly and dry.It
is also recommended that drops of water be dried;
•It is recommended that the grill plate be cleaned when
it is still hot, using the knobs provided to move it from
the cooking rack to the sink.The grill plate should be
washed with non-abrasive detergent.
·On models with glass covers, the covers should be
cleaned with hot water; the use of rough cloths or
abrasives is to be avoided.
N.B.: Avoid closing the cover while the gas burners
are still warm.Remove the grill plate (if present) before
closing the cover.
Important: periodically check the wear of the gas hose
andsubstitute it ifthereare anydefects;werecommended
changing it every year.
Replacing the Oven Lamp
·Disconnect the oven from the power supply by means
of the omnipolar switch used to connect the appliance
to the electrical mains; or disconnect the plug if it is
accessible;
·Remove the glass cover of the lamp-holder;
·Remove the lamp and replace with a lamp resistant to
high temperatures (300°C) with the following
characteristics:
- Voltage 240V
- Wattage 25W
- Type E14
·Replace the glass cover and connect the oven to the
mains.
Greasing theTaps
The taps may jam in time or they may become difficult to
turn.If so, they must be cleaned internally and the grease
replaced.
N.B.:Thisoperation mustbeperformedbyatechnician
authorised by the manufacturer.

15

viale Aristide Merloni, 47 - 60044 Fabriano
tel.0732/6611 - telex 560196 - fax 0732/662954
www.Merloni.com
Cucina 5 fuochi con forno "Nuovo 7 Cuochi" (GB)
01/02 - 195032906.00 Xerox Business Services - Docutech
Table of contents
Other Merloni Oven manuals


