Merrild Cafitesse 50 User manual

Brukerhåndbok
Käyttöohje
Bruksanvisning
Betjeningsvejledning 1 - 24
25- 48
49- 72
73- 96
User manual 97- 120

Serial number :
Registration number :
Service tel. number :
Supplier :

Contents
Introduction ....................................................................................................................................................................100
Safety instructions .........................................................................................................................................................101
Specifications .................................................................................................................................................................103
Machine description.......................................................................................................................................................104
Machine functions and operation .................................................................................................................................106
Switching the machine on/stand-by ..................................................................................................................................106
Filling the cold water tank .................................................................................................................................................106
Coffee pack replacement..................................................................................................................................................107
Delivery of a cup of coffee ................................................................................................................................................108
Delivery of a pot of coffee.................................................................................................................................................109
Delivery of hot water.........................................................................................................................................................110
Relocating the dispenser .................................................................................................................................................. 111
Maintenance - Daily cleaning.........................................................................................................................................112
Maintenance - Weekly cleaning.....................................................................................................................................114
Preparations when the machine is not to be used over long periods .......................................................................115
Troubleshooting .............................................................................................................................................................117
Descaling the cold water tank .......................................................................................................................................119
Quick reference - Cleaning ............................................................................................................................................120

100
Introduction
In this user manual you will find instructions and explanations
concerning machine functions, operation and maintenance.
The machine is designed to deliver coffee and hot water, either
in cups, mugs or in a pot.
Operation is simple and its straight-forward design warrants
convenience in every aspect. Cleaning is uncomplicated and can
be performed in a very short time.
Please operate and maintain the machine as described in this
manual for the best machine performance.
Important
Please read the safety instructions carefully and ask your
sales representative if you have any remaining questions.
The manufacturer and DECS International cannot be held liable in
case of damage and/or injury if the machine is not operated and
maintained according to the instructions given in this manual.
© DECS International 1999-2003
Design and specifications may be subject to change without prior
notification.

101
Safety instructions
Operation
Installation, programming and adjustments must be performed
by a service technician or other authorized personnel.
Do not remove machine covers for safety reasons.
Do not use the machine for other than the intended use.
The machine is intended for indoor operation only. Do not place
the machine too close to a sink (wet) or cooking device (hot).
Do not store the machine at locations with a surrounding
temperature below 1 °C / 34 °F.
Use fresh clear drinking water only to (re) fill the water tank. It is
recommended to refill the cold water tank with fresh tap water at
the start of the day for optimum water quality.
Note that the drip tray capacity is limited to 250 ml / 8 oz (1~ 2
cups). Please empty the drip tray regularly or if coffee or water
has been delivered while no cup or pot was present.
Switch the machine to the stand-by mode when it is not going to
be used for a long period. (for example during the night time or
during weekends).
Only unplug the power cord in case of a machine malfunction
(Store the coffee pack in a refrigerator). The cooling system does
not function without power supply and the coffee will not be
stored at the right temperature.
Clean the machine at the start of the day and on a weekly basis
as described in this manual for hygienic and functional reasons.
Always observe basic hygiene and use only food-grade cleaning
agents. Clean the machine outer parts with a clean damp cloth.
Do not spray it off.
Do not relocate or move the machine without reading the
instructions on page 15 first.
For machines with a fixed water connection: Check the water
quality and install a waterfilter/softener if necessary.
CAUTION The liquids delivered by the machine are hot.
Keep hands and body parts clear from the
delivery area while the machine is producing
coffee or hot water. Therefore, do not leave
the machine unattended in the presence
of children.

102
Product storage
Ensure that the cooling compartment is properly closed at all
times. The coffee quality may otherwise deteriorate.
Store defrosted product packs only in a refrigerator at a
temperature at 6 °C / 43 °F.
Always check the expiration date on the coffee pack (‘best before
date’) and use the coffee pack that has been stored for the
longest period (first-in, first-out principle).
Do not freeze coffee again after it has been defrosted. This will
negatively affect quality and taste.
Electrical safety
WARNING Never immerse the power cord or the machine in
water or any other liquid.
Never plug a power cord into a wall outlet (or
unplug a power cord) when either part is wet or
touched with wet hands.
Do not operate any appliance with a damaged
power cord or plug. The power cord may only be
replaced by a service technician or other
authorized personnel.
Do not connect the machine to any power source
other than indicated on the rating label.
WARNING
WARNING
Please connect the machine to a grounded circuit only.
The machine must be connected to an electrical circuit secured
by an extra fuse or preferably to an electrical circuit equipped with
a ground fault current safety switch.
When the machine has been relocated, please make sure that
the machine does not overload the capacity of the electrical
circuit when plugged in at the new location.
WARNING

103
Specifications
Machine Size (H) 568 mm / 22.4’’ x (W) 365 mm / 14.4’’ x (D) 350 mm / 13.75’’
Weight 12 kg / 26,4 lbs (19 kg / 42 lbs with water and coffee pack)
Outlets Hot water (left) and coffee (right)
Cup volume Adjustable (20 ~ 400 ml / 0.6 ~ 13.5 oz)
Delivery time 8-10 seconds (125 ml / 4 oz)
Pot volume Adjustable (20 ~ 999 ml / 0.6 ~ 33 oz, factory setting: 900 ml)
Delivery time Approx. 60 seconds
Waiting time Between two pots: 120 sec (230 V) / 188 sec (120V) / 228 sec
(110 V)
Power supply 85 ~ 250 V 50/60Hz
Power consumption (rated) 2,1 kW for 230 V / 1,25 kW for 120 V / 1,1 kW for 100 V
Capacity 160 cups per hour at 230 V (20 litres per hour)
116 cups per hour at 120 V (14.5 litres per hour)
100 cups per hour at 100 V (12.5 litres per hour)
Environment Temperature 1 °C ~ 32 °C / 34~ 89 °F for both operation and storage
Humidity Up to 80% RH
Cooling compartment Capacity 1,25 litres bag in box product pack
Temperature 2~ 5 °C / 36~ 41 °F
Internal boiler Capacity 1,8 litre (60 oz)
Temperature range 83~ 96 °C / 181~ 205 °F
Cold water supply Removable cold water tank with a capacity of 3 litres / 100 oz (0.75
gallon) (fixed water connection optional)
Standard accessory Coffee pot

104
Machine description
1. Cold water tank lid
2. Cold water tank
3. Cold water level window with MAX indication
4. Drip tray
5. Cup grille
6. Coffee outlet
7. Hot water outlet
8. Operation panel
9. Cooling compartment door
10. Cooling compartment
11. Coffee pack
12. Cooling comp. temperature high indicator
13. Power on / stand-by indicator
14. On / Stand-by switch
2
1
3
45
7
6
8
10911
I
12
13
14

105
1. Coffee empty - indicator
2. Cold water tank empty - indicator
3. Boiler temperature low - indicator
4. Hot water button
5. Coffee (cup) button
6. Coffee (pot) button
7. Stop button
stop
REPLACE COFFEE PACK
REFILL WATERTANK
WARMING UP, PLEASE WAIT
HOT WATER COFFEE
Operation panel
7654
3
2
1
106
Machine functions and operation
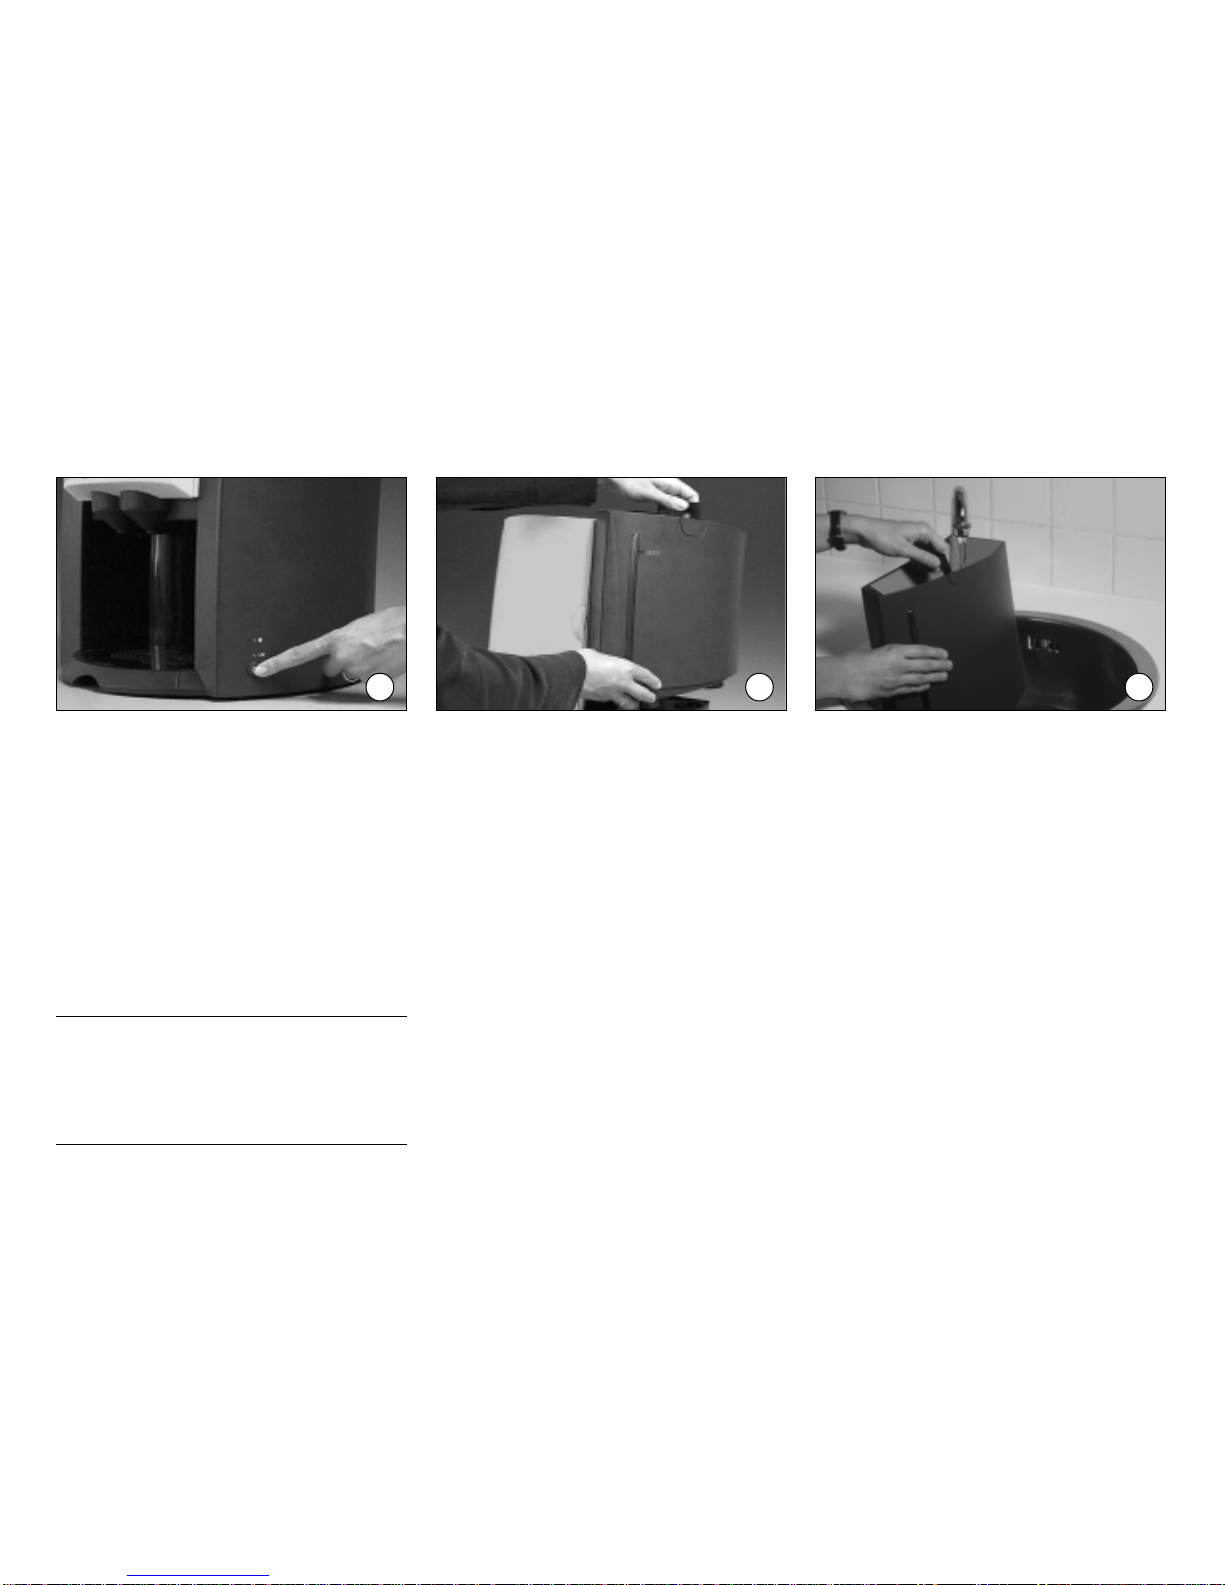
Switching the machine on/stand-by
Press the switch to switch the machine on or
stand-by (fig.1).
The green ‘power on’ indicator will light up
indicating that the machine is switched on.
In the stand-by mode all functions except
the cooling are shut down.
Filling the cold water tank
(not applicable for machines with a fixed
water connection)
When the cold water level window indicates
that no water is present inside the tank or
when the ‘refill water tank indicator’ on:
1. Remove the lid.
2. Lift the cold water tank from the dis-
penser using the handle (fig.2).
3. Empty, rinse and fill the tank with fresh
clean drinking water (fig.3).
• It is recommended to refill the cold
watertank with fresh water at the start
of the day for optimum water quality.
4. Please do not overfill the water tank.
Allow excess water to flow out
through the opening at the
rear side of the tank.
5. Reinstall the cold water tank.
• Place the square opening at the rear
side of the tank over the positioning
hook on the machine frame.
Please do not unplug the power cord
to turn the machine off.
The cooling system does not function
without the power supply and the coffee
inside the coffee pack will deteriorate.
123

107
Coffee pack replacement
When the ‘replace coffee pack’ indicator
lights:
1. Open the cooling compartment door.
2. Lift the empty coffee pack out (fig.4).
3. Wipe off any coffee drops from the
dosing tube to prevent dripping
coffee (fig.5).
4. Dispose of the empty package.
5. Clean the interior of the cooling com-
partment with a clean damp cloth
(fig.6).
6. Take a new coffee pack and inspect
the expiration date. Never use a coffee
pack with an expired date.
Always use the coffee pack that has
been stored for the longest period
(first-in, first-out principle).
7. Follow the instructions printed on the
pack.
• Shake the pack at least 10 times.
Ensure that the pack is well defrosted.
• Unfold the dosing tube.
8. Place the new coffee pack in the cool-
ing compartment.
9. Close the cooling compartment door.
• Check the dispenser operation by
dispensing a cup of coffee.
4 5 6
108
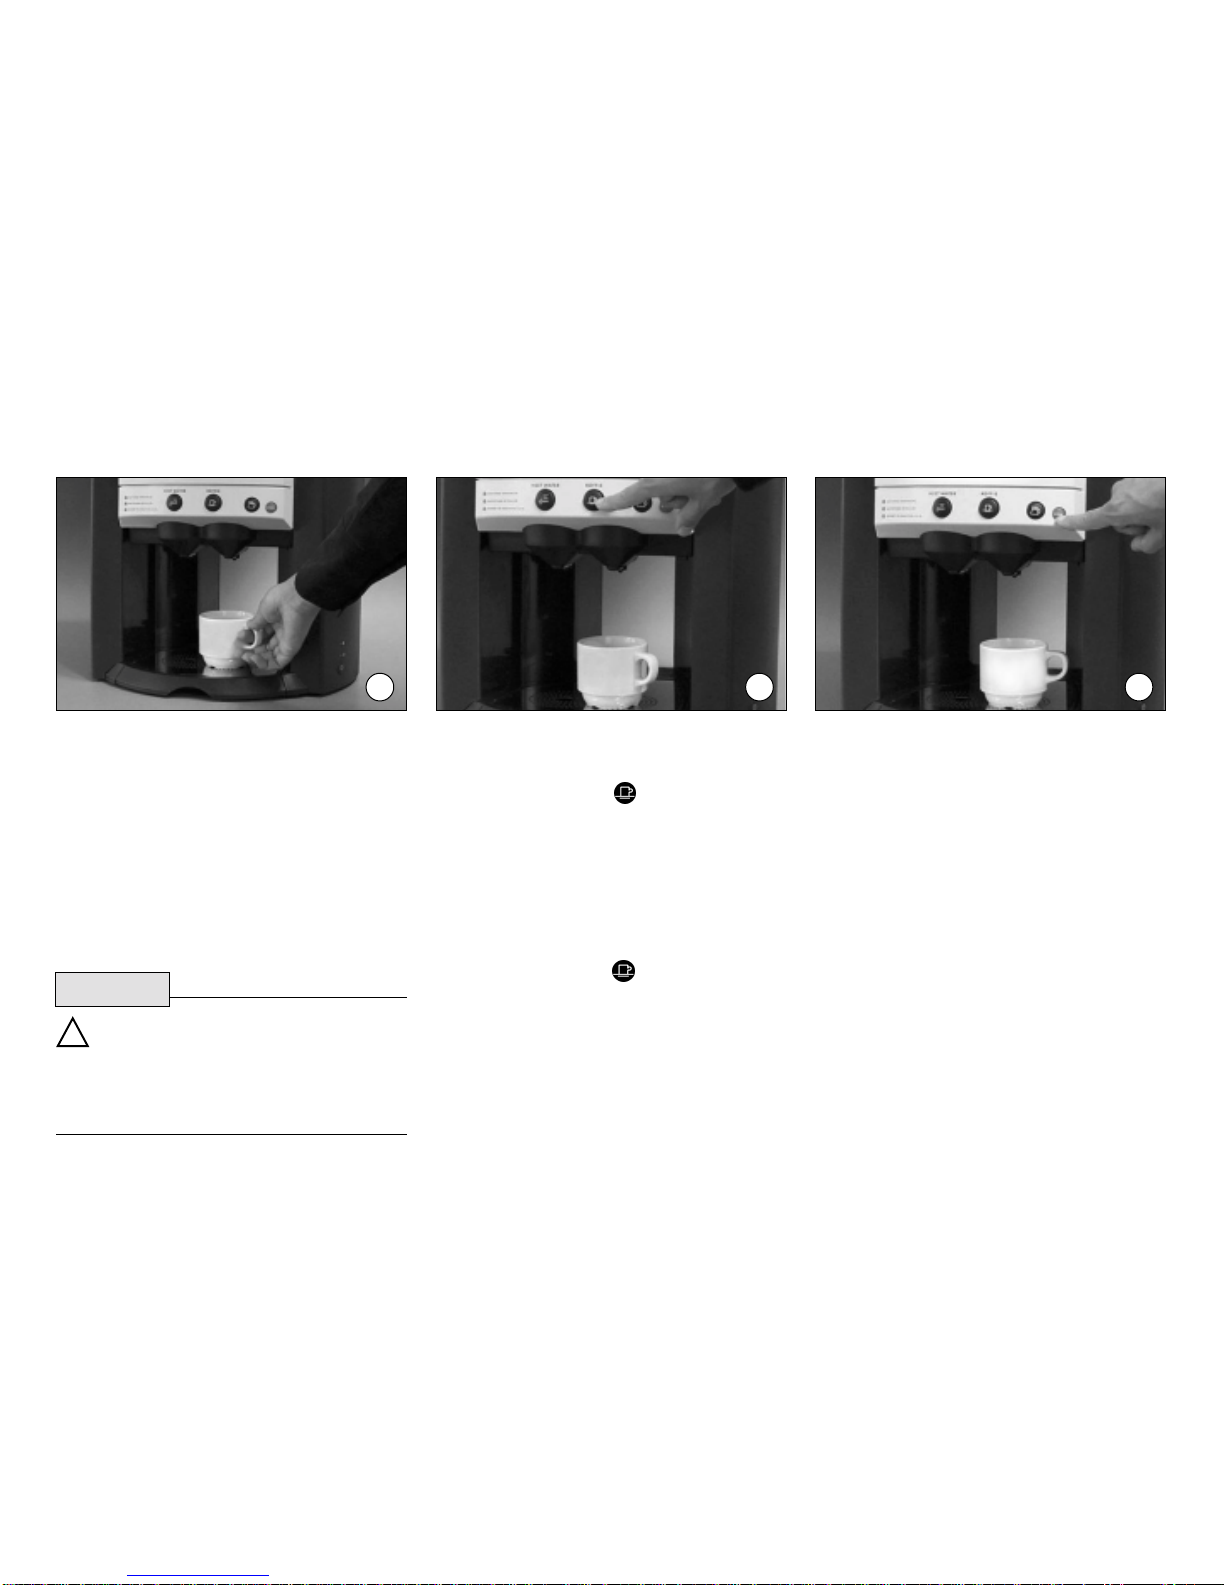
Delivery of a cup of coffee
1. Place a cup or mug on the cup grille in
the indicated area under the right
(coffee) outlet (fig.7).
• The maximum cup height is 130 mm/
5.12”.
2. Press the coffee button (fig.8).
The machine will dispense coffee
from the right outlet and stops after one
cup has been delivered (portioned flow).
If the dispenser is programmed for
continuous flow:
• Press the coffee button to start
coffee delivery.
• Keep the button pressed until you have
obtained the desired amount of coffee.
• The [ stop ] button can be pressed at
any moment to interrupt or cancel
delivery (fig.9).
• You can also press the [ stop ] button
if you want to obtain an amount of
coffee less than one cup.
The liquids delivered by the machine
are hot. Keep hands and body parts
clear from the delivery area while the
machine is producing coffee or hot
water.
!
789
CAUTION

109
Delivery of a pot of coffee
1. Place a pot under the right (coffee)
outlet (fig10).
• Only use the included coffee pot
(1 pot comes with the machine).
2. Press the button (fig.11).
• The machine will dispense coffee
from the right outlet and stop after
0,9 litre / 30.4 oz of coffee has been
delivered.
• The [ stop ] button can be pressed at
any moment to interrupt or cancel
delivery (fig.12).
• You can also press the [ stop ] button
if you want to obtain any amount of
coffee less than 0,9 litre / 30.4 oz.
The liquids delivered by the machine
are hot. Keep hands and body parts
clear from the delivery area while the
machine is producing coffee or hot
water.
!
10 11 12
CAUTION

110
The liquids delivered by the machine
are hot. Keep hands and body parts
clear from the delivery area while the
machine is producing coffee or hot
water.
Delivery of hot water
1. Place a cup or mug on the cup grille in
the indicated area under the left (hot
water) outlet (fig.13).
• The maximum cup height is 130 mm/
5.12”.
2. Press the hot water button to start
hot water delivery.
• Keep the button pressed until you have
obtained the desired amount of hot
water( continuous flow).
If the dispenser is programmed for
portioned delivery (fixed cup volume):
• Press the hot water button.
• Keep the button pressed until you have
obtained the desired amount of hot
water.
• The [stop] button can be pressed at
any moment to interrupt or cancel
delivery (fig.15).
• You can also press the [stop] button
if you want to obtain an amount of
hot water less than one full cup.
!
13 14 15
CAUTION

111
Relocating the machine
It may be desirable to relocate the
machine for cleaning or coffee delivery at
another location. Please observe this
procedure before actually moving the
machine.
It is therefore strongly recommended to turn
off the machine and wait for a minimum of 3
hours (to allow water inside the boiler to
cool off) before you relocate the machine.
1. Switch the machine to stand-by and
unplug the power cord (fig.16).
2. Remove the coffee pack and store it
temporarily in a refrigerator (fig.4)
• Wait for the recommended 3 hours to
allow water in the boiler to cool down.
3. Remove the trough [ 1 ], cold water
tank [ 2 ], and drip tray with grille [ 3 ].
(fig.17).
4. Clean the machine with a clean damp
cloth, especially the area of the outlets.
5. Lift the machine gently as illustrated.
Do no tilt the machine or shake while
carrying (fig.18).
6. Place the machine on an even hori-
zontal and stable surface capable of
holding the weight of the machine
(19 Kg / 42 lbs).
• Make sure that there is enough space
for ventilation behind the machine.
7. Reassemble the machine (drip tray,
grille, trough and cold water tank).
8. Plug the power cord in, switch the
machine on and place coffee pack.
• Make sure that the machine does not
overload the capacity of the electrical
circuit.
Please note that there can be hot water
inside the boiler. If you tilt or shake the
machine while carrying, it may flow out
of the machine.
3
1
2
2
1
16 17 18
1
2
CAUTION

112
Switch the machine to stand-by before
you start the cleaning procedure (fig.19)
(the power cord must remain connected).
Maintenance - Daily cleaning
• Remove the trough by pulling it
downwards and draw it out (towards
front) as shown in figure 20.
Beware of liquids inside trough.
• Clean and rinse the trough.
• Remove the driptray and cup grille
(fig.21).
Beware of liquids inside the tray.
• Remove the grille, empty the tray if
necessary.
• Clean grille and tray.
The tray, trough and cup grille can be
cleaned in a dishwasher. Never clean the
cold water tank in a dishwasher.
! !
12
Important
19 20 21

113
• Clean the entire dispense area with a
clean damp cloth (fig.22). • Reinstall all parts in reverse order
(1- driptray with grille, 2 - trough)
(fig.23).
• Refill the cold water tank if necessary.
• Check if all parts are correctly
reinstalled.
• Switch the machine on.
• Check operation by dispensing cups of
coffee and water.
3 4
22
1
2
23

114
Maintenance - Weekly cleaning
Ensure that the machine is switched to
stand-by (the power cord must remain
connected).
Perform step 1 and 2 of the daily cleaning
procedure (fig.24).
Cooling compartment
• Open the cooling compartment door.
• Remove the coffee pack (lift it gently
out), clean off any remaining coffee
from the tube and store the pack tem-
porarily in a refrigerator.
• Clean the interior of the cooling com-
partment with a clean damp cloth.
(fig.25).
• Clean the circular opening in the base
of the compartment with the special
brush that comes with the machine.
• Reinstall the coffee pack and close the
cooling compartment door.
Cold water tank
• Empty the cold water tank.
• Clean the inside of the tank with a
brush and a food-grade cleaning
agent. (fig.26).
Be careful not to lose the strainer
inside the tank.
Do not clean this part in a dishwasher.
• Rinse the tank well.
• Refill and reinstall cold water tank (do
not exceed the maximum water level).
• Continue with step 3 and 4 of the
daily cleaning procedure.
Beware of liquids inside the
trough.
!
!24 25 26
Remark
Cleaning of the cold water tank is not
applicable if the fixed water connection
is installed.

115
Preparations when the machine is not to be used over long periods
Please take the following preparations
when the machine is not to be used
for a long period.
1. Switch the machine to stand-by and
unplug the power cord (fig.27).
2. Perform the daily cleaning procedure
(page 16).
3. Open the cooling compartment door,
remove the coffee pack (fig.28) and
clean the cooling compartment with a
clean damp cloth. Clean the circular
opening in the base with the special
brush.
Leave the cooling compartment door
ajar after cleaning.
4. Store the coffee pack in a refrigerator
(check shelf-life).
5. Remove the cold water tank, empty
and clean the tank (fig.29).
Please take the following measures
after the machine has not been used
for a long period.
1. Perform the weekly cleaning proce-
dure.
2. Fill the cold water tank with clean
fresh drinking water.
(not applicable for machines with a
fixed water connection)
3. Plug the power cord in the outlet and
switch the machine on.
4. Place the coffee pack.
27 28 29

116
4. Open the cooling compartment door
and install a coffee pack (fig.30).
• It may be possible to use the previously
removed coffee pack provided that the
expiration date is not exceeded.
Please verify therefore the expiration
date.
5. Switch the machine on and purge the
water system by dispensing at least 15
cups of hot water (fig.31).
Dispose of these cups.
6. Refill the cold water tank (fig.32)
(not applicable for machines with a
fixed water connection).
31 3230
Table of contents


