Merry moments SL-4046-RC User manual

\
LED MOTION LASER LIGHT
PROJECTOR WITH REMOTE
PROYECTOR LED LÁSER ANIMADO
CON CONTROL REMOTO
User Manual
Manual
del usuario
English……3
Español…..14

Contents
Parts list.....................................................................3
Contents ...............................................................3
Important safety Instructions ...................................4
User instructions .......................................................7
Instructions for outdoor use .................................7
Instructions for indoor use....................................8
Helpful hints .......................................................10
Cleaning and maintenance......................................11
Other useful information ........................................12
Technical specifications ......................................12
Storing ................................................................12

Parts list
3
6
7
5
4
8
Main parts
1. Main unit
2. Thumbscrew
3. ON/OFF
4. Adaptor
5. Adaptor nut (2)
6. Flat base
7. Lawn stake
8. Remote control
Contents of Packaging
Main unit
Adaptor
Flat base
Lawn stake
Remote control (1-CR2025 button cell battery included)
Instruction manual
1
3
2

Important safety instructions
4
IMPORTANT SAFETY INSTRUCTIONS
When using electrical appliances, basic safety precautions should always be followed.
PLEASE READ AND SAVE ALL
INSTRUCTIONS BEFORE USING THE LED
LASER PROJECTOR.
WARNING: LASER RADIATION. NEVER SHINE INTO EYES OR
FACE. DO NOT STARE INTO BEAM!
1. Close supervision is necessary when any appliance is used near children.
2. This unit is not intended for use by persons (including children) with reduced
physical, sensory or mental capabilities or lack of experience and knowledge,
unless they have been given supervision or instruction concerning use of the
appliance by a person responsible for their safety. Children should be
supervised to ensure that they do not play with the unit.
3. Cleaning and user maintenance should be handled by adults.
4. Improper use of the projection light and its accessories may damage the
appliance and cause injury.
5. DO NOT use the projection light if it is not working properly or if the power
cord has been damaged. Please contact customer service.
6. DO NOT use the projection light for other than intended use.
7. Always attach the plug to the projection light first, then plug the cord into an
outlet. To disconnect, make sure unit is off, then remove from outlet.
8. ALWAYS unplug the projection light from the outlet when not in use and
before cleaning.
9. To protect against electric shock, do not immerse cord, plugs, or main unit in
water or any other liquid. Do not use with extension cord near water or where
water may accumulate.
10. Keep plugs and receptacles dry.
11. DO NOT install or use within 16 feet of a pool or spa.
12. NEVER move the projection light by pulling the cord.
13. Place the projection light on a flat, level, stable, heat resistant surface when
using.
14. DO NOT place the projection light on or near a hot gas or electric burner.
15. DO NOT let cord hang over an edge of table or counter.

Important safety instructions
5
16. DO NOT use the projection light with a damaged outlet.
17. DO NOT use in a bathroom.
18. NEVER attempt to open the housing of the projection light.
19. DO NOT touch hot surfaces, use handles or knobs.
WARNING: WHEN USING OUTSIDE, IT IS RECOMMENDED THAT THE OUTLET
MUST BE WEATHERPROOF. IT IS NOT ADVISABLE TO USE ANY OTHER KIND OF
OUTLET.
SAVE ALL INSTRUCTIONS!

_______ ___ _______ Safety instructions
6
Safety instructions
:
WARNING: Read and understand all instructions. Failure to follow all instructions
listed below may result in electric shock, fire or serious personal injury. The
warnings, cautions, and instruction discussed in this instruction manual cannot
cover all possible conditions and situations that may occur. It must be understood
by the operator that common sense and caution are a factor which cannot be
built into this product, but must be supplied by the operator.
CAUTION: A short power supply cord is provided to reduce the risk of personal
injury resulting from becoming entangled in or tripping over a longer cord.
Extension cords are available from local hardware stores and may be used if care
is exercised in their use. If an extension cord is required, special care and caution
is necessary. Also, the cord must be: (1) marked with an electrical rating of 125V,
and at least 13 A., 1625 W., and (2) the cord must be arranged so that it will not
drape over the countertop or tabletop where it can be pulled on by children or
tripped over accidentally.
Polarized plug
NOTE:
This projection light has a polarized plug (one blade is wider than the other).
As a safety feature to reduce the risk of electrical shock, this plug is intended
to fit in a polarized outlet only one way.
If the plug does not fit fully in the outlet, reverse the plug.
If the plug still does not fit, contact a qualified electrician. Do not attempt to
defeat this safety feature.
Electric power
If electric circuit is overloaded with other appliances, your projection light may not
operate properly. The projection light should be operated on a separate electrical
circuit from other operating appliances.

Safety instructions
7
Safety warning
Although your projection light is easy to operate, for your safety, the warnings
below must be followed:
1. Do not place the projection light near a heat source.
2. Use the projection light on a stable surface away from water.
3. Do not unplug from the power outlet by pulling on the supply cord.
4. The projection light must be unplugged:
A. After each use.
B. If it appears to be faulty.
C. Before cleaning or maintenance.
CAUTION: Use of controls or adjustments or performance of procedures other
than those specified herein may result in hazardous radiation exposure.
CAUTION: The use of optical instruments with this product will increase eye
hazard.
Do not attempt to repair or disassemble the laser. If unqualified persons attempt
to repair this laser product, serious injury may result. Any repair required on this
laser product should be performed by authorized service center personnel.
THIS PRODUCT IS INTENDED FOR HOUSEHOLD USE ONLY.
SAVE THESE INSTRUCTIONS!
User instructions
8
User instructions
WARNING: LASER RADIATION. NEVER SHINE INTO EYES OR
FACE. DO NOT STARE INTO BEAM!
Instructions for outdoor use
1. Remove all projection light components from the packaging.
2. Determine a location that is free from visual obstructions between the projection light and the
intended surface so the laser lights project clearly.
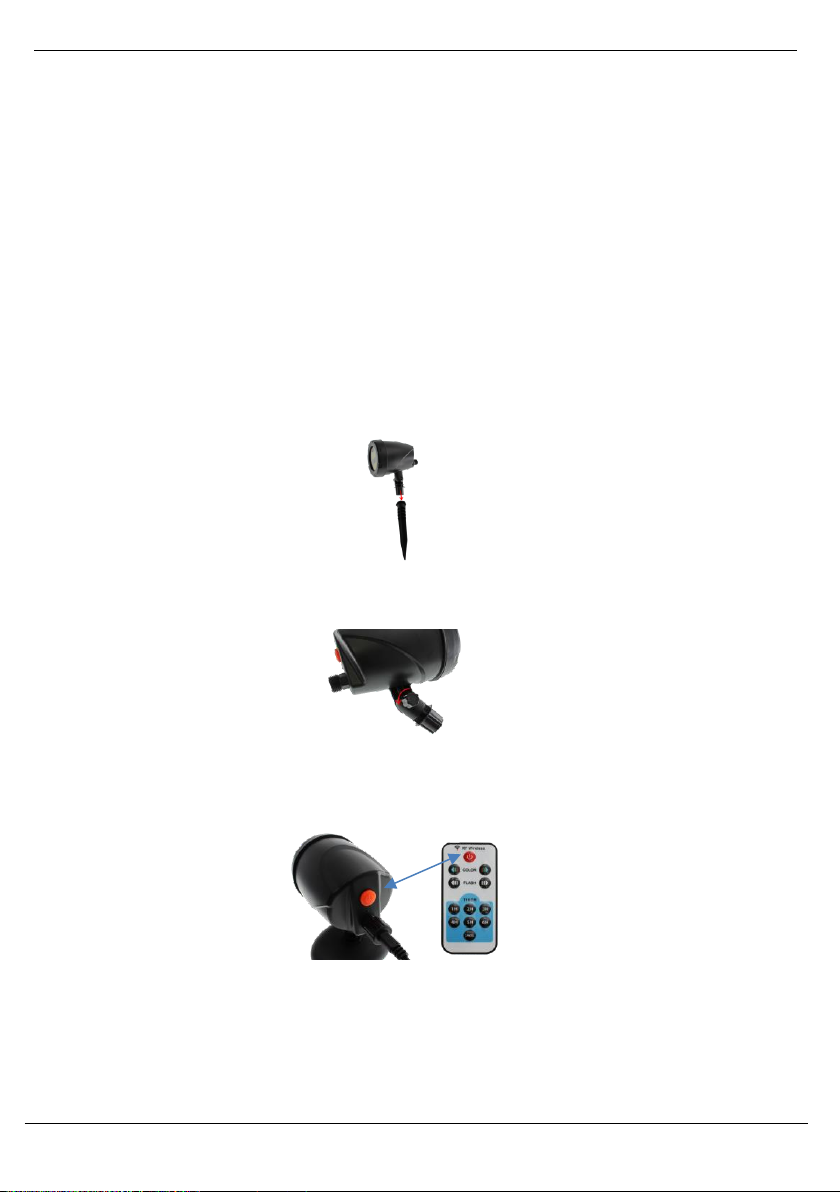
3. Insert lawn stake into the ground, approximately 3-4 inches, in the location desired.
Note: If you have difficulty inserting the stake into the ground, a rubber mallet may be used
(not included) to gently pound in the stake. Never attempt to push or pound the housing of the
projection light.
4. Gently push the housing of the projection light about half way into the opening of the stake. Do
not force it all the way in.
5. Loosen the thumbscrew and adjust the angle of the projection light housing, pointing at your
intended surface. Once pointed at intended surface, tighten the thumbscrew so the housing
will stay in place.
6. Attach an extension cord rated for outdoor use (not included) to the electrical plug on the
projection light. Plug the extension cord into a weatherproof outdoor electrical outlet.
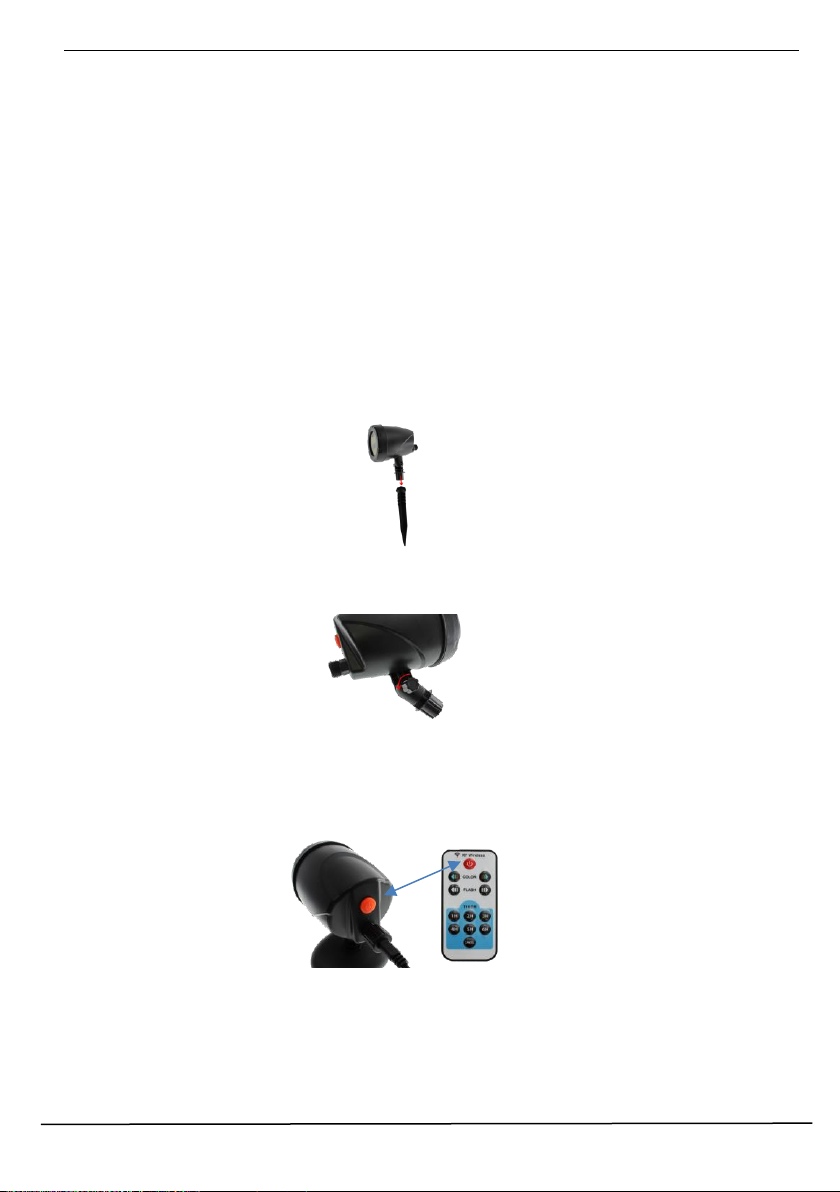
7. Turn the projection light on by pressing the button located on the back of the projection light
housing. The remote may also be used by pressing the power button on the remote.
8. When using the button on the back of the projection light housing, continue to press through
color, flashing and/or fixed patterns to find desired pattern.
9. When using the remote, choose color, flashing and fixed patterns.
10. To turn off, press the button on the back of the projection light housing or the remote for two
seconds.

_______ ___ _______ User instructions
9
Instructions for indoor use
1. Remove all projection light components from the packaging.
2. Determine a location that is free from visual obstructions between the projection light and the
intended surface so the laser lights project clearly.
3. Gently push the housing of the projection light into the flat base.
4. Loosen the thumbscrew and adjust the angle of the projection light housing, pointing at your
intended surface. Once pointed at intended surface, tighten the thumbscrew so the housing
will stay in place.
5. Attach an extension cord (not included) to the electrical plug on the projection light. Plug the
extension cord into an electrical outlet.
6. Turn the projection light on by pressing the button located on the back of the projection light
housing. The remote may also be used by pressing the power button on the remote.
7. When using the button on the back of the projection light housing, continue to press through
color, flashing and fixed patterns.
8. When using the remote, choose color, flashing and/or fixed patterns
9. To turn off, press the button on the back of the projection light housing or the remote for two
seconds.
LED Laser Projection Light has 9 modes:
1. Red and green light spinning
2. Red light spinning
3. Green light spinning
4. Red and green light flash alternately
5. Red and green light spin and flash
6. Red and green light spin and flash faster
7. Red and green light fixed
8. Red light fixed
9. Green light fixed
Remote control functions (unit must be turned on first)
Color: Press the left and right arrows to choose color and design mode
Flash: Press the left and right arrows to choose flash design mode
Timer: Press desired time from 1 hour up to 6 hours. The projector will blink twice and return
to previous function mode.
To activate the motion feature that includes a light sensor so it will only turn on
in the dark, peel off the sticker in the front of the housing that says “Peel this
off”.

Helpful hints
10
WARNING: LASER RADIATION. NEVER SHINE INTO EYES OR
FACE. DO NOT STARE INTO BEAM!
SAVE ALL INSTRUCTIONS!
Helpful hints:
Projection lights will appear brightest in the dark and may look dimmer if there are competing
sources of light, like street lights or porch lamps.
Projection lights are intended to operate in temperatures from -30°F to 100°F. At or below
freezing temperature, the projection light may take up to 10 minutes to warm up and reach full
projection strength.
DISTANCE TO SURFACE
COVERAGE
10 feet
200 sq ft
20 feet
800 sq ft
25 feet
1200 sq ft
30 feet
1800 sq ft
35 feet
2500 sq ft
40 feet
3000 sq ft
FCC PART 15
This device complies with Part 15 of the FCC Rules. Operation is subject to the following two
conditions: (1) this device may cause harmful interference, and (2) this device must accept any
interference received, including interferences that may cause undesired operation.
Warning: Changes or modifications to this unit not expressly approved by the party responsible for
compliance could void the user’s authority to operate the equipment.
NOTE: This equipment has been tested and found to comply with the limits for a Class B digital
device, pursuant to Part 15 of the FCC Rules. These limits are designed to provide reasonable
protection against harmful interference in a residential installation. This equipment generates, uses
and can radiate radio frequency energy and, if not installed and used in accordance with the
instructions, may cause harmful interference to radio communications.
However, there is no guarantee that interference will not occur in a particular installation. If this
equipment does cause harmful interference to radio or television reception, which can be determined
by turning the equipment off and on, the user is encouraged to try to correct the interference by one
or more of the following measures:
Reorient or relocate the receiving antenna.
Increase the separation between the equipment and receiver.
Connect the equipment into an outlet on a circuit different from that to which the receiver
is connected.
Consult the dealer or an experience radio/TV technician for help.

Cleaning and maintenance
11
Cleaning and maintenance
CAUTION:
Always be sure that the LED Laser Projection Light is unplugged and completely cooled
before cleaning or attempting to store the item. NEVER IMMERSE the projection light
housing in water or any other liquid.
1. When performing any cleaning or maintenance to this unit, be sure to unplug
from power outlet first.
2. Wipe down the projection light housing and all parts with a damp cloth, sponge or
paper towel thoroughly before storing.
3. Do not immerse the projection light or run water over the base unit. Dry the
surfaces with a soft cloth or paper towel before storing.
4. Do not use abrasive cleaners on any part of the projection light.

_______ ___ _______ Other information
12
Other useful information
Technical specifications
Model Number SL-4046-RC
Rating Voltage 240V, 60Hz
Nominal Power 5W
Storing
Allow the projection light to cool completely before storing.
Store the projection light in a dry location in the original box if possible.
Do not place any heavy items on top of the projection during storage as this may
result in possible damage.
Service center
If you have any questions in regards to the operation of this projection light or are in
need of a spare part, please contact our service center at:
Tel: 1-888-367-7373
Business Hours: Mon-Fri 10:00am –5:00pm EST
Email: help@myproduct.care
Environmental protection
If the projection light should no longer work at all, please make sure that it is disposed
of in an environmentally friendly way.

Other useful information
13
Contenido
Lista de piezas .....................................................14
Contenido .......................................................14
Instrucciones importantes de seguridad.............15
Instrucciones para el usuario ..............................18
Instrucciones para uso al aire libre .................18
Instrucciones para el uso en interiores ...........19
Consejos útiles................................................21
Limpieza y mantenimiento .................................22
Otra información útil ..........................................23
Especificaciones técnicas ...............................23
Almacenamiento ............................................23

Lista de piezas
14
6
7
5
4
8
Piezas principales
1. Unidad principal
2. Tornillo manual
3. ENCENDIDO/APAGADO
4. Adaptador
5. Rosca del adaptador (2)
6. Base plana
7. Estaca para jardín
8. Control remoto
Contenido del embalaje
Unidad principal
Adaptador
Base plana
Estaca para jardín
Control remoto (incluye 1 pila de botón de tipo CR2025)
Manual de instrucciones
1
3
2

Instrucciones importantes de seguridad
15
INSTRUCCIONES IMPORTANTES DE
SEGURIDAD
Al usar aparatos electrodomésticos, se deben tener en cuenta precauciones de seguridad
básicas.
LEA TODAS LAS INSTRUCCIONES ANTES
DE USAR EL PROYECTOR LED LÁSER.
ADVERTENCIA: RADIACIÓN LÁSER. NO LO APUNTE NUNCA A
LOS OJOS O EL ROSTRO. ¡NO MIRE DIRECTAMENTE AL HAZ!
1. Es necesaria una atenta supervisión cuando el aparato se usa cerca de los
niños.
2. Esta unidad no está diseñada para ser utilizada por personas (incluidos niños)
con disminución en sus capacidades físicas, sensoriales o mentales; o con falta
de experiencia y conocimiento, a menos de que hayan recibido supervisión o
instrucciones relativas al uso del aparato por una persona responsable de su
seguridad. Los niños deben ser supervisados para asegurarse de que no
jueguen con la unidad.
3. La limpieza y el mantenimiento deben correr a cargo de personas adultas.
4. El uso incorrecto del proyector y los accesorios puede dañar el aparato y
causar lesiones.
5. NO utilice el proyector si no funciona correctamente o si el cable de
alimentación eléctrica está dañado. Por favor, póngase en contacto con el
servicio de atención al cliente.
6. NO utilice el proyector para un uso que no sea el previsto.
7. Siempre enchufe primero el cable al proyector antes de enchufarlo a un
tomacorriente. Antes de desenchufar la unidad del tomacorriente, asegúrese
de que esté apagada.
8. SIEMPRE desconecte el proyector del tomacorriente cuando no esté en uso y
antes de limpiarlo.
9. Para protegerse contra una descarga eléctrica, no sumerja el cable, el enchufe
o la unidad principal en agua u otro líquido. No lo utilice con el cable de
extensión cerca del agua o donde pueda acumularse agua.
10. Mantenga los enchufes y los receptáculos secos.
11. NO lo instale o use en un radio de 16 pies (4.9 m) de una piscina o jacuzzi.

_______ ___ Instrucciones importantes de seguridad
16
12. No mueva NUNCA el proyector tirando del cable.
13. Coloque el proyector en una superficie plana, nivelada, estable y resistente al
calor cuando lo use.
14. NO coloque el proyector sobre o cerca de una hornilla caliente de gas o
eléctrica.
15. NO deje que el cable cuelgue del borde de una mesa o mostrador.
16. NO utilice el proyector si el tomacorriente está estropeado.
17. NO lo use en un baño.
18. No intente NUNCA abrir la carcasa del proyector.
19. NO toque las superficies calientes, use las asas o agarraderas.
ADVERTENCIA: AL USARLO AL AIRE LIBRE, SE RECOMIENDA UTILIZARLO CON
TOMACORRIENTES RESISTENTES A LA INTEMPERIE. NO ES RECOMENDABLE
UTILIZAR NINGÚN OTRO TIPO DE TOMACORRIENTE.
¡GUARDE TODAS LAS INSTRUCCIONES!

Instrucciones de seguridad
17
Instrucciones de seguridad
PRECAUCIÓN:
ADVERTENCIA: Lea y comprenda todas las instrucciones. Si no se cumplen todas las
instrucciones indicadas a continuación se pueden producir descargas eléctricas, incendios
o lesiones graves. Las advertencias, precauciones e instrucciones que se detallan en este
manual de instrucciones no cubren todas las condiciones y situaciones posibles que
podrían suceder. El operador debe entender que el sentido común y la precaución son
factores que no se pueden incluir en el producto, sino que los debe aportar el operador
mismo.
PRECAUCIÓN: Se proporciona un cable eléctrico corto para reducir el riesgo de lesiones
personales resultantes de enredarse o tropezar con un cable más largo. Hay disponibles
cables de extensión en las tiendas locales de hardware y estos se pueden utilizar si se
tiene cuidado en su uso. Si se requiere usar un cable de extensión, es necesario tener
especial cuidado y precaución. Además, el cable debe: (1) estar marcado con una
clasificación eléctrica de 125 V y al menos 13 A, 1625 W; y (2) el cable debe colocarse de
manera que no cuelgue de un mostrador o mesa en donde los niños pudieran jalarlo o
tropezar con él accidentalmente.
Enchufe polarizado
NOTA:
Este proyector posee un enchufe polarizado (una clavija es más ancha que la otra).
Como medida de seguridad para reducir el riesgo de descarga eléctrica, este enchufe
está diseñado para entrar en un tomacorriente polarizado en un solo sentido.
Si el enchufe no entra completamente en el tomacorriente, gire el enchufe.
Si el enchufe aún no encaja, comuníquese con un electricista calificado. No intente
eliminar esta característica de seguridad.
Alimentación eléctrica
Si el circuito eléctrico está sobrecargado con otros electrodomésticos, el proyector podría
no funcionar correctamente. El proyector debe conectarse en un circuito eléctrico
diferente al de otros aparatos en funcionamiento.

Instrucciones de seguridad
18
Advertencia de seguridad
Si bien el proyector es fácil de utilizar, se deben cumplir las siguientes advertencias por
razones de seguridad:
1. No coloque el proyector cerca de una fuente de calor.
2. Use el proyector sobre una superficie estable alejada del agua.
3. No lo desenchufe del tomacorriente jalando del cable de alimentación eléctrica.
4. El proyector debe desenchufarse:
A. Después de cada uso.
B. Si parece estar defectuoso.
C. Antes de cualquier operación de limpieza o mantenimiento.
PRECAUCIÓN: El uso de controles y ajustes o la realización de procedimientos que no sean
los especificados en este manual podrían causar una exposición peligrosa a la radiación.
PRECAUCIÓN: El uso de instrumentos ópticos con este producto aumentará el riesgo
visual.
No intente reparar o desmontar el láser. Podrían producirse lesiones graves si una persona
no calificada intenta reparar este producto láser. Todas las reparaciones de este producto
láser las debe realizar el personal autorizado del centro de servicio.
ESTE PRODUCTO ESTÁ DISEÑADO EXCLUSIVAMENTE PARA USO DOMÉSTICO.
¡GUARDE ESTAS INSTRUCCIONES!
_______ ___ Instrucciones para el usuario
19
Instrucciones para el usuario
ADVERTENCIA: RADIACIÓN LÁSER. NO LO APUNTE NUNCA A
LOS OJOS O EL ROSTRO. ¡NO MIRE DIRECTAMENTE AL HAZ!
Instrucciones para uso al aire libre
1. Saque de la caja todos los componentes del proyector.
2. Busque un lugar sin obstrucciones visuales entre el proyector y la superficie de proyección para
que el láser la alcance con claridad.
3. Inserte la estaca unas 3 o 4 pulgadas (7.6 a 10 cm) en la tierra, en la ubicación elegida.
Nota: Si tiene dificultades para insertar la estaca en la tierra, puede usar un martillo de goma
(no incluido) para clavarla. No golpee o empuje NUNCA la carcasa del proyector.
4. Con suavidad, introduzca la carcasa del proyector hasta la mitad de la abertura de la estaca. No
lo fuerce hasta el fondo.
5. Afloje el tornillo manual y ajuste el ángulo de la carcasa del proyector para orientarla a la
superficie que desee. Una vez orientada correctamente, apriete el tornillo manual para que la
carcasa no se mueva.
6. Acople un cable de extensión apto para uso en exteriores (no incluido) al enchufe del
proyector. Enchufe el cable de extensión en un tomacorriente exterior resistente a la
intemperie.
7. Pulse el botón situado en la parte posterior de la carcasa del proyector para encenderlo.
También se puede utilizar el botón de encendido del control remoto.
8. Siga presionando el botón en la parte posterior de la carcasa del proyector para cambiar el
color, activar las opciones de parpadeo y/o de luz fija hasta encontrar la combinación deseada.
9. Utilice también el control remoto para elegir el color, las opciones de parpadeo o de luz fija.
10. Pulse el botón situado en la parte posterior de la carcasa del proyector o en el control remoto
durante dos segundos para apagarlo.

Instrucciones de seguridad
20
Instrucciones para el uso en interiores
1. Saque de la caja todos los componentes del proyector.
2. Busque un lugar sin obstrucciones visuales entre el proyector y la superficie de proyección para
que el láser la alcance con claridad.
3. Empuje suavemente la carcasa del proyector sobre la base plana.
4. Afloje el tornillo manual y ajuste el ángulo de la carcasa del proyector para orientarla a la
superficie que desee. Una vez orientada correctamente, apriete el tornillo manual para que la
carcasa no se mueva.
5. Acople un cable de extensión (no incluido) al enchufe del proyector. Enchufe el cable de
alimentación en un tomacorriente.
6. Pulse el botón situado en la parte posterior de la carcasa del proyector para encenderlo.
También se puede utilizar el botón de encendido del control remoto.
7. Siga presionando el botón en la parte posterior de la carcasa del proyector para cambiar el
color, activar las opciones de parpadeo y/o de luz fija.
8. Utilice también el control remoto para elegir el color, las opciones de parpadeo y/o de luz fija.
9. Pulse el botón situado en la parte posterior de la carcasa del proyector o en el control remoto
durante dos segundos para apagarlo.
El proyector led láser ofrece 9 modos de operación:
1. Luz roja y verde giratoria
2. Luz roja giratoria
3. Luz verde giratoria
4. Luz roja y verde parpadeante alternativamente
5. Luz roja y verde giratoria y parpadeante
6. Luz roja y verde con giro lento y parpadeo rápido
7. Luz roja y verde fija
8. Luz roja fija
9. Luz verde fija
Funciones del control remoto (la unidad debe encenderse primero)
Color: Pulse las flechas izquierda y derecha para elegir el color y el diseño
Parpadeo: Pulse las flechas izquierda y derecha para elegir el parpadeo
Temporizador: Pulse para elegir el tiempo de 1 a 6 horas. El proyector parpadeará dos veces y
regresará al modo anterior.
Para activar la función de movimiento con el sensor de luz que solo se enciende en la
oscuridad, despegue la lámina adhesiva situada en la parte frontal de la carcasa con el
mensaje “Peel this off” (Despegar).
ADVERTENCIA: RADIACIÓN LÁSER. NO LO APUNTE NUNCA A LOS OJOS O EL
ROSTRO. ¡NO MIRE DIRECTAMENTE AL HAZ!
¡GUARDE TODAS LAS INSTRUCCIONES!
Table of contents
Languages:
Popular Lighting Equipment manuals by other brands


Renkforce
Renkforce 808147 operating instructions

American DJ
American DJ Cross X Flash User instructions

Larson Electronics
Larson Electronics HAL-PM-185LED-CPR quick start guide

OttLite
OttLite WingShade quick start guide

Lightolier
Lightolier Lytespan 8105 specification

Fotodiox
Fotodiox EZ Pro instruction manual