Merrylock MK1100 User manual

Instruction Book
Instruction Book
Instruction Book
1-Needle 3-Thread
Overlock Sewing Machine

“IMPORTANT SAFETY INSTRUCTIONS“
“DANGER“___
“WARNING“ “ATTENTION“___
When using an electrical appliance, basic safety precautions should always be followed, including the following:
Read the instruction carefully before you use the machine.
1. The appliance should never be left unattended when plugged in.
2. Always unplug this appliance from the electric outlet immediately after using and before cleaning.
3. Always unplug before re-lamping. Change the light bulb only with the same of bulb and type rated max. 220~
240V/15W or 115V/15W.
* Do not allow this appliance to be used as a toy. Close attention is necessary when this appliance is used by
near children and infirm persons.
* Use this appliance only for its intended use as described in this manual. Use only attachments recommended
by the manufacturer as contained in this manual.
* Never operate this appliance if it has a damaged cord or plug, if it is not working properly, if it has been
or damaged, or dropped into water. Return the appliance to the nearest authorized dealer or service center for
examination, repair, electrical or mechanical adjustment.
* Never operate the appliance with any air openings blocked. Keep ventilation openings of the sewing machine
and foot control free from the accumulation of lint, dust, and loose cloth.
* Keep fingers away from all moving parts. Special care is required around the sewing machine needle and
cutter.
* Always use the proper stitch plate. The wrong plate can cause the needle to break.
* Do not use bent needles.
* Do not pull or push fabric while stitching. It may deflect the needle causing it to break.
* Switch the sewing machine off “ O “ when marking any adjustments in the needle area, such as threading
needle area, such as threading needle, changing needle, threading looper, or changing presser foot and the
like.
* Always unplug the machine from the electrical outlet when removing covers, when covers are opened to raise
the upper cutter or thread the loopers, when lubricating or when making any other user servicing
mentioned in the instruction manual.
* Never drop or insert any abject into any opening.
* Do not use outdoors.
* Do not operate where aerosol (spray) products are being used or where oxygen is being administered.
* To disconnect, turn all controls to the off “ O “ position, then remove plug from outlet.
* Do not unplug by pulling on cord. To unplug, grasp the plug, not the cord.
* Basically, the machine should be disconnected from the electricity supply when not in use.
* If the power cord of this appliance is damaged, it must be replaced with a special cord by your nearest
authorized dealer or service center.
* This appliance is provided with double insulation. (except USA/ CAN) Use only identical replacement parts. See
instructions for servicing double insulated appliances.
* If oil gets in eyes, immediately, rinse the oil out with water. If you swallow oil by mistake, immediately consult a
medical doctor.
* Close cover before operating machine.
or
dropped
adjustments
To reduce the risk of electric shock:
Pour reduire le risque de décharges électriques :
To reduce the risk of burns, fire, electric shock, or injury to persons:
Pour réduire le risque de brûlures, de feu, de décharges électriques ou de blessures Aux personnes :

TABLE OF CONTENTS
1
TABLE OF CONTENTS
Parts Name............................................................................................................................................................ 2
Standard Accessories..........................................................................................................................................
Specifications........................................................................................................................................................
Opening and Closing the Looper Cover.............................................................................................................
Opening and Closing the Sewing Table..............................................................................................................
Opening and Closing the Accessory Box...........................................................................................................
Connecting the Machine to the Power Supply...................................................................................................
How to Use Foot Controller and Control the Sewing Speed.............................................................................
How to Turn the Balance Wheel...........................................................................................................................
How to Attach the Chip Box.................................................................................................................................
Stretch Up the Thread Guide Bar.........................................................................................................................
Attaching the Thread Stripping Disc and net......................................................................................................
Raising or Lowering the Presser Foot.................................................................................................................
How to Change (Remove) the Presser Foot........................................................................................................
How to Thread the Machine............................................................................................................................
-Threading the upper looper.................................................................................................................................
-Threading the lower looper..................................................................................................................................
-Threading the needle.........................................................................................................................................
Securing Ends......................................................................................................................................................
Adjustment of Differential Feed (DF type only)................................................................................................
Thread tension adjusment..................................................................................................................................
Adjustment of Stitch length................................................................................................................................
Adjustment of Cutting Width..............................................................................................................................
Replacing the Light Bulb....................................................................................................................................
Changing the Needle...........................................................................................................................................
Changing the Upper Knife...................................................................................................................................
Using the Needle Plate........................................................................................................................................
Rolled Hemming, Picot Edging and Narrow Hemming....................................................................................
Cleaning and Oiling.............................................................................................................................................
Trouble Shooting.................................................................................................................................................
Optional Feet.......................................................................................................................................................
3
3
4
4
4
5
5
5
5
6
6
7
7
8-10
8
9
10
11
12
13
14
14
14
15
15
16
17
18
19
20

2
Parts Name
Pre-tension thread guide
Thread guide bar
Thread guide
Spool pin
Spool holder
Spool stand
Stitch length dial
Side Cover
Balance wheel
Power socket
Light and Power switch
Needle thread tension dial
Foot pressure cover
Thread take-up lever cover
Needle thread guide
Needle thread guide
Sewing table
Looper cover
Base plate
Upper looper thread tension dial
Lower looper thread tension dial
Needle clamp
Presser foot
Sewing table
Feet holder
Accessory box
Differential feed dial
Extension table
Presser foot lifter
Motor cover
Lamp cover
3
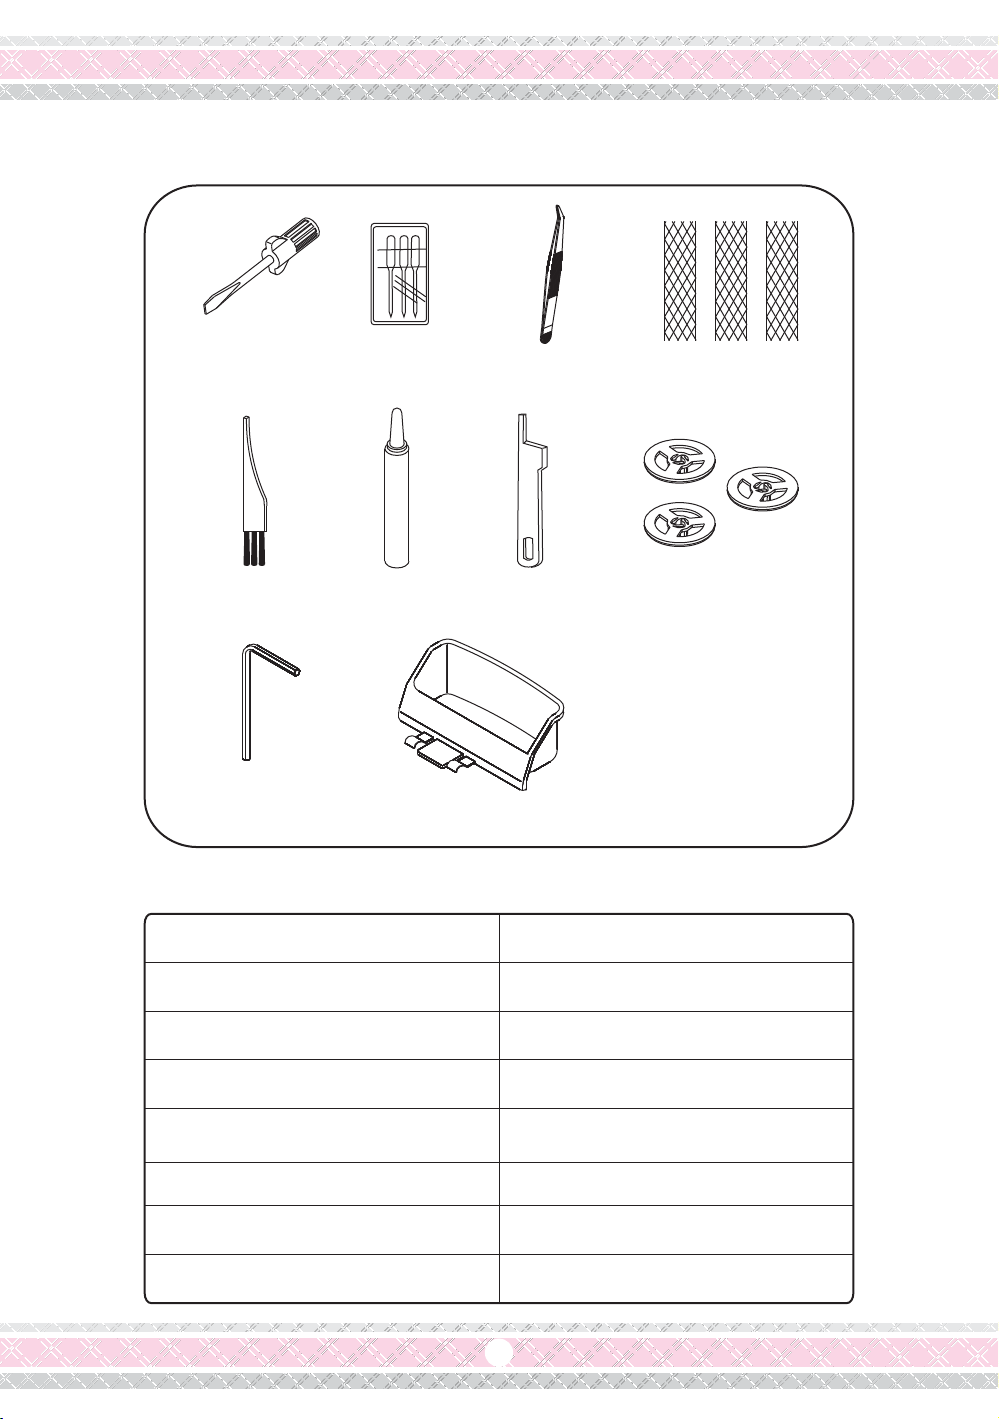
Standard Accessories
Screw driver Set of Needles Tweezers Nets
Lint brush Oil Upper knife Thread stripping discs
Specifications
Hexagon wrench Chip box
Max. speed
Stitch length
Stitch width
Presser foot height
Differential feed (DF type only)
Needle
Dimentions
Net weight
Up to 1300 r.p.m.
1-4mm
3-5mm
Max. 6mm
0.8-2.0
ELx705 # 12 or # 14
292Wx295Dx290H mm
7.4 KGS
4
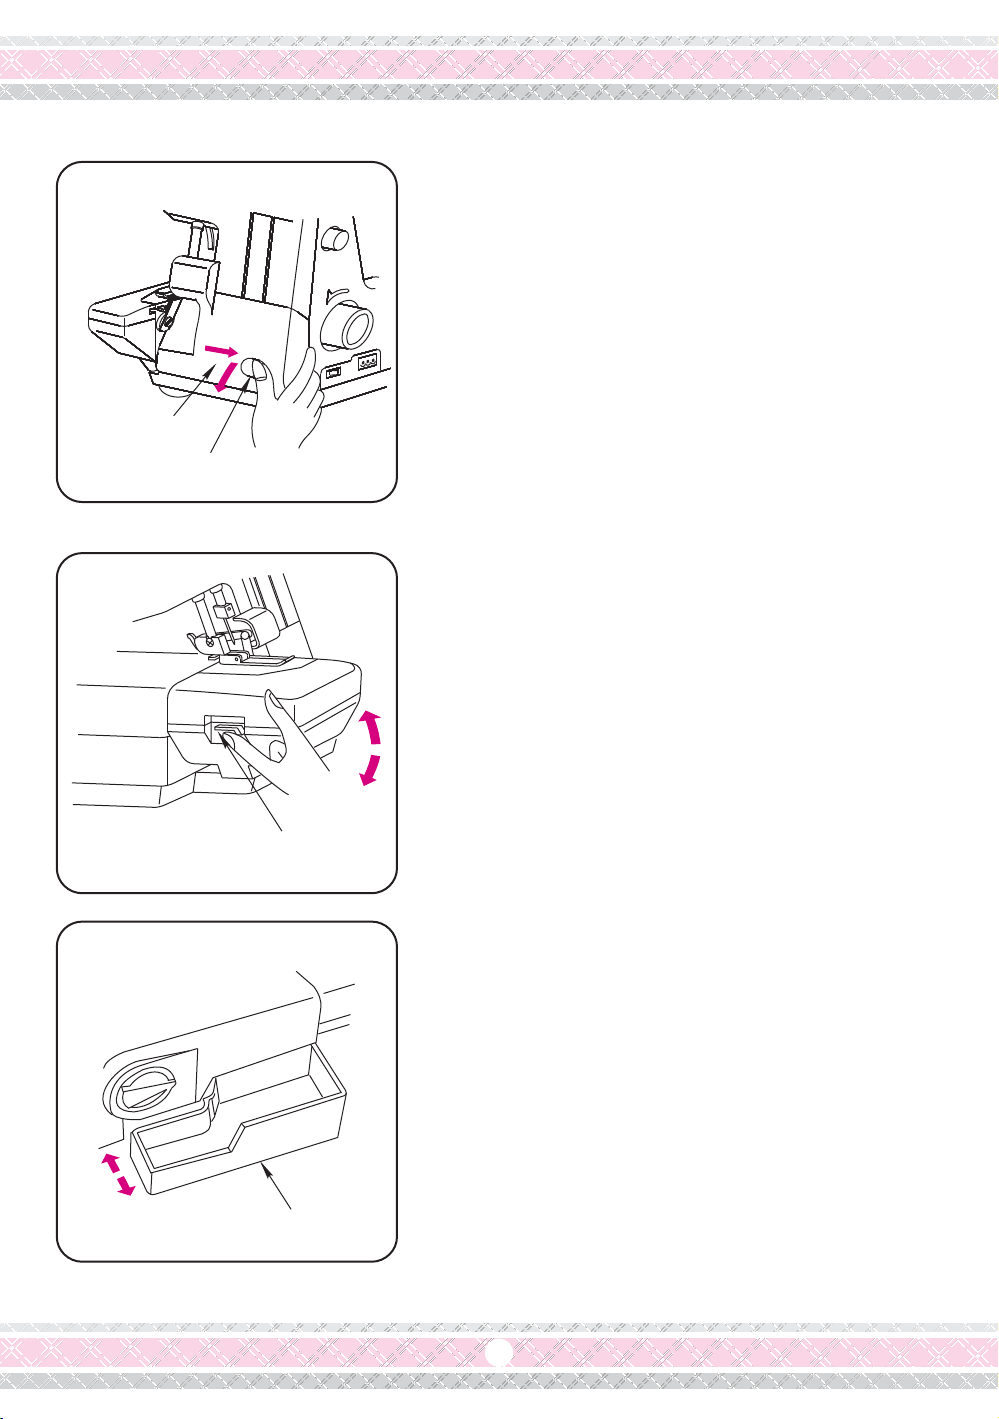
To open:
Hold the hollow to the right as far as it will go, then pull
looper cover toward you.
To close:
Lift looper cover and push against the machine. The
looper cover snaps into the position automatically.
Opening and Closing the Looper Cover
Looper cover
Hollow
Metal lever
Accessory box
To open:
Lift the metal lever, then hold the sewing table going
down.
To close:
Lift sewing table and push it back to the position.
Opening and Closing the Sewing Table
To open:
Draw out the box, it can store all standard accessories.
To close:
Push it back to the position.
*For optional accessories, it can only be stored in the
attached accessories bag.
Opening and Closing the Accessory Box

5
Base plate
Chip box
Insert the projection under the base plate.
How to Attach the Chip Box
Always turn the balance wheel toward you.
Balance wheel
How to Turn the Balance Wheel
ON
I
O
OFF
Light and power switch
Foot controller
1. Tread your foot on the controller.
2. Press and release the controller to practice the
sewing speed.
3. The harder you press on the controller,the faster
the machine runs.
How to Use the Foot Controller and
Control the Sewing Speed
1. Turn off the light and power switch.
2. Connect two plugs to power socket and electrical outlet.
3. Turn on the light and power switch.
-Caution-
Always disconnect the plug from electrical outlet:
- when machine is not in use.
- when attaching or removing parts.
- when threading or cleaning the machine.
Connecting the Machine to the Power Supply
Electrical outlet
Foot controller
Power socket
Light and Power
switch
6
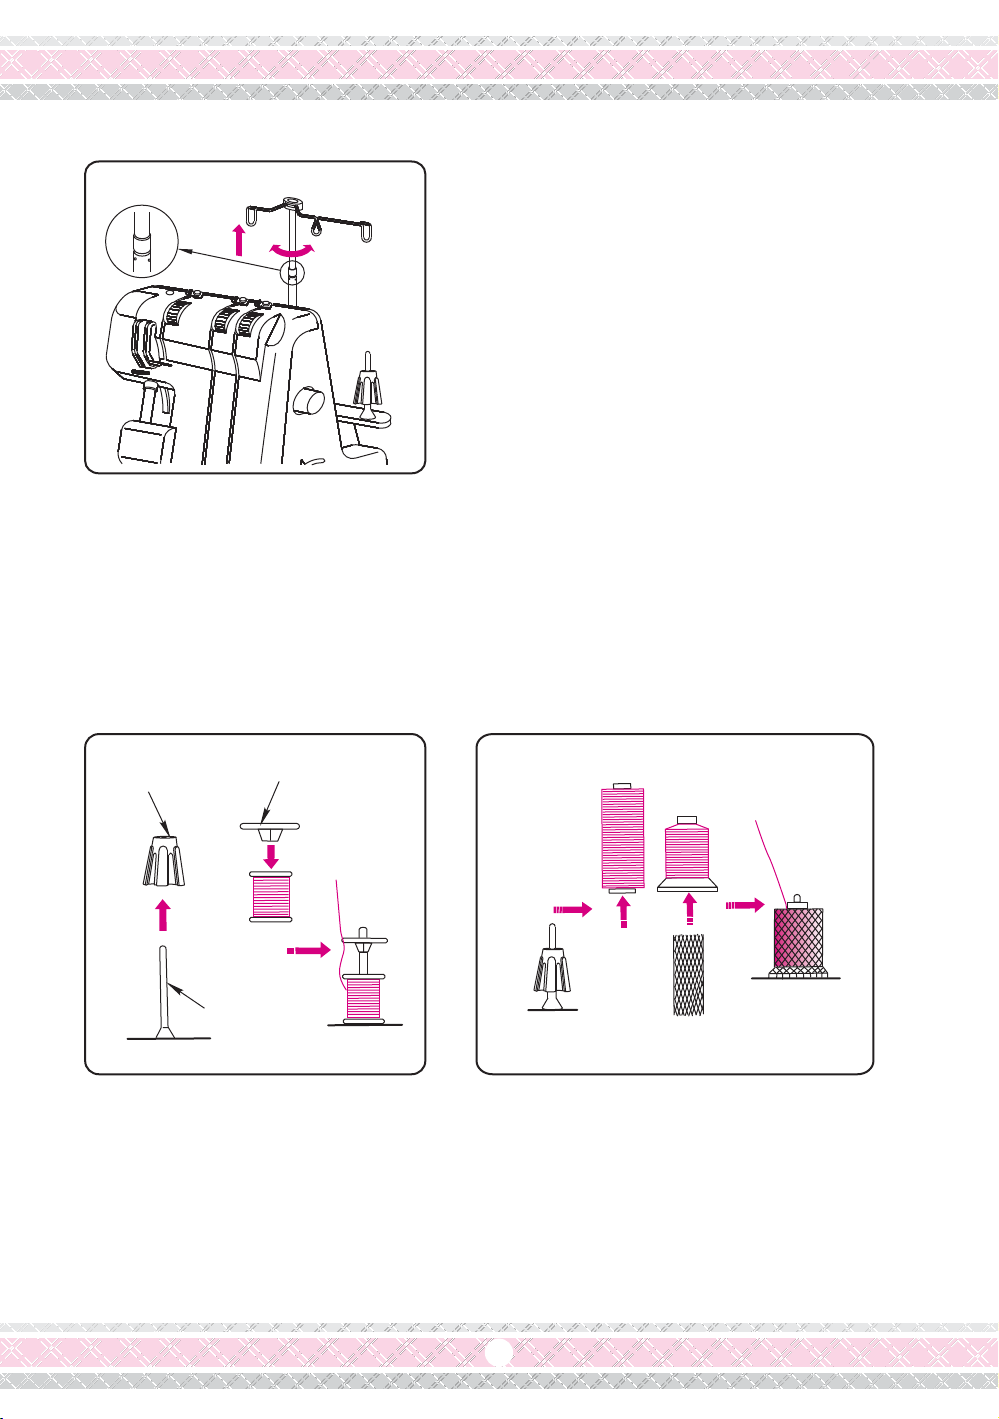
1. Pull the thread guide bar up to the top.
2. Turn the thread guide bar to make it comes right above
the spool pins and locked into the stopper.
1. When you use a small thread spool, pull out the spool holder from the spool pin. Then place the spool
with its slit side up, and put the thread stripping disc on top.
2. If the thread would slip down from the spool during threading and/or sewing, put a net on the spool as
illustrated for preventing jamming. The nets are supplied with the machine.
12
Stretch up the Thread Guide Bar
Attaching the Thread Stripping Disc and Net
Spool pin
Spool holder Thread stripping disc

7
1. Raise the presser foot lifter.
2. Turn the balance wheel to raise the needle.
3. Press the lever to drop off the presser foot.
4. Raise the Presser foot lifter again to remove the
presser foot.
5. Raise the presser foot lifter, and apply the desired
presser foot under the foot holder and make the pin
on the foot lies under the groove of the foot holder.
6. Lower the foot holder and push the lever to lock the
foot in place.
7. Raise the presser foot lifter and see the presser foot
is in place.
Presser
foot lifter
How to Change (Remove) the Presser
Foot
1. Apply the presser foot lifter to raise or lower the
presser foot.
2. Always keep the presser foot down when sewing.
Raising or Lowering the Presser Foot
Presser foot
Foot holder
Lever
Needle
Lever Groove
Pin

8
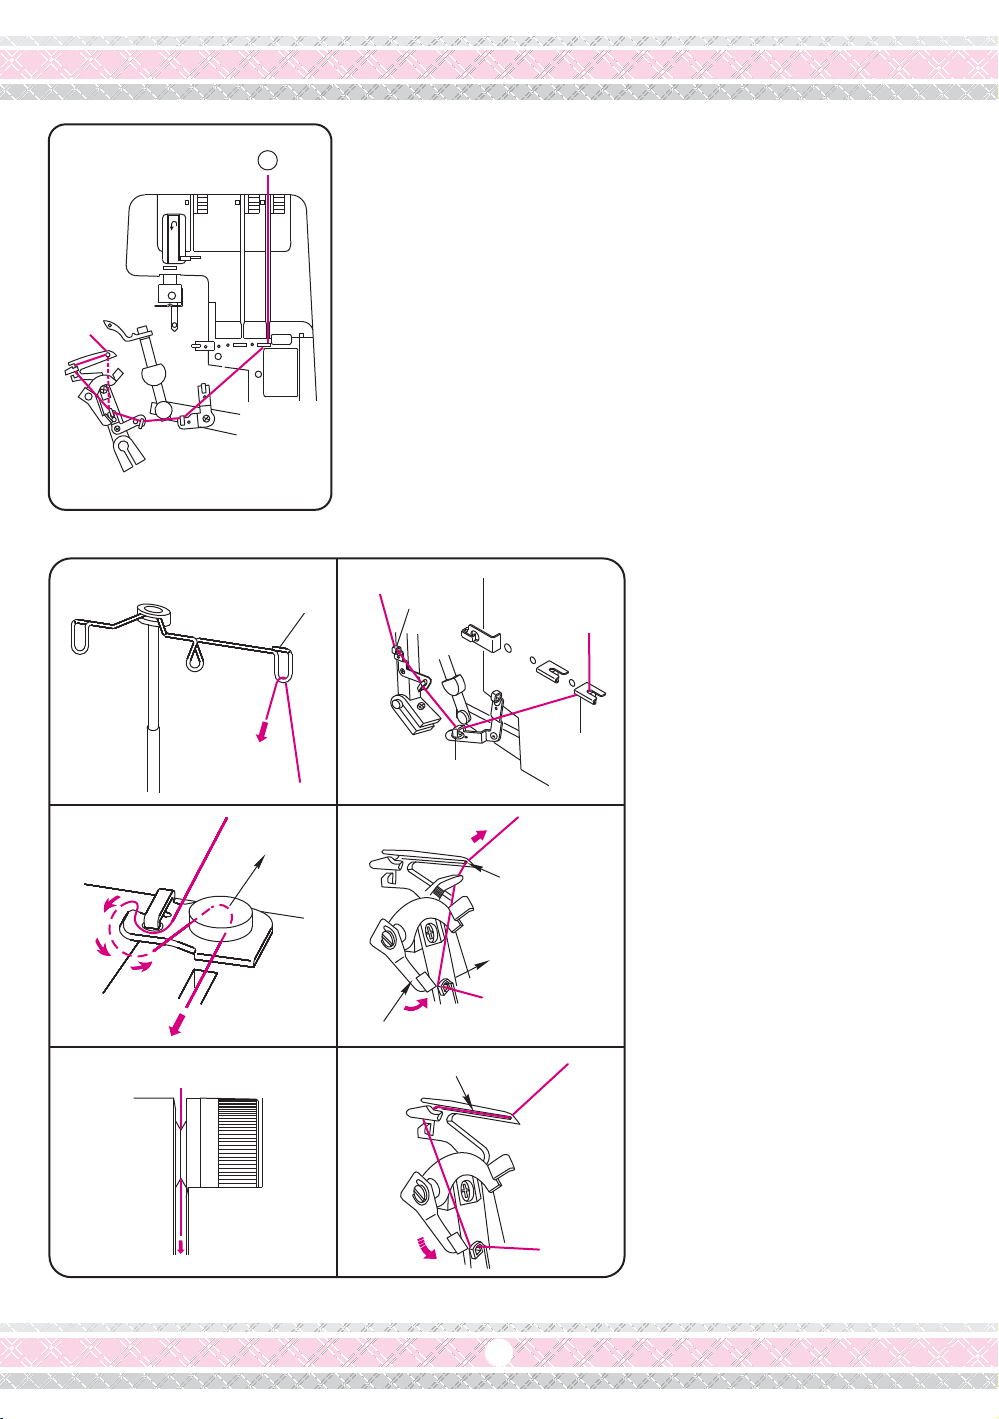
-NOTED-
1. Always thread the upper looper first, then lower
looper, needle on the right and needle on the left.
A threading chart is placed on the machine body
inside the looper cover.
2. Incorrect threading will cause of skipped stitch,
broken thread or uneven thread tension. Before
to sew, make sure that your machine is threaded
properly.
- Open the looper cover.
- Place the spool on the spool holder second from the right.
- Draw the thread through the pre-tension thread guide (1)
from right to left.
- Thread from left to right around the Thread guide (2)
- Thread guides (3, 4, 5)
- Turn the balance wheel toward you until the upper looper
comes outside of the needle plate, and apply the tweezers
to pass thread through looper eye (6)
Threading the upper looper (green)
How to Thread the Machine
()5
(3)
()4
(6)
()2
(1)
Upper looper
3
4
2
312
(a) (b) ( )
c
1
3
4
2
3
4
2
3
4
2
3
4
2
3
4
2
3
4
2
9
- Open the looper cover and sewing table.
- Place the spool on right spool holder.
- Draw the thread through the pre-tension thread guide (1)
from right to left.
- Thread from left to right around the thread guide (2)
- Thread guides (3, 4, 5, 6)
- Turn the balance wheel toward you until the lower looper
extending out 5-10mm from the needle plate edge.
- Pull the thread with tweezers to pass through the lower
looper hole.
- Draw the thread with your left hand tightly.
- Use your finger to push the automatic threader up to
the topmost, and then thread goes throught the lower
looper automatically.
Threading the lower looper (red)
(2)
(5)
(4)
(3)
(1)
2
(a)
(b)
c
()
(d)
(e)
(f)
(6)
Lower looper
hole
Thread guide (6)
Lower looper
Automatic threader
3
4
2

()4
Needle bar
(3)
10
(a)
(b)
c
()
(d)
(e)
(f)
3
4
2
3
- Place the spool on left spool holder.
- Draw the thread through the pre-tension thread guide (1)
from left to right.
- Thread from left to right around the thread guide (2).
- Thread guide (3)
- Thread behind of the thread take-up lever cover.
- Thread guide (4)
- Turn the balance wheel toward you to bring needle bar at
its highest position, then pass the thread through needle bar
thread guide from left to right.
- Pass the thread through the needle eye.
Threading the needle (orange)
(g)
3
4
2
3
4
2
3
4
2
3
4
2
(2)
(b)
(1)
11
bc
a
a
b
c
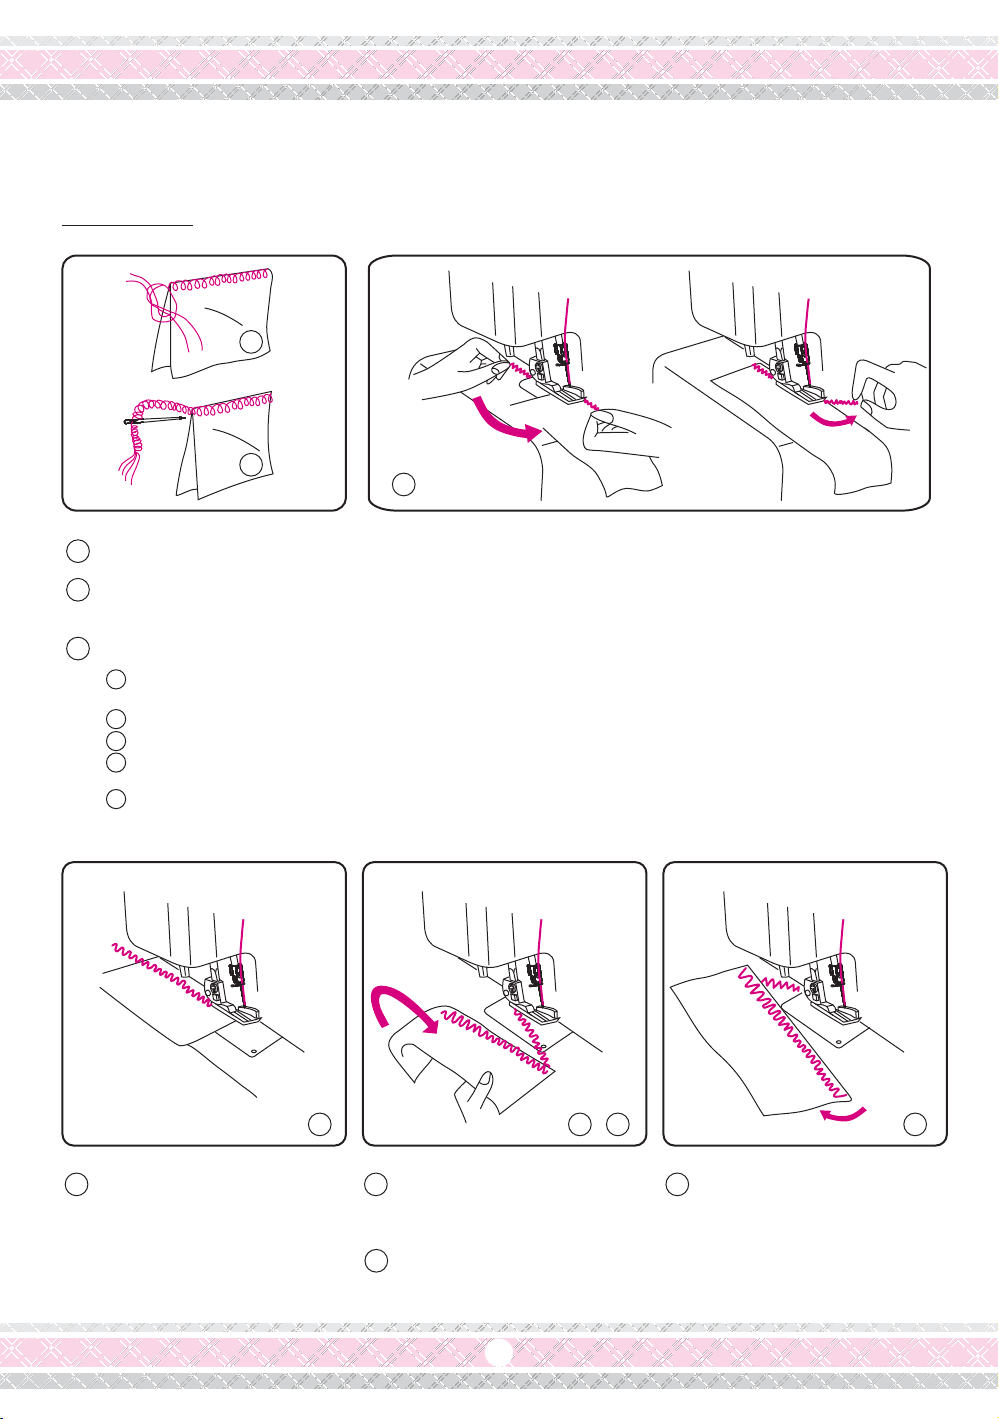
Separate the end of threads and knot.
Thread the chain through a large eyed needle, and weave that chain through the overlock stitches
on the fabric.
Backstitching
To avoid unravelling, it is necessary to leave a thread chain about 5 cm (2") long at the beginning and
end of seam. To secure the beginning and end of a seam choose one of the following methods.
At the beginning
Before putting your fabric in the machines, sew a thread chain about 5 cm (2") long behind the
needle.
Put your fabric in the machine. Then serge a few stitches and stop.
Raise the presser foot and bring the thread chain to the left around and under the presser foot.
Place the thread chain between the presser foot and upper knife, holding it in position as you
lower the presser foot to sew.
After sewing about 2.5 cm (1"), move the chain to the right and under the upper knife, cutting the
chain as you sew.
Serge one stitch off the end
of seam.
Raise the needle and presser
foot, and gently pull the
threads off the prong.
Turn the fabric over so the
under side is up.
Serge about 2.5 cm (1") over
stitching and angle off the
fabric.
Securing Ends
1
2
3
4
5
abcd
c
d
b
a
12
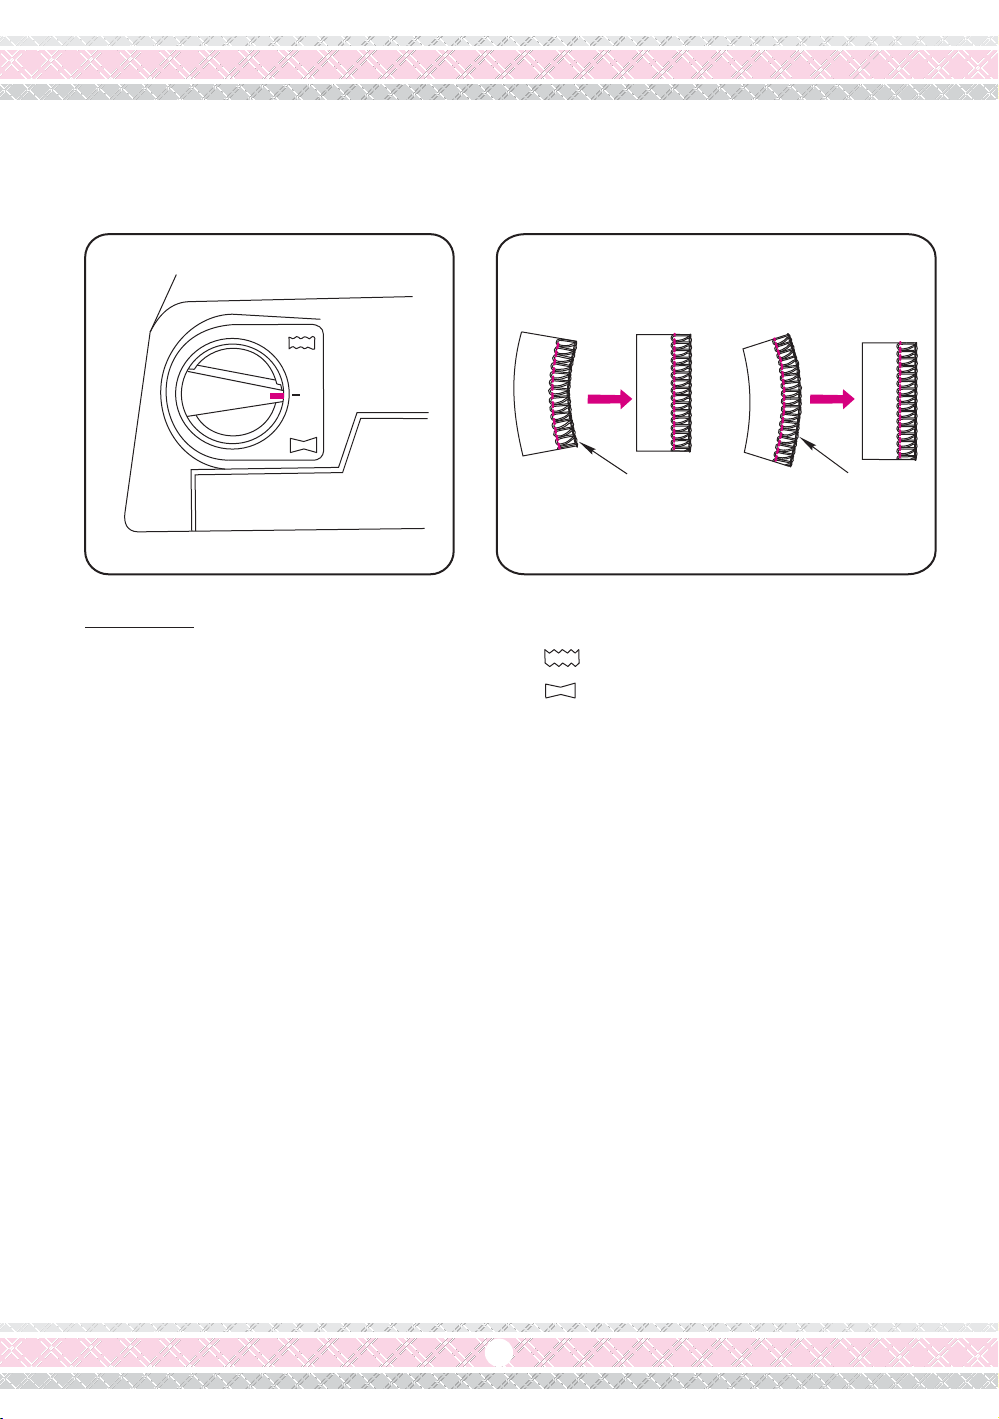
How to adjust
Stretched
1
2
4
5
6
7
8
3
1
2
3
4
5
N
Adjustment of Differential Feed (DF type only)
Gathered
If the sewn fabric is stretched, turn the dial between the " " section.
If the sewn fabric is gathered, turn the dial between the " " section.
* When sewing without differential feed, the adjustment dial should be set on the "N" position.
* To gather into ruffles: Set your machine up for a balanced 3 thread overlock stitch with your length on 3.
set your differential feed dial to 8 to gather.
* To make lettuce edge: Set your machine for a rolled hemming and the differential feed set on 5 to stretch.
Wrong side
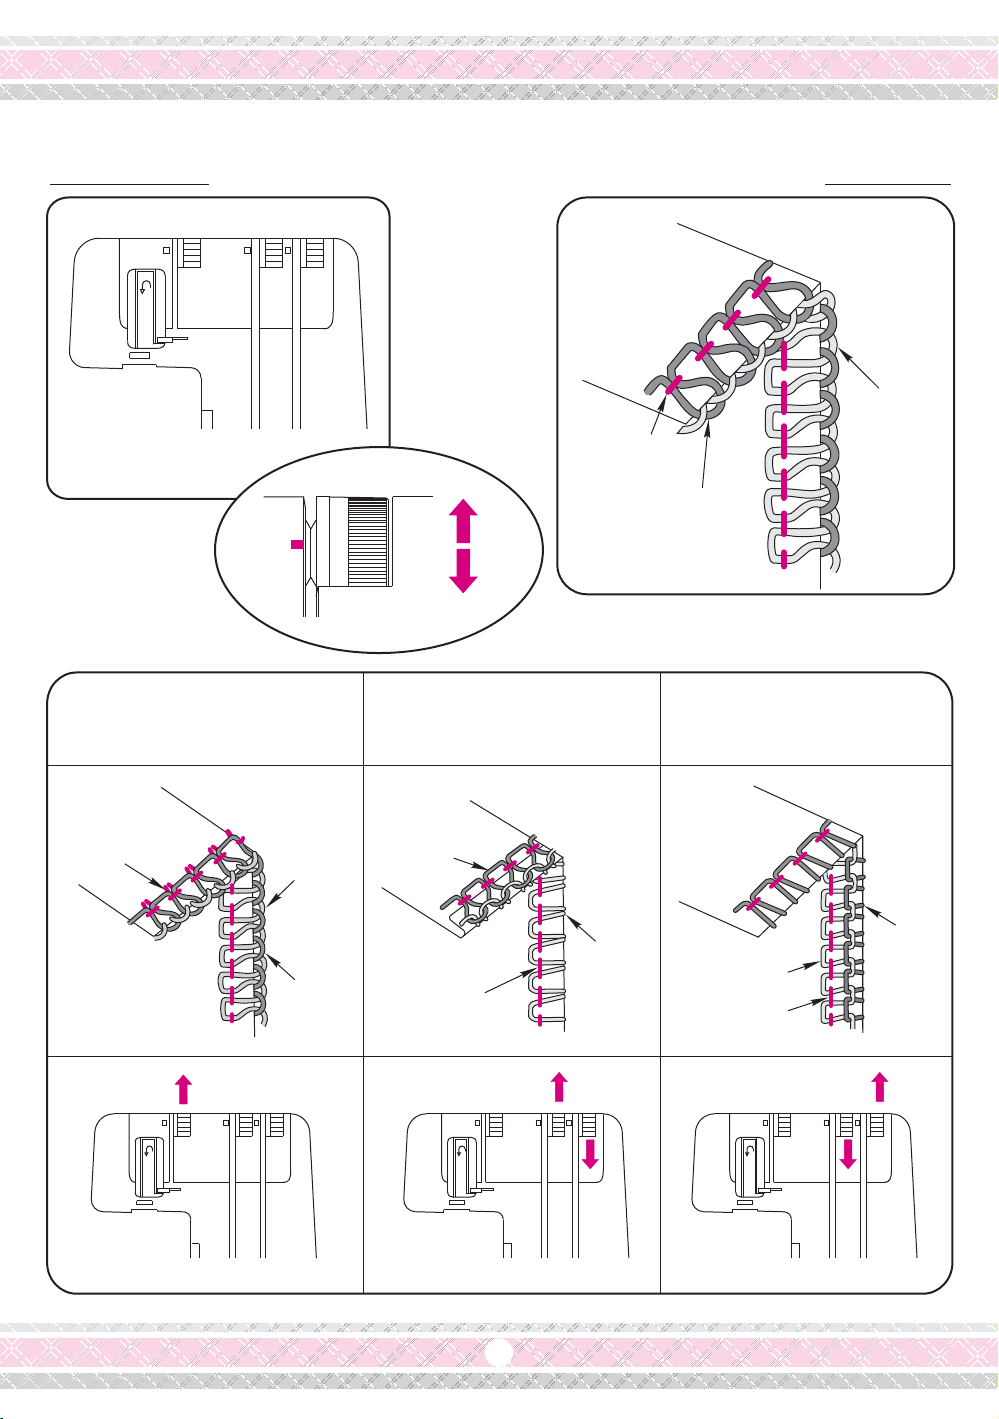
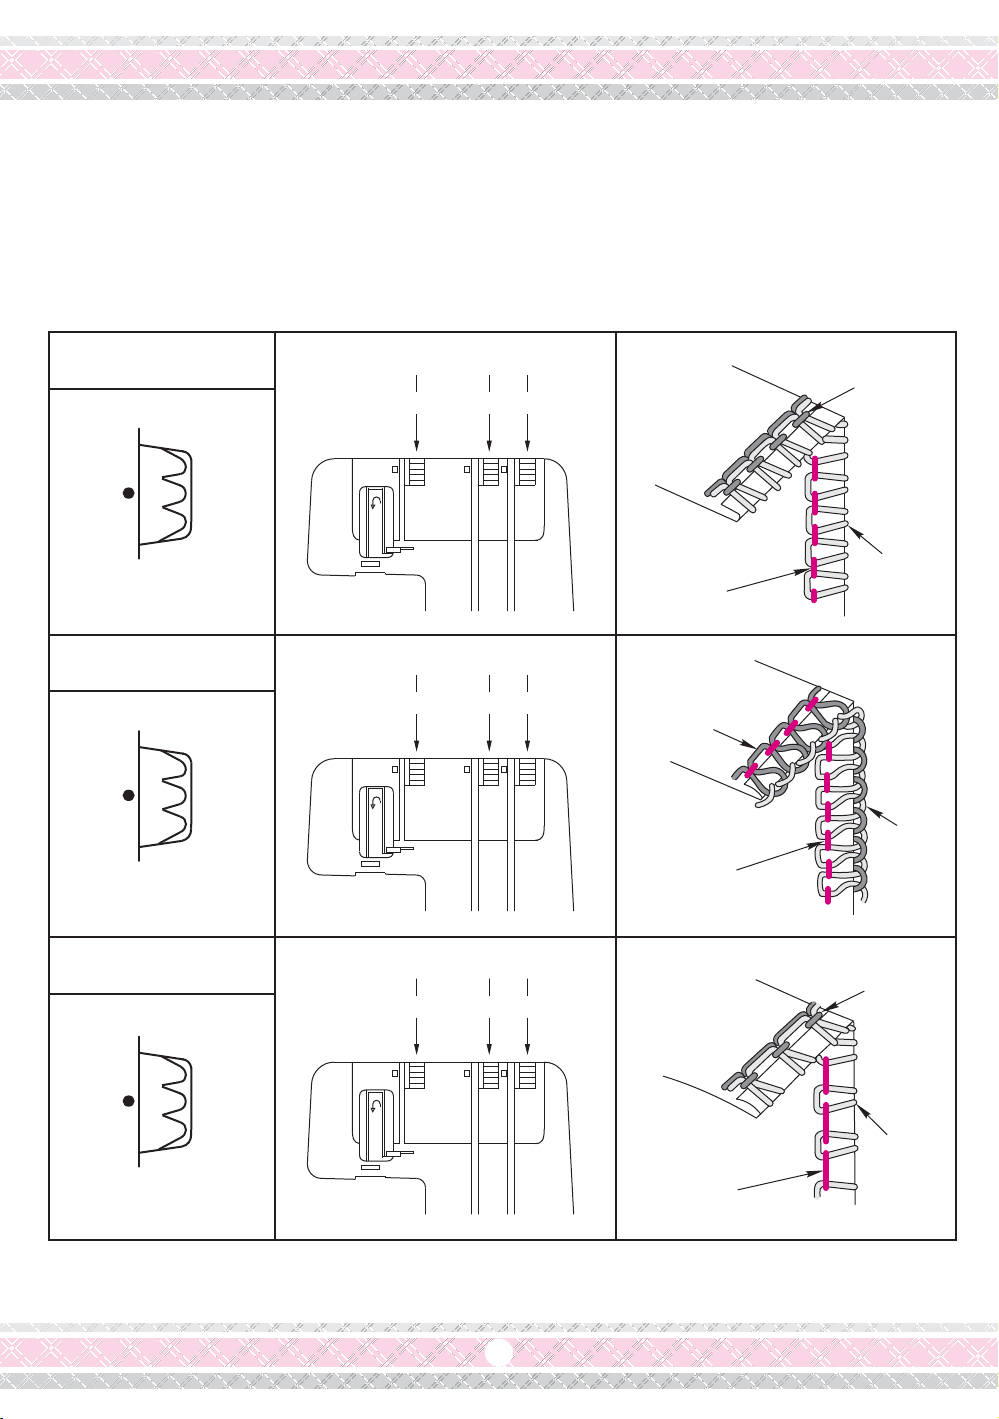
Thread Tension Adjustment
Lower
looper
thread
Upper
looper
thread
Right side
Correct Tension
Needle thread is loose. Lower looper thread is tight and /
or upper looper thread is loose.
Upper looper thread is tight and /
or lower looper thread is loose.
Needle thread
Lower looper
thread
Right side
of fabric
Upper
looper
thread
Wrong side
of fabric
Needle thread
Right side
Needle thread
Lower
looper
thread
Upper
looper
thread
Lower
looper
thread
Wrong side Wrong side
Right side
Upper looper
thread
Needle thread
13
3
4
2
Thread Tension Dial
Tighten
Loosen
3
4
2
3
4
2
3
4
2
3
4
2
3
4
2
3
4
2
3
4
2
3
4
2
3
4
2
3
4
2
3
4
2
3
4
2

14
1. Larger the number, longer the stitch. Smaller the
number, shorter the stitch.
2. The stitch length can be adjusted from 1 to 4mm
(approx. 0.04" to 0.15")
3. The position "N" is for normal over lock sewing.
Adjustment of Stitch Length
Lamp cover
Set screw
Light bulb
To attach
To remove
Counter-
clockwise
Clockwise
The proper cutting width differs with the type of fabric.
Check the seam each time, and adjust the cutting
width as follows:
1. Disconnect the machine from the power supply.
Remove the lamp cover set screw, and remove the
lamp cover.
2. To Remove:
Turn to the left
To Attach
Turn to the right
3. Attach the lamp cover, and tighten the lamp cover
set screw.
For your safety:
The machine is designed to use a 15 WATT MAXIMUM
LIGHT BULB.
Adjustment of Cutting Width
Replacing the Light Bulb
1. Open the sewing table.
2. Turn the cutting width dial
- counter-clockwise to get the larger cutting width.
(for lighter fabrics).
- clockwise to get the smaller cutting width.
(for heavier fabrics).

15
b
c
a
b
a
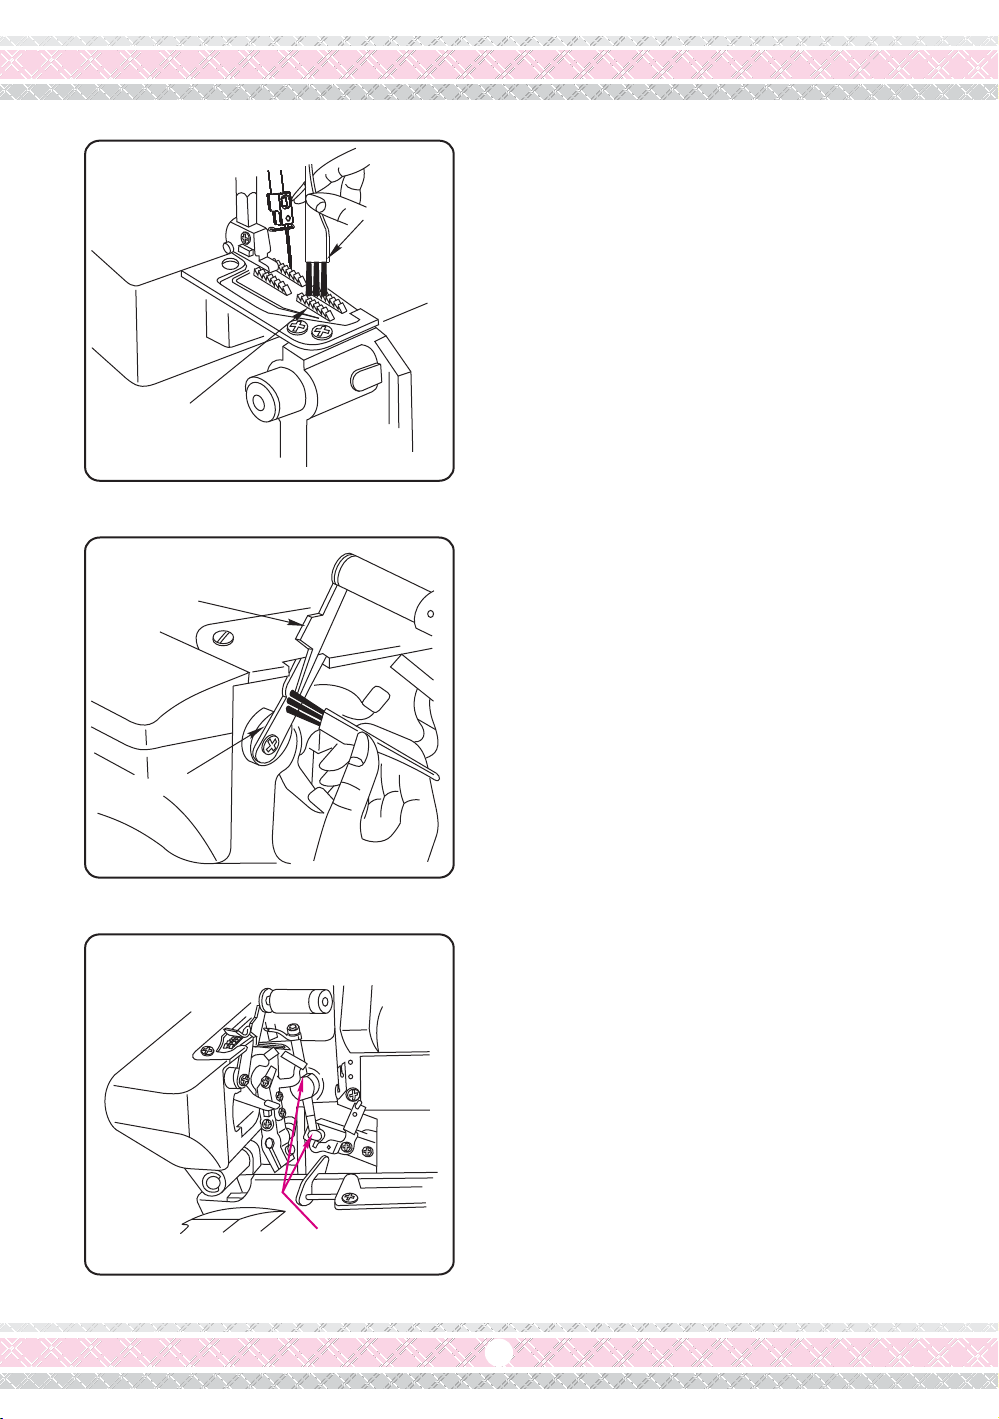
Change the Needle
1. Disconnect the machine from the power supply.
2. Turn the balance wheel to raise the needle above the presser foot.
Then apply the hexagon wrench ( in the accessory box) to loose the needle clamp screw for
the needle you are going to remove. (Figure a )
3. Insert new needle into the needle clamp with its flat side to the back until the top of needle touches
the stopper pin, then tighten the needle clamp screw. (Figure b )
4. When the needles are set correctly, the left needle is higher than the right needle. (Figure b ).
Noted: Never use the needle which is bent or blunt.
Change the Upper Knife
1. Disconnect the machine from power supply.
2. Open the sewing table and looper cover first.
3. Remove the presser foot.
4. Turn balance wheel toward you until the upper knife at its highest position.
5. Loosen the upper knife set screw and take off the upper knife. (Figure a )
6. Replace the new upper knife and tighten the set screw.
7. Turn the balance wheel toward you to set the cutting edge of the upper knife to its lowest position with
the lower knife to overlap between 0.5-1.0mm, and tighten the upper knife set screw securely (Figure b )
8. Re-set the presser foot, and close the sewing table and looper cover.
* The lower knife is made of special hard material and should not require replacement under normal use.
If it is chipped, call your dealer for replacement.
Upper knife
Set screw
Upper
knife
0.5~1.0mm
Lower
knife
Flat side
Push
Needle
clamp
Presser foot
Hexagon
wrench
Needle clamp
screw
* Raising the upper knife (Figure c )
Push the upper knife holder to the right. Turn the knob clockwise until the knife engages.
16
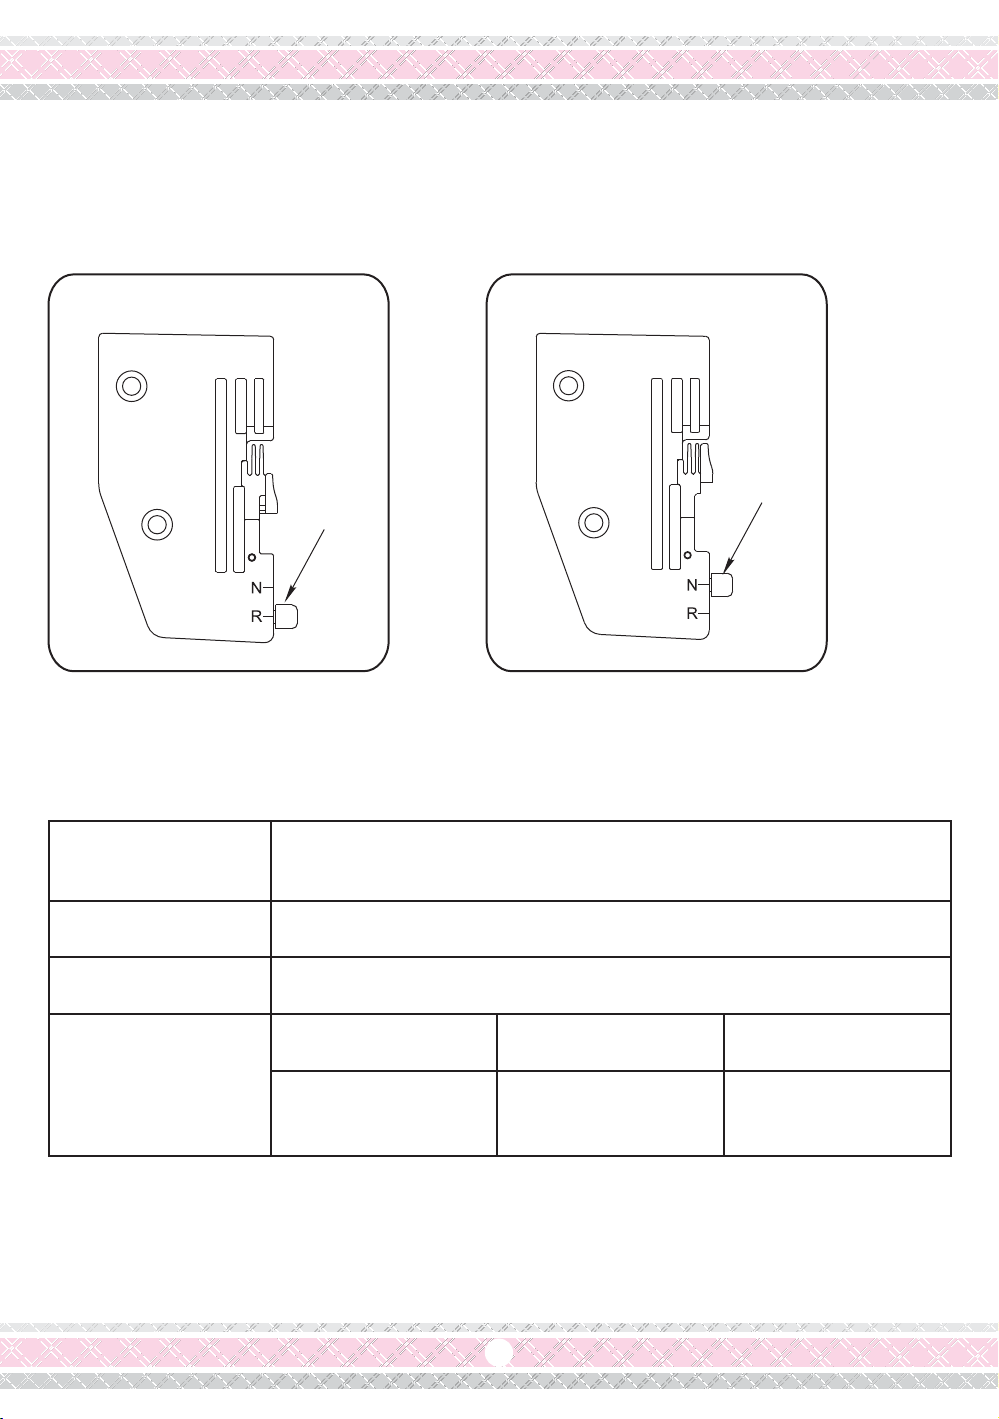
Using the Needle Plate
Lever
Lever
Switch the lever to select the regular or rolled hem and narrow hem sewing.
“R” For rolled and narrow hem sewing “N” For regular sewing
Fabric, needle and threads
Fabric
Needle
Needle thread
Upper and lower
looper threads
Lightweight fabric such as organdy,
crepe de chine, lawn and georgette
ELx705 # 12
Long fiber polyester thread No. 80-100
Rolled Hemming Picot Edging Narrow Hemming
Woolly nylon,
Wooly polyester
Synthetic: 60-100
Silk: 50-100
Wolly nylon,
woolly polyester
3
4
2
3
4
2
3
4
2
3
4
2
3
4
2
3
4
2
3
4
2
3
4
2
3
4
2
4
3
2
1
2
1
3
5
17
Rolled Hemming, Narrow Hemming and Picot Edging
Rolled Hemming
Narrow Hemming
Picot Edging
Stitch length: 1.5 - 2
Stitch length: 1.5 - 2
Stitch length:3-4
3
5
5
7
3
5
3
5
2
4
2
4
2
4
3
5
Wrong side
of fabric
Lower
looper
thread
Needle
thread
Upper
looper
thread
Right side
of fabric
Wrong side
of fabric
Wrong side
of fabric
Lower
looper
thread
Lower
looper
thread
Upper
looper
thread
Upper
looper
thread
Needle
thread
Needle
thread
Right side
of fabric
Right side
of fabric
18
1. Open the sewing table and looper cover.
2. Turn the balance wheel toward you until the needle
goes up to the highest position.
3. Remove the needle plate and presser foot.
4. Using a lint brush (in the accessory box) to brush
around the feed dog.
5. Re-set needle plate and presser foot.
Cleaning and oiling
1. Open the looper cover.
2. Apply 2-3 drops of fine quality sewing machine oil
to the parts as indicated.
3. It is recommended to apply oil once a week in
normal use, once in ten hours in continuous use.
-Cleaning upper knife area-
-Oiling-
1. Open the looper cover.
2. Using a lint brush (in the accessory box) to
brush the upper knife and lower knife area.
Feed dog
Upper knife
2-3 Drops
Lower knife
Lint brush
-Cleaning the feed dog-
* Disconnect the machine from the power supply
before cleaning.
Table of contents
Other Merrylock Sewing Machine manuals


