Merrylock MK480 User manual

INSTRUCTION BOOK

Do not dispose of electrical appliances as unsorted municipal waste. Use
separate collection facilities.
Contact your local government for information regarding the collection systems
available.
If electrical appliances are disposed of in landfills or dumps, hazardous
substances can leak into the groundwater and get into the food chain,
damaging your health and well-being.
When replacing old appliances with new one, the retailer is legally obligated to
take back your old appliance for disposal at least for free of charge.
Thank you for your purchase of this Combination Overlock, Chain Stitch and Cover Stitch
Sewing Machine. This machine, that is intended for household use will provide you with
excellent performance in sewing from light to heavy material (lawn to denim).
Please refer to this Instruction Book for proper use and optimum service. To get the most
out of your sewing machine, read the entire Instruction Book before attempting to operate
the machine. Then familiarize yourself with the machine by following the Instruction Book
page by page.
To ensure that you are always provided with the most modern sewing capabilities, the
manufacturer reserves the right to change the appearance, design or accessories of this
sewing machine when considered necessary without notification or obligation.
1
PREFACE
RECYCLING

2
“IMPORTANT SAFETY INSTRUCTIONS“
“DANGER“___To reduce the risk of electric shock:
“WARNING“___
When using an electrical appliance, basic safety precautions should always be
followed, including the following: Read all instructions before using this overlock
sewing machine.
1. The appliance should never be left unattended when plugged in.
2. Always unplug this appliance from the electric outlet immediately after using and
before cleaning.
1. Do not allow this appliance to be used as a toy. Close attention is necessary
when this appliance is used by or near children and infirm persons.
2. Use this appliance only for its intended use as described in this manual. Use only
attachments recommended by the manufacturer as contained in this manual.
3. Never operate this appliance if it has a damaged cord or plug, if it is not working
properly, if it has been dropped or damaged, or dropped into water. Return the
appliance to the nearest authorized dealer or service center for examination,
repair, electrical or mechanical adjustment.
4. Never operate the appliance with any air openings blocked. Keep ventilation
openings of the sewing machine and foot control free from the accumulation of
lint, dust, and loose cloth.
5. Keep fingers away from all moving parts. Special care is required around the
sewing machine needle and cutter.
6. Always use the proper stitch plate. The wrong plate can cause the needle to
break.
7. Do not use bent needles.
8. Do not pull or push fabric while stitching. It may deflect the needle causing it to
break.
9. Switch the sewing machine off “ O “ when making any adjustments in the needle
area, such as threading needle area changing needle, threading looper, or
changing presser foot and the like.
10. Always unplug the machine from the electrical outlet when removing covers,
when covers are opened to raise the upper cutter or thread the loopers, when
lubricating or when making any other user servicing adjustments mentioned in
the instruction manual.
11. Never drop or insert any abject into any opening.
12. Do not use outdoors.
13. Do not operate where aerosol (spray) products are being used or where oxygen
is being administered.
14. To disconnect, turn all controls to the off “ O “ position, then remove plug from
outlet.
15. Do not unplug by pulling on cord. To unplug, grasp the plug, not the cord.
16. If the power cord of this appliance is damaged, it must be replaced with a
special cord by your nearest authorized dealer or service center.
To reduce the risk of burns, fire, electric shock, or
injury to persons:

3
“This overlock sewing machine is intended for household use only.”
* Keep the instructions at a suitable place close to the machine and hand it over if
you give the machine to a third party.
* Use the machine only in dry locations.
* Never leave the machine unattended with children or elderly people due to they
may not be able to estimate the risk.
* Don’t let children play with the machine.
* This appliance is not intended for use by persons (including children) with reduced
physical, sensory or mental capabilities, or lack of experience and knowledge,
unless they have been given supervision or instruction concerning use of the
appliance by a person responsible for their safety.
* Children should be supervised to ensure that they do not play with the appliance.
* Always unplug the machine if you leave it unattended, to avoid injury by
expediently switch on the machine.
* Always unplug the machine if you carry out maintenance (oiling, cleaning).
* Don’t use the machine if it’s wet or in humid environment.
* Never pull at the cord, always unplug the machine by gripping the plug.
* Never place anything on the pedal.
* Never use the machine if the air vents are blocked keep the air vents of the
machine and the foot pedal free from dust, fusel and leftovers.
* The machine may only be used with foot pedal manufactured by Wakaho. Type
4C-316B for USA and Canada, 4C-316C/4C-326G/4C-345G for other countries.
* If the supply cord connected with foot pedal is damaged, it must be replaced by the
manufacturer or its service agent or a similarly qualified person, in order to avoid a
hazard.
“SAVE THESE INSTRUCTIONS“
17. If oil gets in eyes, immediately, rinse the oil out with water. If you swallow oil by
mistake, immediately consult a medical doctor.
18. To reduce risk of injury, switch off before servicing. Close looper cover before
operating.

Lors de l’utilisation de cette machine, les précautions élémentaires de sécurité
doivent être pris es. Lisez attentivement toutes les consignes de sécurité suivantes
avant de l’utiliser :
* Ne laissez pas la machine sans surveillance lorsqu’elle est sous tension.
Débranchez la immédiatement après l’utilisation et avant le nettoyage.
* Débranchez la machine avant de changer l’ampoule. Remplacer l’ampoule par une
autre de 15 Watts et du même type. Assurez vous d’avoir remis le cache après
avoir changé l’ampoule.
* Assurez vous que le voltage du moteur corresponde à celui de l’installation
électrique.
* Cette machine est conçue pour un usage familial tel que décrit dans cette notice
d’utilisation. Utilisez uniquement les accessoires conseillés dans cette notice.
* Pour débrancher la machine positionnez l’interrupteur sur « O » lorsque vous
effectuez des opérations telles que enfilage des aiguilles ou des boucleurs ,
changement de plaque à aiguille ou de pied presseur etc....
* Débranchez la machine lorsque vous retirez les carters , lubrifiez le mécanisme ou
lors de toute opération d’entretien décrite dans cette brochure.
* N’essayez pas de régler vous-même la courroie du moteur. Si un réglage s’avère
nécessaire, contactez votre Service Après Vente .
* Manipulez le rhéostat avec précaution et évitez de le faire tomber. Assurez-vous
que rien n’est posé dessus.
* Utilisez la plaque à aiguille adéquate. Une plaque non conforme pe ut casser
l’aiguille.
* N’utilisez pas d’aiguille tordue.
* Lors de la couture, éloignez vos doigts de toute pièce en mouvement et
particulièrement de l’aiguille.
* Ne tirez et ne poussez pas le tissu lors de la couture, cela pourrait casser l’aiguille.
* Pour l’entretien des machines à double isolation, n’utilisez que des pièces de
rechange identique . Voir les instructions pour le service après-vente des appareils
à double - isolation.
* Ne jamais utiliser la machine si le cordon ou la prise électrique sont endommagés,
si elle est tombée ou abîmée, si elle a été exposée à l’eau. Contactez votre
Service Après Vente pour tout examen , réglage ou réparation.
* N’utilisez pas la machine si les aérations ou le rhéostat sont obstrués par la
poussière, la bourre de fil ou de tissu.
* N’insérez ou ne faîtes pas tomber d’objets dans les ouvertures de la machine.
*Pour réduire le risque de blessures, éteindre l'interrupteur avant l'entretien. Fermer
le couvercle boucleur avant exploitation.
CONSIGNES DE SECURITE
4
DANGER - Pour reduire le risque de décharges électriques :
AVERTISSEMENT - Pour réduire le risque de brûlures, de feu, de
décharges électriques ou de blessures Aux personnes :

1. PRINCIPAL PARTS
(1) MACHINE OVERVIEW
(2) FREE ARM
(3) MAIN PARTS BEHIND THE LOOPER COVER
2. ACCESSORIES
3. OPTIONAL ACCESSORIES
(1) OVERLOCK PRESSER FOOT
(2) EXTENSION TABLE SET
4. NEEDLE INFORMATION
5. PREPARATION PRIOR TO SEWING
6. TELESCOPIC THREAD STAND
7. PREPARATION FOR THREADING
(1) SETTING UP THE THREAD GUIDE HOLDER
(2) ANTI-SPILL NET
(3) SPOOL CAP
8. REMOVAL AND REPLACEMENT OF CHIP BOX
(1) REPLACEMENT
(2) REMOVAL
9. HOW TO OPEN AND CLOSE LOOPER COVER
(1) OPEN LOOPER COVER
(2) CLOSE LOOPER COVER
10. HOW TO REMOVE AND INSERT NEEDLES
(1) NEEDLE POSITION
(2) TO REMOVE NEEDLE (S)
(3) TO INSERT NEEDLES (S)
11. PRESSER FOOT LIFT
12. CHANGE PRESSER FOOT
13. HOW TO DISENGAGE MOVABLE UPPER CUTTER
(1) TO PLACE MOVABLE UPPER CUTTER IN NON-
WORKING POSITION
(2) TO PLACE MOVABLE UPPER CUTTER IN
WORKING POSITION
14. TO CONVERT UPPER LOOPER TO 2-THREAD
CONVERTER
(1) TO USE THE 2-THREAD CONVERTER
(2) TO DISENGAGE TO UPPER LOOPER
15. STANDARD OVEREDGE AND ROLLED HEM
STITCHING
(1) TO SEW STANDARD OVEREDGE
(2) TO SEW ROLLED HEM
16. GENERAL THREADING INFORMATION
(1) TO THREAD THREAD UPPER LOOPER (GREEN)
(2) TO THREAD LOWER LOOPER THREAD (RED)
(3) TO THREAD OVEREDGE RIGHT NEEDLE
THREAD (BLUE) (B ON NEEDLE CLAMP)
(4) TO THREAD LEFT NEEDLE THREAD (ORANGE)
17. NEEDLE THREADER
5
18. HOW TO CHANGE THREADS : TIE ON METHOD
19. STITCH LENGTH ADJUSTMENT
20. SEWING HINTS
(1) SECURING THE THREAD CHAIN
(2) BRAIDING BY CHAINING OFF
(3) EWING WITH HEAVY DECORATIVE THREADS
IN THE LOOPERS
21. STITCH WIDTH ADJUSTMENTS
(1) WIDTH ADJUSTMENT BY CHANGING NEEDLE
POSITION
(2) WIDTH ADJUSTMENT WITH ADJUSTMENT
KNOB
22. SELECTION OF STITCHES
23. STITCH OVERVIEW
24. TEST SEWING AND CHAIN OFF
(1) TEST SEWING
(2) CHAIN OFF
25. ROLLED EDGE SEWING
26. FLATLOCK SEWING
(1) STANDARD FLATLOCK STITCH
(2) ORNAMENTAL FLATLOCK STITCH
(3) LADDER STITCH
27. PRESSER FOOT PRESSURE ADJUSTMENT
28. DIFFERENTIAL FEED
(1) GATHERED OVERLOCK (STRETCH, KNIT
FABRICS)
(2) STRETCH OVERLOCK (LIGHTWEIGHT
FABRICS)
29. SUGGESTED TENSION SETTING
(1) 2-THREAD WRAPPED OVERLOCK
(2) 2-THREAD OVERLOCK
(3) 2-THREAD FLATLOCK
(4) 3-THREAD OVERLOCK
(5) 3-THREAD FLATLOCK
(6) 3-THREAD STRETCH OVERLOCK
(7) 4-THREAD OVERLOCK
(8) NARROW HEM AND ROLLED HEM
30. MACHINE MAINTENANCE
(1) CLEANING
(2) OILING
(3) REPLACING THE MOVABLE UPPER CUTTER
(4) STORAGE
(5) SERVICING
31. FABRIC, THREAD AND NEEDLE CHART
32. TROUBLE SHOOTING
33. SPECIFICATIONS
34. MACHINE DIMENSIONS
6
6
7
8
8
9
9
9
10
10
11
11
11
11
12
12
12
12
12
12
12
13
13
13
14
14
14
15
15
15
15
15
15
16
16
16
16
17
18
20
21
23
23
24
24
24
24
25
25
25
25
26
27
29
29
29
30
30
30
31
31
31
32
32
32
33
33
33
33
34
34
34
35
35
36
36
36
36
37
37
37
38
39
39
TABLE OF CONTENTS
PAGE PAGE

6
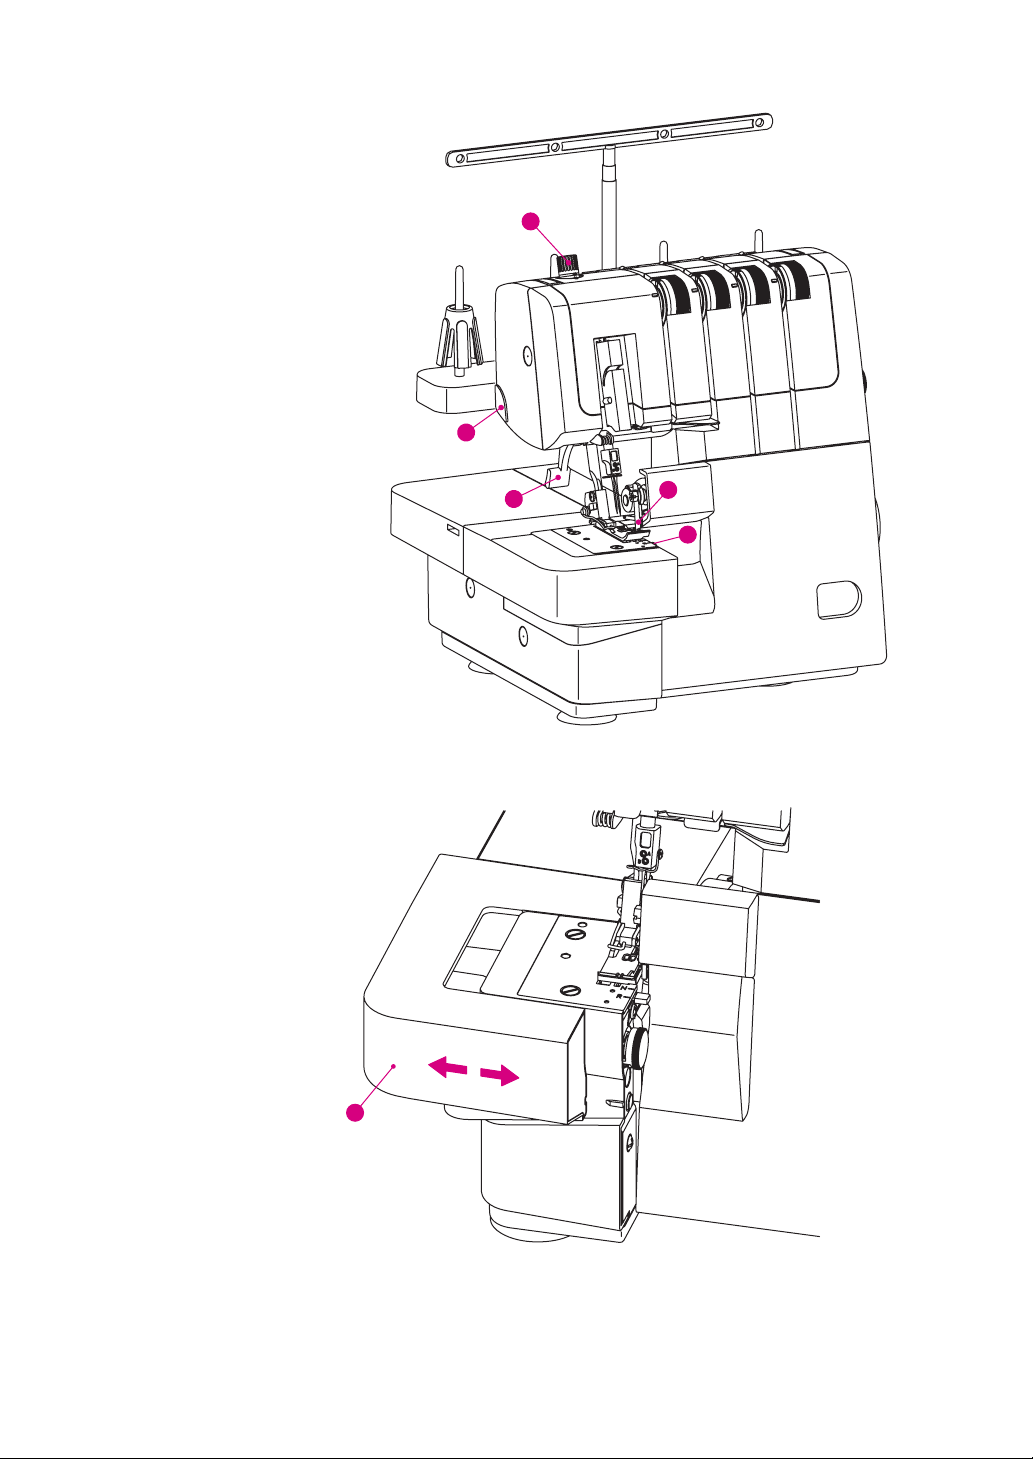
1. PRINCIPAL PARTS
(1) MACHINE OVERVIEW
1. Thread guides and holder
2. Handle
3. dialLeft needle thread tension (orange)
4. dialRight needle thread tension (blue)
5. Upper looper thread tension dial (green)
6. Lower looper thread tension dial (red)
7. Stitch plate
8. Cloth plate
9. Attached extension table
10. lCutting width dia
11. Looper cover
12. Power & light switch
13. Hand wheel
14. Socket
15. Differential feed adjusting dial
16. Stitch length dial
17. Spool stand
18. Spool holder
19. Spool pin
20. Stationary lower knife
21. Chip box
2
1
7
11
12
16
13
17
18
19
6
45
3
15
21
10
20
8
9
14
7
22. Foot pressure adjusting dial
23. Thread cutter
24. Presser bar lifter and tension release
25. Moveable upper knife
26. Stitch finger lever
(2) FREE ARM
1. Attached extension table
* The attached extension table can be removed to expose the free arm.
* To remove pull to the left.
* To attach press firmly to the right until it engages.
* The free arm is ideal for sewing tubular items such as ribbing, trousers and sleeve hems.
1
26
22
23
24 25

8
2. ACCESSORIES
Accessories o are contained in the accessory bag.N . 1~6
1. Flat b screw driverlade
2. Oiler
3. Thread cap (4)unreeling
4. cutterUpper
5. Anti-spill net (4)
6. Thread guide
7. Needle set
8. Brush
(3) MAIN PARTS BEHIND THE LOOPER COVER
1. Upper looper
2. Lower looper
9. Needle threader
10. Screw driver
Tweezers11.
12. 2-thread converter
13. Accessory bag
14. (4)Spool holder
15. Dust cover
16. Chip box
Note : 2No. 7~1 commonly used accessories can place on looper cover, sewing will be more convenient.
13
15 16
14
1231211
8
47
510
9
21
6
9
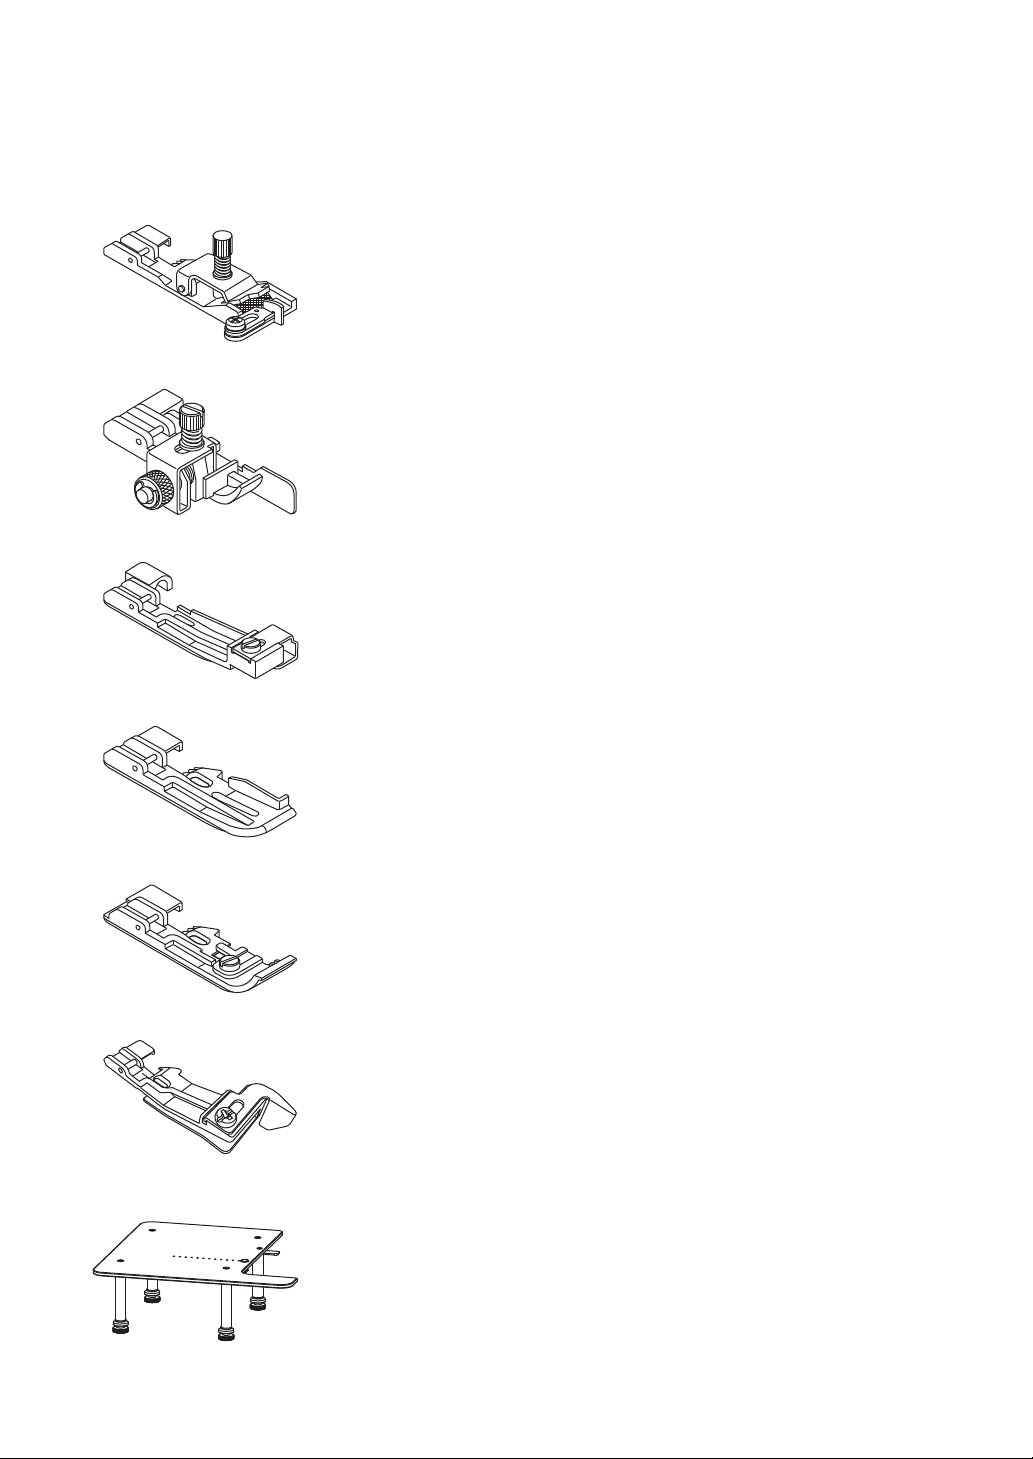
(1) OVERLOCK PRESSER FOOT
3. OPTIONAL ACCESSORIES
Optional presser feet specially prepared for this machine are available at your dealer. The snap-on type
presser foot used on this machine allows easy removal and replacement.
(2) EXTENSION TABLE SET
Extension Table Set N10592
Including extension table, four legs and push pin. Assemble the extension table
and legs according to the illustrations provided with the table. The push pin is
used in the small holes in the table to hold your fabric in place when sewing
circles.
Elastic Foot G20804A
The Elastic Foot guides and stretches narrow elastic (6-12mm, 1/4~1/2”) wear,
lingerie and other elastic insertion techniques.
Blindhem & Lace Foot A1A154A
The Blindhem Foot is perfect for sewing invisible hems and for applying lace.
The hem is sewn, overcast and trimmed in one step.
Beading Foot A1A284A
The Beading Foot smoothly guides beads and pearls through a channel on the
foot for easy application on garments or crafts.
Piping Foot A1A324A
The Piping Foot is perfect for inserting packaged piping into seams and on
edges for a tailored finish. The trim is sewn between the two layers of fabric in
one step. A groove under the foot helps guide the piping. You can also create
your own piping for a custom finish.
The Piping Foot makes it fast and easy to cover cording with fabric and to insert
piping into seams for a professional look!
Taping Foot A1A334A
The Taping Foot is used to apply seam tapes to seams to prevent stretching. It
is especially good for stabilizing shoulder seams. With this foot you can
reinforce and construct seams in one step.
Shirring Foot A1A234A
The Shirring Foot easily makes and attaches shirrs in one step to garments,
pillows, and other home decorative items with this shirring foot.
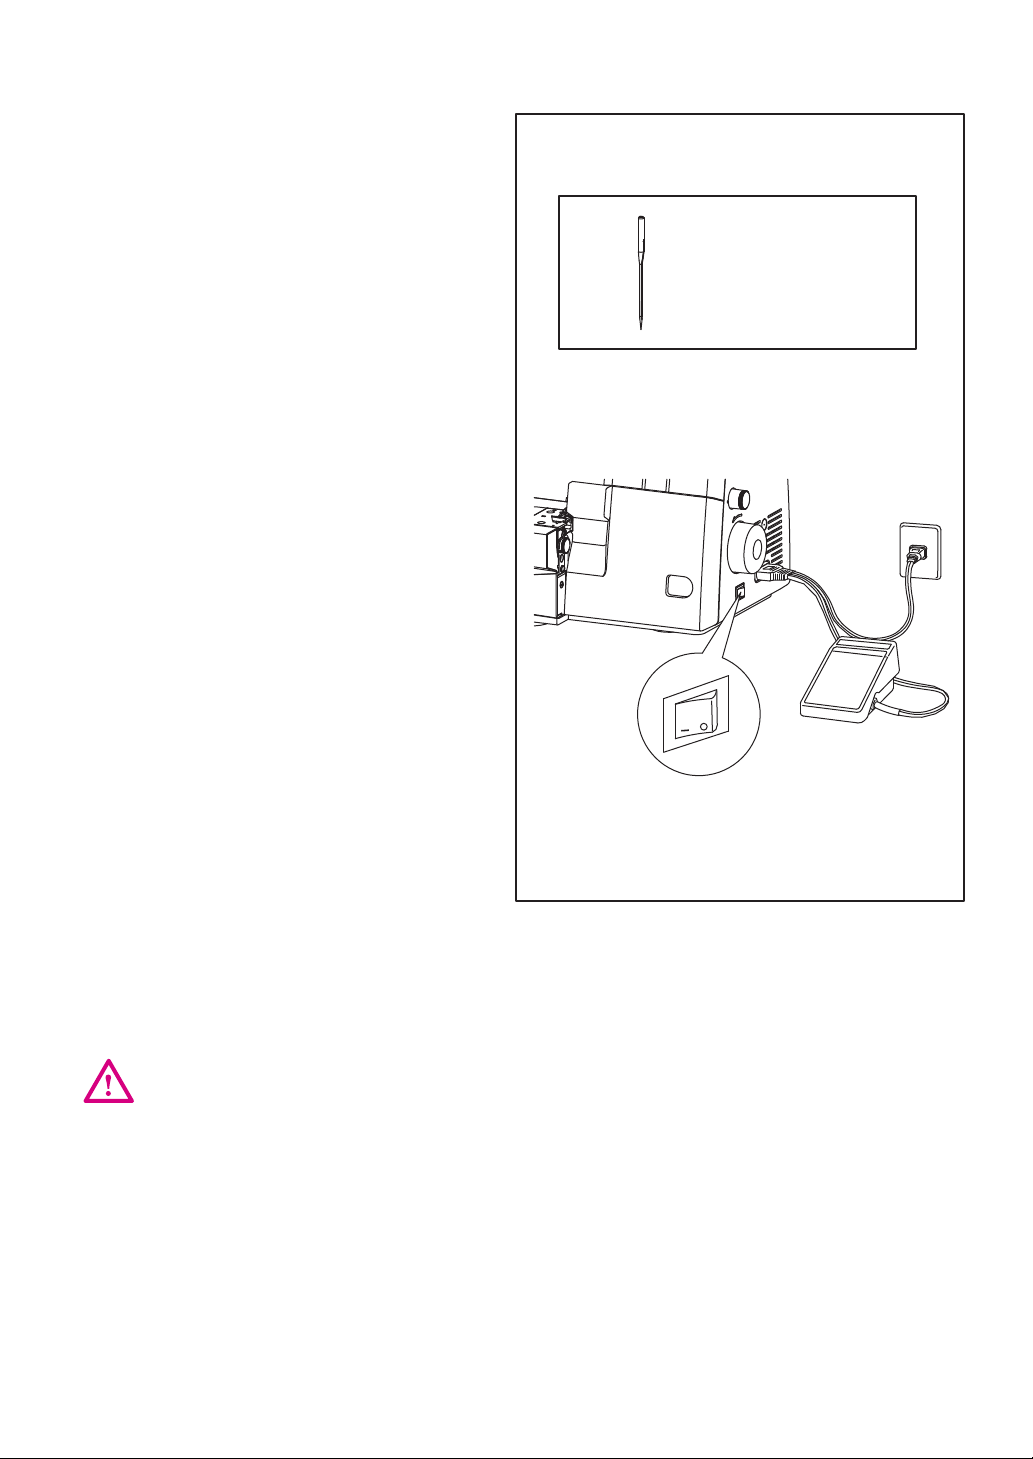
OFF
ON
10
Use only foot controller provided with this machine.
(Type 4C-316B for U.S.A. & CANADA only)
5. PREPARATION PRIOR TO SEWING
* Connect the controller/electric plug to the machine
receptacle.
* Plug power line into electric outlet.
* Power Switch: Push " l " mark side to turn "ON”
Push "O" mark side to turn "OFF”
* To run the machine and control the speed, press
the controller.
* The harder you press, the faster the machine will
sew.
* To stop the machine from sewing, remove your
foot from the controller.
POLARIZED PLUG INFORMATION (FOR U.S.A. & CANADA ONLY)
This appliance has a polarized plug (one blade wider than the other). To reduce the risk of electric shock, this
plug is intended to fit in a polarized outlet only way. If the plug does not fit fully in the outlet, reverse the plug.
If it still does not fit contact a qualified electrician to install the proper outlet. Do not modify the plug in any way.
* Be sure that the electrical voltage of the electric outlet (wall receptacle) is the same as the rated voltage of
the motor.
* Handle the foot controller with care and avoid dropping it on the floor. Be sure not to place anything on top
of it when not in use.
* Disconnect the power line plug from the electric outlet when changing needles, presser feet or when
leaving the machine unattended. This eliminates the possibility of starting the machine by accidentally
pressing the controller.
4. NEEDLE INFORMATION
This overlock uses a flat shank industrial needle
that eliminates the possibility of inserting the needle
backwards.
Do not attempt to use a standard household sewing
machine needle of any size or type in this overlock.
Needle ELx705 size 14/90 is finished with the
machine.
Only use Needle ELx705 size 14/90 and 12/80 as
supplied in the accessory case.
ELx705
Overlock needle
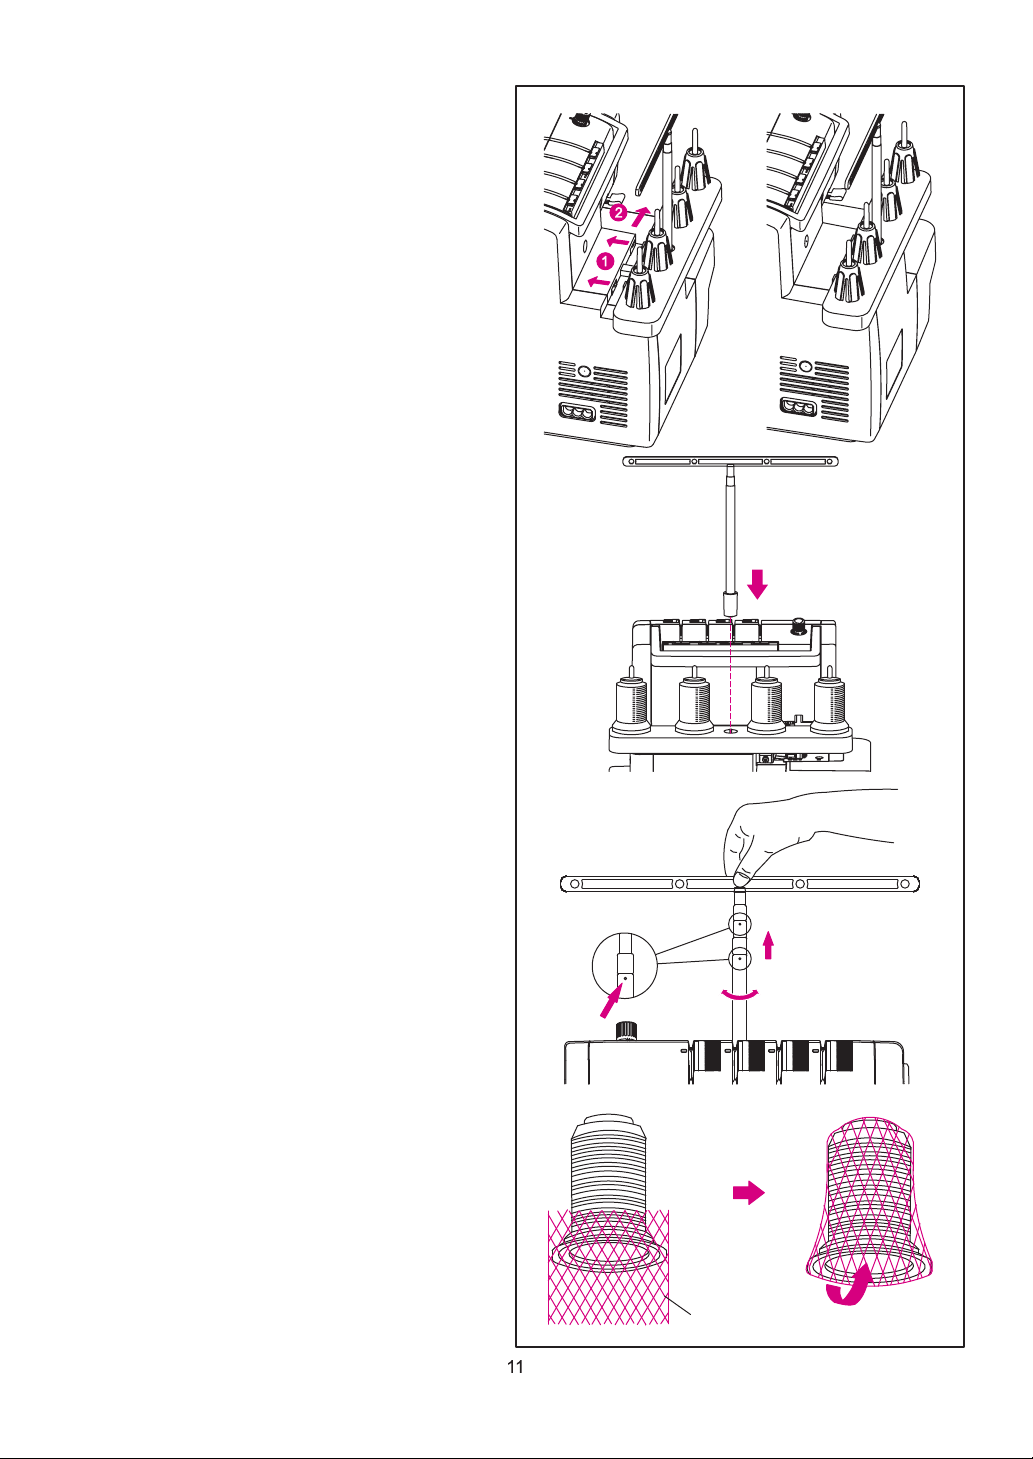
6. TELESCOPIC THREAD STAND
* Place the thread spools over the cone holders on
the spool pin.
* If the machine is already threaded, straighten the
threads to prevent tangling.
7. PREPARATION FOR THREADING
(1) SETTING UP THE THREAD GUIDE
HOLDER
* Fully extend the thread guide holder.
* The two joints on the telescope will click into place
when they are correctly positioned.
* Center the thread guides above the spool pins.
* Place thread over the cone adapters on the spool
pins.
Note : Your new machine is threaded to sew
“ ”. 16 for4-Thread Overlock Refer to Page
instructions on tying onto the threads.
(2) ANTI-SPILL NET
*When using synthetic threads that easily spill off
the cone, slip the anti-spill net furnished with the
machine over the thread from the bottom of the
cone leaving the thread end hanging free at the
top the anti-spill net as shown at right.
Anti-spill net

12
9. HOW TO OPEN AND CLOSE LOOPER
COVER
(1) OPEN LOOPER COVER
* Push the looper cover to the right as far as it will
go.
* Pull looper cover down toward you.
(2) CLOSE LOOPER COVER
* First pull the looper cover upward and then slide it
to the left until it locks.
Note : The looper cover has a safety switch and
the machine will not sew if the looper cover
is open.
8. REMOVAL AND REPLACEMENT OF
CHIP BOX
(1) REPLACEMENT
* Position the machine so the front is nearly
aligned with the edge of the table.
*Insert the chip box under the looper cover. Be
sure the left side of chip box is mounted near the
cutter where the scraps drop.
(2) REMOVAL
*To remove, hold the chip box as shown and pull it
outward.
(3) SPOOL CAP
Spool cap
Thread spool
Press in
*When using a regular thread spool, fit the spool
cap supplied with the machine onto the thread
spool as shown at right.
Be sure to turn off power switch.
Be sure looper cover is closed when sewing.
2
1
1
2

B BA
B
A
Right overlock
needle thread
Overlock left needle
Overlock right needle
Be sure to disconnect the machine from the
electric outlet before removing needle(s).
Left and right overlock
needle thread
Flat surface to the rear
(1) NEEDLE POSITION
1
* With this machine, two needles can be inserted to
the needle clamp as shown in the drawing, single
or two needles can be used for sewing.
* The Instruction Book refers to different needle
positions by illustrating the needle clamp at right.
Note : When both the left and right overlock needles
are inserted, the left needle will be slightly
higher than the right.
(2) TO REMOVE NEEDLE (S)
10. HOW TO REMOVE AND INSERT
NEEDLES
* Turn the hand wheel toward you until the needles
are at their highest position.
* Place a thick piece of fabric [such as felt] under
the presser foot. Lower the needles halfway into
the fabric.
* Loosen, but do not remove the needle clamp
screw with the allen key while you are holding the
needles.
A. Overlock left needle
B. Overlock right needle
Note : When inserting needles into the A and/or B
needle clamps it is necessary to loosen the
needle clamp screws for both A and B.
NOTE : After removing the specific needle which
is not currently to be used for sewing, remember to
fasten the set screw in the screw hole of the needle
clamp and to just fasten tight into the hole.
Please do not over-tighten the screw into the hole or
the needle clamp will be damaged.
13
B
A
To loosen
To tighten
(3) TO INSERT NEEDLES (S)
* Hold the needle with the flat surface to the back.
* Insert the needle into the needle socket as far as it
will go.
* When inserting a needle, if you first lower it down
into the hole in the stitch plate it will line up with
the needle socket. Then direct it upwards.
Note : When inserting needles into the A or B
sockets it is necessary to loosen both A & B
allen Screws. After inserting the needles
equally tighten both screws*
This machine uses ELx705 needles. Do not use
Standard Household Needles.
14
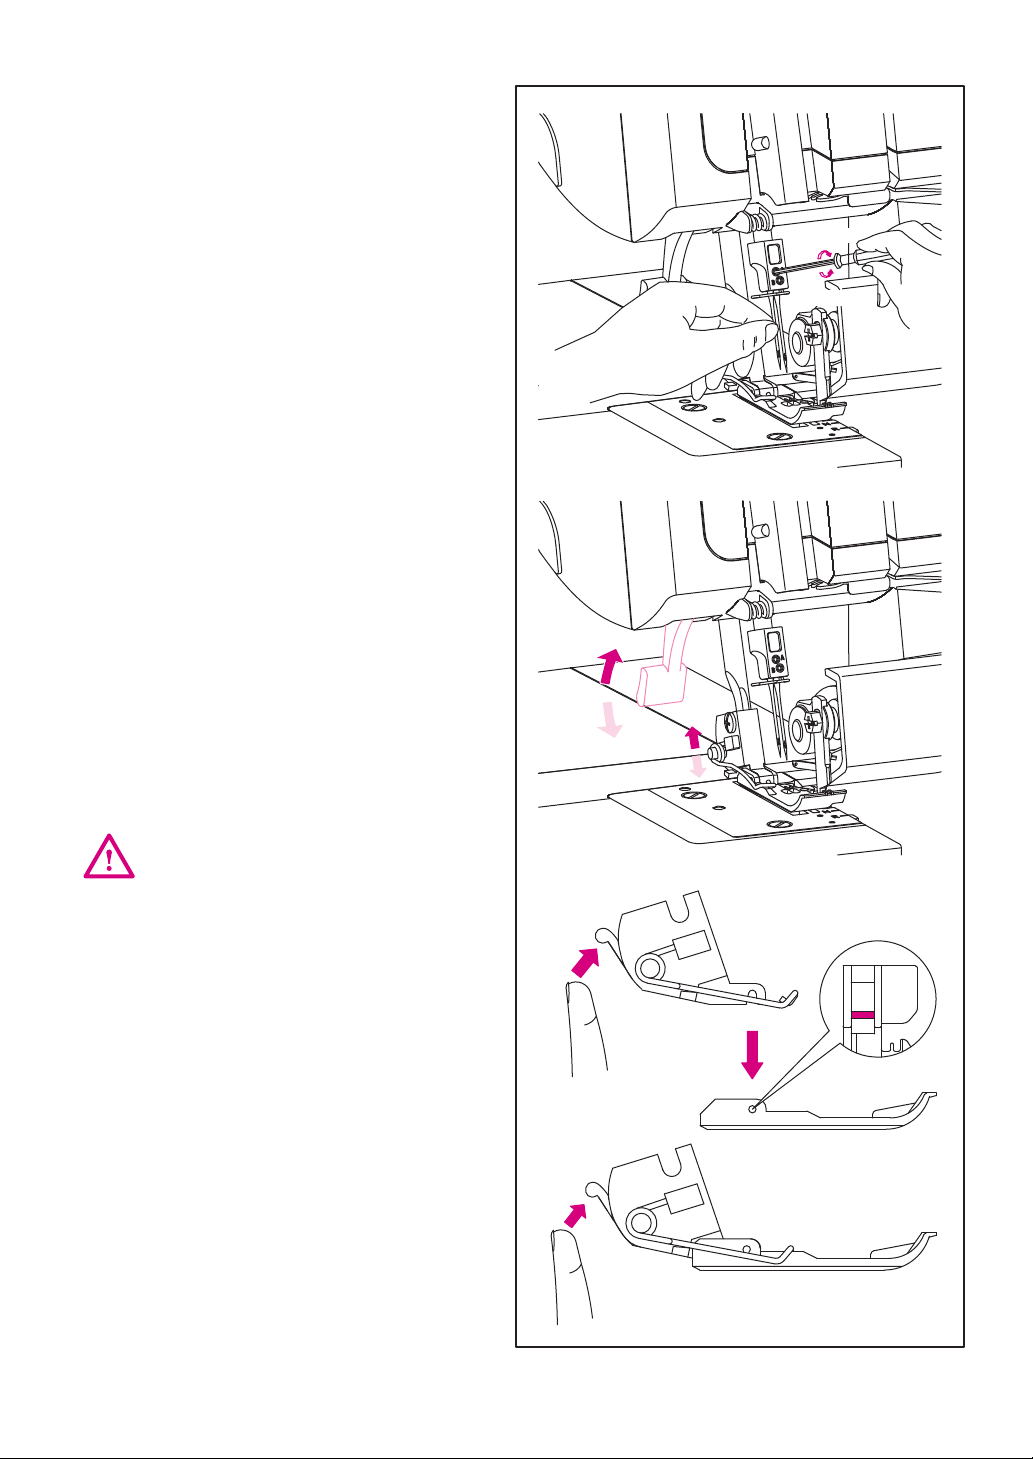
* Raise the presser foot.
* Turn the hand wheel toward you until the needles
are at the highest position.
* Push the red button on the back of the presser
foot ankle to release the presser foot.
* Raise the presser foot to the extra lift position and
the foot will come off.
* Place the new foot with the pin right underneath
the groove of the ankle while in the extra lift
position.
* Lower the presser foot. Push the red button on the
back of the presser foot ankle and the foot will
snap into place.
12. CHANGE PRESSER FOOT
Turn off the main power switch and unplug
the machine.
11. PRESSER FOOT LIFT
* Raise the presser foot by raising presser foot lift
lever at the left side of the machine.
* Raising up the presser foot lift puts the presser
foot in the extra lift position.

2
1
2
1
3
2
1
15
(1) TO PLACE MOVABLE UPPER CUTTER IN
NON-WORKING POSITION
1
*Open looper cover (page 12).
1
* Push the movable upper cotter holder to the right
as far as it will go.
1
* Turn the holder toward t until the upper cutterfron
clicks into a lock position.
1
(2) TO PLACE MOVABLE UPPER CUTTER IN
WORKING POSITION
1
* Open looper cover.
1
* Push the movable upper cutter holder to the right
as far as it will go.
1
* Turn the holder toward back until the upper cutter
clicks into the working position.
13. HOW TO DISENGAGE MOVABLE UPPER
CUTTER
When not threading the upper looper, the 2-thread
converter must be engaged into the upper looper
eye.
1
(1) TO USE THE 2-THREAD CONVERTER
1
*To engage the 2-thread converter, insert the sharp
part into the eye of upper looper.
1
* A raised point located in the trough of 2-thread
converter must be inserted and fixed in the eye of
the 2-thread converter.
1
* When using the upper looper, the 2-thread
converter must be disengaged.
1
(2) TO DISENGAGE TO UPPER LOOPER
1
*To disengage the 2-thread converter, raise the
handle of upper looper according to picture .
14. TO CONVERT UPPER LOOPER TO
2-THREAD CONVERTER
Be sure to turn off power switch
Always close looper cover before operating
machine.
Be sure to turn off power switch.
3
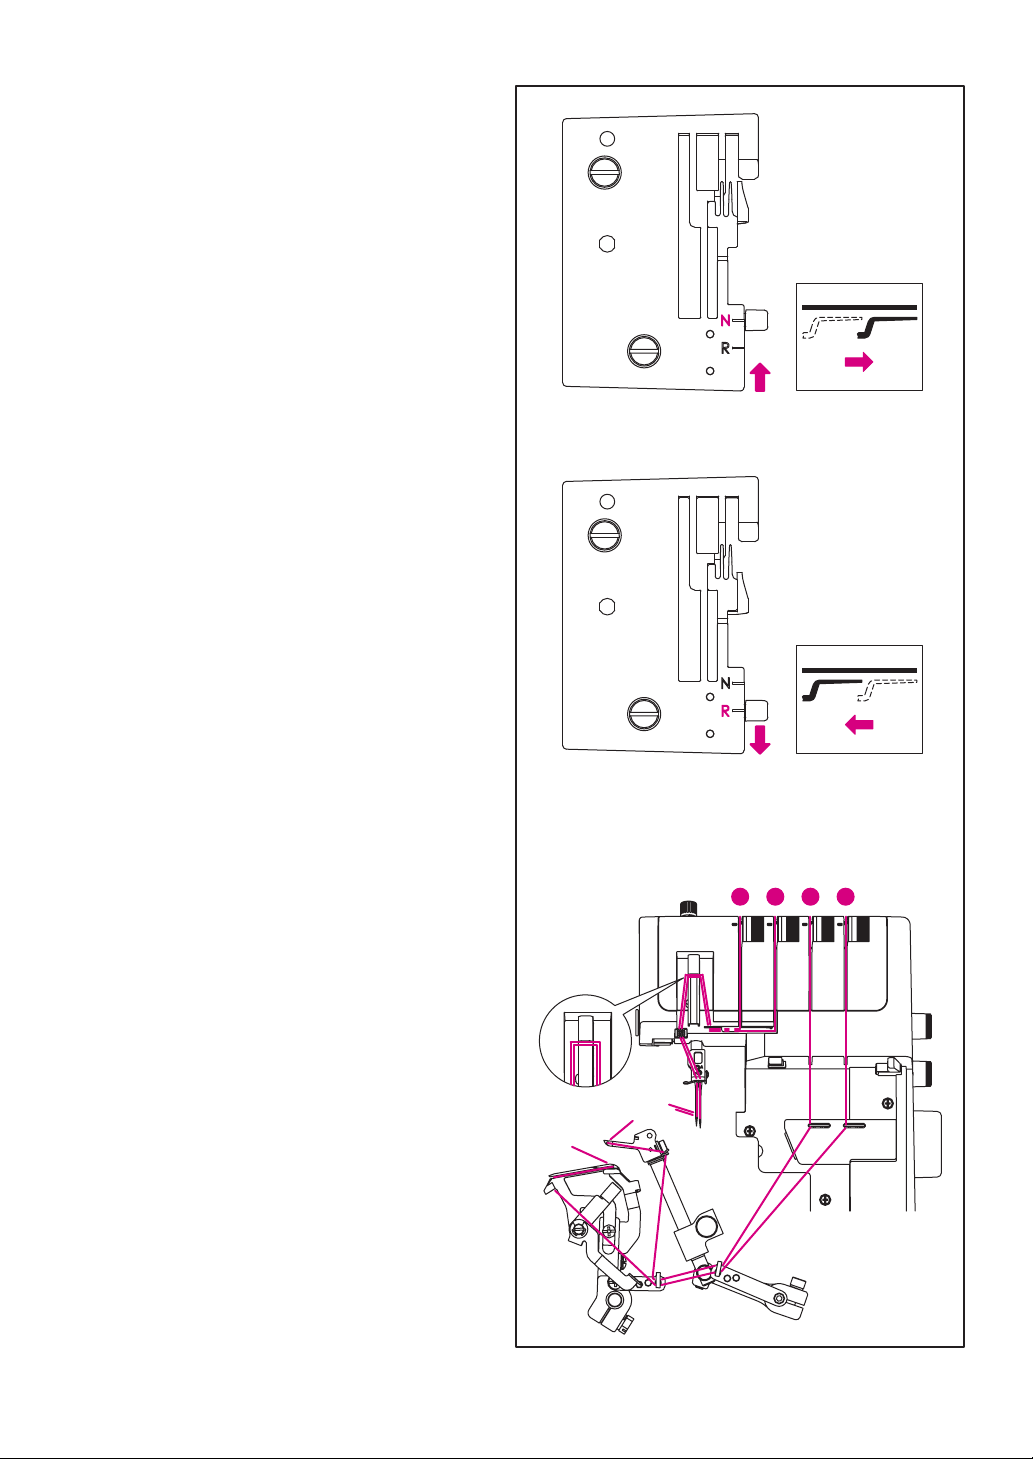
15. STANDARD OVERLOCK AND ROLLED
HEM STITCHING
(1) TO SEW STANDARD OVERLOCK
* Set seam width finger knob to N to move seam
width finger to standard overlock sewing position.
Note : Be sure to push seam width finger knob as
far as it will go in the direction of setting N.
(2) TO SEW ROLLED HEM
* Set seam width finger knob to R to retract the
seam width finger and set it for rolled hem.
Note : Be sure to push seam width finger knob as
far as it will go in the direction of setting R.
16
*Thread the machine in the order (1) to (4) as
shown at right.
Note : Threads go through the take-up lever cover
for Overlock as shown.
Tip : Your new machine is threaded to sew a
standard overlock. Tie your own threads to
these threads and carefully pull them through
the machine, to easily thread your new
overlock machine the first time.
Note : If the lower looper should come unthreaded,
do the following :
(1) Unthread the needle(s)
(2) Thread the lower looper
(3) Thread the needle(s)
16. GENERAL THREADING INFORMATION
32
41

3
5
4
17
Be sure to turn off power switch.
* Thread the thread guide A (2) by pulling the thread
towards the left until it slips under guide.
Then pull thread along the path as illustrated.
* While holding thread with fingers, pass it between
the tension discs and pull thread down to make
certain it is properly located in between the
tension discs (3).
Thread the upper looper as indicated (1)~(8).
* Raise Presser foot to release tension discs.
* Pass thread from back to the front through the
thread guide (1).
(1) TO THREAD THREADUPPER LOOPER
(GREEN)
1
3
2
2
3
2
3
1
4
7
8
5
6

5
8
2
3
1
4
5
6
7
4
5
6
8
7
10cm
(4")
7
8
18
(2) TO THREAD THREADLOWER LOOPER
(RED)
* Thread the thread guide A (2) by pulling the thread
towards the left until it slips under guide.
Then pull thread along the path as illustrated.
* Thread the looper area of the machine following
the green color coded thread guides (4)~(7).
* Thread the hole in the upper looper from front to
back (8).
Note : Make sure thread passes behind lower
looper.
Note : Use tweezers provided in the accessory case
to aid in threading the looper.
* Pull about 10cm (4 inches) of thread through the
looper and place to the back of the stitch plate.
1
* Pass thread from back to the front through the
thread guide (1).
Thread the lower looper as indicated (1)~(8).
* Raise Presser foot to release Tension discs.
2
2

3
5
4
7
8
6
84
5
6
7
19
* Turn the hand wheel toward you until the lower
looper extends out 5~10mm from the stitch plate
edge.
* Thread the looper area of the machine following
the red color coded thread guides (4)~(8).
Note : Use tweezers provided in the accessory case
to aid in threading the looper.
* While holding thread with finger, pass it between
the tension discs and pull thread down to make
certain it is properly located in between the
tension discs (3).
* Place the thread with the point of the tweezers
slightly from right and to the left of threading guide
(4).
* Continue threading through guides (5)-(6).
* To thread the last thread guide (7), pull about 10
cm (4") of thread through guide (8).
Hint : Moving the stitch finger lever to R makes the
threading easier. Remember to set it back to N
before starting to sew.
* Thread the looper eye (8) from front to back using
the tweezers. Make sure the thread runs into the
”V” cutouts (A) on threader lever. Firmly hold the
thread tail with your left hand and pull the threader
lever (B) up into place and back to snap the
thread into thread guide (7).
3
3
4
5
7
8
B
7
B
A
Table of contents
Other Merrylock Sewing Machine manuals


