MesMed MM-210 ESATTO User manual

1
2
Manual instruction
Blood Pressure Monitor
MM –210 ESATTO

3
Contents
1.
Before Using This Device....................................................................................... 23
2.
Important Safety Information and Precautions......................................................... 23
3.
Specifications......................................................................................................... 24
4.
About Blood Pressure............................................................................................. 24
5.
About blood pressure monitor................................................................................. 25
6.
Buttons................................................................................................................... 25
7.
Display................................................................................................................... 25
8.
Battery installation.................................................................................................. 25
9.
Power supply from USB port.................................................................................. 26
10.
Putting on the cuff ................................................................................................ 26
11.
Body positioning during measurement................................................................... 26
12.
Measurements notes.............................................................................................. 27
13.
Setting of user....................................................................................................... 27
14.
Turn on the device................................................................................................ 27
15.
Setting of Year, Date, Time, 24-hour system/ 12-hour system, pressure unit..............27
16.
Measurement........................................................................................................ 28
17.
Function for the detection of cardiac disorders - arrhythmias..................................28
18.
Using Memory-Recall and Memory-deleting..........................................................28
19.
Special function - determining the average of the last 3 measurements................... 29
20.
Memory view ....................................................................................................... 29
21.
Remove measurement results from the device's memory ....................................... 29
22.
Troubleshooting.................................................................................................... 29

4
Thank you for purchasing our product. Please read manual instruction before use.
1. Before Using This Device
INDICATIONS FOR USE: This blood pressure monitor is intended to be used to measure blood
pressure and pulse rate from upper arm by using the oscillometric method at home. This device is
intended for use on adults only and is not for use on groups such as neonatal babies, children, pregnant
women, or pre-eclamptic patients. It can't be used while the arm has bleeding or wound to avoid the
blood flowing from the wound in pressurizing.
2. Important Safety Information and Precautions
MEDICAL DISCLAIMER: This device and manual are not meant to be a substitute for advice
provided by doctors or other medical professionals. Contact your physician for interpretation of
measurements, or if you have or suspect you have a medical issue.
•Contact your physician if you suspect you have a medical issue.
•Not for use by children, pregnant women, or pre-eclamptic patients.
•If you suffer from arrhythmia, diabetes, blood circulation problems, or apoplexy, only use
this device under a physician’s care.
•Prolonged over-inflation of the monitor will result in harmful injury to the patient.
•Do not use this device over a wound, as this can cause further injury.
•Too frequent measurements can cause injury due to blood flow interference.
•This device possible cause improper result due to external interference, such as
acceleration during transport or transport in general.
•Do not attempt to modify this device in any way.
•Store this device in a cool, dry place. Do not subject this device to extreme temperatures,
humidity, or sunlight. This device might not meet performance specifications if stored or used
outside the ranges specified in the “Specifications” section. Keep away from rain.
•Do not immerse this device in water or clean with cleaning products, alcohol, or solvents.
Carefully follow cleaning instructions provided.
•Remove batteries if this device will not be used for three or more months.
•Ensure that the device is used in the environment specified in the declaration of
conformity in this manual, otherwise, may result in improper operation.
•Use of this device adjacent to or stacked with other device should be avoided because it
could result in improper operation.
•This electrical medical equipment requires specific precautions regarding electromagnetic
compatibility. It must be installed and used according to the electromagnetic information.
•Do not use this device where flammable gases or liquids are present.
•Never drop the device
Technical description is contained in this instruction manual
5
3. Specifications.
Model
MM 210 Esatto
Measurement Method
Oscillometric
Display
LCD
Measurement Range
Pressure: 0 to 299 mmHg
Pulse: 40 to 180 beats/minute
Accuracy
Pressure: Within 3 mmHg
Pulse Rate: Within 5% of reading
Inflation
Automatic inflation by pump
Deflation
Automatic rapid deflation
Pressure Detection
Semiconductor pressure sensor
Memory
2persons X 90 measurements each
Power supply
3 AA alkaline batteries (not included)
Battery
About 6 months when used once a day
Operating Environment
Temperature 50°F (10°C) to 104°F ( 40°C)
Humidity 15% to 90% (noncondensing)
Barometric ure 105 kPa to 80 kPa (790 mmHg to 600)
Transport Storage Environment
Temperature -4 °F (-20°C) to 131°F ( 55°C)
Humidity 0% to 95% (noncondensing
Weight of Main Unit
115 g (without batteries)
External Dimensions
103 mm (H) X 77,5mm (W)X 40,8 mm
Measurable Circumference of
arm
22~36cm
Electric Shock Protection
Internal power supply appliance type BF
Contents
Main unit, cuff, manual
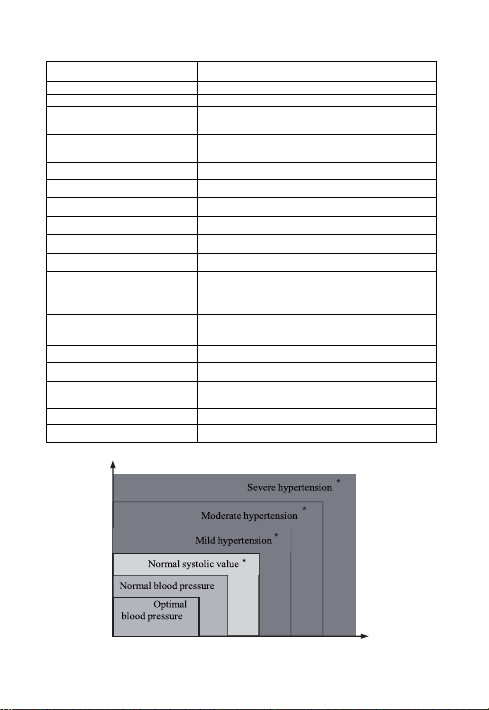
4. About Blood Pressure
180
160
140
130
120
80 85 90 100 110
Diastolic Blood Pressure (mmHg)
(target value)
Systolic Blood Pressure (mmHg)

6
Blood pressure measurements determined with this device are equivalent to those obtained by a
trained observer using the cuff/ stethoscope auscultatory method, within the limits prescribed by
European Society of Hypertension International Protocol revision2010 for the validation of blood
pressure measuring devices in adults. An irregular heartbeat IHB rhythm is defined as a
rhythm that is more than25% slower or 25% faster from the average rhythm detected while the device
is measuring the systolic blood pressure and the diastolic blood pressure. When the device detects an
irregular rhythm two or more times dur ing the measurement, the Irregular Heartbeat Symbol will be
displayed with the measurement values.
5. About blood pressure monitor
Cuff
Set button Start/Stop
button
Memory button
Display
USB power
supply port
6. Buttons
„Start/Stop” button - Universal button, start of measurement.
„Memory button” - it is used to view memory, change the settings parameters.
„Set button” - Switch between users, moving between settings.
7. Display
Low battery
Blood pressure
classification
Systolic pressure
User number
Memory Times
Year/Date/Time
IHB
Diastolic pressure
Average Value
Unit Indicator
Pulse rate
Heartbeat
7
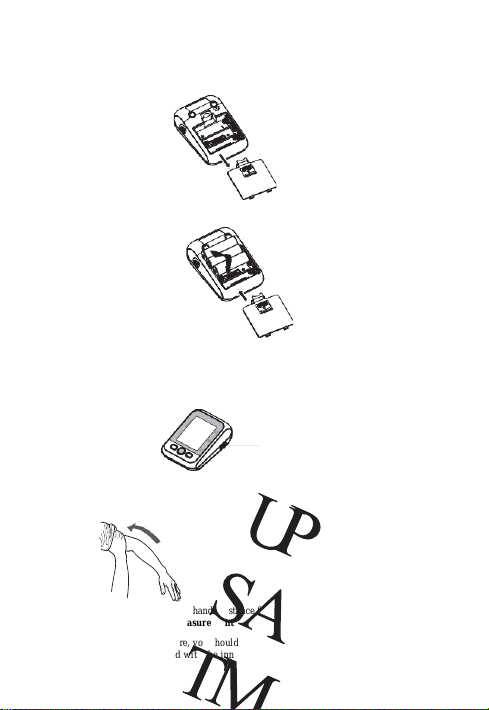
8. Battery installation
a. Take off the battery cover on the back of this device.(Figure 1)
Figure 1
b. Insert three AA alkaline batteries according to the + and –markings. (Figure 2)
Figure 2
c. Snap the battery cover on, ensure it clicks into place.
9. Power supply from USB port
Plug the micro USB cable into the micro USB port on the device as shown (Figure 3).
Figure 3
USB port
10. Putting on the cuff
The cuff should be put on the left hand. Distance from the cuff to elbow bend is 1-2 cm.
11. Body positioning during measurement
Before measuring blood pressure, you should sit comfortably straighten and relax the body.
It is necessary to turn the hand with the inner side up and place the hand at the same height as
the heart.

8
12. Measurements notes
•After measurements, the blood pressure monitor turns off after 2 minutes after pressing the
last button.
•To stop the measurement, press the START/STOP button.
•Between measurements, keep a minimum break of 5 minutes and try to maintain one body
position and breathe evenly and calmly.
•Carefully attach the cuff.
•Do not tilt or tighten the muscles of the hand and hand during measurements.
•Try to maintain one body position.
•Do not talk or move during measurements.
•The result will be automatically stored in the previously selected memory when the
measurement is complete.
13. Setting of user
With device turned off, press and release “SET” button to show the current user.Press “SET”
button to toggle between User 1 and User 2. To select user, press “START/STOP” to confirm and
then the device turns off.
14. Turn on the device
1. Press Start/Stop.
2. When you press the START/STOP button, the device is ready.
3. The blood pressure monitor has an automatic shut-off function and will turn off 2 minutes after
the last press of the button.
15. Setting of Year, Date, Time, 24-hour system/ 12-hour system, pressure unit
a. With device turned off, press and hold “SET” button until flashing year digits occur.
b. Press “MEM” to increase one year, or press and hold “MEM” to increase years. Press
“SET” to confirm and then flashing month digits occur.
c. Press “MEM” to increase one month, or press and hold “MEM” to increase months. Press
“SET” to confirm and then flashing day digits occur.
d. Press “MEM” to increase one day or press and hold “MEM” to increase days. Press
“SET” to confirm and then flashing hour digits occur.
e. Press “MEM” to increase one hour or press and hold “MEM” to increase hours.
Press “SET” to confirm and then flashing minute digits occur.
f. Press “MEM” to increase one minute or press and hold “MEM” to increase minutes.
Press “SET” to confirm and then either “12” digits occur for 12-hour system or “24”
digits occur for 24-hour system.
g. Press “MEM” to toggle between “12” for 12-hour system and “24” for 24-hour
system. Press “SET” to confirm and then pressure unit digits occur.
h. Press “MEM” to toggle between “mmHg” and “kPa”. Press “SET” to confirm and
flashing year occur again, or press “START/STOP” to confirm and then the device turns
off.
i. Setting is completed.
Note: Pressing “START/STOP” will confirm the setting and then the device turns off at any time.

9
16. Measurement
a. This device should be used on bare skin. If necessary, loosely roll up your sleeve to expose
arm. Note that your arm cannot be tightened by your sleeve.
b. With the hose down the inside of your arm and the bottom of the cuff approx. 1~2cm above
your elbow, wrap the cuff around your arm. Secure the cuff with a finger space between the
cuff and your arm by attaching hook-and-loop fastener.
c. Comfortably seated
•Legs uncrossed
•Feet flat on the floor
•Back and arm supported
•Relax as much as possible and do not talk during the measurement.
d. While sitting upright in a chair with your feet flat on the floor, press “START/STOP".
Symbols on screen will flash and cuff will begin to inflate. Do not move, activate arm muscles,
or talk during measurement.
e. Measurement can be stopped at anytime by pressing “START/STOP".
f. When a pulse is detected, a heart symbol will flash on screen.
g. When measurement is complete, the cuff deflates automatically and your systolic pressure,
diastolic pressure, and pulse rate will display on screen.
h. Turn off this device by pressing “START/STOP", remove the cuff from your arm by detaching
hook-and-loop fasteners. If this device is accidentally left on, it will turn itself off after two
minutes.
NOTE: This device will remain set on the same user after you turn it off. To change to the other
user, turn this device off, then press and release “SET” to access user setting. Either the User 1
or User 2 icon will appear. Press “SET” to switch to the other user icon and press
“START/STOP” to confirm the user and then the device turns off.
17. Function for the detection of cardiac disorders - arrhythmias
The device has the function of detecting cardiac arrhythmias. After performing the measurement, an
icon will appear on the display. Speaking, moving affects the measurement result which is why the
device can read it as not a regular heart rhythm. If this icon appears, we recommend repeating the
test. However, if this icon appears frequently, you should consult a doctor.
18. Using Memory-Recall and Memory-deleting
This device will store up to 90 measurements each for two users. When more than 90
measurements are taken, the oldest measurement will be replaced.
a. To access Memory-Recall, press and release “MEM” while this device is off.
b. First, it will display the average of your three most recent measurements, indicated on screen
as M AVG (Measurement Average).
c. Press “MEM” again to see the most recent measurement. Press “MEM” repeatedly to scroll
towards the oldest measurement. On screen, M01 indicates the most recent measurement,
with higher M numbers indicating older measurements.

10
d. If you desire to delete all stored measurements, press and hold “SET” under the Memory-
recall status until “dEL no” is displayed with “no” flashing. Press and release “SET” to switch
to “dEL YES” with “YES” flashing.
Press “START/STOP” with “dEL YES” to confirm clearing the memory and then blank entry
appears on screen, or press “START/STOP” with “dEL no” to go back to the Memory-recall status
without clearing the memory.
e. Press “START/STOP” to exit.
19. Special function - determining the average ofthe last 3 measurements
After each measurement, the result is stored in the device's memory. When you press the MEMORY
button once, the average of the last 3 measurements is shown on the display. This feature is very
useful for regular measurements at the same time of day, allowing you to even more accurately
illustrate your health.
20. Memory view
To view measurements stored in memory:
1. Press the MEMORY button, the display will show the average of the last 3 measurements.
2. By pressing the MEMORY button, you can view subsequent measurements.
21. Remove measurement results from the device's memory
Press “START/STOP” with “dEL YES” to confirm clearing the memory and then blank entry
appears on screen, or press “START/STOP” with “dEL no” to go back to the Memory-recall status
without clearing the memory.
Press “START/STOP” to exit.
22. Troubleshooting
If you see any of these symbols displayed on screen, perform the corresponding correction:
Err Error during inflation
Correction: Adjust cuff, ensuring it is wrapped properly, and repeat measurement. Do not move
or talk during measurement. Ensure cuff is level with heart.
Lo Low battery
Correction: Replace batteries following instructions in the Battery installation section
If you have the following issues without an error code, perform the corresponding correction:
No Power Low batteries or incorrect battery placement Correction: Ensure batteries were
installed according to the + and - shown on this device. If they were, batteries need replacement.
Measurement Too High / Too Low Possible incorrect use of this device
Correction: Adjust cuff, ensuring it is wrapped properly, and repeat measurement.

11

12
Table of contents


