Metagenics Fitness S7 User manual

!
!
!
USE TOOL: #5 m/m
Step 1: Attach the console mast (D) at the first hole position and using
screw (E4) to tight it.
Step 2: Insert the console (L) into console mast(D) and connect the wires
together. Remove the plastic end cap (E7) firstly and put the plastic
end cap (L7) onto the hole and turn clockwise direction to tight it.
Step 3: Put the smart phone holder (L2) onto the console mast (D) at
horizontal or vertical position.
E4
D
E7
L
L7
L
L2
HOW TO ASSEMBLE CONSOLE
Metagenics Fitness S7 Magnetic Spin bike console instructions

!
How to change battery :
1. Open battery cover and insert 2 AAA or 2 UM-4 batteries.
2. Properly put back battery cover.
3. Under regular condition, warranty of battery is one year.
4. If the LCD shows partial display, please take out batteries, wait for 15
and insert again.
seconds
5. Please follow local regulation when through batteries away.
RESET

!
Function and Operation :
Auto ON/OFF
RESET
Press “RESET” is to clear the value.
TIME
SPEED
SPEED display range is 0.0 ~ 99.9 KPH / MPH.
RPM
RPM display range is 15 ~ 999.
DISTANCE
CALORIE
PULSE
RESISTANCE
Resistance display range is LOAD 1~16.
1. Press ENTER key to select TIME, and press UP & DOWN keys to set up the
exercise TIME.
2. If users do not set TIME, time will be automatically count up 00:00~99:59.
3. Setting value of Count Down is from 1:00~99:00:00.
1. Press ENTER key to select DISTANCE and press UP & DOWN keys to set the
exercise value.
2. If users do not set DISTANCE, distance will be automatically count up
0.0~999 km/mile
3. Setting value of Count Down is from 0.5~999 km/mile.
1. Calorie displays CALORIES on the LCD.
2. Calorie will be automatically count up 0.0~999.0.
Pulse display range is 40~200. The Pulse value will display “P”.
The monitor automatically starts working once the user starts to do the exercise
on the machine.
It will automatically turn off after the machine is not been used for 4 minutes.
Km to Miles : Press buttons Enter + Down for 5 seconds

!
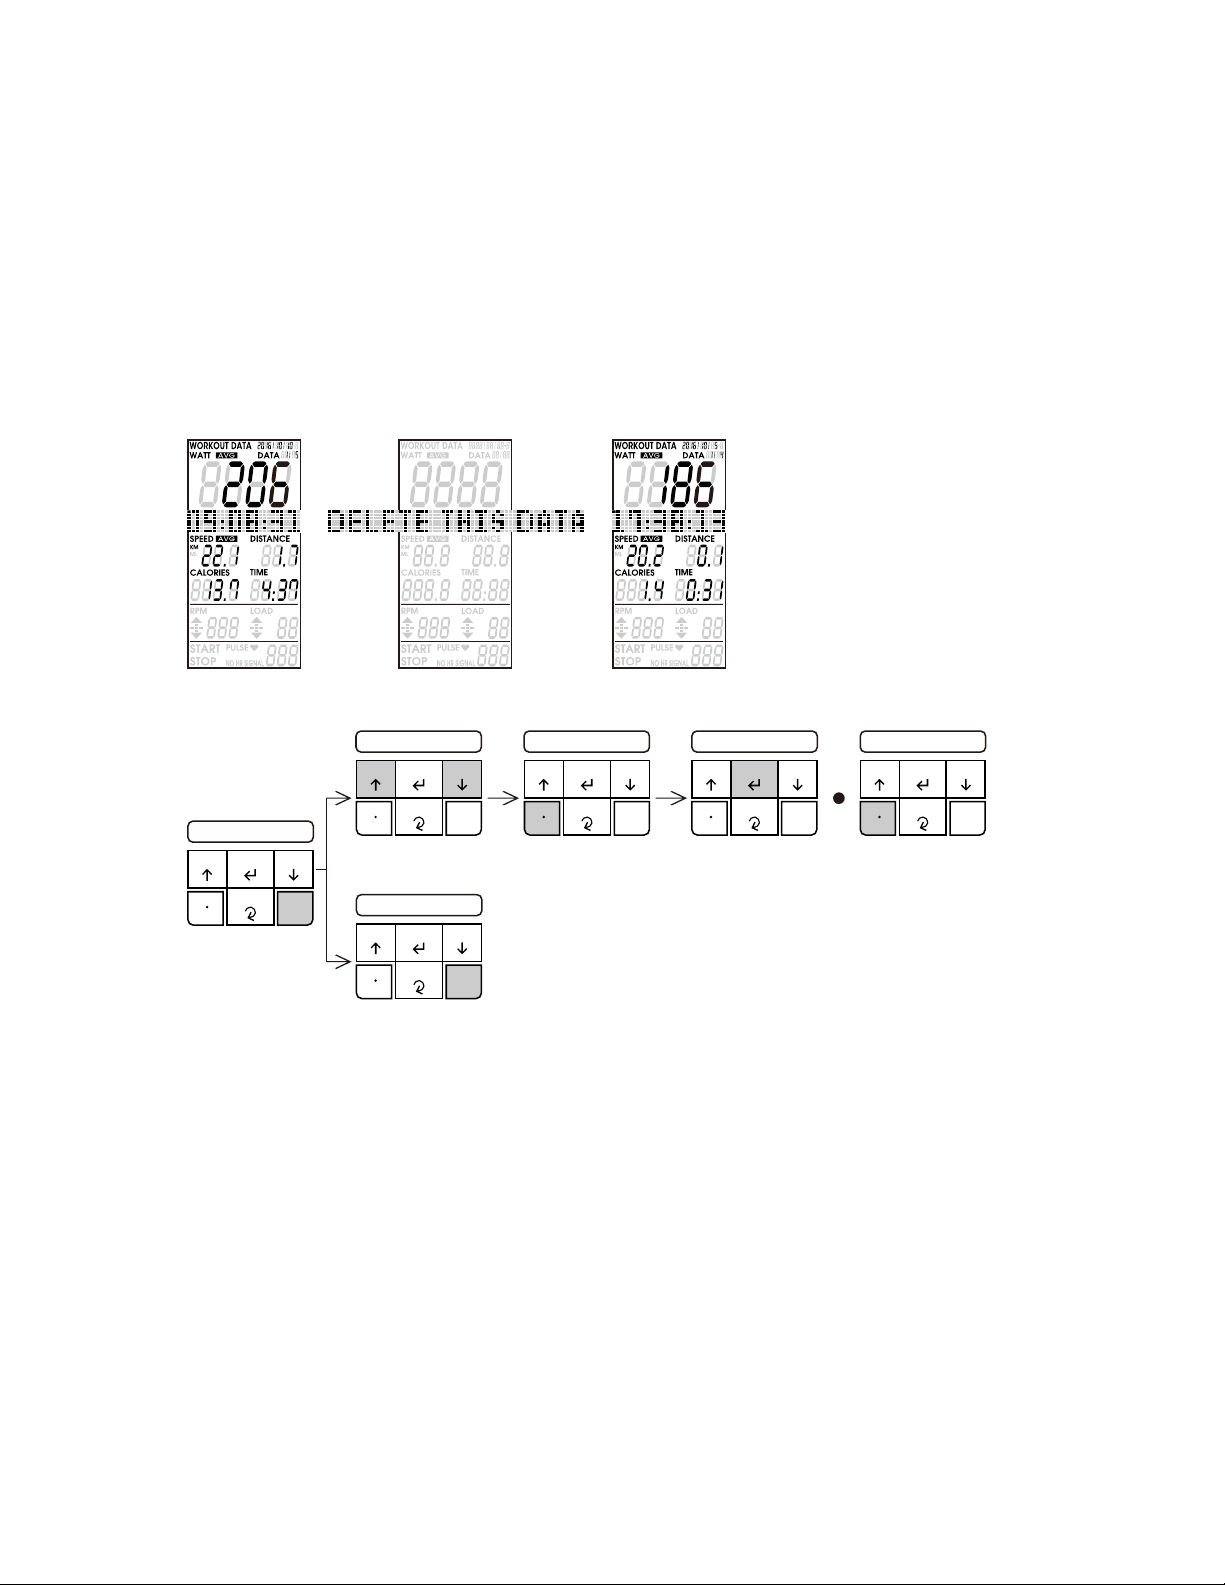
Calendar setting
FIGURE 1 FIGURE 2 FIGURE 3 FIGURE 4 FIGURE 5
Please set up current year, month, day, hour and minute into the display once
user replace the batteries onto case every time. How to: press “ENTER” to choose
among year, month, day, hour or minute. Press UP/DOWN keys to set up the
exercise value.(FIGURE 1 ~ 5)
YEAR SELECT PRESS ENTER
UP ENTER DOWN
DELETE
SAVE
RECORDED
DATA
MONTH SELECT
UP ENTER DOWN
DELETE
SAVE
RECORDED
DATA
UP ENTER DOWN
DELETE
SAVE
RECORDED
DATA
PRESS ENTER
UP ENTER DOWN
DELETE
SAVE
RECORDED
DATA
UP ENTER DOWN
DELETE
SAVE
RECORDED
DATA
DAY SELECT
PRESS ENTER HOUR SELECT
UP ENTER DOWN
DELETE
SAVE
RECORDED
DATA
UP ENTER DOWN
DELETE
SAVE
RECORDED
DATA
PRESS ENTER
UP ENTER DOWN
DELETE
SAVE
RECORDED
DATA
PRESS ENTER
UP ENTER DOWN
DELETE
SAVE
RECORDED
DATA
UP ENTER DOWN
DELETE
SAVE
RECORDED
DATA
MINUTE SELECT
RESET RESET RESET RESET RESET
RESET
RESET
RESETRESETRESET
NOTE:
the date and time should be set up again while batteries replaced.

!
FIGURE 6 FIGURE 7
UP ENTER DOWN
DELETE
SAVE
RECORDED
DATA
PRESS UP
UP ENTER DOWN
DELETE
SAVE
RECORDED
DATA
PRESS ENTER
UP ENTER DOWN
DELETE
SAVE
RECORDED
DATA
RESET RESET
RESET
PRESS ENTER
UP ENTER DOWN
DELETE
SAVE
RECORDED
DATA
RESET
PRESS UP + DOWN FOR 5 SEC
PULL DOWN THE LEVER
TO THE LOWEST POSITION
PULL UP THE LEVER TO
THE HIGHEST POSITION
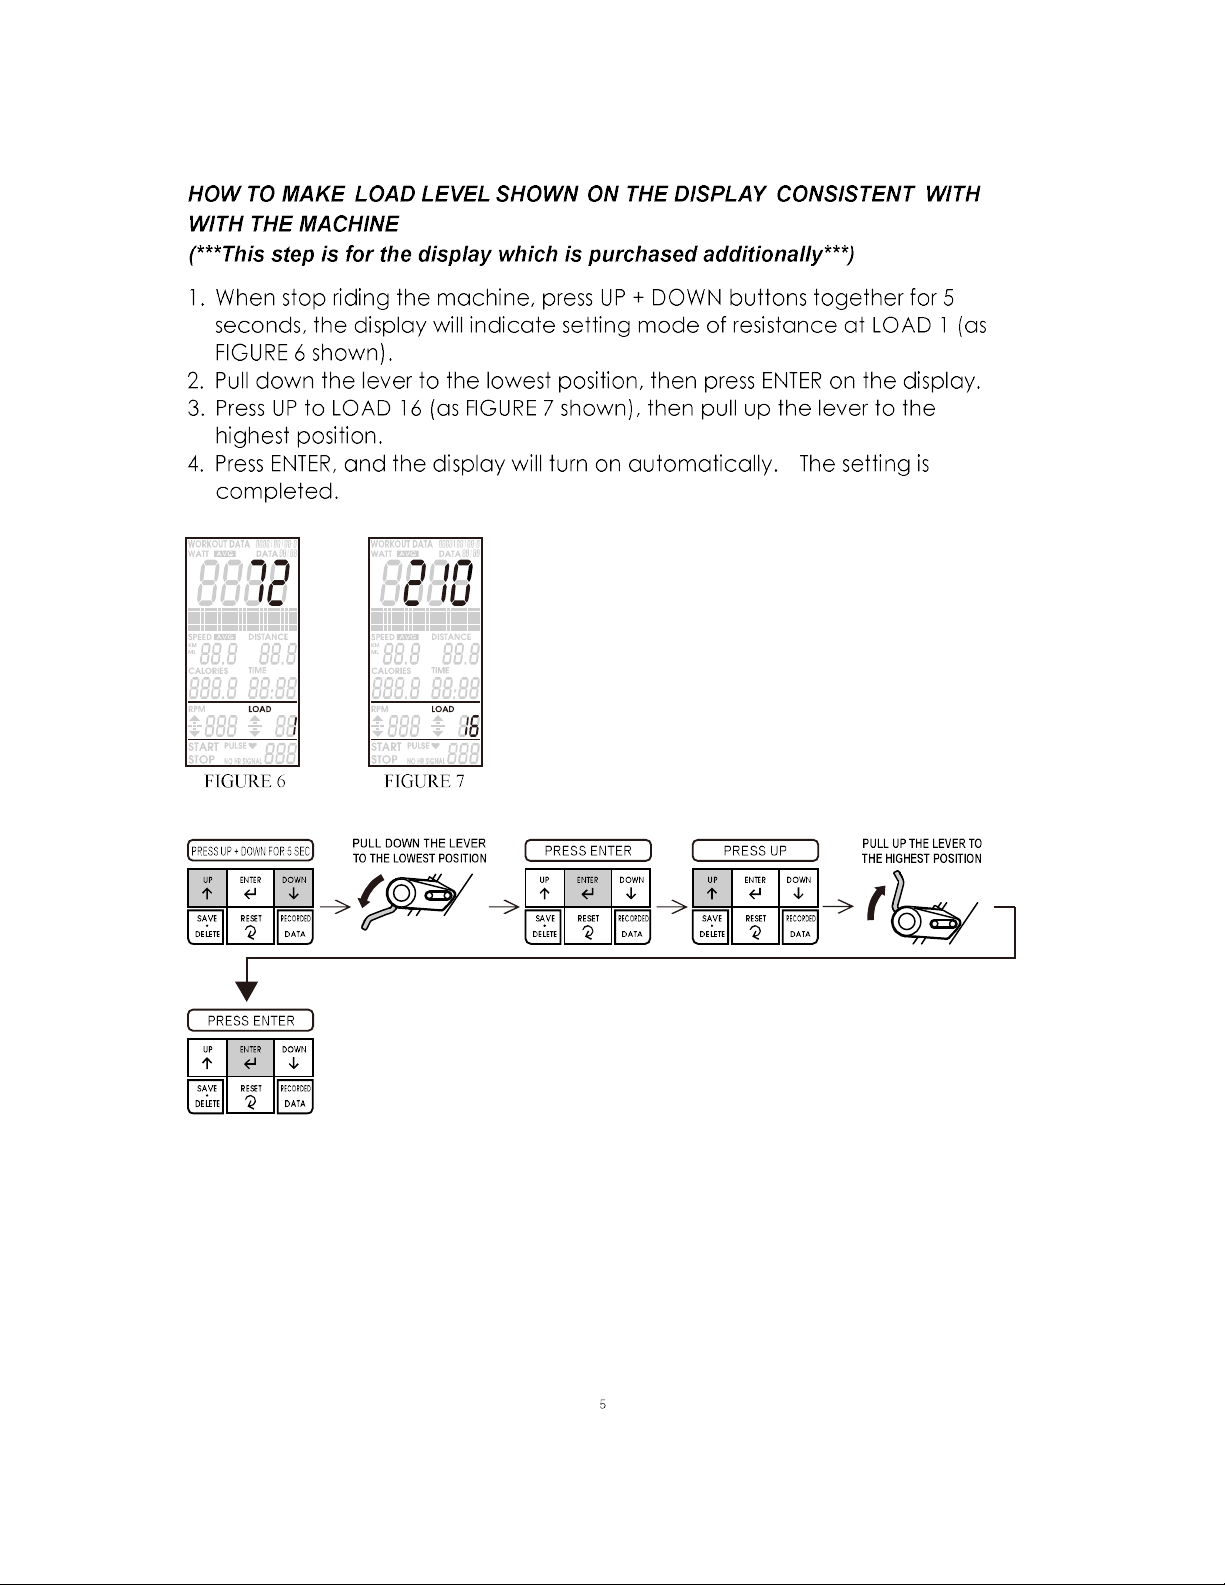
HOW TO MAKE LOAD LEVEL SHOWN ON THE DISPLAY CONSISTENT WITH
WITH THE MACHINE
(***This step is for the display which is purchased additionally***)
1. When stop riding the machine, press UP + DOWN buttons together for 5
seconds, the display will indicate setting mode of resistance at LOAD 1 (as
FIGURE 6 shown).
2. Pull down the lever to the lowest position, then press ENTER on the display.
3. Press UP to LOAD 16 (as FIGURE 7 shown), then pull up the lever to the
highest position.
4. Press ENTER, and the display will turn on automatically. The setting is
completed.

!
FIGURE 8
TIME / DISTANCE / CALORIES SETTING
FIGURE 9
FIGURE 10 FIGURE 11
PRESS ENTER
TIME TARGET SELECT
UP ENTER DOWN
DELETE
SAVE
RECORDED
DATA
UP ENTER DOWN
DELETE
SAVE
RECORDED
DATA
PRESS RESET
UP ENTER DOWN
DELETE
SAVE
RECORDED
DATA
PRESS ENTER
UP ENTER DOWN
DELETE
SAVE
RECORDED
DATA
UP ENTER DOWN
DELETE
SAVE
RECORDED
DATA
DISTANCE TARGET SELECT
PRESS ENTER
UP ENTER DOWN
DELETE
SAVE
RECORDED
DATA
CALORIES TARGET SELECT
UP ENTER DOWN
DELETE
SAVE
RECORDED
DATA
PRESS ENTER
UP ENTER DOWN
DELETE
SAVE
RECORDED
DATA
RESET RESET RESET RESET RESET
RESETRESETRESET
1.
On STOP mode (FIGURE 8), press ENTER to set up the TIME (FIGURE 9).
2.
Press ENTER again to set up the DISTANCE (FIGURE 10).
3.
Press ENTER again to set up the CALORIES (FIGURE 11).
4. Start exercise after setting up, the set target value will start to countdown.
There will be a warning beeping sound will be alerted once the target value
completion. If the target value is not completed, it will continue to
countdown. The target completion will start to count up from 1.

!
FIGURE 12FIGURE 13FIGURE 14FIGURE 15FIGURE 16
1. Watt display range is 20~5000.
3. User can adjust the TARGET WATT while exercising. If user is not exercising
in the range of target watt ±10, the program will be showed ↑↓ to remind
user for adjusting the RPM or LOAD.(FIGURE 13~ 15)
4. If the display showed ↑↓, the warning beeping sound will be alerted as well.
You can turn off the beeping sound by press “ENTER” for 3 seconds.(FIGURE 16)
TARGET WATT SETTING
PRESS ENTER
TIME TARGET SELECT
UP ENTER DOWN
DELETE
SAVE
RECORDED
DATA
UP ENTER DOWN
DELETE
SAVE
RECORDED
DATA
PRESS ENTER
UP ENTER DOWN
DELETE
SAVE
RECORDED
DATA
UP ENTER DOWN
DELETE
SAVE
RECORDED
DATA
DISTANCE TARGET SELECT
PRESS ENTER
UP ENTER DOWN
DELETE
SAVE
RECORDED
DATA
CALORIES TARGET SELECT
UP ENTER DOWN
DELETE
SAVE
RECORDED
DATA
PRESS ENTER
UP ENTER DOWN
DELETE
SAVE
RECORDED
DATA
RESET RESET RESET RESET
RESETRESETRESET
PRESS RESET
UP ENTER DOWN
DELETE
SAVE
RECORDED
DATA
RESET
TARGET WATT SELECT
UP ENTER DOWN
DELETE
SAVE
RECORDED
DATA
PRESS ENTER 3 SEC
UP ENTER DOWN
DELETE
SAVE
RECORDED
DATA
RESET RESET
2. On STOP mode (FIGURE 12), press UP or DOWN to set up TARGET WATT. The
starting WATT value is 180 and will increase or decrease 5 WATT by pressing UP
or DOW
N.
5.
6.
While setting up the TARGET WATT, you can also set up the target of
TIME/DISTANCE/CALORIES.
If you would like to turn off TARGET WATT function, just press RESET to re-start
the console.
To turn on/turn off the
TAG WATT warning beeping sound

!
FIGURE 17FIGURE 18
UP ENTER DOWN
DELETE
SAVE
RECORDED
DATA
RESET
UP ENTER DOWN
DELETE
SAVE
RECORDED
DATA
RESET
UP ENTER DOWN
DELETE
SAVE
RECORDED
DATA
RESET
FIGURE 19
PRESS SAVE & DELETE
PRESS ENTER
PRESS SAVE & DELETE
Workout data recording
1.
When stop workout (FIGURE 17), press SAVE.DELETE button, the display will
show out “SAVE THIS DATA” (FIGURE 18). Press ENTER to confirm the saving
(FIGURE 19). Press again SAVE.DELETE button to give up the saving.
2. Recording data are including: A. SAVED DATE B. AVERAGE WATT C. SAVED
TIME D. AVERAGE SPEED
3. Recorded data will be shown on at right upper corner of display.
4. The new saved data will be recalled prior to old ones.
Confirm the saving
Give up the saving

!
FIGURE 20
RECOEDED DATA
FIGURE 21 FIGURE 22
DATA SELECT
UP ENTER DOWN
DELETE
SAVE
RECORDED
DATA
RESET
UP ENTER DOWN
DELETE
SAVE
RECORDED
DATA
RESET
UP ENTER DOWN
DELETE
SAVE
RECORDED
DATA
RESET
PRESS RECORDED DATA
PRESS RECORDED DATA
1.
While STOP mode (FIGURE 20), press RECORDED DATA button and the display
will be shown out WORKOUT DATA/SAVED DATE/AVERAGE WATT/SAVED TIME/
AVERAGE SPEED/DISTANCE/CALORIES/TIMRE (FIGURE 21).
2. Press UP or DOWN button to review the RECORDED DATA.
3. After RECORDED DATA reviewed, press again RECORDED DATA to return to
operation menu.
4. The maximum RECORDED DATA is 99 numbers.
Return to main menu
!
LOW BATTERY
FIGURE 23FIGURE 24
Attention:
1. If the display showed “LOW BATTERY”, the data will not be saved.
2. If the display showed”replace battery”, please change the new battery.
Working Temperature︰0℃~ 50℃
Storage Temperature.︰-10℃~ 60℃
UP ENTER DOWN
DELETE
SAVE
RECORDED
DATA
PRESS ENTER
UP ENTER DOWN
DELETE
SAVE
RECORDED
DATA
RESET RESET
UP ENTER DOWN
DELETE
SAVE
RECORDED
DATA
RESET
DATA SELECT
UP ENTER DOWN
DELETE
SAVE
RECORDED
DATA
RESET
UP ENTER DOWN
DELETE
SAVE
RECORDED
DATA
RESET
UP ENTER DOWN
DELETE
SAVE
RECORDED
DATA
RESET
PRESS RECORDED DATA
PRESS RECORDED DATA
FIGURE 25
PRESS SAVE & DELETE
PRESS SAVE & DELETE 3 SEC
How to delete the RECORDED DATA
1.
In WORKOUT DATA mode (FIGURE 23), press SAVE.DELETE button and there
will be text shown DELETE THIS DATA. Press ENTER button to confirm the
deletion.
2. After deleting, the numbers of RECORDED DATA shown at right upper corner
display will be reduced together.
3. If you would like to delete ALL the RECORDED DATA, press SAVE.DELETE
button for 3 seconds.
Delete ALL the
recorded data
Return to main menu

!
!
!
!
lSet up the calendar for Mile:
(1) Please press ENTER+DOWN buttons when in the main display to change it
to Mile from preset KM.
(2) Then, please re-install the battery, and you could set up the calendar.
(3) After enter to the main display again, it becomes Mile already with
correct date. As pictures below:
!
!
!
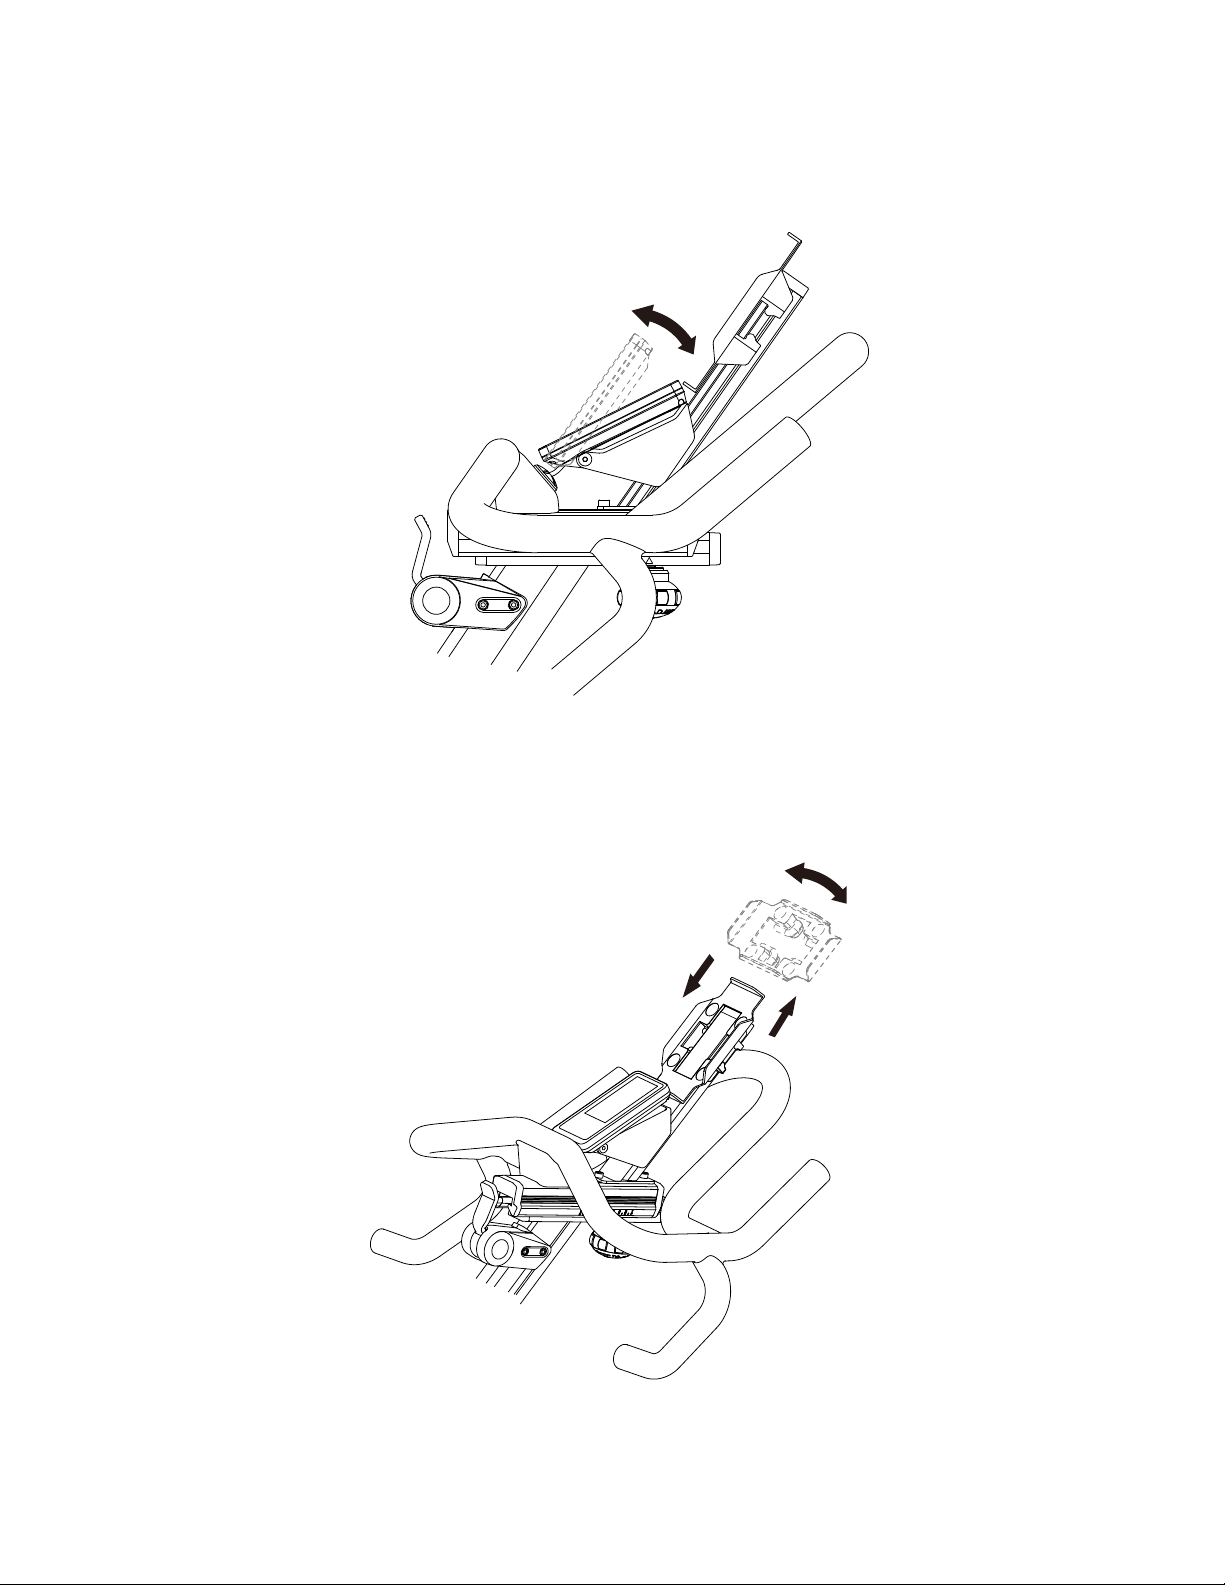
View-angle of console is adjustable.
The direction of smart phone holder can be changed:
Slide the smart phone holder out of the holder tube. Rotate the smart phone holder and install it into
the tube again.
Table of contents
Other Metagenics Fitness Exercise Bike manuals


Popular Exercise Bike manuals by other brands


Sunny Health & Fitness
Sunny Health & Fitness SF-B121021 user manual

Monark
Monark 827E instruction manual

Stamina
Stamina 1310 owner's manual

American Fitness
American Fitness SPR-BK1072A owner's manual
 Service manual")
Cateye
Cateye CS-1000 (CYCLO SIMULATOR) Service manual

BH FITNESS
BH FITNESS H9158H Instructions for assembly and use