METER GROUP 10HS User manual

10HS

i
TABLE OF CONTENTS
1. Introduction..............................................................................................1
2. Operation ...................................................................................................2
2.1 Installation ................................................................................................2
2.2 Removing the Sensor .................................................................................3
2.3 Connecting................................................................................................. 3
2.3.1 Connect to METER Data Logger........................................................ 4
2.3.2 Connect to a Non-METER Data Logger ............................................. 4
2.4 Interfacing with Data Loggers....................................................................6
2.4.1 Data Logger Requirements...............................................................6
2.4.2 METER Data Loggers........................................................................6
2.4.3 Non-METER Data Loggers................................................................ 6
3. System.........................................................................................................7
3.1 Specifications............................................................................................7
3.2 About 10HS................................................................................................ 9
4. Service....................................................................................................... 10
4.1 Calibration ............................................................................................... 10
4.1.1 Dielectric Calibration..................................................................... 10
4.1.2 Mineral Soil Calibration ................................................................. 10
4.1.3 Potting Soil .................................................................................... 11
4.2 Troubleshooting....................................................................................... 12
4.3 Customer Support.................................................................................... 13
4.4 Terms and Conditions .............................................................................. 13
References .................................................................................................... 14
Index ................................................................................................................. 15
13508-05
5.9.2018


1
1. INTRODUCTION
Thank you for choosing the ECH2O 10HS Soil Water Content sensor from METER Group.
This innovative sensor enables volumetric water content monitoring of soil accurately and
affordably.
This manual guides the customer through the sensor features and describes how to use the
sensor successfully. METER hopes the contents of this manual are useful in understanding
the instrument and maximizing its benefit.
Prior to use, verify the 10HS arrived in good condition.

2
OPERATION
2. OPERATION
Please read all instructions before operating the 10HS to ensure it performs to its full
potential.
PRECAUTIONS
METER sensors are built to the highest standards, but misuse, improper protection, or
improper installation may damage the sensor and possibly void the manufacturer’s warranty.
Before integrating 10HS into a system, follow the recommended installation instructions and
have the proper protections in place to safeguard sensors from damage.
2.1 INSTALLATION
When selecting a site for installation, remember that the soil adjacent to the sensor surface
has the strongest influence on the sensor reading and that the sensor measures the
volumetric water content of the soil. Therefore any air gaps or excessive soil compaction
around the sensor and in between the sensor prongs can profoundly influence the readings.
• If installing sensors in a lightning-prone area with a grounded data logger, please read
Lightning surge and grounding practices.
• Test the sensors with the data logging device and software before going to the field.
Do not install the sensor adjacent to large metal objects such as metal poles or stakes. This
can attenuate the sensor's electromagnetic field and adversely affect readings. In addition,
the 10HS sensor should not be installed within 5 cm of the soil surface, or the sensing
volume of the electromagnetic field can extend out of the soil and reduce accuracy.
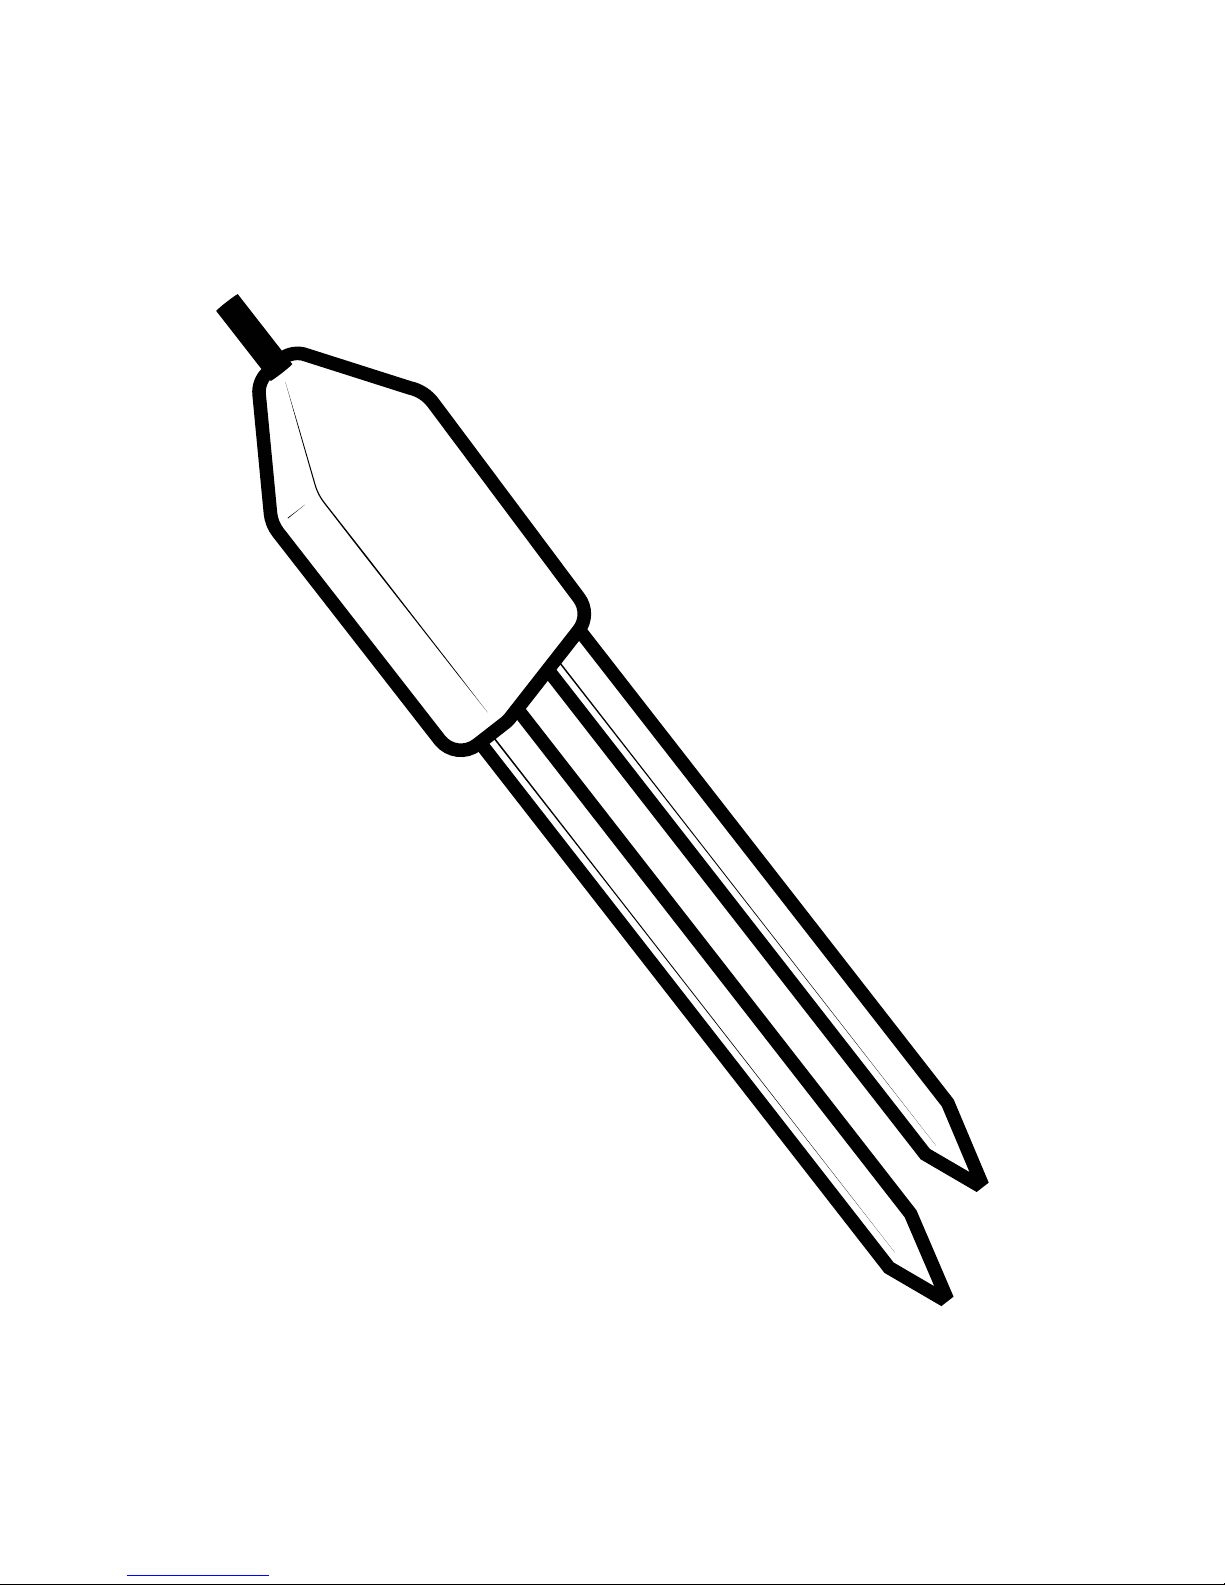
Because the 10HS has gaps between its prongs, it is also important to consider the particle
size of the medium. It is possible to get sticks, bark, roots or other material stuck between
the sensor prongs, which will adversely affect readings. Finally, be careful when inserting the
sensors into dense soil, as the prongs can break if excessive sideways force is used when
pushing them in.
When installing the 10HS, it is imperative to maximize contact between the sensor and soil.
For most accurate results, the sensor should be inserted into undisturbed soil. There are two
basic methods to accomplish a high-quality installation.
With either of these methods, the sensor may still be difficult to insert into extremely
compact or dry soil.
NOTE: Never pound the sensor into the soil! If there is difficulty inserting the sensor, loosen or wet the soil.This will
result in inaccurate VWC measurements until the water added during installing redistributes into the surrounding soil.

3
10HS
METHOD 1. HORIZONTAL INSTALLATION
1. Excavate a hole or trench a few centimeters deeper than the depth at which the sensor
is to be installed.
2. At the installation depth, shave off some soil from the vertical soil face exposing
undisturbed soil.
3. Insert the sensor into the undisturbed soil face until the entire sensing portion of the
10HS is inserted. The tip of each prong has been sharpened to make it easier to push the
sensor into the soil. Be careful with the sharp tips!
4. Backfill the trench taking care to pack the soil back to natural bulk density around the
sensor body of the 10HS.
METHOD 2. VERTICAL INSTALLATION
1. Auger a 4-in hole to the depth at which the sensor is to be installed.
2. Insert the sensor into the undisturbed soil at the bottom of the auger hole using a hand
or any other implement that will guide the sensor into the soil at the bottom of the hole.
Many people have used a simple piece of PVC pipe with a notch cut in the end for the
sensor to sit in, with the sensor cable routed inside the pipe.
3. After inserting the sensor, remove the installation device and backfill the hole taking
care to pack the soil back to natural bulk density while not damaging the black
overmolding of the sensor and the sensor cable in the process.
View a visual demonstration on proper installation of the sensor in How to install soil
moisture sensors.
The sensor can be oriented in any direction. However, orienting the flat side perpendicular
to the surface of the soil will minimize effects on downward water movement. The sensor
measures the average VWC along its length, so a vertical installation will integrate VWC over
a 10-cm depth wile a horizontal orientation will measure VWC at a more discrete depth.
2.2 REMOVING THE SENSOR
When removing the sensor from the soil, do not pull it out of the soil by the cable! Doing so
may break internal connections and make the sensor unusable.
2.3 CONNECTING
The 10HS works most efficiently with METER ZENTRA, EM60, or Em50 data loggers, and
it can also be used with other data loggers, such as those from Campbell Scientific, Inc.
(Section2.4).
10HS sensors require an excitation voltage in the range of 3 to 15 VDC.

4
OPERATION
The 10HS sensors come with a 3.5-mm stereo plug connector (Figure1) to facilitate easy
connection with METER loggers. 10HS sensors may be ordered with stripped and tinned
wires to facilitate connecting to some third-party loggers (Section2.3.2).
Ground
Data
Power
Figure1 Stereo plug connector
The 10HS sensor comes standard with a 5-m cable. It may be purchased with custom cable
lengths for an additional fee (on a per-meter basis). This option eliminates the need for splicing
the cable (a possible failure point). However, the maximum recommended length is 40 m.
2.3.1 CONNECT TO METER DATA LOGGER
The 10HS sensor works seamlessly with METER ZENTRA, EM60, or Em50 data loggers.
Check the METER download webpage for the most recent data logger firmware. Logger
configuration may be done using either ZENTRA Utility (desktop and mobile application) or
ZENTRA Cloud (web-based application for cell-enabled ZENTRA data loggers) (Section2.4.2).
1. Plug the 3.5-mm stereo plug connector into one of the sensor ports on the logger.
2. Using the appropriate software application, configure the chosen logger port for 10HS.
3. Set the measurement interval.
2.3.2 CONNECT TO A NONMETER DATA LOGGER
The 10HS sensor can be used with non-METER (third-party) data loggers. Refer to the third-
party logger manual for details on logger communications, power supply, and ground ports.
10HS sensors can be ordered with stripped and tinned (pigtail) connecting wires for use with
screw terminals. Connect the 10HS wires to the data logger as illustrated in Figure2 and
Figure3,with the power supply wire (brown) connected to the excitation, the analog out wire
(orange) to a analog input, and the bare ground wire to ground.
Ground (bare)
Data (orange)
Power (brown)
Figure2 Pigtail wiring
NOTE: Some 10HS sensors may have the older Decagon wiring scheme where the power supply is white, the analog
out is red, and the bare wire is ground.

5
10HS
Exc. H
Analog In
Data Logger
GL
Analog
Out Ground
Power
Supply
Figure3 Wiring diagram
NOTE: The acceptable range of excitation voltages is from 3 to 15 VDC.To read 10HS sensors with Campbell Scientific
data loggers, power the sensor from a switched 12-V port or a 12-V port if using a multiplexer.
If the 10HS cable has a standard 3.5-mm stereo plug connector and will be connected to a
non-METER data logger, please use one of the following two options.
Option 1
1. Clip off the 3.5-mm stereo plug connector on the sensor cable.
2. Strip and tin the wires.
3. Wire it directly into the data logger.
This option has the advantage of creating a direct connection with no chance of the sensor
becoming unplugged. However, it then cannot be easily used in the future with a METER
readout unit or data logger.
Option 2
Obtain an adapter cable from METER.
The adapter cable has a connector for the stereo plug connector on one end and three
wires (or pigtail adapter) for connection to a data logger on the other end. The stripped and
tinned adapter cable wires have the same termination as seen in Figure3: the brown wire is
excitation, the orange is output, and the bare wire is ground.
NOTE: Secure the stereo plug connector to the pigtail adapter connections to ensure the sensor does not become
disconnected during use.

6
OPERATION
2.4 INTERFACING WITH DATA LOGGERS
2.4.1 DATA LOGGER REQUIREMENTS
The 10HS sensor is designed to work most efficiently with METER data loggers. All METER
readout devices use a 3.0-VDC excitation.
The sensors, however, may be adapted for use with other data loggers, such as those from
Campbell Scientific, Inc., for example. The 10HS requires an excitation voltage in the range of
3 to 15 VDC. The sensors produce an output voltage that depends on the dielectric constant
of the medium surrounding the sensor, and ranges between 10% and 50% of the excitation
voltage. Any data logger which can produce a 3- to 15-VDC excitation with approximately
10-ms duration and read a volt level signal with 12-bit or better resolution should be
compatible with the 10HS sensor. The current requirement for the 10HS is 12 mA at 3 VDC.
METER designed the 10HS sensor for use with data loggers and readout devices that
provide short excitation pulses, leaving the sensors turned OFF most of the time. Continuous
excitation not only wastes battery power, but may, under certain circumstances, cause
the sensor to exceed government specified limits on electromagnetic emissions. Do not
continuously power the 10HS sensor.
2.4.2 METER DATA LOGGERS
METER data loggers can be configured using ZENTRA Utility (a desktop and mobile
application) or ZENTRA Cloud (a web-based application for cellular-enabled ZENTRA data
loggers). Contact Customer Support for more information about these programs.
2.4.3 NONMETER DATA LOGGERS
Non-METER data loggers may require programming to read the 10HS sensor. METER
provides some resources to help interface with Campbell Scientific loggers.
The Campbell Scientific SCWin (Short Cut) program for the 10HS soil moisture sensor is
available.

7
10HS
3. SYSTEM
This section describes the 10HS sensor.
3.1 SPECIFICATIONS
MEASUREMENT SPECIFICATIONS
Volumetric Water Content (VWC)
Range 0−0.57 m3/m3(0%−57% VWC)
Resolution 0.0008 m³/m³ (0.08% VWC) in mineral soils from 0−0.50 m³/m³
(0%−50% VWC)
Accuracy With standard calibration equation, 0.03 m³/m³ (3% VWC) typical
in mineral soils that have solution electrical conductivity <10dS/m
NOTE: With soil-specific calibration, ±0.02 m³/m³ ( ±2% VWC) is typical in any soil.
COMMUNICATION SPECIFICATIONS
Output
300−1,250 mV, independent of excitation voltage
Data Logger Compatibility
Data aquisition systems capable of switched 3–15 VDC excitation and single-ended
voltage measurement at greater than or equal to 12-bit resolution.

8
SYSTEM
PHYSICAL SPECIFICATIONS
Dimensions
Length 16.0 cm (6.3 in)
Width 3.3 cm (1.3 in)
Height 0.8 cm (0.3 in)
Prong Length
10 cm (3.94 in)
Operating Temperature Range
Minimum –40 °C
Typical NA
Maximum 50 °C
NOTE: Sensors may be used at higher temperatures under certain conditions; contactCustomer
Supportfor assistance.
Cable Length
5 m (standard)
40 m (maximum custom cable length)
NOTE: Contact Customer Support if a nonstandard cable length is needed.
Connector Types
3.5-mm stereo plug connector or stripped and tinnedwires
ELECTRICAL AND TIMING CHARACTERISTICS
Supply Voltage (VIN to GND)
Minimum 3 VDC at 12 mA
Typical NA
Maximum 15 VDC at 15 mA
Measurement Duration
Minimum NA
Typical NA
Maximum 10 ms

9
10HS
COMPLIANCE
Manufactured under ISO 9001:2015
EM ISO/IEC 17050:2010 (CE Mark)
2014/30/EU
2011/65/EU
EN61326-1:2013
EN50581:2012
3.2 ABOUT 10HS
The 10HS determines volumetric water content (VWC) by measuring the dielectric constant
of the media using capacitance and frequency domain technology. The 70-MHz frequency
minimizes salinity and textural effects, making this sensor accurate in almost any soil or
soilless media. It arrives with factory calibration for mineral soils, potting soils, and perlite
included in this user manual.
Sensor body
Sensor prongs
Figure4 10HS components

10
SERVICE
4. SERVICE
This section contains calibration information, cleaning and maintenance guidelines,
troubleshooting guidelines, customer support contact information, and terms and conditions.
4.1 CALIBRATION
METER software tools automatically apply factory calibrations to the sensor output data.
However, this general calibration may not be applicable for all soil types. For added accuracy
METER encourages customers to perform soil-specific calibrations.
Which calibration equation to use depends on where it is used. If the calibration equation is
used with sensors connected to a non-METER data logger, use the calibration appropriate
to the excitation voltage. If any METER software is used or the user calibration menu in the
ProCheck is used, use the RAW calibration.
4.1.1 DIELECTRIC CALIBRATION
The 10HS comes precalibrated to measure the dielectric permittivity of the soil with the
accuracy stated in the specification section above. With METER’s data loggers, the following
standard calibration function can be applied.
Equation 1
ε
()()()()()()
()
()
=× −× +× −
×+
−−−
−
.RAW .RAW .RAW
.RAW .
7 449 10 1 969 10 1 890 10
6 691 10 7 457
a
11 47342
2
where RAW is for raw counts.
With non-METER data acquisition equipment, the following calibration can be applied. This
calibration function is valid for any sensor excitation between 3 and 15 VDC.
Equation 2
ε
()()()()()()
()
()
=× −× +× −
×+
−−−
−
.mV. mV .mV
.mV.
2 589 10 5 010 10 3 523 10
9 135 10 7 457
a
10 47342
2
4.1.2 MINERAL SOIL CALIBRATION
For convenience, METER has also developed a standard calibration equation for mineral
soils to be used with the 10HS. With this standard calibration equation and careful sensor
installation, accuracy of better than 3% VWC (0.03 m³/m³) is possible with most mineral
soils. In these soils, it is generally not necessary to calibrate the 10HS for each particular soil
type, and the standard mineral calibration can be used with METER data loggers:
Equation 3
()()()()()
()
=× −× +× −
−− −
VWC. RAW .RAW .RAW .11710395 10 49010192
93 62 3
With non-METER data acqusition equipment, the following calibration can be applied. This
calibration function is valid for any sensor excitation between 3 and 15 V DC.

11
10HS
Equation 4
()()()()()
()
=× −× +× −
−− −
VWC. mV .mV. mV .29710737 10 6691
01
92
93 62 3
Because of the complexity of soils, the accuracy of the VWC measurement can be poor
despite an accurate measurement for dielectric permittivity. Some examples of this are
highly compacted soils, very low bulk density soils, soils with abnormally high organic matter
content, and soils with high-dielectric mineral composition (e.g., TiO2sands). Additionally,
the accuracy of the 10HS may suffer in soils with very high electrical conductivity (>10 dS/m
solution EC). In these soils, it may be necessary to calibrate the 10HS to the specific soil
type. With a soil-specific calibration, the accuracy of the VWC measurements will be
improved to 1% to 2% in any soil or other porous medium.
There are two options for soil-specific calibration.
• Follow the step-by-step instructions for calibrating soil moisture sensors in the application
note Calibrating ECH2O soil moisture probes.
• METER offers a service providing soil specific calibrations.
This calibration service also applies to nonsoil materials, such as compost or potting
materials. Contact Customer Support for more information.
4.1.3 POTTING SOIL
The following equations can be used to convert 10HS output to water content in potting soil.
METER tested several types of potting soil (Sunshine mix, Miracle Grow Potting Mix, and
Custom Nursery soil) at several salinities and found that VWC (in m3/m3) is given in Equation
5for a METER data logger
Equation 5
θ
()()()
()
=× −× −×
−−−
.RAW .RAW .37810899 10 30310
72 52
and in Equation 6 for a non-METER data logger
Equation 6
θ
()()()
()
=× −× −×
−−−
.mV. mV .70510123 10 30310
72 42

12
SERVICE
4.2 TROUBLESHOOTING
If problems with the 10HS are encountered, they most likely manifest themselves in the form
of incorrect or erroneous readings. Review the information in Table 1 and the Troubleshooting
METER soil moisture sensors video to identify the problem. Contact Customer Support for
more information.
Table 1 Troubleshooting the 10HS
Problem Possible Solution
Sensor not responding
Check power to the sensor.
Check sensor cable and stereo plug connector integrity.
Check data logger wiring to ensure brown is power supply, orange is
analog out, and bare is ground.
NOTE: Some 10HS sensors may have the older Decagon wiring scheme where
the power supply is white, the analog out is red, and the bare wire is ground.
Sensor reading too low
(orslightly negative)
Check for air gaps around sensor needles. These could be produced
below the surface of the substrate when the needle contacts a large
piece of material and pushes it out of the way, or if the sensor is not
inserted perfectly linearly.
Ensure the calibration equation being used is appropriate for the
media type. There are significant differences between substrate
calibrations, so be sure to use the one specific to the substrate.
Sensor reading too high
Check to make sure that the media was not packed excessively or
insufficiently during sensor installation. Higher density can cause
sensor reading to be elevated.
Ensure the calibration equation being used is appropriate for the media
type. There are significant differences between calibrations, so be sure
to use the one most suitable to the substrate, or consider developing a
substrate-specific calibration for the particular medium.
Some substrates have an inherently high dielectric permittivity (soils
of volcanic origin or high titanium, for instance). If the substrate has a
dry dielectric permittivity above 6, a custom calibration may need to
be performed. Soils with a bulk EC >10 dS/m require substrate-specific
calibrations (Section4.1).
Cable or stereo plug
connectorfailure
If a stereo plug connector is damaged or needs to be replaced contact
Customer Support for a replacement connector and splice kit.
If a cable is damaged follow these guidelines for wire splicing and
sealing techniques.

13
10HS
4.3 CUSTOMER SUPPORT
Customer service representatives are available for questions, problems, or feedback Monday
through Friday, 7 am–5 pm Pacific time.
Email: support.environment@metergroup.com
sales.environment@metergroup.com
Phone: +1.509.332.5600
Fax: +1.509.332.5158
Website: metergroup.com
If contacting METER by email, please include the following information:
Name
Address
Phone
Email address
Instrument serial number
Description of the problem
NOTE: For 10HS sensors purchased through a distributor, please contact the distributor directly forassistance.
4.4 TERMS AND CONDITIONS
By using METER instruments and documentation, you agree to abide by the METER Group,
Inc. USA Terms and Conditions. Please refer to metergroup.com/company/meter-group-inc-
usa-terms-conditions for details..

14
SERVICE
REFERENCES
Bogena HR, Huisman JA, Oberdörster C, Vereecken H. 2007. Evaluation of a low-cost soil
water content sensor for wireless network applications. J Hydrol. 344(1–2): 32–42.
Kizito F, Campbell CS, Campbell GS, Cobos DR, Teare BL, Carter B, Hopmans JW. 2008.
Frequency, electrical conductivity, and temperature analysis of a low-cost capacitance
soil moisture sensor. J Hydrol. 352(3–4): 367–378.

INDEX
15
Index
A
accuracy 7
C
cable length 8
calibration 10–11
potting soil 11
compliance 9
connecting
METER data logger 4, 6
non-METER logger 4–5, 6
connector types 8
customer support 12
D
data logger 4
connecting 3, 4
sample program 6
dielectric calibration 10
E
email 13
I
installation
horizontal 3–4
vertical 3
M
measurement time 8
mineral soil calibration 10–11
O
orientation 3
P
particle size 2
potting soil 11
power requirements 8
R
range 7
S
specifications
communication 7
data logger compatibility 7
electrical and timing 8
measurement 7
physical 8
T
terms and conditions 13–14
troubleshooting 12–13
W
wiring 4–5
Z
ZENTRA
ZENTRA Cloud 4, 6
ZENTRA Utility 4, 6

14565-01
03.15.2018
METER Group, Inc. USA
2365 NE Hopkins Court
Pullman, WA 99163
T: +1.509.332.5600 F: +1.509.332.5158
E: info@metergroup.com
W: metergroup.com
© 2018 All Rights Reserved.

Table of contents
Other METER GROUP Accessories manuals