Metria COMT-040-001 User manual

Pocket Conductivity Tester
Instruction Manual
METRIA

Pocket Conductivity Tester
1
Thank you for selecting the METRIA pocket conductivity tester. This manual provides a step-by-step guide to help you operate the meter,
please carefully read the following instructions before use.
Installing the Batteries
•Remove the battery compartment lid.
•Insert the three G13A batteries into the battery compartment, note polarity.
•Replace the battery compartment lid and turn clockwise until it is tight.
Keypad Information
INDEX:
KEY
FUNCTION
MEAS/HOLD
• Switches the tester ON/OFF.
• Locks the measured value, press the key again to resume measuring.
• In the calibration mode, confirms the setting value or exits the calibration.
CAL
• Press and hold the key to enter the calibration mode.
• Press the key again to increase the setting value.
°C
• In the measurement mode, shows the current temperature.
• In the calibration mode, decrease the setting value.

Pocket Conductivity Tester
2
Prior to Use
•Remove the electrode protective cap from the tester.
•Soak the electrode for a few minutes in tap water to remove dirt and oil stains on the electrode.
Switching the Tester On and Off
•Press the Meas key to switch on the tester, the display shows measured value.
•Press and hold the Meas key for 5 seconds, the tester will switch off.
•If you do not press any key for 8 minutes, the tester will automatically switch off to conserve energy.
Power
On
5 sec.
Power
Off

Pocket Conductivity Tester
3
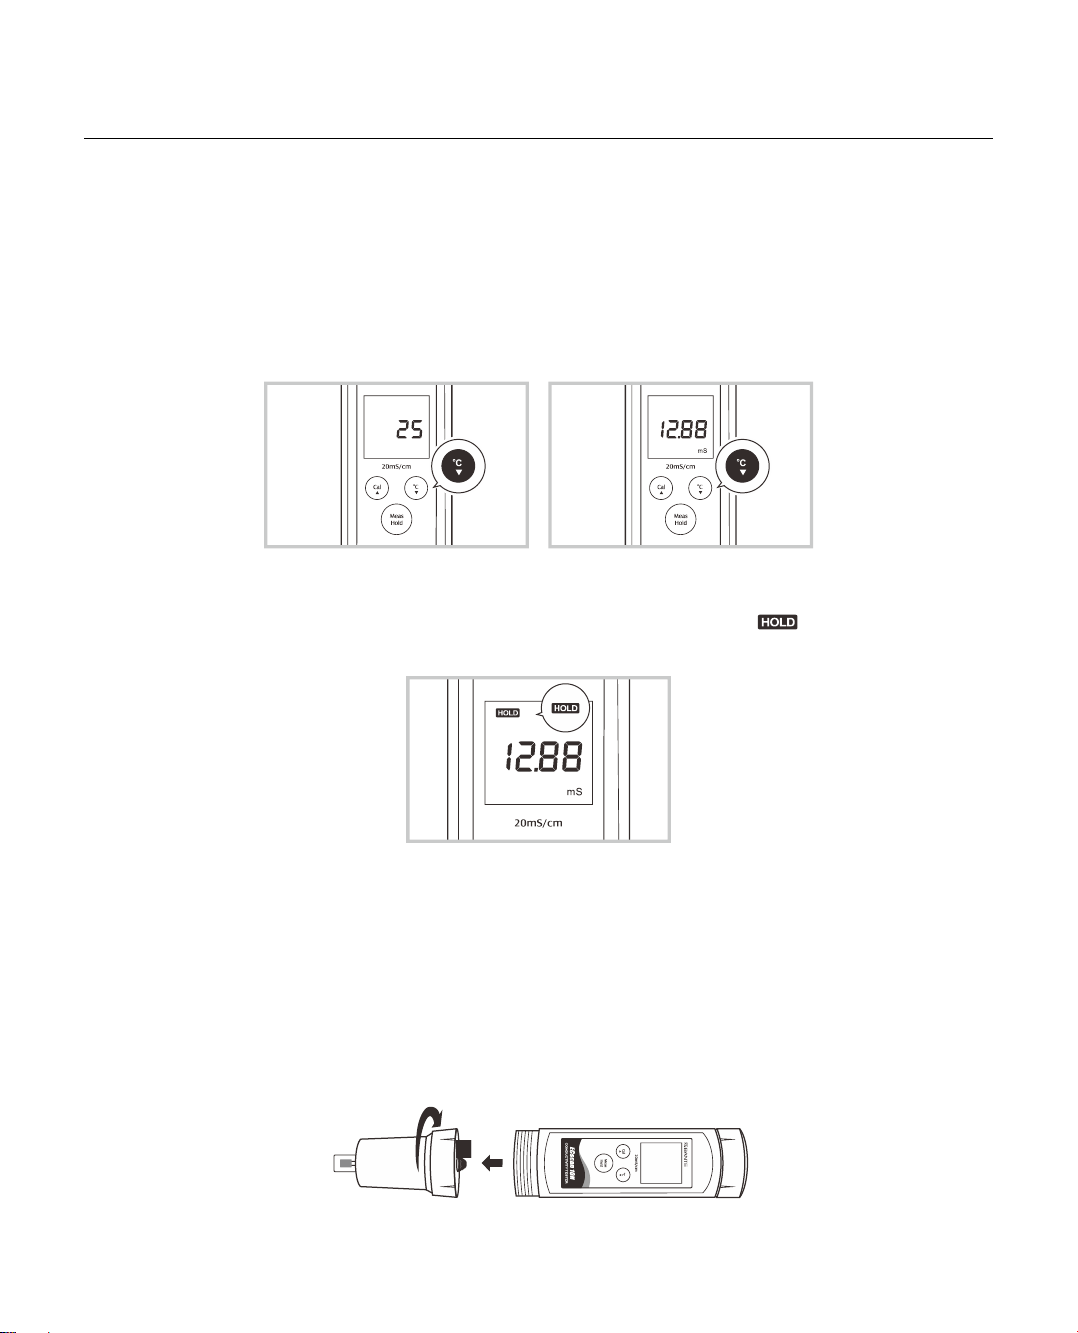
Conductivity Calibration
Pocket conductivity tester allows 1 point calibration. To ensure accurate measurement, we recommend that calibrating the meter regularly.
The tester acceptable calibration ranges from 10 to 18mS/cm (COMT-040-001), 1000 to 1800 µS/cm (COMT-030-001) and 100 to 180 µS/cm
(COMT-020-001). Make sure that you use fresh conductivity standard solution during the calibration. DO NOT reuse calibration solution as it
may be contaminated and affect the calibration and accuracy of measurement.
1. Rinse the conductivity electrode with distilled water , then rinse with a small
amount of standard solution.
2. Place the electrode into the standard solution (e.g., 12.88mS/cm), stir the tester
gently. Make sure there are no air bubble trapped in the slot of the sensor.
3. Press and hold the Cal key, the tester enters the calibration mode.
4. Press the or key to set the calibration value. Ensure the displayed value
matches your calibration standard.
Press or key once, the setting value will gradually increase or decrease. Press
and hold the or key, the setting value will quickly increase or decrease.
5. Press the Meas key, the calibration value will automatically flash 3 times. The tester
returns to the measurement mode. Calibration is completed.
Exit the calibration
During the calibration process, if you want to exit the calibration mode, DO NOT press the Meas key in the step 5. Press the or key
until the display shows “---“, then press the Meas key to exit.
Pocket Conductivity Tester
4
Conductivity Measurement
•Rinse the conductivity electrode thoroughly with distilled water.
•Place the electrode into the sample solution, stir the tester gently.
•Record the measured value when the reading is stable.
Temperature Measurement
In the conductivity measurement mode, press the oCkey, the display shows the temperature value. Press the oCkey again, the tester
returns to the conductivity measurement mode.
Data Hold
During the measurement, press the Hold key, the tester immediately locks the displayed value, the icon appears on the display.
Press the key again to resume measuring.
Electrode Care and Maintenance
•DO NOT touch the measurement area of electrode and always make sure that is clean.
•If there is a build-up of solids inside the measurement area, these should be removed very carefully with a cotton bud soaked in
solvent, taking care not to touch the metal parts of the inner cell. After the solids are removed, the electrode must be recalibrated.
Electrode Replacement
When the tester fails to calibrate or gives fluctuating readings for calibration standards, you need to replace the electrode.
1. Twist the electrode collar counter clockwise, pull the old electrode away from the tester.

Pocket Conductivity Tester
5
2. Align the slot on the new electrode, gently push the electrode into the tester.
3. Twist the electrode collar clockwise until it is tight. Installation is completed.
Troubleshooting
LCD DISPLAY
CAUSE
CORRECTIVE ACTION
Electrode dried out
Soak the conductivity electrode in tap water for 10
minutes
Measured value is out of range
Check the electrode whether clogged, dirty or broken
Incorrect calibration solution
Using the fresh conductivity standard solutions for
calibration
Setting value does not match calibration
solution
Reset the calibration value
Electrode is broken
Replace the electrode module
Specifications
Model
COMT-040-001
COMT-030-001
COMT-020-001
Range
0.1~19.99mS/cm
10~1999µS/cm
1.0~199.9µS/cm
Accuracy
±1% F.S
±1% F.S
±1% F.S
Resolution
0.01mS/cm
1µS/cm
0.1µS/cm
Calibration Point
1 point, 12.88mS/cm
1 point, 1413µS/cm
1 point, 146.5µS/cm
Temperature
Compensation
0~50°C, Automatic
0~50°C, Automatic
0~50°C, Automatic
Operating Temperature
0~60°C, 32~140°F
0~60°C, 32~140°F
0~60°C, 32~140°F
Relative Humidity
< 80%
< 80%
< 80%
Power Requirements
3 × 1.5V "G13A" batteries
3 × 1.5V "G13A" batteries
3 × 1.5V "G13A" batteries
Dimensions
185 (L) × 40 (Dia.) mm
185 (L) × 40 (Dia.) mm
185 (L) × 40 (Dia.) mm
Weight
100g
100g
100g

Hazardous Substance Statement
METRIA Instruments is committed to the reduction and eventual elimination of all hazardous substances in both the manufacturing process
and finished products we supply. We have an active manufacturing and procurement program to minimize and eliminate the use of harmful
heavy metals such as cadmium, lead, mercury and the like. New technologies and design parameters are also promoting these efforts and
we expect to have little or no such materials in our product in the coming years. We welcome our customer suggestions on how to speed
up these efforts.
Warranty
The warranty period for tester is one year from the date of shipment. Above warranty does not cover the sensor and calibration solution.
Out of warranty products will be repaired on a charged basis. The warranty on your tester shall not apply to defects resulting from:
•Improper or inadequate maintenance by customer.
•Unauthorized modification or misuse.
•Operation outside of the environment specifications of the products.
For more information, please contact the nearest authorized distributor.
This manual suits for next models
2
Table of contents


