manuals.online logo
Brands
  1. Home
  2. •
  3. Brands
  4. •
  5. Metz
  6. •
  7. Flat Panel TV
  8. •
  9. Metz MF 55TK36 User manual

Metz MF 55TK36 User manual

This manual suits for next models

1

Other Metz Flat Panel TV manuals

Metz 20 TK 51 User manual

Metz

Metz 20 TK 51 User manual

Metz Flat-Cinema-TV 40 TK 81 User manual

Metz

Metz Flat-Cinema-TV 40 TK 81 User manual

Metz Slim TV User manual

Metz

Metz Slim TV User manual

Popular Flat Panel TV manuals by other brands

Panasonic VIERA TX-R26LM70K null

Panasonic

Panasonic VIERA TX-R26LM70K null

JVC PD-42DX null

JVC

JVC PD-42DX null

Samsung LT-P326W Connection guide

Samsung

Samsung LT-P326W Connection guide

Philips 32PFL7602D - annexe 1 Specifications

Philips

Philips 32PFL7602D - annexe 1 Specifications

Samsung LNR1550X brochure

Samsung

Samsung LNR1550X brochure

Sanyo FVM4212 owner's manual

Sanyo

Sanyo FVM4212 owner's manual

Philips 47PFL7623D Specification sheet

Philips

Philips 47PFL7623D Specification sheet

JVC LT-32Z48 instructions

JVC

JVC LT-32Z48 instructions

Sony KE-42XBR900 - 42" Xbr Plasma Wega™ Integrated... Dimension Guide

Sony

Sony KE-42XBR900 - 42" Xbr Plasma Wega™ Integrated... Dimension Guide

Vizio M190MV Firmware update instructions

Vizio

Vizio M190MV Firmware update instructions

Philips Brilliance 298X4 user manual

Philips

Philips Brilliance 298X4 user manual

Samsung UN55F7050AF quick start guide

Samsung

Samsung UN55F7050AF quick start guide

Philips 1EMN26039A user manual

Philips

Philips 1EMN26039A user manual

RCA TruFlat F20TF30 Brochure & specs

RCA

RCA TruFlat F20TF30 Brochure & specs

Samsung LW32A33W Connecting guide

Samsung

Samsung LW32A33W Connecting guide

Philips 37PF5520D brochure

Philips

Philips 37PF5520D brochure

Sony FD Trinitron Wega KV-30HS420 Specifications

Sony

Sony FD Trinitron Wega KV-30HS420 Specifications

Philips 32PFL7782D Specifications

Philips

Philips 32PFL7782D Specifications

manuals.online logo
manuals.online logoBrands
  • About & Mission
  • Contact us
  • Privacy Policy
  • Terms and Conditions

Copyright 2025 Manuals.Online. All Rights Reserved.

Palma MF 55TK36 – VT Stereo
Operating instructions
- 1 -
Contents
Remote control handset RK18 .............. 2
Control Panel Buttons ............................ 3
Antenna Connections ............................. 3
Preparation ............................................. 4
Features ............................................... 4
Safety Precautions ................................. 4
Before S itching on your TV ................. 6
Power connection ................................ 6
Connections to the RF input socket .... 6
How to connect other devices .............. 6
Inserting batteries in the remote contro
handset ................................................ 6
S itching the TV ON/OFF ....................... 6
To switch the TV on .............................. 6
To switch the TV off .............................. 6
Operating the TV..................................... 7
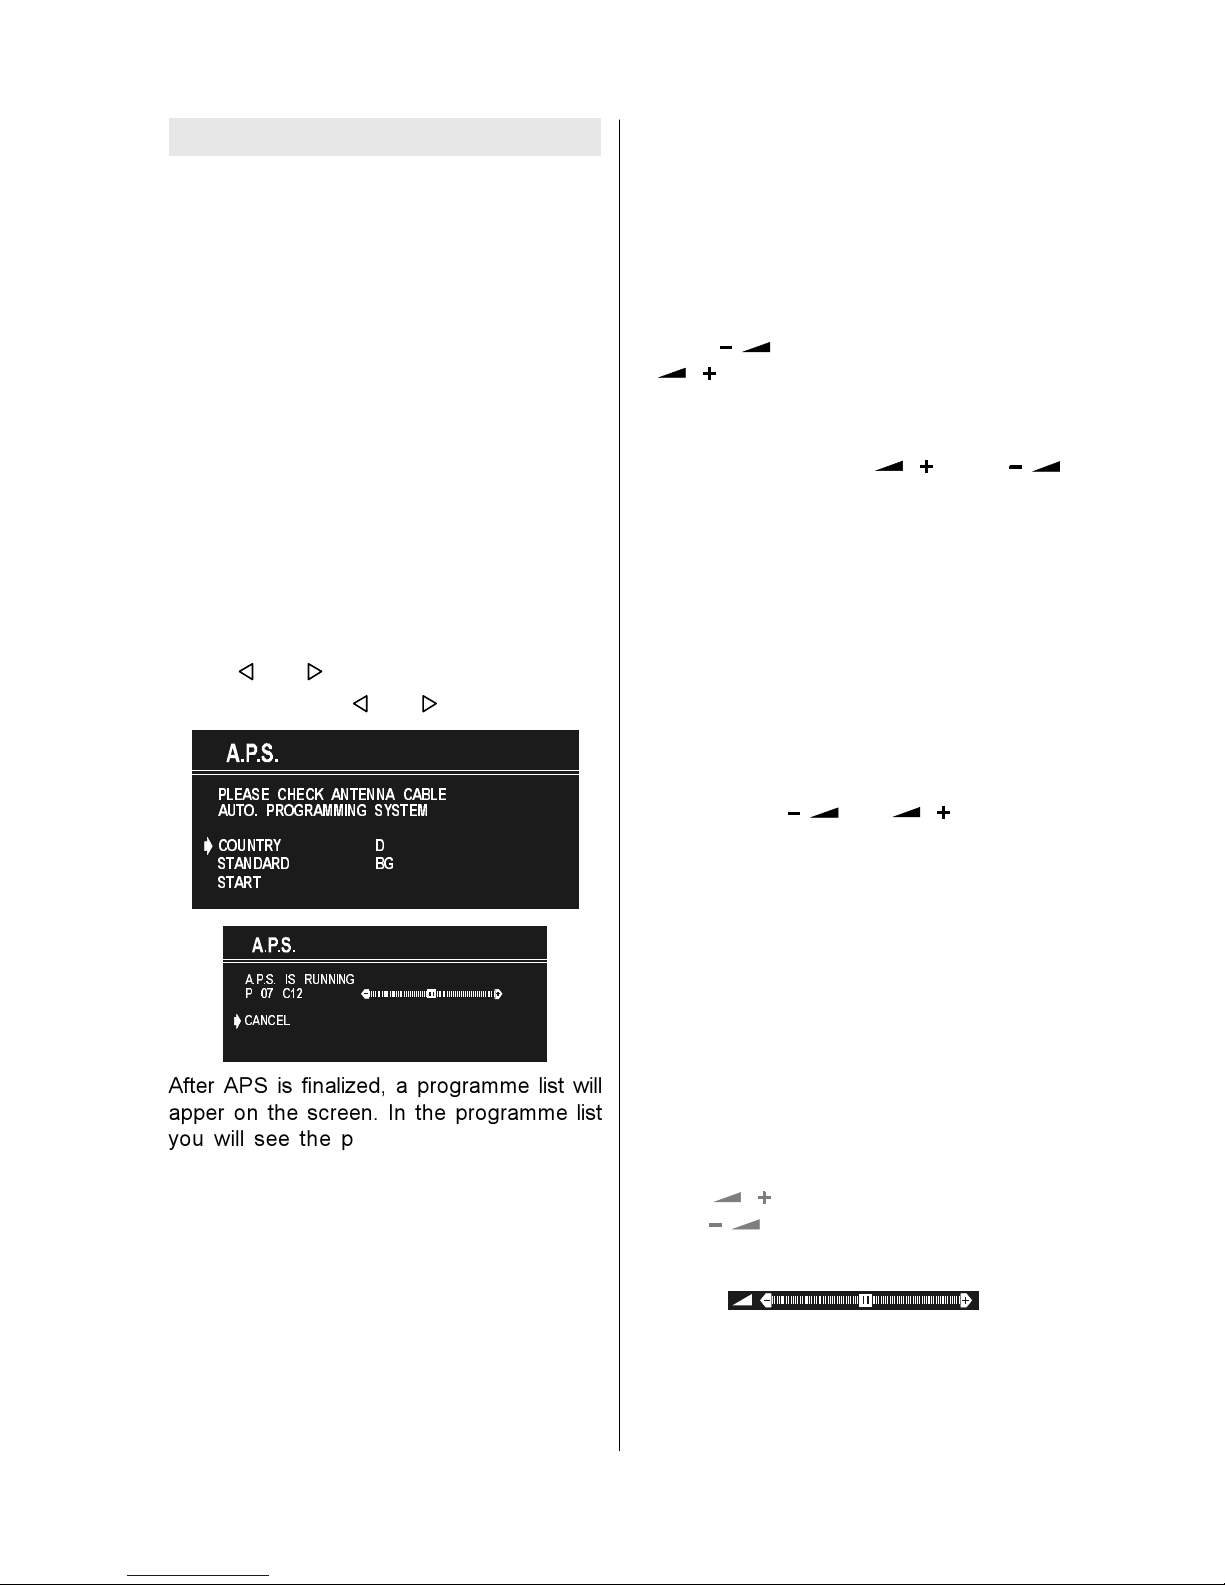
A.P.S. ..................................................... 7
(Automatic Programming System) ...... 7
Operating with the buttons on the TV set7
Operating with Remote Contro ........... 7
Menu System .......................................... 8
Sound Menu ......................................... 9
Picture Menu ...................................... 11
Feature Menu ..................................... 12
Insta Menu ........................................ 13
Programme Menu .............................. 14
Other Features ...................................... 16
TV Status ............................................ 16
Programme Swap .............................. 16
Doub e-digit (- -) ................................. 16
Persona Preferences ........................ 16
Sound Indicator .................................. 16
S eep Timer Last Minute Indicator ..... 16
Mute Indicator ..................................... 16
No-Signa ........................................... 17
B ue Background During No-Signa .. 17
Vo ume Bar ......................................... 17
AV Modes ............................................ 17
Teletext .................................................. 17
To operate Te etext ............................. 17
To se ect a page of Te etext ................ 17
To Se ect Index Page ......................... 18
To Se ect Te etext with a TV
Programme ........................................ 18
Searching for a page whi e watching
TV ....................................................... 18
To Se ect Doub e Height Text ............. 18
To Revea concea ed Information .... 18
To Stop Automatic Page Change ....... 18
To Se ect a Subcode Page ................ 18
Fastext ................................................ 18
To exit Te etext .................................... 19
To Disp ay the Time ........................... 19
Connect Peripheral Equipment ........... 19
Via the Euroconnector ........................ 19
Via Ant Input ........................................ 19
Decoder.............................................. 19
TV and Video Recorder ...................... 19
Copy Faci ity ....................................... 21
Camera and Camcorder ................... 21
Search for and store the test signa of
the video recorder .............................. 21
Connect the decoder to the video
recorder .............................................. 21
Connecting Headphones .................. 21
Tips ........................................................ 21
Care of the Screen ............................. 21
Poor Picture ........................................ 21
No Picture ........................................... 21
Sound ................................................. 21
Remote Contro .................................. 22
No so ution ......................................... 22
Specifications ....................................... 22
- 2 -
Infra-red light!
Do not point the remote control
handset at your eyes and press
any of the buttons on it!
Remote control handset RK18
The remote control handset sends its commands to the TV set with the aid of infra-red light. For this reason, it must
always be pointed towards the TV set in order to operate correctly. Use of the remote control may possibly interfere
with other devices or systems which are controlled by infra-red signals (such as infra-red headphones).
The remote control handset may not operate correctly if the TV set is e posed to direct sunlight, because the TV set is
not able to detect the infra-red signals. The TV set must be switched on with its main switch before the remote control
handset can be used.
- 3 -
Control Panel Buttons
Antenna Connections

±3&+ 0(18
3RZHU 

9ROXPH



3URJUDP

0HQX)URQW

$9 +HDGSKRQH
- 4 -
Preparation
For venti ation, eave a space of at east 10
cm free a around the set. To prevent any
fau t and unsafe situations, p ease do not
p ace any objects on top of the set.
Use this apparatus in tropica and/or moder-
ate c imates.
Features
 It is a remote contro ed co our te evision.
 100 programmes from VHF, UHF bands or
cab e channe s can be preset.
 It can tune cab e channe s.
 Contro ing the TV is very easy by its menu
driven system.
 It has Euroconnector socket for externa de-
vices (such as computer, video, video
games, audio set, etc.)
 Second Euroconnector socket is avai ab e.
 Stereo sound system (German stereo) is
avai ab e.
 Fu function Te etext (Fastext, Toptext).
 It is possib e to connect headphone.
 Direct channe access.
 A.P.S. (Automatic Programming System).
 A programmes can be named.
 Programme swapping between ast
watched two programmes.
 Forward or backward automatic tuning.
 S eep timer.
 Automatic sound mute when no transmis-
sion.
 When no va id signa is detected, after 5
minutes the TV switches itse f automatica y
to stand-by mode.
 WSS (Wide Screen Signa ing).
Safety Precautions
1. Power Source
The receiver shou d be operated on y from a
230V AC, 50 Hz out et. Ensure you se ect the
correct vo tage setting for your convenience.
2. Power Cord
The power supp y cord shou d be p aced so
that it is not ike y to be wa ked on or pinched
by items p aced upon them or against it. Pay
particu ar attention to cord where it enters
the p ug, power out et, and the point where it
exits from the receiver.
3. Moisture and Water
Do not use this equipment in a humid and
damp p ace (avoid the bathroom, the sink in
the kitchen, and near the washing machine).
Do not expose this equipment to rain or wa-
ter, as this may be dangerous and do not
p ace objects fi ed with iquids on top. Avoid
from dripping or sp ashing.
4. Cleaning
Before c eaning, unp ug the receiver from
the main supp y, out et. Do not use iquid or
aeroso c eaners. Use soft and dry c oth.
5. Ventilation
The s ots and openings on the receiver are
intended for venti ation and to ensure re i-
ab e operation. To prevent overheating,
these openings must not be b ocked or cov-
ered in anyway.
6. Lightning
In case of storm and ightning or when go-
ing on ho iday, disconnect the power cord
from the wa out et.
. Replacement Part
When rep acement parts are required, be
sure the service technician has used re-
p acement parts which are specified by the
manufacturer or have the same specifica-
tions as the origina one. Unauthorised sub-
stitutions may resu t in fire, e ectrica shock,
or other hazards.
8. Servicing
P ease refer a servicing to qua ified per-
sonne . Do not remove cover as this may re-
su t in e ectric shock.
- 5 -
9. X-rays
The x-rays generated in this te evision are
shie ded sufficient y.
10. Naked Flame Sources
Do not p ace naked f ame sources on the
apparatus.
Warning!
Any intervention contrary to regulations, in
particular, any modification of high voltage
or a replacement of the picture tube may
lead to an increased concentration of x-rays.
Any television modified in this way no longer
complies with license and must not be oper-
ated.
Instructions for waste disposal:
 Packaging and packaging aids are recy-
clable and should principally be recycled.
Packaging materials, such as foil bag, must
be kept away from children.
 Batteries, including those which are heavy
metal-free, should not be disposed of with
household waste. Please dispose of used
batteries in an environmentally sound man-
ner. ind out about the legal regulations
which apply in your area.
The ightning f ash with arrowhead symbo , within an equi atera tri-
ang e, is intended to a ert the user to the presence of uninsu ated "dan-
gerous vo tage" within the product's enc osure that may be of sufficient
magnitude to constitute a risk of e ectric shock of persons.
The exc amation point within an equi atera triang e is intended to a ert
the user to the presence of important operating and maintenance (ser-
vicing) instructions in the iterature accompanying the app iance.
RISK OF ELECTRIC SHOCK
CAUTION
DO NOT LEAVE YOUR TV AT STAND-BY OR OPERATING WHEN YOU LEAVE YOUR HOUSE
- 6 -
Before Switching on your TV
Power connection
IMPORTANT: The TV set is designed to op-
erate on 230V AC, 50 Hz.
 After unpacking, a ow the TV set to reach the
ambient room temperature before you con-
nect the set to the mains.
Connections to the RF input
socket
VHF/UHF

W
79

5($5

3$1(/
&$%/(79
 Connect the aeria or cab e TV p ug to the
RF input socket ocated at the back of the TV
and connect the cab e p ug coming out from
the TV out socket ocated at the devices
(VCR, DVB etc.) to this socket as we .
How to connect other devices
IMPORTANT: Switch off the TV before con-
necting any externa device.
Sockets for externa connections are at the
back and front of the TV. For connection of
other devices via Euroconnector refer to the
manua s of the re ated devices.
Inserting batteries in the remote
control handset
 P ace the batteries in the right directions as
seen be ow.
 Remove the battery cover ocated on the
back of the handset by gent y pu ing up-
wards from the indicated part.
 Insert two LR03 AAA or equiva ent type bat-
teries inside.
 Rep ace the battery cover.
NOTE: Remove batteries from remote con-
trol handset when it is not to be used for a
long period.Otherwise it can be damaged
due to any leakage of batteries.
Switching the TV N/ FF
To switch the TV on
Your TV wi switch on in two steps:
1- Press the power button ocated on the front
of the TV. Then the TV switches itse f to
standby mode and the RED LED ocated
be ow the TV turns on.
2- To switch on the TV from stand-by mode
either:
Press a digit button on the remote contro so
that a programme number is se ected,
or,
Press Programme Up or Down buttons on
the front of the TV or on the remote contro ,
so that ast switched off programme is se-
ected.
By either ways the TV wi switch on and the
RED LED wi turn GREEN.
To switch the TV off
 Press the stand-by button on the remote
contro , so the TV wi switch to stand-by
mode and the GREEN LED wi become
RED,
or,
Press the power button ocated on the front
of the TV, so the TV wi switch off and the
GREEN LED wi turn off.
- 7 -
perating the TV
You can operate your TV both using the
remote control handset and onset but
tons.
A.P.S.
(Automatic Programming System)
"PLEASE, CHECK ANTENNA CABLE AUTO.
PROGRAMMING SYSTEM" message wi be
disp ayed when you turn on your TV for the
first time. APS, searches and sorts a chan-
ne s and stores them automatica y on your
TV, according to the transmission of pro-
gramme systems in your area.
To cance APS before starting, press TV
button. First of a choose the COUNTRY.
This, wi effect the sort process in APS. To
se ect START use P+ or P- button and
press   or   button. To cance APS dur-
ing running press   or   button.
3/($6( &+(&. $17(11$ &$%/(
$872 352*5$00,1* 6<67(0
&28175<
67$1'$5'
67$57
'
%*
$36 ,6 5811,1*
3  &
&$1&(/
After APS is fina ized, a programme ist wi
apper on the screen. In the programme ist
you wi see the programme numbers and
names assigned to the programmes.
If you do not accept the ocations and / or the
programme names of programmes, you
can change them in Programme menu.
Operating with the buttons on the
TV set
Vo ume setting and programme se ection
can be made using the buttons on the front
pane .
Volume Setting
 Press   button to decrease vo ume or
 button to increase vo ume, so a vo -
ume eve sca e (s ider) wi be disp ayed at
the midd e of the bottom on the screen.
 By pressing both the   and  
buttons at the same time you can enter Main
menu.
Programme Selecting
 Press P/Ch + button to se ect the next pro-
gramme or - P/Ch button to se ect the pre-
vious programme.
Entering Main Menu
 Press "MENU" button to enter Main menu. In
the Main menu se ect sub-menu using - P/
Ch or P/Ch+ button and enter the sub-
menu using   or   button. To
earn the usage of the menus, refer to the
Menu System section.
Operating with Remote Control
The remote contro handset of your TV is de-
signed to contro a the functions of the
mode you se ected. The functions wi be
described in accordance with the menu sys-
tem of your TV.
Functions of the menu system are de-
scribed in Menu System section.
Volume Setting
Press   button to increase vo ume.
Press   button to decrease vo ume. A
vo ume eve sca e (s ider) wi be disp ayed
at the midd e of the bottom on the screen.
- 8 -
Programme Selecting
(Previous or next programme)
 Press P- button to se ect the previous pro-
gramme.
 Press P+ button to se ect the next pro-
gramme.
Programme Selecting (direct access):
Press digit buttons on the remote contro
handset to se ect programmes between 0
and 9. TV wi switch to the se ected pro-
gramme. To se ect programmes between
10 - 99, you must use the doub e digit button
"- -".
this OSD is disp ayed at the eft
hand upper on the screen.
After then, press the digit buttons consecu-
tive y which programme you want to se ect
(eg. for programme 27, first press 2 and
then 7). When it is ate to press any digit but-
ton this function wi be ignored and the dis-
p ay wi be erased. In the same way it must
not be ate to press any digit button after en-
tering the first digit. The imit of the de ay
time is 3 seconds.
Press direct y the programme number to
rese ect sing e digit programmes.
Programme S apping
 Press " " (programme swap) button to
se ect the ast se ected programme. This
button provides swapping between ast two
se ected programmes. For examp e, se ect
programme 8, then se ect programme 2.
Now, if you press " " button, programme 8
wi be se ected. If you press the same button
again, programme 2 wi be se ected and
so on.
Menu System
Your TV has been designed with a menu
system, to provide an easy manipu ation of a
mu ti-function system. The TV is contro ed
by choosing the commands, which are dis-
p ayed on the screen.
Press the "MENU" button. The Main menu
wi be disp ayed at the midd e on the
screen.
A the se ected items in this menu system
is indicated with CYAN characters and with
an arrow on the eftside of items.
To se ect a sub-menu use P+ or P- but-
ton, and press   or   button. Each op-
tion can a so be se ected with the co oured
button and   button on the remote con-
tro .
MAIN MENU
The menu system is described be ow.
The short way in order to enter the menus,
press :
"MENU" Button, Main Menu.
Red ( ) Button, Sound Menu.
Green ( ) Button, Picture Menu.
Yello ( ) Button, Feature Menu.
Blue ( ) Button, Install. Menu.
"" Button, Programme Menu.
Menu button has two functions; first is open-
ing or c osing the "MAIN MENU", and the
second is c osing the sub-menu and then
opening its parent menu.