Mezzo ESP-7501 User manual

Petrifilm™
Yeast and Mould Count Plate
Interpretation
Guide
It is easy to count yeast and mould colonies on Petrifilm
Yeast and Mould count plates. An indicator
dye stains yeast and mould colonies to provide contrast
and facilitate counting.
To differentiate yeast and mould colonies on Petrifilm
Yeast and Mould count plates, look for one or more of
the following typical characteristics:
YEAST
- Small colonies
- Colony has defined edges
- Pink-tan to blue-green in colour
- Colony may appear raised ("3D")
- Usually no focus (dark centre) in middle of colony
MOULD
- Large colonies
- Colony has diffuse edges
- Variable colour (moulds may produce their own pigments)
- Colonies appear flat
- Usually a focus in centre of colony
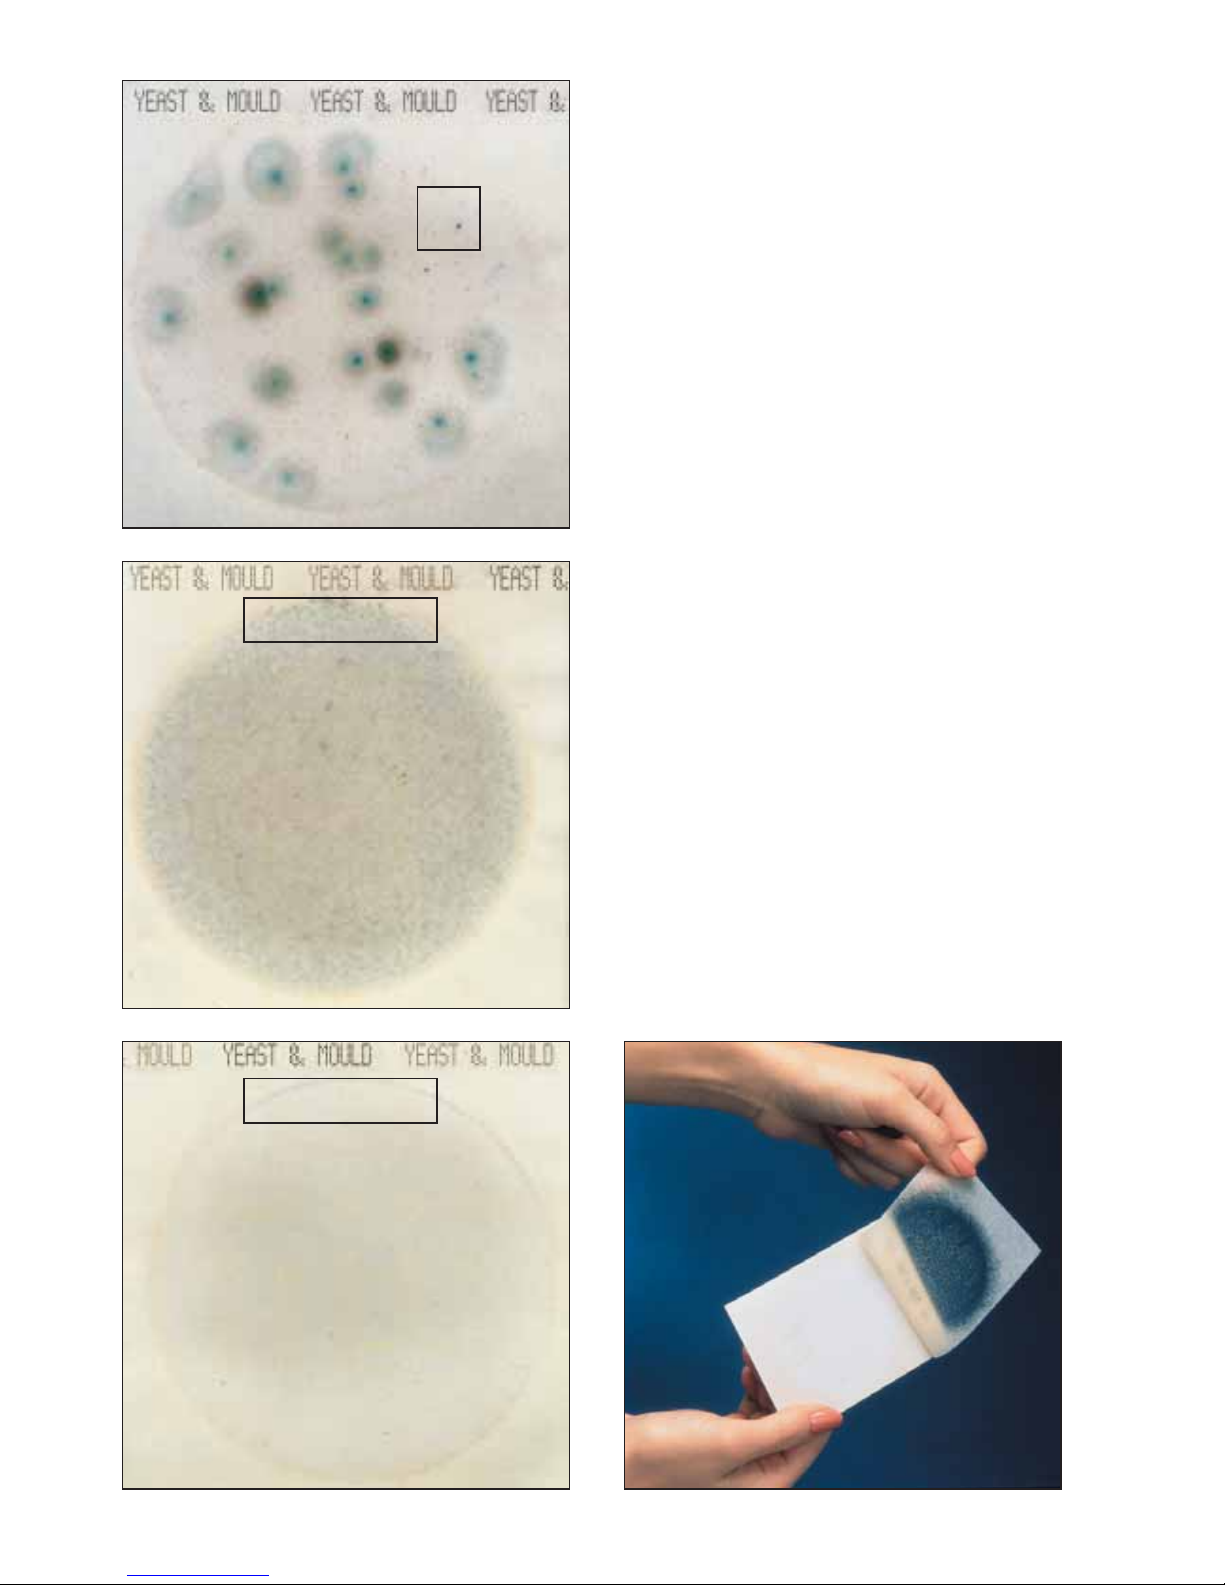
The colonies in figure 1 are characteristic examples of
yeasts: small, blue-green colonies, with defined edges, and
no foci. (Yeast count = 44)
The colonies in figure 2 are characteristic examples of
moulds: large, variable coloured colonies, with diffuse
edges, and centre foci. (Mould count = 27)
Figure 1
Yeast count = 44
Mold count = 27 Figure 2
3
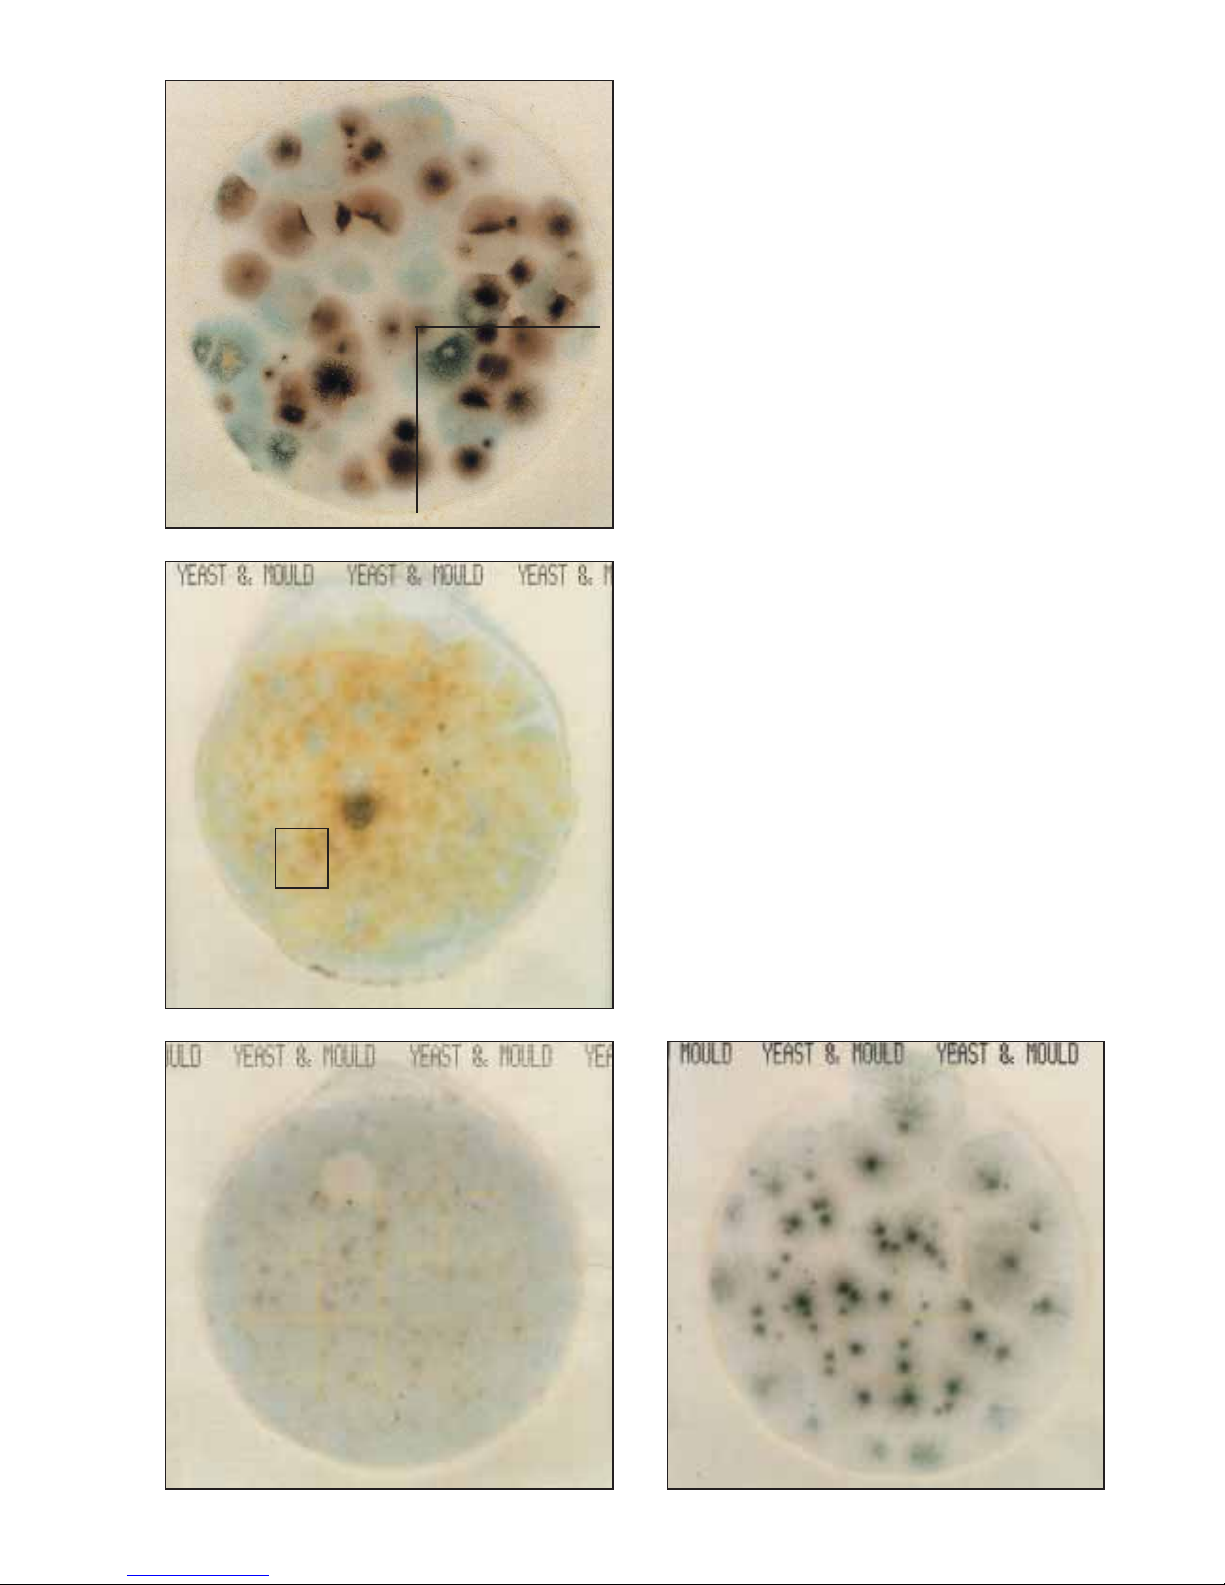
The 3M™Petrifilm™Yeast and Mould Count Plate in figure 3
contains as easily countable number of mould colonies,
(large, green colonies with diffuse edges, and centre foci)
and a high number of yeast colonies. The yeast colonies are
small, tan colonies with defined edges, and no foci. When
colonies number more than 150, estimate the count. (Yeast
count = 480 (estimate); Mould count = 21)
Determine the average number of colonies in one square
(1 cm2) and multiply it by 30 to obtain the total count per
plate. The inoculated area of a Petrifilm Yeast and Mould
count plate is approximately 30 cm2.
The Petrifilm Yeast and Mould count plate in figure 4
contains a high number of yeast colonies - too numerous to
count (TNTC). The small, blue colonies outlined at the
edge of the plate differentiate the plate 'from a TNTC mould
count. (Yeast count = TNTC actual count > 104)
Sometimes Petrifilm Yeast and Mould count plates with
high numbers of yeast colonies may appear to have blue
growth only around the edges (figure 5). This is also
recorded as a yeast count of TNTC. (Yeast count = TNTC
actual count > 106)
If Petrifilm Yeast and Mould count plates appear to have
no growth, lift the top film and examine the gel that adheres
to the top film (figure 6). If numerous yeast are present,
you will see white colonies in the gel. This is recorded as a
yeast count of TNTC. (Yeast count = TNTC)
Yeast
Yeast count = 480 (estimate);
Mould count = 21 Figure 3
Yeast count = TNTC (actual count < 104)Figure 4
Yeast count = TNTC (actual count < 106)Figure 5 Yeast count = TNTC Figure 6
The mould colonies on the 3M™Petrifilm™Yeast and Mould
Count Plate in figure 7 are variably pigmented colonies,
with diffuse edges, and centre foci. They are large, and
beginning to crowd, sporulate, and overlap each other on
the plate. For ease in counting, divide the plate into sections
and look for foci to help distinguish individual colonies.
(Mould count = 59) The section shown has 15 moulds.
Note the variable pigmentation, and fuzzy edges of
the plate in figure 8, caused by the high numbers of mould
colonies and sporulation that has taken place. Estimate
the count by counting the foci. There are 4 colonies in
the square shown. (Mould count = 120 estimate)
As with all plate count methods, crowded plates may show
atypical colony characteristics. Proper dilution is important
to ensure an accurate count.
The Petrifilm Yeast and Mould count plates in figures 9
and 10 are 1 : 10 and 1 : 100 dilutions respectively, of the
same product. The colonies in the figure 9 are small, faint
and numerous making the count difficult to estimate.
An artifact bubble is present. (Mould count = TNTC)
Dilution of the product to obtain a colony count within
the desired counting range (15-150 colonies), makes
counting easy. The moulds in figure 10 are large, with
diffuse edges and centre foci. (Mould count = 58).
The over-crowding on the plate in figure 9 prevented
their typical growth.
Moulds
Mold count = 59 Figure 7
Mold count = 120 (estimate) Figure 8
Mold count = TNTC Figure 9 Mold count = 58 Figure 10

All living cells contain the enzyme phosphatase. In the
presence of phosphatase, the indicator in the 3M™Petrifilm™
Yeast and Mould Count Plates is activated and stains the
yeast and mould colonies a blue colour.
Some raw and processed food products that contain living
cells (and therefore, phosphatase) may also cause this blue
colour reaction to occur. Two types of colour reaction from
products are sometimes seen: a uniform blue background
colour, or intense, pinpoint blue spots (often seen with
spices or granulated products).
A colour reaction caused by natural phosphatase in a
product can be distinguished from yeast and mould
colonies by one or more of the following techniques:
1. Dilution: When possible, further dilution will eliminate
blue background colour, or reduce the number of pinpoint
blue spots.
2. Late Supernate: Mix sample and let settle 3-5 minutes
to eliminate large product particles that can often cause the
pinpoint colour reactions.
3. Incubation Temperature: Incubate plates at the proper
temperature 20-25°C. Enzyme (phosphatase) reactions occur
faster as temperatures increase.
4. Check & Note: Check Petrifilm Yeast and Mould
count plates after 24-48 hours of incubation. Product
colour change can occur within 24-48 hours. Make note
of any colour seen, to aid in final interpretation.
The Petrifilm Yeast and Mould count plate in figure 11,
is an example of a plate with uniform background colour
caused by the "natural phosphatase" present in the sample
tested. The "grainy" appearance is due to particles of
product in the dilution plated. To help distinguish from the
TNTC yeast or mould count, note the edges of the plate.
(Yeast and Mould count = 0)
Figure 12 is an example of intense, pinpoint blue spot
reactions seen occuring from the "natural phosphatase" in
some food products. Note their SHAPE - tiny, pinpoints or
irregularly shaped, and COLOUR - deep blue, that often
look faint, or smeared around the edges of some of the
larger particles. (Yeast and Mould count = 0)
Another example of intense blue pinpoint colour reactions
is shown in figure 13. The pinpoint dots are very bright,
tiny, and irregularly shaped. The yeast colonies are small,
blue-green colonies with defined edges. The mould
colonies are large, variably pigmented colonies with
diffuse edges and centre foci. (Yeast count = 7;
Mould count = 7)
Phosphatase Reaction
Yeast and Mould count = 0 Figure 11
Yeast and Mould count = 0 Figure 12
Yeast count = 7; Mould count = 7 Figure 13

Figure 14 is the same product as shown in figure 13, plated
after allowing the product particulates to settle 3-5 minutes
before plating. There are still a few pinpoint spots (in the
squares above) caused by product particles, but most
product interference was eliminated. (Yeast count = 12
Mould count = 4)
Incubating yeast and mould plates at a higher temperature
may not mean a faster result - it may mean an inaccurate
result as illustrated in the Petrifilm Yeast and Mould count
plates in figures 15 and 16. They are duplicate plates of the
same product and dilution, but were incubated for different
times at different temperatures.
Proper incubation TIME and TEMPERATURE are
important to ensure growth of the types of yeast and mould
that can cause spoilage. These yeast and moulds are
generally slow growing, and sensitive to high temperatures,
regardless of the method used.
To ensure optimum growth, incubate 3M™Petrifilm™Yeast
and Mould Count Plates at 20°C-25°C (room temperature),
and check plates for growth at both 3 and 5 days. Since
mould colonies grow between the films, inspecting Petrifilm
plates will not dislodge spores and cause additional colonies.
Time & Temperature
Yeast count = 12; Mould count = 4 Figure 14
Yeast count = TNTC
Incubated 3 days at 35°C
Yeast count = TNTC (actual count >107)
MOULD count = 120 (estimate)
Incubated 5 days at room temperature.
Microscopic Differentiation
Yeasts and moulds are very
diverse organisms, and cannot
always be distinguished from each
other macroscopically. As with
any method, positive
differentiation can be made with
microscopic examination.
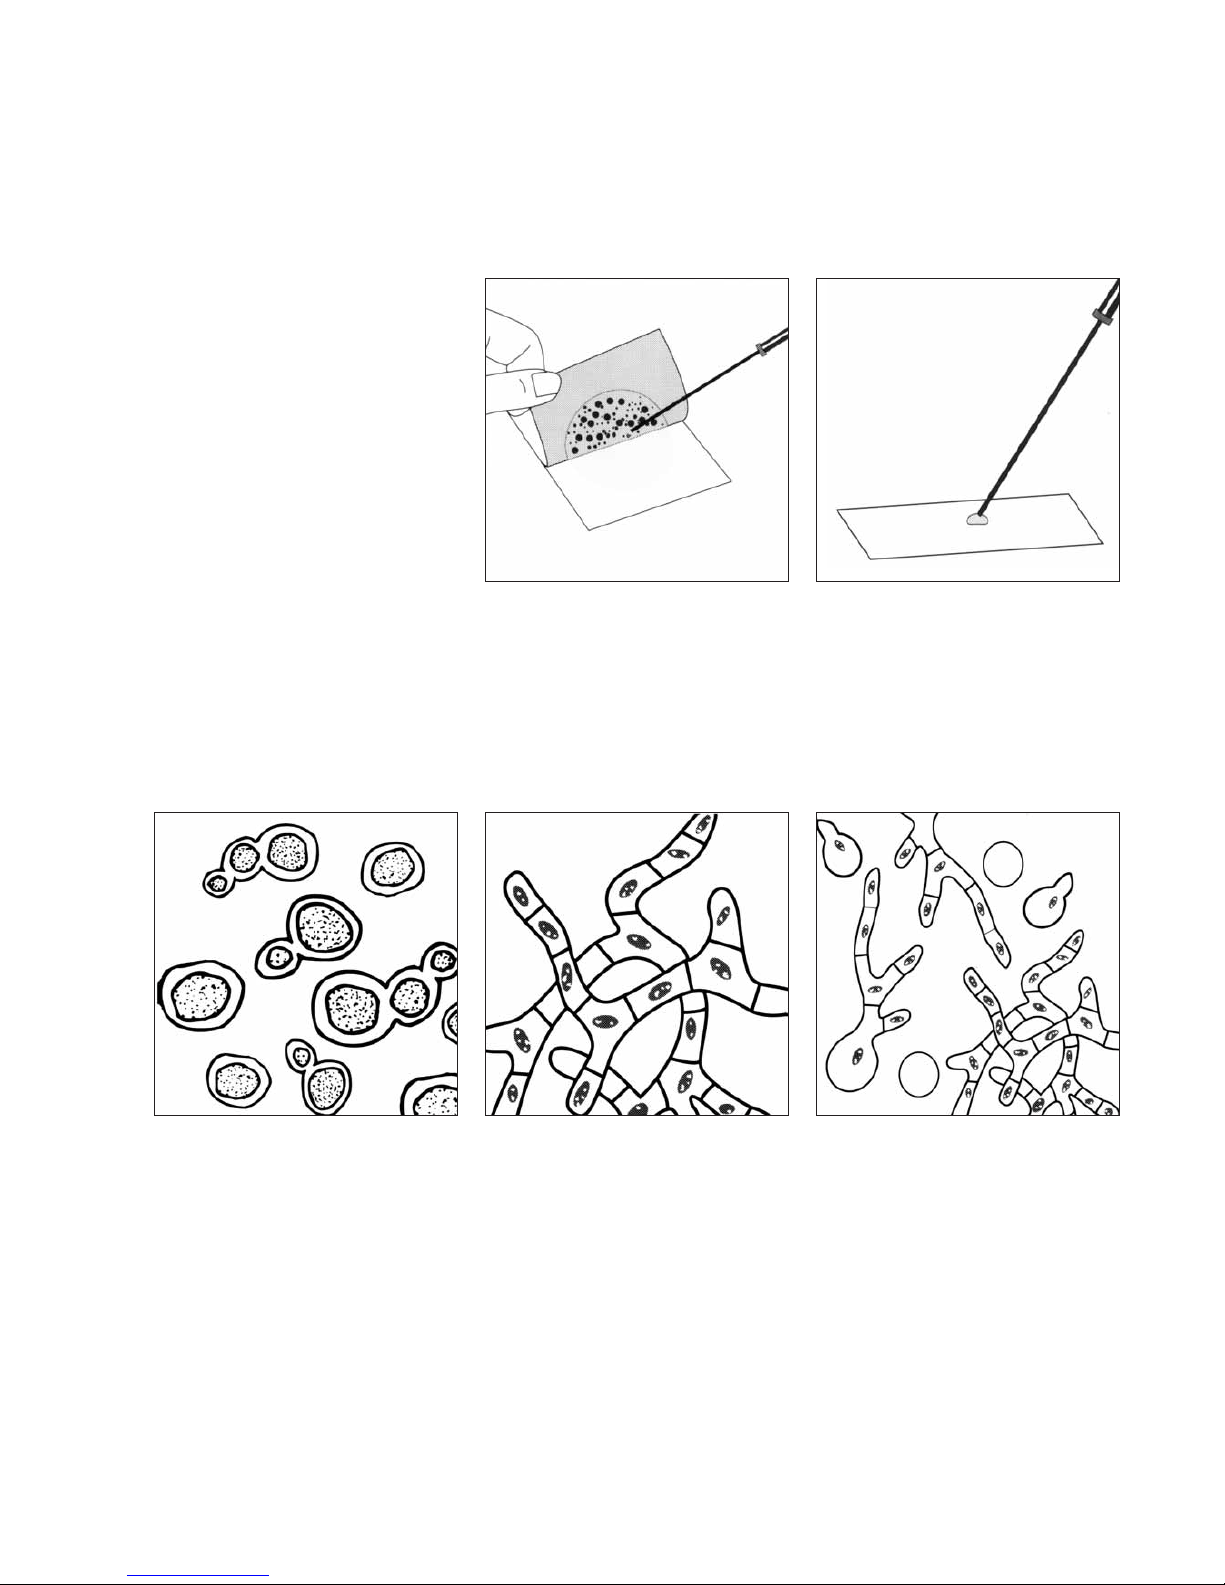
To isolate colonies for further
identification, lift the top film and pick
the colony from the gel.
branching, thread-like filaments
(mycelium) – MOULD
or MOULD in various stages of
germination.
Look for oval shaped, budding
YEAST
Transfer the colony to a drop of sterile
water on a microscope slide, cover with
a coverslip, and view under oil
immersion power.

Reminders
for use
Petrifilm
3M™Petrifilm™
Yeast & Mould Count Plates
For detailed warnings, cautions, disclaimer of warranties / limited remedy, limitation of 3M liability,
storage and disposal information and instructions for use, see product's package insert.
Refrigerate unopened packages.
Use before expiration date on
package.
Storage
1
Petrifilm
To seal opened package, fold end
over and tape shut.
2
Petrifilm
Keep resealed package at ≤21°C
(≤70°F), ≤50%RH. Do not
refrigerate opened packages. Use
Petrifilm count plates within one
month after opening.
3
Prepare a 1: 10 or greater dilution
of food product.* Weigh or pipette
food product into Whirl-Pak
®
bag, stomacher bag, dilution
bottle or other appropriate sterile
container.
Sample Preparation
4
Add appropriate quantity of diluent.
These include Standard Methods
phosphate buffer, 0.1% peptone
water, distilled water, phosphate
buffered saline, and Butterfield's
buffer. Do not use buffers
containing sodium citrate or
thiosulfate.
5
Blend or homogenize sample per
current procedure.
* If greater sensitivity is required
with dairy or juice products please
refer to Petrifilm Dairy & Juice
Products sheet.
6
Place Petrifilm count plate on flat
surface. Lift top film.
Inoculation
7
With pipette perpendicular to
Petrifilm count plate, place 1ml of
sample onto centre of bottom film.
8
Release top film; allow it to DROP.
DO NOT roll top film down.
9

Holding crossbar, position
Petrifilm Yeast & Mould spreader over
Petrifilm count plate.
10
Apply pressure on spreader to
distribute inoculum over circular
area. Do not twist or slide the
spreader.
11
Lift spreader. Wait one minute for gel
to solidify.
12
<70°F
Incubate Petrifilm count plates with
the clear side up in stacks of 20 or
less at a temperature of 25°C
for 3-5 days.
Incubation Interpretation
13
Read Petrifilm count plates on a
standard Quebec-type colony
counter or other magnified light
source. Refer to Guide to
Interpretation when reading
results.
14
•Note: Remember to inoculate and spread each Petrifilm plate before going on to the next.
•Steps 9 and 10 are unique to Petrifilm Yeast & Mould count plates.
•Incubate Petrifilm Yeast & Mould count plates in a plastic container or plastic bag to optimize colony development.
Additional Comments
Europe
Laboratoires 3M Santé
Boulevard de l'Oise
95029 Cergy Pontoise Cedex
France
Tel.: +33 (0)1 30 31 85 71
Fax: +33 (0)1 30 31 85 78
Dealer's stamp
3
Microbiology Products
3M Health Care Ltd
3M House
Morley Street
Loughborough
Leicestershire LE11 1EP
Tel: (01509) 613181
Fax No. (01509) 613087
www.3M.com/microbiology 3M and Petrifilm are trademarks of the 3M Company
Whirl-Pak is a trademark of Nasco
© 3M Health Care Limited 2006
Date Version
January 2006 1.0
Other manuals for ESP-7501
2
Other Mezzo Coffee Maker manuals


