Mezzo ESP-7501 User manual
USERS MANUAL ESPRESSO MAKER
Model: ESP-7501
ESPRESSO MAKER
Thank you for choosing to purchase one of our MEZZO products. We appreciate your business and believe that
we have provided you with a product that is both reliable and value for money. We encourage you and your
friends to choose from our range of MEZZO products again in future.
PACKAGE CONTENTS
1 Espresso maker
1 Water container
2 Ceramic Espresso cups
1 Drip tray with Grid
1 Coffee measuring spoon
1 Coffee Tamper
1 Filter Holder
1 Filter
1 Instruction manual
Confirm all parts before disposing of carton.
SAFETY INSTRUCTIONS
Carefully read this manual before using this appliance. Make sure that you know how the appliance functions and
how to operate it. Maintain the appliance in accordance with the instructions to ensure that it functions properly.
Keep this manual with the appliance. If the appliance is to be used by a third party, this instruction manual must
be supplied with it. The safety instructions, by themselves, do not eliminate danger completely, and proper
accident prevention measures must always be used.
For any customer query or in the unlikely event of a product failure, please phone or
email the helpline contact details below for assistance.
DO NOT RETURN THE PRODUCT TO THE RETAILER.
Toll Free Help line: 1300 366 144
1
BEFORE INITIAL USE
Remove all packaging. Carefully wipe the outer case with a soft damp cloth and dry it afterwards with a dry
towel. Do not immerse the appliance in water or any other liquid. Check for any damage that may have occurred
during transit. Do not use if the appliance is damaged in any way or if the supply cord is damaged. Immediately
return to supplier for replacement or repair. Wash all accessories in warm soapy water to remove any impurities
that may have accumulated. Dry with a dry towel.
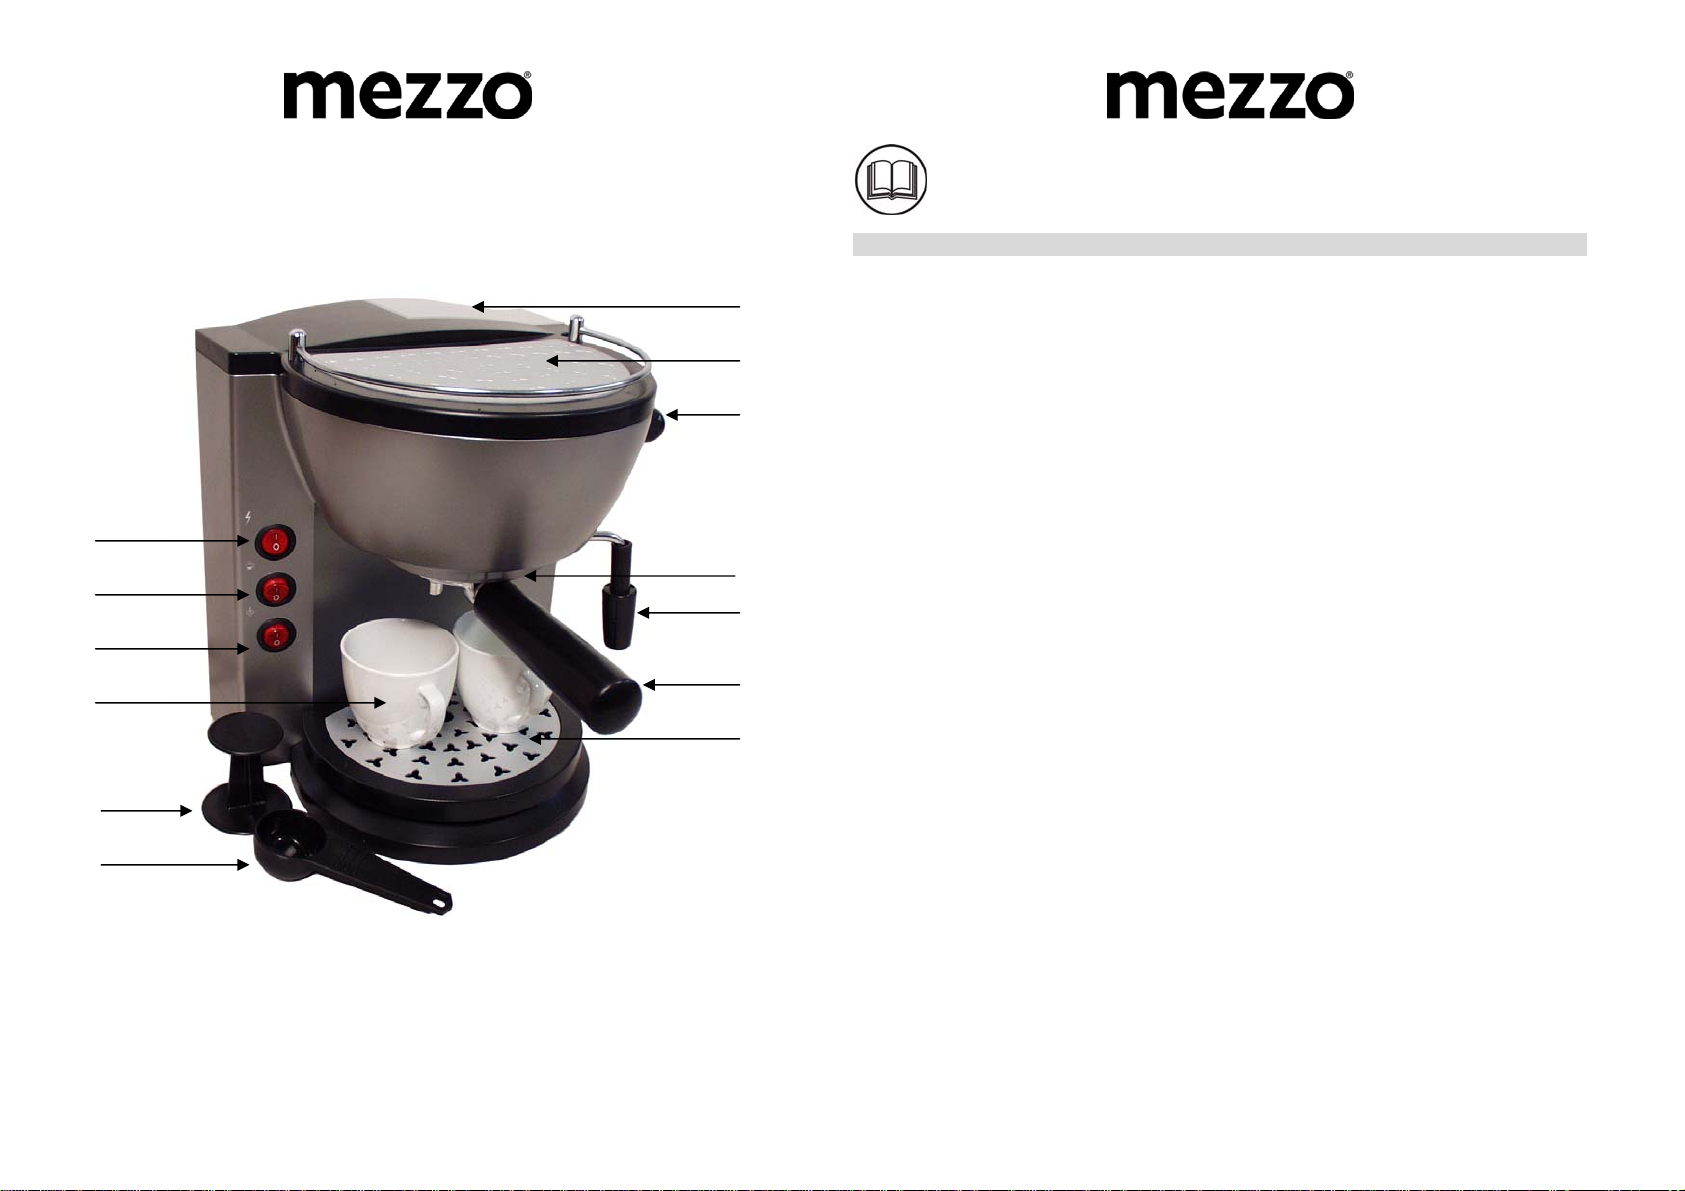
LIST OF CONTROLS AND PARTS
This appliance has been designed for general indoor household use only. Disconnect from the power supply
when not in use.
A. Power ON/OFF switch and indicator lamp
B. Espresso ON/OFF switch and indicator lamp
C. Steam ON/OFF switch and indicator lamp
D. Ceramic Espresso cup x 2
E. Coffee Tamper
F. Coffee measuring spoon
G. Water container
H. Cup warmer
I. Steam control knob
J. Brew Head (where the Filter Holder connects to the Espresso Maker)
K. Steam outlet
L. Espresso Filter Holder
M. Removable Drip tray
ASSEMBLY AND PREPERATION
Place the Drip Tray into position, making sure the Grid is attached to the top of the Drip Tray.
Attach the Water Tank if it is not already attached.
Have the following Accessories and Ingredients ready:
-Filter and Filter Holder
-Espresso Cup or Cups, and Mug or Glass if required (Mug and Glass not included)
-Coffee Measuring Spoon
-Coffee Tamper
-Ground Coffee or Coffee Beans – not included
-Coffee Grinder (if applicable) – not included
-Milk Frothing Jug – not included
-Cold, fresh milk – not included
2
G
H
I
A
J
B K
C
L
D
M
E
F
3
MAKING THE PERFECT ESPRESSO COFFEE.
Selecting coffee to use
Using Pre-Ground Coffee
-Ensure that the Ground Coffee is an Espresso Grind, and is suitable for Espresso Machines (see notes
on page 10 regarding the Grind of Coffee).
Grinding your own Coffee Beans
-If grinding your own Coffee Beans to use in this Espresso Maker, make sure that the Grind is not too
fine, but also not too coarse. If the grind is too fine, the water will not be able to flow through the
coffee, resulting in over extracted Espresso Coffee that is dark and bitter. If the grind is too coarse the
water will flow through the Coffee too quickly, resulting in an under extracted Espresso Coffee that
will not have the optimal flavour.
Experiment with different Brands and Varieties of Ground Coffee or Coffee Beans to find the Variety that you
prefer.
STEP 1 – Fill the Water Tank.
-Ensure the Power On/Off switch is in the “O” OFF position.
-Turn the Power Switch off at the wall socket, and unplug the Espresso Machine.
-To remove the Water Tank for refilling, simply lift the transparent Water Tank out of its enclosure.
-You can also refill the Water Tank while it is still attached to the Espresso Maker.
-Fill the Water Tank with clean cold water to the Maximum Level indicated. It is extremely important
that this water is as clean as possible, as this will affect the flavour of the coffee.
-Replace the Water Tank if it has been removed, pushing down gently on the top of the Water Tank
until it is firmly in position.
-Ensure that the lid to the Water Tank is closed at all times (except when filling).
NOTE: Check the water level in the Water Tank before use, and replace the water daily.
The Water Tank should be refilled with fresh, cold water before each use.
Do not use mineral or distilled water or any other liquid in the Water Tank.
4

STEP 2 – Preparing the Coffee.
-Ensure that both the Filter and the Filter Holder are clean and dry, and that there are no left over
Coffee Grounds from the previous use.
-Place the Filter into the Espresso Filter Holder. Place the Filter Holder onto a flat, level surface.
-Using the Measuring Spoon provide, fill the Filter with Ground Coffee to the 1 mark inside the Filter
for a single espresso shot, or to the 2 mark inside the Filter for either a double espresso shot, or for
two cups of espresso coffee.
-When the Filter is filled up to the 1 level for a single espresso shot, only approximately 30ml of
espresso coffee (one full white porcelain cup) should be extracted.
-When the Filter is filled up to the 2 mark for a double espresso shot, again, only approximately 30ml
of espresso coffee should be extracted.
-When the Filter is filled up to the 2 mark for two cups of espresso coffee (two single shots), only
approximately 60ml of espresso coffee (two full white porcelain cups) should be extracted.
-If you want a mug of coffee, fill the Filter up to the 2 mark, and extract 60ml of espresso coffee. If
you want a larger coffee, fill the mug up with hot water before adding the 60ml of espresso coffee to
the mug.
STEP 3 – Tamping the Coffee.
-Distribute the Coffee evenly in the Filter.
-Hold the black plastic Tamper with your palm flat on the small side. Hold the Handle of the Filter
Holder with your other hand, keeping the Filter Holder firmly in place on a flat, level surface. Tamp
the Coffee evenly and lightly (First Tamp) with the large end of the Coffee Tamper.
-Some of the Ground Coffee may stick to the side of the Filter. To remove this Ground Coffee from
the sides of the Filter, gently tap the Filter so that these grinds fall back onto the Tamped Ground
Coffee.
-At this time also clear off any excess Ground Coffee from the rim of the Filter Holder to ensure a
proper fit into the Brew Head.
-For the Second and Final Tamp, Tamp down firmly and evenly on the Ground Coffee in the Filter.
Turn the Tamper 360 degrees (1 revolution) to polish the surface of your Tamped Coffee.
-Make sure you Tamp evenly. An uneven Tamp will result in an uneven Extraction.
-DO NOT sharply hit the Filter, as this will unevenly distribute the Ground Coffee, allowing shortcuts
for the water to pass through. This causes part of the espresso to be over-extracted and part of the
espresso to be under-extracted.
5
STEP 4 – Priming the Brew Head.
Before placing the Filter Holder into position it is recommended to run a short flow of water through the Brew
Head.
-Make sure that the Power ON/OFF Switch is in the “O” OFF position, and plug the power cord into a
standard household outlet and switch on.
-Make sure that the Espresso ON/OFF Switch and the Steam ON/OFF Switch are in the “O” OFF
position, and turn the Power ON/OFF Switch to the “ | “ ON position. The Power Switch and the
Steam Switch will illuminate to show that the Power is ON and that heating is taking place. When the
Steam Switch light goes out, this indicates that the Espresso Maker has reached the correct
temperature for making Espresso Coffee.
-The Steam Switch Light will cycle on and off as the temperature is maintained at the correct level by
the internal heating system.
-Place a container or empty cup under the Brew Head.
-With the Filter Holder removed, prime the Brew Head by switching the Espresso ON/OFF Switch to
the ON “ | “ position momentarily (approx 5 seconds). A pumping noise will be heard in this
operation. Switch the Espresso Switch back to the OFF “O” position after a small amount of water
has flowed out of the Brew Head.
STEP 5 – Warming the Cups.
-The Cup Warmer will start to warm as the Espresso Maker heats up.
-Pre-Warm the Espresso Cups by placing them on the Cup Warmer. This will help maintain the
temperature of the Espresso Coffee.
STEP 6 – Inserting the Filter Holder.
-Place the Filter Holder underneath the Brew Head so that the Handle is aligned with the left hand side
(and thinnest side) of the dotted line. Push the Filter Holder up into the Brew Head and turn the
handle to the right (anticlockwise). Turn the handle of the Filter Holder until resistance is felt. This
should be when the Handle of the Filter Holder is at about 90 degrees (sticking straight out) from the
Espresso Maker.
-Do Not use excessive force when turning the Handle of the Filter Holder, as this can damage the
Brew Head. When the Filter is filled to the 2 mark with Ground Coffee, the Filter Holder Handle
may not turn all the way round to 90 degrees from the Espresso Maker.
6

STEP 7 – Brewing the Espresso Coffee.
-The Steam ON/OFF Switch cycles off when the Espresso Maker has reached the correct temperature
for brewing.
-Ensure the Drip Tray and Grid (sits on the Drip Tray) are in place.
-Place one or two pre-warmed cups beneath the Filter Holder Outlets. If using one cup, make sure that
the cup is positioned under BOTH of the Espresso Outlet Holes in the Filter Holder. If using two
cups, placed the cups side by side so that one of the Espresso Outlet Holes flows into each cup.
-Press the Espresso Switch to the ON “ | “ position.
-After a few seconds Espresso Coffee will begin to pour into the cups. You will hear a pumping noise
during this process.
-When the Espresso Coffee has almost filled the cup (or cups), press the Espresso Switch to the OFF
“O” position and remove your cup (or cups).
-Once you have switched the Espresso Maker Switch to the OFF position, Espresso Coffee will
continue to pour for a second or two, and will drip into the drip tray. This is because there is still hot
water stored in the Ground Coffee in the Filter. You can either catch this excess Espresso Coffee with
a small container, or allow it to fall into the drip tray.
-If the Steam Function is not required, Press the Power Switch to the OFF “O” position, and allow the
Espresso Maker to cool.
STEP 8 – Emptying the Filter Holder.
-Remove the Filter Holder from the Brew Head by turning the Filter Holder to the left (clockwise)
until it releases. To empty the used Ground Coffee, turn the Filter Holder on it’s side in a bin and
gently tap out the coffee against the side of the bin. Be careful, as the Filter can sometimes come out
of the Filter Holder during this procedure. This used Ground Coffee should not be disposed of down a
sink, as it could block the drain. Remove the Filter from the Filter Holder by pushing upwards on the
rim of the Filter. The Filter should pop out of the Filter Holder without too much force needed. Rinse
the Filter Holder and Filter with water and allow to dry.
-NOTE: When you remove the Filter Holder from the Espresso Maker, be careful of the Filter Holder
dripping Espresso Coffee. If possible, have a small bin or container for the used Ground Coffee close
at hand.
-WARNING: Do not attempt to remove the Filter Holder with the Power Switch in the ON “ | “
position.
7
FROTHING MILK FOR A CAPPUCCINO OR LATTÉ.
-Ensure that the Water Container is filled up with clean cold water
-Press the Power Switch to the ON “ | “ position.
-The first step in making a Cappuccino or Latté is to make a Single or Double Espresso Shot (see
pages 4 to 7).
-To steam milk it is recommended to use a small Stainless Steel milk frothing jug (not included).
-Fill the Milk Frothing Jug up 1/3 full with cold fresh milk. Low Fat Milk will generally froth easier
than Full Fat Milk, but Full Fat Milk will generally provide a smoother, longer lasting froth.
-Make sure that the Steam Control (I) is turned clockwise fully (away from you), so that this is in the
OFF position.
-Press the Steam Switch to the ON “ | “ position. The Steam Switch Light will illuminate, signalling
that heating is taking place. When the Steam Switch Light goes out, the Espresso Machine is ready to
steam.
-When the Steam Switch Light goes out, quickly insert the Rubber Steam Outlet into the milk so that
the lower section of the Rubber Steam Outlet is immersed in the milk.
-Turn the Steam Control anticlockwise (towards you) slowly until you hear steam coming out of the
Steam Outlet into the Milk. Adjust the Steam Control up or down to create more or less Steam as
required.
-Hold the Milk Frothing Jug at an angle so that the bottom of the Steam Outlet sits just below the
surface of the milk.
-When the milk starts to increase in volume, immerse the Steam Outlet deeper into the jug to heat the
milk.
-Hold the Milk Frothing Jug at an angle with one hand and place your other hand on the outer base of
the Milk Frothing Jug.
-When the base of the Milk Frothing Jug becomes too hot to touch, turn the Steam Control clockwise
(away from you) fully, and press the Steam ON/OFF Switch to the “O” OFF position. This will stop
the steam before removing the Milk Frothing Jug.
-Pour the steamed milk into each cup of freshly brewed Espresso Coffee and spoon in the Frothed
Milk to the following ratios:
Cappuccino – 1/3 Espresso Coffee, 1/3 Steamed Milk, 1/3 Frothed Milk.
Latté – 1/3 Espresso Coffee topped with Steamed Milk and about 1cm of Frothed Milk (traditionally
served in a glass).
8

CAUTION NOTES WHEN FROTHING MILK
-NOTE: Always ensure that the Rubber Attachment has been firmly pushed onto the Steam Outlet.
-NOTE: Ensure NOT to turn the Steam Control to the full position BEFORE inserting the Steam
Outlet into the Milk. This will avoid steam pressure blowing the Milk out of the Milk Frothing Jug.
-NOTE: To avoid splattering of hot milk, do not lift the end of the Steam Outlet above the surface of
the Milk while frothing.
-NOTE: Milk should not be allowed to run over the top of the Rubber Attachment on the Steam
Outlet, otherwise it will not function properly.
-NOTE: Always clean the Steam Outlet and the Rubber Attachment after each use (see page 11).
-Please note that frothing milk takes a bit of practise to get the froth and the milk to the texture and
temperature that you prefer. This will get easier the more Cappuccinos or Lattés you make.
ESPRESSO MAKING TIPS
INGREDIENTS
-Ensure all ingredients to be used (including water, ground coffee, coffee beans, milk, etc.) are clean
and fresh.
-Whole Fresh Coffee Beans (freshly ground) are recommended, but Pre-Ground Coffee can also be
used with a great result.
-When using pre-ground coffee, this should be stored in an air-tight container in a cool, dry place, and
will last about 1 week. It is a good idea to only purchase 1 weeks worth of pre-ground coffee at a
time, ensuring that it is always fresh. Do not refrigerate or freeze.
-When using freshly ground whole coffee beans, grinding just before use gives the best result. After
grinding, the oils that were previously protected inside the coffee bean are exposed to the air, which
oxidise and stale the coffee.
-The coffee beans that you may use for grinding should be stored in an air-tight container in a cool,
dry place. Coffee Beans should not be kept for longer than 1 month, as the flavour will diminish. Do
not refrigerate or freeze.
9
WATER FLOW
-When making Espresso Coffee, make sure that the water flows through the Coffee Filter at the correct
rate.
-If the water flow is too slow, the Espresso Coffee will be over extracted and will be dark and bitter,
with an uneven crema on top.
-If the water flow is too fast, the Espresso Coffee will be under extracted. The optimal flavour will not
develop, the coffee will be watery and will lack the thick crema on top.
-The water flow can be adjusted by varying the pressure that the coffee is tamped (pressed down) in
the Filter, or by changing the Grind of Coffee.
THE GRIND
-If purchasing a pre-ground Coffee, ensure that the Coffee is an Espresso Grind, and is suitable for
Espresso Machines.
-If grinding Coffee Beans, the grind should not be too fine or powdery. The grind of the Coffee affects
the rate at which the water flows through the Coffee. If the grind is too fine, the water will not be able
to flow through the coffee, resulting in over extracted Espresso Coffee that is dark and bitter. If the
grind is too coarse though, the water will flow through the Coffee too quickly, resulting in an under
extracted Espresso Coffee that will not have the optimal flavour, and will lack the thick crema on top.
TAMPING (PRESSING)
-The firmness of the Tamp will also affect the Water Flow through the Coffee, as explained above.
-If the Coffee is Tamped too lightly, the water will flow through the Coffee too easily, resulting in an
under extracted Espresso Coffee.
-If the Coffee is Tamped too firmly, the water will flow through the Coffee too slowly, resulting in an
over extracted Espresso Coffee.
EXPERIMENTING
-Experimenting with different Pre-Ground Coffee, Coffee Beans, Grinds of Coffee, and the firmness
of the Tamp is the best way to get the flavour of the Espresso Coffee that to suit your preference.
10

SHUTDOWN AND CLEANING
Shutting down the Espresso Maker.
-Ensure the Espresso Maker has completely cooled before cleaning.
-Switch all power off to the appliance and disconnect from the mains supply.
-Ensure all ON/OFF switches are turned to the OFF position.
-Turn the Steam Valve to the open position to remove any excess steam build up inside the
appliance.
-Empty any unused water from the Water Tank.
Cleaning the Accessories.
-Remove the Filter Holder, and empty the used coffee from the Filter into a rubbish bin.
-Separate the Filter from the Filter holder, and wash both in warm, soapy water and dry with a dry
towel.
-Remove the drip tray and empty the contents down the sink. This can be washed in warm soapy
water. Dry with a dry towel.
-Remove the Water Tank and rinse with cold water. Do not use detergent to wash the Water Tank.
-The 2 Ceramic Espresso Cups can also be washed in hot soapy water. Dry with a dry towel.
-Also wash the Measuring Spoon and Compacting Tool after each use. These can also be washed in
warm soapy water. Dry with a dry towel.
Cleaning the Espresso Maker.
-Make sure the unit has completely cooled before commencing cleaning.
-With a damp cloth, wipe up under the Brew Head to remove used coffee that has accumulated here.
Repeat this until all coffee has been removed.
-Wipe in and around the drip tray area for any coffee that has been spilt.
-Wipe over the entire Espresso Maker with a soft damp cloth.
-Do not use harsh cleaners or solvents as these may damage the plastic.
Cleaning the Steam Outlet.
-Make sure that the Steam Outlet has completely cooled before commencing cleaning.
-Remove the rubber cover for the Steam Outlet.
-Wash the Rubber Cover in warm soapy water and dry with a dry towel.
-Take the reverse end of the Measuring Spoon, and unscrew the cap of the Steam Outlet.
-Wash the Cap of the Steam Outlet in warm soapy water, and dry with a dry towel.
-Wipe the outer surface and the bottom of the Steam Outlet with a damp cloth to remove milk
residue.
11
Decalcifying the Espresso Maker
-Mineral build up from hard water can reduce the water flow and affect the taste of the Espresso
Coffee. Users should run a mixture of white vinegar and water through the machine once every 2 or
3 months to clear away any built up mineral deposits. Follow the below instructions:
-Mix approx 50ml of white vinegar with 50ml of water and pour into the empty water tank.
-With all Switches set to the OFF position, plug the Espresso Maker plug into the wall socket and
turn the power on.
-Turn the Power Switch to the ON “ | “ position.
-Place a large container under the Brew Head.
-With the Filter Holder not attached, run half of the Water and Vinegar mixture though the Brew
Head, and run the other half through the Steam Outlet, catching the Water and Vinegar in the
container.
-Remove the Water Tank and rinse thoroughly with fresh water.
-Fill the water tank with fresh cold water, and run half of the water through the Brew Head, and half
of the water through the Steam Outlet to rinse.
Storing the Espresso Maker
-After the Espresso Maker and all Accessories have been washed and dried, store your Espresso
Maker, Accessories and this Instruction Manual in a dry safe place.
-The Espresso Maker can be stored on a kitchen bench top , but ensure that the unit is not plugged in
when not in use, and that the Water Tank is empty when not being used.
NOTE: Do not wash any of the accessories in a Dishwasher.
12

POPULAR COFFEE RECIPES
Espresso (Short Black)
Uses one single shot of Espresso (approx 30ml). Served in a small cup or glass.
Long Black
Generally uses one single shot of Espresso (approx 30ml). Served in a medium sized cup. Add hot water to taste.
Flat White
Uses one single shot of Espresso (approx 30ml). Served in a medium sized cup. Topped with steamed milk to
taste.
Latté
Uses one single shot of Espresso (approx 30ml). Served in a glass. Top with steamed milk poured down the
inside rim of the glass. Should end up with approx 1cm of froth on top.
Cappuccino
Uses one single shot of Espresso (approx 30ml). Served in a cup with 1/3 Espresso Coffee, 1/3 Steamed Milk and
1/3 Frothed Milk. Can dust with chocolate or cinnamon powder if you desire.
Macchiato
Uses one single shot of Espresso (approx 30ml). Served in a 70ml Demitasse and topped with a dash of Frothed
Milk.
Have a look inside recipe books and on the internet for other Espresso Coffee recipes to try, and also other uses
for Espresso Coffee.
TECHNICAL SPECIFICATIONS
Supply Voltage 220-240 V AC 50 Hz
Rating 1100 W
Water Tank Capacity 950 ml
13
ELECTRICAL SAFETY AND IMPORTANT SAFEGAURDS
Warning! Read fully before using this appliance.
When using electric appliances always use common sense and observe safety regulations where applicable to
reduce the risk of fire, electric shock and personal injury.
Always check that the power supply corresponds to the voltage on the rating plate.
Warning! Disconnect from the mains supply before filling with water.
Warning! Do not use without water in the water tank. This will destroy the appliance.
Warning! Do not aim the steam at any part of the body. Handle with care. Use the protective sleeve.
Warning! Use only water. Do not use carbonised or fizzy type liquids.
Warning! Do not touch hot surfaces during use. Allow appliance to fully cool down before cleaning.
Warning! Do not operate in temperatures below 0ºC. Residual water may freeze and damage the appliance.
Caution! Always fully unwind any cord to avoid overheating. Never allow the supply cord to come in contact
with hot objects. Do not carry the appliance by the cord or yank the cord to disconnect it from the mains supply.
Disconnect by first switching off the outlet, grasping the plug and pulling it out gently. Do not let the supply cord
hang over the edge of a table or counter.
Caution! If the supply cord is damaged, it must be replaced by the manufacturer, its service agent or a similarly
qualified person in order to avoid a hazard.
Warning! Children. This appliance is not intended for use by young children or infirm persons. Young children
must be supervised by a responsible person to ensure that they can operate the appliance safely. Young children
must be supervised to ensure that they do not play with the appliance.
Warning! Water. Do not immerse. Do not immerse any part of this appliance or supply cord in water or other
liquid. Do not use with wet hands or use in damp situations.
Caution! Do not drop the appliance. Do not use this appliance if it has been damaged in any way, immersed in
water, the supply cord is damaged or the operation is faulty. Contact with any damaged appliance could result in
electric shock.
Warning! Do not leave the appliance unattended while in use. Disconnect from the power supply.
Warning! Hot Steam. Do not open the water reservoir cap without first releasing all steam pressure that may
have built up. Do not attempt to remove the filter holder when appliance is in operation.
Consider the environment.
Do not use in damp or wet conditions. Do not use without adequate light. Do not use near flammable or
hazardous materials. Do not use outdoors. Do not leave unattended while connected to the power supply.
Store in a safe place
When not in use store your appliance and all its accessories and instruction manual in a safe and dry place.
Liability.
No liability can be accepted for any damage or personal injury caused by non-compliance with these instructions
or any other improper use or mishandling. This appliance is intended for household use only.
14

WARRANTY CARD
This product is guaranteed against faulty materials and workmanship for a period of twelve months from the date
of purchase. This warranty becomes void if the product has been tampered with, damaged by accident, damaged
in any other way by improper use or has been purchased second hand. All production orders have quality
inspections.
For any customer query or in the unlikely event of a product failure, please phone or
email the helpline contact details below for assistance.
DO NOT RETURN THE PRODUCT TO THE RETAILER.
WARRANTY FOR APPLIANCES USED COMMERCIALLY LIMITED TO 90 DAYS
Product: ______________________________________________________
Model No.: _____________________________________ Purchase Date:_________
Product Purchased From: ________________________________________________
_________________________________________________________________________
Your Name: _____________________________________________________________
Address: ________________________________________________________________
______________________________________________ Phone Number: __________
IMPORTANT!
Please retain this warranty card along with your purchase receipt. Please do not post to the
retailer Toll Free Help line: 1300 366 144
Email: info@telefixsales.com.au
Other manuals for ESP-7501
2
Table of contents
Other Mezzo Coffee Maker manuals


