Mia Cucina GYV65 User manual

User Manual
Built-in Oven
GYV65
GYV34
Dear Customer
Thank you for choosing Mia Cucina products. These
meticulously designed products, manufactured with the
highest quality materials, have been carefully tested to satisfy
all your needs. Please read and follow the following
instructions that ensure correct operation and optimal
performance.

EN
1
TABLE OF CONTENTS PAGE
1 - Safety Instructions 2
2 - Product Features 3
3 - Installation of the Oven 4
Electricals 4
Respect for the environment 4
Connection to the electrical power mains 10
The first time you use the oven 11
Removable Guides (if present) 11
4 - Instructions for Use 11
5 - Control panel 12
Keypad 12
Error codes 13
Beeps 13
Default Settings 13
F Failure Number Codes 13
Preheat and Fast Preheat 13
Timer 13
6 - General Oven Information 13
7 - General Oven Tips 14
Preheating the Oven 14
Operational Suggestions 14
Utensils 14
Oven Condensation and Temperature 14
High Altitude Baking 14
Instructions for initial switch-on 15
8 - Getting Started 15
9 - User Settings 16
Language 16
Temperature & Weight 16
Time 16
Date 17
Brightness 17
Volume 17
10 - System Setting 18
Event Log 18
Demo 18
11 - Starting your Oven 19
Switching the oven on and offf 19
Selecting the cooking mode 19
Changing the cooking mode 19
Changing temperature 19
TABLE OF CONTENTS PAGE
12 - Cooking Mode Tables 20
Pre-heating phase 22
Fast Preheat 22
Eco 22
Using Oven Lights 22
13 - Time Oven Mode Operation 23
Cook Time 23
Stop Time 23
14 - Setting the Meat Probe (if present) 24
15 - Understanding the Various Oven Modes 26
Roast Tips and Techniques 26
General Guidelines 26
True Convection Tips and Techniques 26
Convection Roast Tips and Techniques 27
Convection Broil Tips and Techniques 27
Broil Tips and Techniques 27
Dehydrate Tips and Techniques 27
Dehydrate Chart 28
16 - Recipes 29
17 - Sabbath Mode Instructions (on some models) 31
18 - Oven Care and Cleaning 32
Clean 32
Removing the door 32
Removing the slide oven door 33
How to remove the inner glass of the “FULL
GLASS” panoramic door 33
Replacement of the oven light 34
19 - Solving Baking Problems 35
20 - Solving Operational Problems 36
21 - Assistance or Service 37
Service Data Record 37

EN
2
1 - Safety Instructions
IMPORTANT
The oven’s data plate is accessible even with the oven fully
installed. The plate is visible simply by opening the door.
Always quote the details from it to identify the appliance
when ordering spare parts.
• Do not disassemble any parts prior to having disconnected
the oven from the mains.
• Do not use the appliance if any part is broken (for example a
glass). Disconnect it from the mains and call service.
• Before using the oven, it is recommended to make it operate
at noload at the maximum temperature for an hour to
eliminate the insulating material odour.
• In all models, leave the door closed when the grill is used.
• The cooling fan may remain in operation so long as the oven
is hot, even after it has been switched off.
• During the use the appliance becomes very hot; don’t touch
the heating elements inside the oven.
• Parents and adults should pay particular attention when
using the product in presence of children.
• Children should be overseen so as to ensure that they don’t
play with the equipment.
• Keep children under age 8 away, unless constantly
supervised.
• This appliance is not intended for use by persons (including
children over age 8) with reduced physical sensory or mental
capabilities, or lack of experience and knowledge, unless
they have been given supervision or instruction concerning
use of the appliance by a person responsable for their safety.
• Children may not perform cleaning and maintenance
unsupervised.
• In order to avoid damage to the oven enamel coat, do not
cover the oven muffle sole with any item (e.g. aluminum foil,
pans and the likes).
• Do not use harsh abrasive cleaners or sharp metal scrapers
to clean the oven door glass since they can scratch the
surface, which may result in shattering of the glass.
• Abrasive detergents and steam cleaning equipment should
not be used for cleaning.
• The appliance must not be installedbehind a decorative door
in order to avoid overheating.
• WARNING: Ensure that the appliance is switched off before
replacing the lamp to avoid the possibility of electric shock.
• The oven is cool and power to the oven has been turned off
before removing the door. Failure to do so could result in
electrical shock or burns.
• Use only the meat probe supplied with the appliance.
IMPORTANT
If the oven is installed in an ambient temperature below 37
°F (3 °C), F*0117 may appear; when a higher ambient
temperature is reached, the error will no longer appear.

EN
3
2 - Product Features
Refer to the figures below for the correct placement of the grills
EMBOSSED GUIDES
REMOVABLE GUIDES

EN
4
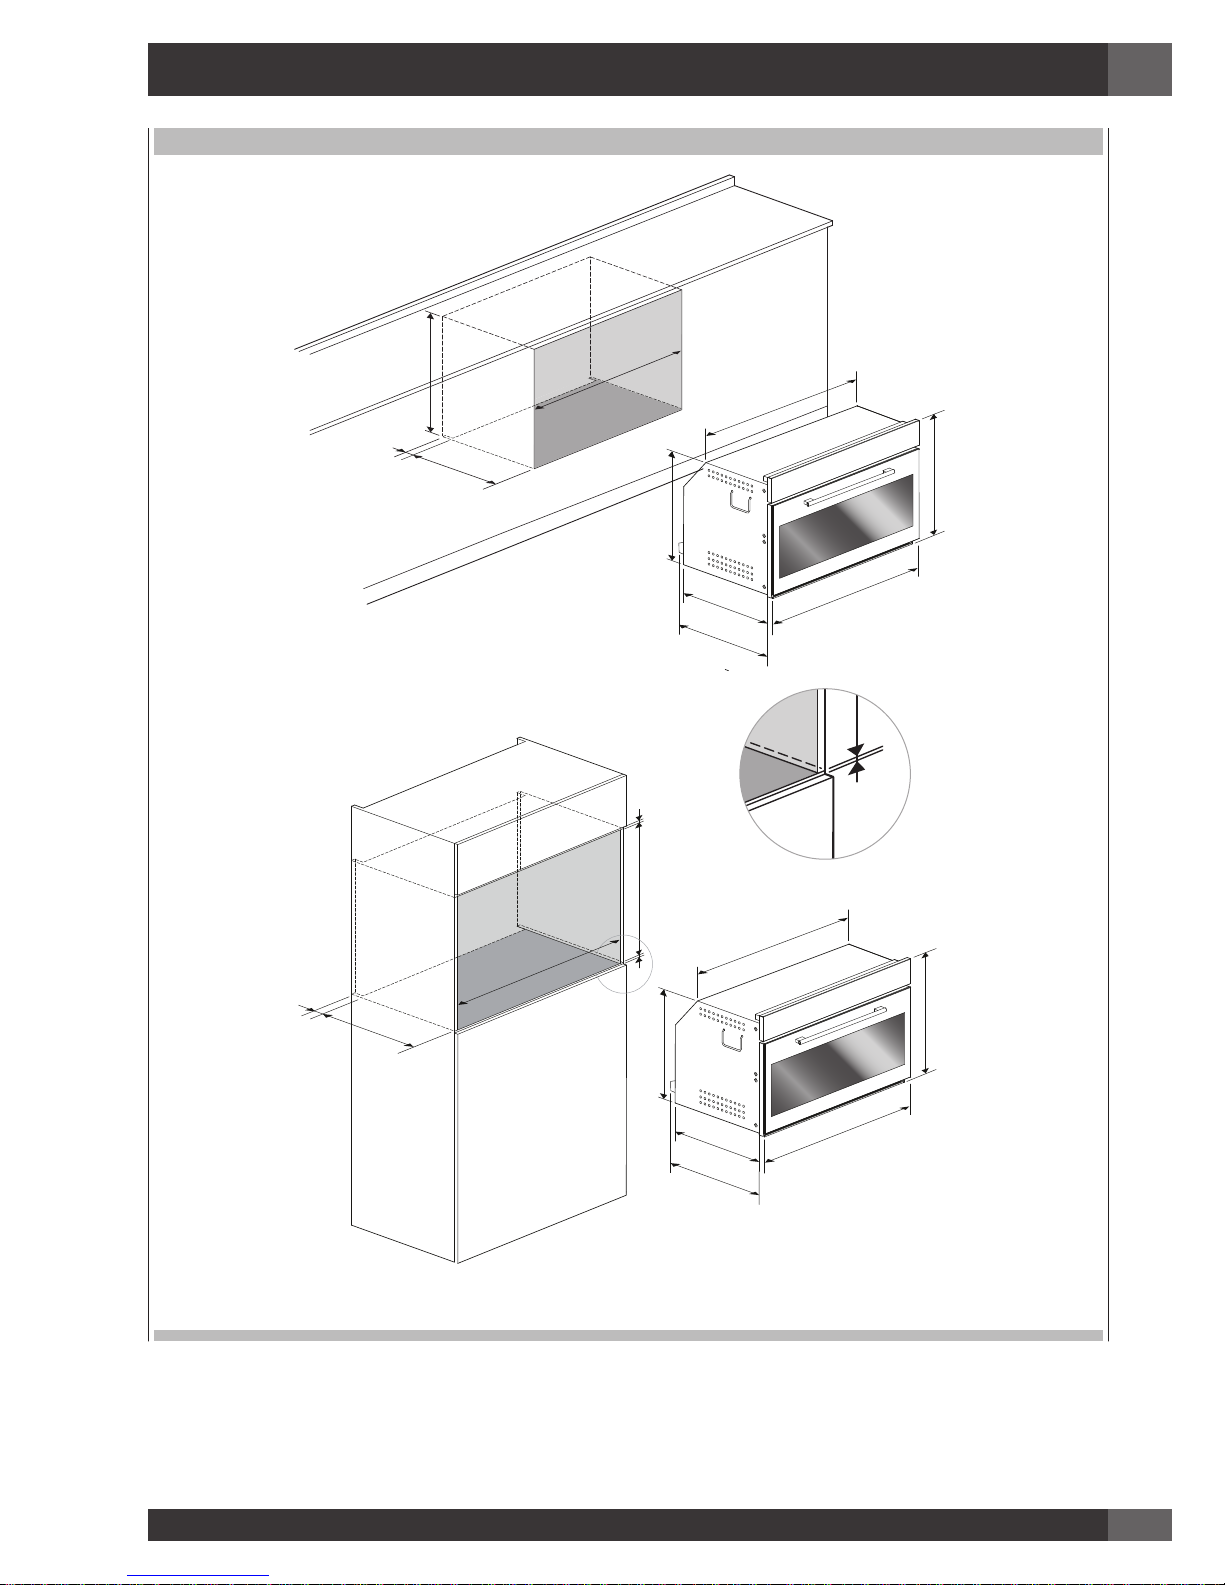
3 - Installation of the Oven
To install the oven into the kitchen a cutout should be made
in accordance with the dimensions shown in the Cutout &
Dimensions figure.
The apparatus is to be fastened to the top by means of the two
screws provided in the kit through the holes made on the oven
uprights.
The cabinet in which the apparatus is installed shall be open
on the back side to ensure a sufficient air circulation and
prevent overheating.
WARNING
As the apparatus is to be fitted in your kitchen furniture,
make sure that all surfaces in contact with the oven can resist
a temperature of approx 90°C.
Electricals
Maximum absorbed power: (see data plate).
Supply voltage: (see data plate).
NOTE: This appliance is in compliance with following
European directives: 2006/95/CE (LVD),
2004/108/CE (EMC), 2011/65/CE (RoHS),
2012/19/UE (WEEE), 2002/40/CE.
Respect for the environment
The documentation for this appliance is printed on paper
bleached without chlorine or recycled paper to contribute to
protecting the environment. The packaging was designed
to prevent damage to the environment; they are ecological
products that can be recovered or recycled.
Recycling the packing saves raw materials and reduces the
volume of industrial and domestic waste.
THE PACKING MATERIAL is 100% recyclable and marked
with the recycling symbol. Dispose of in conformity with
local law. The packing material (plastic bags, polystyrene
parts, etc.) must be kept out of the reach of children because
it is potentially dangerous. THIS APPLIANCE is marked in
conformity with European Directive 2012/96/UE, Waste
Electrical and Electronic Equipment (WEEE). By making sure
that this product is disposed of correctly, the user contributes
to preventing potential negative consequences for the
environment and health.
THE SYMBOL on the product or accompanying documentation
indicates that this product must not be treated as domestic
waste but must be delivered to a suitable collection point for
the recycling of electrical and electronic equipment.

EN
5
MOD. 45
560
min 460
50
510
533
455
594
540
432
560
min 450
50
510
min 458
min 3
560
min 3
533
455
594
540
432
560
50
510
595
528
26
144
140
596
554
545
Dimensions are in millimeters

EN
6
MOD. 60
560
50
510
595
min 600
min 5
535
21
594
594
540
min 5
535
21
594
595
510
560
595
50
510
Dimensions are in millimeters

EN
7
MOD. 75
595 710
510
50
594
750
682
545
21
568
710
50
510
595
min 5
585
min 5
min 5
594
750
682
545
21
568
Dimensions are in millimeters

EN
8
MOD. 90x48
50
860
min 475
510
min 5
min 5
517
477
893
849
472
538
560
min 5
517
477
893
849
472
538
50
860
510
min 480
Dimensions are in millimeters
EN
9
MOD. 90x60
560
min 5
50
860
595
510
min 5
min 5
530
594
895
826
563
551
595 860
510
50
530
594
895
826
563
551
Dimensions are in millimeters

EN
10
Connection to the electrical power mains
WARNING
This apparatus must be earthed.
The oven is only for domestic use.
The feed voltage and the absorbed power are as indicated on
the data plate attached to the left-hand side upright, which can
be seen when the oven door is open.
Connecting must be carried out by qualified personnel and in
accordance with the regulations currently in force.
The manufacturer can not be held responsible for any
damages to persons or objects caused by failure to observe
these instructions.
If the supply cord is damaged, it must be replaced by the
manufacturer, its service agent or similarly qualified persons in
order to avoid a hazard.
The oven must be connected to the mains through a multipole
circuit breaker with a contact-to-contact gap of at least 3
mm, making sure that the earth wire is not disconnected. For
connecting use a flexible cable remembering to make it long
enough to allow the oven to be removed from its housing unit
when maintenance work is required.
Such a device must be fitted to the power supply in compliance
with the regulations
governing electrical installations.
The socket or switch must be easily reachable with the oven
fully installed.
CABLE TYPES AND MINIMAL DIAMETERS
SASO
H05RR-F 3x1,5 mm² H05RR-F 3x2,5 mm²
H05VV-F 3x1,5 mm² H05VV-F 3x2,5 mm²
H05RN-F 3x1,5 mm² H05RN-F 3x2,5 mm²
H05V2V2-F 3x1,5 mm² H05V2V2-F 3x2,5 mm²

EN
11
4 - Instructions for Use
The first time you use the oven
Clean the oven thoroughly with soapy water and rinse well.
Operate the oven for about 30 minutes at maximum
temperature to burn off all traces of
grease which might otherwise create unpleasant smells when
cooking.
WARNING
Never use aluminum foil to cover the oven racks or to line
the oven. It can cause damage to the oven liner if heat is
trapped under the foil.
WARNING
Make sure you do not force it to avoid damage to the
enamel.
Removable Guides (if present)
To remove the lateral frames from smooth-walled ovens,
proceed as shown in the figure.

EN
12
5 - Control panel
Keypad
To operate the key, press gently. The keypad will not work if
more than one key is pressed at the same time.
Movement arrows
Return to previous display page. Keep
pressed to return to Home page
Switches the oven on and off.
Confirms the settings and starts cooking
operations. When pressed during a
cooking operation, the function is placed in
pause. Press again to restart.
To set the timer.
Enter the functions menu during cooking.
Switches the inner oven light on and off.
Your appliance could vary slightly compared to the illustrations below.
A- Keypad
B- Display screen
PM
FRIDAY 11/20/2015
04:26
BA

EN
13
6 - General Oven Information
Before using your oven for the first time remove all packing and foreign materials from the oven(s). Any material of this sort left inside
may melt or burn when the appliance is used.
Error codes
This code appears in the event of the electronic control
indicating a fault. When the error appears, the current function
is blocked. If the type of error is related to a safety function,
the oven becomes unusable and every time a start attempt is
made, the same error appears (in which case call in the after-
sales service), while if the error relates to a minor fault, after
being restarted the oven can be used for the functions that do
not involve the faulty part (e.g., a heating element).
Beeps
Confirms that the command has been received after a key has
been pressed.
It also indicates that a time function has been completed (e.g.
Timer or Timed Cooking). During the execution of a recipe,
an acoustic signal warns the user that the oven is waiting for
operation by the user (e.g., insert the dish or turn it over).
Beeps also signal an oven fault.
Default Settings
The cooking modes automatically select a suitable temperature
when the cooking mode is selected, these can be changed
when a different one is needed.
F Failure Number Codes
These codes are displayed when the electronic control detects
a problem in the oven or in the electronics.
The error code is recorded in the Error Log in the Setup menu.
This error can be communicated to the service technician so
he/she can understand the possible cause of the problem in
advance.
Preheat and Fast Preheat
Whenever a cooking mode is set and the oven is heating,
the preheating starts, during this period, the instantaneous
temperature is displayed together with the thermometer icon.
As soon as the 100% is reached, the control sounds an “end of
preheat” tone and the current temperature value disappears.
When it’s necessary to heat up the oven rapidly, a Fast
Preheat mode is available: it uses the heating elements and the
convection fan in a special way, in order to reduce the heating
time as long as possible.
After having set one of the cooking functions for which the
fast preheat is available and set the desired temperature value
touch the key, after entering the functions menu, select the
icon by means of the keys and confirm by means
of the key .
As soon as the set-point temperature is reached, the control
sounds a and both “Fast Preheat Icon” and “current
temperature” disappear. The oven switches automatically to
the desired cooking mode that was previously set: put the food
inside now.
Timer
WARNING
The timer on your oven does not turn the appliance on or
off, its only purpose is to alert you through the buzzer. When
you want to turn off the oven automatically, use the end-of-
cooking or delayed cooking function.
NOTE Pressing the OFF button does not reset or stop the
timer.
1. Press the button and set the desired time using the
arrows and confirm with the button . To switch
the selection between hours and minutes use the arrows
.
2. The time can be set from 1 minute to 12 hours and 59
minutes and, when set, the remaining time is always visible
in the bottom status bar until the time expires or is reset.
3. To change or cancel the time set, you must reset the timer
by pressing and holding the button for a few seconds.
4. Timer format is usually HR:MIN, switching into MIN:SEC
during the last minute.
5. When the time expires, the display shows 00:00 and the
buzzer will sound for one minute or until the button is
pressed.

EN
14
7 - General Oven Tips
Preheating the Oven
• Preheat the oven when using the Bake, Convection Bake and
Convection Roast modes.
• Use Fast Preheat mode when a shorter time is desired to
preheat the oven.
• Selecting a higher temperature does not shorten the preheat
time.
• Preheating is necessary for good results when baking cakes,
cookies, pastry and breads.
• Preheating will help to sear roasts and seal in meat juices.
• Place oven racks in their proper position before preheating.
• During preheating, the selected cooking temperature is
always displayed.
• A beep will confirm that the oven is preheated and the
“detected temperature” will turn off.
Operational Suggestions
• Do not set pans on the open oven door.
• Use the interior oven lights to view the food through the oven
door window rather than opening the door frequently.
Utensils
• Glass baking dishes absorb heat. Reduce oven temperature
25°F (15°C) when baking in glass.
• Use pans that give the desired browning. The type of finish
on the pan will help determine the amount of browning that
will occur.
• Shiny, smooth metal or light non-stick / anodized pans reflect
heat, resulting in lighter, more delicate browning. Cakes and
cookies require this type of utensil.
• Dark, rough or dull pans will absorb heat resulting in a
browner, crisper crust. Use this type for pies.
• For brown, crisp crusts, use dark non-stick / anodized or
dark, dull metal utensils or glass bake ware. Insulated baking
pans may increase the length of cooking time.
• Do not cook with the empty broiler pan in the oven, as this
could change cooking performance.
• Store the broil pan outside of the oven.
Oven Condensation and Temperature
• It is normal for a certain amount of moisture to evaporate
from the food during any cooking process. The amount
depends on the moisture content of the food. The moisture
may condense on any surface cooler than the inside of the
oven, such as the control panel.
• Your new oven has an electronic temperature sensor that
allows maintaining an accurate temperature. Your previous
oven may have had a mechanical thermostat that drifted
gradually over time to a higher temperature. It is normal that
you may need to adjust your favorite recipes when cooking
in a new oven.
High Altitude Baking
• When cooking at high altitude, recipes and cooking time
will vary from the standard.

EN
15
8 - Getting Started
Instructions for initial switch-on
Once the oven has been connected to the power supply for
the first time, the control automatically prepares for setting a
number of user settings, which remain stored in case of any
subsequent switch-on.
• Language
• Temperature & Weight
• Time
• Date
Refer to the USER SETTING paragraph for setting instructions.
After making the user settings, the control moves automatically
to the “Standby” display page.

EN
16
9 - User Settings
With the oven on, select the icon and confirm with the
key to enter the SETTINGS menu. This menu permits
personalizing the settings of your oven. To make access, no
active cooking or any set time functions must be in progress.
NOTE The Setting menù can never be set if any time function
is already set: first delete all the active time functions.
1. Press the keys to select the sub menu and confirm by
means of the key.
2. Use this menu to change the following settings:
Press the keys or to select the setting or change
a sub menu from among the six available ones and confirm
by means of the key.
12
yk
abc
SETUP
LANGUAGE
Language
Press the arrow key to select a language from among
those available, and confirm with the key.
Temperature & Weight
Press the arrow key and to select one of the two
temperature options “°C/°F” or weight options Kg/ib and
confirm with the key.
°F
°C
lb
Kg
Time
Press the arrow key to select the time format between the
options “12h AM/PM or 24h” and confirm with the key.
Subsequently, set the time using the arrows and confirm
with the key.

EN
17
Date
Press the arrow key to select the date format from among
the options “D.M.Y. – Y.M.D. – M.D.Y.” and confirm with the
key. Subsequently set the value using the arrows and
confirm with the key.
Brightness
Press the arrow key to choose which luminosity setting
to change between ON or STANDBY, then by means of the
arrows select the required degree of luminosity and
confirm with the key.
Volume
Press the arrow key to select the required degree of
luminosity and confirm with the key .
EN
18
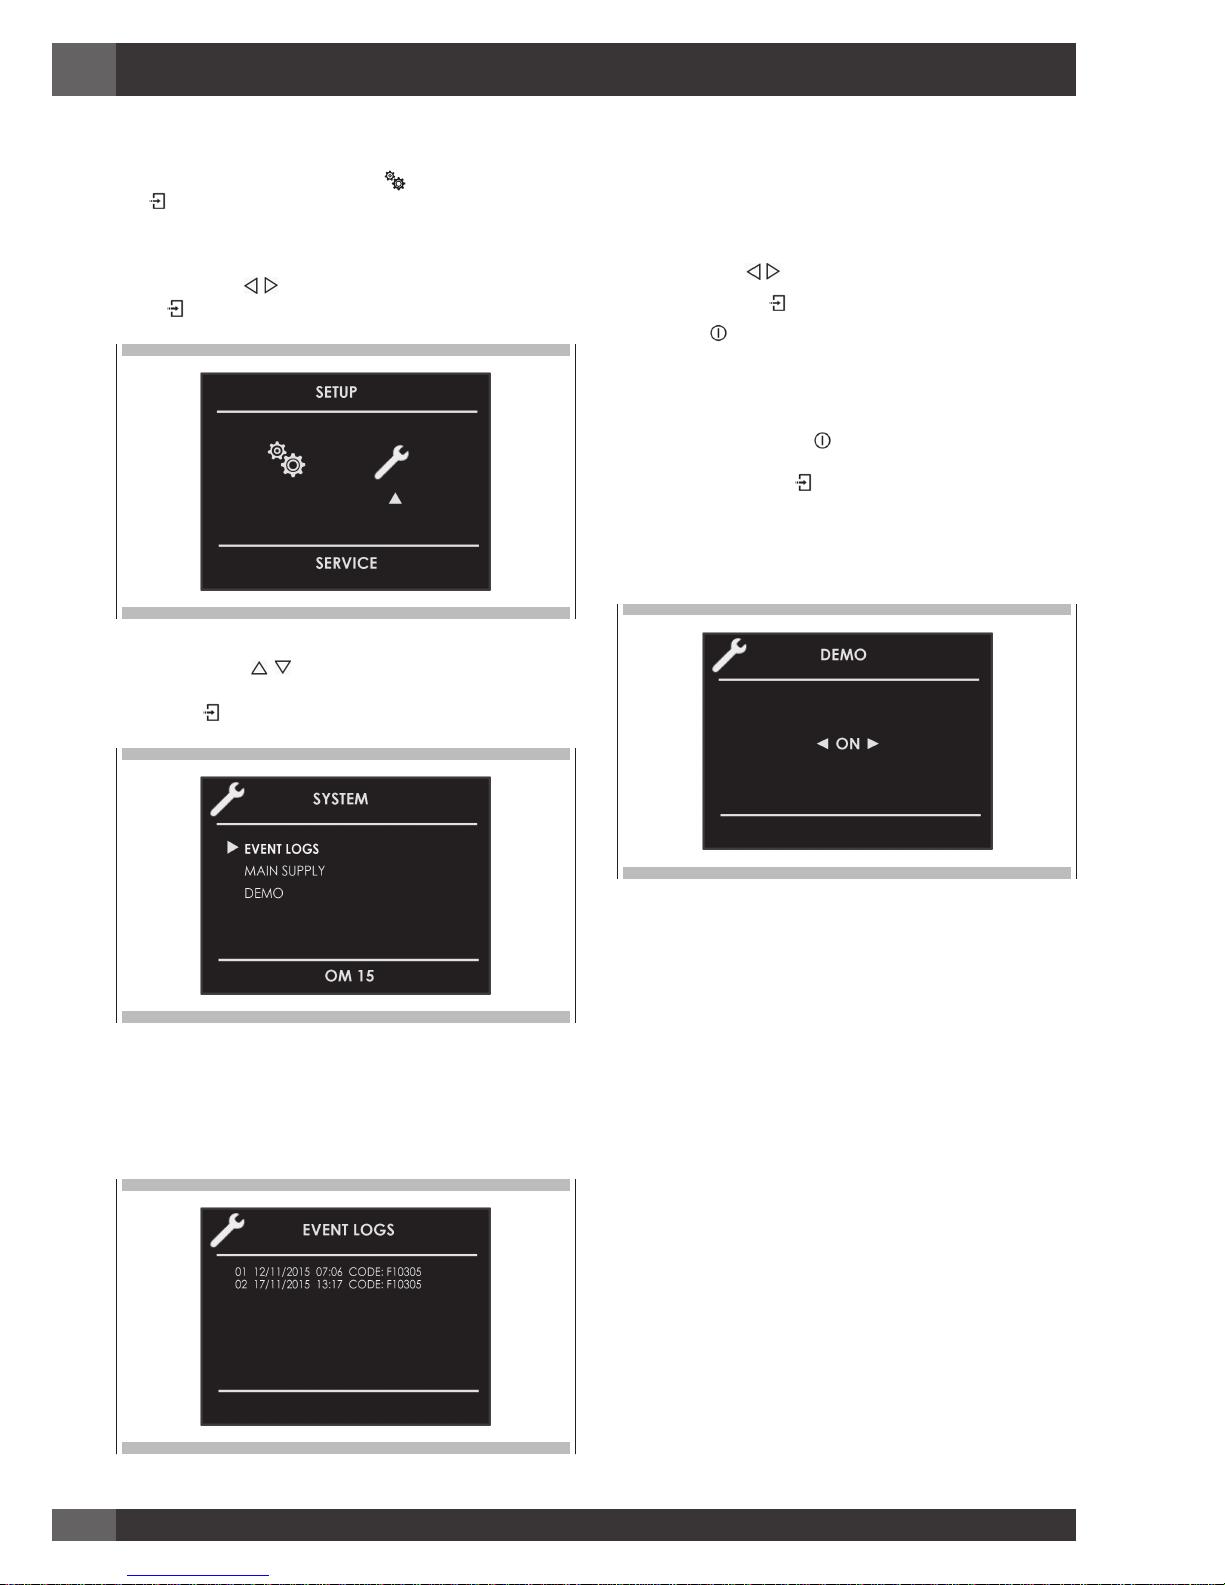
10 - System Setting
With the oven on, select the icon and confirm with the
key to enter the SETTINGS menu. This menu permits setting
a number of parameters or special functions. It also permits
accessing the error events list.
1. Press the keys to select the sub menu and confirm with
the key.
2. Use this menu to change the following settings:
Press the keys to select the item to be set or to be
displayed from among the three available ones and confirm
with the key.
Event Log
The menu permits checking any recorded errors. These codes
can be notified to the after-sales service.
Demo
The purpose of this function is to set the DEMO mode, which
makes the oven useless for cooking but automatically performs
a demonstration of functions.
1. Press the keys to select the item ON.
2. Confirm with the key.
3. Press the key.
After about 30 seconds, the oven starts to operate in this mode.
To temporarily stop the DEMO function, simply keep any key
pressed for a few seconds until the oven switches to standby.
To start it again, press the key.
To disable the function, enter the DEMO display page and set
OFF. Confirm using the key.
NOTE Once set, the function remains enabled even if the
oven is disconnected from the power mains.
This manual suits for next models
1
Table of contents
Other Mia Cucina Oven manuals


