Michaelo Espresso Cafina c60 User manual

This copyright protected manual is
intended exclusively for
use with machines supplied by
Michaelo Espresso
Reproduction of any part of this
manual is strictly prohibited
Cafina Technical
Service Manual

Installation Setup
Installation Setup / Checklist Page 1 of 2
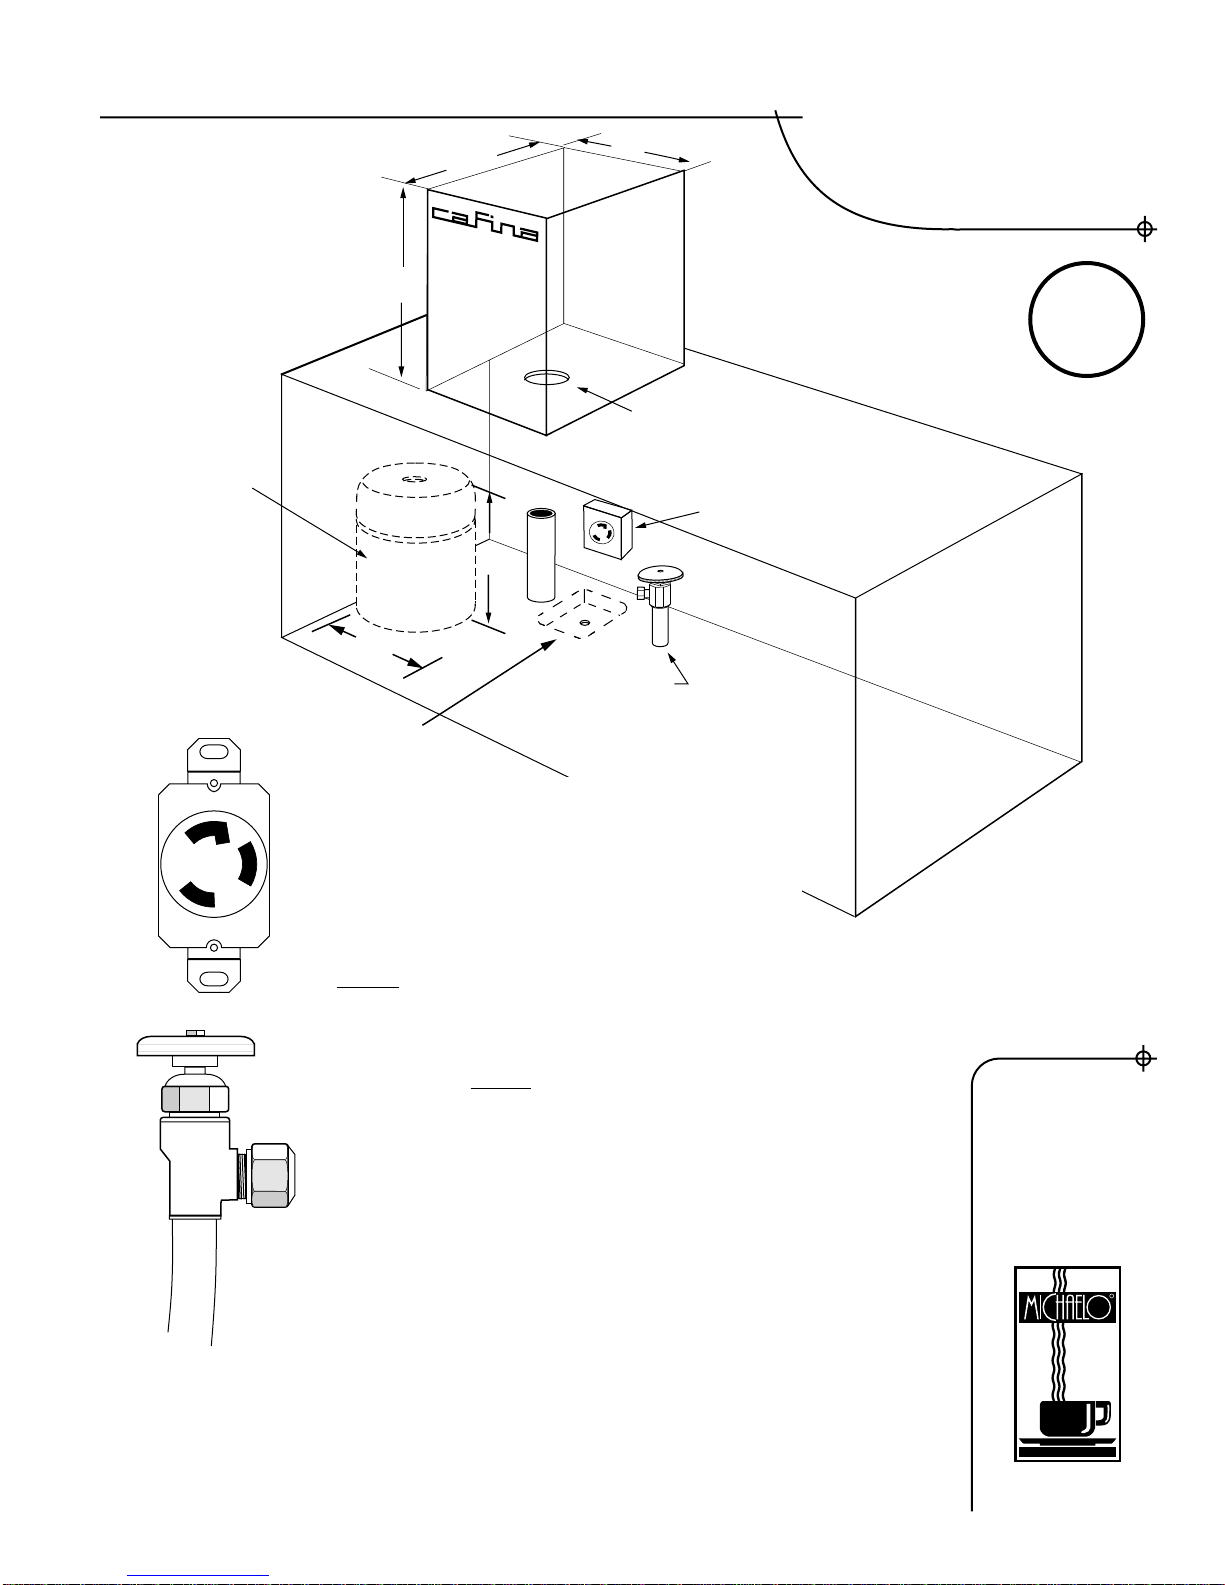
Cold water feed line:
3/8” Compression Fitting with Shut Off Valve
Located within 6-10 feet of Cafina
Water line must be flushed thoroughly
Filtration:
Water line MUST have a coarse particulate
filter
A fine carbon filter is strongly advised
Hardness Should be below 7 GPG
(A water softener may also be needed)
Drain:
Floor Sink or drain should be within 6 feet
Path for drain hose must not have Horizontal runs
Drain Hose must have a 2” air gap at floor
18”
23”
36”
11”
16”
Drain
Accumulator Tank
(optional item - May
be provided with the
machine)
2-3/8” hole for lines
NEMA L630R
Water
3/8” compression with
shut off
Optional
Floor Sink
30 Amp, 220 Volt outlet:
NEMA L6-30-R
Outlet within 6 feet of Cafina
208 Volts minimum at outlet
(A booster may need to be installed)
2
3
Section 2: Installation/Tools
Cafina c60 Service Manual
© 2003 Michaelo Espresso,
Inc. All rights reserved.
Michaelo Espresso
3801 Stone Way N.
Seattle, WA 98103
(800) 545-2883
(206) 695-4950
Fax (206) 695-4951

Installation Check list
Page 2 of 2
Set Cafina Pump Pressure to 8 bars. Go to the service position,
select handling, and switch the pump on. Check pressure on gauge.
Turn off pump and release pressure by running the bypass valve,
adjust pump as needed and check again.
Run the Reference. If beans are available at the time of installation,
follow the Run Reference instructions in the service manual.
Run Each Drink. Test each drink button at least once.
Test Steam and Water buttons.
Run A Cleaning Cycle.
Check over equipment for shipping damage. Report any damage found to Michaelo:
800-545-2883.
Check Incoming Water Pressure. It should be between 45 PSI and 90 PSI, if the
incoming pressure is greater than 90 PSI there MUST be a pressure reducer placed in
the line. Preferably before the filtration system.
Flush Incoming Water Line. Run several gallons of water through the lines at full force
before connecting to the machine. This is extremely important; there are several very
small ports that will become clogged if this procedure is not followed.
Install long legs.
Hook up Water Line. Use white Teflon washers as needed.
Install Drain Hose with clamp provided and ensure that it runs continuously downward.
The end of the hose should have an air gap at the floor drain.
Purge Brew Boiler. Unscrew the top of the Hex shaped Safety valve above the brew
boiler until water flows out into the drip tray. Re-tighten valve.
Check White Coffee Chute. Should be snug against grinders, tighten screw.
Check Piston Assembly Mounting Screws. Screws can work loose in shipping.
Check Incoming Voltage and Amperage. The Cafina requires 208v MINIMUM, and
ideally 220v. The unit is 5400W and MUST have a 30-amp breaker.
Do Not plug Cafina in until Water is hooked up.
Section 2 : Installation/Tools
Cafina c60 Service Manual
4
© 2003 Michaelo Espresso,
Inc. All rights reserved.
Michaelo Espresso
3801 Stone Way N.
Seattle, WA 98103
(800) 545-2883
(206) 695-4950
Fax (206) 695-4951

Recommended tools
Recommended Tools Page 1 of 1
Michaelo recommends
Wiha Brand System 6 with
284 series long blades
Wihatools.com
Open end wrenches
22mm
20mm
14mm
12mm
7mm
Set of Metric
Allen Wrenches
Small Phillips for ICU board
adjustments
8mm Socket for
Grinder Burr Change
Standard and Phillips
Screwdrivers
Wire Brush and Dental Pick
Allen Wrenches with long
handles 2.5mm, 3mm, 4mm
2
5
Section 2: Installation/Tools
Cafina c60 Service Manual
© 2003 Michaelo Espresso,
Inc. All rights reserved.
Michaelo Espresso
3801 Stone Way N.
Seattle, WA 98103
(800) 545-2883
(206) 695-4950
Fax (206) 695-4951

Section 2 : Installation/Tools
Cafina c60 Service Manual
6
© 2003 Michaelo Espresso,
Inc. All rights reserved.
Michaelo Espresso
3801 Stone Way N.
Seattle, WA 98103
(800) 545-2883
(206) 695-4950
Fax (206) 695-4951

Service Call Worksheet
1. Check condition of Filters:
Incoming Pressure Output Pressure
2. Number of shots on hit counter
3. Run Protocol in Service Mode
(delete when finished)
4. Check Water flow and Flowmeter under “System” in Manager mode.
Actual flow time:
4-6 Seconds is normal for 65ml
5. Grind Times:
From reference or run shot then look at Manager mode page 3
Consider changing burrs if over 2.5 sec
6. Check for coffee grounds in Slider area under Piston.
Vacuum if needed
7. Run Reference if needed
Double shots should average 14 seconds
8. Run hot water until Boiler Autofills
Wait 30 seconds then test Steam Output
9. Check that drain line is running smoothly
10. Delete Filter counter
Upon completion of call, fax this sheet
back to Michaelo (206) 695-4951
Technician: ________________________
Service Company: ____________________
PO #:_____________________
Date: ____________________
Customer: Machine Serial #:
PSI PSI
Record DP Codes Here:
Number of DP 30 Codes / Cleanings:
Sec
Double*
Double**
Sec
Sec
OK, no leaks
OK, no leaks
Cafina Service Worksheet
3
Section 3: Service Call Instructions
Cafina c60 Service Manual
7
© 2003 Michaelo Espresso,
Inc. All rights reserved.
Michaelo Espresso
3801 Stone Way N.
Seattle, WA 98103
(800) 545-2883
(206) 695-4950
Fax (206) 695-4951
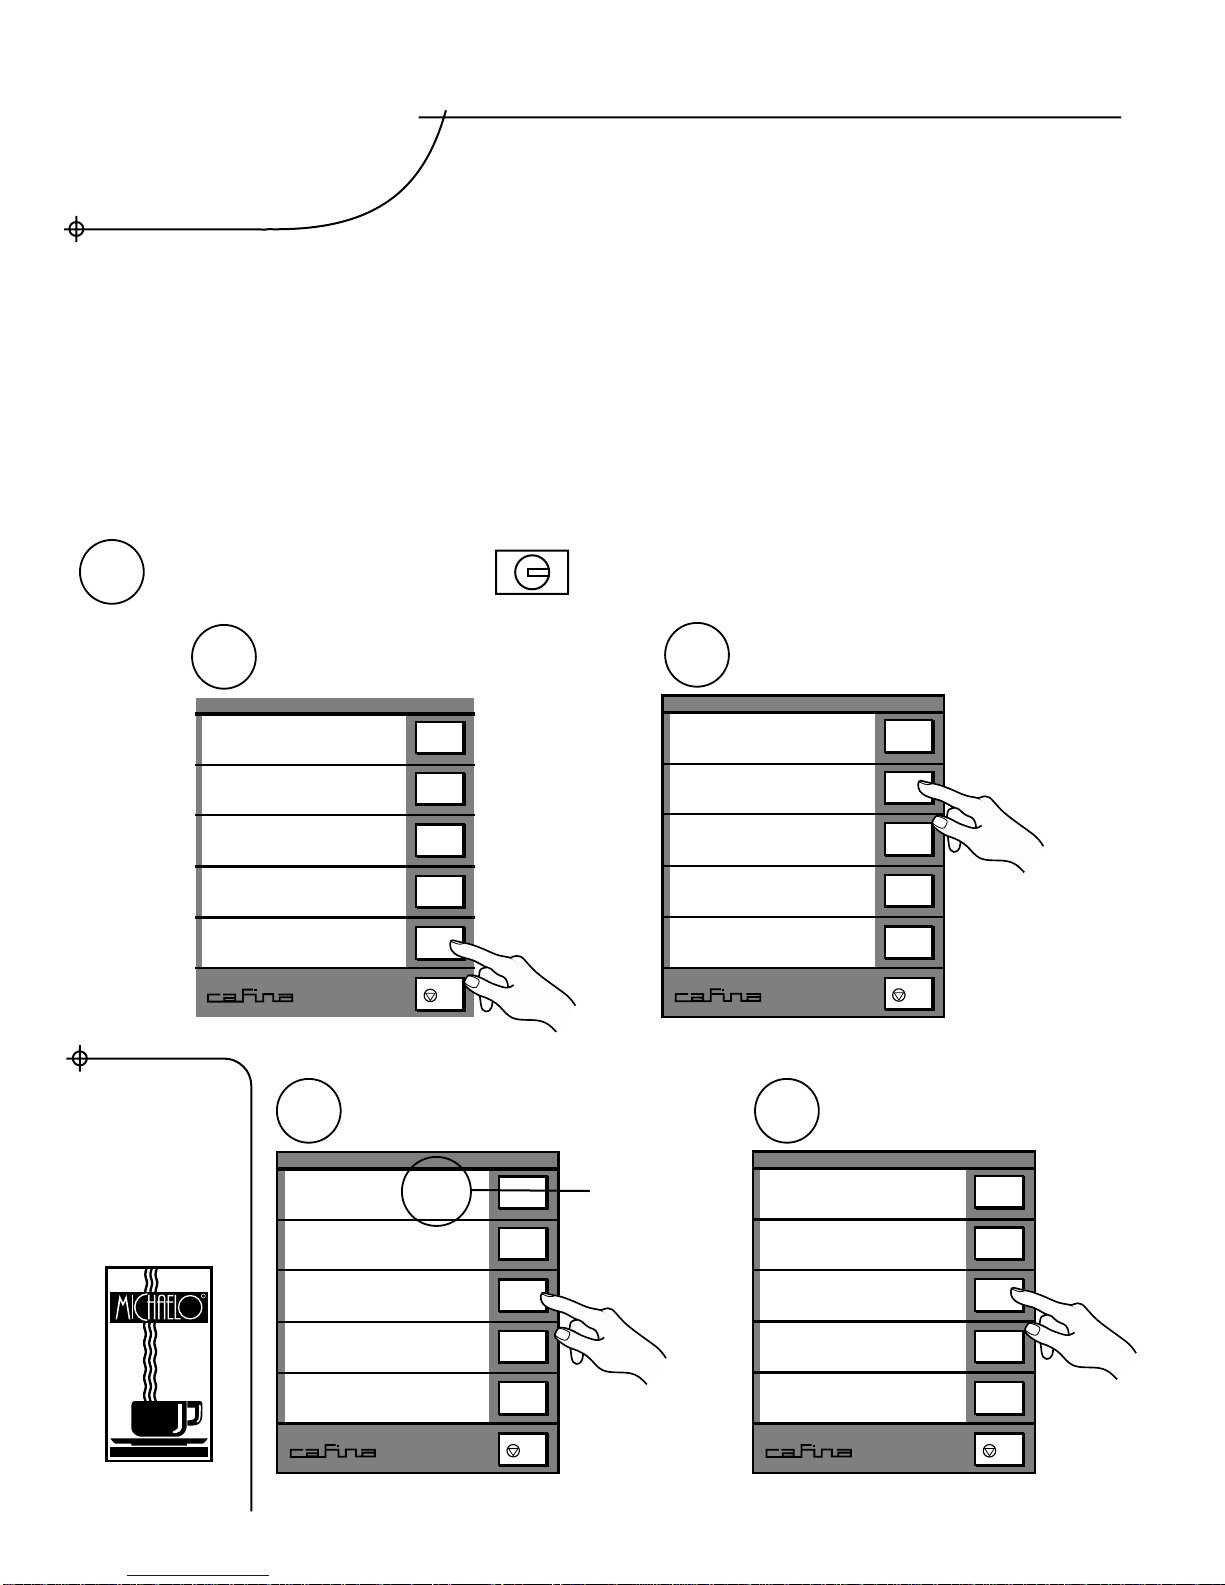
Filter Reminder Reset
Page 1 of 1
Since the reminder needs to be reset with a service key,
we recommend resetting the count at every service call
and monitoring the filters independently.
Key to Service Position
Select Next Select filter
Press delete to reset the
counter to the pre-set value Select YES to confirm
c60 s
set cleaning
filter
product names
run reference
next >>
c60 s
product data
protocol
handling
temperature
next >>
c60 s
filter 47204
filter pre-set 6000
delete >>
filter +5000
filter -5000
c60 s
**filter**
delete?
YES >>
NO >>
1
5
2 3
4
This counter
counts down
from the pre-set
value
MANAGER
OFF
ON (Service)
The Cafina filter reminder displays a
flashing “filter” message over the drink
menu after a preset number of drinks
have been run ( 60,000 is the default).
Section 3: Service Call Instructions
Cafina c60 Service Manual
8
© 2003 Michaelo Espresso,
Inc. All rights reserved.
Michaelo Espresso
3801 Stone Way N.
Seattle, WA 98103
(800) 545-2883
(206) 695-4950
Fax (206) 695-4951

Grind Time Check
Grind Time Check Page 1 of 1
The time displayed will always be the time of the last drink made.
V3.51 Software automatically displays the grind time of the last drink made on
page 3 in Manager mode (If Grind time doesn’t display in Manager, go to main
Reference page in service to see time.)
Select the Reference Drink you wish to check
and allow the machine to brew it. Reminder: The
Reference Drink name is followed by an asterisk.
Turn key to Manager position
Press Shift twice to view 3rd Screen of Manager
Mode and note the time recorded next to
Grinding.
1
3
MANAGER
OFF
ON
Default 1st page of drink menu
when machine is on
c60 s
Single
Double*
Triple
Americano 12
Americano 16
2
c60 s
protocol
System
Grinding 1.78
Manager Screen 3
Grinding
time for
last drink
brewed
Evaluating Grinder Burr Condition from the Grind Time Reading
Evaluating Grinder Burr Condition from the Grind Time Reading
New Burrs = less than 1.7
Normal Burrs = 1.2 - 2.25**
*If Double Shot is not 14 Grams, call Michaelo for grind time range
**If time = greater than 2.25 - Call Michaelo for advice
FOR 14 GRAM DOUBLE SHOT*
FOR 14 GRAM DOUBLE SHOT*
The condition of the grinder burrs is
monitored by watching the change in grinding time
for the reference drinks. The grind time increases as the
grinder burrs wear out. Worn burrs take longer to grind
the same amount of coffee.
Check each Grinder Separately
3
Section 3: Service Call Instructions
Cafina c60 Service Manual
9
© 2003 Michaelo Espresso,
Inc. All rights reserved.
Michaelo Espresso
3801 Stone Way N.
Seattle, WA 98103
(800) 545-2883
(206) 695-4950
Fax (206) 695-4951

Clogged Filters may cause:
“no water” reading
DP 31 (Boiler slow to fill)
DP 11 & 13 (poor flow through coffee)
Bypass Valve
Should be Closed all the time
Flushing Valve
Incoming
Water Pressure
Water Pressure
to Cafina
The water pressure to the Cafina will slowly decrease over
time as the filters become clogged.
Test the flow through the filters by opening the Flushing valve.
The outgoing gauge may still read high with clogged filters if
no water is being used, but will drop as soon as the flushing valve
is opened.
The Coarse Filter should be changed when it turns brown.
When the filters clog up it shows that they’re working. They are
stopping the coarse and fine sediment from harming the machine
and changing the taste of the coffee.
Checking Filters, Typical Set-up
Page 1 of 1
Section 3: Service Call Instructions
Cafina c60 Service Manual
10
© 2003 Michaelo Espresso,
Inc. All rights reserved.
Michaelo Espresso
3801 Stone Way N.
Seattle, WA 98103
(800) 545-2883
(206) 695-4950
Fax (206) 695-4951
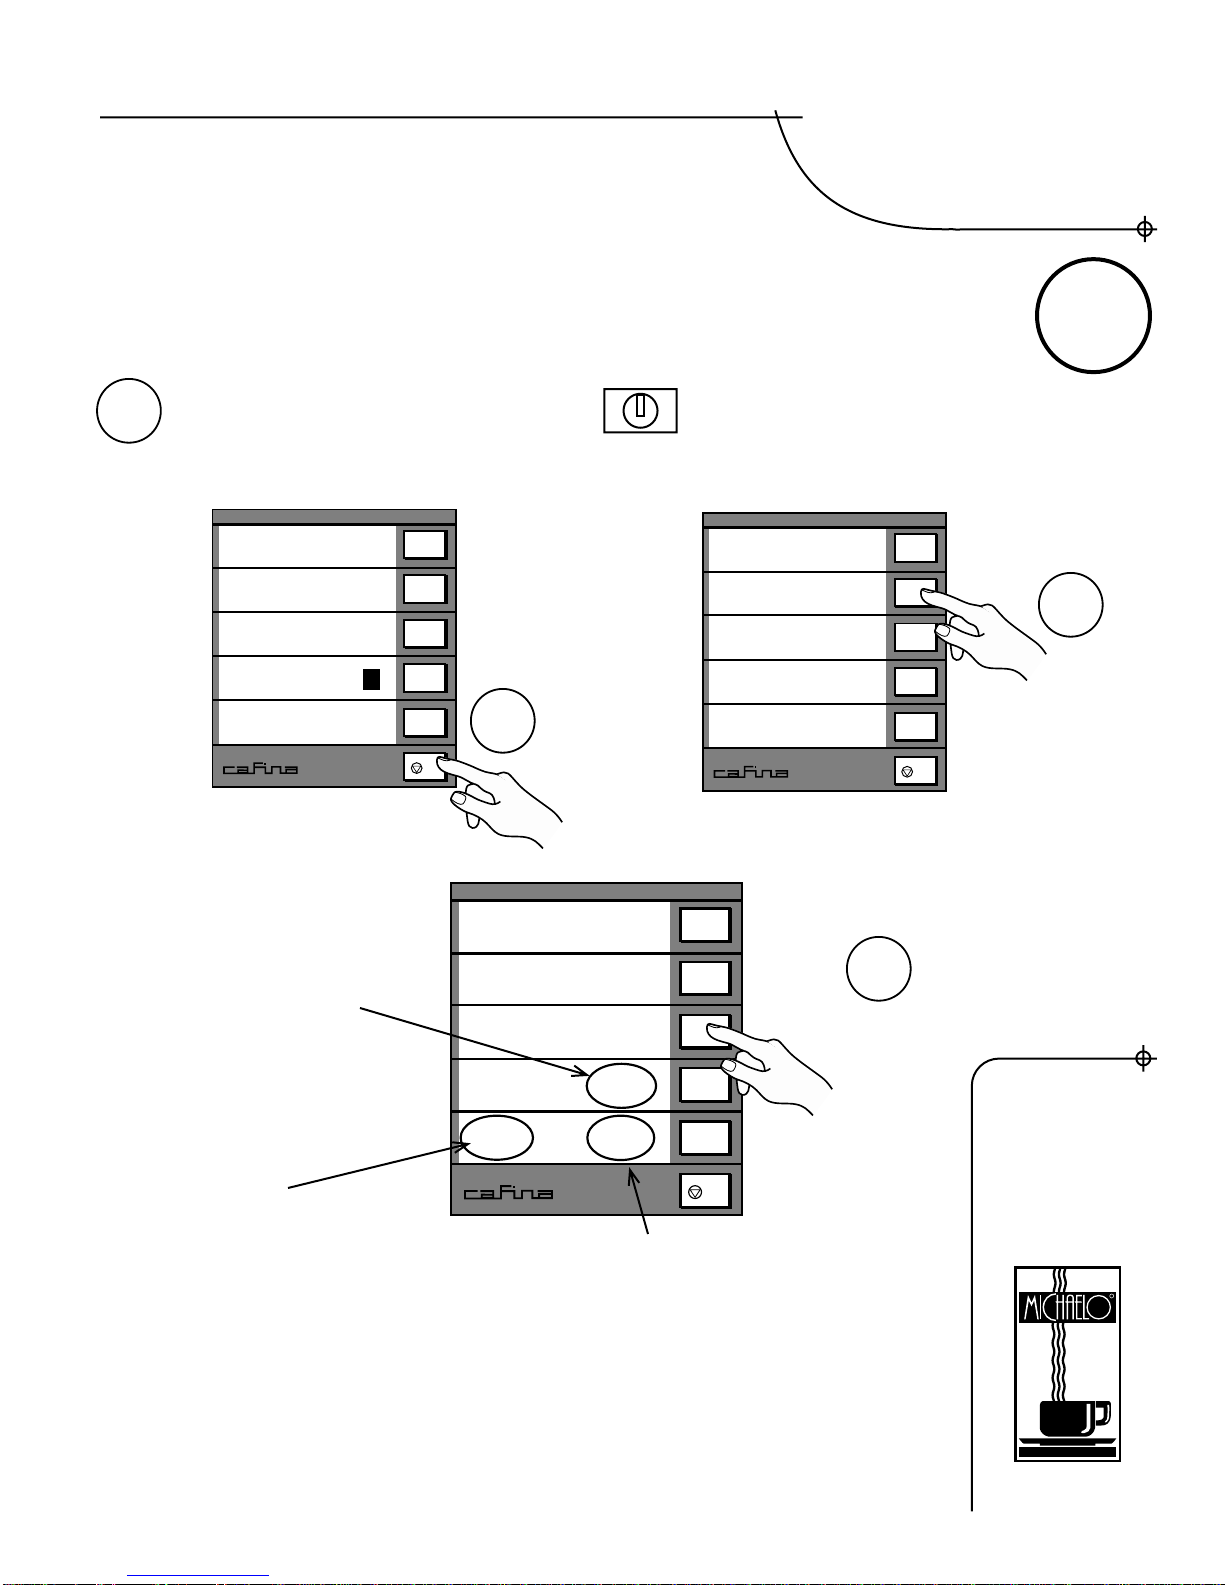
System test
System Test
No Coffee water flow test
The System Test is used to make sure the water is
flowing freely through the machine before running ref-
erence or troubleshooting shot time problems
c60 s
Double*
start >>
actual time 4.5s
136 65ml
Press Shift twice
c60 s
protocol
System
Grinding 1.78
Key to Manager Position
1MANAGER
OFF
ON
c60 s
daily counter
water quantity
coffee quantity
lock buttons
0
4
3
2Select System
Press Start
Water flow Time
4-6 seconds Normal flow time for 65ml of water
6-8 seconds Run several cleaning cycles and try again
8+ seconds Check water flow from Brew Valve
See next page
Flowmeter Pulse
Count Pre-set amount of water
3
Section 3: Service Call Instructions
Cafina c60 Service Manual
11
© 2003 Michaelo Espresso,
Inc. All rights reserved.
Michaelo Espresso
3801 Stone Way N.
Seattle, WA 98103
(800) 545-2883
(206) 695-4950
Fax (206) 695-4951
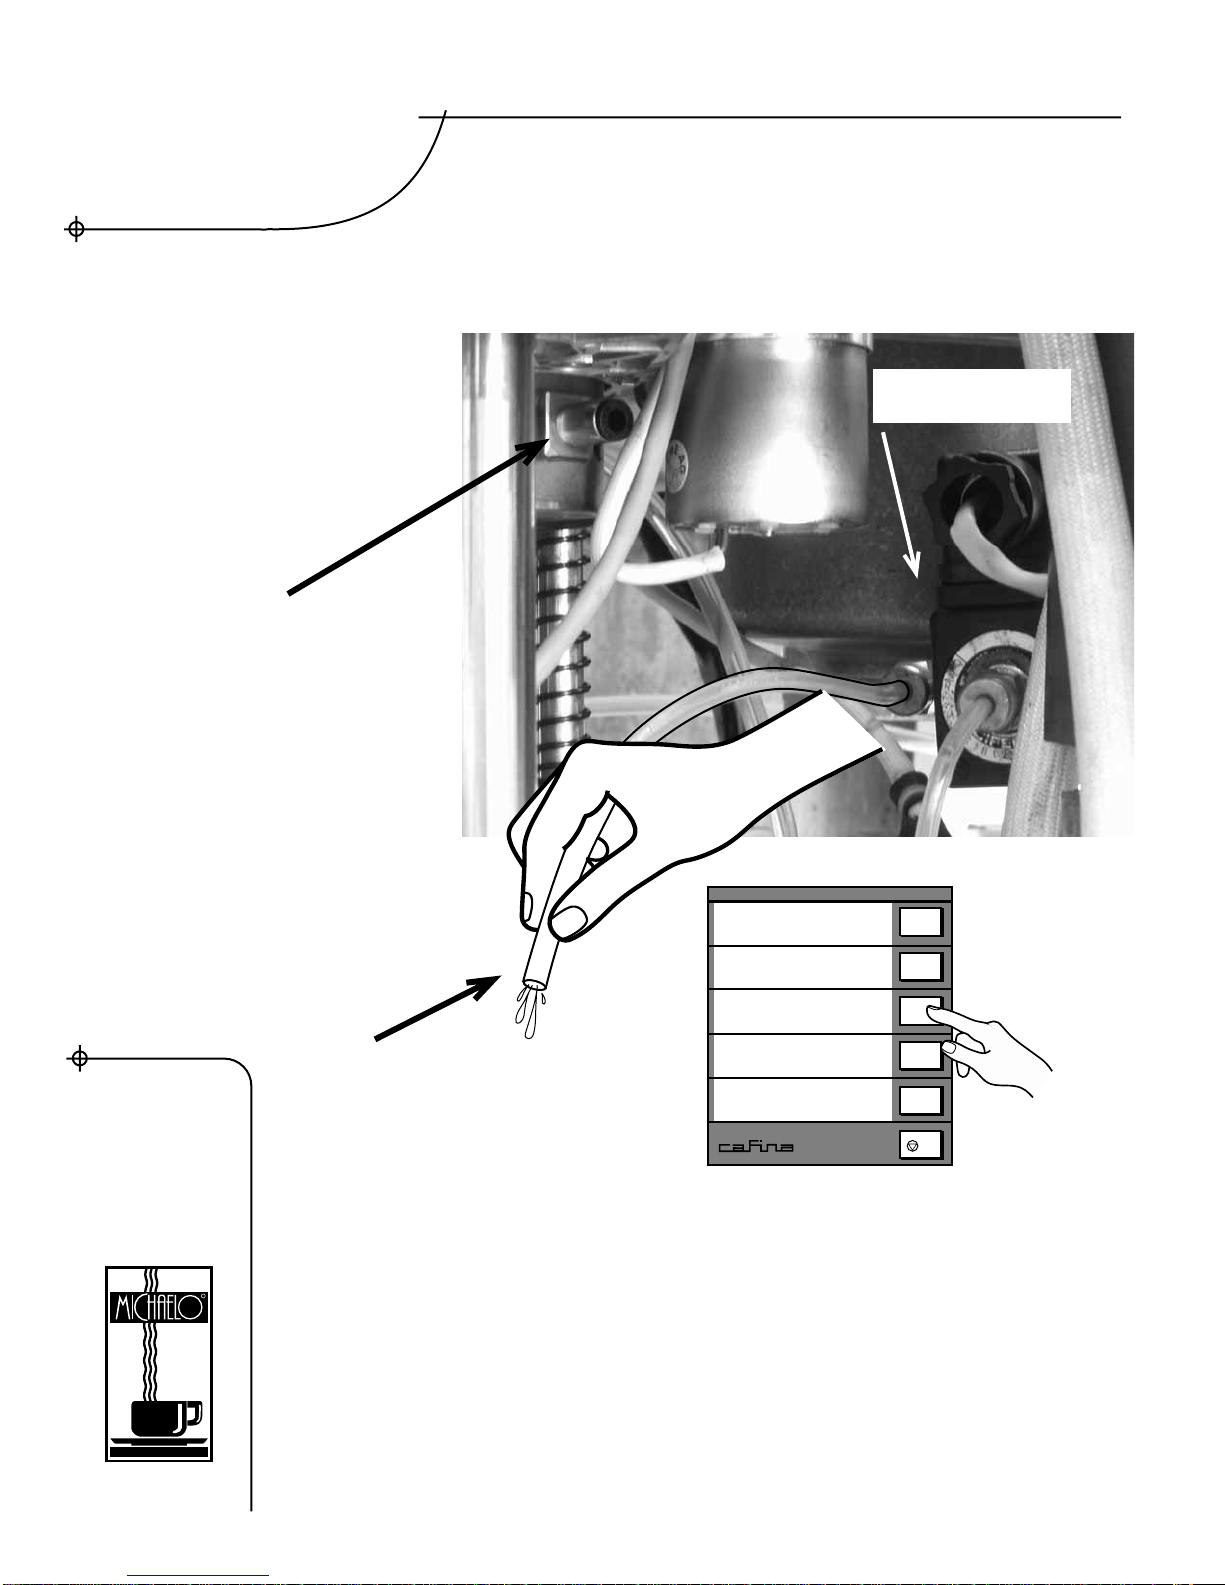
c60 s
Double*
start >>
actual time 4.5s
136 65ml
Disconnect the line to the
bottom of the brew chamber
If actual time returns to normal the problem is a clog in
the Brew Chamber, Tamp or Spout
If actual time is still over 8 seconds then look for a clog
in the:
Flowmeter, Brew Valve, or Brew Boiler
Remove the Spout Panel
Replace the Grounds
Drawer
Run System test
while holding the line
pointed into the drip-tray
Turn Key to Manager
Press shift twice
to display System Test
Times the water flow from the Brew Valve
before it goes to the Piston
Use if the System test is over 8 seconds to
isolate the location of the clog
Brew Valve
Check Water Flow from Brew Valve
Page 1 of 1Page 1 of 1
Section 3: Service Call Instructions
Cafina c60 Service Manual
12
© 2003 Michaelo Espresso,
Inc. All rights reserved.
Michaelo Espresso
3801 Stone Way N.
Seattle, WA 98103
(800) 545-2883
(206) 695-4950
Fax (206) 695-4951

Remove the Steam Tip
Fill a Milk Pitcher with cold water (Never use any cleaner!)
Heat the Steam Wand by running it for 10 seconds
Turn the Steam off and immediately insert the Wand into the
cold water
Run Steam again for 2 seconds then turn off
Wait 10 seconds for the water to be sucked up into the wand/
valve
Repeat steps 5 and 6 four to five times to soften and flush out
the clog
Refill the pitcher with fresh cold water and repeat if needed
Steam Wand Backflush
Steam Wand Backflush Page 1 of 1
A clogged Steam Tip is the most
likely cause of weak steam flow.
Remove the Steam Tip by unscrewing it
from the wand and clean out the holes.
If cleaning the tip doesn’t restore good flow
try this cold water backflushing procedure:
NEVER leave the steam wand in the milk pitcher.
The milk will be sucked up into the wand and may contaminate the boiler.
1
2
3
4
5
6
7
8
2 Seconds On
10 Second Pause
Repeat 5 times
10 Second
pre-heat
2
35
4
3
Section 3: Service Call Instructions
Cafina c60 Service Manual
13
© 2003 Michaelo Espresso,
Inc. All rights reserved.
Michaelo Espresso
3801 Stone Way N.
Seattle, WA 98103
(800) 545-2883
(206) 695-4950
Fax (206) 695-4951

Section 3: Service Call Instructions
Cafina c60 Service Manual
14
© 2003 Michaelo Espresso,
Inc. All rights reserved.
Michaelo Espresso
3801 Stone Way N.
Seattle, WA 98103
(800) 545-2883
(206) 695-4950
Fax (206) 695-4951

Page 1 of 8
Check DP codes in Protocol
Record codes then Delete when prompted
Check grind time for each grinder
Run Cleaning Cycle or System Test to empty coffee chamber
Run bypass valve in handling to check for clog
Remove and clean Bypass Elbow if needed
Remove Piston, set aside
Move Grinder collars by hand to check for free play
Remove Collar and clean threads if hard to turn
Clean inside of machine
Clean Dispensing spout, Bean hopper, and all panels
Install new Piston
Plug machine in with key in the ON position
O-data should count automatically (pulses at top of travel)
if not clear o-data in service mode and turn OFF/ON
Check that pump is set to 8 bars
Run Reference for both Grinders
Check Steam Wand for leaks
Delete Filter counter
Run hot water, check that boiler autofills
Check each drink button
Check filters and drain line
General Service Checklist
General Service Checklist
4
Section 4: General Service
Cafina c60 Service Manual
15
© 2003 Michaelo Espresso,
Inc. All rights reserved.
Michaelo Espresso
3801 Stone Way N.
Seattle, WA 98103
(800) 545-2883
(206) 695-4950
Fax (206) 695-4951

Top Cover
• Remove the two 2.5mm Allen screws on either side of the cover.
• Lift cover and disconnect grounding wire.
Sides
• Remove Top Cover
• Grasp side panel at front edge, top and middle with fingertips.
• Pull sharply out.
* To replace: insert rear of side panel into back panel. Snap the front edge
into place with the heel of your hand.
Grab Side panel
with fingertips and
pull sharply to
open.
2.5mm Allen screws
#2303083
Page 2 of 8
Remove Panels
Back Panel (Usually can stay on for Piston change)
• Remove Top Cover and Sides
• Loosen the 10mm nuts on the bottom tabs first,
then the 4mm Allen screws on the top tabs.
• Swing panel out from the bottom.
Section 4: General Service
Cafina c60 Service Manual
16
© 2003 Michaelo Espresso,
Inc. All rights reserved.
Michaelo Espresso
3801 Stone Way N.
Seattle, WA 98103
(800) 545-2883
(206) 695-4950
Fax (206) 695-4951

4
1. Remove Grounds Drawer
2. Remove the 2.5mm Allen screw in the upper left corner
3. Remove Drip Tray Grating
4. Loosen the two 7mm nuts on the underside bottom edge of the panel
5. Push Spout to lowest position
6. Swing bottom of panel out of the front of the Drip Tray
7. Disconnect brew lines by reaching behind panel and pulling the clear
lines off of the short silicon connector tube
Always reconnect
the Brew Line to the
Right Hand side!
Line from Bypass Valve
Swing bottom of
panel out to front
of Drip Tray
Loosen 7mm nuts
2.5mm Screw
2301041
Push
Spout
Down
Page 3 of 8
Remove Dispensing Spout Panel
Remove Dispensing Spout Panel
Silicone Connector Tubes
Stay on Spout
Tubes #2701015
Complete
Spout
2601003
Section 4: General Service
Cafina c60 Service Manual
17
© 2003 Michaelo Espresso,
Inc. All rights reserved.
Michaelo Espresso
3801 Stone Way N.
Seattle, WA 98103
(800) 545-2883
(206) 695-4950
Fax (206) 695-4951

Page 4 of 8 Replace the Step Motor Cable even if
it looks OK. The stress from thousands
of cycles can damage the wires even if
the outer insulation looks fine.
1Unplug connector and disconnect cable clamps from Step Motor control Board
2Plug the cable end without jumper wires into the circuit board
3Secure the cable clamp
4Set the Step Motor Board aside until you have reinstalled the piston
5Cable MUST be threaded through guides on step motor frame!
NOTE:
Inspect the new cable. Notice that, although the connectors at each end of the
cable are identical, one end has two black jumper wires attached. This end of
the cable must be connected to the Step Motor.
Step Motor Cable (2703048)
Plug end with black
jumpers goes to step
motor
Cable MUST be threaded
through guides when
reinstalling
Step Motor
STEP MOTOR
BOARD 2703027
Replace Step Motor Cable -
see next page
Make sure to re-install
the Cable Clip
Section 4: General Service
Cafina c60 Service Manual
18
© 2003 Michaelo Espresso,
Inc. All rights reserved.
Michaelo Espresso
3801 Stone Way N.
Seattle, WA 98103
(800) 545-2883
(206) 695-4950
Fax (206) 695-4951

4
Replace Piston
Replace Piston Page 5 of 8
Before replacing piston:
• Unplug Machine
• Remove Top Cover
• Remove Dispensing Spout Panel
Disconnect ribbon cable from top
of Step Motor Board
Slide Step Motor Board up and out
of guides
Unplug power lead from bottom of
Step Motor Board
Disconnect cable from Step Motor:
• Pry gently with screwdriver
• Plug pulls directly to the left
• Be careful not to bend pins
• Plug end with black jumpers
goes to step motor
• Refer to page previous for detailed
instructions
Unhook cable from guides on Step
Motor frame
It may be easier to screw the piston
down by hand and unhook the
cable from the front
Cable MUST be threaded through
guides when reinstalling
Set Board and attached cable aside
Raise Piston by turning
sprocket counter clockwise
1
2
3
4
5
6
7
PISTONASSEMBLY
STEP MOTOR
BOARD
PISTONASSEMBLY Line Pot Cable
2703036
2
STEP MOTOR
4
5
6
Step Motor Board
2703027
Section 4: General Service
Cafina c60 Service Manual
19
© 2003 Michaelo Espresso,
Inc. All rights reserved.
Michaelo Espresso
3801 Stone Way N.
Seattle, WA 98103
(800) 545-2883
(206) 695-4950
Fax (206) 695-4951
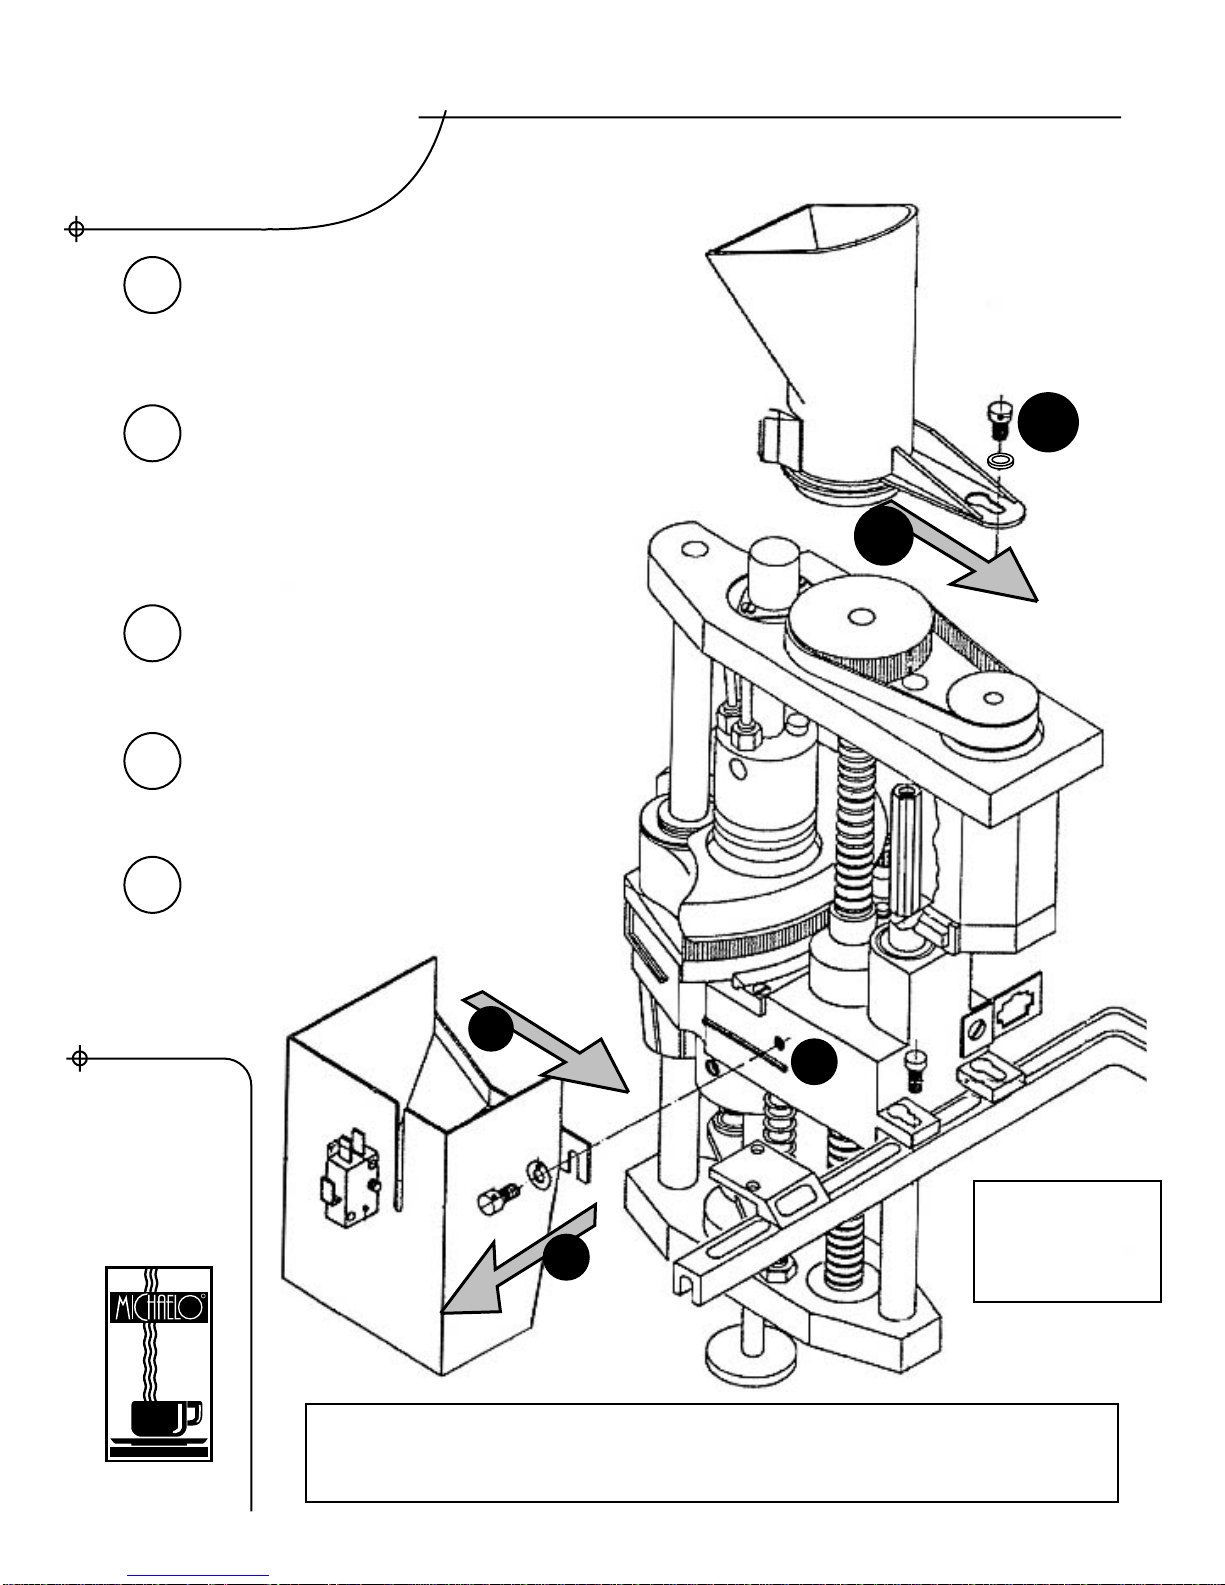
Replace Piston
Page 6 of 8
Remove 3mm Hex Screw and Lock
washer - Use one drop of Locktite when
replacing
Slide Grounds Chute forward
Remove Chute and set aside
When replacing, be sure that grinder
tunnels are fully inserted into Chute
Remove 3mm Hex Screw
and Washer
Slide Puck Chute forward to
release from notch on Piston
Pull Puck Chute away from Piston
Leave chute sitting loosely in
place
When replacing the Puck Chute, be sure it is fully seated in the notch or
water will leak during cleaning cycle
8
9
10
11
12
8
9
10
10
11
11
12
12
Grounds
Chute
2253089
Puck chute &
Switch
2253087
2703391
Section 4: General Service
Cafina c60 Service Manual
20
© 2003 Michaelo Espresso,
Inc. All rights reserved.
Michaelo Espresso
3801 Stone Way N.
Seattle, WA 98103
(800) 545-2883
(206) 695-4950
Fax (206) 695-4951
Table of contents
Popular Coffee Maker manuals by other brands

Oster
Oster BVSTDC3401013 instruction manual

Rheavendors Group
Rheavendors Group Variflex user manual

Rocket
Rocket R NINE ONE user manual

Philips
Philips SENSEO HD7854 user manual

Astoria
Astoria LOFT HOML Use and maintenance manual, Instructions for the user

VKI Technologies
VKI Technologies 2001 Operation and service manual


