Michele Attitude MWW11A000038 User manual

3
ENGLISH
Thank you for purchasing this MICHELE watch. The precision and quality of the
quartz movement assures excellent accuracy and never needs winding.
The following instructions are provided to help you familiarize yourself with the
proper operation and care of your MICHELE watch. To ensure correct use, please
read and follow the instructions carefully.
All diamonds used on Michele watches are genuine diamonds and sourced from
non conflict areas. The total carat weight and number of stones is marked on the
back of the case or provided on the diamond certificate included with purchases
prior to September 2007.
4
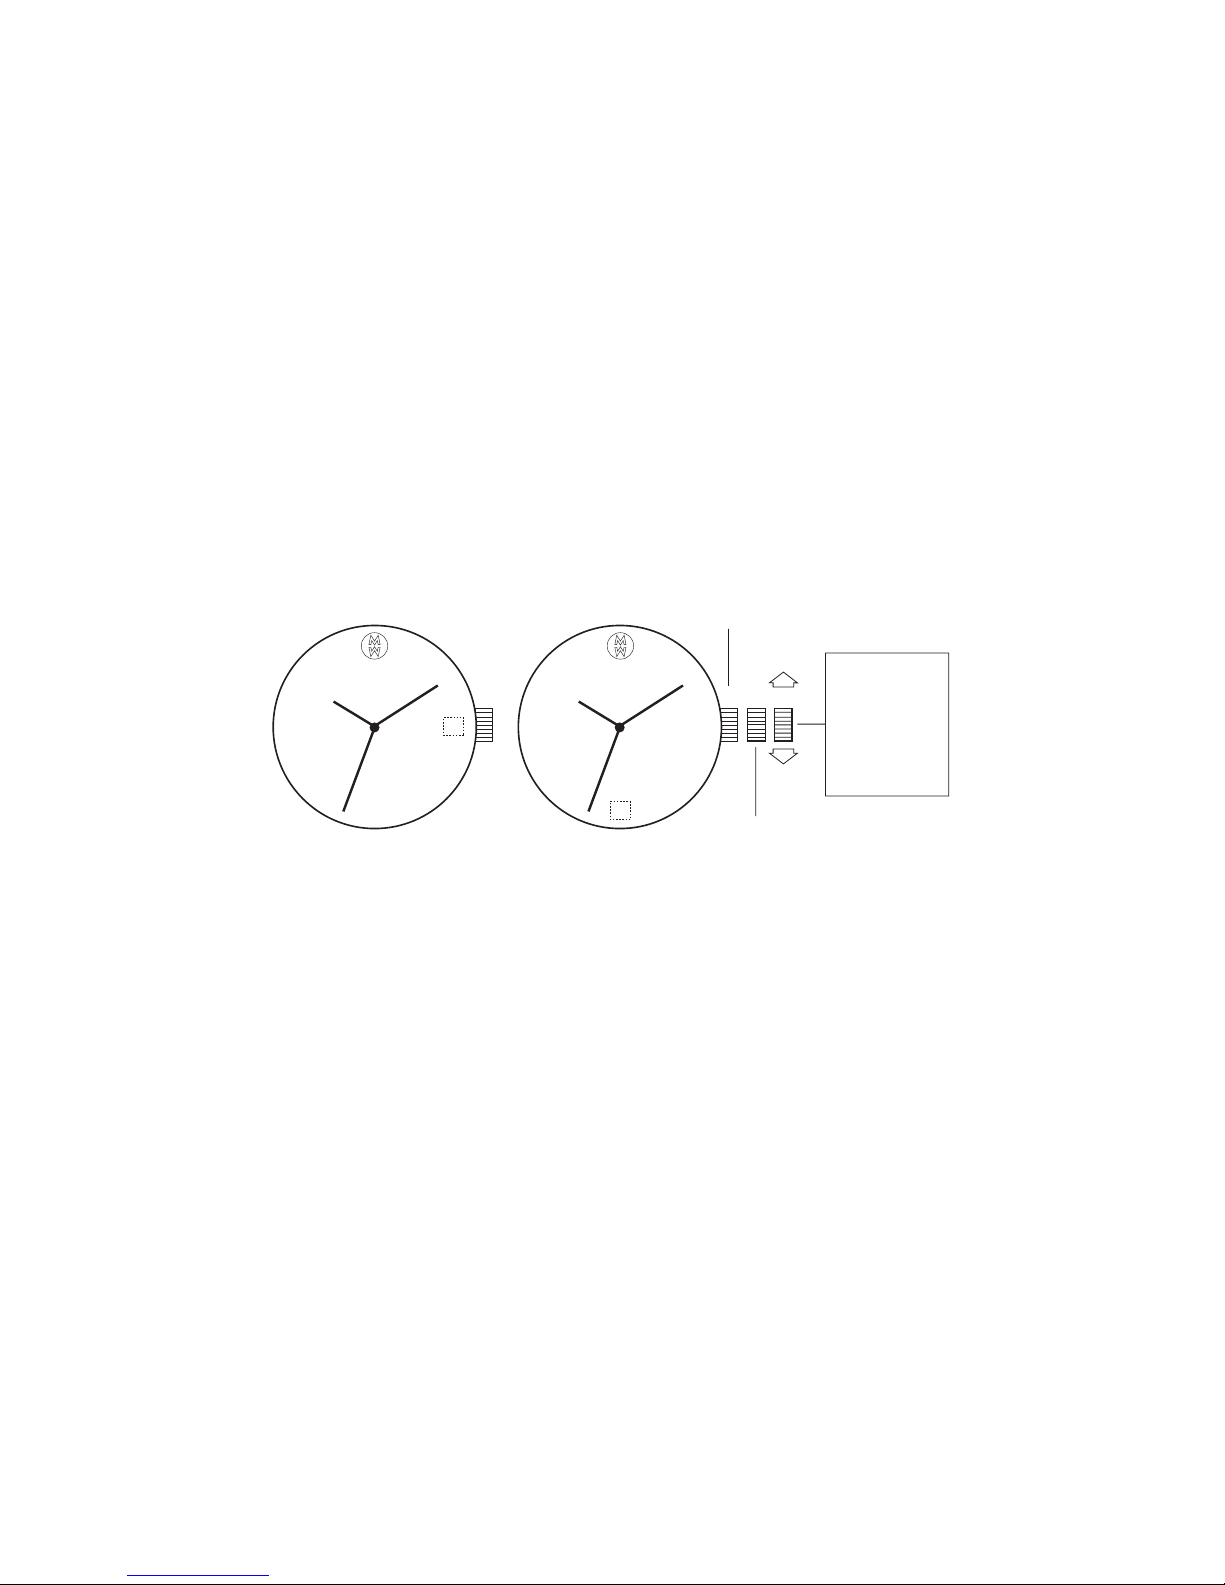
DATE MODELS
Setting the Time
Setting the Date
Do not change the date between the hours of 10pm and 2am.
This is the time when the movement is in position to carry out the automatic date change, and any interference
may cause damage to the movement.
For rapid correction of date, turn the crown either clockwise or counter-clockwise to set the date. The
direction varies according to the movement.
Rapid correction of date
Dis
p
lay 1 Dis
p
lay 2
Closed
II III
Rotate to set
hour & minute
hands. Date
advances with
each 24 hour
rotation of
hour hand.
I
5
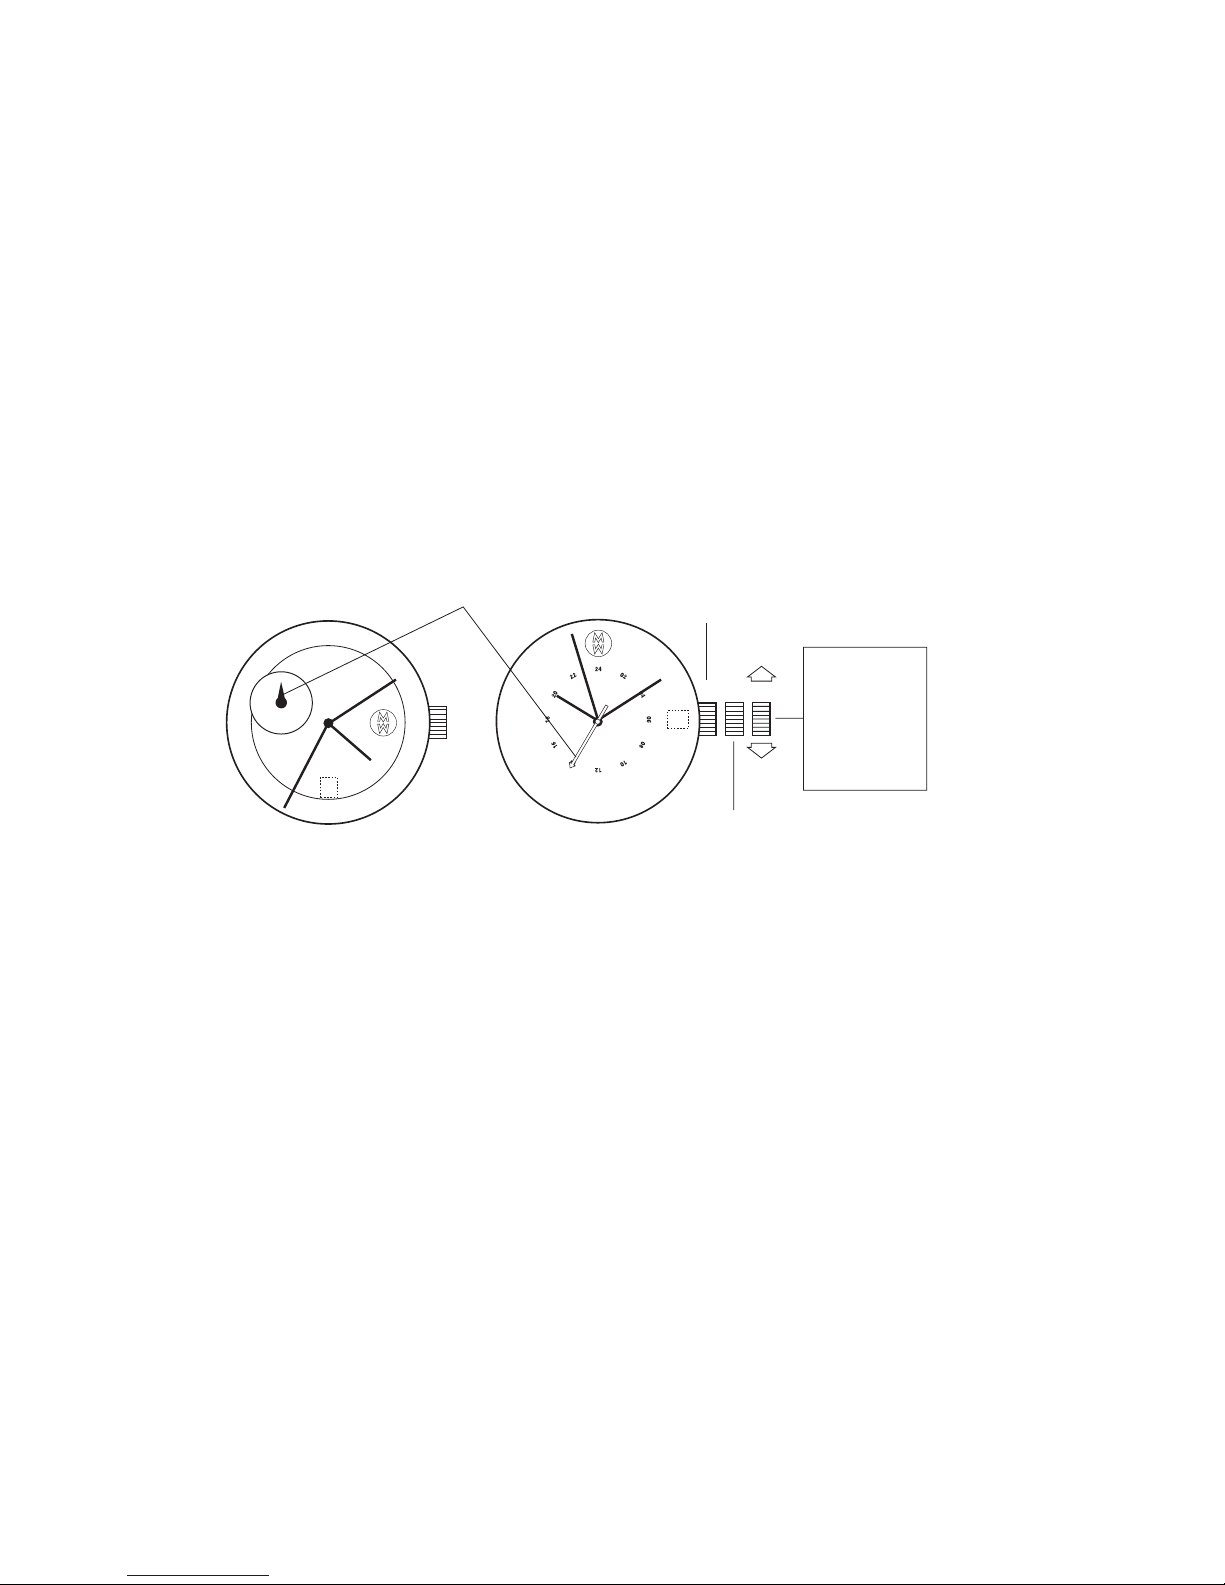
Setting the 24 Hour Hand
Do not change the date between the hours of 10pm and 2am.
This is the time when the movement is in position to carry out the automatic date change, and any interference
may cause damage to the movement.
Rapid correction of date window clockwise.
Rotate counter-clockwise to advance 24 hour hand.
Closed
II III
Rotate to set
hour & minute
hands. Date
advances with
each 24 hour
rotation of
hour hand.
I
Display 1 Display 2
24 Hour Hand

6
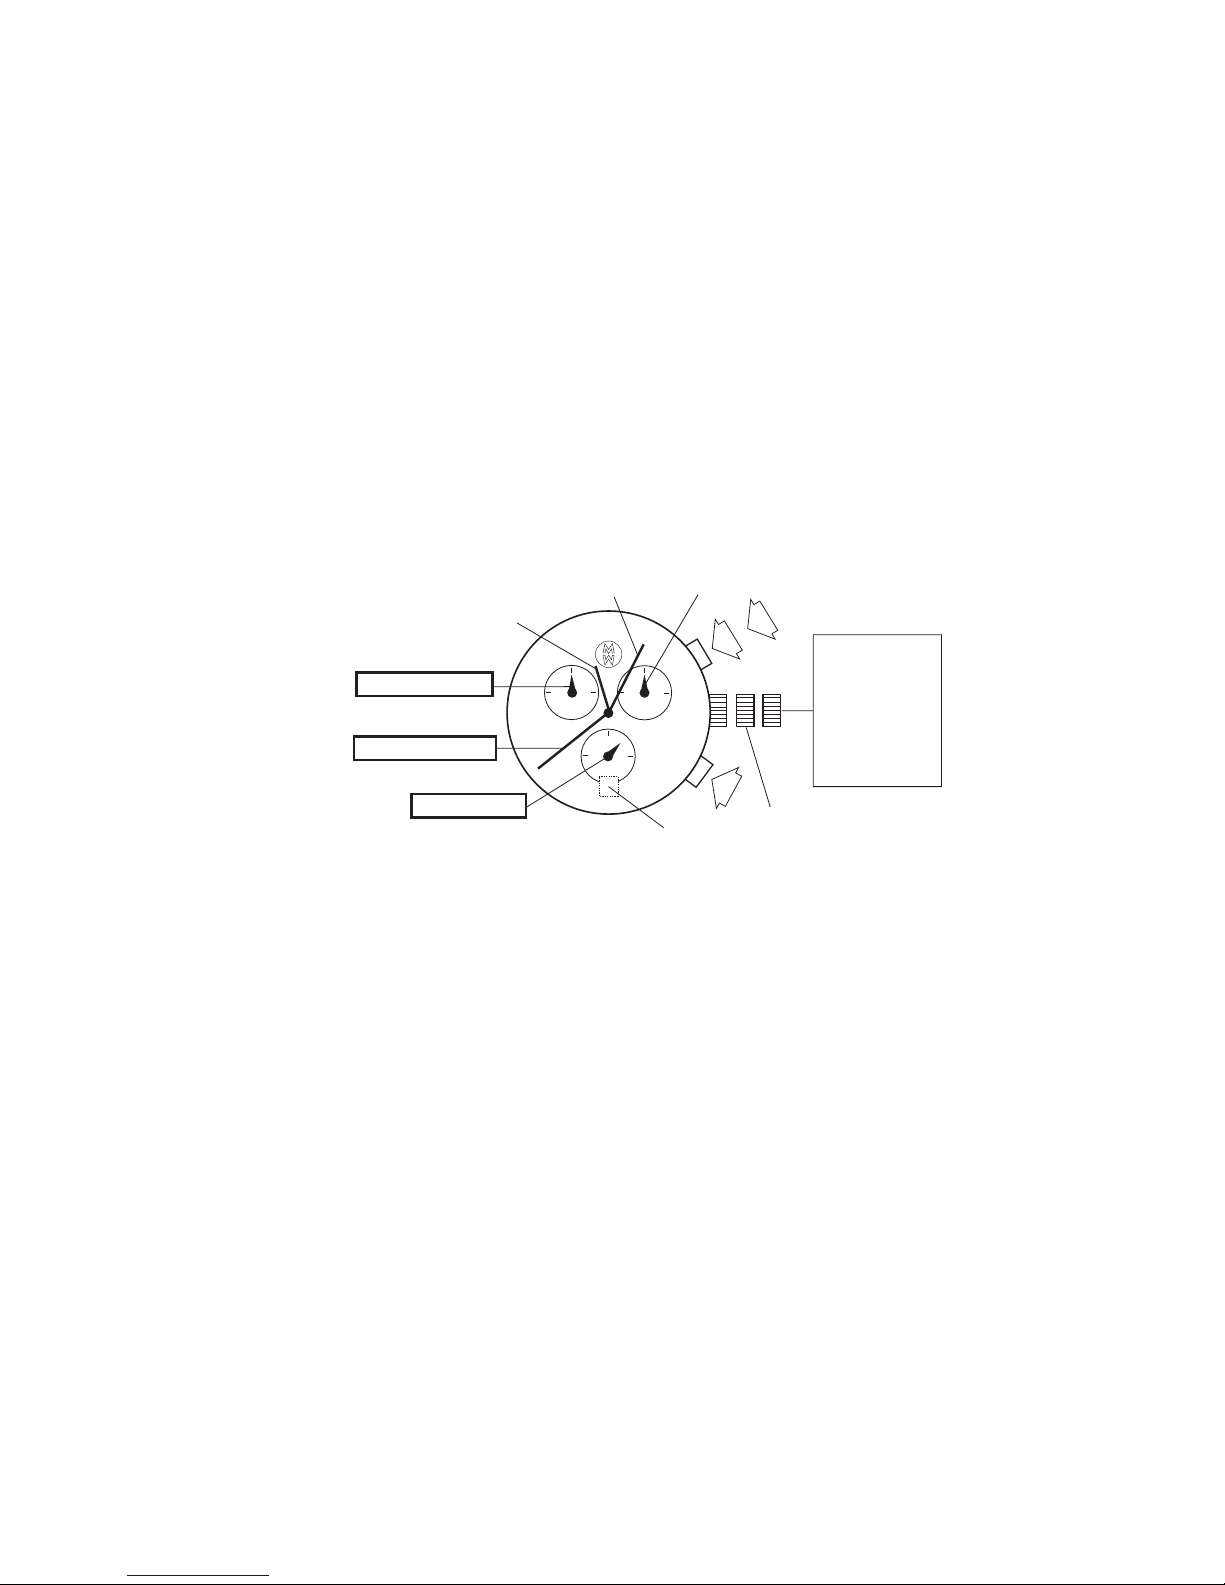
BIG DATE (7331)
Name of Parts and Functions
Manufactured in Switzerland, the BIG DATE Movement is a highly complex quartz movement. Watch
insiders call this type of movement a “Complication” due to its intricate mechanics and engineering.
While the date must be changed once a month, watch and fashion enthusiasts believe that this only adds
character to an already exceptional watch.
Minute Hand
Crown
Small Second Hand
Big Date
Hour Hand

7
How to Set Time and Date
Time
Pull crown out two clicks to position “3” as shown above. Once
in position “3,” turn the crown in a counter-clockwise (down)
direction. See indicator “A” in diagram.
Once you have reached the correct hour and minute setting, press
the crown all the way in to position “1” as shown in the drawing.
When setting the hour be sure that the date jumps so that you can properly set the time to AM or PM.
Date
NOTE: Your Big Date calendar shows the date with two digits. The 5th of a month will appear as “05.” The
date indicator is a complication using two disks to illustrate date function.
Pull crown out one click to position “2” as shown in drawing. Once in position “2,” turn the crown in a
counter-clockwise (down) direction. See indicator “B” in diagram.
Once you have reached the desired date, push the crown back to position “1.” NOTE: Your date must be
corrected manually at the beginning of each new month.
1
B
2 3
A

8
CHRONOGRAPH MODELS (5021.D)
Setting the Time
1. Pull crown out to position III (the watch stops).
2. Turn crown until you reach the correct time.
3. Push crown back to position I.
Setting the Date
1. Pull crown out to position II (the watch continues to run).
2. Turn crown until yesterday’s date appears.
3. Pull crown out to position III (the watch stops).
4. Turn crown until correct date appears.
5. Continue to turn crown until correct time appears.
6. Push crown back to position I.
Crown
I II III
Minute Hand
Hour Hand
Second Hand
Date

9
Chronograph
• The minute counter measures 30 minutes per rotation.
• The center stop-second measures 60 seconds per rotation.
PLEASE NOTE:
Before using the chronograph functions, please ensure that:
- the crown is in position I (= normal position).
- the two chronograph hands are precisely at zero position following activation of pusher B. Should this
not be the case, the positions of the hands must be adjusted (see the chapter entitled “Adjusting the
chronograph hands to zero position”).
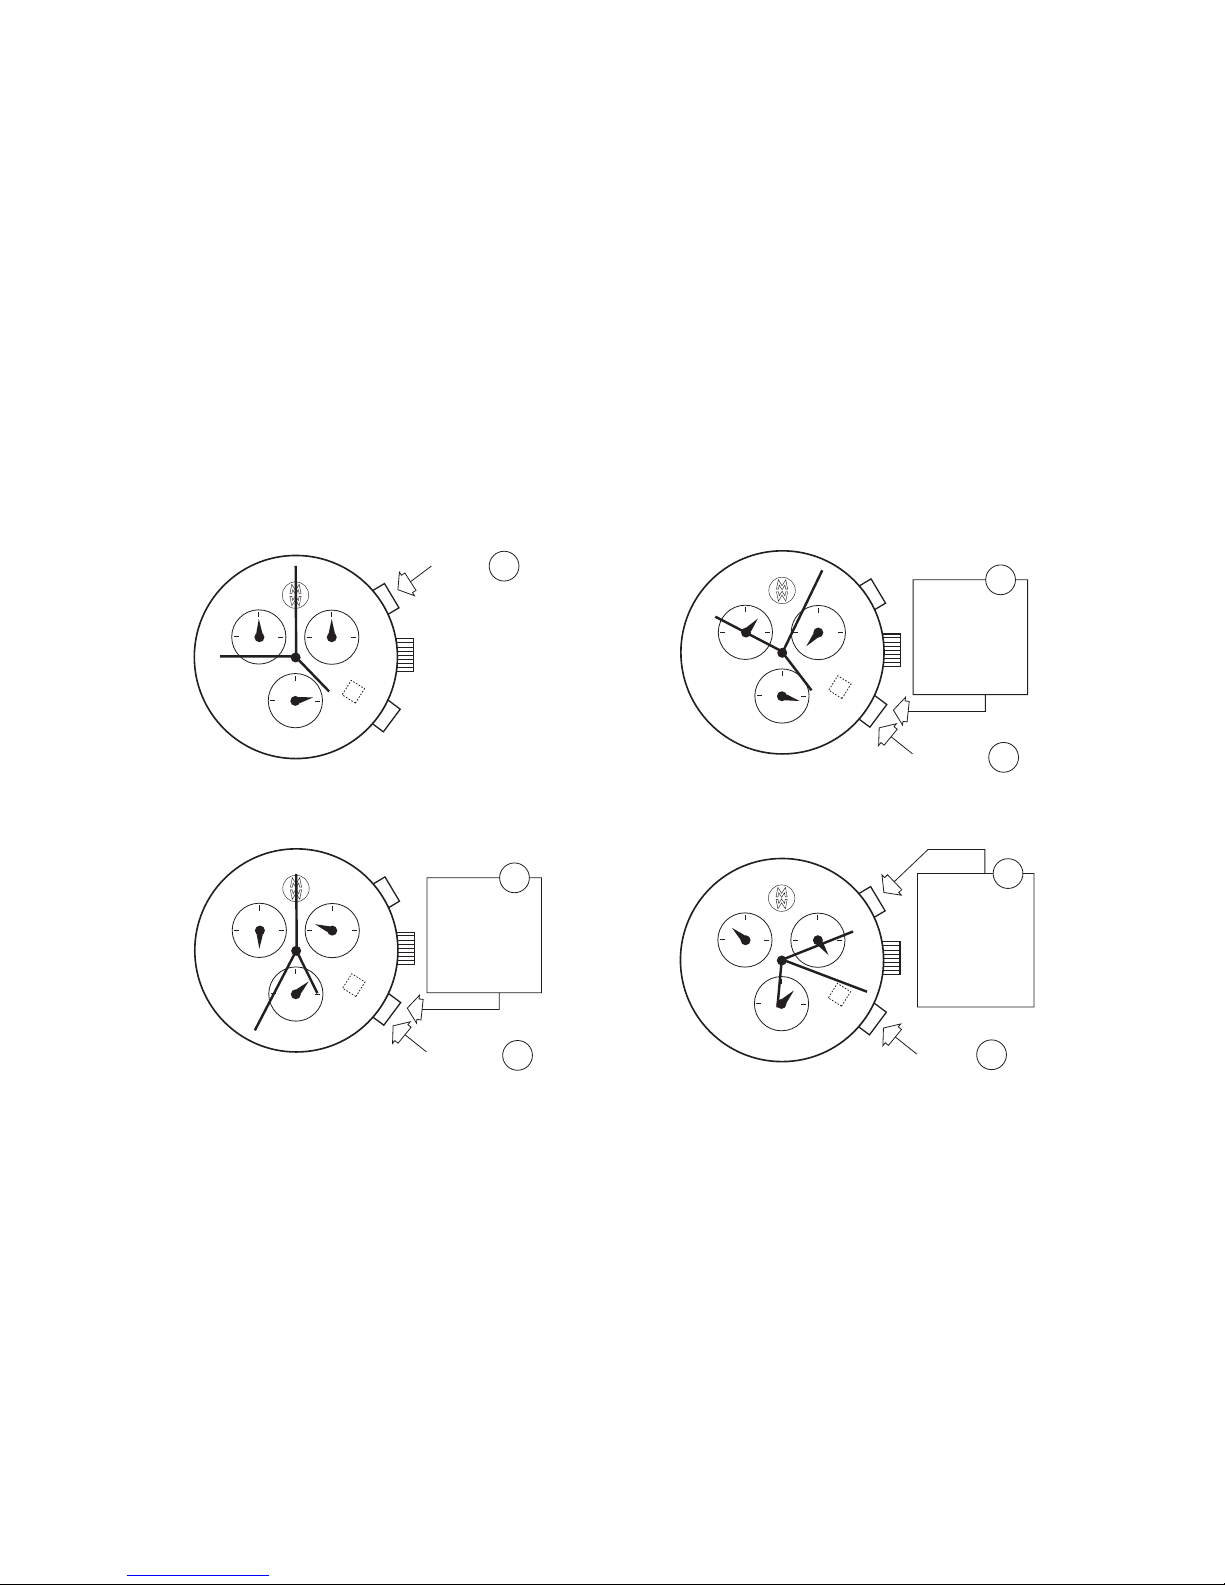
Chronograph: Basic Function
(Start / Stop / Reset)
1. Press pusher A to start the center stop-second hand.
2. To stop the timing, press pusher A again.
3. To reset the two chronograph hands to zero positioning, press pusher B.
Crown
I II III
Center Stop-second
Minutes Counter
Pusher A
Pusher B

10
*NOTE: To prevent premature loss of power, always reset chronograph to zero position when
not in use.
Chronograph: Intermediate or Interval Timing
1. Press pusher A to start the center stop-second hand.
2. Press pusher B to stop the chronograph.
*NOTE: Although the chronograph hands have stopped, the movement continues to record the
current timing.
3. Make up the measured time:
Press pusher B again and the 2 chronograph hands are quickly advanced to the ongoing measured time.
To continue to record intervals, continue to push pusher B.
4. Press pusher A to stop and the final time is displayed.
5. To reset the two chronograph hands to zero positioning, press pusher B.
Adjusting the Chronograph Hands to Zero Position
1. Pull crown out to position III (the two chronograph hands are in their correct or incorrect zero position).
2. Keep pushers A and B depressed simultaneously for at least 2 seconds (the center stop-second rotates
by 360° - corrective mode is activated).
3. Press pusher A to single step the center stop-second hand. Press and hold pusher A to advance the
center stop-second hand quickly. Press pusher B to advance to the next hand.
4. Press pusher A to single step the minute counter hand. Press and hold pusher A to advance the minute
counter hand quickly.
5. Return the crown to position I.
11
I II III
1
2
3
Rotate to set
hour & minute
hands. Date
advances with
each 24 hour
rotation of
hour hand.
Minute Hand Second Hand
30 Minutes Timer
60 Seconds Timer
Hour Hand
12 Hour Timer
Date Indicator
Rapid Correction of Date
CHRONOGRAPH MODELS (ETA 2894-2)
Pushers
1. To start chronograph
2. To stop chronograph
3. To reset chronograph to zero
AUTOMATIC WINDING MOVEMENT
A timepiece fitted with an automatic winding movement obtains the power to wind itself by the movement
of your wrist. It is important that your timepiece is adjusted to match the size of your wrist. A loose fit may
result in a loss in capacity of the timepiece to wind itself. When fully wound, your timepiece has a power-
reserve of approximately 38 hours. If the timepiece has not been worn for over 38 hours it will stop and have
to be worn again to restore power and function.

12
CHRONOGRAPH MODELS (ETA 251)
NOTE: Please refer to the dial configuration or movement numbers of your timepiece to find the
corresponding diagrams.
Display 1
Minute Hand
Hour Hand
Second Hand
1/10 Second Timer
Pushbutton A
Crown
(Position I, II, III)
Pushbutton B
Date Indicator
I II III
60 Seconds Timer
30 Minutes Timer
Display 2
Minute Hand
Hour Hand
Second Hand
1/10 Second Timer
Pushbutton A
Crown
(Position I, II, III)
Pushbutton B
Date Indicator
I II III
60 Seconds Timer
30 Minutes Timer

13
Zero Reset
Set the hand of the
1/10 second timer to zero
Set the hand of the
30 minutes timer to zero
Set the hand of the
60 seconds timer to zero
Crown
I II III
NOTE: To reset the timer hands (60 seconds hand, 30 minutes hand and 1/10 seconds hand) press Pusher A
or B. Each time you press the pusher, it will advance the hands by a single unit. If you hold the pusher pressed
in for more than 2 seconds, it advances rapidly.
WARNING: Before adjusting the Zero Reset, put back the chronograph hands to their original position to
ensure that the chronograph timer is not running.

14
Correction Mode
Setting the Time
Setting the Date
Time Zone Correction
NOTE: While crown is in position III, the second
hand stops rotating.
Timing Mode
Simple Timing Function
WARNING: Before starting the timer, put back the
chronograph hands to their original positions. If
necessary, see diagram titled “Zero Reset.”
I II III
A
B
Time zone correction
Rotate to set
hour & minute
hands. Date
advances with
each 24 hour
rotation of
hour hand.
Reset to zero
START
Setting crown
in position l
STOP
Read time - example:
- 5 minutes
- 57 seconds
- 7/10 second
1
2
3
I
A
B
15
Timing Mode
Split-time or Intermediate Time Function
Crown
in position l
START 1
I
A
B
SPLIT 1
Read time 1
- 5 minutes
- 4 seconds
- 6/10 sec.
2
RESTART 3
I
A
B
SPLIT 2
Read time 2
- 15 minutes
- 36 seconds
- 8/10 sec.
4
RESTART 5
I
A
B
STOP
Read
Last time
- 25 minutes
- 18 seconds
- 4/10 sec.
6
Reset
to zero 7
I
A
B

16
WATER RESISTANCE
All MICHELE timepieces are designed with a minimum water-resistance rating of 3ATM (100ft/30m).
The water-resistance of a timepiece protects the movement from, dust, moisture, and risk of damage to the
movement should it be immersed in water.
Please see chart for guidelines for recommended exposure of various water ratings.
It is important not to attempt to adjust the position of the crown while the timepiece is in contact with water.
Water can enter the case causing damage to the movement.
For timepieces with screw-down crowns, it is important to ensure the crown is in the proper position and
completely locked before contact with water.
For timepieces with chronograph functions, do not engage the chronograph under water, as water may leak
in the case and cause damage to the movement.

17
USE PRECAUTIONS
Resistance to Water
All MICHELE timepieces are designed to withstand use as indicated on line 1 of the following chart.
Indication Water-related Use
Water-resistant
characteristics
Light spray
perspiration, light
rain, etc.
Bathing, etc. Swimming, etc.
Skin diving,
(Diving without
oxygen cylinder)
1
3 ATM
OK NO NO NO
2
5 ATM
OK OK NO NO
3
10 ATM
OK OK OK NO
4
20 ATM
OK OK OK OK
Always set the crown in the normal position. Tighten screw-lock crown completely.

18
CARE AND PRECAUTIONS
Each MICHELE timepiece is designed and manufactured to exceed the highest of standards. Unlike most other
mechanical objects, a watch operates non-stop. In order to ensure optimal performance and longevity from your
timepiece, please review the simple guidelines for care and precautions of your new MICHELE timepiece.
Care
Your timepiece should be cleaned with a soft cloth and water only. Do not submerge your timepiece. Your
timepiece should be wiped clean and dried with a soft cloth after any saltwater use. In order to maintain
the “new look” of metal bracelets, we recommend periodic cleanings of the bracelet. Remove bracelet
from case and dip a soft brush in warm soapy water and gently rub bracelet clean. We advise having your
timepiece serviced every 18-24 months to ensure long use and trouble free operation.
Your strap requires care and caution. The natural material used to manufacture your strap is delicate and
sensitive to the elements. Water, sunlight, exposure to chemicals or perspiration will cause discoloration,
shrinkage and damage to your strap. Use a soft cloth to wipe your strap clean when removing your watch.
All rubber, silicon rubber and stainless steel bracelets are water-resistant. They are recommended for more
active lifestyles.
Please treat your strap with care and attention. It will keep you in fashion.
Precautions
Your timepiece is a complex integration of parts and components brought together by skilled craftsmen.
There are certain actions or environmental situations that may damage or impede your timepiece’s ability
to perform optimally.

19
It is important to avoid the following conditions: extreme heat or cold, as well as prolonged periods of
exposure to direct sunlight, exposure to wet conditions that exceed your timepieces’ water rating (see
case back and chart). Never operate any of the function buttons or crown when timepiece is in contact
with water.
Your timepiece should not be affected by magnetic fields generated by household items such as televisions
and stereos, but avoidance of other strong electric fields or static electricity, which may interrupt mechanism,
is suggested. It is also important to avoid extreme shock or impact.
THE ELAPSED TIME BEZEL
(For models having rotating bezels.) The elapsed time ratchet bezel is unidirectional and will only rotate in
one direction – counter-clockwise. This is to insure that it remains fixed in the required position.

20
HOW TO CHANGE STRAPS
Push metal tab inward until the pin is released.
Repeat this process in reverse to re-insert the new strap.
21
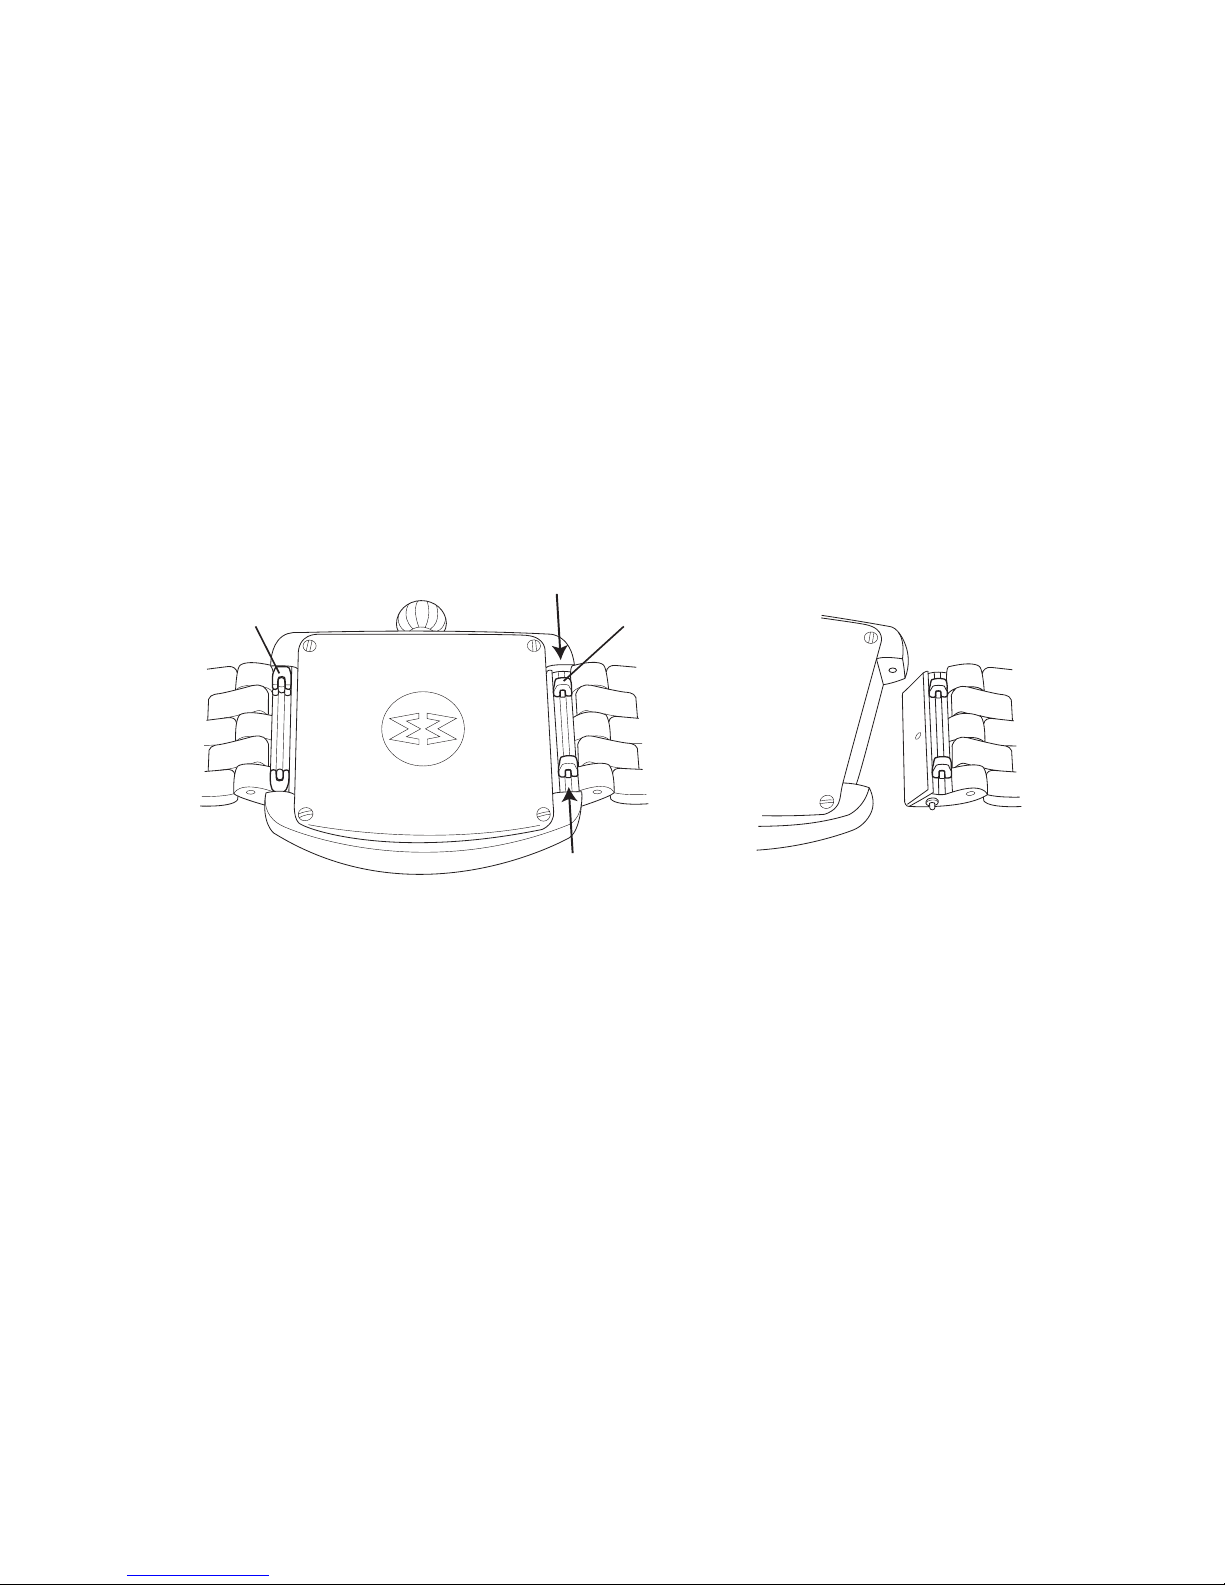
HOW TO CHANGE BRACELETS
Lift up both tabs.
Push tabs toward each other to release pin.
To re-attach, hold the bracelet against a firm surface, depress the tabs inward, and attach the head.
Tabs Down Tabs Up

120
TWO (2) YEAR INTERNATIONAL WARRANTY
Your MICHELE watch is warranted by MICHELE Watches* for a period of
two (2) years from the original date of purchase under
the terms and conditions of this warranty. The MICHELE warranty covers materials and manufacturing defects. A copy of the
receipt and/or your completed warranty card is required for proof of purchase.
During the warranty period the watch movement, hands and dial are the only components covered under this warranty. A
covered component will be repaired or the watch will be replaced free of repair charges, if it proves to be defective in material
or workmanship under normal use.
In case of replacement, MICHELE cannot guarantee that you will receive the same model watch. If your model is not available,
a watch of equal value and similar style will be provided. The warranty for the replacement watch ends two (2) years from the
date the replacement watch is received.
This Warranty Does Not Cover:
• Any defects in materials and workmanship of battery, case, crystal, strap or bracelet.
• Damage resulting from improper handling, lack of care, accidents, or normal wear and tear.
• Water damage unless marked water-resistant.
This warranty is void if the watch has been damaged by accident, negligence of persons other than authorized MICHELE sales
or services agents, unauthorized service, or other factors not due to defects in materials or workmanship.
The foregoing warranties and remedies are exclusive and in lieu of all other warranties, terms or conditions, express, implied
or statutory, as to any matter whatsoever, including, without limitation, warranties of merchantability, fitness for a particular
purpose, accuracy, satisfactory quality, title, and non-infringement, all of which are expressly disclaimed by MICHELE. MICHELE
shall not be liable for incidental, consequential, indirect, special or punitive damages or liabilities of any kind arising out of or
in connection with the sale or use of this product, whether based in contract, tort (including negligence), strict product liability
or any other theory, even if MICHELE has been advised of the possibility of such damages and even if any limited remedy
specified herein is deemed to have failed of its essential purpose. MICHELE’s entire liability shall be limited to replacement or
repair of the purchase price paid, at MICHELE’s sole option.
This manual suits for next models
99
Table of contents
Other Michele Watch manuals


