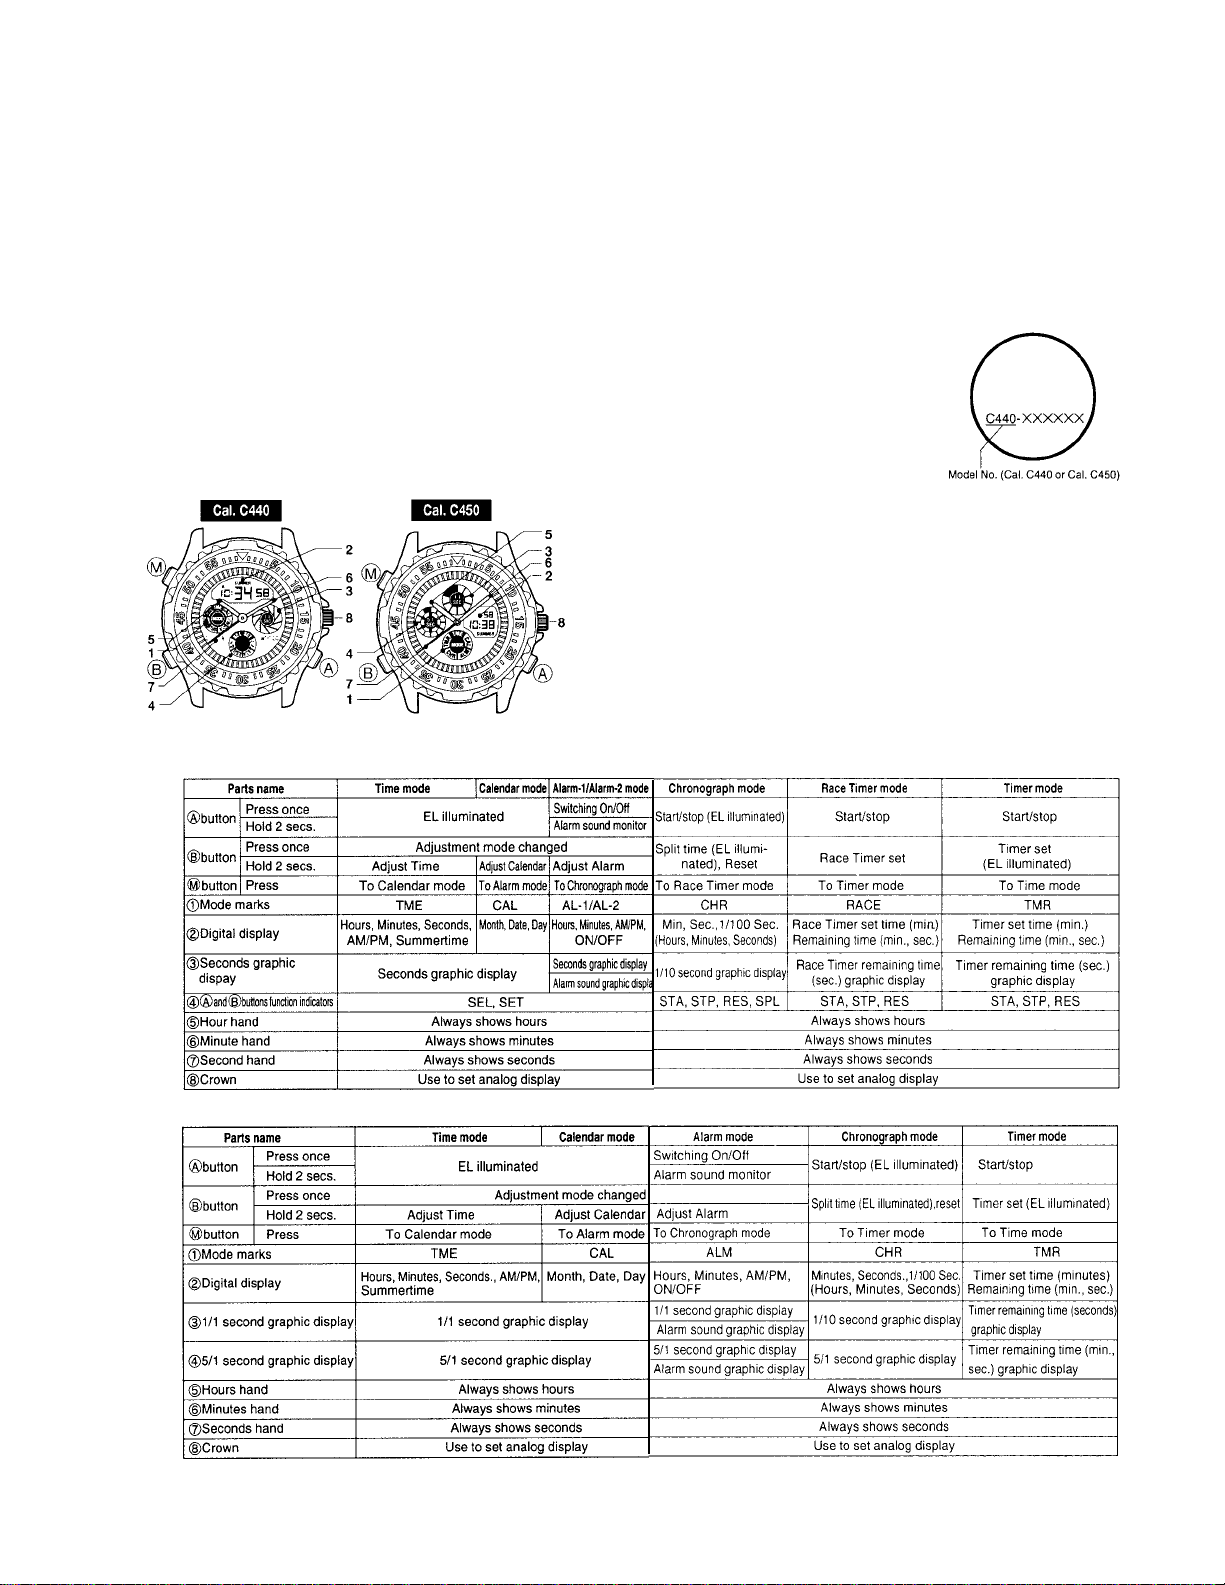
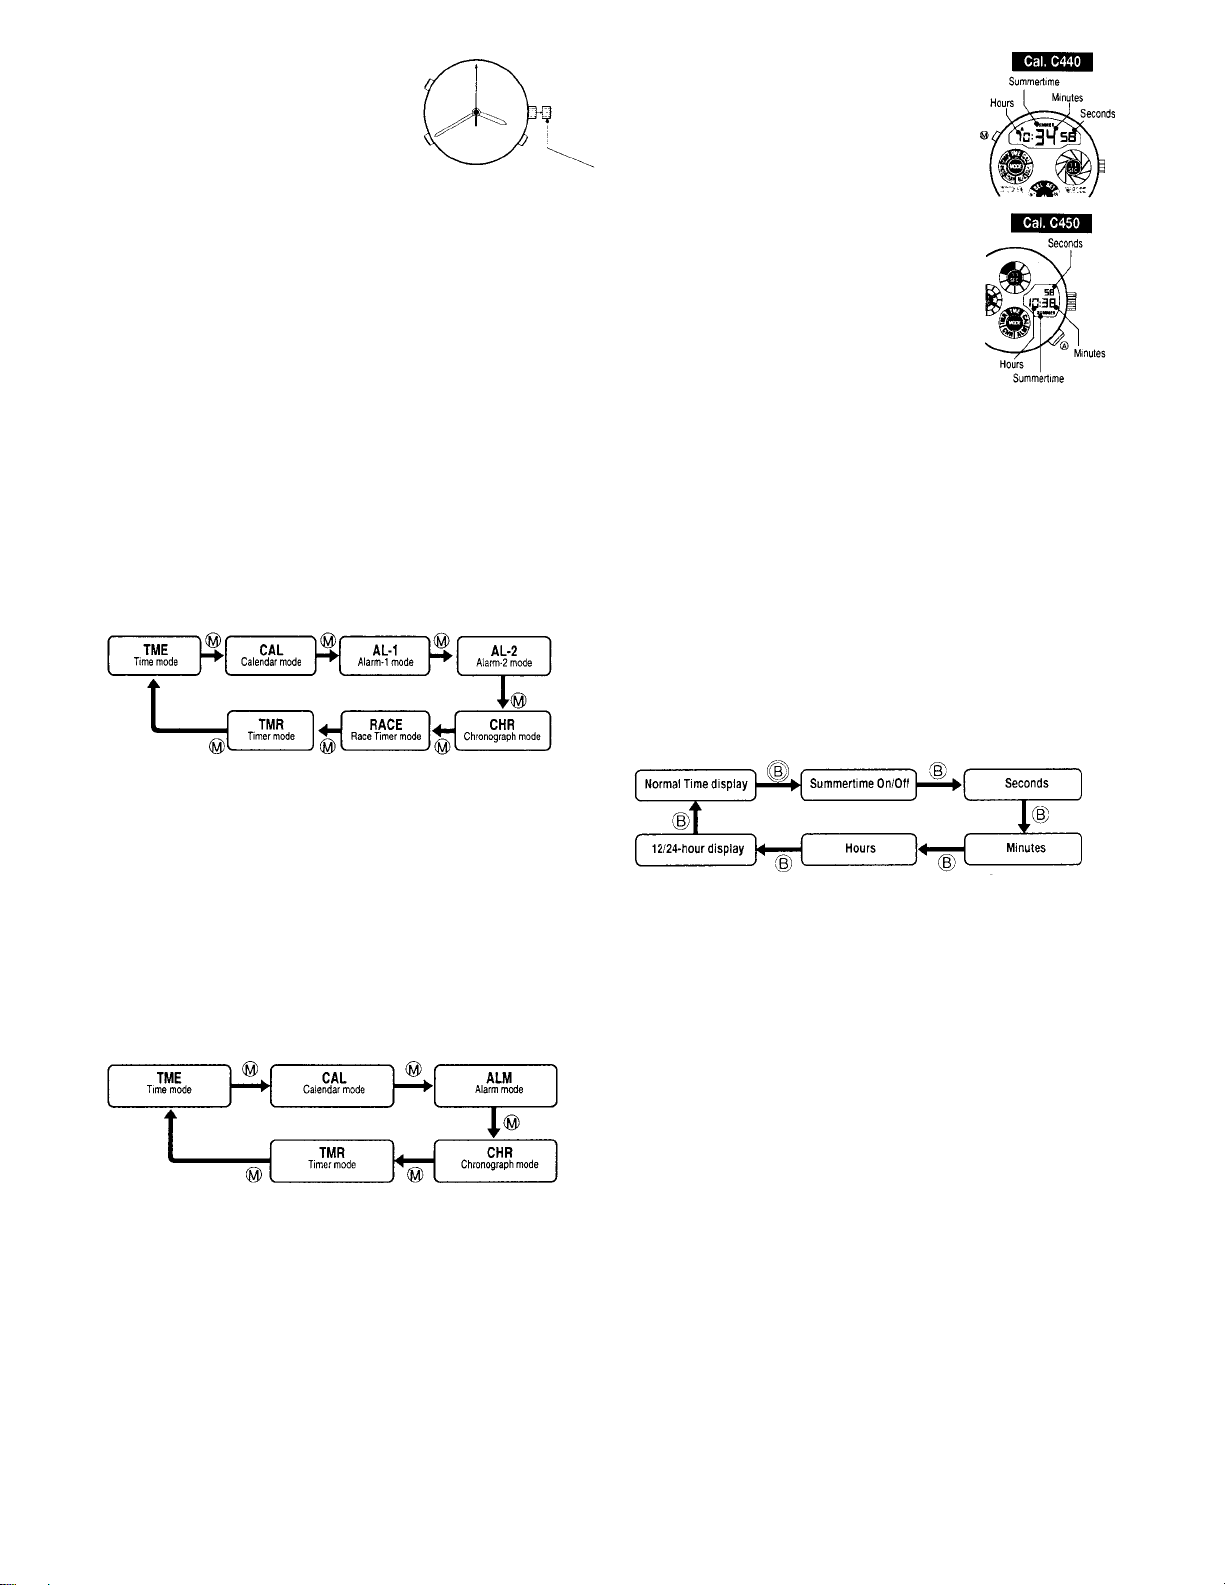
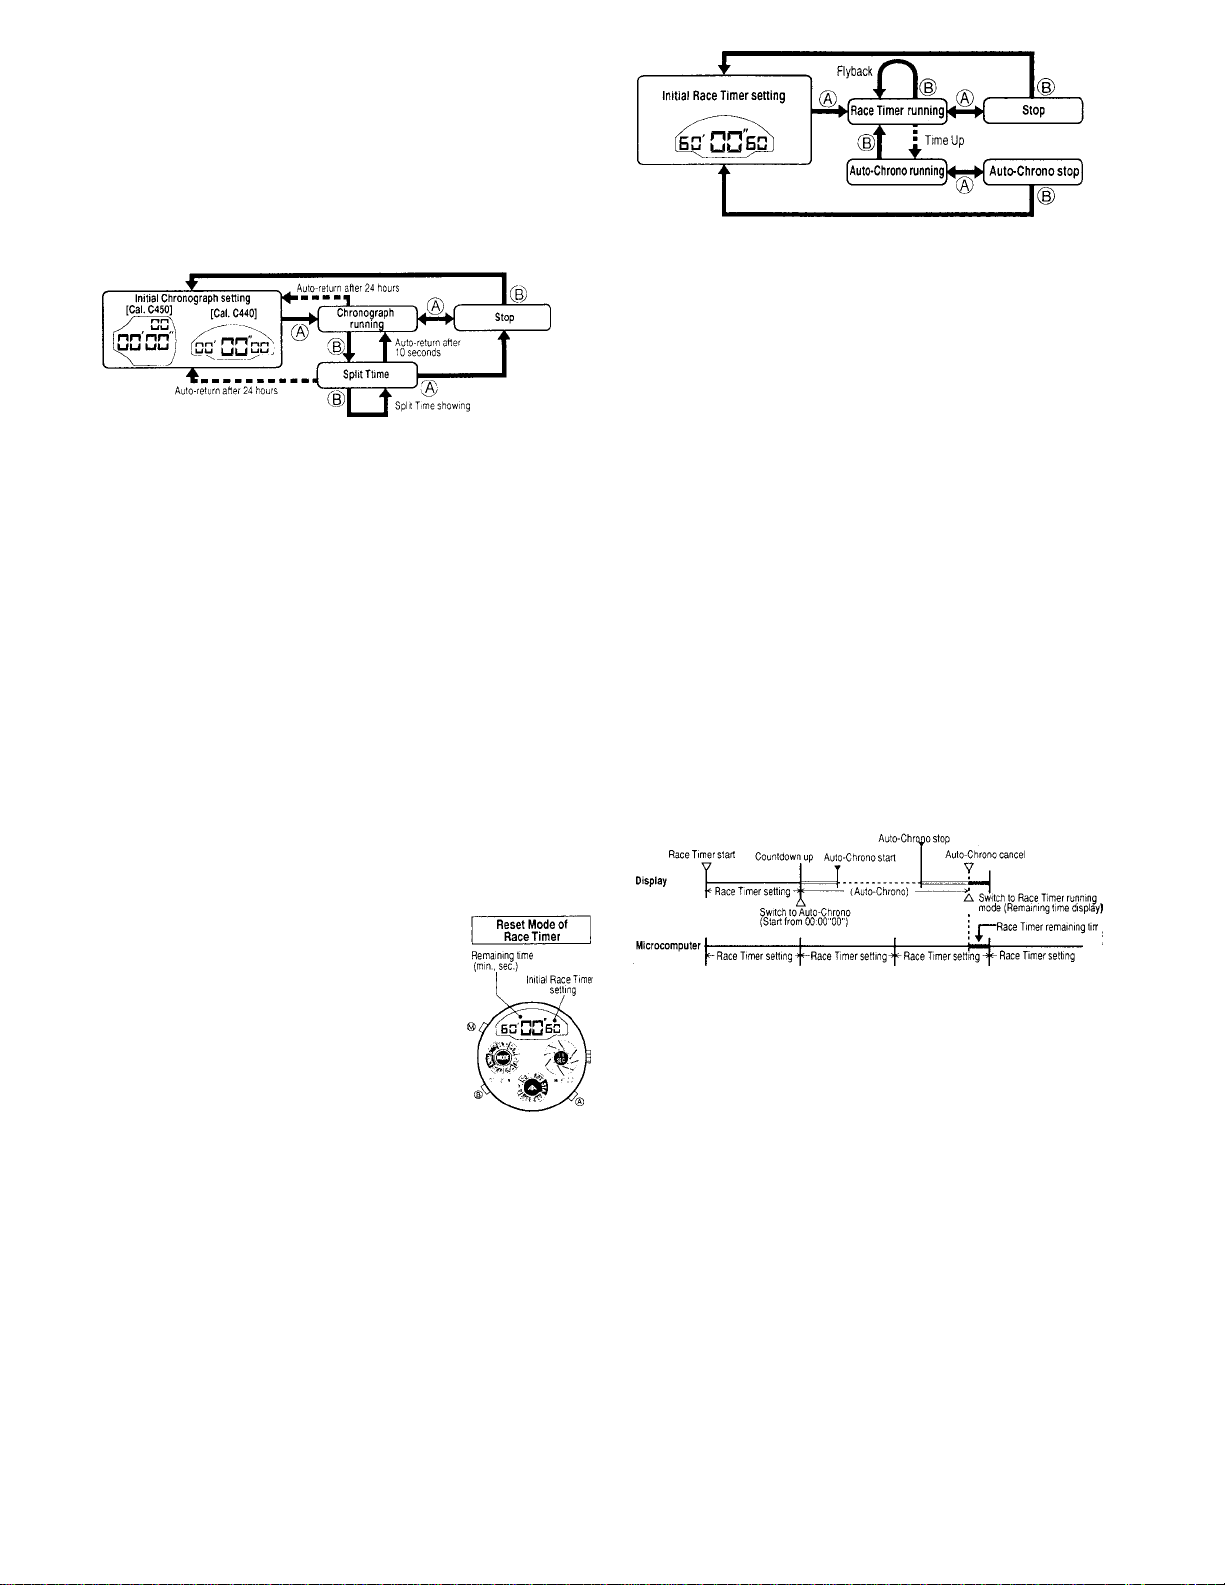
manuals.online logo
Brands
  1. Home
  2. •
  3. Brands
  4. •
  5. Citizen
  6. •
  7. Watch
  8. •
  9. Citizen JQ7 Series User manual

Citizen JQ7 Series User manual

CITIZEN QUARTZ
COMBO MINI
Model No. JQ7XXX
Cal. No. C450, C451
• INSTRUCTION MANUAL
CTZ-B6806
The contents of this manual are edited to be used
commonly for Cal. C440 and C450.
• Several types with different design are also available.
When reading this instruction manual please keep
the watch diagram in view. Symbols used in the
sections on operating instructions refer to the
symbols indicated in this diagram.
Some functions and operating
methods are different if model
number (Cal. No.) differs. Please
check Cal. on the back of your
watch, and read Instruction
Manual.
1. Main Features
This is an analog and digital combination watch
equipped with Race Timer for marine sports (Cal.
C440), Chronograph for timing race events, Timer
and other functions.
EL (electro-luminescence) Light illuminates display
in the dark.
2. Parts Name and Functions (When reading this
instruction manual, please keep the diagram
in view.)
3. Setting Analog Time Display
1) Pull out crown and second
hand stops.
2) Turn crown and set hands to
the correct time.
3) Push crown back in to restart
the watch.
To set the watch to the correct time:
Stop seconds hand at “0”. Move minutes hand a
few minutes ahead of the time you want to set, then
move it back to the correct time and push crown
back synchronizing with the time tone or time
casting.
*Analog and digital displays can be set to
different times to use as a dual time watch.
4. Mode Selection
Cal. C440
In addition to Time display, Cal. C440 has 6
functions of Calendar, Alarm-1, Alarm-2,
Chronograph, Race Timer and Timer. Mode of
watch changes each time 嘷Mbutton is pressed. See
Mode Indicator to check the present mode.
Auto-Return:
Display will return automatically to normal Time
display mode if left in Alarm-1 or Alarm-2 mode for
more than 2 minutes without any operation.
Cal. C450
In addition to the Time display, Cal. C450 has 4
functions of Calendar, Alarm-1, Chronograph and
Timer. Mode of watch changes each time 嘷Mbutton
is pressed.
See Mode Indicator to check the present mode.
Auto-Return:
Display will return automatically to normal Time
display mode if left in Alarm mode for more than 2
minutes without any operation.
5. Using Digital Function
A Setting Digital Time Display
• EL Light is illuminated when 嘷A
button is pressed in normal
Time display mode.
To set for Summertime
1) Press 嘷Bbutton for more than
2 seconds in normal Time
display mode. “Summer,
ON/OF” flashes.
2) Press 嘷Abutton to set for
summertime. Indicator
changes to On or Off each
time this button is pressed.
• “SUMMER” is on display when set to summertime.
The watch shows the time one hour earlier than
the regular time when it is set to summertime.
To adjust Seconds
1) Press 嘷Bbutton in adjustment mode (“SUMMER”
is flashing). Seconds flash.
2) Press 嘷Abutton while Seconds are flashing.
Digits return to “00,” and restart.
To adjust Time display
1) Press 嘷Bbutton in adjustment mode (Seconds
are flashing). Flashing digits change in order as
shown in diagram each time button is pressed.
2) Press 嘷Abutton to adjust flashing digits. Press
and hold 嘷Abutton for rapid advancement.
• Summertime On/Off is changed each time 嘷A
button is pressed.
• 12/24-hour display is changed each time 嘷A
button is pressed.
• Be sure to set AM/PM mark correctly when using
12-hour display system.
• Auto-Return to normal Time display will activate
when the watch is left in adjustment mode for
more than 2 minutes.
• If
嘷Mbutton is pressed in adjustment mode,
display will return directly to normal Time.
Linkage with Summertime:
Setting of Alarms 1 & 2 (Cal. C440) or Alarm (Cal.
C450) does not change when Summertime is set in
Time display Mode.
Analog Time
Setting Position
Button Operation:
嘷BPress for 2 seconds or longer. 嘷BPress once.
B Setting Calendar
• Calendar shows Month, Date and
Day.
• EL Light is illuminated while 嘷A
button is pressed and held in
Calendar display mode.
To set Calendar
1) Press 嘷Bbutton in Calendar mode
for more than 2 seconds. Month
flashes.
2) Flashing digits change in order as
shown in the diagram each time 嘷B
button is pressed.
3) Press 嘷Abutton to adjust flashing
digits. Press and hold 嘷Abutton for
rapid advancement.
• Year can be set from 1996 to 2099.
• Auto-Return to normal Calendar display will
activate when the watch is left in adjustment
mode for more than 2 minutes.
• Day of the week is automatically set with
adjustment of Month, Date and Year.
• When calendar is set to non-existent date (e.g.,
February 30) display will show automatically first
day of next month when returned to normal mode.
• Month-end adjustments are not necessary as
Calendar is programmed to be set automatically.
If 嘷Mbutton is pressed in adjustment mode,
display will return directly to normal Calendar
display mode.
C Setting Alarm-1 (Cal.
C440)/Alarm (Cal. C450)
To set Alarm-1 (Cal. C440)/Alarm
(Cal.450)
1) Press 嘷Bbutton in alarm mode for
more than
2 seconds. Hours flash.
2) Press 嘷Bbutton as necessary to
select digits to be adjusted. Press
嘷Abutton to set Alarm.
• If Time display is set to 12-hour
display system, it is linked to
Alarm. Make sure that AM/PM is
set correctly.
• Alarm setting does not change when Summertime
is set in Time display mode.
To switch Alarm On/Off
• Press 嘷Abutton in Alarm mode to switch alarm
On/Off.
Alarm Sound
• Alarm buzzer will sound for about 20 seconds.
Press any button to stop Alarm sound.
• Alarm Monitor
• Alarm will sound while 嘷Abutton is pressed in
Alarm mode
Auto-Return
• Display will return automatically to normal Alarm
display mode if left in Alarm adjustment mode for
more than 2 minutes without any operation.
• Display will return automatically to Time display
mode when 2 minutes have elapsed in normal
Alarm display mode.
Instant Manual Return
• Press 嘷Mbutton in Alarm adjustment mode to
return instantly to normal Alarm display.
D Setting Alarm-2 (Cal. C440)
• Alarm-2 can be set and operated in the same
way as Alarm-1. Alarm-2 has a different sound.
E Using Chronograph
Chronograph measures up to 23 hours 59 minutes
59 seconds in 1/100 second. It will stop at next
second when it reaches exactly 24 hours and reset
to 00 minute 00 second 00. Chronograph also has a
split time measurement function.
[Display of Time Measurement]
• Chronograph shows minutes, Seconds and 1/100
Second up to 60 minutes and will change to
Hours, Minutes and Seconds after 60 minutes.
To Measure Total Elapsed Time
1) Press 嘷Abutton to start/stop Chronograph.
• Start/stop can be repeated for any number of
times by pressing 嘷Abutton.
• EL Light will turn ON for 4 seconds when
counting is stopped by pressing 嘷Abutton.
2) Press 嘷Bbutton when counting is stopped to
reset Chronograph.
Minutes
(Change to Hours
after 60 min.)
To Measure Split Time
1) Press 嘷Abutton to start/stop Chronograph.
2) Press 嘷Bbutton while Chronograph is counting.
Split time will appear for 10 seconds.
• “SPL” will flash when Split Time is shown.
• EL light will turn ON for 4 seconds when 嘷Bbutton
is pressed.
• Press 嘷Bbutton when counting is stopped to
reset the Chronograph.
* If switched to another mode while Chronograph
is running and then returned to Chronograph
mode, the watch will show time measurement
going on at time of mode switching. (If switched
while Split Time is shown, the watch will return to
Chronograph running mode.) However, if
Chronograph counting has exceeded 24 hours,
the watch will return to Chronograph reset mode.
F Using Race Timer (Cal. C440)
• Race Timer can be set to 15 different durations
of countdown in 60, 55, 50, 45, 40, 35, 30, 25, 20,
15, 10, 6, 5, 3 and 1 minute. Use this function by
setting to one of these countdown lengths as
desired.
• When Race Timer countdown is finished, Time-up
signal will sound for 5 seconds and the watch will
be automatically set to Chronograph mode (Auto-
Chrono) and start counting from 00 hour 00 minute
00 second.
To Set Race Timer
Press 嘷Bbutton in Race Timer mode.
Length of time countdown will change
15 times starting from 60 minutes to
1 minute. Set Race Timer to desired
length. Press and hold 嘷Bbutton for
rapid advancement.
To Use Race Timer
1) Press 嘷Abutton in Race Timer
mode. Timer starts countdown from the time set.
2) Press 嘷Abutton stop/start countdown.
3) Press 嘷Bbutton when countdown is stopped.
Race Timer display returns to initial setting.
4) If 嘷Bbutton is pressed while countdown is
continuing Race Timer returns to initial setting
and automatically restarts countdown.
5) When Race Timer countdown is finished, Time-
Up signal will sound for five seconds and the
watch will be automatically set to Chronograph
mode (Auto-Chrono) and start counting from 00
hour 00 minute 00 second.
• Buzzer will sound to mark remaining time at 10,
5, 3, 1 minute and 50, 40, 30, 20, 10, 5, 4, 3, 2, 1
second.
Auto-Chrono Measurement
• When Race Timer countdown is finished, Time-
Up signal will sound and the watch will be
automatically set to the Chronograph running
mode (Auto-Chrono).
• Auto-Chrono will start counting from 00 hour 00
minute 00 second.
Using Auto-Chrono
1) To stop Auto-Chrono, press 嘷Abutton while Auto-
Chrono is running. To restart Auto-Chrono, press
嘷Abutton while Auto-Chrono is stopped.
2) To switch to Race Timer running mode, press 嘷B
button while Auto-Chrono is running.
Display after switching to Race Time/Auto-Chrono
* When Race Timer and Auto-Chrono are running,
microcomputer in the watch keeps repeating
Race-Timer countdown as shown in diagram. If
switched to Race Timer from Auto-Chrono, the
watch will show Race Timer countdown in
progress. (Countdown of microcomputer does not
stop even if Auto-Chrono is stopped.)
3) To return to initial Race Timer setting, press 嘷B
button in Auto-Chrono stop mode
• The watch will return to Time display mode if 嘷M
button is pressed in Race Timer or Auto-Chrono
mode.
• If switched to another mode from initial Race
timer setting, Race Timer running, Race Timer
stop, Auto-Chrono running or Auto-Chrono stop
mode and then reset to Race Timer, function will
return to the mode set at the time of switching.
However, if Auto-Chrono counting has exceeded
24 hours, the watch will return to initial Race
Timer setting Mode.
G Using Timer
• Timer can be set up to 60
minutes in units of one minute.
Buzzer will sound for 5 seconds
when countdown is up and
display will return to initial set
time.
To set Timer
Press 嘷Bbutton in Timer Mode
when set time is flashing. Set time digits decrease in
units of one minute. Press and hold 嘷Bbutton for the
rapid change of digits.
To use Timer
1) Press 嘷Abutton. Timer starts countdown from set
time.
2) Press 嘷Abutton to stop/restart Timer. EL Light
turns On when 嘷Bbutton is pressed while Timer is
running.
3) Press 嘷Bbutton when Timer is stopped to return
to initial set time.
• If switched to another mode from initial Timer
setting, Timer running or Timer stop mode and
then reset to Timer, function will return to the
mode set at the time of switching. However, if
Timer countdown is finished, the watch will return
to initial Timer setting.
6. EL Light
EL Panel
EL (electro-luminescence) panel is a fluorescent
panel which becomes illuminant when voltage is
applied to it.
EL Illumination
EL Panel will illuminate:
1) When 嘷Abutton is pressed and held in normal
Time or Calendar mode.
2) When 嘷Bbutton is pressed to display Split Time
or 嘷Abutton is pressed to stop Chronograph
mode.
3) When 嘷Bbutton is pressed and held in Timer
countdown mode.
7. All-Reset Function
Use All-Reset function when battery has been
replaced or the watch indicates or operates
abnormally.
1) Pull out crown.
2) Press 嘷A,嘷Band 嘷Mbuttons simultaneously. All
digital displays disappear.
3) Release 3 buttons. All digital displays are shown.
4) Push back crown. Buzzer sounds in confirmation.
After completing all-reset procedures, adjust
displays in each mode.
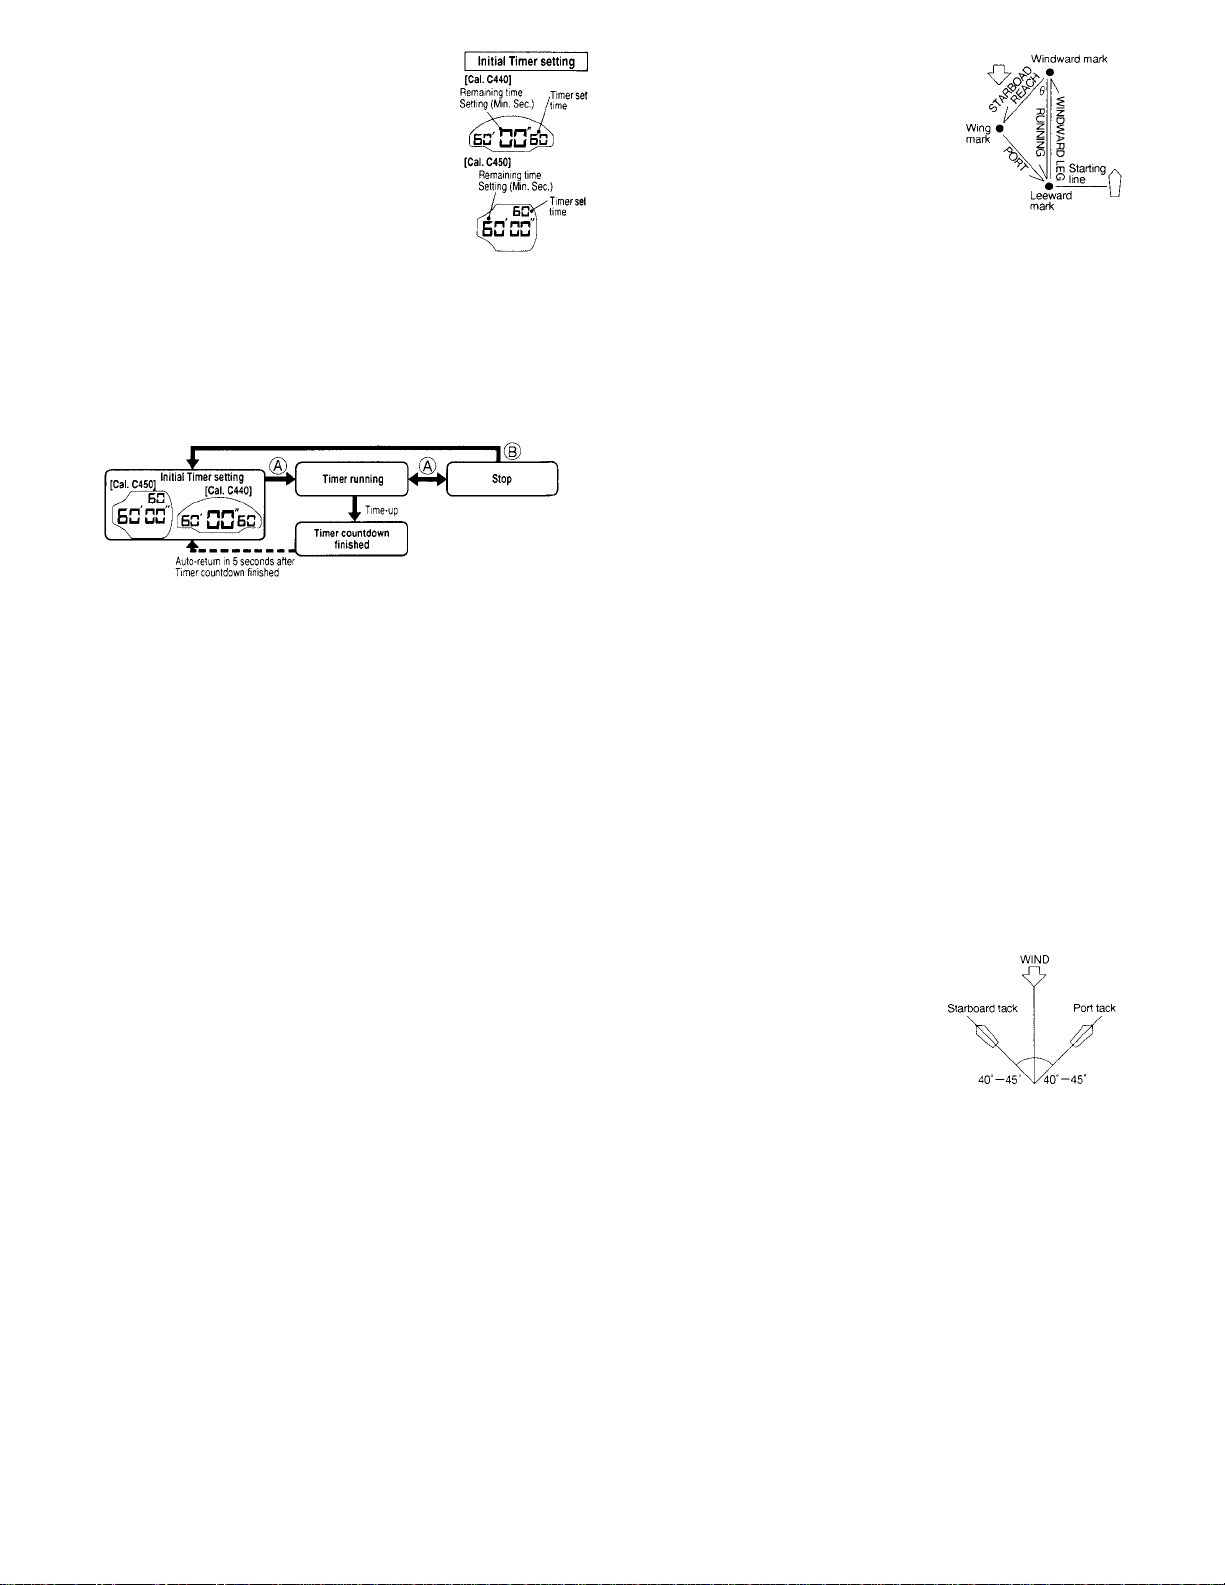
8. How To Use The Rotating Bezel
(Some models are not equipped
with the rotating bezel)
Many yacht races are set in
triangulated course layouts such as
the one described here where the
winner is the boat that navigates
the designated course around the
marks in the fastest time.
Direction: Navigational bearings are most often
given in terms of degrees.
North: 0⬚East: 90⬚South: 180⬚West: 270⬚
StarBoard: The right-hand side of a yacht looking
forward.
Port: The left-hand side of a yacht looking forward.
Using the rotating bezel (1)
1) Before a race, determine the direction of the wind
from the direction and position of the windward
marker. Line up the number representing the wind
direction (in degrees) on the bezel with the
triangle (∆) mark at 12 o’clock. (Ex: northeasterly
wind at 45⬚)
2) The course bearing from the windward mark to
the wing mark (starboard reach) is read off the
bezel, in degrees, at the green triangle (∆) on the
bottom of the left side of the dial.
3) The course bearing from the wing mark to the
leeward mark (port reach) is read off the bezel,
in degrees, at the red triangle (∆) on the bottom
right.
4) When sailing from the windward mark to the
leeward mark, the small, white triangle at the
bottom of the watch dial becomes the reference
point for determining course bearings.
Note that the above explanation is only valid for
times when the Hangle is at 45⬚. At 60⬚, use the
values lying above the red and green triangles; at
30⬚, use the values lying below the two triangles.
Using the rotating bezel (2)
Most present-day yachts are
capable of sailing at 45⬚to the
wind.
To be in a position of being able
to read the wind shift after the
start of a race, make several
runs before the race matching your course as close
as possible to the red (or green) bars on the left (or
right) upper portion of the watch face.
Using the rotating bezel in the following way you
can determine the angle between the start/finish line
and the direction from which the wind is blowing.
The start/finish line is usually set at right angles to
the direction of the wind, but because the wind is
always shifting direction, it is a rare occasion when
a true 90⬚angle is met.
In this case, line up the white triangle at the 12
o’clock position on the watch with the direction from
which the wind is blowing. Sail from one end of the
start/finish line to the other, using the white lines
marked (at 3 or 9 o’clock) on the watch to site your
destination. If the course steered falls on the plus
(+) side of the white line, you are on a favourable
heading to start the race when you cross the
start/finish line.
If the course steered falls to the minus (–) side of
the white line on the watch, you know it is
favourable to cross the start/finish line on a heading
from the opposite direction.
• Use any one or a combination of three methods
described above to help your boat into and
maintain the position you feel is the most
advantageous during a race.
9. Precautions
1) Resistance to water
Refer to the table for water-resistance performance
after checking the water-resistance characteristics
inscribed on the face and back of the watch.
• Always set the crown in the normal position.
• While working with water and using as a water-
resistance sports watch, when the watch is dipped
in the sea water or after a lot of sweat, please rinse
it well in fresh water and dry it well with a cloth.
• Leather belts have characteristics that may affect
durability after getting wet.
• Because there is always moisture inside the watch,
when the air temperature is lower than inside the
watch, the surface of the glass may fog. If the fog
remains temporarily there is no problem, but if it
doesn’t disappear after a long period of time,
please consult the shop you purchased it from or a
shop dealing with Citizen Watch.
Check the chart to determine the water resistant
properties of this watch.
2) Avoid temperature extremes
Avoid leaving your watch in direct sunlight or in
extremely warm locations for long periods of time.
• This will cause malfunctioning and shorten the life
of a battery. Do not leave your watch for long
periods of time in extremely cold places.
• This may cause your watch to gain or lose time.
• Place your watch on your wrist to restore its
original accuracy should it begin to gain or lose
time.
3) Avoid wet conditions
Do not operate the buttons when your watch is wet.
4) Avoid strong shock
This watch will withstand the bumps and jars normally
incurred while playing and during sports activities.
Avoid dropping your watch on the ground or
otherwise imparting severe shock to it.
5) Avoid strong magnetic fields
Keep your watch out of the immediate vicinity of
strong magnets. Generally, your watch is not
affected by magnetic fields from such household
appliances as television sets and stereo equipment.
6) Static Electricity
The integrated circuits used in the watch are
sensitive to static electricity. If exposed to intense
static electricity, the watch’s display may lose its
accuracy.
7) Avoid harmful chemicals, solvents and gases
Avoid wearing your watch in the presence of strong
chemicals, solvents and gases. If your watch comes
in contact with materials such as gasoline, benzine,
paint thinner, alcohol, spray cosmetics, nail polish,
nail polish remover, adhesives or paint, discolouration,
deterioration or damage to the case, band, and
other components may occur.
‘‘WATER RESISTANT’’ may sometimes be abbreviated ‘‘WATER RESIST’’ • Always set the crown in the normal position
8) Photosensitive eyeglasses
The watch digital display can become difficult to read
clearly when wearing photosensitive eyeglasses or
sunglasses such as ski goggles and tinted fishing
glasses. This problem can be corrected by turning
your wrist slightly to change the angle between the eye
and the watch providing a clear view of the display.
9) Keep your watch clean
Wipe off any water and moisture that adheres to the
case, glass and band with a soft, clean cloth. Any
dirt left on the case or band may cause skin rash. A
watchband will easily become soiled with dust and
perspiration because it is in direct contact with the
skin. Even a stainless or gold-plated band may begin
to corrode if it has not been cleaned for a long period
of time. Mesh bands, because the meshes are very
fine, will lose their particular “flexibility” if they are
left soiled for a long time.
Metal watchbands are usually washed with a brush in
mild, soapy water and wiped with a soft, absorbent
cloth to make sure all water is removed. Pay attention
to prevent any water from getting inside your watch
when the band is washed.
10) Periodic inspection
Getting your watch checked once every year or two
is recommended to ensure long use and trouble-free
operation.
11) Watch bands
Metal bands: Metal watch bands can be cleaned
with a toothbrush, soap and water.
Leather bands: Wipe off the front side of the band
with a soft dry cloth, and remove stains on the back
side of the band with a cloth moistened with alcohol.
Plastic or rubber bands: Wash in water. (Avoid using
solvents as they may cause the band to dissolve.)
12) Be sure to keep the batteries out of reach of
infants and small children. Should accidental
ingestion occur, consult a doctor at once.
10. Specifications
• Caliber No.: C440/C450
• Type: Analog/digital combination display quartz
watch
• Accuracy: ±20 seconds/month at 5⬚– 35⬚C (41⬚–
95⬚F)
• Operating temperature range: 0⬚– 55⬚C (32⬚–
131⬚F)
• Display functions:
Time: Hours, Minutes, Seconds, Summertime
Calendar: Month, Date, Day
Alarm: Hours, Minutes (Alarm-1/Alarm-2
(Cal. C440 only) )
Chronograph: 24-hour measurement
(in 1/100 sec.), Split time measurement
Race timer: 15 different lengths of setting
(Cal. C440 only)
Timer: 60-minute countdown (in 1 minute)
• Additional function: EL (electroluminescence) panel
• Battery: 280 – 44 (SR927W)
• Battery life: Approx. 2 years based on assumed
use of Alarm-1 and Alarm-2 each 20 sec./day,
Race Timer buzzer 5 secs./week and EL light
3 secs./day.
This watch will keep specified accuracy for about 2
years when used under normal conditions after a
new battery has been installed. However, battery life
will vary depending on frequency of use of Alarm,
Chronograph and EL light.
* These specifications are subject to change for
product improvement without prior notice.

Other Citizen Watch manuals

Citizen C45 User manual

Citizen

Citizen C45 User manual

Citizen Quartz 5500 Manual

Citizen

Citizen Quartz 5500 Manual

Citizen 891 Manual

Citizen

Citizen 891 Manual

Citizen 9051 User manual

Citizen

Citizen 9051 User manual

Citizen 6000A-00 Manual

Citizen

Citizen 6000A-00 Manual

Citizen Eco-Drive User manual

Citizen

Citizen Eco-Drive User manual

Citizen YF10 User manual

Citizen

Citizen YF10 User manual

Citizen P130 Manual

Citizen

Citizen P130 Manual

Citizen MIYOTA GP52 User manual

Citizen

Citizen MIYOTA GP52 User manual

Citizen H61 Series User manual

Citizen

Citizen H61 Series User manual

Citizen E81 Series User instructions

Citizen

Citizen E81 Series User instructions

Citizen CTZ-B6778 User manual

Citizen

Citizen CTZ-B6778 User manual

Citizen 510 User manual

Citizen

Citizen 510 User manual

Citizen E670 User manual

Citizen

Citizen E670 User manual

Citizen U040 User manual

Citizen

Citizen U040 User manual

Citizen BV1116-12A User manual

Citizen

Citizen BV1116-12A User manual

Citizen D200 Operating manual

Citizen

Citizen D200 Operating manual

Citizen 6P80 User manual

Citizen

Citizen 6P80 User manual

Citizen YF05 User manual

Citizen

Citizen YF05 User manual

Citizen F990 User manual

Citizen

Citizen F990 User manual

Citizen Quartz 7810 Manual

Citizen

Citizen Quartz 7810 Manual

Citizen 0S60 User manual

Citizen

Citizen 0S60 User manual

Citizen E260 User manual

Citizen

Citizen E260 User manual

Citizen 520 User manual

Citizen

Citizen 520 User manual

Popular Watch manuals by other brands

Casio 2622 user guide

Casio

Casio 2622 user guide

Seiko 7T52B Technical guide

Seiko

Seiko 7T52B Technical guide

Certina Chronographs with alarm user manual

Certina

Certina Chronographs with alarm user manual

Omega 2503.80.00 user guide

Omega

Omega 2503.80.00 user guide

Suunto X6 user guide

Suunto

Suunto X6 user guide

Movado Series 800 Operating instructions warranty & service guide

Movado

Movado Series 800 Operating instructions warranty & service guide

Fossil WRIST NET reference guide

Fossil

Fossil WRIST NET reference guide

ZIIIRO LUNAR instruction manual

ZIIIRO

ZIIIRO LUNAR instruction manual

pTron Force X10 product manual

pTron

pTron Force X10 product manual

Techmade DYNAMIC user manual

Techmade

Techmade DYNAMIC user manual

LORUS R23 Series instruction manual

LORUS

LORUS R23 Series instruction manual

SELLITA SW330-2 Technical documentation

SELLITA

SELLITA SW330-2 Technical documentation

Solus Leisure 850 user manual

Solus

Solus Leisure 850 user manual

Zeon IN3206 CALIBRE 456 Operation manual

Zeon

Zeon IN3206 CALIBRE 456 Operation manual

Dunhill DM7 Instructions for using

Dunhill

Dunhill DM7 Instructions for using

oneConcept Kids Guard manual

oneConcept

oneConcept Kids Guard manual

U-Boat BLACK SWAN manual

U-Boat

U-Boat BLACK SWAN manual

Pulsar W880 manual

Pulsar

Pulsar W880 manual

manuals.online logo
manuals.online logoBrands
  • About & Mission
  • Contact us
  • Privacy Policy
  • Terms and Conditions

Copyright 2025 Manuals.Online. All Rights Reserved.