MICRIUM YWireless-RX65N User manual

!
!
!
Page 1
!
!
!
Micriµm
YWireless-RX65N Smart Home Gateway - Getting Started Guide
Micriµm
YWireless-RX65N Smart Home Gateway
Getting Started Guide
Introduction
There are countless resources to build an IoT system with. Embedded engineers are faced with
a large variety of protocols, cloud services, platforms, techniques and solutions to choose from.
Because most of these resources seem disjointed, we put together a complete set of resources
required to develop an IoT device and integrated in a larger system.
In order to help you compliment the knowledge you are getting in this guide, we believe that
some hands-on experience will help understanding the concepts at play.
The purpose of this getting started guide is to introduce embedded engineers to the Renesas
YWireless-RX65N Smart Home Gateway application. This application will use the following
resources:
§The Renesas YWireless-RX65N platform.
§The IAR Systems Embedded Workbench for RX.
§The Micriµm µC/Probe run-time graphical live watch tool.
§The!Amazon!Web!Services!IoT!platform.
§Micriµm embedded software.
Objectives
After completing this hands-on session, you will be able to:
§Build an IAR project for the YWireless-RX65N and program the board.
§Use Micrium’s uC/Probe to interact with the YWireless-RX65N.
§See your YWireless-RX65N based IoT device send data to and receive data from the
AWS IoT platform.
§Understand what the AWS IoT platform is and how it’s used.

!
!
!
Page 2
!
!
!
Micriµm
YWireless-RX65N Smart Home Gateway - Getting Started Guide
Setup
The setup for this guide requires the following elements:!
§A laptop/desktop with internet connectivity.
§A Renesas YWireless-RX65N board.
§A Renesas E1 programmer.
§A WiFi router with access to the Internet
oThe router can be secured with an SSID and a password but could not contain
other authentication like an additional web authentication as often found in hotels
or public places.
Laptop/desktop prerequisite
Software tools required on the computer:
§IAR Embedded Workbench for RX (EWRX) compiler and debugger.
§Micriµm µC/Probe, a data visualization tool for embedded target variables.
§Google Chrome for access to the webpages displaying the data generated and required
by the embedded target.

!
!
!
Page 3
!
!
!
Micriµm
YWireless-RX65N Smart Home Gateway - Getting Started Guide
1. AWS Overview
1-1. Introduction
Amazon Web Services (AWS) is a secure cloud services platform, offering computing power,
database storage, content delivery and other functionality for developers in an on-demand
cloud. It originally launched in 2006 to provide a cloud for web sites and client side applications.
Since then it has grown to over 50 different services and an estimated third of the Internet is
hosted on, or interacts with, AWS in some fashion.
The main focus of this guide is AWS IoT, the IoT platform launched in October 2015. More
details on AWS IoT are provided in the next section.
1-2. AWS IoT
This graphic shows the architecture of AWS IoT and how data flows through it. To fully
understand how messages are passed into AWS IoT, we need to break it into two parts:
security and protocol. Beyond how messages are passed into AWS IoT will be covered in later
sections of this guide.

!
!
!
Page 4
!
!
!
Micriµm
YWireless-RX65N Smart Home Gateway - Getting Started Guide
1-2-1. Security
Before we can even begin to discuss the protocol and message type that is sent to AWS
IoT, we first need to “get in the front door”. All connections to AWS IoT require a mutually
authenticated TLS connection. This is different than a normal TLS/SSL connection you
would have on a web page where you see an icon similar to this
A normal web page SSL connection is one-way where the server you’re connecting to
presents you with a certificate that has been signed by a Certificate Authority. Your
browser has a list of acceptable Certificate Authorities and checks the certificate
presented by the server against this list. If it matches the browser decides this is a
trustworthy connection and accepts the certificate.
A mutually authenticated TLS connection takes the above a step further. In our
connection with AWS IoT, we will be presented with a certificate from AWS so we can
decide if we want to trust AWS similar to your browser received a certificate from a
server. But our IoT device also has to present AWS IoT with a certificate so AWS IoT can
decide if they want to trust this device. The certificate is also used as a sort of
username/password for access control.
1-2-2. Protocol
AWS IoT messages are sent primarily via the message protocol Message Queue
Telemetry Transport (MQTT). This guide will not get into the details on the MQTT
protocol, but more information on the protocol can be found at http://www.mqtt.org.
The MQTT protocol sits right above TCP, is extremely lightweight and is ideal for small
embedded devices.
While it will not be covered in this guide, data can also be sent to AWS IoT via
Websockets and HTTP. Both of those protocols are much heavier than MQTT and not
practical for an embedded device.
At this point we have enough background information to get started.

!
!
!
Page 5
!
!
!
Micriµm
YWireless-RX65N Smart Home Gateway - Getting Started Guide
2. IAR Configuration
2-1. Configuring the Smart Home Gateway application in IAR
Open the IAR Systems Embedded Workbench for RX (EWRX) by clicking the shortcut on
the desktop or via searching in the Start Menu or Windows Explorer.
Once EWRX is running, click File →Open →Workspace…and browse to the workspace file
OS3-TCPIP-WIFI.eww located at the following path:
└───Micrium
└───Examples
└───Renesas
└───YWIRELESS-RX65N
└───OS3-TCPIP-WIFI
└───IAR
The workspace will open in a window similar to the one shown in the image below:

!
!
!
Page 6
!
!
!
Micriµm
YWireless-RX65N Smart Home Gateway - Getting Started Guide
First we need to configure the WiFi parameters. Open the file app_cfg.h found under the APP
directory in IAR. Around line 132 you will find the WiFi configuration. Ensure the configuration is
as follows:
APP_CFG_WIFI_NET_SSID: Your WiFi SSID
APP_CFG_WIFI_NET_PSK: Your WiFi Password
2-2. Configuring IAR for E1 and uC/Probe
In order to program and debug the YWireless-RX65N we need to configure it for the Renesas
E1 programmer. Also, since we will be using uC/Probe at the same time as debugging we need
to enable the uC/Probe plugin in IAR.
Right click on the project as shown above and select Options.

!
!
!
Page 7
!
!
!
Micriµm
YWireless-RX65N Smart Home Gateway - Getting Started Guide
Click on the Debugger category as shown above and change the Driver to E1/E20. Also make
sure the Run to:box is selected and set to run to main.

!
!
!
Page 8
!
!
!
Micriµm
YWireless-RX65N Smart Home Gateway - Getting Started Guide
Next, remain in the Debugger category and click on the Plugins tab. Scroll to the bottom of the
plugins and check the uC/Probe plugin as shown above.

!
!
!
Page 9
!
!
!
Micriµm
YWireless-RX65N Smart Home Gateway - Getting Started Guide
2-3. Compiling the application in IAR
Right click on the project again and choose Rebuild All. This will clean the project and build
everything from scratch.
After the build you should see Linking followed by Total number of errors: 0. If the total number
of errors is not zero, scroll up in the build log to determine the error, fix the errors and attempt to
build again.
!
!
!
Page 10
!
!
!
Micriµm
YWireless-RX65N Smart Home Gateway - Getting Started Guide
2-4. Powering and connecting the YWireless-RX65N
At this point we are just about ready to program the YWireless-RX65N with our application.
Before we can we must connect the power to the target and connect the E1 programmer.
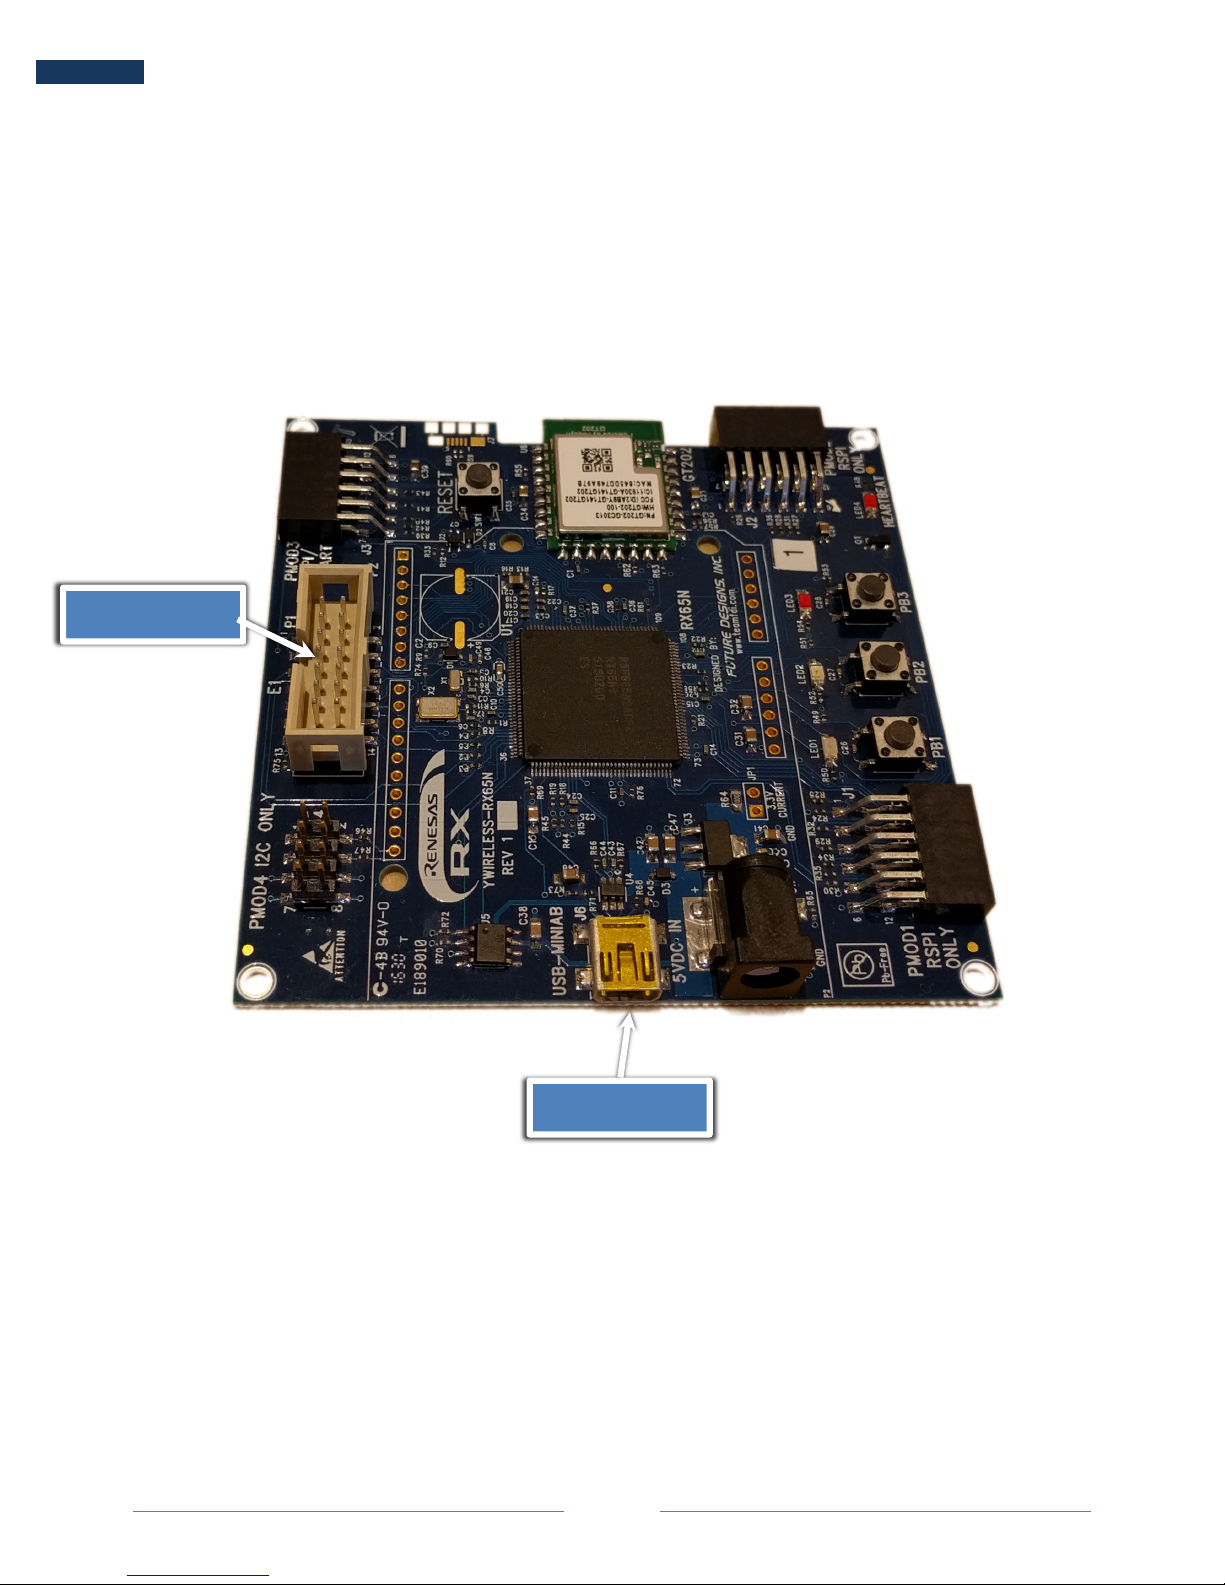
The YWireless-RX65N is powered by the USB mini port as shown below. You can connect the
USB cable to your computer or to any USB power source, the device will not enumerate. Next
connect the E1 to the programming port as shown below.
USB Mini Port
E1 Connector

!
!
!
Page 11
!
!
!
Micriµm
YWireless-RX65N Smart Home Gateway - Getting Started Guide
3. Flashing and running the Smart Home Gateway
In IAR click the Download and Debug button on the toolbar or select Project →Download
and Debug to flash the application to the YWireless-RX65N. This will cause a window to pop up
with the following:
While launching the debug session, the debugger will flash the board, verify the programming,
load the debug file and verify it. It may take up to a minute. Once IAR finishes flashing and
verifying the code will run until it hits main() and then break. At this point you can hit the Go
button to start the application.
The application will start µC/OS-III and µC/TCP-IP. The µC/DHCPc (DHCP Client) will negotiate
an IP Address assuming that your network has a DHCP server available. Once an address is
pulled the AWS IoT module will establish a connection with the AWS IoT broker and then signal
to the Smart Home Gateway application that it can begin to pass messages to AWS IoT.
Since there is no graphical display on this board we will use uC/Probe to interact with the target
as shown in the next section. There are however LEDs that give the status of the boards WiFi
connection.
Go
!
!
!
Page 12
!
!
!
Micriµm
YWireless-RX65N Smart Home Gateway - Getting Started Guide
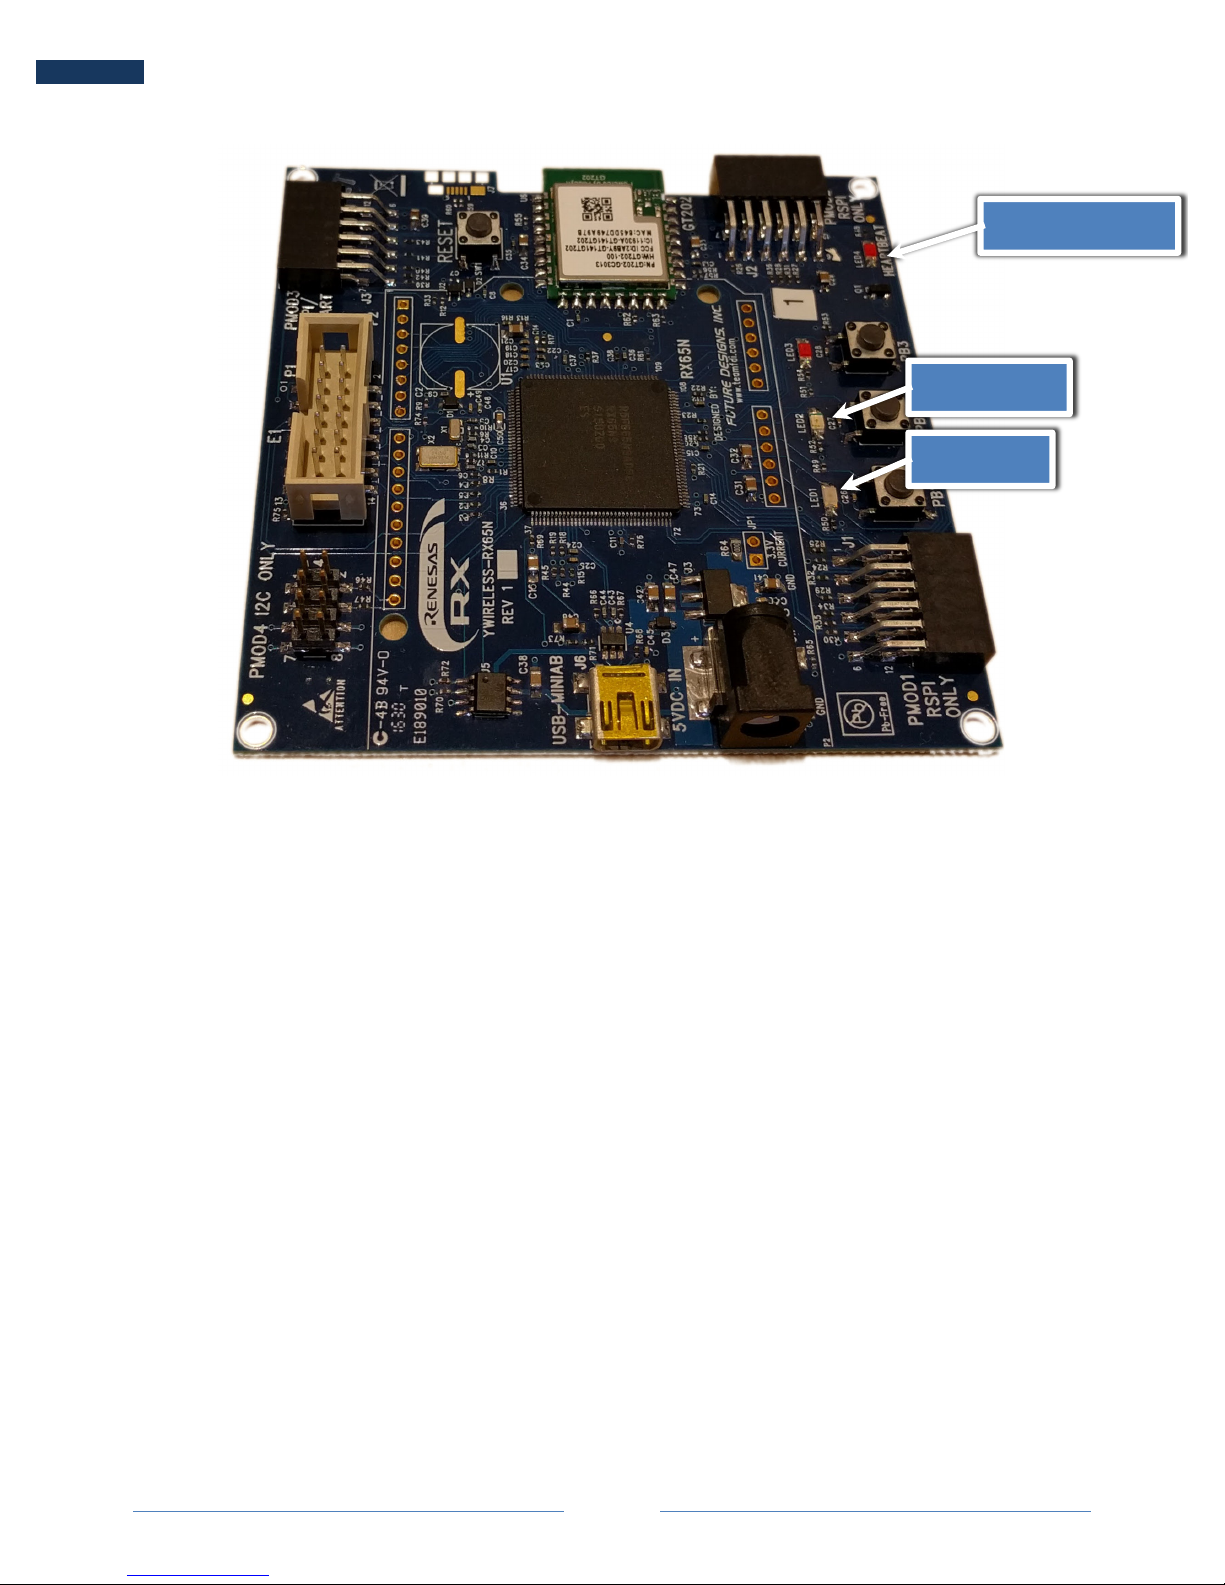
There are three LEDs used on the YWireless-RX65N to indicate the status of the board:
Heartbeat LED – This is controlled in its own task. If its not blinking either the debugger has hit a
breakpoint or the OS has crashed.
Yellow LED – The YWireless-RX65N is still trying to establish a connection with the network.
Green LED – The YWireless-RX65N has established a network connection and is online.
Heartbeat LED
Yellow LED
Red LED

!
!
!
Page 13
!
!
!
Micriµm
YWireless-RX65N Smart Home Gateway - Getting Started Guide
4. Using the Smart Home Gateway with µC/Probe
µC/Probe is a graphical live watch tool that allows for run-time data visualization. µC/Probe
takes advantage of the newer processor architectures allowing for reading/writing memory
locations while the processor is running. µC/Probe can access the embedded target via various
communication channels:
•J-Link JTAG probe
•CMSIS DAP
•IAR C-Spy (interfacing with other JTAG probes)
•TCP/IP (Ethernet or WiFi)
•RS-232
•USB
The IoT example featured in this getting started guide runs a simulator to create data for a
Smart Home Gateway. The Smart Home Gateway (SHG) is a demonstration of a consumer-
oriented use case for the IoT. The use case is that of a household with smart appliances
communicating over a personal area network. In this example the home is equipped with three
appliances and three temperature sensors. Each device publishes its data about it’s state on a
set interval, but if any changes are made to the state of an appliance or temperature value the
data is published immediately. The gateway publishes this data using the MQTT protocol to
AWS IoT. This allows us to use this data in AWS in any way we desire. Similarly, data is
published from AWS IoT down to the Smart Home Gateway in the form of commands which
allows us to remotely control the Smart Home Gateway.
The SHG demo fulfills two roles: it simulates the devices and it acts as the gateway between the
simulated environment and the MQTT broker. The simulated devices and their related MQTT
topics are described in greater detail below.
Resources
Appliances
Temperature Sensors
Dishwasher
Kitchen
Dryer
Family Room
Lamp
Garage
In this guide you will use µC/Probe to control and monitor the simulation through a dashboard
that contains controls to modify the appliance state and temperature value. At the same time,
the dashboard will display the appliance state and current temperature values.
!
!
!
Page 14
!
!
!
Micriµm
YWireless-RX65N Smart Home Gateway - Getting Started Guide
4-1. Configuring uC/Probe
To!download!a!free!trial!of!uC/Probe!use!this!link:!https://www.micrium.com/ucprobe/trial/!
Look for the µC/Probe icon on the desktop or in the start-up menu.! !
Click File →Open to open the dashboard example file SmartHomeGateway.wspx located at
the following path:
└───Micrium
└───Examples
└───Renesas
└───YWIRELESS-RX65N
└───OS3-TCPIP-WIFI
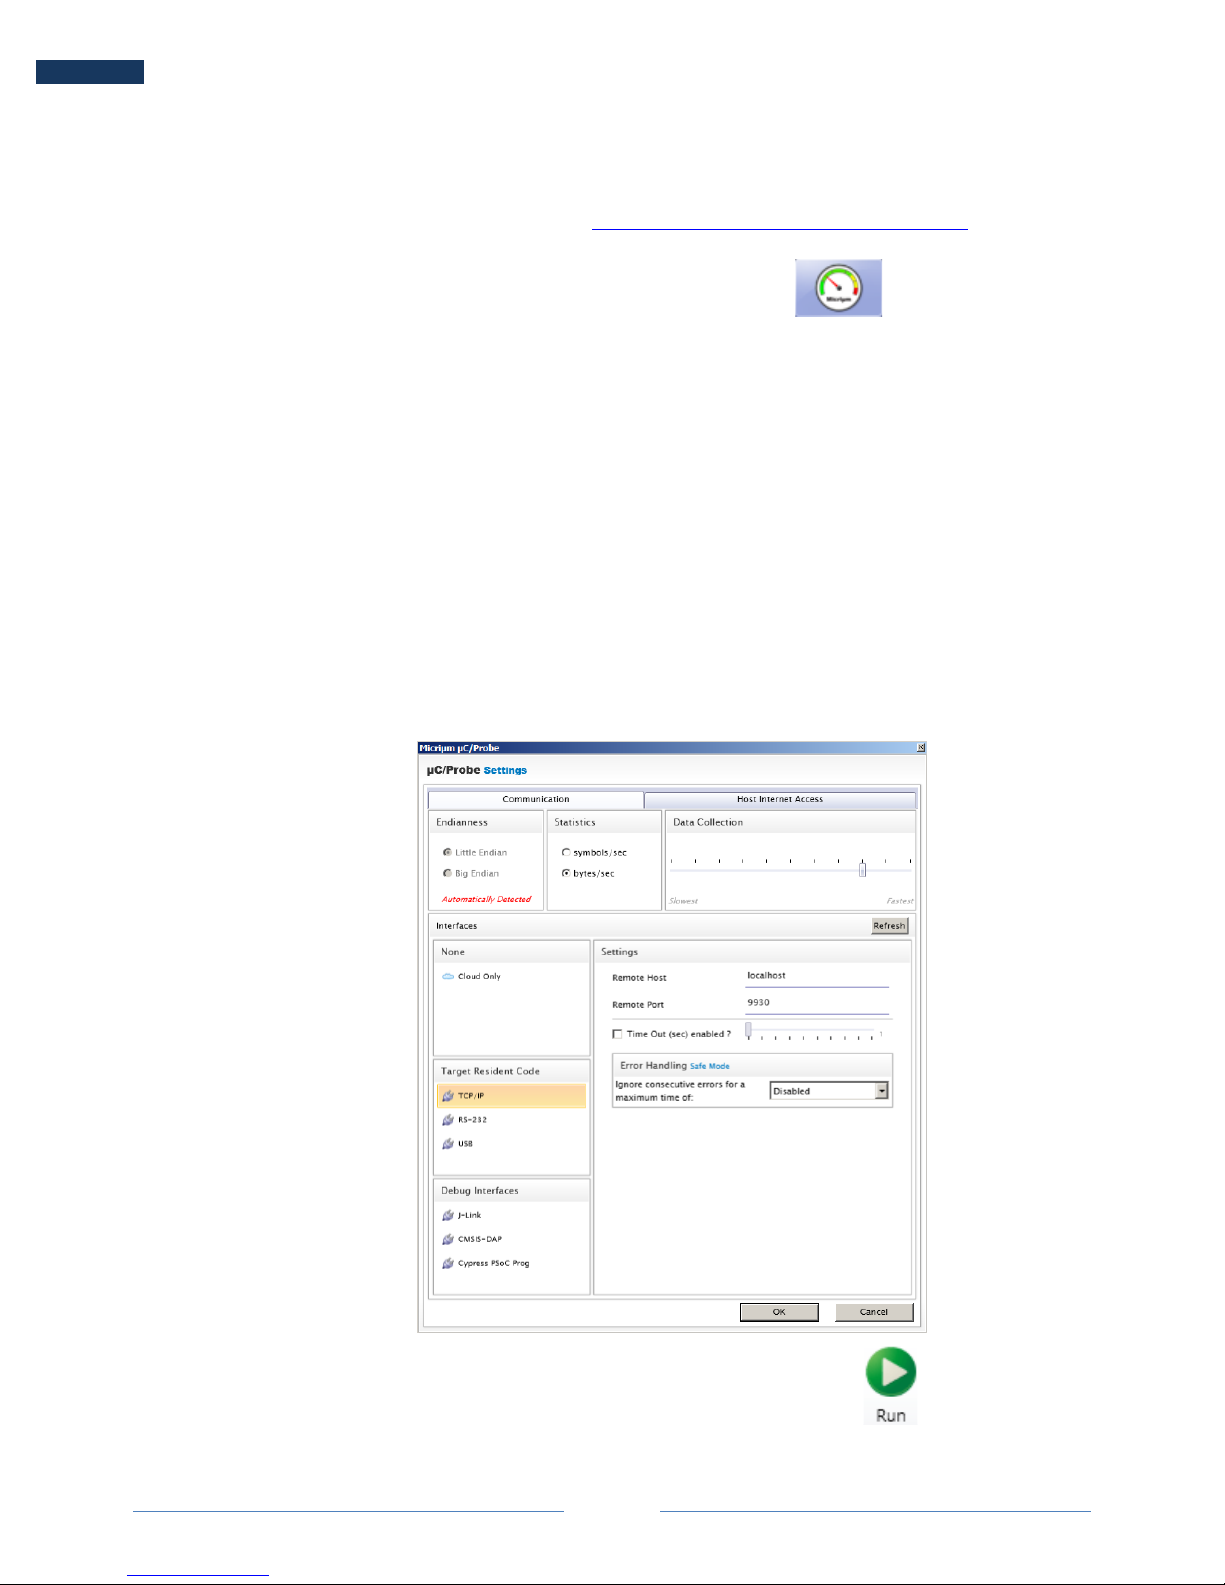
Click the Settings button located in the top toolbar of µC/Probe and configure the
Communication Settings to TCP/IP. In the Settings box the Remote Host and Remote Port will
be set to IAR. Ensure the remote host and port are set to:
Remote Host: localhost
Remote Port: 9930
.
Click OK then click the Run button located in the top toolbar of µC/Probe.

!
!
!
Page 15
!
!
!
Micriµm
YWireless-RX65N Smart Home Gateway - Getting Started Guide
4-2. Using the Smart Home Gateway dashboard
Once you hit the run button, Probe will load the Smart Home Gateway dashboard as shown
above. The left hand side of the dashboard allows you to control the appliance state and the
temperature value. These values are then represented on the right hand side of the dashboard.
Any changes made to the variable states will immediately be pushed to AWS IoT and any
changes made remotely will be reflected here as soon as the message is received.

!
!
!
Page 16
!
!
!
Micriµm
YWireless-RX65N Smart Home Gateway - Getting Started Guide
5. Monitoring and controlling the YWireless-RX65N
from the Web
AWS IoT is the platform where all the data generated by the embedded target is published. The
IoT device connects to this platform using MQTT; a simple publish/subscribe protocol. For more
information about MQTT please visit http://mqtt.org
Your IoT device is periodically publishing the latest embedded target simulation data values to
the MQTT broker at Amazon. At the same time, the IoT device subscribes to a topic to receive
any requests from a remote MQTT client to control the Smart Home Gateway.
In this exercise you will use your internet browser to control and monitor the appliance state as
well as monitor the room temperatures as you modify them in Probe.
5-1. Viewing the MQTT data on the web
Open an internet browser such as Google Chrome and go to the following address:
https://mqtt.micrium.com/
Ensure the Training/Non-Micrium Account box is not checked.
Enter your YWireless-RX65N’s MAC address for the Thing ID field. You can find the Thing ID on
the Probe Workspace as shown below. Do not put colons or dashes between the octets.

!
!
!
Page 17
!
!
!
Micriµm
YWireless-RX65N Smart Home Gateway - Getting Started Guide
Once the Thing ID field has been filled out click on the Create Client button.
If your screen stays like the above picture (orange boxes, 0 appliances and 0 sensors) for
longer than three minutes, check that your YWireless-RX65N heartbeat LED is blinking and the
green LED is lit. If the heartbeat is not blinking ensure you have IAR debugging and its not at a
breakpoint. If the heartbeat is blinking but the yellow LED remains lit, check your WiFi settings. !
!
Once the web page receives data from the YWireless-RX65N it will populate the screen with the
appliances and temperature sensors as shown in the pictures below.
Thing ID

!
!
!
Page 18
!
!
!
Micriµm
YWireless-RX65N Smart Home Gateway - Getting Started Guide
Any local action done using µC/Probe will be reflected remotely on the webpage and any
remote action done on the webpage will be reflected locally and displayed using µC/Probe. At
this stage, we see that the communications between the IoT device, AWS IoT and the webpage
are bidirectional. From this point, what a system based on this architecture can do is only limited
by your creativity.

!
!
!
Page 19
!
!
!
Micriµm
YWireless-RX65N Smart Home Gateway - Getting Started Guide
6. MQTT in the Smart Home Gateway
6-1. MQTT Topics and Messages
The MQTT protocol is based on the principle of publishing messages and subscribing to topics.
A device publishes its data as a message with an associated topic. Subscribing applications
need to know which device originally published each received message.
MQTT supports a hierarchical topic namespace. This allows application designers to organize
topics to simplify their management. Levels in the hierarchy are delimited by the '/' character,
such as:
com.ucos/appliance/001122334455
Two wildcard characters are supported to ease subscriptions to multiple messages:
•A '#' character represents a complete sub-tree of the hierarchy and thus must be the last
character in a subscription topic string, such as com.ucos/#. This will match any topic
starting with com.ucos/, such as com.ucos/appliance/001122334455 and
com.ucos/temperature/012345012345.
•A '+' character represents a single level of the hierarchy and is used between delimiters.
For example, com.ucos/+/001122334455 will match
com.ucos/temperature/001122334455 and com.ucos/appliance/001122334455
but not com.ucos/appliance/012345012345.
Deciding on your topic hierarchy is an important step in your system design.
An MQTT message is what gets passed through the MQTT topics. The type of data sent as the
message payload is only limited by your use of it. Some common formats are JSON, null
terminated strings and binary data. The type of payload you send is usually application
dependent. For example, if you are transmitting data over a cellular network where you are
charged for every MB you send, it probably does not make sense to send data in a complex
JSON payload. Whereas if you are connected over a WiFi network it may be completely
reasonable to send a JSON payload to simplify storing data in a database or displaying the data
on a web page.

!
!
!
Page 20
!
!
!
Micriµm
YWireless-RX65N Smart Home Gateway - Getting Started Guide
6-2. Smart Home Gateway Topics and Messages
In the Smart Home Gateway application we utilize two main topics: appliance and temperature.
Each topic has messages for each item in their topic category.
All messages passed back and forth are formatted in JSON. If you are not familiar with JSON
you can read about the format here: https://en.wikipedia.org/wiki/JSON
6-2-1. Appliance Messages
The Smart Home Gateway simulates three appliances: Dishwasher, Dryer, and a Lamp.
All of the appliances pass data in the same JSON format on the topic
com.ucos/appliance/thingid:
{“appliance” : {“state” : “0/1”, “milliamps” : “current_consumed”}}
Each appliance passes it’s state as a 0 for off and 1 for on. It also passes a field
millamps used to keep track of how much energy each appliance uses. In this example
we will not use the milliamps field.
To control an appliances state, the YWireless-RX65N subscribes to the topic
com.ucos/appliance/cmd/thingid. The message format for controlling an appliance
remotely is:
{“appliance” : {“state” : “0/1”}}
When the YWireless-RX65N receives a message on the command topic, it will change
the appliance’s state which then forces the YWireless-RX65N to immediately publish that
appliance’s new state.
6-2-2. Temperature Messages
The Smart Home Gateway simulates monitoring the temperature of three rooms in a
house: Family Room, Kitchen and Garage.
{“room” : {“F” : “temperature_val”, “humidity” : “humidity_val”}}
Each temperature sensor passes the temperature in Fahrenheit and the humidity
percentage (0 – 100). In this example we will not use the humidity value.
There is no command channel for the temperature sensors as the sensors we are
simulating are not configurable.


