microdowell BAYCOM 2200 Series User manual
Universal Notebook Battery Pack
User's Manual

Thank you for purchasing Energy Box universal notebook battery pack.
Energy Box is ideal when your notebook built-in battery gets depleted or
when you want to increase your notebook battery runti e.
Please read the user anual thoroughly before start using Energy Box and
keep it in a safe place for future reference.
Safety precautions
In order to prevent battery leakage, heat or explosion, please be aware to:
•Do not throw the battery into water or fire. Avoid water (or any other
liquid) seepage into the battery;
•Store the battery in a cool and dry place, do not use under extre e heat;
•Avoid to short circuit the battery ter inals with etal objects, do not
transport or store the battery with necklace, hair clipper or other etal
objects near it;
•Avoid striking, throw or shaking the battery;
•Avoid piercing the battery shell via nail or other sharp objects, avoid to
ta per with it, to ha er or to tra ple on the battery;
•Do not atte pt to disasse ble or alter the battery in any way.
This device is designed to power equipments like notebooks. Do not
use it to support medical equipments directly related to human life.
1
Danger! Battery leakage, explosion or fire ay be caused if
you do not follow the below precautions carefully

Warning!
•Do not put battery into icrowave oven or pressured vessel;
•Stop using when unusual s ell, s oke, heating, colour-change of battery
cover or other abnor alities co e out of the battery;
•Keep away fro the fire when leakage or unusual s ell co es out fro
the battery;
•Leaked electrolyte ay cause fire or explosion;
•Do not wipe your eyes if the leaked electrolyte enters into the : wash
with running water and ask your doctor for i ediate assistance, the
eyes ay be da aged if not treated ti ely.
Attention!
•Do not use the battery in extre ely hot environ ent (>40°C), like inside
the car with direct sunlight or in su er. Otherwise, the battery beco es
overheated. High te peratures decrease the battery perfor ance and
shorten its service life.
•If you have to store the battery for a long ti e (over three onths), keep
it charged to 50% of the rated capacity (charge once every 3 onths),
store it in a dry place with a te perature not beyond -10°C ~ 40°C, and
avoid the contact with corrosive objects. Keep away fro the fire and
heat sources in general.
•Teach children how to use the battery according to the user anual, and
pay attention to guarantee their correct operations.
•If the battery leaks the electrolyte on skin or clothes, wash with running
water, otherwise it will cause skin infla ation.
2
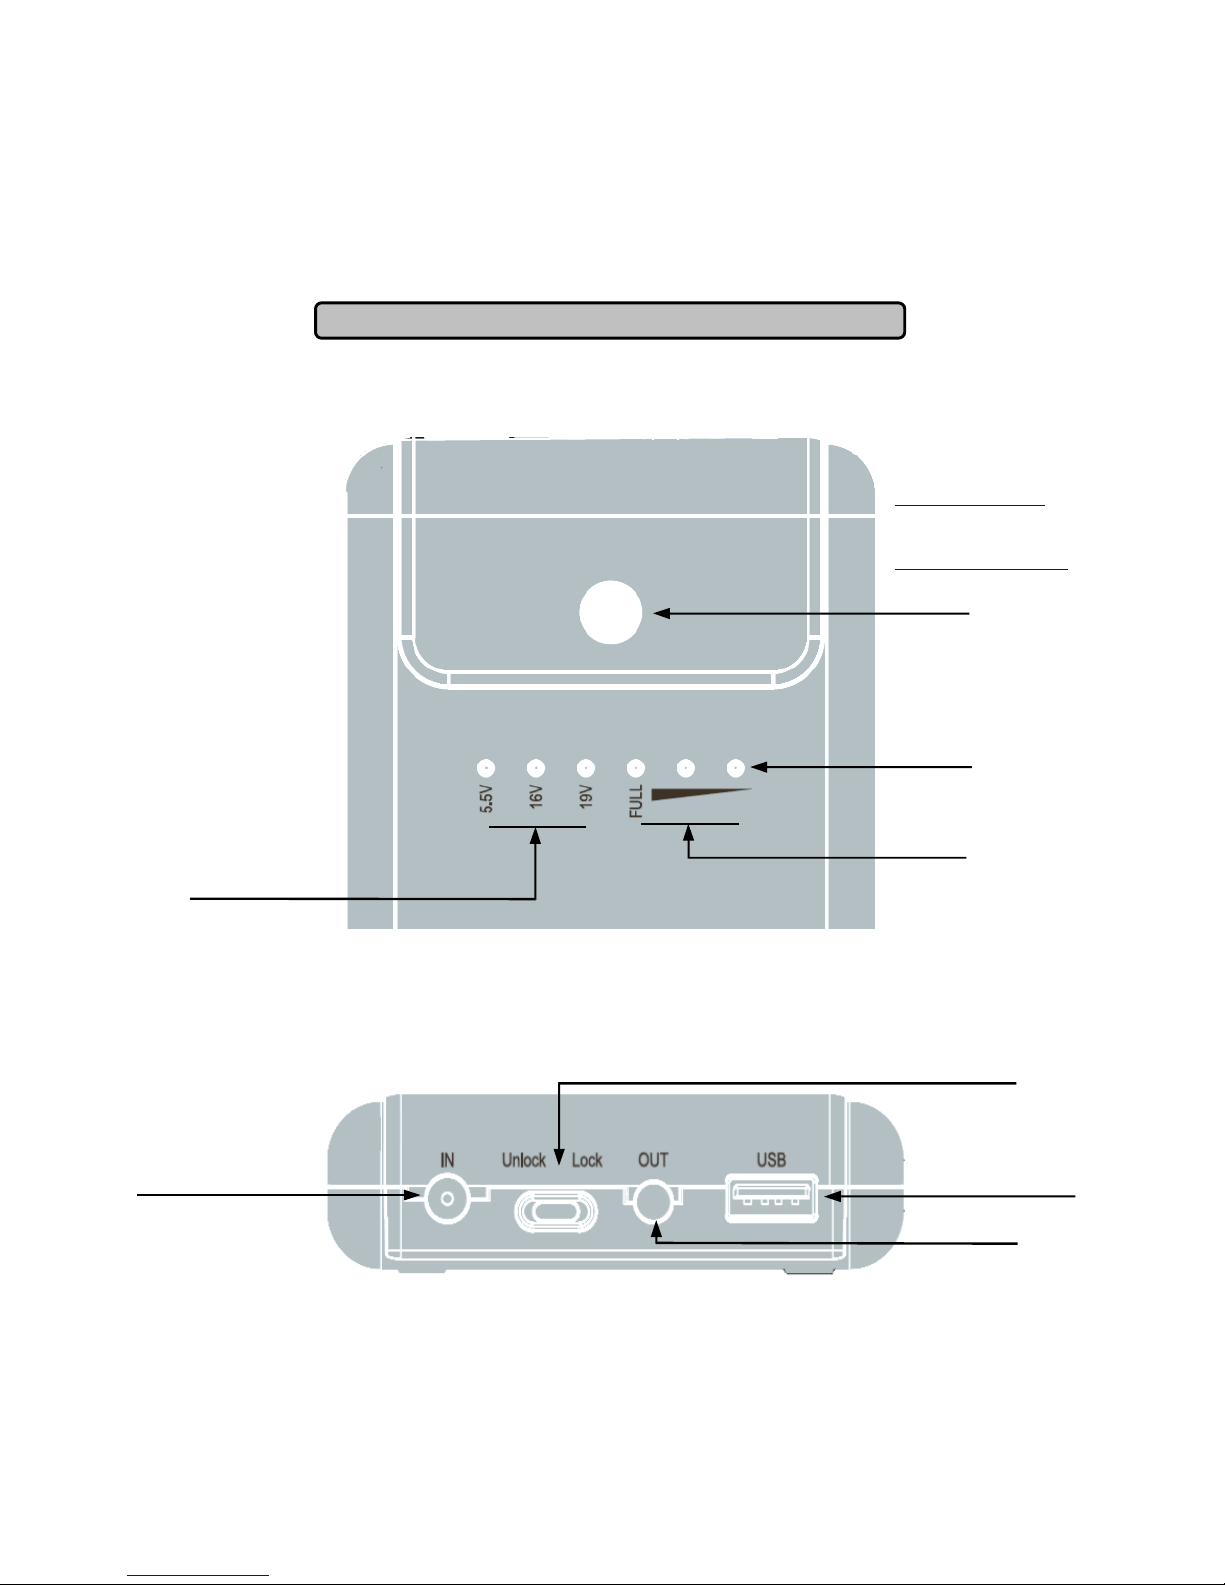
unctions Illustration
ront Panel Description
Rear Panel Description
3
Charging Indicator
Power level Indicators
Pushbutton
in “Lock” ode: shows
re aining battery power
in “Unlock” ode: changes
output voltage
Selected Output Voltage
Input connector
(charge)
Unlock/Lock Output Voltage Switch
USB Output port
Output connector

Basic Operations
Energy Box provides two different voltage outputs (16V - 19V) in order to be
co patible with ost notebook odels.
Step 1:
Before using Energy Box, ake sure it is fully charged. Read the “how to
charge” section carefully first.
Step 2:
Refer to the user anual of your notebook or check the label to figure out
brand and odel. Fro the co patibility list select the input (Lxx) and output
(LxxD) proper tips and the voltage value according to the notebook brand
and odel. Take IBM T40 as an exa ple.
If your laptop odel is not included in the Co patibility List check the voltage
of its power supply and then try if any of the tips can fit. Refer to “Tips
4

Specifications” chapter for the tips characteristics and polarity.
Step 3:
Set the battery pack output voltage at the value required by your notebook as
follows:
1. Move the Lock/Unlock switch to Unlock position;
2. press the pushbutton to select output voltage. The output voltage is
displayed by a LED (5.5V, 16V and 19V are selectable);
3. Move the Lock/Unlock switch back to Lock position;
Step 4:
Press the pushbutton on the front panel of the battery pack and check LED
indicators. If only one or no indicators are lighted, it eans that the battery is
not charged and first you have to fully charge it using your notebook charger.
Follow the instructions on the “how to charge” section in order to charge
Energy Box. During the charge the first LED will be red lit. The fully charge
status is indicated by the FULL LED (green) lit, and the red LED turned off. In
order to i prove the charge efficiency, during the charge process do not
connect to Energy Box your notebook if its built-in battery is discharged.
Step 5:
Once Energy Box is fully charged, before proceeding the Lock/Unlock switch
ust be in Lock position. Then connect the selected output tip (LxxD) to
bundled output cable, then insert it into DC-IN connector of your notebook.
Connect the other end of the output cable into OUT connector of Energy
Box. The battery pack is now ready to supply power to your notebook. As
soon as you connect the output cable, Energy Box will deliver selected
voltage (16V or 19V) to your notebook.
5

Battery Level Indicators
Three power level LED indicators show Energy Box power status. By
pressing the pushbutton on Energy Box during discharging or when it is on
idle status (switch on Lock position), the re aining power level will be
displayed for so e second. Details on indicators status are as following:
During charge During discharge
0% - 10% (red) 70% - 100% (green)
10% - 40% (red) 70% - 40% (green)
40% - 70% (red) 40% - 10% (green)
100% (green) <10% (green blink)
5.5V
16V
19V
FULL
5.5V
16V
19V
FULL
When the re aining power is below 10%, the battery pack goes into low
voltage status. This condition is indicated by the first green LED blinking.
When this happens, please save your work and switch to ains-operated
power as soon as possible.
USB Output
The USB port provides a 5.5V supply. Connect USB input device (eg.
Mobile Phone, MP3 player USB cable, etc.) to Energy Box USB port and
5.5V will be delivered to the device.
6
☼

How to charge
Connect the proper input tip (Lxx) to the notebook original AC adapter, then
connect it to the IN connector of battery pack (refer to illustration for ore
details). Connect then the other ter inal with electricity source to start the
charge. During the charge the first LED will be red lit. The fully charge will
be indicated by the FULL LED (green) lit, and the red LED turned off. In
order to i prove the charging efficiency, during the charge of Energy Box
do not connect your notebook if built-in battery is discharged. Otherwise,
the charge ti e lengthens.
Main Output Power
Before proceeding the Lock/Unlock switch ust be in Lock position Connect
one ter inal of the bundled output cable to the OUT connector of battery
pack (refer to illustration for ore details), and the other ter inal to the
proper output tip (LxxD) and then to the DC-IN connector of the notebook.
Note: ake sure Energy Box is at proper output voltage level (16V or 19V)
7
Charge T ip
(Lxx)
Original Notebook AC Adapter

before connect it to the notebook. During battery pack discharge, it will
offer power supply to notebook first and charge the notebook built-in
battery with s all current. In order to i prove Energy Box runti e, take out
the built-in battery fro the notebook (if discharged) before connecting it
to Energy Box.
Warnings & Protections
In case of high current require ent (>3,2A) or abnor al use, Energy Box
internal te perature can raise to a high degree: should this happen, the
battery pack will shut off auto atically.
When the internal te perature decreases to a safe degree, the battery
pack will turn on and unchain the safety protection auto atically. Then it
can be used again safely.
Do not use Energy Box with portable devices with high current require ent
(>3,2A).
8
Output Cable Output T ip

Technical Specifications
Model
Energy Box – Universal Notebook Battery Pack
Capacity
4000 Ah
Di ensions (W×D ×H)
170 x 85 x 23
Weight
450 g
Operating Te perature
0 °C ~ 40 °C
Input
Charge Input (voltage / current)
16Vdc~25Vdc / 4A ~ 2.5A
Charge Ti e
2.5 ~ 3.5 h
Cycle Life
More than 300 full charging cycles
Output
Capacity
44.4 W/h
Voltage (OUT)
16V, 19V (selectable)
Voltage (USB OUT)
5.5V (USB port)
Current
3.2 A
Max Constant Output Power
50 W
Accessories
Input Connector Tips
6 Different types
Output Connector Tips
6 Different types + 1 Output Cable
9
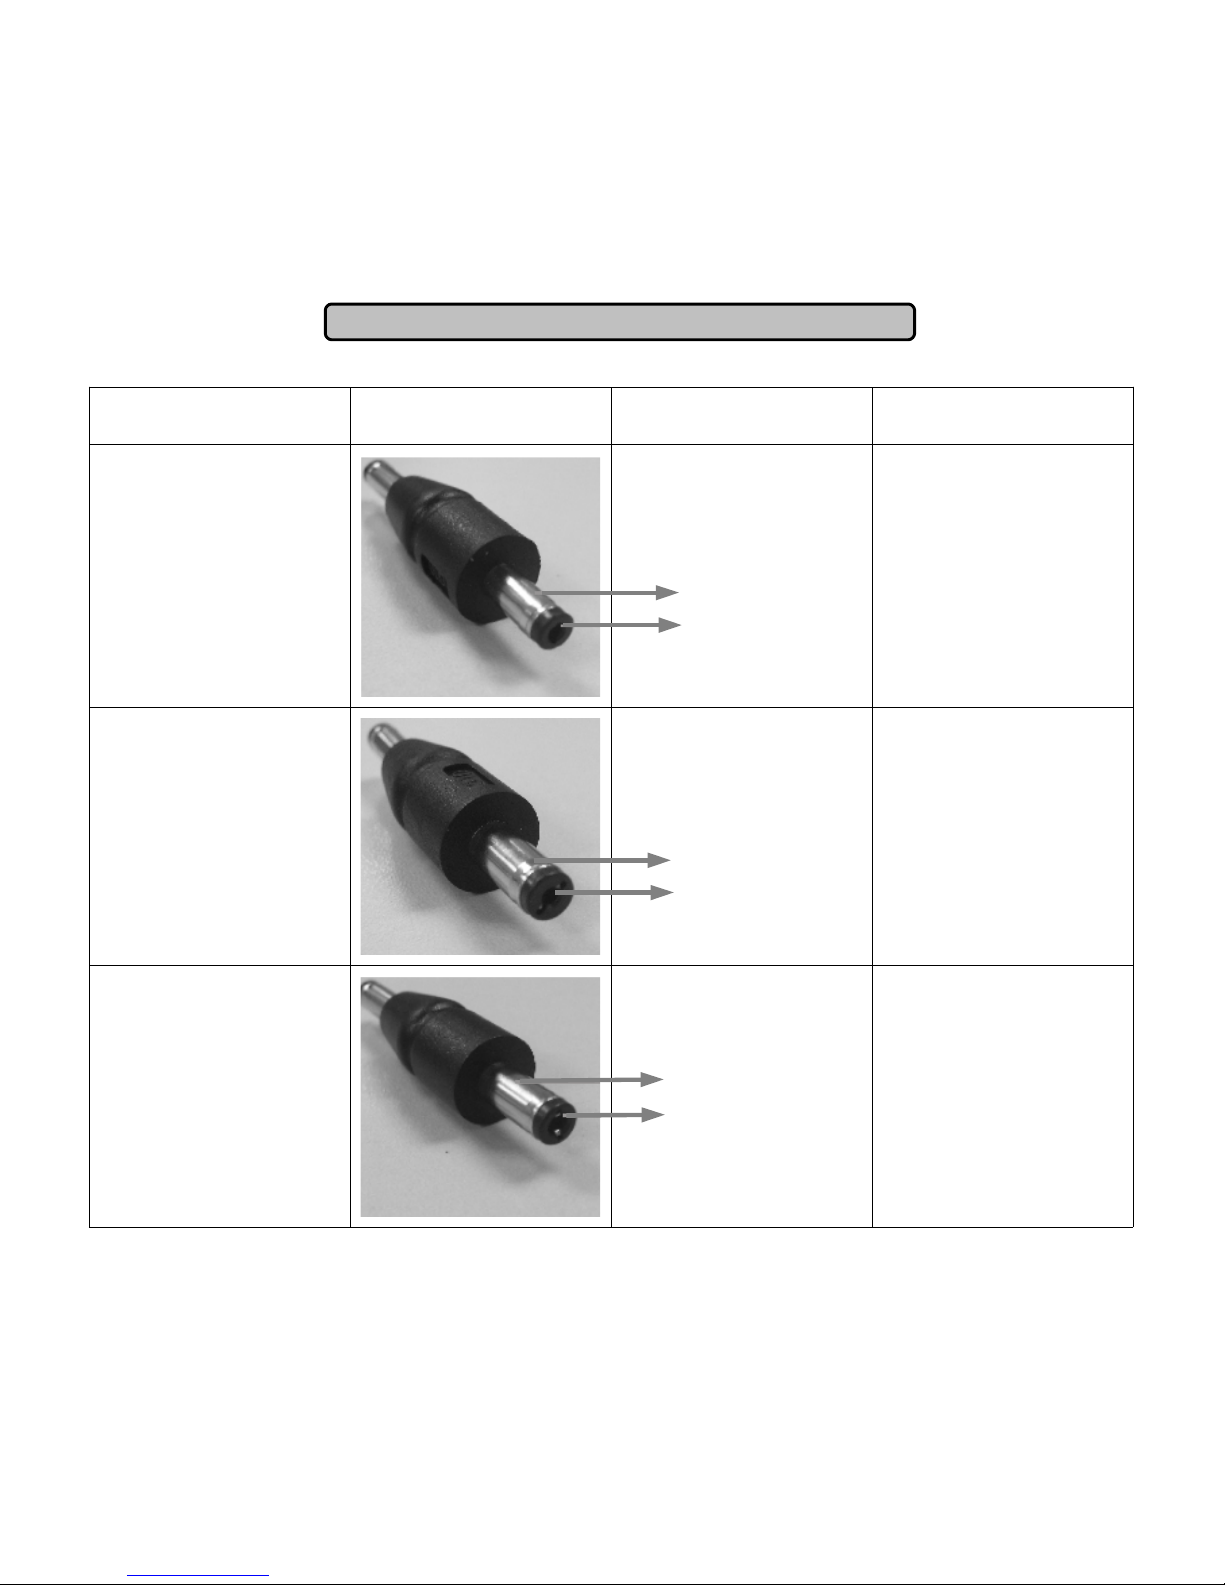
Tips Specifications
Model Picture Polarity Dimension
L01D 4.75x1.7
L51D 5.5x1.7
L53D 5.5x2.5
10
-
center+
-
center+
-
center+
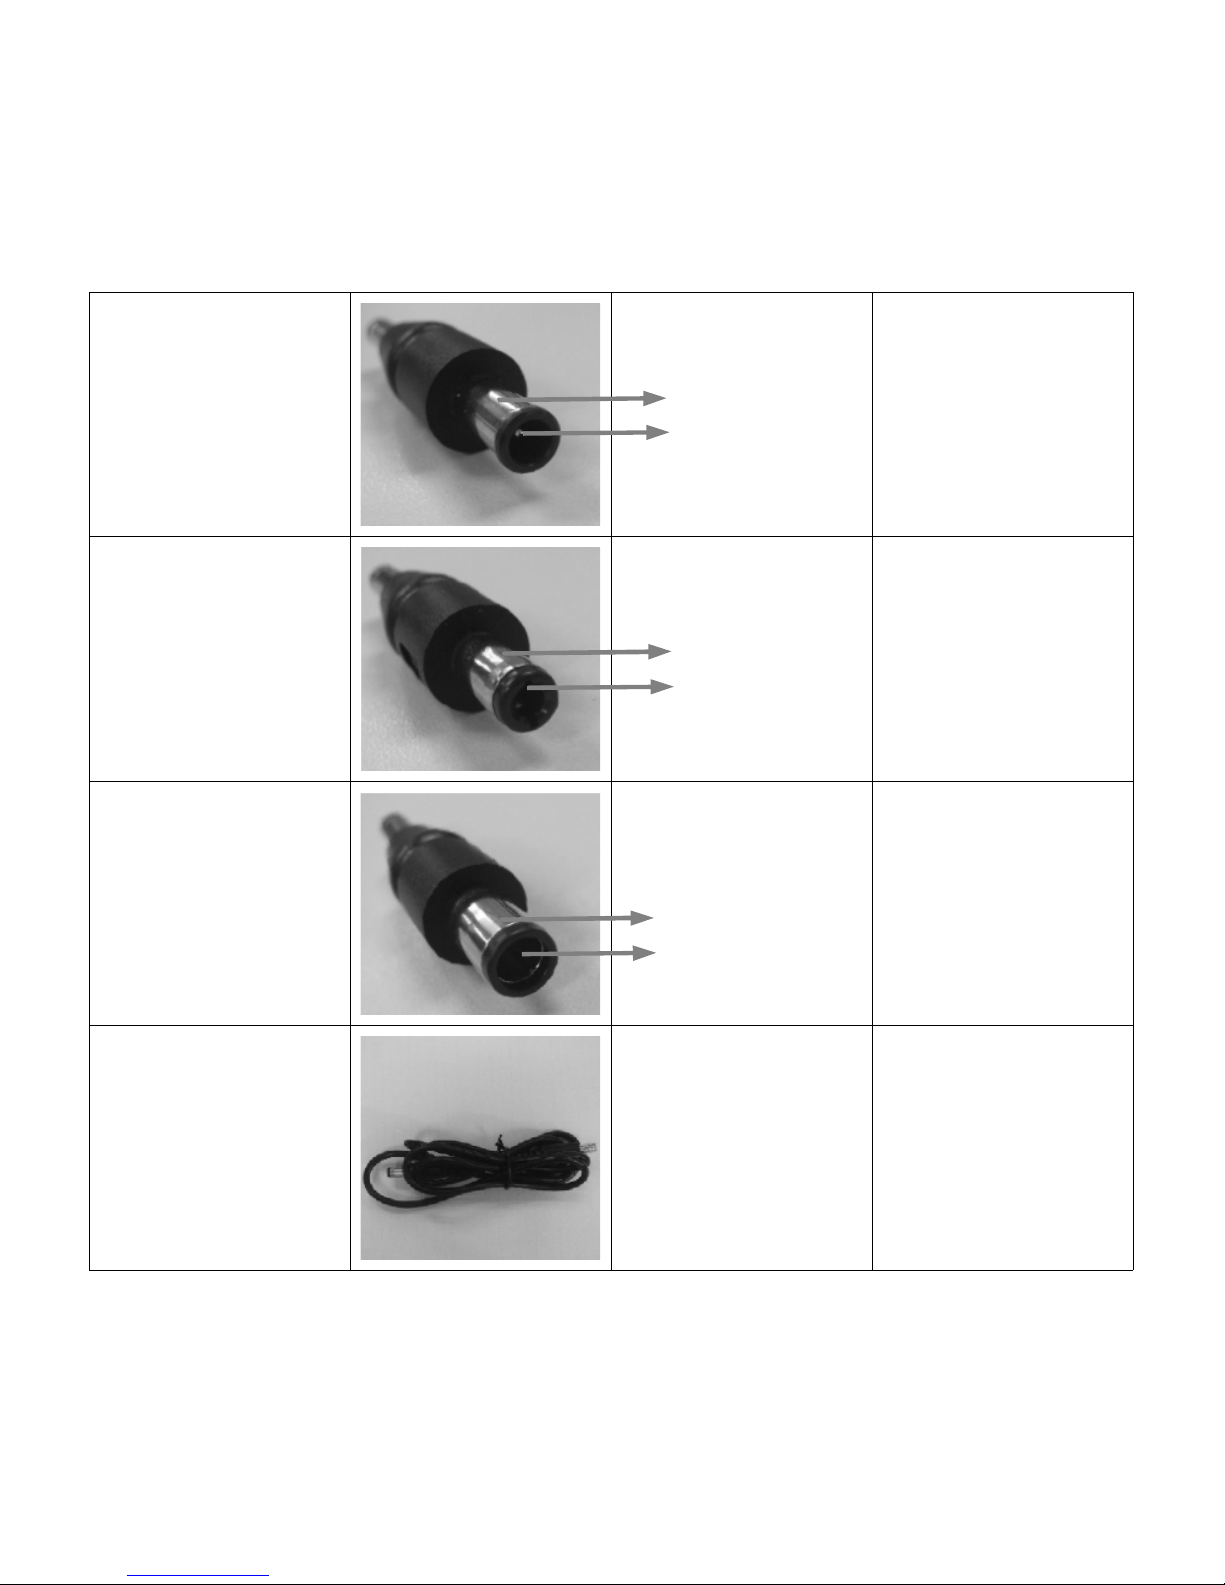
L54D 6.5x4.5
L55D 6.3x3.0
L61D 5.5x1.7
Output Cable 5.5x2.1
11
-
center+
-
center+
-
center+

Devices and Tips Compatibility List
Brand Series Model Voltage Tips Number
Acer/TI
Extensa 501
Extensa 502
Extensa 503
Extensa 600 Series
Extensa 700 Series
Extensa 710 Series
Extensa 712 Series
19V Output Cable
Extensa 390
Extensa 390C
Extensa 391
Extensa 392
Extensa 393
Extensa 394
Extensa 395
Extensa 512
Extensa 513
Extensa 514
Extensa 515
Extensa 516
Extensa 517
Extensa 610
Extensa 610CD
Extensa 610CDT
Extensa 616 Series
Extensa 620 Series
Extensa 690 Series
Extensa 900 Series
19V L53/L53D
12

Acer/TI
Travel ate 200
Travel ate 201
Travel ate 202
Travel ate 203
Travel ate 204
Travel ate 205
Travel ate 210
Travel ate 212
Travel ate 213
Travel ate 220
Travel ate 222
Travel ate 260
Travel ate 261
Travel ate 270
Travel ate 290
Travel ate 290E
Travel ate 310
Travel ate 311
Travel ate 312
Travel ate 313
Travel ate 314
Travel ate 330
Travel ate 332
Travel ate 333
Travel ate 340
Travel ate 341
Travel ate 342
Travel ate 343
Travel ate 344
Travel ate 345
19V L51/L51D
13
Brand Series Model Voltage Tips Number

Acer/TI
Travel ate 346
Travel ate 347
Travel ate 350
Travel ate 351-354
Travel ate 361-364
Travel ate 505
Travel ate 506
Travel ate 507
Travel ate 508
Travel ate 520
Travel ate 521
Travel ate 524
Travel ate 525
Travel ate 527-529
Travel ate 534
Travel ate 600
Travel ate 602
Travel ate 603
Travel ate 604
Travel ate 610
Travel ate 611
Travel ate 612
Travel ate 613
Travel ate 614
Travel ate 620
Travel ate 621
Travel ate 622
Travel ate 623
Travel ate 630
Travel ate 631
19V L51/L51D
14
Brand Series Model Voltage Tips Number

Acer/TI
Travel ate 632
Travel ate 633
Travel ate 710
Travel ate 720
Travel ate 721
Travel ate 722
Travel ate 723
Travel ate 730
Travel ate 732
Travel ate 734
Travel ate 735
Travel ate 736
Travel ate 737
Travel ate 738
Travel ate 739
Travel ate 740
Travel ate 741
Travel ate 742
Travel ate 743
Travel ate 744
19V L51/L51D
ALPHA-TOP
U370 Micron 19V L53/L53D
G756
U360 19V Output Cable
AMI FT6T20
TF6760 19V L53/L53D
AST
Ascentia AST
Ascentia A40
Ascentia A41
19V L54/L54D
15
Brand Series Model Voltage Tips Number

AST
Ascentia A4
Ascentia A432
Ascentia A51
Ascentia A60
Ascentia A70
19V L54/L54D
ASUS
A1000 Series
ArtBook L7336
B1000 Series
F7000
F7400
Grandio F7400
L1000B Series
L2000B Series
L2000D Series
L2000E Series
L3000C Series
L3000S Series
L7000
L7000C
L7200
L7233
L7300
L8400
M1000 Series
M2000 Series
M2 Sereis
MP8xxx Series
S1000 Series
T4700CS
19V L01/L01D
16
Brand Series Model Voltage Tips Number

ASUS T7200
T9000 Series 19V L01/L01D
BAYCOM
2200 Series
2700 Series
2850 Series
19V L53/L53D
ChemUSA
Che book 6120
Che book 6120L
Che book 6120N
Che book 7020
19V L55/L55D
Che book 1535
Che book 2020
Che book 2056
Che book 2250
Che book 2300
Che book 2333
Che book 2370VA
Che book 3015
Che book 3015E
Che book 3815
Che book 3830
Che book 3830A
Che book 4025
Che book 4027
Che book 5200
Che book 5400
Che book 5580
Che book 9400
Che book 9750
19V L53/L53D
17
Brand Series Model Voltage Tips Number

ChemUSA
Che book 9780
Che book 9950 19V L53/L53D
Che book 1200
Che book 2060E
Che book 7200
Che book 7300
Che book 7400
Che book 8200
Che book 8400
Che book 3300N
19V L01/L01D
Compaq
Ar ada 100
Ar ada 4100
Ar ada 4200 Series
16V Output Cable
Ar ada 1100
Ar ada 1120
Ar ada 1125
Ar ada 1130
Ar ada 4110
Ar ada 4110D
Ar ada 4110T
Ar ada 4120
Ar ada 4120T
Ar ada 4124D
Ar ada 4125D
Ar ada 4130
Ar ada 4130T
Ar ada 4131
Ar ada 4131T
19V Output Cable
18
Brand Series Model Voltage Tips Number

Compaq
Ar ada 4150
Ar ada 4150T
Ar ada 4160
Ar ada 4160T
Ar ada 4210T
Ar ada 4220T
19V Output Cable
Ar ada 110
Ar ada E300
Ar ada E500
Ar ada E700
Ar ada M300
Ar ada M700
Ar ada V300
Ar ada 600 series
Ar ada 800 series
Ar ada M-series
19V L01/L01D
Contura 3/20
Contura 3/25
Contura 3/25C
Contura 4/20
Contura 4/25
Contura 4/25C
Contura 4/25CX
19V Output Cable
Contura 386/486 series
Contura 400C
Contura 400CX
Contura 410C
Contura 410CX
19V L53/L53D
19
Brand Series Model Voltage Tips Number
This manual suits for next models
9
Table of contents


