MicroStep Start Shaphon SH-HC31 User manual

Safety notice
Please carefully read the manual before using the product.
Safety operation
Users must follow safety operation rules made by the country and the company.
Mechanical danger
Operation and repair of automation equipment are a little dangerous and are careful. Please
be far away from the working equipment. Please control the equipment by correctly using the
panel’s buttons. Don’t wear so loose clothes when using and repairing the equipment.
High-voltage danger
Be careful of electric shock during operation. Please install the equipment according to its
manual. Don’t touch cables or wires after power on. Only professional maintenance personal
can open the controller. When the equipment has problems, power should be off and then
repair.
Power isolation
Please check whether power is right, DC24V before power on.
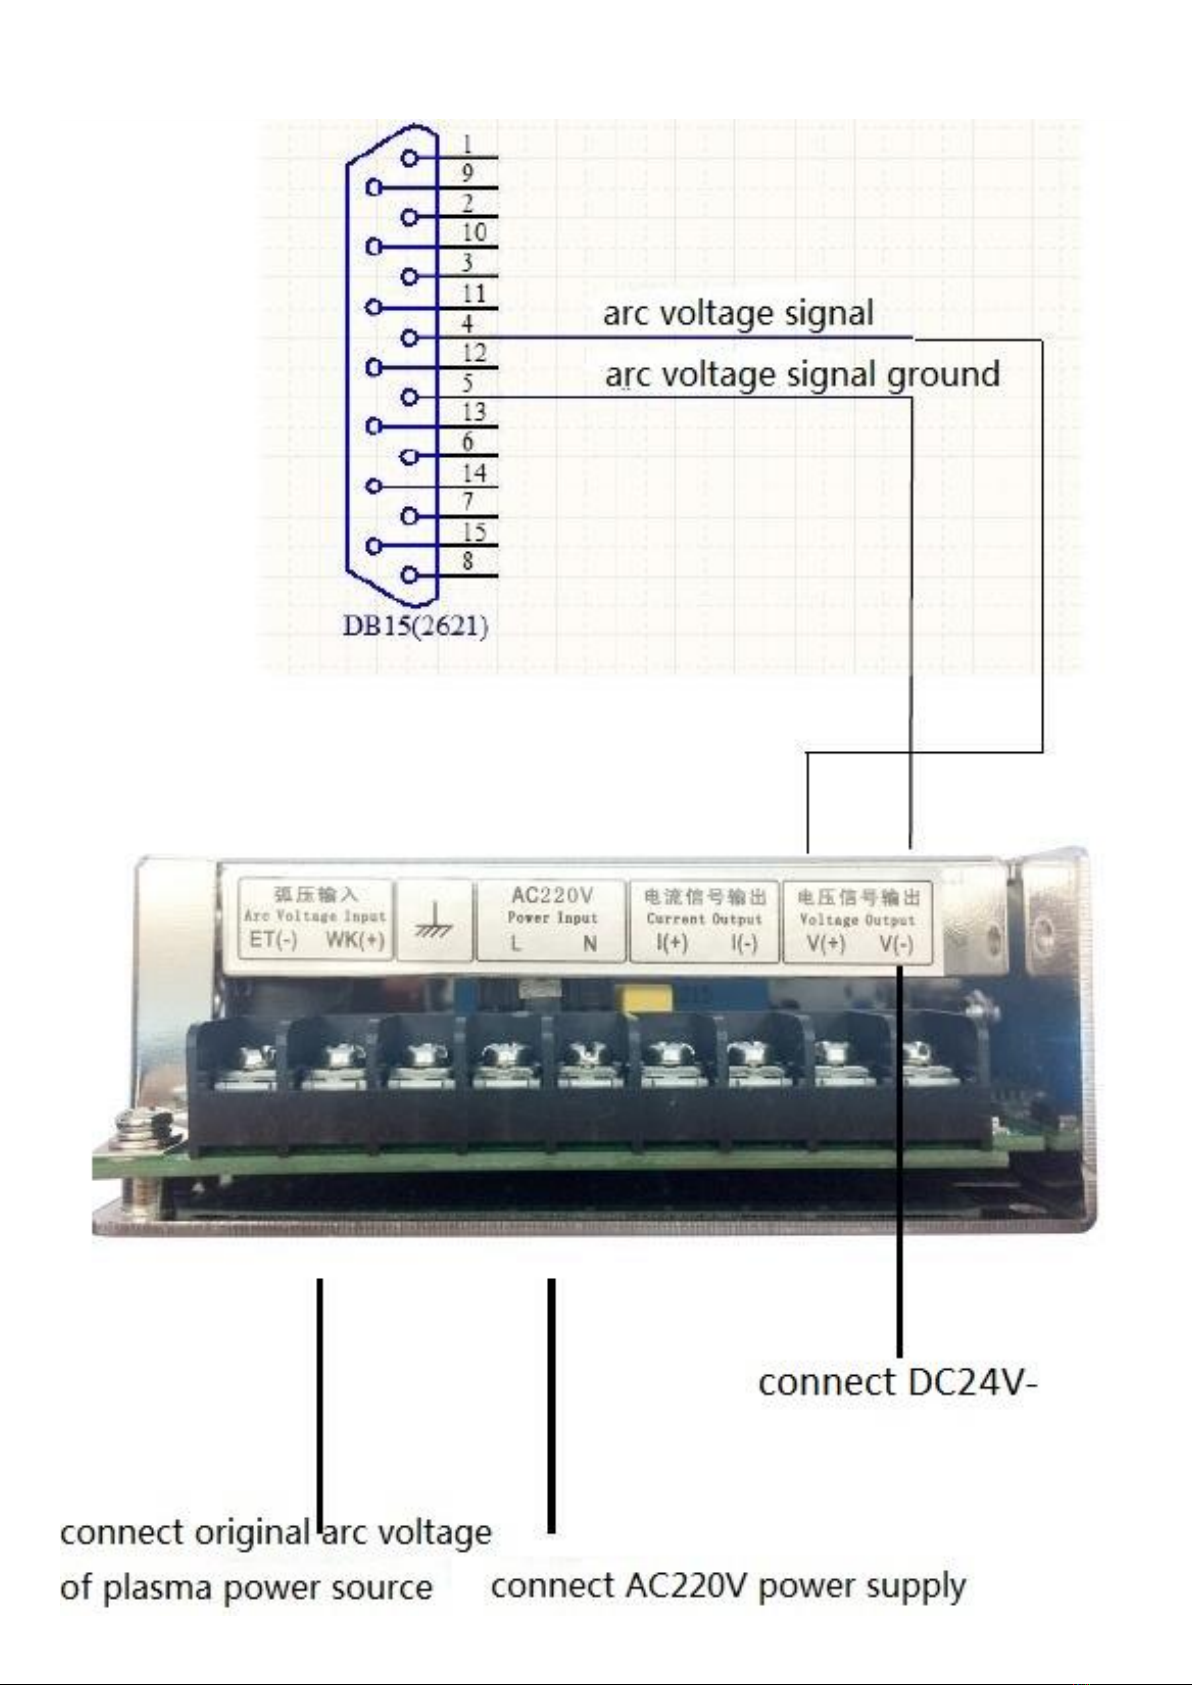
Good ground-connection
All parts of the cutting machine and the controller should connect ground.
The most effective method of reducing plasma interference is to use shielding wire and good
ground-connection. Controller’s ground wire diameter should be over 4 mm², and try to keep a
shorter distance to the ground. DC24V ground (-) must break with ground.
Controller maintenance
When the controller can’t work normally, you need to check relative hardware or wire
connection after power off. Don’t open the controller to repair without professional personnel.
Please feel free to let us know when the controller has problems.
Warranty statement

Guarantee period: within 12 month after leaving our company.
Guarantee terms: during guarantee period any problems under normal operations.
During guarantee period, we charge for out of guarantee terms.
We charge for all problems out of guarantee period.
Following situations are beyond guarantee:
Any damage under abnormal operation or accident damage;
Damaged by plug in and out of the controller when power on;
Natural disasters;
Repair, disassemble, retrofit, etc. at random without our allowance.
Chapter 1 General Introduction
1-1 basic index
Processor: industrial ARM chip
Display: 4-digit nixie tube
Max. stroke: 100mm
Auto height adjustment range: 2-30mm
Height adjustment accuracy: ±0.5mm
Auto height adjustment speed: 3000mm/min (max.)
Communication: 485*1
Power supply: DC24V, 3A
Working temperature: 0℃~+40℃
Storage temperature: -40℃~+60℃
1-2 technical feature
SH-HC31 is the upgrade model of SH-HC30. Besides previous advantages of “integration of

control and mechanical parts”, “stepper motor & driver” and “one-key calibration”, it adds
new features as below,
Knobs for height and sensitivity adjustment: it can statically and dynamically adjust the height
and the sensitivity and save the result. The pulse adjustment knob has better lifetime and
reliability than contact-type potentiometer.
Industrial ARM processor: all new ARM embedded core replaces the previous the single chip.
The processing speed is faster and anti-interference ability is stronger.
1-3 installation
Plasma (arc voltage)

Flame (capacitance)

1-4 connection
SH-HC31 15-pin port definition
Pin
No.
Definition
Instruction
4
Arc voltage signal
Connect arc voltage signal of plasma power source, input range
DC0-5V. If plasma power source has no DC0-5V, then a voltage
divider box needs to be connected.
5
Arc voltage signal
ground
Connect arc voltage signal ground of plasma power source
7, 14
DC24V+
Connect DC24V+
8, 15
DC24VG
Connect DC24VG
10
Manual/auto
Connect output of CNC cutting controller or external switch, 24V
signal, high level is manual mode, low level is auto mode.

11
Plasma/flame
Connect output of CNC cutting controller or external switch, 24V
signal, high level is plasma mode, low level is flame mode.
12
Up
Connect output of CNC cutting controller or external switch, 24V
signal, low level is effective.
13
down
Connect output of CNC cutting controller or external switch, 24V
signal, low level is effective.
The connection (plasma mode) of SH-HC31 and CNC cutting controller CC-S3/CC-S3A

The connection (plasma mode) of SH-HC31 and voltage divider box AHD1
If plasma power source is original arc voltage(1:1) , then connect –(20~200)V input.
If plasma power source is 50:1 arc voltage, then connect –(0.1~5)V. And open the voltage
divider box, break the jumper JP2 and connect JP1.

The connection (plasma mode) of SH-HC31 and the voltage divider box AHD2

The connection (plasma mode) of SH-HC31 and the voltage divider box AHD3

The connection (plasma mode) of SH-HC31 and the voltage divider box AHD4
If the plasma power is raw arc voltage, then connect to WK+ and ET-. And AHD4 only DIP 1
(100:1) is ON.
If the plasma power is 50:1 arc voltage, then connect to WK+ and ET-. And AHD4 only DIP 3
(2:1) is ON.

The connection (flame mode) of SH-HC31 and CNC cutting controller CC-S3/CC-S3A
The connection (plasma &flame mode) of SH-HC31 and CNC cutting controller CC-S3/CC-S3A

An external relay is needed. Its coil connects pin 9 of CNC cutting controller. When change to
plasma mode, pin 9 output is low, and the relay works for following purposes:
1. auto/manual signal, change from flame mode pin 21 to plasma mode pin 5.
2. arc voltage/capacitance switch signal, change to arc voltage mode after breaking DC24VG.
3. plasma arc strike output of CNC cutting controller is connected.
Chapter 2 Quick Start
2-1 panel
Instruction
Height knob, adjust and set cutting height.
In the plasma mode and the manual mode, press it to display b value (location height/pierce
height), then set.

Sensitivity knob, adjust and set the sensitivity.
In the plasma mode and the manual mode, press it for one-button location, the torch moves
down, and touches the zero point switch, and then moves up to the location height and stops.
In the flame mode and the manual mode, press it 2s for one-button calibration.
LED screen, display settings and working information
Indicator lights, display working states
2-2 Quick start procedure
plasma mode
Power on it, choose the plasma mode press the sensitivity button for the initial location
(and press the height button to adjust b value) manually cut a line to check the arc voltage
value in LED screen set that arc voltage value for auto height start auto cutting to check
the height (adjust the arc voltage height and sensitivity) finish setting.

Flame mode
2-3 display and state
LED display
U: plasma mode, range 30~250
C: flame mode, range 3~30
E: sensitivity, range 1~10
b: initial location height/pierce, range 1~20mm
H: maximum adjustment speed when auto cutting, 5~50

L: initial adjustment speed when auto cutting, 1~20
P: up/down speed in manual mode, 20~80
d: auto adjustment speed ratio (the bigger the value is, more slowly the speed adjusts)
Indicator lights
Up: move up
Down: move down
Auto: in the auto mode. When the light off, in the manual mode
Upper limit
Lower limit
Arc voltage: there is arc voltage signal input
2-4 error alarm
EE01: cancel auto, press the sensitivity button to cancel the error
EE02: it fails to save settings and power off THC and power on again.
Other manuals for Start Shaphon SH-HC31
1
Table of contents
Popular Industrial Equipment manuals by other brands

Allen-Bradley
Allen-Bradley 140G-H Trip Unit Installation

Siemens
Siemens SIVACON S4 operating instructions

SCHUNK
SCHUNK UFG 26 Assembly and operating manual

SMC Networks
SMC Networks CP96N Series Operation manual

Hitachi
Hitachi TRF-NP63S1 instruction manual

Nexen
Nexen Air Champ Overlap Eliminator user manual

Cyber-Tech
Cyber-Tech mechanical Joysticks JS-2050-HD Series quick start guide

Greemman
Greemman RECO130F Manual book

CMC
CMC OilQSens OQ 3000 user manual

GIGAIPC
GIGAIPC QBiX-Pro-AMDA1606H-A1 quick start guide

Siemens
Siemens SITRANS LPS200 instruction manual

Flexco
Flexco XP Series Safety, operation and maintenance manual