Midas DL231 User manual

Quick Start Guide
MIDAS DL231
24 Input, 24 Output Active Microphone Splitter with
2 Independent MIDAS Microphone Preampliers per Input

2MIDAS DL231 Quick Start Guide 3
Terminals marked with this symbol carry
electrical current of sucient magnitude
to constitute risk of electric shock.
Use only high-quality professional speaker cables with
¼"TS or twist-locking plugs pre-installed. Allother
installation or modication should be performed only
by qualiedpersonnel.
This symbol, wherever it appears,
alertsyou to the presence of uninsulated
dangerous voltage inside the
enclosure-voltage that may be sucient to constitute a
risk ofshock.
This symbol, wherever it appears,
alertsyou to important operating and
maintenance instructions in the
accompanying literature. Please read the manual.
Caution
To reduce the risk of electric shock, donot
remove the top cover (or the rear section).
No user serviceable parts inside. Refer servicing to
qualied personnel.
Caution
To reduce the risk of re or electric shock,
do not expose this appliance to rain and
moisture.The apparatus shall not be exposed to dripping
or splashing liquids and no objects lled with liquids,
suchas vases, shall be placed on the apparatus.
Caution
These service instructions are for use
by qualied service personnel only.
Toreduce the risk of electric shock do not perform any
servicing other than that contained in the operation
instructions. Repairs have to be performed by qualied
servicepersonnel.
1. Read these instructions.
2. Keep these instructions.
3. Heed all warnings.
4. Follow all instructions.
5. Do not use this apparatus near water.
6. Clean only with dry cloth.
7. Do not block any ventilation openings. Install in
accordance with the manufacturer’s instructions.
8. Do not install near any heat sources such as
radiators, heat registers, stoves, or other apparatus
(including ampliers) that produce heat.
9. Do not defeat the safety purpose of the polarized
or grounding-type plug. A polarized plug has two blades
with one wider than the other. A grounding-type plug
has two blades and a third grounding prong. The wide
blade or the third prong are provided for your safety. Ifthe
provided plug does not t into your outlet, consult an
electrician for replacement of the obsolete outlet.
10. Protect the power cord from being walked on or
pinched particularly at plugs, convenience receptacles,
and the point where they exit from the apparatus.
11. Use only attachments/accessories specied by
themanufacturer.
12. Use only with the
cart, stand, tripod, bracket,
or table specied by the
manufacturer, orsold with
the apparatus. When a cart
is used, use caution when
moving the cart/apparatus
combination to avoid
injury from tip-over.
13. Unplug this apparatus during lightning storms or
when unused for long periods of time.
14. Refer all servicing to qualied service personnel.
Servicing is required when the apparatus has been
damaged in any way, such as power supply cord or plug
is damaged, liquid has been spilled or objects have fallen
into the apparatus, the apparatus has been exposed
to rain or moisture, does not operate normally, or has
beendropped.
15. The apparatus shall be connected to a MAINS socket
outlet with a protective earthing connection.
16. Where the MAINS plug or an appliance coupler is
used as the disconnect device, the disconnect device shall
remain readily operable.
17. Correct disposal of this
product:This symbol indicates that
this product must not be disposed
of with household waste,
according to theWEEE Directive
(2012/19/EU) and your national
law.This product should be taken
to a collection center licensed for the recycling of waste
electrical and electronic equipment (EEE).The
mishandling of this type of waste could have a possible
negative impact on the environment and human health
due to potentially hazardous substances that are generally
associated with EEE. At the same time, your cooperation
in the correct disposal of this product will contribute to
the ecient use of natural resources. For more
information about where you can take your waste
equipment for recycling, please contact your local city
oce, or your household waste collection service.
18. Do not install in a conned space, such as a book
case or similar unit.
19. Do not place naked ame sources, such as lighted
candles, on the apparatus.
20. Please keep the environmental aspects of battery
disposal in mind. Batteries must be disposed-of at a
battery collection point.
21. Use this apparatus in tropical and/or
moderate climates.
MUSIC Group accepts no liability for any loss which
may be suered by any person who relies either
wholly or in part upon any description, photograph,
or statement contained herein.Technical specications,
appearances and other information are subject to
change without notice. All trademarks are the property
of their respective owners. MIDAS, KLARK TEKNIK,
LAB GRUPPEN, LAKE,TANNOY,TURBOSOUND,
TC ELECTRONIC,TC HELICON, BEHRINGER, BUGERA
and DDA are trademarks or registered trademarks
of MUSIC Group IP Ltd. © MUSIC Group IP Ltd.
2017 All rights reserved.
For the applicable warranty terms and conditions
and additional information regarding MUSIC Group’s
LimitedWarranty, please see complete details online at
music-group.com/warranty.
Las terminales marcadas con este símbolo
transportan corriente eléctrica de
magnitud suciente como para constituir
un riesgo de descarga eléctrica. Utilice solo cables de
altavoz profesionales y de alta calidad con conectores
TS de 6,3 mm o de bayoneta prejados. Cualquier otra
instalación o modicación debe ser realizada únicamente
por un técnico cualicado.
Este símbolo, siempre que aparece,
leadvierte de la presencia de voltaje
peligroso sin aislar dentro de la caja;
estevoltaje puede ser suciente para constituir un riesgo
dedescarga.
Este símbolo, siempre que aparece,
leadvierte sobre instrucciones operativas
y de mantenimiento que aparecen en la
documentación adjunta. Por favor, lea el manual.
Atención
Para reducir el riesgo de descarga
eléctrica, no quite la tapa (o la parte
posterior). No hay piezas en el interior del equipo que
puedan ser reparadas por el usuario. Si es necesario,
póngase en contacto con personal cualicado.
Atención
Para reducir el riesgo de incendio o
descarga eléctrica, no exponga este
aparato a la lluvia, humedad o alguna otra fuente que
pueda salpicar o derramar algún líquido sobre el aparato.
Nocoloque ningún tipo de recipiente para líquidos sobre
el aparato.
Atención
Las instrucciones de servicio deben
llevarlas a cabo exclusivamente personal
cualicado. Para evitar el riesgo de una descarga eléctrica,
no realice reparaciones que no se encuentren descritas
en el manual de operaciones. Lasreparaciones deben ser
realizadas exclusivamente por personalcualicado.
1. Lea las instrucciones.
2. Conserve estas instrucciones.
3. Preste atención a todas las advertencias.
4. Siga todas las instrucciones.
5. No use este aparato cerca del agua.
6. Limpie este aparato con un paño seco.
7. No bloquee las aberturas de ventilación. Instale el
equipo de acuerdo con las instrucciones del fabricante.
8. No instale este equipo cerca de fuentes de calor
tales como radiadores, acumuladores de calor, estufas u
otros aparatos (incluyendo amplicadores) que puedan
producir calor.
9. No elimine o deshabilite nunca la conexión a tierra
del aparato o del cable de alimentación de corriente.
Unenchufe polarizado tiene dos polos, uno de los cuales
tiene un contacto más ancho que el otro. Una clavija con
puesta a tierra dispone de tres contactos: dos polos y la
puesta a tierra. El contacto ancho y el tercer contacto,
respectivamente, son los que garantizan una mayor
seguridad. Si el enchufe suministrado con el equipo no
concuerda con la toma de corriente, consulte con un
electricista para cambiar la toma de corriente obsoleta.
10. Coloque el cable de suministro de energía de manera
que no pueda ser pisado y que esté protegido de objetos
alados. Asegúrese de que el cable de suministro de
energía esté protegido, especialmente en la zona de la
clavija y en el punto donde sale del aparato.
11. Use únicamente los dispositivos o accesorios
especicados por el fabricante.
12. Use únicamente la
carretilla, plataforma,
trípode, soporte o mesa
especicados por el
fabricante o suministrados
junto con el equipo.
Altransportar el equipo,
tenga cuidado para evitar
daños y caídas al tropezar con algún obstáculo.
13. Desenchufe el equipo durante tormentas o si no va a
utilizarlo durante un periodo largo.
14. Confíe las reparaciones únicamente a servicios
técnicos cualicados. La unidad requiere mantenimiento
siempre que haya sufrido algún daño, si el cable de
suministro de energía o el enchufe presentaran daños,
sehubiera derramado un líquido o hubieran caído objetos
dentro del equipo, si el aparato hubiera estado expuesto
a la humedad o la lluvia, si ha dejado de funcionar de
manera normal o si ha sufrido algún golpe o caída.
15. Al conectar la unidad a la toma de corriente eléctrica
asegúrese de que la conexión disponga de una unión
atierra.
16. Si el enchufe o conector de red sirve como único
medio de desconexión, éste debe ser accesiblefácilmente.
17. Cómo debe deshacerse de
este aparato: Este símbolo indica
que este aparato no debe ser
tratado como basura orgánica,
según lo indicado en la Directiva
WEEE (2012/19/EU) y a las
normativas aplicables en su país.
En lugar de ello deberá llevarlo al punto limpio más
cercano para el reciclaje de sus elementos eléctricos/
electrónicos (EEE). Al hacer esto estará ayudando a
prevenir las posibles consecuencias negativas para el
medio ambiente y la salud que podrían ser provocadas por
una gestión inadecuada de este tipo de aparatos. Además,
el reciclaje de materiales ayudará a conservar los recursos
naturales. Para más información acerca del reciclaje de
este aparato, póngase en contacto con el Ayuntamiento
de su ciudad o con el punto limpio local.
18. No instale esta unidad en un espacio muy reducido,
tal como encastrada en una librería o similar.
19. No coloque objetos con llama, como una vela
encendida, sobre este aparato.
20. Tenga presentes todas las advertencias relativas
al reciclaje y correcta eliminación de las pilas. Las pilas
deben ser siempre eliminadas en un punto limpio y nunca
con el resto de la basura orgánica.
21. Use este aparato en rangos de temperatura
moderados y/o tropicales.
MUSIC Group no admite ningún tipo de responsabilidad
por cualquier daño o pérdida que pudiera sufrir
cualquier persona por conar total o parcialmente en la
descripciones, fotografías o armaciones contenidas en
este documento. Las especicaciones técnicas, imágenes
y otras informaciones contenidas en este documento
están sujetas a modicaciones sin previo aviso.Todas las
marcas comerciales que aparecen aquí son propiedad
de sus respectivos dueños. MIDAS, KLARK TEKNIK,
LAB GRUPPEN, LAKE,TANNOY,TURBOSOUND,
TC ELECTRONIC,TC HELICON, BEHRINGER, BUGERA
y DDA son marcas comerciales o marcas registradas
de MUSIC Group IP Ltd. © MUSIC Group IP Ltd.
2017 Reservados todos los derechos.
Si quiere conocer los detalles y condiciones aplicables
de la garantía así como información adicional sobre la
Garantía limitada de MUSIC Group, consulte online toda la
información en la web music-group.com/warranty.
Important Safety
Instructions
LEGAL DISCLAIMER
Instrucciones de
seguridad
NEGACIÓN LEGAL
GARANTÍA LIMITADA
LIMITED WARRANTY

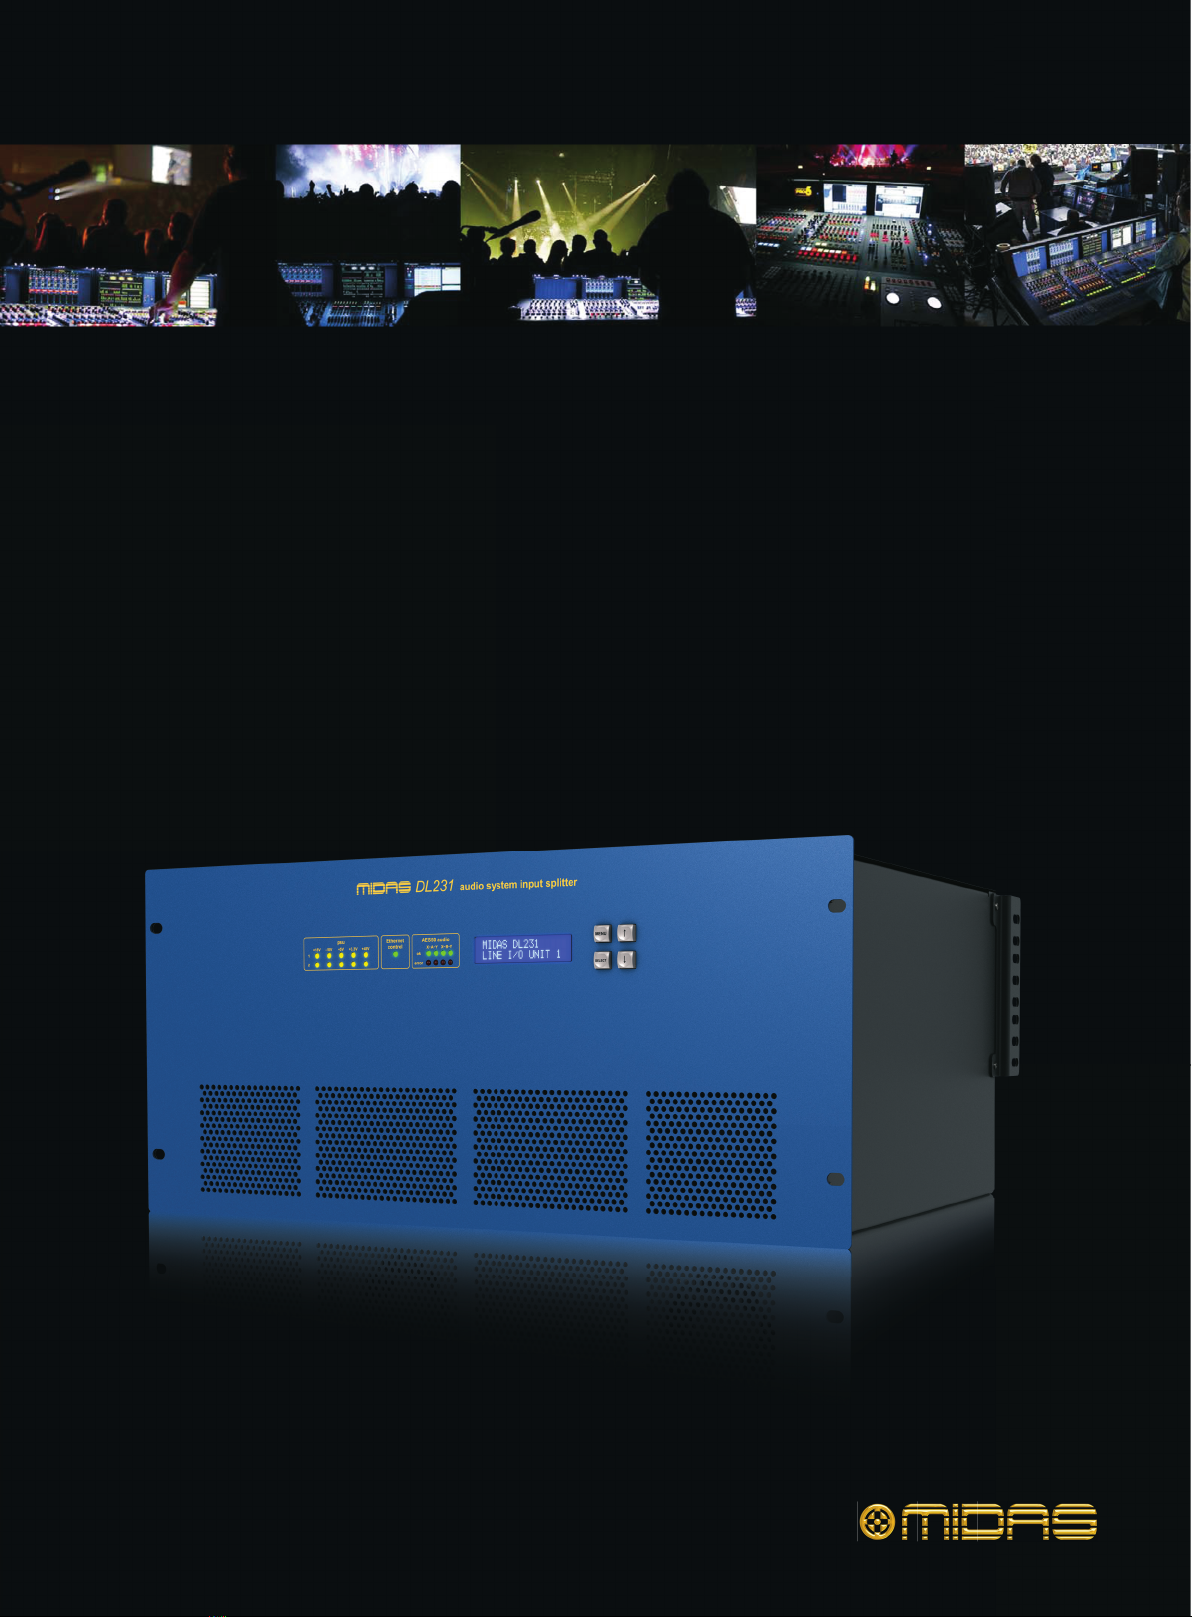
4MIDAS DL231 Quick Start Guide 5
Les points repérés par ce symbole portent
une tension électrique susante pour
constituer un risque d’électrocution.
Utilisez uniquement des câbles d’enceintes professionnels
de haute qualité avec ches Jack mono 6,35 mm ou ches
à verrouillages déjà installées.Touteautre installation ou
modication doit être eectuée uniquement par un
personnel qualié.
Ce symbole avertit de la présence d’une
tension dangereuse et non isolée à
l’intérieur de l’appareil - elle peut
provoquer des chocs électriques.
Attention
Ce symbol signale les consignes
d’utilisation et d’entre !Tien importantes
dans la documentation fournie. Lisez les consignes de
sécurité du manuel d’utilisation de l’appareil.
Attention
Pour éviter tout risque de choc électrique,
ne pas ouvrir le capot de l’appareil ni
démonter le panneau arrière. L’intérieur de l’appareil
ne possède aucun élément réparable par l’utilisateur.
Laissertoute réparation à un professionnel qualié.
Attention
Pour réduire les risques de feu et de choc
électrique, n’exposez pas cet appareil à la
pluie, à la moisissure, aux gouttes ou aux éclaboussures.
Ne posez pas de récipient contenant un liquide sur
l’appareil (un vase par exemple).
Attention
Ces consignes de sécurité et d’entretien
sont destinées à un personnel qualié.
Pouréviter tout risque de choc électrique, n’eectuez
aucune réparation sur l’appareil qui ne soit décrite par le
manuel d’utilisation. Les éventuelles réparations doivent
être eectuées uniquement par un technicien spécialisé.
1. Lisez ces consignes.
2. Conservez ces consignes.
3. Respectez tous les avertissements.
4. Respectez toutes les consignes d’utilisation.
5. N’utilisez jamais l’appareil à proximité d’un liquide.
6. Nettoyez l’appareil avec un chion sec.
7. Veillez à ne pas empêcher la bonne ventilation de
l’appareil via ses ouïes de ventilation. Respectezles
consignes du fabricant concernant l’installation
del’appareil.
8. Ne placez pas l’appareil à proximité d’une source
de chaleur telle qu’un chauage, une cuisinière ou tout
appareil dégageant de la chaleur (y compris un ampli
depuissance).
9. Ne supprimez jamais la sécurité des prises bipolaires
ou des prises terre. Les prises bipolaires possèdent deux
contacts de largeur diérente. Leplus large est le contact
de sécurité. Les prises terre possèdent deux contacts plus
une mise à la terre servant de sécurité. Si la prise du bloc
d’alimentation ou du cordon d’ali-mentation fourni ne
correspond pas à celles de votre installation électrique,
faites appel à un électricien pour eectuer le changement
de prise.
10. Installez le cordon d’alimentation de telle façon
que personne ne puisse marcher dessus et qu’il soit
protégé d’arêtes coupantes. Assurez-vous que le cordon
d’alimentation est suffisamment protégé, notamment au
niveau de sa prise électrique et de l’endroit où il est relié à
l’appareil; cela est également valable pour une éventuelle
rallonge électrique.
11. Utilisez exclusivement des accessoires et des
appareils supplémentaires recommandés par lefabricant.
12. Utilisez
exclusivement des
chariots, des diables,
desprésentoirs, despieds
et des surfaces de
travail recommandés
par le fabricant ou
livrés avec le produit.
Déplacezprécautionneusement tout chariot ou diable
chargé pour éviter d’éventuelles blessures en cas dechute.
13. Débranchez l’appareil de la tension secteur en cas
d’orage ou si l’appareil reste inutilisé pendant une longue
période de temps.
14. Les travaux d’entretien de l’appareil doivent
être eectués uniquement par du personnel qualifié.
Aucunentretien n’est nécessaire sauf si l’appareil est
endommagé de quelque façon que ce soit (dommagessur
le cordon d’alimentation ou la prise par exemple), siun
liquide ou un objet a pénétré à l’intérieur du châssis,
si l’appareil a été exposé à la pluie ou à l’humidité, s’il ne
fonctionne pas correctement ou à la suite d’une chute.
15. L’appareil doit être connecté à une prise secteur
dotée d’une protection par mise à la terre.
16. La prise électrique ou la prise IEC de tout appareil
dénué de bouton marche/arrêt doit rester accessible
enpermanence.
17. Mise au rebut appropriée de
ce produit: Ce symbole indique
qu’en accord avec la directive DEEE
(2012/19/EU) et les lois en vigueur
dans votre pays, ce produit ne doit
pas être jeté avec les déchets
ménagers. Ce produit doit être
déposé dans un point de collecte agréé pour le recyclage
des déchets d’équipements électriques et électroniques
(EEE). Une mauvaise manipulation de ce type de déchets
pourrait avoir un impact négatif sur l’environnement et la
santé à cause des substances potentiellement
dangereuses généralement associées à ces équipements.
En même temps, votre coopération dans la mise au rebut
de ce produit contribuera à l’utilisation ecace des
ressources naturelles. Pour plus d’informations sur
l’endroit où vous pouvez déposer vos déchets
d’équipements pour le recyclage, veuillez contacter votre
mairie ou votre centre local de collecte des déchets.
18. N’installez pas l’appareil dans un espace conné tel
qu’une bibliothèque ou meuble similaire.
19. Ne placez jamais d’objets enammés, tels que des
bougies allumées, sur l’appareil.
20. Gardez à l’esprit l’impact environnemental lorsque
vous mettez des piles au rebus. Les piles usées doivent
être déposées dans un point de collecte adapté.
21. Utilisez l’appareil dans un climat tropical
et/ou modéré.
MUSIC Group ne peut être tenu pour responsable pour
toute perte pouvant être subie par toute personne
se ant en partie ou en totalité à toute description,
photographie ou armation contenue dans ce
document. Les caractéristiques, l’apparence et d’autres
informations peuvent faire l’objet de modications
sans notication.Toutes les marques appartiennent à
leurs propriétaires respectifs. MIDAS, KLARK TEKNIK,
LAB GRUPPEN, LAKE,TANNOY,TURBOSOUND,
TC ELECTRONIC,TC HELICON, BEHRINGER, BUGERA
et DDA sont des marques ou marques déposées
de MUSIC Group IP Ltd. © MUSIC Group IP Ltd.
2017Tous droits réservés.
Pour connaître les termes et conditions de garantie
applicables, ainsi que les informations supplémentaires
et détaillées sur la Garantie Limitée de MUSIC Group,
consultez le site Internet music-group.com/warranty.
Vorsicht
Die mit dem Symbol markierten
Anschlüsse führen so viel Spannung,
dassdie Gefahr eines Stromschlags besteht.
Verwenden Sie nur hochwertige, professionelle
Lautsprecherkabel mit vorinstallierten 6,35 mm
MONO-Klinkensteckern oder Lautsprecherstecker
mit Drehverriegelung. Alle anderen Installationen
oder Modikationen sollten nur von qualiziertem
Fachpersonal ausgeführt werden.
Achtung
Um eine Gefährdung durch Stromschlag
auszuschließen, darf die Geräteabdeckung
bzw. Geräterückwand nicht abgenommen werden.
ImInnern des Geräts benden sich keine vom Benutzer
reparierbaren Teile. Reparaturarbeiten dürfen nur von
qualiziertem Personal ausgeführt werden.
Achtung
Um eine Gefährdung durch Feuer bzw.
Stromschlag auszuschließen, darf dieses
Gerät weder Regen oder Feuchtigkeit ausgesetzt werden
noch sollten Spritzwasser oder tropfende Flüssigkeiten
in das Gerät gelangen können. Stellen Sie keine mit
Flüssigkeit gefüllten Gegenstände, wie z. B.Vasen,
aufdasGerät.
Achtung
Die Service-Hinweise sind nur durch
qualiziertes Personal zu befolgen.
Umeine Gefährdung durch Stromschlag zu vermeiden,
führen Sie bitte keinerlei Reparaturen an dem Gerät
durch, die nicht in der Bedienungsanleitung beschrieben
sind. Reparaturen sind nur von qualiziertem
Fachpersonaldurchzuführen.
1. Lesen Sie diese Hinweise.
2. Bewahren Sie diese Hinweise auf.
3. Beachten Sie alleWarnhinweise.
4. Befolgen Sie alle Bedienungshinweise.
5. Betreiben Sie das Gerät nicht in der Nähe vonWasser.
6. Reinigen Sie das Gerät mit einem trockenenTuch.
7. Blockieren Sie nicht die Belüftungsschlitze. Beachten
Sie beim Einbau des Gerätes die Herstellerhinweise.
8. Stellen Sie das Gerät nicht in der Nähe von
Wärmequellen auf. Solche Wärmequellen sind z. B.
Heizkörper, Herde oder andereWärme erzeugende Geräte
(auchVerstärker).
9. Entfernen Sie in keinem Fall die
Sicherheitsvorrichtung von Zweipol- oder geerdeten
Steckern. Ein Zweipolstecker hat zwei unterschiedlich
breite Steckkontakte. Ein geerdeter Stecker hat zwei
Steckkontakte und einen dritten Erdungskontakt.
Derbreitere Steckkontakt oder der zusätzliche
Erdungskontakt dient Ihrer Sicherheit. Falls das
mitgelieferte Steckerformat nicht zu Ihrer Steckdose
passt, wenden Sie sich bitte an einen Elektriker, damit die
Steckdose entsprechend ausgetauscht wird.
10. Verlegen Sie das Netzkabel so, dass es vor
Tritten und scharfen Kanten geschützt ist und nicht
beschädigt werden kann. Achten Sie bitte insbesondere
im Bereich der Stecker,Verlängerungskabel und an
der Stelle, an der das Netzkabel das Gerät verlässt,
aufausreichendenSchutz.
11. Das Gerät muss jederzeit mit intaktem Schutzleiter
an das Stromnetz angeschlossen sein.
12. Sollte der Hauptnetzstecker oder eine
Gerätesteckdose die Funktionseinheit zum Abschalten
sein, muss diese immer zugänglich sein.
13. Verwenden Sie nur Zusatzgeräte/Zubehörteile,
dielaut Hersteller geeignet sind.
14. Verwenden
Sie nurWagen,
Standvorrichtungen,
Stative, Halter oderTische,
die vom Hersteller benannt
oder im Lieferumfang
des Geräts enthalten
sind. Falls Sie einen
Wagen benutzen, seien Sie vorsichtig beim Bewegen
derWagen-Gerätkombination, umVerletzungen durch
Stolpern zuvermeiden.
15. Ziehen Sie den Netzstecker bei Gewitter oder wenn
Sie das Gerät längere Zeit nicht benutzen.
16. Lassen Sie alleWartungsarbeiten nur von
qualiziertem Service-Personal ausführen. EineWartung
ist notwendig, wenn das Gerät in irgendeiner Weise
beschädigt wurde (z. B. Beschädigung des Netzkabels oder
Steckers), Gegenstände oder Flüssigkeit in das Geräteinnere
gelangt sind, das Gerät Regen oder Feuchtigkeit ausgesetzt
wurde, das Gerät nicht ordnungsgemäß funktioniert oder
auf den Boden gefallen ist.
17. Korrekte Entsorgung dieses
Produkts: Dieses Symbol weist
darauf hin, das Produkt
entsprechend derWEEE Direktive
(2012/19/EU) und der jeweiligen
nationalen Gesetze nicht
zusammen mit Ihren
Haushaltsabfällen zu entsorgen. DiesesProdukt sollte bei
einer autorisierten Sammelstelle für Recycling elektrischer
und elektronischer Geräte (EEE) abgegeben werden.
Wegen bedenklicher Substanzen, diegenerell mit
elektrischen und elektronischen Geräten inVerbindung
stehen, könnte eine unsachgemäße Behandlung dieser
Abfallart eine negative Auswirkung auf Umwelt und
Gesundheit haben. Gleichzeitig gewährleistet Ihr Beitrag
zur richtigen Entsorgung dieses Produkts die eektive
Nutzung natürlicher Ressourcen. Fürweitere
Informationen zur Entsorgung Ihrer Geräte bei einer
Recycling-Stelle nehmen Sie bitte Kontakt zum
zuständigen städtischen Büro, Entsorgungsamt oder zu
Ihrem Haushaltsabfallentsorgerauf.
18. Installieren Sie das Gerät nicht in einer beengten
Umgebung, zum Beispiel Bücherregal oder ähnliches.
19. Stellen Sie keine Gegenstände mit oenen
Flammen, etwa brennende Kerzen, auf das Gerät.
20. Beachten Sie bei der Entsorgung von Batterien
den Umweltschutz-Aspekt. Batterien müssen bei einer
Batterie-Sammelstelle entsorgt werden.
21. Verwenden Sie das Gerät in tropischen und/oder
gemäßigten Klimazonen.
MUSIC Group übernimmt keine Haftung fürVerluste,
die Personen entstanden sind, die sich ganz oder
teilweise auf hier enthaltene Beschreibungen,
Fotos oder Aussagen verlassen haben.Technische Daten,
Erscheinungsbild und andere Informationen können
ohne vorherige Ankündigung geändert werden.
AlleWarenzeichen sind Eigentum der jeweiligen
Inhaber. MIDAS, KLARK TEKNIK, LAB GRUPPEN, LAKE,
TANNOY,TURBOSOUND,TC ELECTRONIC,TC HELICON,
BEHRINGER, BUGERA und DDA sindWarenzeichen oder
eingetrageneWarenzeichen der MUSIC Group IP Ltd.
© MUSIC Group IP Ltd. 2017 Alle Rechte vorbehalten.
Die geltenden Garantiebedingungen und zusätzliche
Informationen bezüglich der von MUSIC Group
gewährten beschränkten Garantie nden Sie online unter
music-group.com/warranty.
Consignes de sécurité
DÉNI LÉGAL
GARANTIE LIMITÉE
Wichtige
Sicherheitshinweise
HAFTUNGSAUSSCHLUSS
BESCHRÄNKTE GARANTIE

6MIDAS DL231 Quick Start Guide 7
Aviso!
Terminais marcados com o símbolo
carregam corrente elétrica de magnitude
suciente para constituir um risco de choque elétrico.
Use apenas cabos de alto-falantes de alta qualidade
com pluguesTS de ¼" ou plugues com trava de torção
pré-instalados.Todas as outras instalações e modicações
devem ser efetuadas por pessoasqualicadas.
Este símbolo, onde quer que o encontre,
alerta-o para a leitura das instruções de
manuseamento que acompanham o
equipamento. Por favor leia o manual de instruções.
Atenção
De forma a diminuir o risco de choque
eléctrico, não remover a cobertura
(ouasecção de trás). Não existem peças substituíveis por
parte do utilizador no seu interior. Para esse efeito recorrer
a um técnico qualicado.
Atenção
Para reduzir o risco de incêndios ou
choques eléctricos o aparelho não deve ser
exposto à chuva nem à humidade. Além disso, não deve
ser sujeito a salpicos, nem devem ser colocados em cima
do aparelho objectos contendo líquidos, tais como jarras.
Atenção
Estas instruções de operação devem ser
utilizadas, em exclusivo, por técnicos de
assistência qualicados. Para evitar choques eléctricos
não proceda a reparações ou intervenções, que não as
indicadas nas instruções de operação, salvo se possuir as
quali-cações necessárias. Para evitar choques eléctricos
não proceda a reparações ou intervenções, que não as
indicadas nas instruções de operação. Só o deverá fazer se
possuir as qualicações necessárias.
1. Leia estas instruções.
2. Guarde estas instruções.
3. Preste atenção a todos os avisos.
4. Siga todas as instruções.
5. Não utilize este dispositivo perto de água.
6. Limpe apenas com um pano seco.
7. Não obstrua as entradas de ventilação. Instale de
acordo com as instruções do fabricante.
8. Não instale perto de quaisquer fontes de calor
tais como radiadores, bocas de ar quente, fogões de
sala ou outros aparelhos (incluindo amplicadores)
que produzam calor.
9. Não anule o objectivo de segurança das chas
polarizadas ou do tipo de ligação à terra. Uma cha
polarizada dispõe de duas palhetas sendo uma mais larga
do que a outra. Uma cha do tipo ligação à terra dispõe
de duas palhetas e um terceiro dente de ligação à terra.
A palheta larga ou o terceiro dente são fornecidos para
sua segurança. Se a cha fornecida não encaixar na sua
tomada, consulte um electricista para a substituição da
tomada obsoleta.
10. Proteja o cabo de alimentação de pisadelas ou
apertos, especialmente nas chas, extensões, e no local
de saída da unidade. Certique-se de que o cabo eléctrico
está protegido.Verique particularmente nas chas, nos
receptáculos e no ponto em que o cabo sai doaparelho.
11. O aparelho tem de estar sempre conectado à rede
eléctrica com o condutor de protecção intacto.
12. Se utilizar uma cha de rede principal ou uma
tomada de aparelhos para desligar a unidade de
funcionamento, esta deve estar sempre acessível.
13. Utilize apenas ligações/acessórios especicados
pelofabricante.
14. Utilize apenas com
o carrinho, estrutura,
tripé, suporte, ou mesa
especicados pelo
fabricante ou vendidos
com o dispositivo.
Quandoutilizar um
carrinho, tenha cuidado ao
mover o conjunto carrinho/dispositivo para evitar danos
provocados pela terpidação.
15. Desligue este dispositivo durante as trovoadas
ou quando não for utilizado durante longos períodos
detempo.
16. Qualquer tipo de reparação deve ser sempre
efectuado por pessoal qualicado. É necessária uma
reparação sempre que a unidade tiver sido de alguma
forma danicada, como por exemplo: no caso do cabo
de alimentação ou cha se encontrarem danicados;
naeventualidade de líquido ter sido derramado ou
objectos terem caído para dentro do dispositivo; no caso
da unidade ter estado exposta à chuva ou à humidade;
seesta não funcionar normalmente, ou se tiver caído.
17. Correcta eliminação deste
produto: este símbolo indica que
o produto não deve ser eliminado
juntamente com os resíduos
domésticos, segundo a Directiva
REEE (2012/19/EU) e a legislação
nacional. Este produto deverá
ser levado para um centro de recolha licenciado para a
reciclagem de resíduos de equipamentos eléctricos e
electrónicos (EEE). O tratamento incorrecto deste tipo
de resíduos pode ter um eventual impacto negativo
no ambiente e na saúde humana devido a substâncias
potencialmente perigosas que estão geralmente
associadas aos EEE. Ao mesmo tempo, a sua colaboração
para a eliminação correcta deste produto irá contribuir
para a utilização eciente dos recursos naturais. Paramais
informação acerca dos locais onde poderá deixar o seu
equipamento usado para reciclagem, é favor contactar
os serviços municipais locais, a entidade de gestão de
resíduos ou os serviços de recolha de resíduosdomésticos.
18. Não instale em lugares connados, tais como
estantes ou unidades similares.
19. Não coloque fontes de chama, tais como velas
acesas, sobre o aparelho.
20. Favor, obedecer os aspectos ambientais de descarte
de bateria. Baterias devem ser descartadas em um ponto
de coletas de baterias.
21. Use este aparelho em climas tropicais
e/ou moderados.
O MUSIC Group não se responsabiliza por perda alguma
que possa ser sofrida por qualquer pessoa que dependa,
seja de maneira completa ou parcial, de qualquer
descrição, fotograa, ou declaração aqui contidas.
Dados técnicos, aparências e outras informações
estão sujeitas a modicações sem aviso prévio.
Todas as marcas são propriedade de seus respectivos
donos. MIDAS, KLARK TEKNIK, LAB GRUPPEN, LAKE,
TANNOY,TURBOSOUND,TC ELECTRONIC,TC HELICON,
BEHRINGER, BUGERA e DDA são marcas ou marcas
registradas do MUSIC Group IP Ltd. © MUSIC Group
IP Ltd. 2017Todos direitos reservados.
Para obter os termos de garantia aplicáveis e condições e
informações adicionais a respeito da garantia limitada do
MUSIC Group, favor vericar detalhes na íntegra através
do website music-group.com/warranty.
Instruções de Segurança
Importantes
LEGAL RENUNCIANTE
GARANTIA LIMITADA
注意
感電の.恐れがありますので、カ
バーやその他の部品を取り外
したり、開けたりしないでください。高品
質なプロ用スピーカーケーブル(¼" TS標準
ケーブルおよびツイストロッキングプラ
グケーブル)を使用してください。
注意
火事および感電の危険を防ぐ
ため、本装置を水分や湿気の
あるところには設置しないで下さい。装置
には決して水分がかからないように注意
し、花瓶など水分を含んだものは、装置の
上には置かないようにしてください。
注意
このマークが表示されている
箇所には、内部に高圧電流が
生じています。手を触れると感電の恐れが
あります。
注意
取り扱いとお手入れの方法に
ついての重要な説明が付属の
取扱説明書に記載されています。ご使用の
前に良くお読みください。
注意
1. 取扱説明書を通してご覧ください。
2. 取扱説明書を大切に保管してくだ
さい。
3. 警告に従ってください。
4. 指示に従ってください。
5. 本機を水の近くで使用しないでくだ
さい。
6. お手入れの際は常に乾燥した布巾を使
ってください 。
7. 本機は、取扱説明書の指示に従い、
適切な換気を妨げない場所に設置してく
ださい。取扱説明書に従って設置してくだ
さい。
8. 本機は、電気ヒーターや温風機器、
ストーブ、調理台やアンプといった熱源か
ら離 して 設 置してください 。
9. ニ極式プラグおよびアースタイプ
(三芯)プラグの安全ピンは取り外さないで
ください。ニ極式プラグにはピンが二本つ
いており、そのうち一本はもう一方よりも幅
が広くなっています。アースタイプの三芯プ
ラグにはニ本のピンに加えてアース用のピ
ンが一本ついています。これらの幅の広い
ピン、およびアースピンは、安全のためのも
のです。備え付けのプラグが、お使いのコン
セントの形 状と異なる場合は、電器技師に
相談してコンセントの交換をして下さい。
10. 電源コードを踏みつけたり、挟んだり
しないようご注意ください。電源コードや
プラグ、コンセント及び製品との接続には
十分にご注意ください。
11. すべての装置の接地(アース)が確保
されていることを確認して下さい。
12. 電源タップや
電源プラグは電
源遮断機として利
用されている場合
には、これが直ぐ
に操作できるよう
手元に設置して下
さい。
13. 付属品は本機製造元が指定したもの
のみをお使いください。
14. カートスタンド、三脚、ブラケット、
テーブルなどは、本機製造元が指定したも
の、もしくは 本 機の 付属品となるもののみ
をお使いください。カートを使用しての運
搬の際は、器具の落下による怪我に十分ご
注意ください。
15. 雷雨の場合、もしくは長 期 間ご使 用に
ならない場合は、電源プラグをコンセント
から抜いてください。
16. 故障の際は当社指定のサービス技術
者にお問い合わせください。電源コードも
しくはプラグの損 傷、液体の装置内への浸
入、装置の上に物が落下した場合、雨や湿
気に装置が晒されてしまった場合、正常に
作動しない場合、もしくは 装置を地 面に落
下させてしまった場合など、いかなる形で
あれ装置に損傷が加わった場合は、装置
の修理・点検を受けてください。
17. 本製品に電源コード
が付属されている場合、
付属の電源コードは本製
品以外ではご使用いただ
けません。電源コードは
必ず本製品に付属された
電源コードのみご使用く
ださい。
18. ブックケースなどのような、閉じたス
ペースには設置しないでください。
19. 本機の上に点火した蝋燭などの裸火
を置かないでください。
20. 電池廃棄の際には、環境へのご配慮
をお願いします。電池は、かならず電池回
収場所に廃棄してください。
21. 本機器は熱帯気候および/または温
帯気候下でご使用ください。
ここに含まれる記 述 、写真、意見の全
体または一部に依拠して、いかなる人が
損害を生じさせた場合にも、MUSIC Group
は一切の賠償責任を負いません。技術
仕様、外観およびその他の情報は予告
なく変 更になる場合があります。商標
はすべて、それぞれの所有者に帰属しま
す。MIDAS、KLARK TEKNIK、LAB GRUPPEN、
LAKE、TANNOY、TURBOSOUND、TC ELECTRONIC、
TC HELICON、BEHRINGER、BUGERAおよびDDA
はMUSIC Group IP Ltd.の商標または登録商
標です。© MUSIC Group IP Ltd. 2017無断転用
禁止。
適用される保証条件とMUSIC Groupの限定
保証に関する概要については、オンライン
上music-group.com/warrantyにて詳細をご確
認ください。
安全にお使いいただくために
限定保証
法的放棄

8MIDAS DL231 Quick Start Guide 9
ࣝధ൦ಗᄋጽቬܭЧధ
ܹᄋႄุߜڛᝐႄԁᬘǎᬎ
Ώၺࣝధ ¼''TSᩛତ݁
ᄋᰵַ᠐˅ˋܧ٩ጴǎధᄋ߸ᜊួ
ڪᮍႁՍಬᄋ˅ˋցᤊᛢǎ
൦ಗଣᧉ১ַаߜڛఴ
ፑᎇᄋԁᬘႄԎధᝐႄԁᬘǎ
൦ಗଣᧉ১ಋᬅᄋ᧙
ᄋΏၺԤ፦οឮǎឱ឵ధ
Угǎ
࠶
˟ᥙГᝐႄԁᬘឱӉ఼
ᮈᄧᑁ᭨ౝǎܭа෦
ధԼΚၺ፦οΏၺᄋᦋǎឱ࠳፦ο
ᮋႁՍಬᄋ˅ˋցᤊᛢǎ
࠶
˟ᥙГᅍ༣ᝐႄԁᬘឱӉ
࠳൦ܭᎷᭂິ˘ǎ
൦ܭ˸ˁԼԫ͵ຶᄪధ͵ᄋࠕ
٩˸ˁԼᎷЦʾݡᔊၬǎ
࠶
፦οឮ௨ፍՍಬᄋ˅ˋ፦
οցΏၺᄋǎ˟ᥙГᝐႄԁ
ᬘᬕΏၺឮ˻ଣ҃ᄋܲឱӉᤊᛢ
ͶЦ߳፦οǎధ፦οڪᮍႁՍಬᄋ˅
ˋցᤊᛢǎ
1. ឱ឵ᤉឮǎ
2. ឱݱؔεߜᤉឮǎ
3. ឱญధᄋᇩǎ
4. ឱᥗ߷ధᄋឮǎ
5. ឱӉڛ᭦ᤄබᄋڢஶΏၺశַǎ
6. ឱၺࣱ࣌ຎพశַǎ
7. ឱӉ܅܌ᤱ᮴Աǎ߸ᜊశַឱᥗ
ཱིԉࠓᄋឮǎ
8. ឱӉ࠳శַ߸ᜊڛམ຺ᬅᤄ
ݡජྠ༰ߖЦ߳ၸམᄋܭ
Ӌҫ٩ǎ
9. ឱӉሩᬕমତ݁ڢତ݁ᄋ߸М
ᜊᎷǎڢତ݁௨ႁˑ˕ତ܌གྷԤʸ˕
ڢ݁ǎᔫᬥ᠏ଣΚᄋତ݁ˁᤡՍ১
ᄋତឱႄࢻటʸ˕Սᤡᄋତǎ
10. ݱؔεઑႄ຺ጴΏЦˁᜃᢇ҉
ᆢࡀЦญႄ຺ତ݁ǍܴၺତԤܭ
ᤍܬǎ
11. ឱԷΏၺԉࠓࠁᄋᬅܭ֘
ᦢǎ
12. ឱԷΏၺԉࠓ
ࠁᄋᬥ᠏ᩚ
ᄋଏᢽ౷ߖ
ʽᝉ౷౷֘ಹ
ߖǎᔫΏၺଏᢽ
ୄᤃܭឱญ
߸МᎷܭ
ᥙГଏᢽ֘
ܭϛωᏬԫǎ
13. ᥆ႄᭈᲟఱˁΏၺశܭ
ឱફѤႄ຺ତ݁ǎ
14. ధ፦οڪᮍႁՍಬᄋ፦οցᤊ
ᛢǎܭԫ૰ᭋᤊᛢ፦οΔݡႄ຺ጴ
ႄ຺ତ݁ԫ૰͵ุЛྮᗁЛܭ
аܭᥔᭂԫܭˁᑠࣣᤃͼ
ᜃگǎ
15. శܭᤍႄ຺ʸࠁధڢ
εઑǎ
16. ᔫႄ຺ତ݁٩Ч
ᏺՍ٩ၺͼளႄᜊᎷ
ε߳ܬᬥԼ
ஶΨ୳ͼ࿅ঘǎ
17. శַᤡၺ๓
ફ2000ዜʿڢӞశ
ַᤡၺ᭥མࣝජό
ʿǎ
ࠬͶڃڛ൦ឮ˻ଣ҃ᄋМᦋ
ᦋଢᤙǍڐྠܧᏬᤶᄋ૰
݀MUSIC Groupˁ᠈Ͷ᠋ǎస
ԡஞ֘ܲᔫధటஉিˁԴᛢᤱ
ᅽǎధᄋಗڪ˟ЦՋᒮధᏩᄋ
᠊ǎMIDAS, KLARK TEKNIK, LAB GRUPPEN,
LAKE, TANNOY, TURBOSOUND, TC ELECTRONIC,
TC HELICON, BEHRINGER, BUGERA ֘DDA ௨
MUSIC Group IP Ltd.ОՄᄋಗญгಗǎ
© MUSIC Group IP Ltd. 2017ྡీధǎ
ధУᮄˮᬸڅεοᄋᤡၺ൝ԤЦ߳ᄲУ
θ্ឱᄇᬇmusic-group.com/warrantyᎫቤಋ
ᄻߺᄋឡጻθ্ǎ
其他的重要信息
保修条款
法律声明

10 11MIDAS DL231 Quick Start Guide
1. Introduction
Welcome!
Thank you for purchasing the DL231 Audio System I/O unit.
The MIDAS DL231 Audio System I/O unit is housed in arugged 19" 2U rack-mount
chassis with cosmetic trim, suitablefor use and storage in aroad ight case.
All user interface controlsand feedback are located on the front panel.
User interface controlsare laid out for ease of operation with consideration for
the amount of user feedback required. All switches are high quality momentary
type with integral blue LEDillumination and printed switch caps.
All primary connectors are on the rear of the unit. All inputsand outputs
are on balanced XLR connectors. All analogue audio inputs and outputs
are tolerant of 48 Vconnection and short circuit protected. The DL231 uses
Neutrik XLR connections.
The DL231 I/O unit is amixed technology product combining analogue and
digital circuitry. These circuit types are combined on the input and output cards
using multi-layer horizontal PCBs. Extreme care has been taken when planning
and executing the PCB layout to maintain good grounding and analogue/
digital separation.
The DL231 unit uses proven technology from the DL251 I/O unit from the current
MIDAS range. The analogue input and output cards are identical,and the CPU
card is amodied version of the one used in the DL251.
The user interface software is based on the same menu system currentlyused
on existing MIDASI/O units and has provision for all of the functions these units
can perform.
Equipped with 48 channelsof MIDAS premium mic-pre ampliers with 2.5 dB
ultra precise gain steps, the DL231 unit is an ideal partner for all MIDAS digital
consoles (especiallythe XL8,PRO3/6/9 and PRO X consoles), signicantly
increasing mixablemic inputs.
Integration Within The MIDAS Product Range
Styled to match existing MIDAS consolelivery, MIDAS high performance I/O has
never been easier or more cost eective.
Features
• 2award-winning MIDAS microphone preampliers per channel with
switchable+48 Vphantom power
• 2dual redundant AES50 network ports with independent phase-locked
loop synchronisation
• 24 electronicallybalanced output channelscan be sourced from microphone
preampliers or AES50 ports
• Remote operation up to 100mvia CAT5/5e cable
• 24 bit audio operation with 96 kHzsamplerate
• All settings programmablefrom front panel controlsor console
• PSU status indicator LEDs and conguration LCD display on front panel
• Features Neutrik EtherCON* AES50 network ports
• Rugged 5U rackmount chassis for durability in portableapplications
• Dual redundant auto-ranging universal switch-mode power supplies
• 3-Year Warranty Program**
• Designed and engineered in England
*All third-party trademarks are the property of their respective owners. Their use neither constitutes a claim of the trademark nor affiliation
of the trademark owners with MUSIC Group. Product names are mentioned solely as a reference for compatibility, effects and/or components.
**Warranty details can be found at music-group.com.
About this manual
This is the operation manual for the DL231 I/O unit. This manual is intended to
helpget your unit installed and in operation as quicklyas possibleby giving
you unpacking, installation, connection, setting up and operating instructions.
Tohelpfamiliarise you with the DL231, there is adescription of the front and rear
panels, along with easy-to-follow user instructions.
The DL231 -front panelThe DL231 -rear panel
2. Getting Started
This section shows you how to unpack, install,connect up, switch on and
congure the DL231 I/O unit.
This equipment is supplied by a mains voltage that can
cause electric shock injury.
Before installing, setting up or operating this equipment, make sure
that you have read and fully understand all of this section and the
“Important safety instructions” at the front of this manual. Refer to
additional safety information on the top cover of the unit.
Unpacking
Carefullyunpack your DL231 I/O unit. Then, inspect the DL231 I/O unit carefully
for any signs of damage that may have occurred during transit and notify the
courier immediatelyif you discover any.
Check the contents of your DL231 I/O unit equipment package. Ifthere are any
parts missing, incorrect or faulty, please contact your local distributor or MIDAS
at the address at the front of this manual.
Please retain the original packing in case you shouldneed to return the
equipment to the manufacturer or supplier, or transport or ship the unit later.
Installation
Before installing and operating this equipment, make sure it is correctly
connected to the protective earth conductor of the mains voltage supplysocket
outlet through each mains lead.
Ideallyacool area is preferred, away from power distribution equipment or other
potential sources of interference.
Do not install the equipment in places of poor ventilation.
Do not install this equipment in alocation subjected to excessive heat, dust or
mechanical vibration. Allow for adequate ventilation around the equipment,
making sure that its fans and vents are not obstructed. Whenever possible,
keep the equipment out of direct sunlight.
Mount in rack only.
Power
The internal power supplies are of the switch mode type that automatically
senses the incoming mains voltage and will work where the nominal voltage is in
the range 100 VAC to 240VAC.
The correct leads for connection in the area to which the unit was shipped are
supplied with the unit. The equipment shouldonlybe plugged into the mains
outlets using the supplied leads.
Make sure the plug tted on the supplied mains cableis securelytted to the
mains IECconnector on the unit. When tting or removing aplug, always hold
the plug itselfand never use the cable, as this may damage it. Never insert or
remove an electric plug with wet hands.
Handling the equipment
When lifting or moving the equipment, always take its size and weight
into consideration.
Completelyisolate the equipment electricallyand disconnect all cables from the
equipment before moving it.
Do not insert your ngers or hands in any gaps or openings on the equipment,
for example, vents.
Electric elds
Inaccordance with Part 15 of the FCC Rules & Regulations, “… changes or
modications not expresslyapproved by the party responsiblefor compliance
couldvoid the user’s authority to operate the equipment.”
Shouldthis product be used in an electromagnetic eldthat is amplitude modulated
by an audio frequency signal (20 Hzto 20 kHz), the signal to noise ratio may be
degraded. Degradation of up to 60 dB at afrequency corresponding to the modulation
signal may be experienced under extreme conditions (3 V/m, 90% modulation).

12 13MIDAS DL231 Quick Start Guide
Connecting up
The DL231 I/O unit uses the following leads and connectors:
Primary Analogue Inputs:
Mic/Line Inputs -Balanced XLR connectors -10K load
Primary Analogue Outputs:
Main Outputs -Balanced XLR connectors -50R Source
AES50 Connections:
Neutrik EtherCON with status indication
Ethernet Control Connection:
Neutrik EtherCON with status indication
Diagnostics Connection:
9WFemale‘D’ type connector
Power Connections:
IECmains inlet – 100-240VAC~50-60 Hz
For further information about the connectors used in conjunction with the
DL231 I/O unit, see Section 5. Connectors.
3. Front Panel
(5)(1) (2) (3) (4) (6) (7)
4. Rear Panel
(19)
(20)
(15
)
(16)
(18)
(8) (9) (10) (11) (12) (13) (14)
(17)
(1) The psu panel monitors the two voltage supplies. There are ve yellow
LEDs per voltage supply, and each LEDrepresents avoltage rail.An LEDwill
illuminate when its respective voltage rail is active.
(2) The Ethernet control panel has asinglegreen LED, which has three
states of illumination: ashing = active; on = connected; and o =
not connected.
(3) The AES50 audio panel shows the health status of the communications of
the AES50 connections. Ifthe green ok LEDis illuminated, communication
is good.However, if the red error LEDis illuminated, there is aproblem on
that connection.
(4) LCD Display -2x16 character blue backlit liquid crystal display.
(5) Conguration Control -‘Menu’, ‘Select’, ‘Up’ and ‘Down’ buttons for
conguring menu items.
(6) There are fourair intakes for fan cooling. Do not obstruct.
(7) There are four cut-outs for rack mounting xings.
(8) Unit serial number label.
(9) Ventilation grills, which provide an air outtake for fan cooling of the inside
of the unit.
(10) MaleXLR chassis connectors, which provide outputs for line equipment.
Each socket has ared LEDthat illuminates when mute is on for that output.
(11) FemaleXLR chassis connectors, which provide inputs for mic/line
equipment. Each socket has ared LEDthat illuminates when +48 V
phantom power is on for that input.
(12) The diagnostics connector is a9-way D-type connector for connecting a
laptop/PC by service personnel for diagnostics purposes. This is not an
operator function and is only to be used by service personnel.
(13) The boot mode switch selects between normal operation and a
service personnel-onlyconguration boot mode. Ithas an adjacent
red LED, which illuminates to show when the unit is in service only
conguration mode.
(14) The MUTE button mutes all the outputs simultaneouslywhen helddown
for longer than one second. Ithas an integral LEDthat illuminates when
mute is active.
(15) There are three MIDI (musical instrument digital interface) sockets —
MIDI in,MIDI out and MIDI thru — for connection of aMIDI device,
such as asynthesiser. The MIDI in socket receives MIDI data, and the
MIDI thru socket gives out the same MIDI data that is received by the
MIDI in socket. The MIDI out socket gives out MIDI datagenerated by the
attached MIDAS Digital Console.

14 15MIDAS DL231 Quick Start Guide
(16) Four AES50 audio EtherCON sockets provide connection to the console
and pass audio and control data in both directions. Each socket has apair
of red and green LEDs, which indicate the following:
•• Green pulsating and red extinguished = valid audio and valid control
data; active link.
•• Green constantlyilluminated and red extinguished = valid audio and
valid control data; standby link.
•• Green extinguished and red illuminated = no audio; link has failed.
(17) The Ethernet control EtherCON socket on the rear panel allows Ethernet
control via Cat 5e cableup to 100 mlong. This socket has agreen LEDthat
indicates the following:
•• Green LEDsolid = connected but not active
•• Green LEDashing = active
•• Green LEDextinguished = faultor no connection
Mains power
Each mains inlet should be sourced from its own separate
wall-mounted mains outlet socket. Otherwise, both mains
sources must be suitably distributed so as to meet local
safety regulations.
The mains is supplied to the DL231 via dual redundant mains inlets.
(18) Dual redundant power supplies.
(19) Mains on/o isolator switch.
(20) Mains IECsocket.
5. Connectors
Toensure the correct and reliableoperation of the equipment, onlyhigh quality
balanced, screened, twisted pair audio cableshouldbe used. XLR connector
shellsshouldbe of metal construction so that they provide ascreen when
connected to the console/snake and, where appropriate, they shouldhave Pin 1
connected to the cablescreen.
(1) Line output audio connector.FemaleXLR plug and maleXLR chassis
connector with the following pinouts: 1= ground; 2= hot; and 3= cold.
(2) Mic/line input audio connector.MaleXLR plug and femaleXLR chassis
connector with the following pinouts: 1= ground; 2= hot; and 3= cold.
(3) Ethernet socket.RJ45plug and EtherCON socket.
(4) Diagnostics.9-way, D-type plug and socket.
132
232
6. Operation
Programming Mode
This chapter describes the programming mode of the DL231 I/O Unit.
Menu navigation
The four programming buttons in the control panel have the following functions.
Navigation buttons Usage
Moves up or down amenu level,or exits programming
mode, depending on the current menu level.
Selects the current option.
Scrollsthrough the current level of menus/options.
Scrollsthrough the current level of menus/options in
the opposite direction to the up arrow button.
The menu owcharts on pages 17 through 21 give an overview of all the menus
and their options, and shows you how to navigate your way around them. Inthe
diagram the menus are shown on the left, and each subsequent lower level is to
the right.
To enter/exit programming mode
Toenter programming mode,press the MENU button and holddown for
approximatelytwo seconds; the defaultdisplay will change to the top-level
“Select Menu:” display (see “Menus” on this page).
Toexit programming mode from any menu display screen, press MENU
repeatedlyuntil youreach the defaultscreen. The unit will exit programming
mode automaticallyafter about 20 seconds of inactivity if none of the
programming buttons are pressed within that time.
To select a menu
Inprogramming mode, scroll to the menu you want by using the up/down arrow
buttons, then press SELECT.
Menus
The eight menus in programming mode are as follows:
1. MicSplit ID – for setting up the unit’s network ID(see “MicSplit ID
Menu” below).
2. AES50 Sync – for selecting the method for synchronizing the AES50
(see “AES50 Sync Menu” below).
3. Output Source – for setting up the output signal routing from the unit’s
analogue or AES50 digital inputs.
4.48 V Control – for controlling the source of 48 Vphantom power.
5. Sample Rate – allows you to set the unit’s samplerate (48kor 96k
samplerates).
6. AES50 Status – lets you view/clear the AES50 values.
7.S/W Version – for viewing the unit’s software version number.
8.Reset All – lets you reset all settings to default.
Inprogramming mode the four programming buttons in the control panel are
used to navigate and select options from anumber of menus, which let you set
up the unit and view information.

16 17MIDAS DL231 Quick Start Guide
Menu Flowchart
Menu 1: MicSplit ID
Menu 2: AES50 Sync
Press and
hold down
for about
two seconds
Menu 1
Default screen
Asterisk
indicates
parameter is
available for
selection.
ID range is from
1 to 8
Default screen
Channel A
and
Channel B
have matching
submenus
Menu 2
Asterisk
indicates
parameter
is available
for selection
Menu 1
Press and
hold down
for about
two seconds
Menu 3: Output Source
Menu 4: 48 V Control
Press and
hold down
for about
two seconds
Default screen
Asterisk
indicates
parameter
is available
for selection
Navigate through
2 menus
Menu 3
Press and
hold down
for about
two seconds
Navigate through
3 menus
Default screen
Menu 4
Asterisk
indicates
parameter
is available
for selection

18 19MIDAS DL231 Quick Start Guide
Menu 5: Sample Rate
Menu 6: AES50 Status
Press and
hold down
for about
two seconds
Navigate through
4 menus
Default screen
Menu 5
Asterisk
indicates
parameter
is available
for selection
Press and
hold down
for about
two seconds
Navigate through
6 menus
AES50 A status range
is from 1 to 6
Menu 6
Default screen
AES50 B status range
is from 1 to 6
Each AES50 B
status 1 to 6
has its own
submenu.
Each AES50 A
status 1 to 6
has its own
submenu.
Menu Chart (Overview)
Press and
hold down
for about
two seconds
Default screen

20 21MIDAS DL231 Quick Start Guide
7. Technical Specications
This section contains the technical specications for the DL231 I/O unit.
Due to our policy of continual improvement, MIDAS reserves the right to alter the
function or specication at any time without notice.
General Statistics
General Specications
Audio Performance Specications
Frequency response
Input Output Gain 20 Hz 20 kHz
DL231 I/O Box DL231 I/O Box 0 dB +0dB to -1 dB +0dB to -1 dB
DL231 I/O Box DL231 I/O Box 45dB +0dB to -1 dB +0dB to -1 dB
Gain error at 1 kHz
Input Output Gain Max. Min.
DL231 I/O Box DL231 I/O Box 0 dB +1dB -1 dB
DL231 I/O Box DL231 I/O Box 45dB +1dB -1 dB
Input CMRR Typical
Input Output Gain 100 Hz 1 kHz
DL231 I/O Box DL231 I/O Box 0 dB 70dB 70dB
DL231 I/O Box DL231 I/O Box 45dB 90 dB 90 dB
Distortion at 0 dBu
Input Output Gain 1 kHz 10 kHz
DL231 I/O Box DL231 I/O Box 0 dB 0.01%0.01%
DL231 I/O Box DL231 I/O Box 45dB 0.03%0.03%
Distortion at +20 dBu
Input Output Gain 1 kHz 10 kHz
DL231 I/O Box DL231 I/O Box 0 dB 0.01%0.01%
DL231 I/O Box DL231 I/O Box 45dB 0.03%0.03%
XLR Connections
DL231
1x5U rack I/O box houses: 24 x(XLR) mic/line inputs (48 mic/line amps)
24 x(XLR) line outputs
Resilience
Dual redundant network cables and dual redundant PSUs
Sampling frequency 48 kHz/96 kHz
Dynamic range @ 1kHz22Hzto 22 kHz(at unity gain): > 107 dB
Maximum gain 45dB
Crosstalk@ 1kHZ-90dB physicallyadjacent input channels
Crosstalk@ 10k HZ-90dB physicallyadjacent input channels
Dimensions 5U x410 mm deep
Net weight 15 kg
Shipping weight 18 kg
Power requirements 100 Vto 240VAC ±10%,50 to 60 Hz
Power consumption <150 W
Operating temperature range +5° Cto +40° C
Storage temperature range -20° Cto +60° C
Signal path noise 22 Hz to 22 kHz unweighted (inputs 150 Ω terminated)
Input Output Gain Output noise EIN
DL231 I/O Box DL231 I/O Box 0 dB -86dBu -86dBu
DL231 I/O Box DL231 I/O Box 45dB -81dBu -126 dBu
Dynamic range 22 Hz to 22 kHz unweighted
Input Output Gain Maximum level Dynamic range
DL231 I/O Box DL231 I/O Box 0 dB +21 dBu 107 dB
DL231 I/O Box DL231 I/O Box 45dB +21 dBu 102 dB
System Inputs and Outputs
Input and Output Characteristics
Analogue input characteristics
Input Load Z Gain Max. level Connector
DL231 I/O Box 10 kΩ-2.5 dB to +45dB +24 dBu XLR
Analogue output characteristics
Output Source Z Gain Max. level Connector
DL231 I/O Box 50 Ω 0dB +21 dBu XLR
48 kHz digital I/O characteristics
Type AES50
Channels24
Data length 24-bit
I/O Bi-directional
Description notes Conforms to AES50-2011
Connector EtherCON XLR
96 kHz digital I/O characteristics
Type AES50
Channels24
Data length 24-bit
I/O Bi-directional
Description notes Conforms to AES50-2011
Connector EtherCON XLR
I/O Box inputs
Connector 3-pin XLR balanced
A/D converter 24-bit, 96 kHzand 128 times oversampling
I/O Box outputs
Connector 3-pin XLR balanced
D/A convertor 24-bit, 96 kHzand 128 times oversampling
MIDI
MIDI connector In, out and through on 5-pin DIN(for use with MIDAS consoles only)
48 kHz I/O digital system inputs and outputs
System connector A(X)1xAES50 (24 channelsof bi-directional digital audio) on EtherCON XLR
Redundant connector A(Y) 1 xAES50 (24 channelsof bi-directional digital audio) on EtherCON XLR providing redundant backup
System connector B(X)1xAES50 (24 channelsof bi-directional digital audio)on EtherCON XLR
Redundant connector B(Y) 1 xAES50 (24 channelsof bi-directional digital audio) on EtherCON XLR providing redundant backup
96 kHz I/O digital system inputs and outputs
System connector A(X)1xAES50 (24 channelsof bi-directional digital audio) on EtherCON XLR
Redundant connector A(Y) 1 xAES50 (24 channelsof bi-directional digital audio) on EtherCON XLR providing redundant backup
System connector B(X)1xAES50 (24 channelsof bi-directional digital audio)on EtherCON XLR
Redundant connector B(Y) 1 xAES50 (24 channelsof bi-directional digital audio) on EtherCON XLR providing redundant backup

22 MIDAS DL231 Quick Start Guide 23
Other important information
1. Register online. Please register your new
MUSICGroup equipment right after you purchase it by
visiting midasconsoles.com. Registering your purchase
using our simpleonline form helps us to process your repair
claims more quicklyand eciently. Also, read the terms and
conditions of our warranty, ifapplicable.
2. Malfunction. Shouldyour MUSICGroup
Authorised Reseller not be located in your vicinity, you
may contact the MUSICGroup Authorised Fulller for your
country listed under “Support” at midasconsoles.com.
Shouldyour country not be listed, please check if your
problem can be dealtwith by our “OnlineSupport” which
may also be found under “Support” at midasconsoles.com.
Alternatively, please submit an online warranty claim at
midasconsoles.com BEFORE returning theproduct.
3. Power Connections. Before plugging the unit
into apower socket, please make sure you are using the
correct mains voltage for your particular model.Faultyfuses
must be replaced with fuses of the same typeand rating
without exception.
1. Registro online. Le recomendamos que registre
su nuevo aparato MUSICGroup justo después de su compra
accediendo alapágina web midasconsoles.com. Elregistro
de su compra através de nuestro sencillosistema online nos
ayudará aresolver cualquier incidencia que se presente ala
mayor brevedad posible. Además,aproveche para leer los
términos ycondiciones de nuestra garantía, si es aplicable
en sucaso.
2. Averías. Enel caso de que no exista un distribuidor
MUSICGroup en las inmediaciones, puede ponerse en
contacto con el distribuidor MUSICGroup de su país,
queencontrará dentro del apartado “Support” de nuestra
página web
midasconsoles.com
.Encaso de que su país no
aparezca en ese listado, acceda alasección “Online Support”
(quetambiénencontrará dentro del apartado “Support” de
nuestra páginaweb) ycompruebe si su problema aparece
descrito ysolucionado allí. De forma alternativa, envíenos a
través de lapágina web una solicitud online de soporte en
periodo de garantía ANTESde devolvernos el aparato.
3. Conexiones de corriente. Antes de enchufar
este aparato auna salida de corriente, asegúrese de que
dicha salida sea del voltaje adecuado para su modelo
concreto. Encaso de que deba sustituir un fusiblequemado,
deberá hacerlopor otro de idénticas especicaciones,
sinexcepción.
1. Enregistrez-vous en ligne.Prenez letemps
d’enregistrer votre produit MUSICGroup aussi vite que
possiblesur lesite Internet midasconsoles.com. Le fait
d’enregistrer leproduit en ligne nous permet de gérer
les réparations plus rapidement et plus ecacement.
Prenezégalement letemps de lire les termes et conditions
de notre garantie.
2. Dysfonctionnement. Si vous n’avez pas de
revendeur MUSICGroup près de chez vous, contactez le
distributeur MUSICGroup de votre pays:consultez laliste
des distributeurs de votre pays dans lapage “Support” de
notre site Internet midasconsoles.com. Si votre pays n’est
pas dans laliste, essayez de résoudre votre problème avec
notre “aideen ligne” que vous trouverez également dans la
section “Support” du site midasconsoles.com. Vous pouvez
également nous faire parvenir directement votre demande
de réparation sous garantie par Internet sur lesite
midasconsoles.com AVANT de nous renvoyer leproduit.
3. Raccordement au secteur. Avant de relier
cet équipement au secteur, assurez-vous que latension
secteur de votre région soit compatibleavec l’appareil.
Veillez àremplacer les fusibles uniquement par des modèles
exactement de même tailleet de même valeur électrique
— sans aucune exception.
1. Online registrieren. Bitte registrieren Sie
Ihr neues MUSICGroup-Gerät direkt nach dem Kauf auf
der Website midasconsoles.com. Wenn Sie Ihren Kauf
mit unserem einfachen online Formular registrieren,
können wir Ihre Reparaturansprüche schneller und
ezienter bearbeiten. Lesen Sie bitte auch unsere
Garantiebedingungen, fallszutreend.
2. Funktionsfehler. Sollte sich kein MUSICGroup
Händler in Ihrer Nähe benden, können Sie den
MUSICGroup Vertrieb Ihres Landes kontaktieren, derauf
midasconsoles.com unter „Support“ aufgeführt ist.
Sollte Ihr Land nicht aufgelistet sein, prüfen Sie bitte,
ob Ihr Problem von unserem „Online Support“ gelöst
werden kann, den Sie ebenfallsauf midasconsoles.com
unter „Support“ nden. Alternativ reichen Sie bitte Ihren
Garantieanspruch online auf midasconsoles.com ein,
BEVOR Sie das Produktzurücksenden.
3. Stromanschluss. Bevor Sie das Gerät an
eine Netzsteckdose anschließen, prüfen Sie bitte, obSie
die korrekte Netzspannung für Ihr spezielles Modell
verwenden. Fehlerhafte Sicherungen müssen ausnahmslos
durch Sicherungen des gleichen Typs und Nennwerts
ersetztwerden.
1. Registre-se online. Por favor, registre seu novo
equipamento MUSICGroup logo após acompra visitando
osite midasconsoles.com Registrar sua compra usando
nosso simples formulário online nos ajuda aprocessar
seus pedidos de reparos com maior rapidez eeciência.
Além disso, leia nossos termos econdições de garantia,
caso seja necessário.
2. Funcionamento Defeituoso.
Casoseufornecedor MUSICGroup não esteja localizado
nas proximidades, você pode contatar um distribuidor
MUSICGroup para oseu país listado abaixo de “Suporte”
emmidasconsoles.com. Se seu país não estiver na
lista, favorchecar se seu problema pode ser resolvido
com onosso “Suporte Online” que também pode ser
achado abaixo de “Suporte”em midasconsoles.com.
Alternativamente, favor enviar uma solicitação de garantia
online em midasconsoles.com ANTESda devolução
do produto.
3. Ligações. Antes de ligar aunidade àtomada,
assegure-se de que está autilizar avoltagem correcta para
omodeloem questão. Os fusíveis com defeito terão de
ser substituídos, sem qualquer excepção, por fusíveis do
mesmo tipo ecorrente nominal.
1. ヒューズの格納部/電圧の選択:
ユ ニット を パ ワーソケ ットに 接 続 する 前 に 、
各モデルに対応した正しい主電源を使用し
ていることを確認してください。ユニットに
よっては 、230 Vと120 Vの2つの違うポジ
ションを切り替えて使う、ヒューズの格 納 部
を備えているものがあります。正しくない値
のヒューズは、絶対に適切な値のヒューズに
交換されている必要があります。
2. 故障:MUSICGroupディーラーがお客様
のお近くにないときは、midasconsoles.comの
“Support”内に列記されている、お客様の国
のMUSICGroupディストリビューターにコン
タクトすることが できます。お客様の国が
リストに ない 場 合 は 、同じmidasconsoles.com
の“Support”内にある“OnlineSupport”でお客
様の問題が処理できないか、チェックして
みてください。あるいは、商品を返送する前
に、midasconsoles.comで、オンラインの保証
請求を要請してください。
3. 電源接続:電源ソケットに電源コードを
接続する前に、本製品に適切な電圧を使用
してい ることをご 確 認ください 。不具合が
発生したヒューズは必ず電圧および電流、
種類が同じヒューズに交換する必要があり
ます。
Important information
Aspectos importantes
Informations importantes
Weitere wichtige
Informationen
Outras Informações
Importantes
その他の重要な情報
1. 在线注册。 请购买 MUSICGroup 产品后立
即在 midasconsoles.com 网站注册。 网页上有简
单的在线注册表格。 这有助于我们更快更有
效率地处理您维修等事宜。 请阅读保修的相
关条款及条件。
2. 无法正常工作。 若您的 MUSICGroup 产品
无法正常工作, 我们会为您尽快修复。 请联
系您购买产品的销售商。 若你所在地区没有
MUSICGroup 销售商, 请联系 midasconsoles.com
网站的 “WHERETOBUY” 一栏下的所列出的子
公司或经销商。
3. 电源连接。 将本设备连接电源前, 请确
保使用的电压正确。 保险丝需要更换时,
必须使用相同型号及定额的保险丝。
其他的重要信息

Quick Start Guide 2524 MIDAS DL231
FEDERAL COMMUNICATIONS
COMMISSION COMPLIANCE
INFORMATION
ResponsibleParty Name: MUSIC Group Research
UK Limited
Address: Klark Industrial Park,
Walter Nash Road,
Kidderminster. Worcestershire.
DY11 7HJ. England.
Phone Number: +44 1562 741515
DL231
complies with the FCC rules as mentioned in the following paragraph:
This equipment has been tested and found to complywith the limits for aClass A
digital device, pursuant to Part 15 of the FCC Rules. These limits are designed to
provide reasonableprotection against harmful interference when the equipment
is operated in acommercial environment. This equipment generates, uses, and can
radiate radio frequency energy and, if not installed and used in accordance with
the instruction manual,may cause harmful interference to radio communications.
Operation of this equipment in aresidential area is likelyto cause harmful
interference in which case the user will be required to correct the interference at his
own expense.
Important information:
Changes or modications to the equipment not expresslyapproved by MUSICGroup
can void the user’s authority to use the equipment.
DL231

midasconsoles.com
Other manuals for DL231
1
Table of contents
Other Midas Media Converter manuals