Middle Atlantic WoodKit C3 Series User manual

THANK YOU
Thank you for purchasing a C3 Series WoodKit. Please read these instructions thoroughly before
installing or assembling this product.
C3 Series
WoodKit
Instruction Sheet
NOTE: The 1-, 2-, 3-, and 4-bay C3 woodkit models are available
for 24” (610 mm) and 32” (813 mm, shown) frame heights.
100-00040 Rev A

IMPORTANT SAFETY INSTRUCTIONS
DANGER HAZARDOUS VOLTAGE: The lightning flash with the arrowhead symbol, within an equilateral triangle is intended to alert the user to the
presence of uninsulated dangerous voltage within the product’s enclosure that may be of sufficient magnitude to constitute a risk of electric shock to
persons.
WARNING: A warning alerts you to a situation that could result in serious personal injury or death.
CAUTION: A caution alerts you to a situation that may result in minor personal injury or damage to the product and/or property.
NOTE: A note is used to highlight procedures pertaining to the installation, operation, or maintenance of the product.
• Read these instructions.
• Keep these instructions.
• Heed all warnings.
• Follow all instructions.
• Clean only with dry cloth.
• Only use attachments/accessories specified by the manufacturer.
WARNING: Failure to read, understand and follow the following information can result in serious personal injury, damage to the
equipment or voiding of the warranty. It is the responsibility of the Installer/User to ensure that this product is loaded according to
specifications.
WARNING: Middle Atlantic Products, electrical systems conform to and should be properly grounded in compliance with require-
ments of the current National Electrical Code or codes administered by local authorities. All electrical products may present a possible
shock or fire hazard if improperly installed or used. Electrical products may bear the mark of a Nationally Recognized Testing
Laboratory (NRTL) and should be installed in conformance with current local and/or the National Electrical Code.
WARNING: Exceeding the weight ratings specified on page 4 of the C3 Series Credenza Frame instruction sheet (100-00032) can
result in serious injury or damage to the equipment. It is the responsibility of the Installer/User to ensure the components installed do
not surpass the weight ratings as an unstable condition can occur which may cause possible injury or damage.
CAUTION: Note that during construction, there must be no possibility of personal injury, for example the squeezing of fingers or
arms.
CAUTION: If there is visible damage on the product, it must not be installed.
CAUTION: Safety measures must be practiced at all times during the assembly of this product. Use proper safety equipment and
tools for the assembly procedure to prevent personal injury.
CAUTION: For loading, always put heavier items at the bottom of the bays, not near the top, in order to help prevent the possibility
of the furnishing tipping over.
CAUTION: The appliance is not intended for use by young children or infirm persons without supervision.
Safety Instructions: Rack Mount
Elevated Operating Ambient: If installed in a closed or multi-unit rack assembly, the operating ambient temperature of the rack
environment may be greater than room ambient. Therefore, consideration should be given to installing the equipment in an environment
compatible with the maximum ambient temperature (Tma) specified by the manufacturer.
Reduced Air Flow: Installation of the equipment in a rack should be such that the amount of air flow required for safe operation of the
equipment is not compromised.
Mechanical Loading: Mounting of the equipment in the rack should be such that a hazardous condition is not achieved due to uneven
mechanical loading.
Circuit Overloading: Consideration should be given to the connection of the equipment to the supply circuit and the effect that
overloading of the circuit might have on overcurrent protection and supply wiring. Appropriate consideration of equipment nameplate
ratings should be used when addressing this concern.
Reliable Earthing: Reliable earthing of rack-mounting equipment should be maintained. Particular attention should be given to supply
connections other than direct connections to the branch circuit (e.g. use of power strips).
Disconnect Device (Pluggable Equipment): The socket-outlet shall be installed near the equipment and shall be easily accessible.
Page 2

DANGER TENSION DANGEREUSE: Le symbole de la pointe de flèche, dans un triangle équilatéral, est destiné à alerter l'utilisateur sur la
présence de tension dangereuse non isolée dans l'enceinte du produit qui peut être d'une ampleur suffisante pour constituer un risque d'électrocu-
tion.
AVERTISSEMENT: Un avertissement vous avertit d'une situation pouvant entraîner des blessures graves ou la mort.
ATTENTION: Une attention vous avertit d'une situation pouvant entraîner des blessures mineures ou des dommages au produit et/ou à la
REMARQUE: Une remarque est utilisée pour mettre en évidence les procédures relatives à l'installation, au fonctionnement ou à l'entretien du
produit.
INSTRUCTIONS IMPORTANTES SUR LA SÉCURITÉ
• Lire ces instructions.
• Conservez ces instructions.
• Respectez tous les avertissements.
• Suivez toutes les instructions.
• Nettoyer uniquement avec un chiffon sec.
• N'utilisez que des accessoires spécifiés par le fabricant.
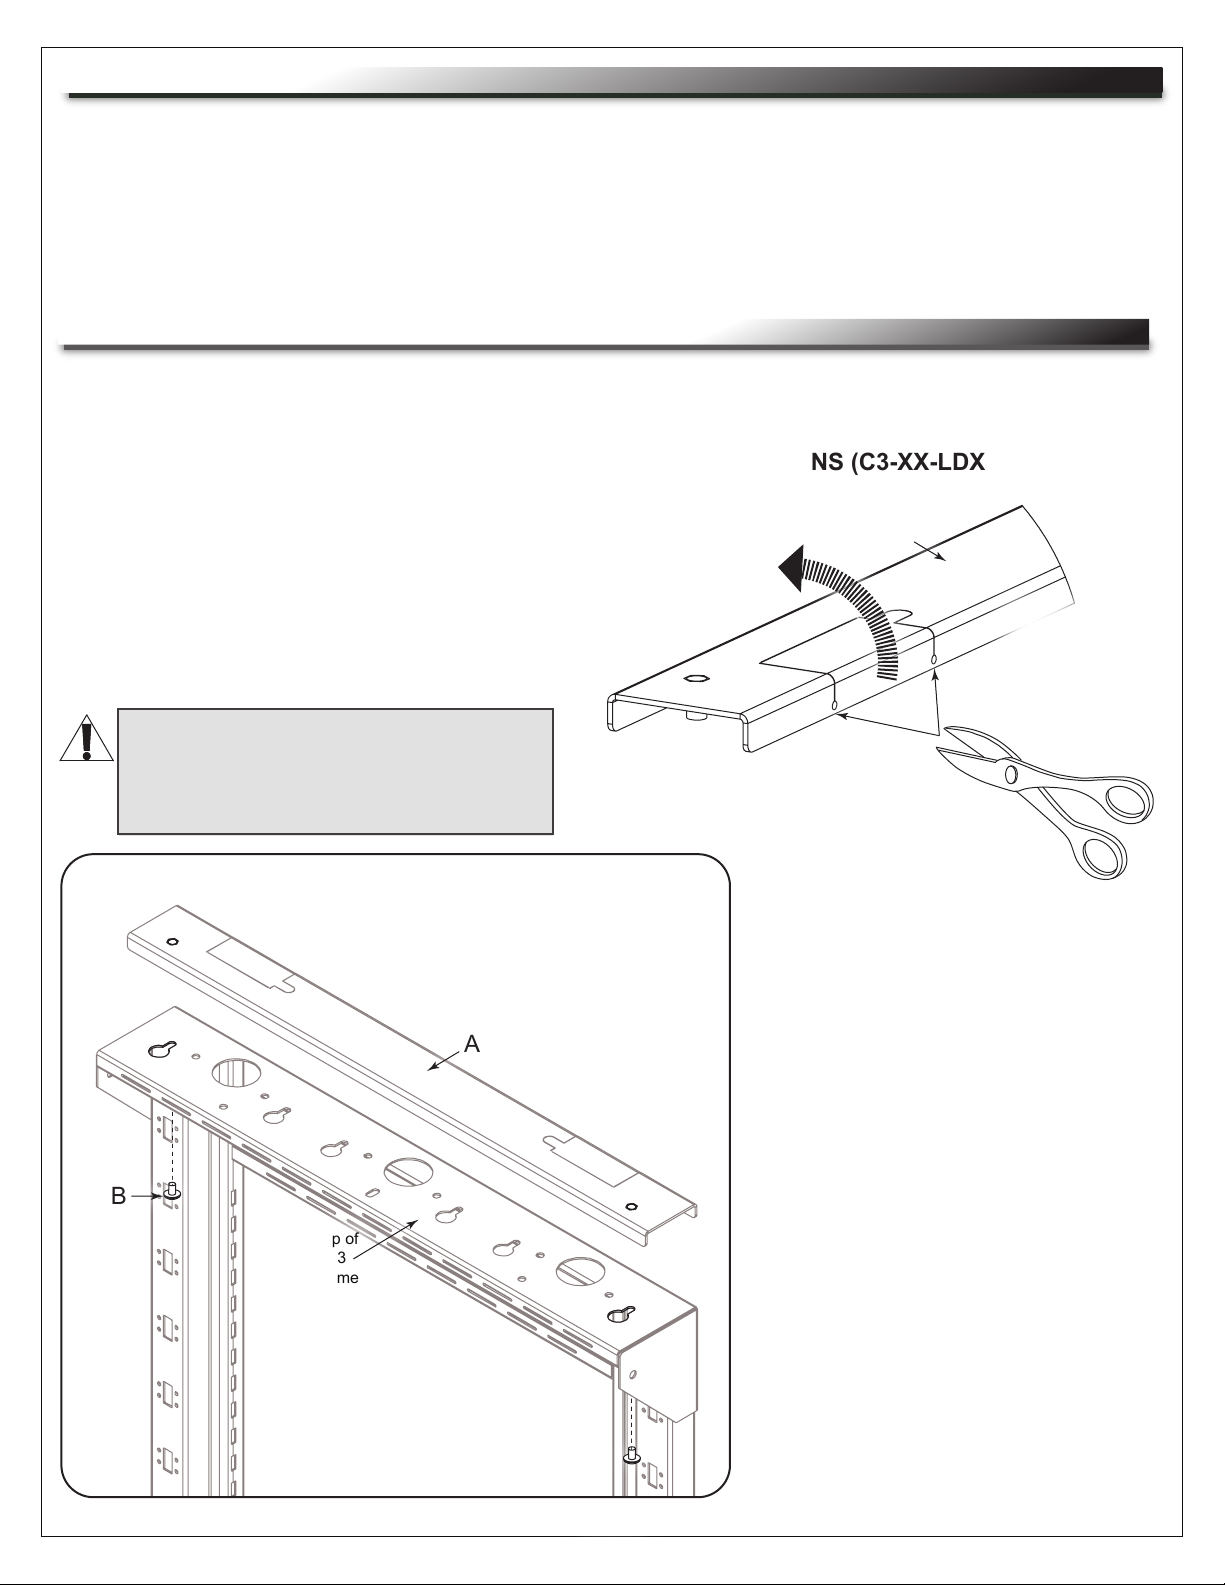
AVERTISSEMENT: Le dépassement des poids nominaux spécifiés à la page 4 de la Fiche d'instructions du cadre C3 Credenza
(100-00032) peut entraîner des blessures graves ou des dommages à l'équipement. Il est de la responsabilité de l'installateur/utili-
sateur de s'assurer que les composants installés ne dépassent pas les poids nominaux, car une situation instable peut se produire
et entraîner des blessures ou des dommages.
AVERTISSEMENT: Les produits Middle Atlantic, les systèmes électriques sont conformes et doivent être correctement mis à la
terre conformément aux exigences du Code national de l'électricité en vigueur ou aux codes administrés par les autorités locales.
Tous les produits électriques peuvent présenter un risque d'électrocution ou d'incendie s'ils sont mal installés ou utilisés. Les
produits électriques peuvent porter la marque d'un laboratoire d'essais reconnu au niveau national (NRTL) et doivent être installés
conformément au code électrique local et/ou national en vigueur.
ATTENTION: S'il ya des dommages visibles sur le produit, il ne doit pas être installé.
ATTENTION: Des mesures de sécurité doivent être mises en œuvre en tout temps lors de l'assemblage de ce produit. Utiliser un
équipement et des outils de sécurité appropriés pour la procédures de afin d'éviter les blessures.
ATTENTION: Notez que pendant la construction, il ne doit pas y avoir de risque de blessure, comme par exemple le écraser des
doigts ou des bras.
ATTENTION: Pour le chargement, placez toujours des articles plus lourds au bas des baies, pas près du sommet, afin d'éviter la
possibilité de basculement de l'ameublement.
ATTENTION: L'appareil n'est pas destiné à être utilisé par des enfants en bas âge ou des personnes infirmes sans surveillance.
AVERTISSEMENT: Refus de lire, comprendre et suivre la renseignements suivants peut traduire par de graves blessures, des
dommages à l'équipement ou invalider la garantie. Il est la responsabilité de l'installateur/utilisateur de s'assurer que ce produit
est chargé conformément aux spécifications.
Consignes de sécurité: montage en rack
Température de fonctionnement élevée: Si installé dans un rack fermé ou à unités multiples , la température ambiante de fonctionnement de
l'environnement du rack peut être supérieure à ambiante de la pièce. Par conséquent, il faudrait envisager d'installer l'équipement dans un environne-
ment compatible avec la température ambiante maximale (Tma) spécifiée par le constructeur.
Réduction Air accréditives: Installation de l'équipement dans un rack doit être telle que la quantité de flux d'air nécessaire au bon fonctionnement de
l'équipement ne soit pas compromise.
Chargement mécanique: Le montage de l'équipement dans le rack doit être telle qu'une condition dangereuse ne lié à un chargement mécanique
irrégulier.
Surcharge des circuits: Il faudrait envisager à la connexion de l'équipement au circuit d'alimentation et l' effet que la surcharge du circuit pourrait avoir
sur la protection contre les surintensités et le câblage d'alimentation. Examen approprié des équipements évaluations de la plaque signalétique doit être
utilisée pour traiter de cette préoccupation.
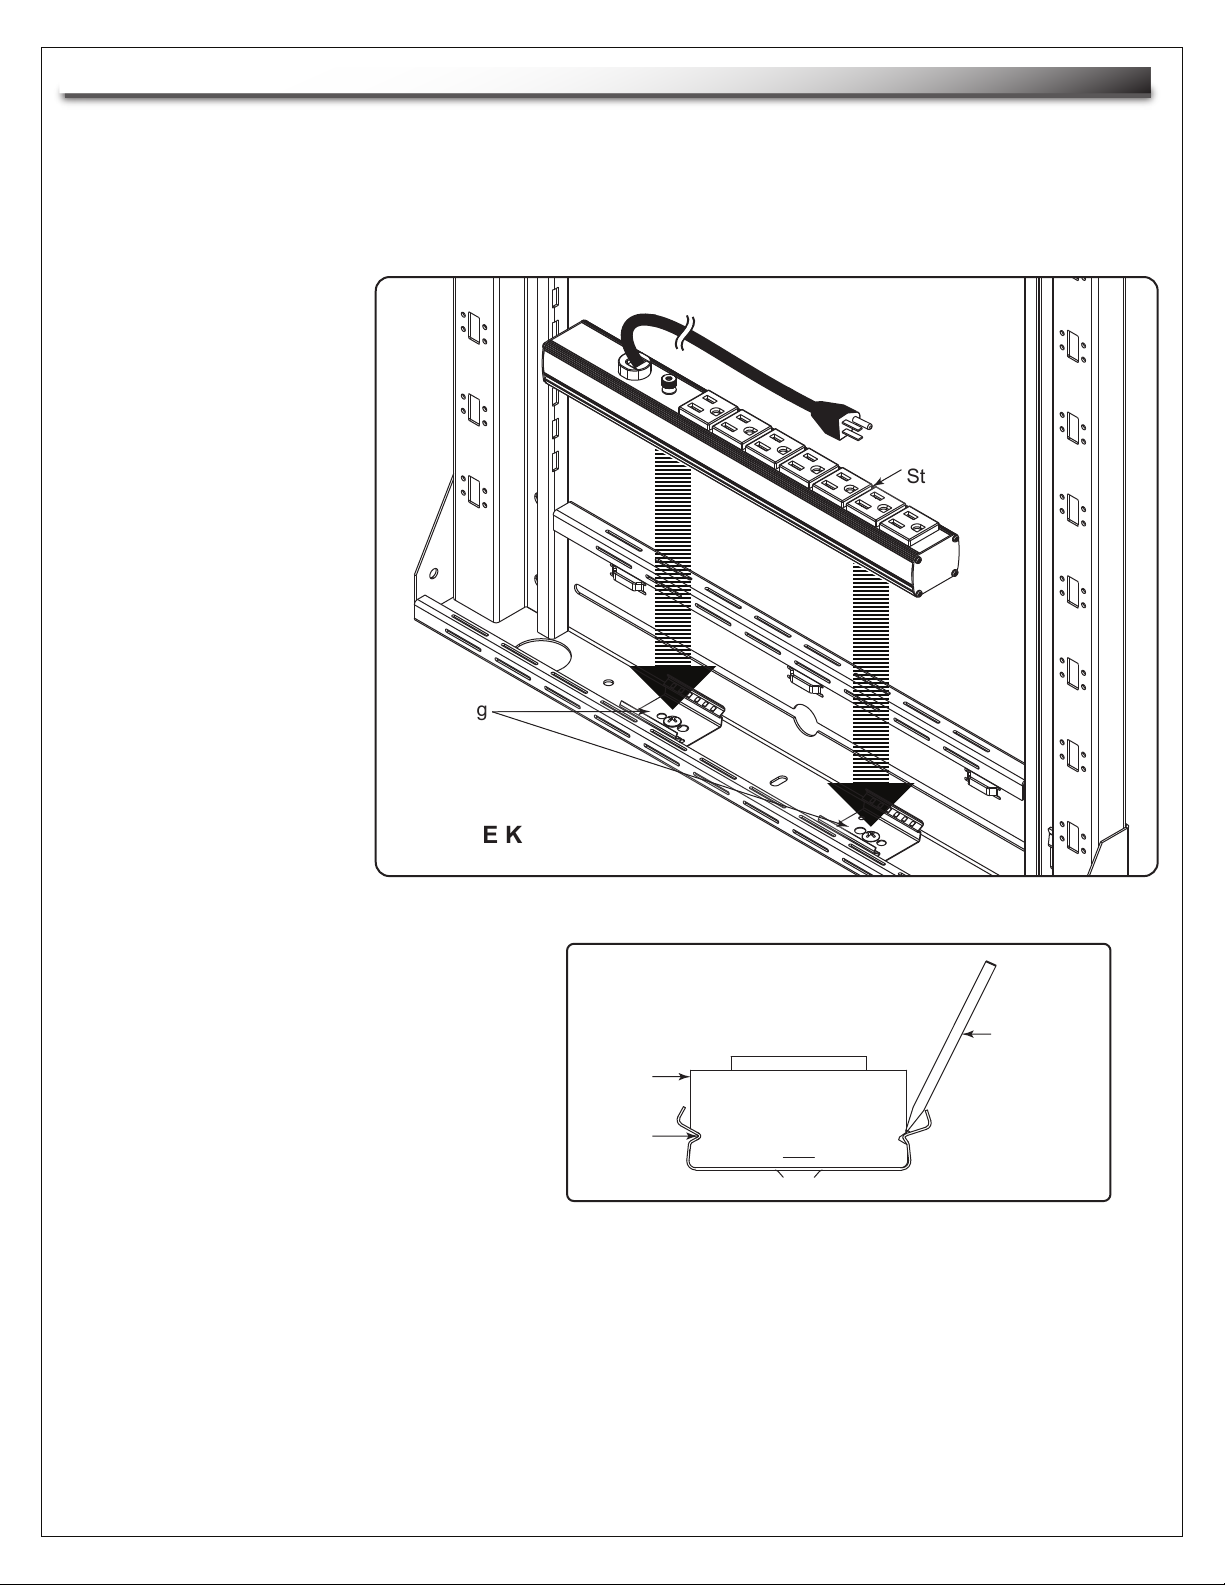
Mise à la terre fiable: Fiable mise à la terre de l'équipement de montage en rack doit être maintenue. Une attention particulière devrait être accordée
aux connexions d'alimentation autres que les connexions directes vers le circuit de dérivation (par exemple de l'utilisation de bandes de puissance).
Appareil Disconnect (Équipement Pluggable): La prise de courant doit être installée à proximité du matériel et doit être facilement accessible.
Page 3

SUPPLIED COMPONENTS AND HARDWARE
REQUIRED TOOLS
• Power Driver
• #2 Phillips Bit
• Tin Snips or Cutting Pliers
• File
• Protective Eyewear
• Level
• #2 Phillips Screwdriver
• Rubber Mallet
WARNING: Use tools with caution and follow all necessary safety protocols.
AVERTISSEMENT: Utiliser des outils avec prudence et suivre tous les protocoles de sécurité
nécessaires.
Pre-Assembled WoodKit
(Includes Doors)
C
NOTE: The 1-, 2-, 3-, and 4-bay C3 woodkits are shown in 32”
(813 mm) frame height.
NOTE:
• To order more hardware, contact support at
1-800-266-7225.
• Additional hardware is included that may not
be required for your installation.
INTRODUCTION
• After unpacking and inspecting your woodkit, put the wood back inside the box for added protection
until required for specific assembly steps.
• Instruction sheets may also be accessed at www.middleatlantic.com.
NOTE: Only use this instruction sheet to install your C3 Series WoodKit after completing the following:
1. Refer to the C3 Series Credenza Frame instruction sheet (100-00032) and secure the frame to your
wall.
2. Refer to the following instruction sheets to install the C3 Series options you may have purchased for
your credenza.
○ C3 Series Display Mount Option (C3-XX-LDXU) Instruction Sheet (100-00034)
○ C3 Series Slide-Out Rack Option (C3-TECHKIT4-SO) Instruction Sheet (100-00036)
○ C3 Series Fixed Rack Option (C3-TECHKIT4-ST) Instruction Sheet (100-00037)
○ C3 Series Shelf Option (C3-SHELFKIT) Instruction Sheet (100-00038)
Page 4
1-Bay
2-Bay
Model Qty.
2
4
3-Bay 6
4-Bay 8
10-32 x ¾” Truss
Screw With
Washer
D(2x) Grommet
F
NOTE: Grommets are
provided for any
custom cable
management holes
you may want to make
in your woodkit.
#10 x ⅝” Wood Screw
E
1-Bay
2-Bay
Model Qty.
4
8
3-Bay 12
4-Bay 16
NOTE: Cover for dual and single displays shown.
Horizontal
Cover
A
(3x)
10-32 x ⅜” Pan
Head Screws
B

INTRODUCTION (CONTINUED)
NOTE: If your installation includes a purchased fan kit and/or a large cover option (for your display
option), after installing the other options you may have purchased for your credenza and then installing
this woodkit, refer to the C3 Series Fan Kit (C3-FANKIT) instruction sheet (100-00039) and/or C3 Series
Display Mount Large Cover Option instruction sheet (100-00035) to install your fan kit and/or your large
cover option, respectively. Kits and options other than the fan kit and large cover option should be
installed before your woodkit is attached to the frame.
ATTACHING THE HORIZONTAL COVER TO THE FRAME
NOTE: If your installation does not include a C3 Series Display Mount Option (C3-XX-LDXU), proceed to
step 3 below.
INSTALLATIONS INCLUDING C3 SERIES DISPLAY MOUNT OPTIONS (C3-XX-LDXU) ONLY:
1. Use tin snips or cutting pliers to cut along bottom edges of
knockouts on the horizontal cover (A) to accommodate your
corresponding uprights as shown. (FIGURE A)
2. Carefully bend each knockout until they break
off the cover.
3. Place the horizontal cover (A) on
the top of the frame and use a
power driver, #2 Phillips bit, and
(2x) 10-32 x ⅜” pan head screws
(B) to attach the cover to the top of
your frame as shown. (FIGURE B)
NOTE:
• Horizontal cover for single display
on a 1-bay C3 model shown.
• Corresponding hardware and
openings are in black for clarity.
• Attachment locations vary slightly
on C3 models with more bays.
• Horizontal covers for dual display
installations (3- and 4-bay C3
models only) vary slightly as well.
Page 5
CAUTION: File down any rough edges
after cutting.
ATTENTION: Limez les bords rugueux
après la coupe.
FIGURE A
Cut along
bottom edges
of knockouts
and carefully
bend until they
break off.
A
FIGURE B
A
B
Top of
C3
Frame

Page 6
TIP: If the door does not come off the hinges easily,
make sure both top and bottom hinge levers are fully
pressed. Then, gently push the outside of the door
slightly past the open position. This forces the inside
of the door inward and should release the hinges.
(FIGURE D)
3. Carefully set aside removed door(s).
REMOVING PRE-INSTALLED DOOR(S) FROM YOUR WOODKIT
NOTE:
• For ease of woodkit (C) installation, we recommend removing the doors first as shown in this procedure.
• When removing doors from a 3- or 4-bay model, keep track of which bay each door came from for easy
reinstallation.
1. Carefully remove your woodkit (C) from the packaging and place in an upright position on floor or
stable platform.
NOTE: Generic hinge shown. Inset, partial, and full overlay hinges all release the same way.
2. Remove the pre-installed door(s) from the woodkit by opening the door, pressing the levers on
the hinges, and carefully pulling inward as shown. (FIGURE C)
Press this lever on both
hinges to release door.
FIGURE C
FIGURE D
With both hinge levers pressed, gently push the
outside of the door slightly past the open position.
C
C

ATTACHING THE WOODKIT TO THE FRAME
1. Team lift the woodkit (C, oriented as shown with the fan opening(s) on the bottom) and carefully
attach it over your frame. (FIGURE E)
NOTE:
• Be careful not to pinch any cables while securing the woodkit to the frame.
• Adjust torque on power driver to lightest setting and only increase as necessary.
• You may have to temporarily remove any installed rack options and shelves when attaching the woodkit
to the frame.
2. While holding your woodkit in place on the frame, use a power driver, #2 Phillips bit, and
10-32 x ¾” truss screws (D) to loosely attach the top of your frame to the top of the woodkit in each
bay. Leave the screws just a bit loose for any minor woodkit depth adjustments on the frame.
3. Repeat the previous step and loosely attach the bottom of your frame to the bottom of your woodkit
in each bay.
NOTE:
• The following figure shows upward and downward views loosely attaching a 1-bay woodkit to its frame.
• Corresponding hardware and openings are in black for clarity.
FIGURE E
NOTE: Slots on the frame allow for
minor woodkit depth adjustments
Page 7
C
D
D
Upward view of 1-bay woodkit onto frame.
Downward view of 1-bay woodkit onto frame.

Page 8
4. After making slight woodkit depth adjustments on the frame, use power driver to fully tighten the top
and bottom 10-32 x ¾” truss screws (D). Do not overtighten. (FIGURE F)
5. Use power driver and #10 x ⅝” wood screws (E) to secure the secure the woodkit to the frame top and
bottom more permanently. Do not overtighten.
NOTE:
• The following figure shows upward and downward views securing a 1-bay woodkit to its frame.
• Corresponding hardware and openings are in black for clarity.
ATTACHING THE WOODKIT TO THE FRAME (CONTINUED)
FIGURE F
REINSTALLING THE DOOR(S)
NOTE: Generic hinges shown. Inset, partial, and full
overlay hinges all attach in a similar manner.
1. Reinstall the door(s) to the woodkit by carefully
hooking together the front sections of the hinge
hardware (top hinge pictured) as shown.
(FIGURE G)
FIGURE G
Woodkit Side Panel
Door
NOTE: Hinge, door, and woodkit side panel
isolated for clarity.
C
E
E
Upward view of 1-bay woodkit onto frame.
Downward view of 1-bay woodkit onto frame.

Page 9
REINSTALLING THE DOOR(S)
(CONTINUED)
2. Press the outer section of the hinge hardware into the hinge plate until it clicks into place.
(FIGURE H)
FIGURE H
Press outer section of hinge into the plate
until it clicks into place.
Hinge
Hinge
Plate
ADJUSTING THE DOOR(S)
NOTE: Generic hinges shown. Inset, partial, and full overlay hinges all have adjustment screws in
similar locations and make the same movements.
• If necessary, use a #2 Phillips screwdriver to adjust door hinges as shown. (FIGURE J)
FIGURE J
Side Adjustment Depth AdjustmentHeight Adjustment

Page 10
1. Carefully push your
power strip into the
power mounting clips
until it snaps into place
as shown. (FIGURE K)
2. Use a rubber mallet and
gently tap your power
strip into the power
mounting clips, if
needed.
TIP: Remove the power strip from the
power mounting clips by wedging a flat
head screwdriver between the side of
the power strip and mounting clip, and
gently pry them from each other as
shown. (FIGURE L)
INSTALLING POWER STRIP INTO MOUNTING CLIPS (SLIDE-OUT AND FIXED RACK OPTIONS ONLY)
NOTE: The power strip mounting clips and the slide-out rack or fixed rack options are installed before the
woodkit, while the actual power strip is installed into the clips after the woodkit is attached to the frame.
For more information, refer to the C3 Series Slide-Out Rack Option instruction sheet (100-00036) or C3
Series Fixed Rack Option instruction sheet (100-00037).
NOTE: Top view of power strip,
clip, and enclosure trim shown.
FIGURE L
Power
Strip
Flat Head
Screwdriver Tip
Power
Mounting
Clip
FIGURE K
Power
Mounting
Clips
Power
Strip

WARRANTY
For warranty information, refer to http://www.middleatlantic.com/company/about-us.aspx#warranty
Corporate Headquarters
Voice: 973-839-1011 - Fax: 973-839-1976 - International Voice: +1 973-839-8821 -
Middle Atlantic Canada
Voice: 613-836-2501 - Fax: 613-836-2690 - ca.middleatlantic.com -
Middle Atlantic EMEA Technical Support
Factory Distribution
United States: New Jersey, California, Illinois - Canada: Ontario - The Netherlands: Weert
At Middle Atlantic Products we are always listening. Your comments are welcome.
Middle Atlantic Products is an ISO 9001 and ISO 14001 Registered Company.
UNDERSTANDING NEXT STEPS
If your installation includes a purchased fan kit and/or a large cover option (for your purchased display
option), refer to the C3 Series Fan Kit (C3-FANKIT) instruction sheet (100-00039) and/or C3 Series
Display Mount Large Cover Option instruction sheet (100-00035) to install your fan kit and/or your large
cover option, respectively.
NOTE: Attaching your display(s) (display(s) not included) to the horizontal extrusion of the display
mount option (C3-XX-LDXU, if purchased) must be done as the final part of your C3 installation
process.
For more information, refer to "Attaching Your Display to the Horizontal Extrusion" on page 11 of the
C3 Series Display Mount Option (C3-XX-LDXU) Instruction Sheet (100-00034).
Page 11

Other manuals for WoodKit C3 Series
4
This manual suits for next models
4
Table of contents
Popular Indoor Furnishing manuals by other brands

Coopers of Stortford
Coopers of Stortford G842 Instructions for use

GFW
GFW MARIANNE TV UNIT Assembly instructions

Kohl's
Kohl's THE BIG ONE ROCKING DISH CHAIR Assembly instructions

Songmics
Songmics RYG02 Assembly instructions

real living
real living OAKMONT GBO19-002 Assembly instruction

Displays2go
Displays2go DP031NVB user manual