miDent TRUESONIC User manual

Inteligentní ultrazvukový
domácí čistič zubů s
TRUESONIC
Uživatelská příručka
Product introduction
Děkujeme za výběr a důvěru

Představení produktu
Zdraví začíná u zubů. Děkujeme, že jste si vybrali náš inteligentní ultrazvukový čistič
zubů Truesonic. Je speciálně navržen pro domácí použití. Truesonic má stabilní
výkon s řadou funkcí. Účinně odstraňuje zubn� plak, zubn� kámen, skvrny ze zubů a
odstraněn�m tvrdého zubn�ho kamene předcház� onemocněn� dásn�. Tento
multifunkčn� odstraňovač zubn�ho plaku využ�vá pokročilé vibrace k odstraněn�
zubn�ho kamene a pigmentace z vašich zubů. Obsluha je jednoduchá, pohodlná,
rychlá a efektivní.
Důležité bezpečnostní pokyny
•Před použit�m výrobku si pečlivě přečtěte tento návod A UCHOVEJTE JEJ PRO
BUDOUCÍ POUŽITÍ.
•Při použit� vždy přiložte špičku na povrch zubu. Vyvarujte se zbytečného
kontaktu špičky s měkkými tkáněmi, jako jsou dásně, sliznice nebo kůže.
•Vibrace ucítíte až při kontaktu se zubem. Při kontaktu s dásní se čistič
automaticky vypne.
•Špička se během čištěn� nesm� dotýkat keramické protézy, plomby ani jakékoliv
výplně zubu. Mohlo by doj�t k poškozen� špičky. Nepoužívejte přístroj jinou
metodou, než je popsána v tomto návodu.
•Kovová hlavice čističe zubů je vyměnitelná.
•Udržujte čistič zubů v dostatečné vzdálenosti od oč�.
•V případě poruchy, prosím přestaňte používat.
•Tento výrobek není hračka. Nenechte ho používat své děti.
•Zakázáno pacientům s kardiostimulátorem.
•Pacienti s onemocněním srdce, těhotné ženy a děti by měli být opatrní.
•Nevystavujte výrobek přímému slunečnímu záření, měl by být skladován
v 10° až 40°C ve vnitřním prostředí.
•Výrobek sami nerozebírejte.
•Nepouž�vejte výrobek během nab�jen�.
•V případě problémů s kvalitou produktu kontaktujte zákaznický servis obchodu,
kde jste tento produkt zakoupili.
01

Princip fungování produktu
Tento čistič pracuje na principu, který převád� elektrickou energii na energii
ultrazvukových vibrac�. Stisknut�m tlač�tka napájen� zapněte zař�zen�, upravte výkon
pomoc� tlačítek režimů a začněte čistit požadovaná m�sta na zubech. Vysoké
vibrace slouží k rozdrcení zubního kamene, odstranění odolných zubních skvrn a
uvolněného zubního kamene.
Záležitosti vyžadující pozornost
1. Pokud máte onemocnění parodontu, poraďte se před použitím se svým zubním
lékařem.
2. Může dojít ke krvácení i v případě zdravé dásně.
3. Pokud krvácení z dásní přetrvává, což může být způsobeno defekty dásní, jako
je periodontální onemocnění, přerušte používání a poraďte se se svým zubním
lékařem.
4. V procesu čištění zubů nezůstávejte pracovním hrotem dlouho na povrchu
zubů.
5. Po spuštění přístroje není slyšet žádný zvuk hrotu. Zvuk ultrazvuku uslyšíte až
při kontaktu se zubem.
6. Nenamáčejte do vody nebo kapaliny.
7. Před a po použití udržujte stroj čistý.
8. Pracovní hrot musí být při použití utažen.
9. Neohýbejte ani neobrušujte pracovní hrot.
10. Neklepejte ani neškrábejte do rukojeti.
11. Po použití stroj osušte a uchovávejte jej v suchém a chladném prostředí.
12. Během používání zařízení netahejte za napájecí kabel, aby nedošlo k oddělení
rukojeti od stroje.
02

Čištění a údržba
Popis produktu
03
1. Nevkládejte ani nepouštějte výrobek do jiných kapalin ani do nich.
2. Se zařízením je třeba zacházet opatrně a skladovat jej na suchém
místě.
3. Nemíchejte s toxickými, žíravými, hořlavými a výbušnými materiály.
4. Po každém čištění si důkladně vypláchněte ústa.
5. Umyjte kovovou hlavici pod čistou tekouc� vodou.
6. Otřete tělo čističe zubů.
1. Čisticí kovová hlavice
2. Tlačítko ON/OFF
3. 3stupňový režim
4. Zobrazení stavu
nabíjení
5. Montážní nářadí

Používání
1. Před použitím se ujistěte, že je čistič plně nabitý. Úplné nabit� trvá přibližně 2
hodiny.
2. Pokud nab�j�te čistič zubů poprvé nebo jste jej delš� dobu nepouž�vali (déle než 3
měs�ce), může úplné nabit� vyžadovat v�ce času.
3. Vyberte vhodný hrot a nainstalujte jej ve směru hodinových ručiček.
NEPOUŽÍVEJTE silné otáčení, aby nedošlo k poškození.
4. Stiskněte tlačítko pro spuštění přístroje ON a zapněte režim SOFT pro normální
čištění. Rozsvítí se kontrolka režimu spuštění a LED světlo na předním konci
rukojeti, což znamená, že přístroj běží.
5. Strana konce špičky se um�st� na zub tak, aby byl pohyb špičky rovnoběžný s
povrchem zubu.
6. Těžko odstranitelný zubn� kámen však může vyžadovat vyšš� nastaven� výkonu v
režimu COMFORT a STRONG.
7. Ujistěte se, že během čištěn� udržujete kontakt špičky s povrchem zubu. Špičkou
stále pomalu pohybujte tam a zpět a nechte práci na př�stroji. Použ�vejte krátké a
dlouhé tahy, aby se celý povrch každého zubu vyčistil.
8. Nikdy nesetrvávejte na jednom místě déle než 5s, aby nedošlo k zahřátí
ošetřovaného místa.
9. Pozor: Při čištění zubů nevyvíjejte velkou sílu na jednom místě!
10. Přístroj je náchylný na poškození vnitřních a vnějších součástí způsobených
pádem či nesprávným zacházením.
11. Použ�vejte přístroj s navlhčenými ústy.
12. Pokud vám během použ�ván� ústa vyschnou, vypláchněte si je.
13. Při použit� na vnitřn� straně zubu použijte zubn� zrcátko.
14. Detekce nízkého napětí. Alarm bliká když je napětí baterie nižší než 3V.
15. Po použití dlouze stiskněte tlačítko OFF a vypněte napájení. Zařízení má
přednastavenou funkci automatického vypnutí po 10 minutách, aby se zabránilo
ochraně proti přehřátí.
04

05
Hroty
Hrot 1 je tenký, používá se k odstranění zubního kamene a mezizubní čištění.
Hrot 2 je širší, slouží k odstranění velkých zubních kamenů a pigmentace na zubech.
•Dezinfikujte pracovní hrot horkou vodou s vysokou teplotou před použitím.
•Abyste předešli křížové infekci, nesdílejte pracovní hrot s dalšími lidmi.
•Frekvence přístroje je různá, vyberte si prosím správný pracovní režim.
•Použijte pracovní hrot správně, jak je uvedeno výše.

06
Jak používat hroty
Pracovní hrot se jemně svisle dotýká zubů a pohybuje se nahoru a dolů, stejně
jako doleva a doprava. Upravte dobu používání každé části podle stavu zubů.
Nečistoty na povrchu zubů
Mezizubní mezery
Nečistoty na zadní straně zubů
Hranice mezi dásní a zubem
Nečistoty v nerovnostech zubů
Použijte ústní zrcátko, při
čištění zadní části zubů

07
Výměna pracovního hrotu
Potvrďte pozici A
Vložte klíč do polohy A
Otočte hlavu proti směru hodinových
ručiček pomocí klíče k oddělení pracov-
ního hrotu a dokončete demontáž.
Preventivní opatření
Vyvarujte se příliš těsnému utažení,
které by mohlo způsobit poškození.
Pokud je spojení uvolněné, vibrace nelze přenášet správně.
Použijte instalační klíč a ujistěte se, že pracovní hrot je
připojen pevně. K rozebrání nepoužívejte jiné nástroje. Můžete
způsobit poruchu nebo poškození.

08
Údržba
Nepoužívejte ředidla, benzen a rozpouštědla, chemikálie, nebo čisticí
prášky.
Tělo přístroje může být přímo omyté vodou a špínu
lze otřít pomocí hadříku.

Product introduction
Product features
How to use it safely
Health starts with teeth. Thank you for choosing our LED household intelligent ultra-
sonic household tooth cleaner. The LED lamp household intelligent ultrasonic house-
hold tooth cleaner is specially designed for family users. Through innovative design,
the complex structure of the original tooth cleaner is changed into an intelligent chip
integrated circuit, and the advanced intelligent frequency stabilization design con-
cept is adopted. It has stable performance and strong applicability, and can coop-
erate with a variety of functions. The whole process of tooth cleaning is completed
under the control of microprocessor, which ensures the stable output of power and
can effectively remove dental calculus, smoke stains, plaque and tea stains. The
operation is simple, convenient, fast and ecient.
1. This product is designed for family, simple, fast and ecient.
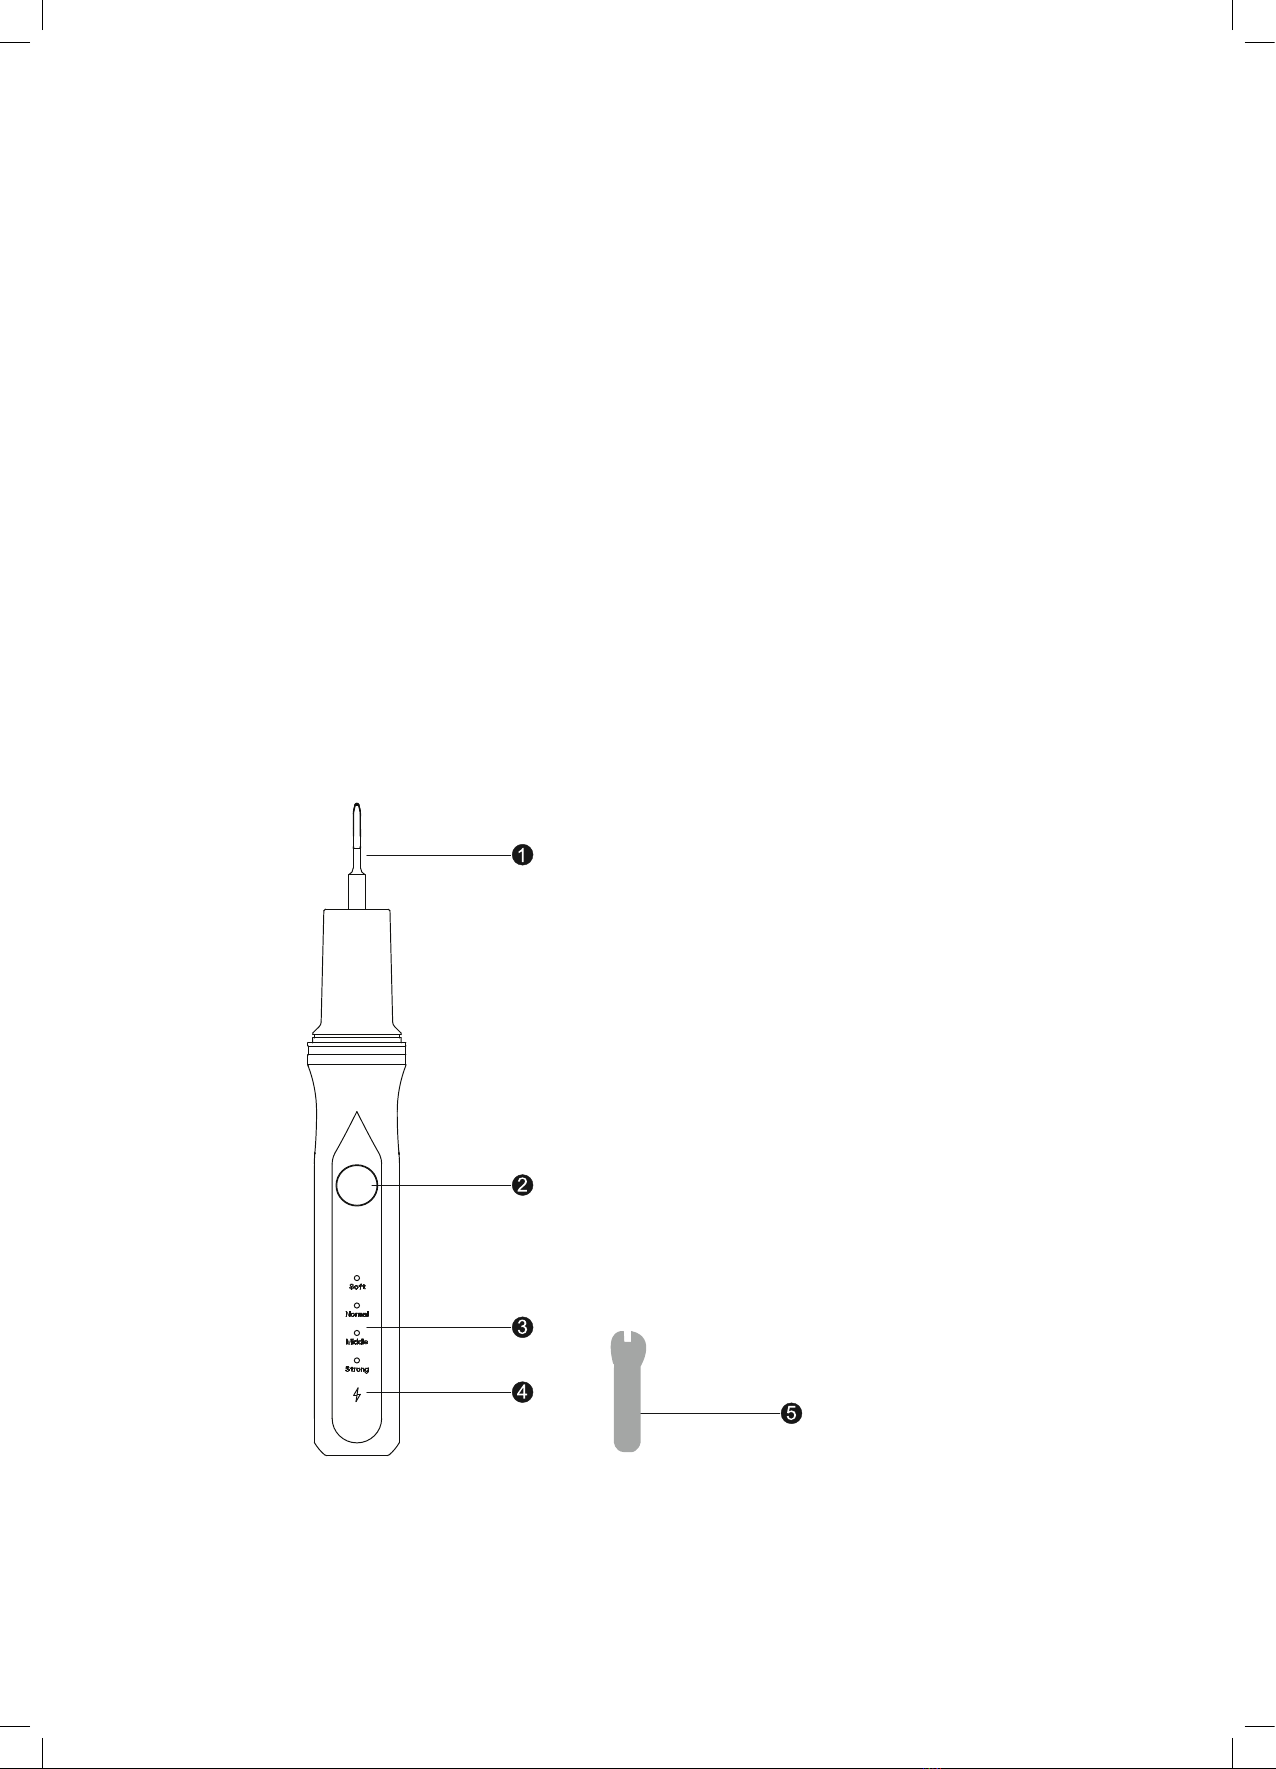
2. UHF vibration, gentle, comfortable, enhanced three mode adjustable.
3. 10 minutes automatic stop work protection design, stop work after the LED light
off.
4. Integrated design, head LED lighting, clear observation of oral conditions.
5. The ultrasonic transducer is made of aviation titanium alloy.
•If you use any improper method that is not described in this instruction manual or
is not used correctly, please stop using it. In case of failure, please stop using.
•This product is not a toy. Please don’t let your child use it directly.
•It is forbidden for patients with pacemaker.
•Patients with heart disease, pregnant women and children should be cautious.
•Please do not put the product in direct sunlight, it should be stored in 10° to 40°C
indoor environment.
•Please don’t disassemble, transform or bend this product by yourself.
•In case of product quality problems, please contact the customer service of the
store where you purchased this product.
09

Product principle
Matters needing attention
The high-frequency electric pulse wave is generated by the electronic oscillation
circuit, amplied to a certain intensity, and transmitted to the transducer, which con-
verts the electric energy into mechanical energy, and stimulates the working tip to
produce the same frequency vibration, so as to achieve the purpose of crushing the
dental calculus and sweeping away the stubborn dental stains and loose tartar. The
ion is produced by the ion generator, and the ion is produced by holding the ion con-
necting ring. The negative ions are transmitted to the teeth, and the tooth stains are
loose and separated from the teeth by using the principle of negative ion exclusion.
1. When the ultrasonic working tip touches the teeth, it makes a beeping sound,
which is the normal working state.
2. If you have periodontal disease, consult your dentist before use.
3. If it is on the boundary of the gingiva, gingival bleeding may occur even in the
case of healthy gingiva.
4. If gum bleeding persists, which may be due to gum defects such as periodontal
disease, discontinue use and consult your dentist.
5. In the process of tooth washing, do not stay on the surface of teeth for a long
time with the working tip. To remove the calculus and stains of stubborn teeth,
please use the working tip to remove them.
6. When working without water, do not touch the gums for a long time.
Long time contact with the gums may bum the gums.
7. After the machine is started, there is no peak sound at the working point.
If there is a peak sound, it is a normal phenomenon, you can re install the working
tip or tighten the working tip.
8. Even if it is not used directly with the front end of the head, a weak current will be
felt due to the ion output when treating the area near the parts with tooth decay,
gold crown or silver crown. In this case, please do not touch the ion connection
ring, only use the ultrasonic output for treatment, and the ion output will not be
transmitted to the teeth.
10

Cleaning and maintenance
Matters needing attention
Popis produktu
11
1. Do not put or drop the product into or into other liquids.
2. The equipment should be handled with care and stored in a dry place.
3. Do not mix with toxic, corrosive, ammable and explosive materials.
1. Do not soak in water or liquid.
2. Keep the machine clean before and after use.
3. The working tip must be tightened when using.
4. Power on for the rst time to use, rst run for 2 ~ 3 seconds, stop for 1 second,
such operation several times, easy to work head in the best state.
5. Do not bend or grind the work tip.
6. Do not knock or scrape the handle.
7. Please dry the machine after use and keep it in a dry and cool environment.
8. Do not pull the power cord during the use of the equipment, so as not to cause
the handle to separate from the machine.
1. Tooth cleaning head
2. Switch button
3. 5-gear experience mode
4. Electric quantity display
5. Assembly tools

How to operate
1. Make sure the cleaner is fully charged before use.
2. Press the on key to start the machine, tum on the light and enter the soft gear.
At the same time, turn on the negative ion and ultrasonic mode. Press the on key
again, the negative ion remains unchanged,and the ultrasonic enters the comfort
gear. And so on, there are three gears in total. It is suggested to start from the low
gear and gradually increase the gear after adaptation.
1. Soft
2. comfort
3. strong
3. Select a suitable working point and install it clockwise on the main engine with
a small wrench. DO not use strong rotation, so as not to damage the interface.
First, open the appropriate gear and vibrate the tooth stone with the metal head.
Then, when operating on the tooth stone, scrape it with a Ittle strength and try
more times. Because the tooth stone is stubborn, a ittle more patience will make
it easier to master the method.
4. Press C on and off, the mode light shines, and the LED light at the front end of the
handle lights up, indicating that the machine is running.
5. When the machine works normally, the vibration frequency is very fast. When
cleaning teeth, it only needs light contact and repeated movement at a certain
speed to clear teeth stones.
Caution: DO not apply partial force or stay too long when cleaning teeth!
6. When of, please press the on key, and unplug the power plug after the LED light is
off.
7. The machine is a precision equipment. Please avoid damage to internal and ex-
ternal components caused by ling, touching and dropping.
8. Brush head is to clean the teeth after calculus, can not be used as an electric
toothbrush.
9. Low voltage detection, when the battery voltage is lower than 3V, ash light
alarm.
After use, long press the open key, the power off, the equipment preset 10 min-
utes automatic shutdown function, to prevent overheating protection.
10.
12

13
Introduction to work tips
Tip 1 is thin, used to remove calculus and tooth smoke stains on gingiva.
Tip 2 is wider, used to remove large stones and smoke stains on the neck and lingual
side of the supragingival teeth.
•Please steam, soak in alcohol and disinfect the working tip by high temperature
and high pressure before use.
•In order to prevent cross infection, do not share the work tip with many people.
•The machine frequency is different, please choose the right working point.
•Please use the work tip correctly as shown above.

14
How to use work tips
The work tip gently touches the teeth vertically and moves to the top and bottom as
well as left and right. Please adjust the use time of each part according to the condi-
tion of teeth.
Tooth surface dirt
Interdental gap
Dirt on the back of teeth
Boundary between gum and
tooth
Dirt from uneven teeth
Please use mouth glasses
when treating the back of teeth
Please do not use the surface of the work tip without tooth dirt.

15
How to change the work tip
The orientetion of the work tip may be diferent but as long as it is tirmly mounted on
it, it can be used in any direction.
Con rm position A
Insert the wrench in position A
Rotate the head counter clockwise with
a wrench to separate the working tip
and complete the disassembly.
Preventive measure
Avoid over tight assembly, resulting in
damage to the interface.
If the connection is loose, the output cannot be transmitted cor-
rectly, so make sure the work tip is tightly connected and use
the wrench kit for the work tip installation. Please do not use
other tools to disassemble the sample plate, which may cause
failure or damage.

16
How to maintain
Please do not use diluents, benzene and solvents, chemicals, scrubbing
powder.
The main body can be directly washed with water,
and the dirt on the main body can be wiped with a
rag.

Table of contents
Languages: