MIGEL GAF 140 User manual


1
GAF 140
•
•
•
•
•
•
•
•
•
•
•
•
•
•

2
•
•
•
•
•
•
•
•
•
•

3
•
•
•
•
•
•
•
•
•
•
•
•
4
9
1
4
11
10
3
5
6
7
8
2

5
•
6
˚C˚C
Power
Heating

7
""
o

8
o

9

10
˚C

11
•
•
•

12
•
""
•
•
•
•
˚C
˚C•
13
)WEEE(

Location
Mains Cable
Personal Safety
GAF 140
Before usng ths oven, please read ths nstructon manual
completely.
English
Specications
1
•This appliance is intended for domestic use only. It should NOT be used for
commercial purposes. Such use may damage the product and will invalidate
your warranty.
•Always locate your appliance away from the edge of a worktop.
•Ensure that the appliance is used on a rm, at, heat resistant surface.
•Do not use the appliance outdoors, or near water.
•The mains cable should reach from the socket to the base unit without
straining the connections.
•Do not let the mains cable hang over the edge of a worktop where a child
could reach it.
•Do not let the cable run across an open space e.g. between a low socket
and table.
•Do not let the cable run across a cooker or toaster or other hot or sharp
areas which may damage the cable.
•If the supply cable is damaged, DO NOT USE THE APPLIANCE. The cable
must be replaced by a suitably qualied person with a special cable assembly
available from the manufacturer or its service agent.
•WARNING: To protect against re, electric shock and personal injury, do
not immerse the cord, plug and / or appliance in water or any other liquid.
•The use of accessory attachments not recommended by the manufacturer
may cause damage to the unit and a risk of personal Injury. It will also
invalidate your warranty.
•WARNING: This appliance contains no user-serviceable parts. All repairs
must only be carried out by a qualied engineer. Improper repairs may place
the user at risk of harm.
•WARNING: Do not use the appliance after a malfunction or if it has been
dropped or damaged in any way.
•WARNING: Do not use the appliance for any purpose other than its
intended use.
Input Power: 1400W
Pot Capacity: 4.8L
Basket Capacity: 3.5L
Voltage: 220-240V
Frequency: 50/60Hz

2
Children
Safety Considerations Specically for this Product
•Never allow a child to operate this appliance.
•Children are vulnerable in the kitchen, particularly when unsupervised and
if appliances are being used or cooking is being carried out.
•Teach children to be aware of dangers in the kitchen, warn them of the
dangers of reaching up to areas where the child cannot see properly or
should not be reaching.
•This appliance is not intended for use by persons )including children(
with reduced physical, sensory or mental capabilities, or lack of experience
and knowledge, unless they have been given supervision or instruction
concerning use of the appliance by a person responsible for their safety.
•Children should be supervised to ensure that they do not play with the
appliance.
•IMPORTANT: When operating this Air Fryer , keep at least four inches )ten
centimetres( of free space on all sides of the oven to allow for adequate air
circulation.
•WARNING: DO NOT place your Air Fryer under cupboards, blinds or
curtains. Risk of overheating / re.
•To disconnect, turn o at the wall socket before removing the plug from
the mains outlet.
•Unplug from the outlet when not in use and before cleaning. Always hold
and pull the plug, never pull the cord.
•Allow the appliance to cool before putting on or taking off parts, and before cleaning
•WARNING: Do not cover any part of the Fryer with a cloth or similar, it will
cause overheating. Risk of re.
•Never leave the appliance unattended when operating.
•WARNING: This is an AIR FRYER . It requires very little oil to cook. Do not ll
the pot with oil or fat.
•WARNING: Extreme caution must be observed when moving an appliance
with hot contents.
•WARNING: Do not use the product with wet or moist hands.
•Only clean your Product after it has been disconnected from the Mains
Supply and allowed to fully cool down.
•This appliance is not intended for use by persons )including children(
with reduced physical, sensory or mental capabilities, or lack of experience
and knowledge, unless they have been given supervision or instruction
concerning the use of the appliance by a person responsible for their safety.
•Children shall not carry out maintenance or cleaning of this appliance.
3
•Do not use any accessories other than manufacturer recommended
accessories in this Air Fryer .
•Always wear protective, insulated oven gloves when inserting or removing
items from the hot Air Fryer .
•The appliance must be used on a level, stable heat-resistant surface.
•The temperature on the surface of this appliance is high during cooking
and for some time after it has been in use. Do not touch with bare hands.
•WARNING: Do not use this appliance in conjunction with an external timer
or remote control.
•The rst time you use your Air Fryer there may be a slight odour or a small
amount of smoke given o. This is normal and is just the manufacturing
residues burning o.
•Always place the ingredients to be fried in the basket to prevent it from
coming into contact with the heating elements.
•WARNING: DO NOT ll the pot with oil as this may cause a Fire hazard
•WARNING: This is a CLASS I Product and as such needs to be connected to
an EARTHED supply.
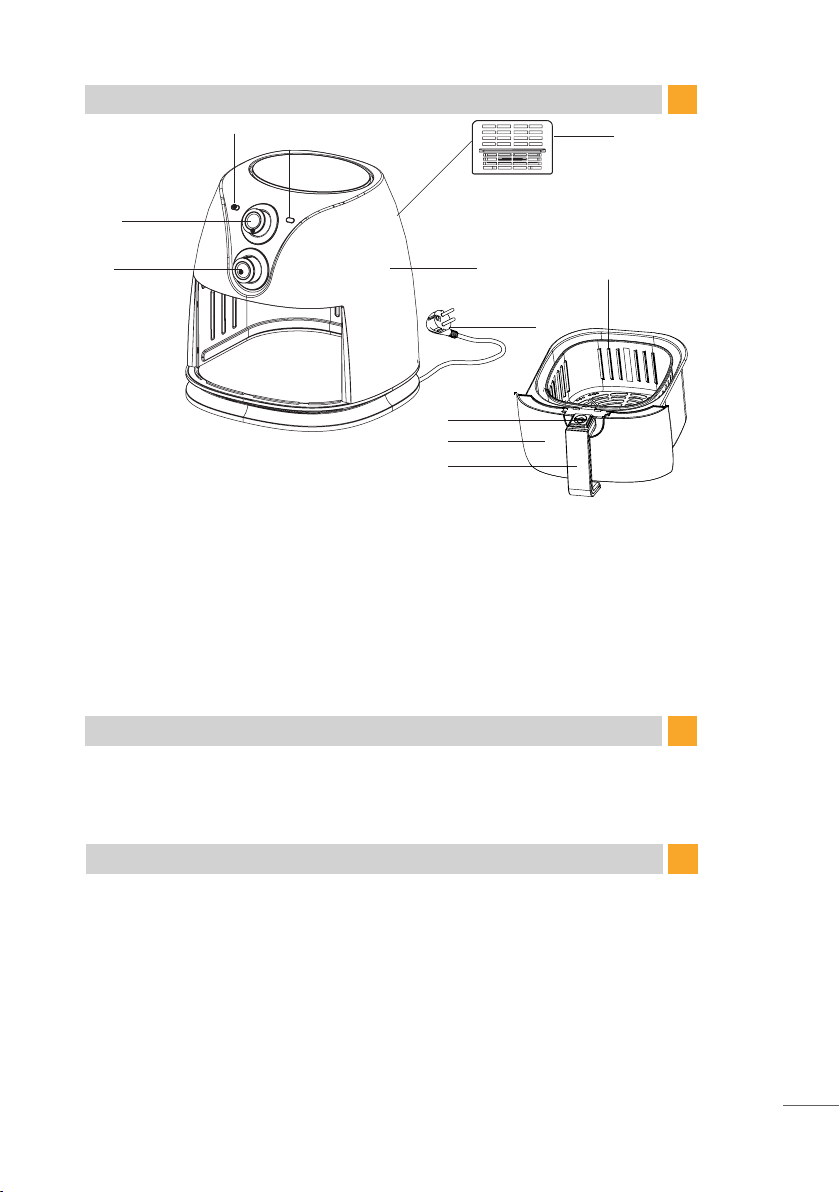
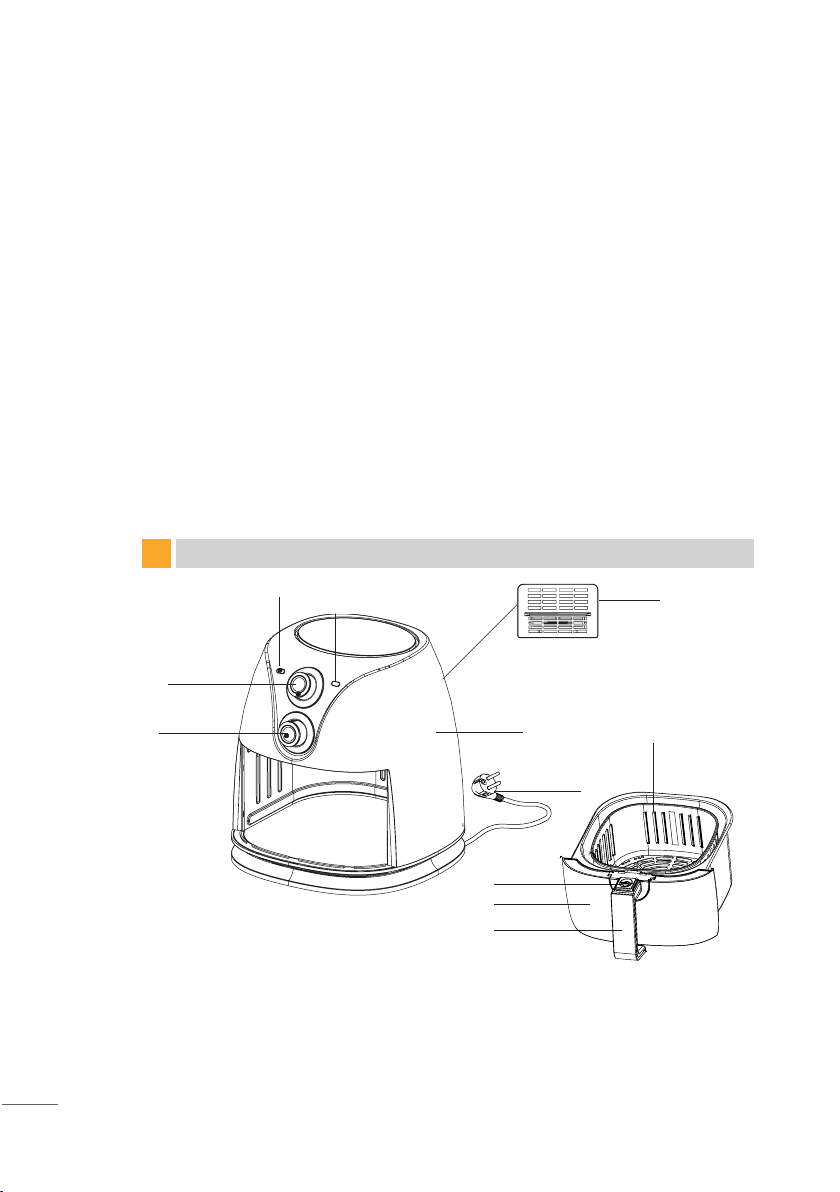
KEY PARTS
1. Power ON Indicator
2. Power and Timer Knob
3. Temperature Knob
4. Frying Basket
5. Basket Release Button & Cover
6. Cooking Pot
7. Cooking Pot Handle
8. Air Outlet
9. Heating ON Indicator
10. Main Body
11. Power Cord & Plug
9
1
4
11
10
3
5
6
7
8
2

4
Electrical Requirements
How to use your Air Fryer
Before rst use
Whenusingelectrical appliancesbasic safetyprecautionsshould alwaysbefollowed.
Check that the voltage indicated on the rating plate corresponds with that of
your local network before connecting the appliance to the mains power supply.
If your appliance is supplied with a non-rewirable plug tted to the mains
lead and should the fuse need replacing, you must use an ASTA or BS
approved type conforming to BS1362 and of the same rating. If in doubt
consult a qualied electrician for advice or assistance. If you need to remove
the plug - DISCONNECT IT FROM THE MAINS and cut it o the mains lead.
You must then dispose of it IMMEDIATELY and SAFELY. Never attempt to re-
use the plug or insert it into a socket outlet as
To begin using your Air Fryer , rst,carefully unpackit and check that ithas not
sustained any damage during transportation. Also check that all the items
shown in the PRODUCT OVERVIEW are present. We recommend that you
retain your packaging so that, in the unlikely event of a fault developing, you
are able to return the product in the correct packaging for best protection.
1. Remove all packaging material.
2. Remove any stickers or labels from the appliance. DO NOT remove the
Product Rating Plate.
3. Thoroughly wash the Cooking pot )6(, Frying Basket )4( in hot soapy water
using a non-abrasive sponge. Rinse and dry.
Note: You can also use a dishwasher to wash these items.
4. Wipe the inside and outside of the appliance with a moist cloth.
5. Dry thoroughly with a soft cloth.
IMPORTANT: This is an Air Fryer that works on hot air. Do not ll the pot with
oil or frying fat.
Preparing for use
1. Place the appliance on a stable, level and heat resistant surface.
IMPORTANT: Do not place the appliance on non-heat-resistant surfaces.
2. Place the Frying Basket )4( in the Cooking pot )6( correctly
IMPORTANT: This appliance is tted with a SAFETY INTERLOCK. If the
Cooking pot)6( is not properly located into the Air Fryer then the appliance
will not operate. When correctly located the pot will be ush with the body
of the Fryer on both sides.
3. Plug the Appliance into an earthed wall outlet socket.
5
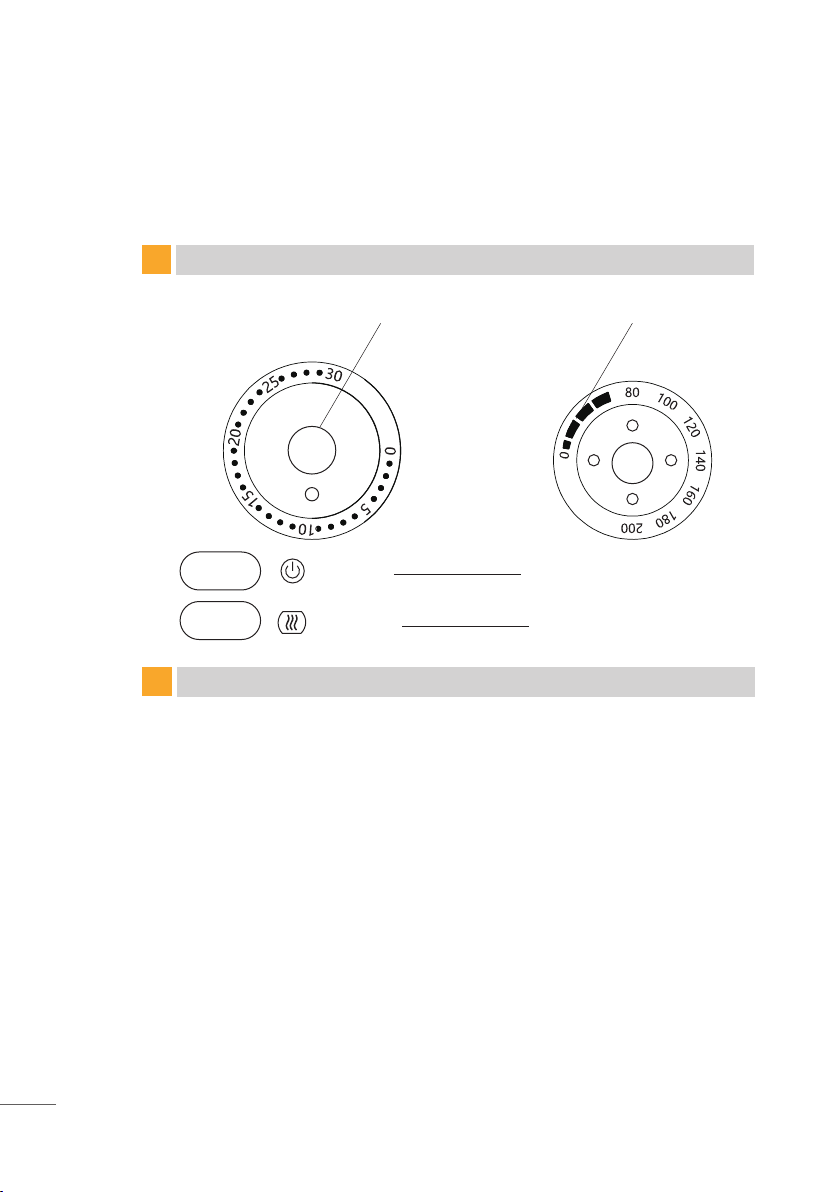
Power ON Indicator
Heating ON Indicator
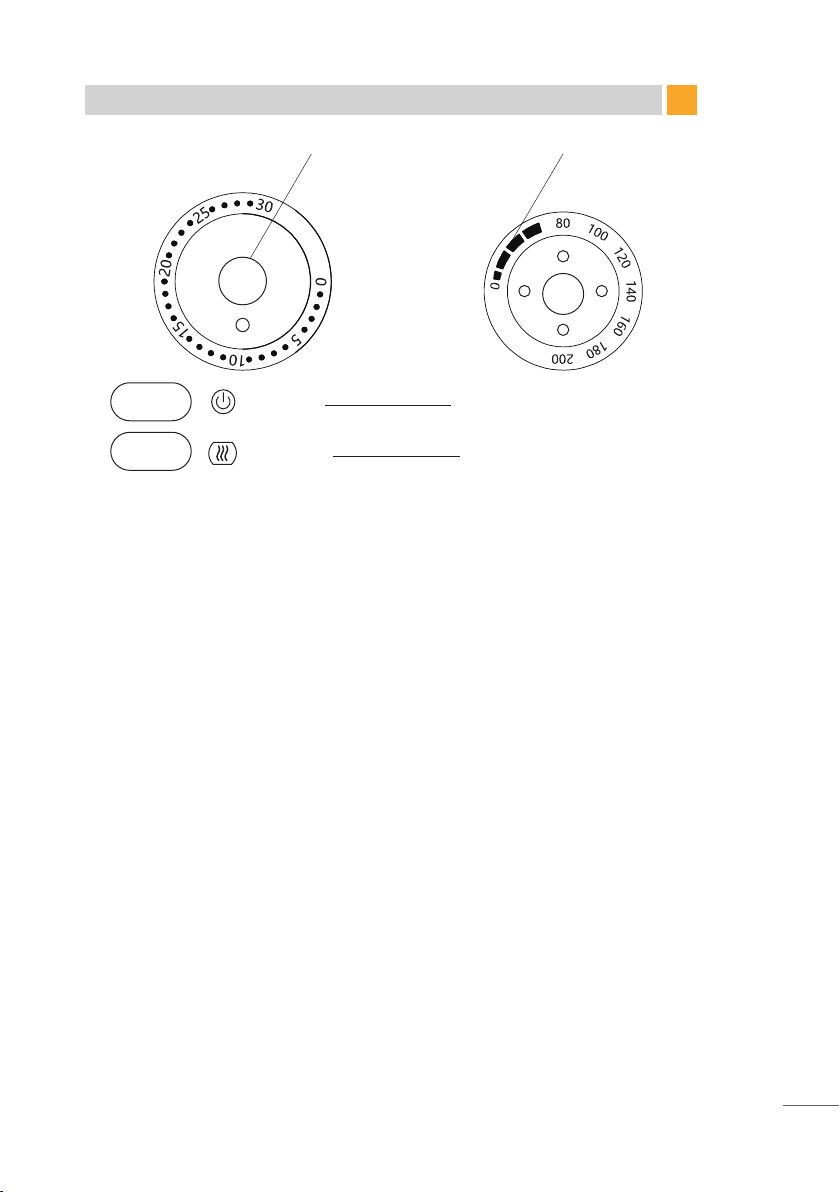
User Controls
Power and Timer Control Temperature Control
WARNING: Before connecting the power check that the voltage of your local
mains supply matches that shown on the Rating Plate of your appliance.
4. Do not ll the pot with oil or any other liquid.
5. Do not put anything on top of the appliance.
6. Do not block the Air Inlet & Outlet )8( at the rear of the unit. This disrupts
the airow and aects the hot air cooking result.
User Controls and Indicators Description
1. POWER and TIMER – The Power and Timer Control )2( provides both
Power ON/OFF andTIMER functionality.The Air Cooker and Fryer is switched
on once the Power andTimer Control is turned clockwise away from the OFF
position. The control provides a Timer range from 1-30 minutes. When set
an audible ticking can be heard as the timer counts down. Once the pre-set
time is reached a “bell” will be heard to alert the user that the set cooking
time has been reached.
2. TEMPERATURE – The temperature range can be set anywhere between 80-
2000C. The rotary Temperature Control )3( is marked for user guidance at 80,
100, 120, 140, 160, 180 and 200˚C but any in-between levels can also be used.
3. Power ON Indicator: The Power ON Indicator )1( will illuminate once the
Timer has been set turning on the power to the appliance.
4. Heating ON Indicator: The Heating ON Indicator )9( will illuminate when
the appliance is heating. During operation the indicator will cycle ON and
OFF as the required temperature is maintained.
Power
Heating

6
Using the Appliance
Basic Operation
The Air Fryer can readily prepare a large range of foods. Please refer to the
section "Recommended Settings”on PAGE 13. For some ideas of the kinds of
foods you can prepare please refer to the separate Recipe Booklet.
The following instructions show you how to operate your Air Fryer .The basic
sequence of operations remains the same no matter what you are cooking
)all numbers shown refer to the diagrams on PAGE 3(:
1. Ensure the Power and Timer Control )2( is set to OFF.
2. Connect your Air Fryer to a convenient wall socket and switch on the
socket.
3. Remove the Cooking pot )6( by pulling carefully on the handle. It is
advisable to place one hand on the top of the Air Cooker whilst you do this.
If the appliance has been recently operated then use oven gloves for this
purpose.
4. Place the Cooking pot on a at, stable and heat resistant surface.
5. Remove the Frying Basket )4( if needed.
NOTE: The Frying Basket with a release Basket Release Button)5(, in order to
use safe, the protect cover can not be shoved until the Cooking pot is taken
out. Take out the Cooking pot and make sure it is placed on a at, stable and
heat resistant surface, then shove the the protect cover and press the Basket
Release Button )5( to separate the Frying Basket from the Cooking pot.
Never press the Basket Release Button )5( until the Cooking pot is placed on
a at, stable and heat resistant surface.
6. Add the food you wish to cook to the Frying Basket )taking care not to
overll(, then return the Frying Basket to the Cooking pot and then slip the
Cooking pot to the Air Fryer.
NOTE: The Air Fryer is tted with an Interlock mechanism which will prevent
the appliance from operating if the Cooking pot is not correctly located.
Check that both sides of the pot are ush with the body of the Cooker. This
indicates that it is correctly located.
7. Turn the Temperature Control )3( to select your required temperature.
8. Turn the Power and Timer Control )2( to the required cooking time.
9. The Air Cooker and Fryer will now start to heat. Both the Power ON and the
Heating ON Indicators will illuminate. The time that you set starts counting down.
NOTE: The Heating ONindicator willcycle ON and OFFas the set temperature
is maintained.
10.When the cooking time you have set has elapsed the Air Fryer bell will
Table of contents
Languages:
Other MIGEL Fryer manuals

Popular Fryer manuals by other brands


Moffat
Moffat Waldorf FN8127EE Installation and operation manual

creative housewares
creative housewares Taurus AIR FRY PLUS English Manual

Heritage
Heritage 023610 Instructions for use and care

Kalorik
Kalorik AFO 47797 SS user manual

KOKKENCHEF
KOKKENCHEF 10131696 instruction manual

Morgan
Morgan MDF-32SS user manual


