Mikuni MX Series User manual

CONTENTS
1. Planning The Installation....................................................... .............. 2
2. Installation..................................................... ................................. 3
3. Trial Operation................................................. ............................... 7
4. Final Check.................................................. ................................... 8
5. Wiring Diagrams.................................................. ............................ 9

Installation of the heater.
The Mikuni MX series heaters are diesel fired water heaters running off either a 12 or 24 volt DC supply.To ensure good service
from your heater it is important to install it correctly paying attention to al l the details laid out within this instruction manual.
This manual details installation of models MX40 & MX60 as there are many c ommon installation parameters. When the parameters
differ seperate details are given specific to each heater.
Planning the Installation
Take time to plan your installation!
The heater should be sited in an area where:
(i) It will not have items stored against it.
(ii) It will not be exposed to weather.
(iii) It is within the parameters set out in this m anual regarding fuel and power supply.
(iv) It is within the parameters set out in this manual regarding heater mounting.
(v) The exhaust outlet skin fitting is well clear of the water line.
(vi) The exhaust pipe is not touching anything inside the boat which could be damaged by heat - The exhaust pipe does get hot even
though it is insulated!
Types of installation.
The 'MX' Heaters can be used to heat radiators, matrix heaters or a combination of both. The domestic hot water can be obtained by
passing the hot water from the Mikuni throug h the coil of a calorifier.
The system can be either gravity fed from a header tank or pressurised from the domestic pump with an accumulator tank to allow
for expansion in the system.
Tools for your Installation.
1. Electric drill with slow speed.
2. Crimping pliers.
3. Wire cutters.
4. Metric spanners 8mm to 13mm.
5. Flat blade & posidrive screwdrivers.
6. Sharp knife.
7. Pipe shears [for plastic & rubber water pipe].
- 2 -
Plumbing requirements.
We recommend plastic plumbing for marine applications as it is easy to fit and modify i.e: If you wish to add an extra radiator/
matrix heater at a later date. The MX40 & MX60 should be plumbed with a 22mm main circuit with 15mm 'T' off to the radiators/
matrix heaters. It is very important to maintain good water flow through th e heat exchanger of the Mikuni heater due to their
compact size.

1. Mounting the heater.
The heater should be monted in a well ventilated locker which should be dry and within 2 m etres of a suitable site for the exhaust
skin fitting. It should also give consideration to servicing and access for cleaning the glow plug.
MX40:
The MX40 is supplied mounted on a stainless steel 'plate' which incorporates the control box and fuel pump assy. The unit is pre-
wired and factory tested for ease of installation. The Anti-Vibration mounts and mounting brackets should be fixed to the mounting
plate as shown in Dia 2. The mounting plate should then be screwed to a vertical bulkhea d with the 4 x 3/4" No10 s/s self tapping
screws provided. Try and keep the horizontal axis as close to 0oas possible.
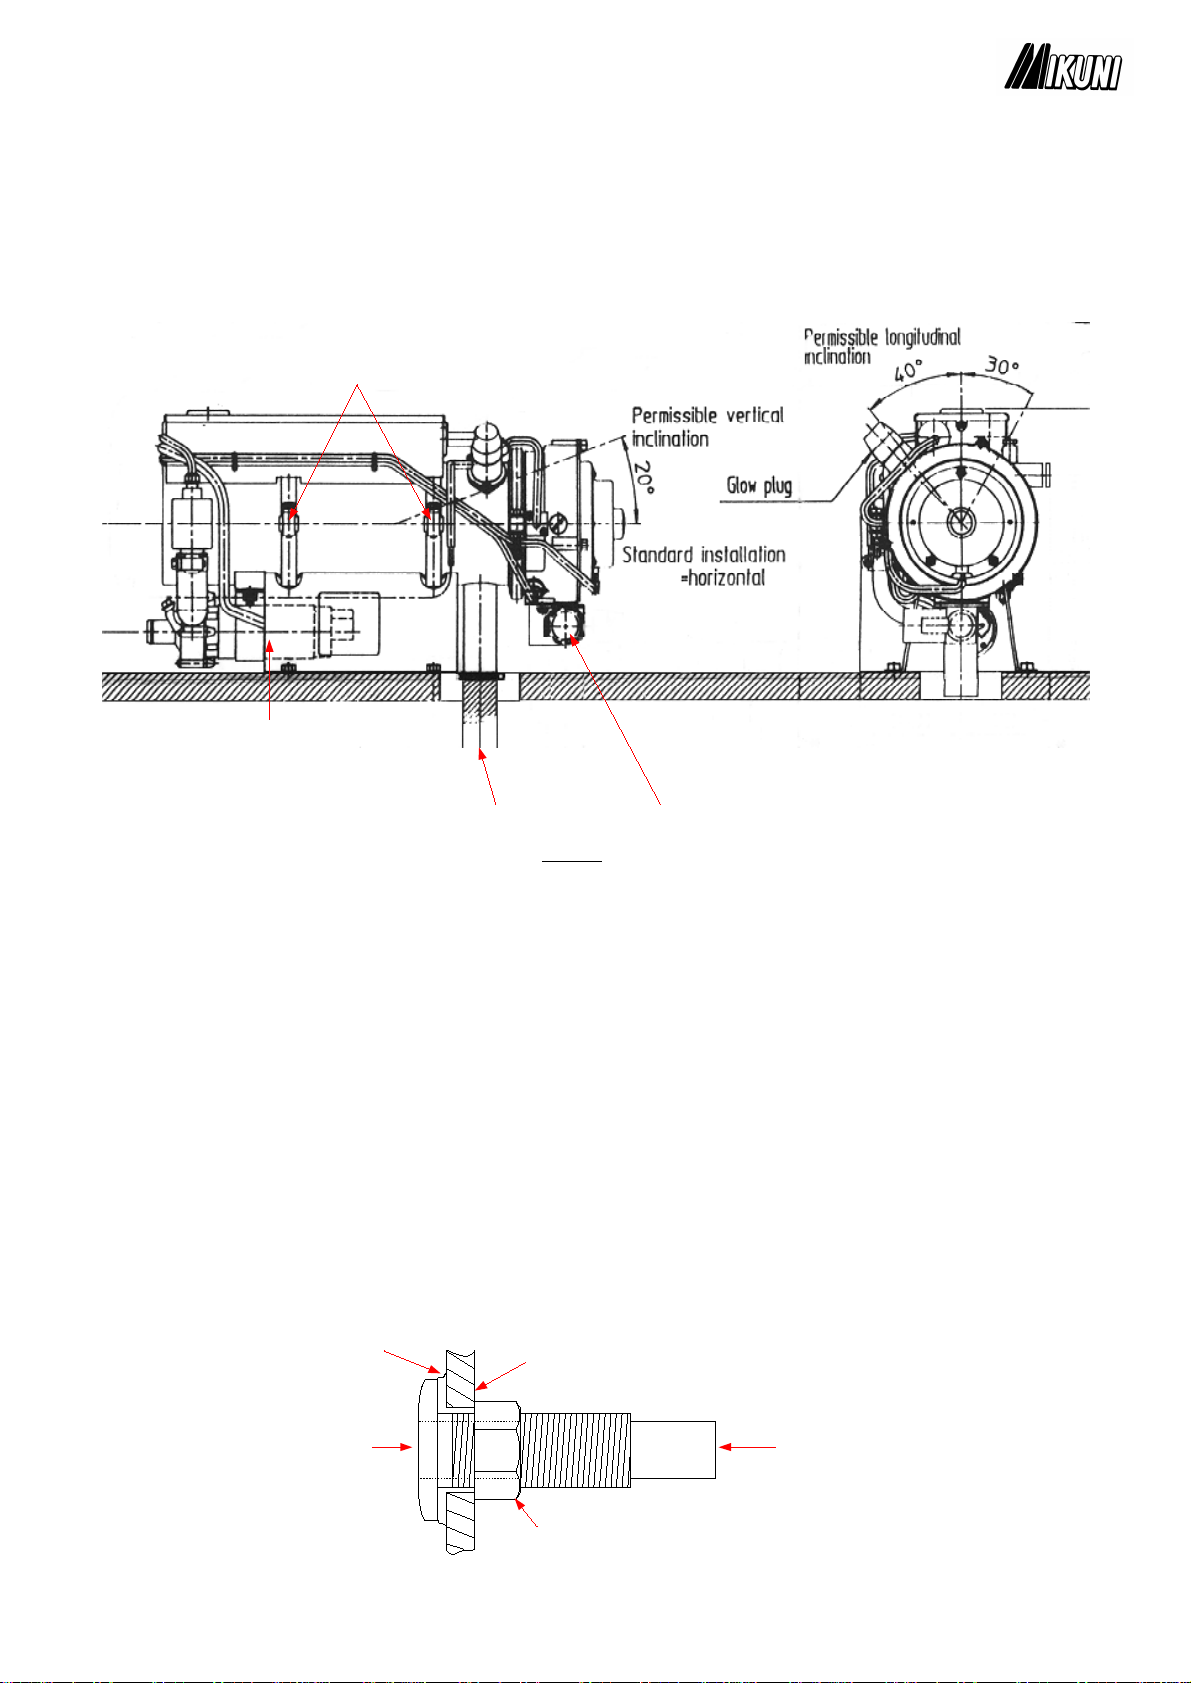
It is very important to mount the heater as shown in Dia 2. b elow for correct operation.
Note: The permissible inclination angles shown in Dia 2.
16mm
16mm
CombustionAir Inlet
Exhaust Pipe
Horizontal Axis
Water Inlet
Hot Water Outlet
Vertical Bulkhead
Mounting Plate
A.V. Mount
TOP TOP
END VIEW FRONT VIEW
- 3 -
Dia 2.
Permissible longitudinal
inclination = 15oeither
side of vertical
Mounting Plate
Fuse Holders
Control Box
Fuel Pump
Heater Body
Mounting Bracket
A.V. Mount
Dia 1.
20o
Permissible Vertical
inclination.
MX60:
The MX60 is supplied on a mounting bracket which is best mounted on a horizontal surf ace as shown in Dia 3. If you want to mount
the heater on a vertical bulkhead it is possible to rotate the mounting bracket by r eleasing the 2 x hose clips marked 'A'.
The MX60 shown is Dia 3. is a 24 volt unit which has the water pump attached to the heat er body. The 12 volt MX60 has a seperate
water pump.
SIDE VIEW END VIEW
Exhaust pipe Combustion air inlet
Water pump
[fixed to heater on 24v model only].
Dia 3.
'A'.
If you mount the MX60 on a horizontal surface, mark the mounting screws and exhau st position with the template provided. Drill a
40mm clearance hole for the exhaust pipe and 4 x 7mm holes for the mounting bracket. Now fix heater in place with the 4 x
M6x25mm s/s set screws provided.
2. Exhaust system:
There are 2 types of exhaust fitting supplied with the MX40/MX60 heater units. The i nland waterways kits have a brass screw in
skin fitting whilst the 'offshore' kits have a polished stainless steel skin fitting. The exhaus t skin fitting needs to be fitted as far above
the water line as possible to prevent any ingress of water into the heater. An ideal place for the skin fitting is on the transom.
Brass Skin Fitting:
Once you have planned the siting, drill a 4mm pilot hole as guidance for the pilot drill o n the hole saw arbour. Now drill the correct
size hole: MX40=28mm MX60=35mm. When you have completed this apply silicon to the rear of the face and tighten the brass nut
to secure.
Silicon sealant Transom
Securing Nut
Spigot for s/s exhaust
Exhaust Outlet
Brass Exhaust Terminal
- 4 -

Transom
Fix the s/s exhaust to the skin fitting and secure with the heavy duty clamp. Cut the exhaust at a convenient place and slide over the
first section of insulating sleeve, turn the ends back inside themselves and clamp in place with 2 x 38mm hose clips provided. Now
put a heavy duty clamp on the remaining end and insert the silencer.
Take the remaining insulation sleeve and 2 x 38mm clamps, slide onto the exhaust, form into a swan neck to prevent any ingress of
water, cut to length and fit to the silencer with the heavy duty clamp. Now fix the insulation sleeve as before.
NOTE: THE EXHAUST DOES GET HOT- DO NOT CLAMP IT TO ANY COMBUSTIBLE MATERIALS.
Stainless Steel Skin Fitting:
Once you have planned the siting, drill a 4mm pilot hole as guidance for the pilot drill o n the hole saw arbour. Now drill the correct
size hole: MX40=40mm MX60=55mm. When you have completed this re-drill the hole at an angle at a slow speed (see dia 2 ) to
allow the skin fitting to fit in a snug hole. Now drill 4 x 5mm holes for the fixing bolts, appl y silicon to the rear of the face and secure
in place with the 4 x M5 x 40 c/s screws provided.
Drill with hole saw at angle after
you have drilled the
perpendicular hole.
BE CAREFUL!
4 x fixing screws
Dia 5.
Silicon sealant
3. Combustion Air Inlet.
The combustion air is normally drawn from the area/locker that the heater is situat ed in. Ensure that there is adequate ventilation for
the burner MX40 = 1,020mm2. MX60 = 1,960mm2.
The MX40 has an integral combustion air silencer and filter whilst the MX60 is a seperate unit which has to be fitted. Mount the
silencer in a convienient place near the heater with the cable ties provided. Now cut the 28mm enduraflex ducting to length and fix
using 2 x 28mm hose clips.
4. Fuel System.
The heater is supplied with a fuel standpipe to be fitted into the top of the fuel tank. Use this whenever possible-it is the preferred
method because it does not interfere with the engine fuel supply.
Find a suitable location in the fuel tank that has no obstructions inside, put some g rease around the chosen location and drill a 22mm
hole - the grease should help prevent any debris falling into the fuel tank. Now cut the standpipe so that it is about 30mm off the
bottom of the fuel tank, slide into place and tighten the fixing nut. (see dia 6.)
The fuel pump should be fitted near the fuel standpipe
- 5 -

NOTE: The fuel pump is a solenoid which is pulsed by the control box - be careful not to mount it on a board that may resonate. If
after installation the pump is n oisy re-locate it!
Installation of copper fuel line.
1. Fit the 1/4" to 3/16" reducer onto the standpipe.
2. Cut the required length of copper pipe from the amount supplied and
fit to the fuel cock.
3. Fit the straight connectors to the fuel pump. NOTE: 3 connectors are
fitted with 1 rubber olive and 1 copper olive and 1 straight connector is
fitted with 2 rubber olives.The connector with 2 rubber olives is to be
mounted between the fuel pump outlet and the fuel damper. Item 'A'.
4. Mount the fuel pump near the fuel cock at a 45o angle as shown. The
MX60 has a solenoid valve instead of the manual fuel cock which will
turn the fuel on automatically when the heater is operated.
5. Fix the remaining connector to the fuel inlet on the heater with the
rubber olive on the heater stub.
6. Cut the copper pipe to length, fit to the pump and the heater.
Length of pipe (max)
Standpipe to fuel pump:
Fuel pump to heater:
Head (max)
Bottom of fuel tank to pump centre:
Pump centre to heater centre:
(mm)
2000
5000
1000
<2000
- 6 -
5. Electrical.
The Mikuni heaters are supplied with simple plug together wiring looms.
MX40.
The MX40 is prewired on the s/s mounting plate. The only connections required are for the bat tery supply, the on/off switch and the
timer/thermostat.
Plug the 2 core power loom into the heater loom and run it directly to the battery. Fit the i nline 30 amp fuseholder and connect up to
the battery leaving the fuse out at the moment. Now mount the timer/thermostat and on /off switch and run the 3 core cable. Plug the
on/off switch in and connect the 2 x blue/yellow wires to the 'com' and 'n.o.' terminals on the timer/thermostat.
NOTE: Do not connect the live feed to the main power switch. If the power is turned off at the supply whilst the heater is running, it
will not be able to perform its cool down purge cycle, which could cause damage tothe internal components.
Dia 6.
30mm
Diesel
tank
Fuel standpipe
1/4" x 3/16" Reducer 3/16" Fuel cock
Solenoid Valve
MX60 Only
Fuel pump.
These olives are
neoprene rubber.
'A'.
Heater.
The fitting on theheater uses a neoprene
rubber olive
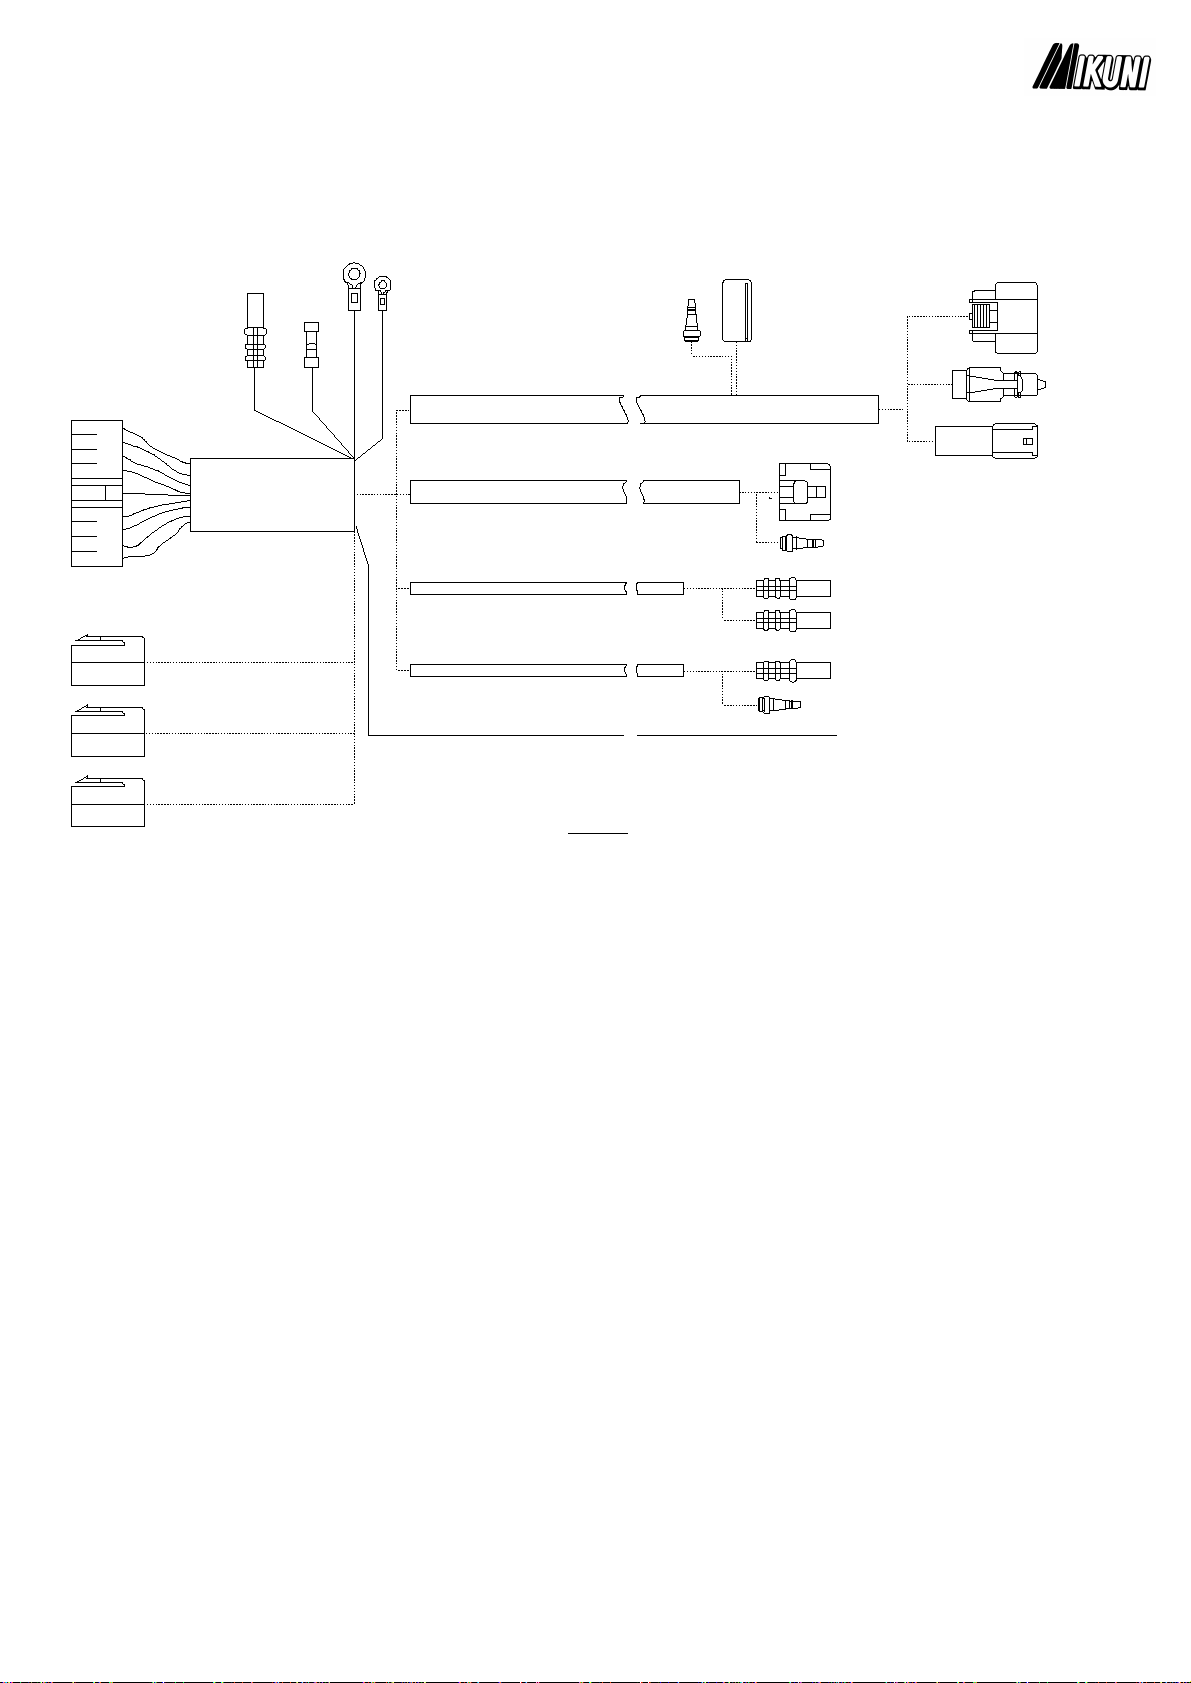
MX60
The MX60 wiring loom as shown in Dia 7 is a plug together assy. It is important to make sure that all the plugs are connected
correctly and that the 'No 2' neutral wires are all con nected to a common negative.
Plug in fuse holders red/blue
main power feed
Yellow/red No.12
black/white No.10
17 way housing
to control box.
3A
25A
30A
MX60 main harness.
2 core cable to fuel pump
2 core cable to water pump
glow plug
regulator &
resistor heater plug
glow plug
connectors
Red No.19
Black No.2
Red No.24
To fuel solenoid valve
Black No.2
To fuel solenoid valve
2 x Black No.2
To Neutral
Heater to control box
Switch panel to control box
Dia 7.
-
7 -
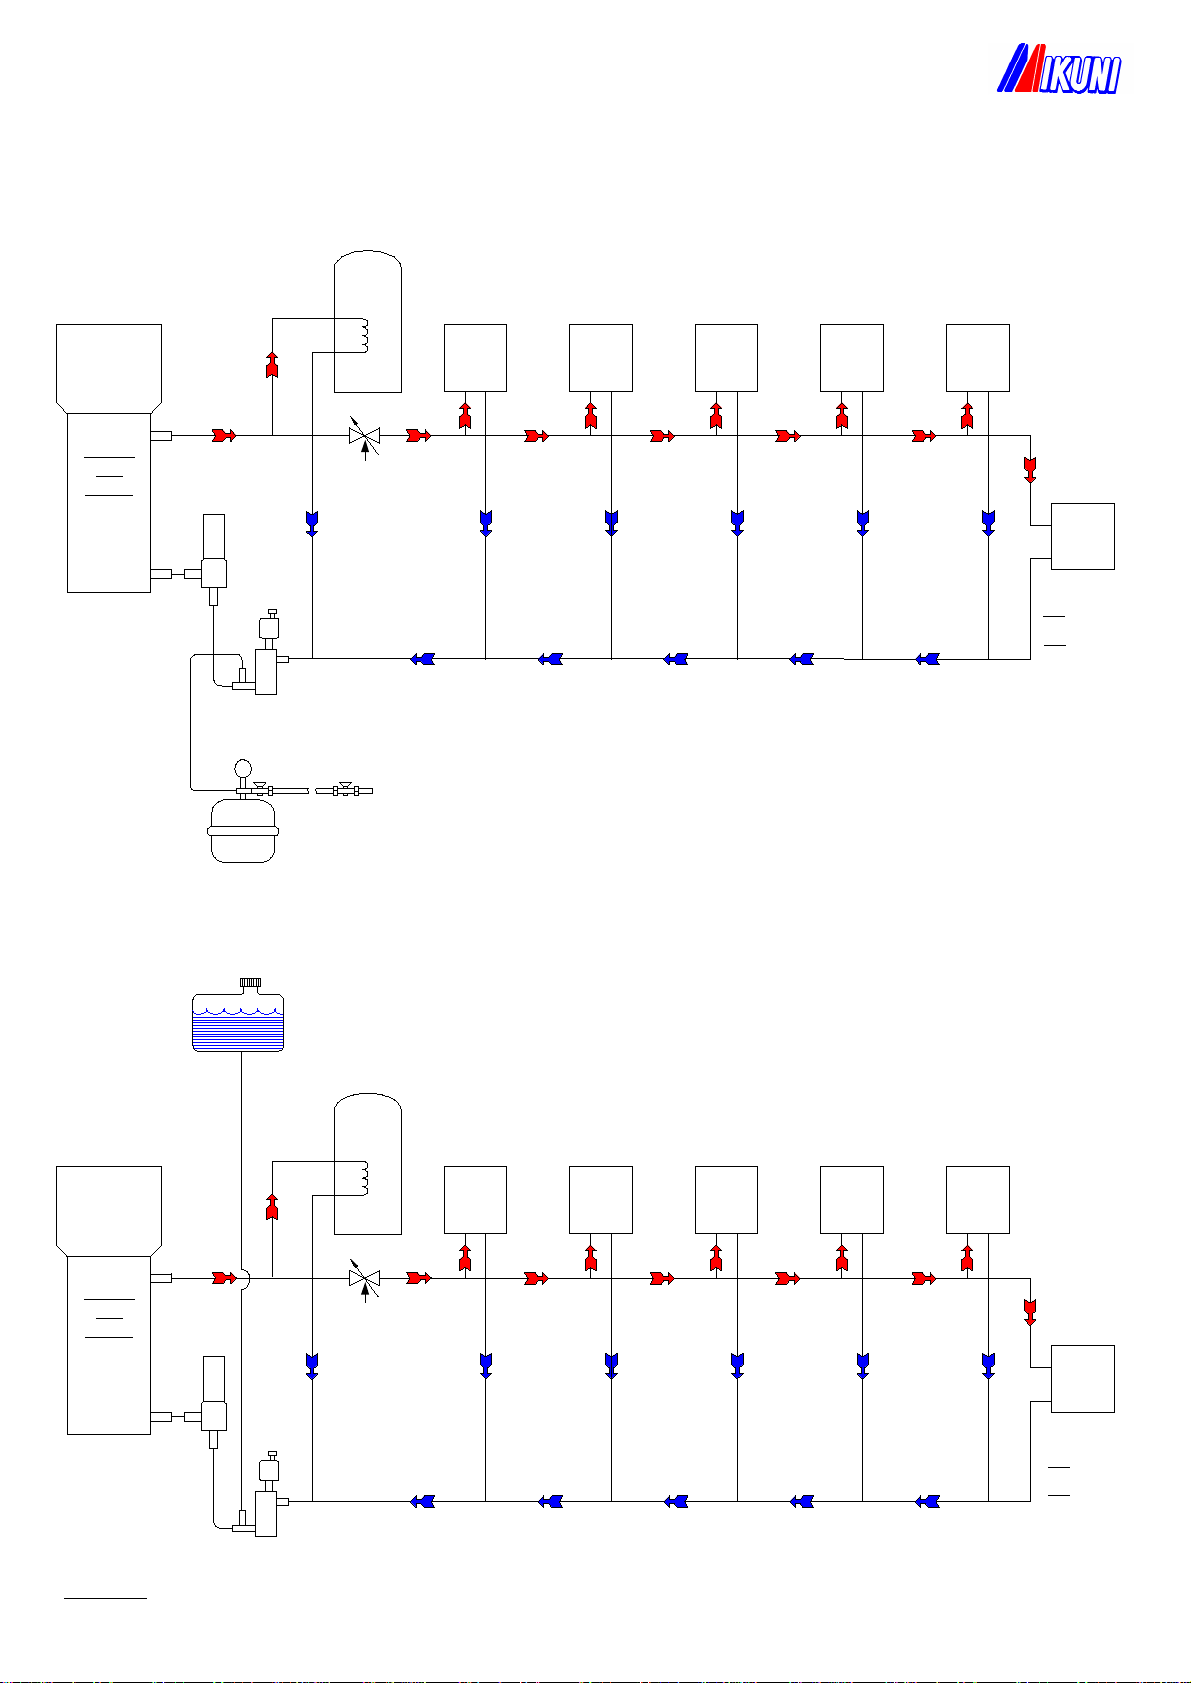
6. Plumbing.
The MX40 and MX60 heaters are both plumbed in the same way using a 2 pipe system with a 22mm 'spine' and 15mm 'T' off's to the
radiators or matrix heaters [ see Dia 8 ]. This allows for maximum water flow through the system and takes into account the
resriction in internal diameter of elbows, 'T' pieces etc when using plastic plumbing.
Accumulator
Tank
Heater
Heater Heater Heater Heater Heater
Water
Pump
Mikuni
MX
Heater
Cold
water
feed.
Air
Separat
or
Cold water
feed
from
domestic
pump.
=15mm
pipe
=22mm
pipe
Hot
out
Calorifier
'A'
Heater
Heater Heater Heater Heater Heater
Water
Pump
Mikuni
MX
Heater
Header
Tank
2 - 3
Litres.
Air
Separa
tor =15mm
pipe
=22mm
pipe
Hot
out
Calorifier
'A'
Plumbing Circuit Guide.
Pressurised System.
Gravity System
NOTE: 'A' is an optional gate valve for shutting off the heating circuit in the summer.
-
8 -
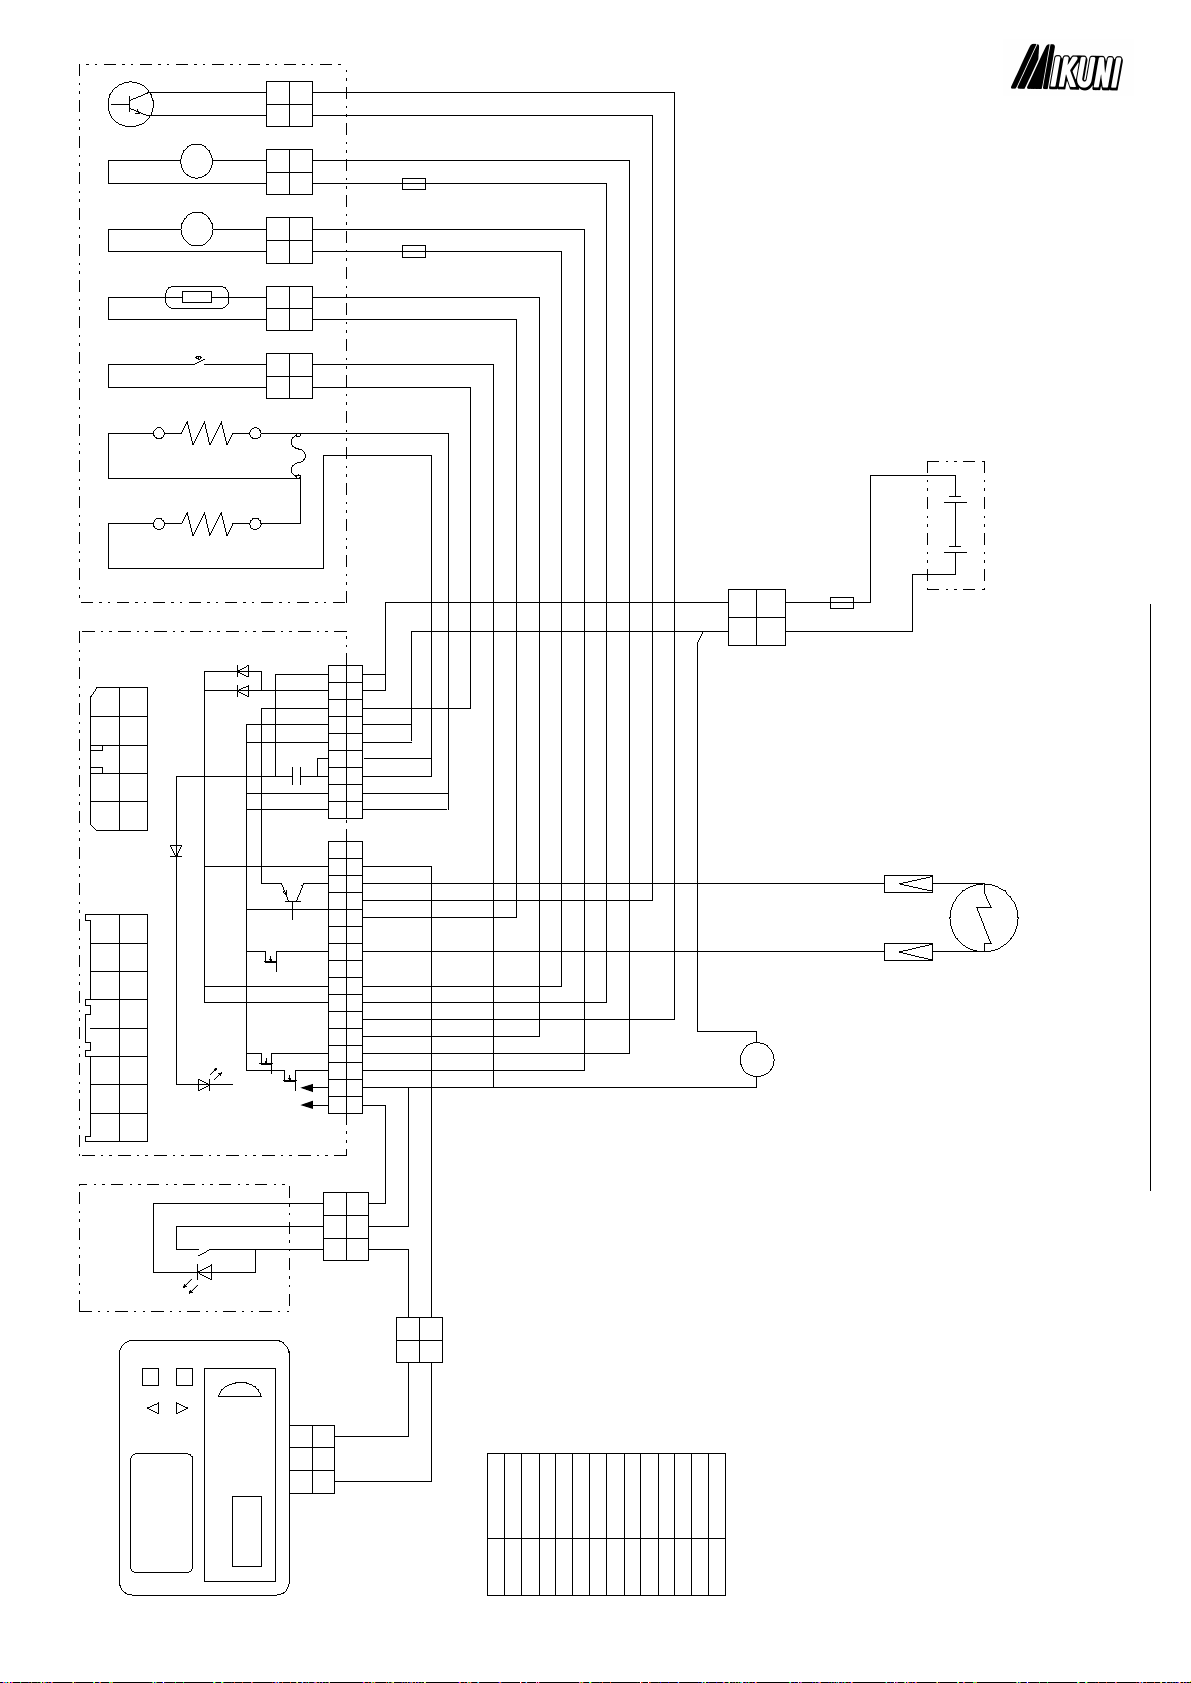
CONTROL
BOX
SOLENOID FUEL
PUMP
FUSE 30A
WHITE
GREEN
BLUE/YELLOW BLUE/YELLOW
RED/BLACK
FUSE3A
FUSE 12V=7.5A. 24V=5A RED
RED
BLACK
FUEL
SOLENOID
VALVE
NOTE: The Optional fuel solenoid
valve is directional. There is an arrow
engraved on the back to show the flow
direction
2R
Q6
Q4
Q5
SELF DIAGNOSTIC LAMP
L L
B B
R
L YR LY
Q3
W G B BW GB RY RB
GWBW WR
W W
R R
ON/OFF SWITCH
LED1.
ON/OFF
SWITCH
TIMER/THERMOSTAT
TEMPERATUR
E
DANFOSS
123
HEATER
WR
G
GW
GB
RB
BW
L
WHITE
M
M
GLOW
PLUG
GLOW RESISTOR
L1.
OVERHEAT STAT
THERMISTOR
COMBUSTION
MOTOR
WATER PUMP
FLAME SENSOR
R
B
RY
BLUE
1
1
2
2
NOTES:
1. L1=THE 12V VERSION HAS NO GLOW RESISTOR
SO THE CIRCUIT WILL INCLUDE L1 IN THE LOOM.
BATTERY
D.C. 12V , 24V.
Symbol
W
G
B
BW
GB
RY
R/B
BW
GW
L
YR
LY
WR
Cable Colour
White
Green
Black
Black/White
Green/Black
Red/Yellow
Red/Black
Black/White
Green/White
Blue
Yellow/Red
Blue/Yellow
White/Red
MX40 Wiring Diagram incl Optional Fuel solenoid valve.
-
9 -
This manual suits for next models
2
Popular Water Heater manuals by other brands

Nibe
Nibe VPA 450/300 Installation and maintenance instructions

Lochinvar
Lochinvar Armor X2 AWN1000 Installation & operation manual

Scheer
Scheer MA 50 User instructions

Ventmatika
Ventmatika CW Series quick start guide

Bosch
Bosch NG Installation and operating instructions

A.O. Smith
A.O. Smith ITE 400 Installation, user and service manual

STIEBEL ELTRON
STIEBEL ELTRON EIL 3 Premium Operations & installation guide

Kenmore
Kenmore 153.32562 owner's manual

Ariston Thermo
Ariston Thermo 120 Installation and maintenance instructions

Bradford White
Bradford White ES-2400-1-S-10 Installation guide and owner's manual

Vagner Pool
Vagner Pool EOV manual

Aroma
Aroma AAP-340F-1 instruction manual


