Milex Power Airfryer XXXL User manual
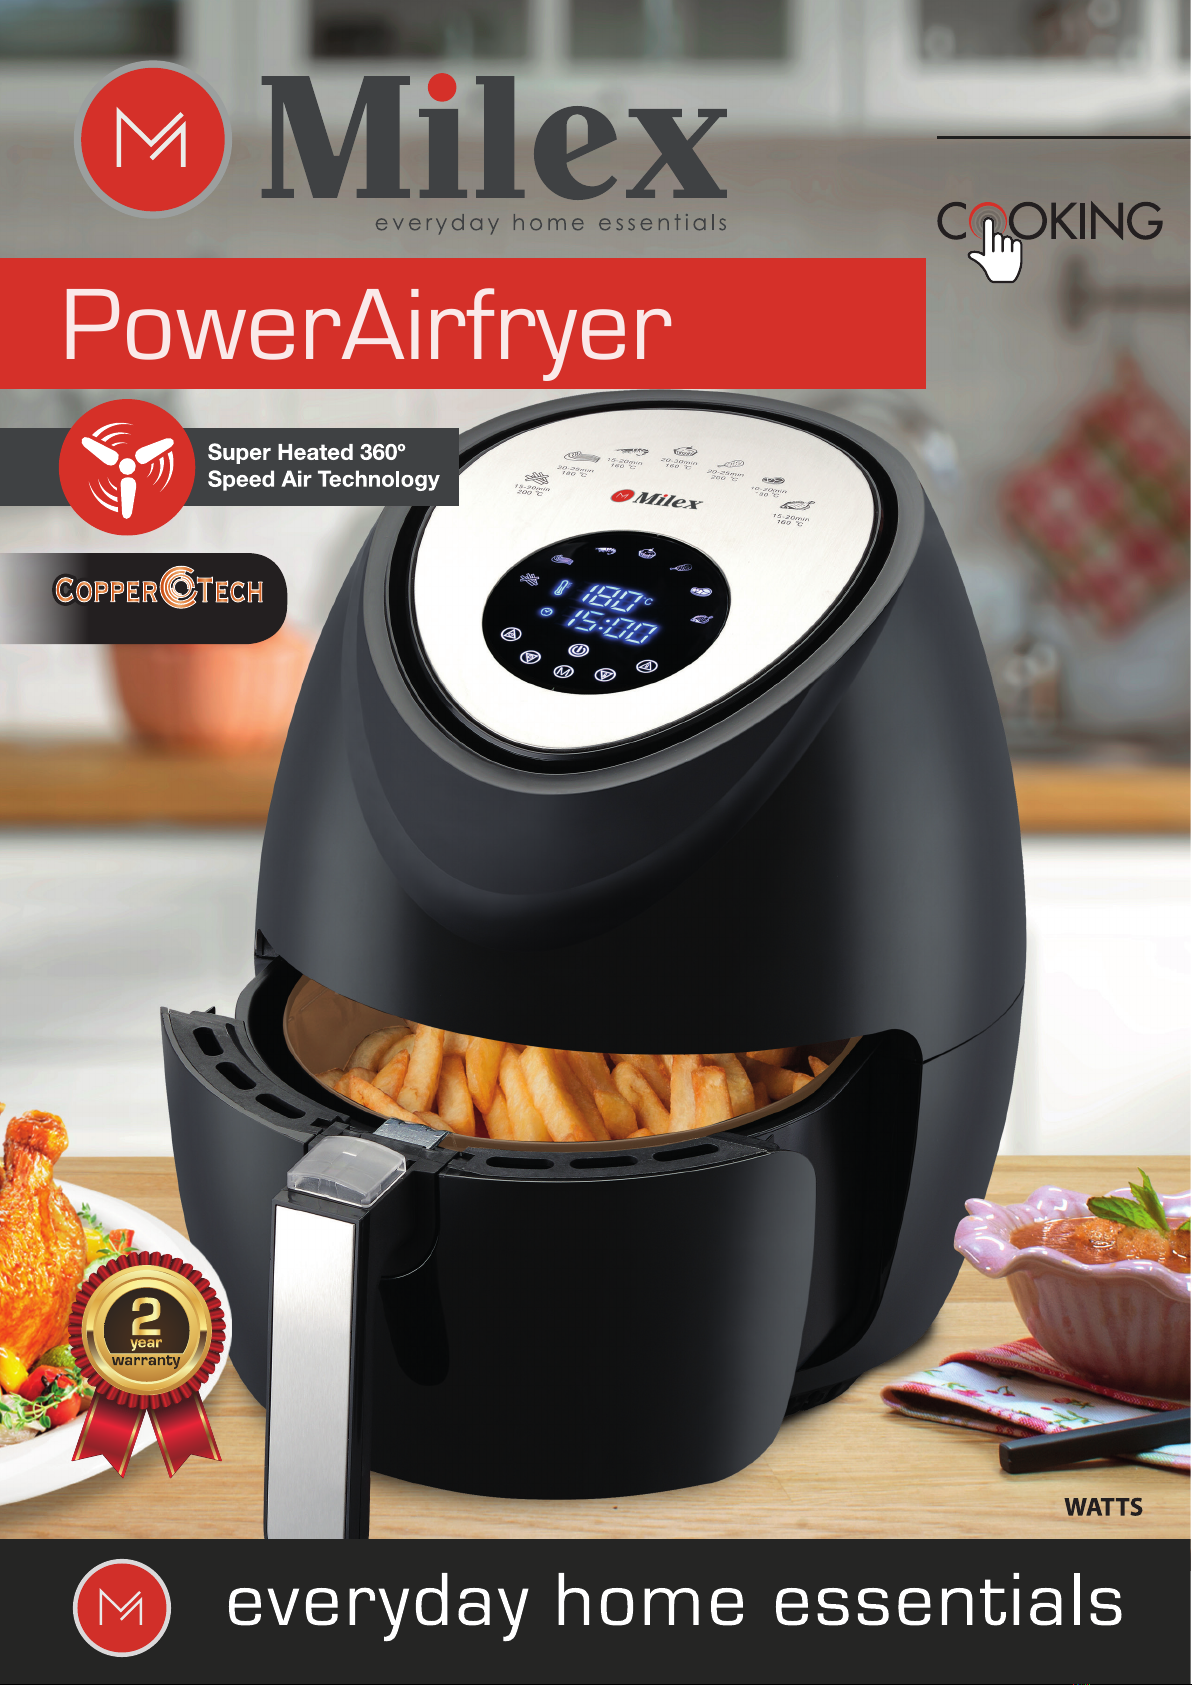
PowerAirfryer
XXXL
5.6 Litre
One-Touch
1800
durable copper infused non-stick coating

Congratulations on purchasing our Milex Power Airfryer XXXL. Each unit is manufactured to ensure
safety and reliability. Before using this appliance for the first time, please read the instruction manual
carefully and keep it for future reference.
▲FEATURES OF THE MILEX POWER AIRFRYER XXXL
• XXXL 5.6 litre capacity
• 1800W
• Digital LED easy touch-screen control panel
• Professional large display for easy viewing and use
• Caters for 7-10 people
• Copper-infused non-stick coating, dishwasher safe parts
• Cool touch housing
• Use little-to-no oil at all for healthier cooking
• Up to 200° cooking
• 60 minute timer with auto shutoff and alarm indicator
• Grill, roast, air fry, bake, steam and sauté
• Rapid air technology heats the oven quickly and cooks food to perfection
• With 7 easy presets: Fries, Roast, Shrimp, Bake, Chicken, Steak and Fish
• Temperature and time adjustable for manual cooking as well as during preset cooking
• Time and temperature display simultaneously on the display
• Timer counts down the cooking cycle
• Cooking continues automatically once you have pulled the basket out to check on the food
• Includes food separator, recipe booklet and user manual
• For domestic use only
▲ IMPORTANT SAFEGUARDS
When using electrical appliances, basic safety precautions should always be followed, including:
1. To avoid damaging the appliance and to prevent danger or potential injury - do not immerse the
power cord, plug, the appliance, or its heating elements in water or under the tap during cleaning.
2. To avoid electrical shock and to avoid short-circuiting your appliance, do not put any liquid into the
applance.
3. Make sure that your output voltage corresponds to the voltage stated on the rating label of the
appliance.
4. If the electrical circuit is overloaded with other appliances, your oven may not operate properly. It
should be operated on a dedicated electrical circuit.
5. Check the power cord and plug regularly for any damage. If the cord or the plug is damaged, the
manufacturer or a qualified person must replace it in order to avoid an electrical hazard. DO NOT
USE this unit if the plug, the power cord or the appliance itself is damaged in any way.
6.This appliance is NOT INTENDED FOR USE by persons with reduced physical, sensory, or mental
capabilities, or lack of experience and knowledge, unless they are UNDER THE SUPERVISION of
a responsible person or have been given proper instruction in using the appliance. This appliance
is NOT INTENDED FOR USE by children.
7. Children should be supervised to ensure that they do not play with the appliance.
8. Keep the appliance and its power cord OUT OF THE REACH of children when it is in operation or
in the “cooling down” process.
9. A short detachable cord is provided to reduce the hazards resulting from becoming entangled in or
tripping over a longer cord.
10.Do not let the cord hang over the edge of a table or counter. Ensure that the cord is not in a
position where it can be pulled on inadvertently.
IMPORTANT SAFEGUARDS & SPECIFICATIONS

11. KEEP THE POWER CORD AWAY from hot surfaces. DO NOT PLUG in the power cord or
operate the appliances controls with wet hands.
12. DO NOT carry the appliance by the power cord.
13. Do not use the appliance on a gas or electric cooking top or over or near an open flame.
14. Never use this appliance with an extension cord of any kind.
15. NEVER CONNECT this appliance to an external timer switch or separate remote-control system.
16. Always operate the appliance on a horizontal surface that is level, stable, and non-combustible.
17. DO NOT USE the oven for any purpose other than described in this manual.
18. NEVER OPERATE the appliance unattended.
19. DO NOT COVER the air intake vent or air outlet vent while the appliance is operating. Doing so
will prevent even cooking and may damage the unit or cause it to overheat.
20. The appliances outer surfaces may become hot during use. The basket and pan WILL BE HOT.
WEAR OVEN GLOVES when handling hot components. Wear oven gloves when handling hot
surfaces.
21. While cooking, the internal temperature of the appliance reaches very high and hot temperatures.
TO AVOID PERSONAL INJURY, never place hands inside the appliance unless it has thoroughly
cooled down. Do not place plastic dishes, bowls or protection film into the oven. Use only
oven-proof heat resistant cookware.
22. DO NOT OPERATE the appliance on or near combustible materials such as tablecloths and
curtains. Do not allow this appliance to touch curtains, wall coverings, clothing, dishtowels or
other flammable materials during use. Caution is required on surfaces where heat may cause
damage - an insulated heat pad is recommended. Never place the appliance on a plastic, fabric
or carpeted surface while cooking.
23. When cooking, DO NOT PLACE the appliance against a wall or against other appliances. Leave
at least 10cm of free space on the back and sides and above the appliance. Do not place any
thing on top of the appliance.
24. Let the unit cool down completely before you clean or store it.
25. Extreme caution must be used when moving the unit. It is recommended that you do not move it
when it is switched on or before it has cooled down.
26. To prevent food contact with the interior upper screen and heating element, DO NOT OVERFILL
the basket.
27. NEVER POUR oil into the basket or pan. Fire and personal injury could result.
28. When in operation, air is released through the air outlet vent. KEEP YOUR HANDS AND FACE at
a safe distance from the air outlet vent. Please also take care of hot air while removing the
basket & pan from the appliance.
29. Should the appliance emit black smoke, UNPLUG IT IMMEDIATELY and wait for the smoke to
stop before removing oven contents.
30. Should the cooking cycle time be too long, burning the food and smoke starts release from the air
outlet - UNPLUG IT IMMEDIATELY and wait for the smoke to stop before removing oven
contents. Once it is safe and sufficiently cooled, please clean the oven accessories to avoid
IMPORTANT SAFEGUARDS
stubborn grease and grime.
31. Remove the plug from the socket by gripping the plug. Do not pull on the cord to disconnect the
appliance from the mains. Always unplug the unit when not in use, before cleaning or when
adding or removing parts.
32. Let the appliance cool down for approximately 30 minutes before handling, cleaning, or storing.
33. Make sure the ingredients prepared in this unit come out cooked to a golden/yellow colour rather
than dark or brown. Remove burnt remnants.
34. CAUTION: Do not move the sliding button guard forward until the pan and basket are resting on
a level, heat resistant surface. Discontinue use if the sliding button guard ever becomes
detached from the unit.
35. Do not use accessories or attachments other than those we supply.
36. This appliance is intended for normal household use only. It is not intended for use in commercial
or retail environments. Do not use outdoors.
37. If the oven is used improperly or for professional or semi-professional purposes or if it is not used
according to the instructions in the user manual, the warranty will become invalid.
38. Should the inner temperature control system fail, the overheating protection system will be
activated and the Unit will not function. Should this happen, unplug the power cord. Allow time for
the Unit to cool completely before restarting or storing.
39. The appliance has a built in “shut-off” device, that will automatically shut down the unit when the
Timer LED reaches zero. You can manually switch off the appliance by selecting the Power
Button. The fan motor will continue running for approximately 20 seconds to “cool down” the unit.
40. This appliance features as built-in safety switch. Only once the basket and pan have been
inserted into the Airfryer correctly, will the appliance switch to “Stand-By” Mode or continue its
cooking cycle.
41. Do not use harsh abrasives, caustic cleaners or oven cleaners when cleaning this appliance.
42. Do not use anything metal or sharp, you will damage the non-stick surfaces.

11. KEEP THE POWER CORD AWAY from hot surfaces. DO NOT PLUG in the power cord or
operate the appliances controls with wet hands.
12. DO NOT carry the appliance by the power cord.
13. Do not use the appliance on a gas or electric cooking top or over or near an open flame.
14. Never use this appliance with an extension cord of any kind.
15. NEVER CONNECT this appliance to an external timer switch or separate remote-control system.
16. Always operate the appliance on a horizontal surface that is level, stable, and non-combustible.
17. DO NOT USE the oven for any purpose other than described in this manual.
18. NEVER OPERATE the appliance unattended.
19. DO NOT COVER the air intake vent or air outlet vent while the appliance is operating. Doing so
will prevent even cooking and may damage the unit or cause it to overheat.
20. The appliances outer surfaces may become hot during use. The basket and pan WILL BE HOT.
WEAR OVEN GLOVES when handling hot components. Wear oven gloves when handling hot
surfaces.
21. While cooking, the internal temperature of the appliance reaches very high and hot temperatures.
TO AVOID PERSONAL INJURY, never place hands inside the appliance unless it has thoroughly
cooled down. Do not place plastic dishes, bowls or protection film into the oven. Use only
oven-proof heat resistant cookware.
22. DO NOT OPERATE the appliance on or near combustible materials such as tablecloths and
curtains. Do not allow this appliance to touch curtains, wall coverings, clothing, dishtowels or
other flammable materials during use. Caution is required on surfaces where heat may cause
damage - an insulated heat pad is recommended. Never place the appliance on a plastic, fabric
or carpeted surface while cooking.
23. When cooking, DO NOT PLACE the appliance against a wall or against other appliances. Leave
at least 10cm of free space on the back and sides and above the appliance. Do not place any
thing on top of the appliance.
24. Let the unit cool down completely before you clean or store it.
25. Extreme caution must be used when moving the unit. It is recommended that you do not move it
when it is switched on or before it has cooled down.
26. To prevent food contact with the interior upper screen and heating element, DO NOT OVERFILL
the basket.
27. NEVER POUR oil into the basket or pan. Fire and personal injury could result.
28. When in operation, air is released through the air outlet vent. KEEP YOUR HANDS AND FACE at
a safe distance from the air outlet vent. Please also take care of hot air while removing the
basket & pan from the appliance.
29. Should the appliance emit black smoke, UNPLUG IT IMMEDIATELY and wait for the smoke to
stop before removing oven contents.
30. Should the cooking cycle time be too long, burning the food and smoke starts release from the air
outlet - UNPLUG IT IMMEDIATELY and wait for the smoke to stop before removing oven
contents. Once it is safe and sufficiently cooled, please clean the oven accessories to avoid
stubborn grease and grime.
31. Remove the plug from the socket by gripping the plug. Do not pull on the cord to disconnect the
appliance from the mains. Always unplug the unit when not in use, before cleaning or when
adding or removing parts.
32. Let the appliance cool down for approximately 30 minutes before handling, cleaning, or storing.
33. Make sure the ingredients prepared in this unit come out cooked to a golden/yellow colour rather
than dark or brown. Remove burnt remnants.
34. CAUTION: Do not move the sliding button guard forward until the pan and basket are resting on
a level, heat resistant surface. Discontinue use if the sliding button guard ever becomes
detached from the unit.
35. Do not use accessories or attachments other than those we supply.
36. This appliance is intended for normal household use only. It is not intended for use in commercial
or retail environments. Do not use outdoors.
37. If the oven is used improperly or for professional or semi-professional purposes or if it is not used
according to the instructions in the user manual, the warranty will become invalid.
38. Should the inner temperature control system fail, the overheating protection system will be
activated and the Unit will not function. Should this happen, unplug the power cord. Allow time for
the Unit to cool completely before restarting or storing.
39. The appliance has a built in “shut-off” device, that will automatically shut down the unit when the
Timer LED reaches zero. You can manually switch off the appliance by selecting the Power
Button. The fan motor will continue running for approximately 20 seconds to “cool down” the unit.
40. This appliance features as built-in safety switch. Only once the basket and pan have been
inserted into the Airfryer correctly, will the appliance switch to “Stand-By” Mode or continue its
cooking cycle.
41. Do not use harsh abrasives, caustic cleaners or oven cleaners when cleaning this appliance.
42. Do not use anything metal or sharp, you will damage the non-stick surfaces.
IMPORTANT SAFEGUARDS
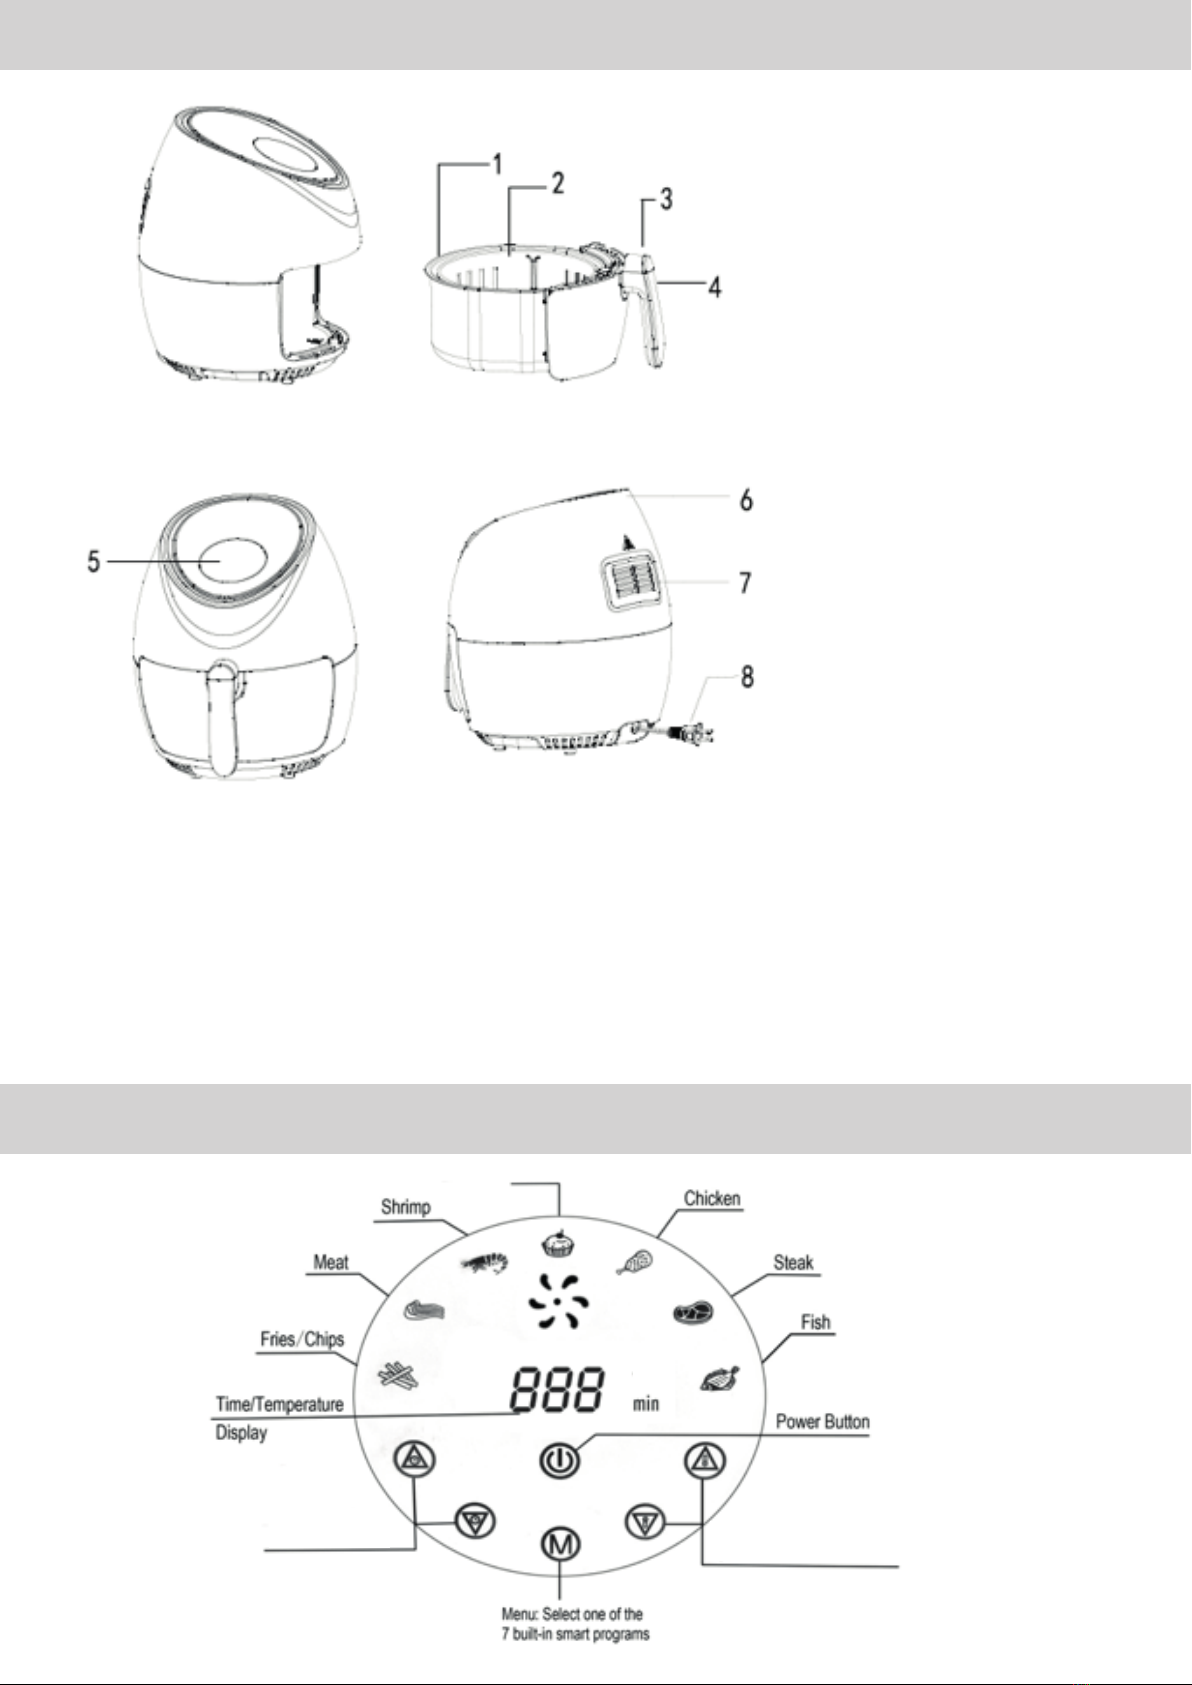
1) Pan
2) Basket
3) Basket Release Button
4) Basket Handle
5) Digital Touch Control Panel and Screen
6) Air Inlet
7) Air Outlet
8) Cord and Plug
• Food Divider/ Separator Insert (optional to be used inside the basket)
PRODUCT COMPONENTS
CONTROL PANEL & COOKING TIMES
Bake
Timer: Sets timer
up to 60 minutes Temperature: Sets temperature
up to 200ºC
ºC
The spinning blue fan icon will appear when the unit is turned on and for up to 20 seconds after it
is turned off.
To cycle through the smart preset programs, keep pressing the “M” button. To select one of the
smart presets, simply press the power button once. When a smart preset program is selected, the
predetermined time and cooking temperature function begins. Note: you can override the preset
program at any time during cooking by increasing time and temperature manually.
You can adjust time or temperature by pressing the “ ” or “ ” buttons. Time is on the left side of
the screen and temperature on the right side of the screen. Tip: quickly reach the time or temper-
ature you require by pressing and holding your finger on the appropriate arrow button. You turn
the unit off at any time during the cooking cycle by pressing the power button once.
The display conveniently shows a countdown of the remaining cooking time and will simultaneous-
ly show the selected cooking temperature during a cooking cycle.
▲ SMART PRESET CHART
This chart shows the time and temperature settings for each of the smart presets.
Keep in mind that these settings are indications. As ingredients differ in origin, size, shape and
brand, we cannot guarantee the best settings for your ingredients.
Warning
Never use a cooking vessel filled with cooking oil or any other liquid with this unit! Fire hazard or
personal injury could result.
▲ COOKING GUIDE
This guide will help you select the correct temperature and time for best results. As you become
more familiar with the Power Air Fryer XXXL’s cooking process, you may adjust these settings to
suite your own personal tastes.
*We recommend preheating the unit for more efficient cooking simply by selecting a cook time of 2
or 3 minutes and cook at the default or higher temperature. For preheating, you will need to insert
the empty pan and basket (already assembled) into the air fryer.
CONTROL PANEL & COOKING TIMES
SETTING
DEFAULT
TEMPERATURE
DEFAULT
TIME
French Fries 200°C 15 Minutes
Roast 180ºC 25 Minutes
Shrimp 160ºC 20 Minutes
Bake 160°C30 Minutes
Chicken 200°C20 Minutes
Steak 180ºC 20 Minutes
Fish 160ºC 20 Minutes
COOKING TIMES
FOOD ITEM
MIN-MAX
(cups or
grams)
TIME*
(minutes)
TEMP °C
SHAKE
COMMENTS
Thin Frozen
Fries
1 1/
4
-3 cups
15-16
200°C
YES
Thick Frozen
Fries
1 1/
4
-3 cups
15-20
200°C
YES
Homemade
Fries
1 1/
4
-3 1/
4
cups
10-16
200°C
YES
Add 1/
2
Tbsp. oil
Homemade
Potato Wedges
1 1/
4
-3 1/
4
cups
18-22
180°C
YES
Add 1/
2
Tbsp. oil
Homemade
Potato Cubes
1 1/
4
-3 cups
12-18
180°C
YES
Add 1/
2
Tbsp. oil
Hash Browns
1 cup
15-18
180°C
YES
Potato Gratin
2 cups
15-18
200°C
Steak
1/
4
-498grams
8-12
180°C
Pork Chops
1/
4
-498grams
10-14
180°C
Hamburger
1/4-498grams
7-14
180°C
Sausage Roll
1/
4
-498grams
13-15
200°C
Chicken
Drumsticks
1/
4
-498grams
18-22
180°C
Chicken Breast
1/
4
-498grams
10-15
180°C
Spring Rolls
1/
4
-
1360grams
15-20
200°C
YES
Use oven-ready
Frozen Chicken
Nuggets
1/
4
-498grams
10-15
200°C
YES
Use oven-ready
Frozen Fish
Sticks
1/
4
-498grams
6-10
200°C
Use oven-ready
Mozzarella
Sticks
1/
4
-498grams
8-10
180°C
Use oven-ready
Stuffed
Vegetables
1/
4
-498grams
10
160°C
Cake
1 1/
4
cups
20-25
160°C
Use baking tin
Quiche
1 1/
2
cups
20-22
180°C
Use baking tin/ oven
dish
Muffins
1 1/
4
cups
15-18
200°C
Use baking tin
Sweet Snacks
1 1/
2
cups
20
160°C
Use baking tin/ oven
dish
COOKING TIMES

The cooking time for whole roasted chicken will vary with weight. Use a meat thermometer
to check the internal temperature as per the chart below:
Food
Type
Internal Temperature
Beef & Veal
Ground
160° F (70° C)
Steaks,
roasts-medium
160° F (70° C)
Steaks, roasts-rare
145° F (63° C)
Chicken & Turkey
Breasts
165° F (75° C)
Ground, stuffed
165° F (75° C)
Whole bird, legs,
thighs, wings
165° F (75° C)
Fish & Shellfish
Any type
145° F (63° C)
Lamb
Ground
160° F (70° C)
Steaks,
roasts-medium
160° F (70° C)
Steaks, roasts-rare
145° F (63° C)
Pork
Chops, ground, ribs,
roasts
160° F (70° C)
Fully cooked ham
140° F (60° C)
!HINTS AND TIPS
!
•Foods that are smaller in size usually require a slightly shorter cooking time than
larger ones.
•Large quantities of food only require a slightly longer cooking time than smaller
quantities.
•“Shaking” smaller sized foods halfway through the cooking process, assures that all
the pieces are evenlyfried.
•Misting a bit of vegetable or olive oil to fresh potatoesis suggested for a crispier
result. When adding a little oil, do so just before cooking.
•Snacks normally cooked in an oven can also be cooked in the Milex Power Air Fryer
XXXL.
•Use pre-made dough to prepare filled snacks quickly and easily. Pre-made dough
also requires a shorter cooking time than homemade dough.
•Place a heat resistant baking tin or oven dish in the Milex Power Air Fryer Oven
XXXL when baking a cake or quiche. A heat resistant tin or dish is also suggested
when cooking fragile or filled/stuffed foods.
•You can use the Milex Power Air Fryer XXXL to reheat foods. Simply set the
temperature to 150° Cfor up to 10 minutes.
•Meat, fish and vegetables can be coated with a light spray of olive oil before
being
grilled;
this will further help to prevent the food from sticking to the bowl surface
.
•To prevent heat loss and for even cooking, do not remove the basket and pan
frequently
fromthe appliance.
COOKING TIMES
HINTS AND TIPS

Fish -Thai infused flavours, lime, coriander, cumin, lemon,
teriyaki,
dill,
honey.
Mixed Vegetables -
(Onion,
peppers,
courgettes)
Rosemary, garlic, thyme,
basil.

! ! "" ! !
!
Recipe Ideas
Garlic and
Herbs:
Slice 2cloves of garlic, pour over some olive oil
and
sprinkle with your favourite herbs,
thyme and rosemary are a good
choice.
Chilli and
Garlic:
Slice 2cloves of garlic, pour over
some
olive oil and add a pinch of dried chilli
flakes.
Herby
flavour:
Add dried bay leaves, these will add a subtle flavour; they will start
to
heat and release
their
fragrance.
Thai
flavours:
Add coconut milk, sliced lemongrass and crushed kaffir lime leaves to impart a
Thai
fragrance.
Oriental:
Add sliced ginger, rice wine and soy sauce
.
!FOOD SAFETY
Check food is cooked through before serving. If in doubt, cook it a bit more.
Cook meat, poultry, and any derivatives (mince, burgers, etc.) until the juices run clear. Cook fish until
the flesh is opaque throughout.
! SLIDING BUTTON GUARD
The sliding button guard helps to ensure that you do not press the basket release button by accident.
Pressing the basket release button will cause the basket to separate from the pan and may result in injury
if not done on a level, heat-resistant surface.
Do not move the sliding button guard forward until the pan and basket are resting on a level, heat-resistant
surface.
CAUTION: Discontinue use if Sliding Button Guard ever becomes detached from Unit.
To remove the basket from the pan, simply slide the button guard forward and press the release button
on the handle to free the basket from the pan
! BEFORE FIRST USE
Before using this appliance, please read these instructions completely. Save this manual and pass it on
to next user.
Unpack the appliance and remove all protective packaging, stickers, labels and wrappings. Check that
all accessories and parts are included. If the unit is incomplete, kindly return it to the retailer immediately.
Take the entire unit in its original packaging and the proof of purchase to the store where your purchase
was made.
RECIPE IDEAS
FOOD SAFTY
SLIDING BUTTON GAURD
BEFORE FIRST USE

SHAKING INGREDIENTS
USAGE
! ! "# ! !
!
Please ensure to discard or store the protective packaging and wrappings immediately after the above
check. It is important to keep these away from babies, infants and children for safety purposes.
Place the unit on a stable, horizontal and even surface.
Pull the pan out from of the fryer. You may feel a slight resistance when pulling the pan out. Place
your hand on top of the appliance and gently pull the pan handle. CAUTION: IF THE SLIDING
BUTTON GUARD MOVES FORWARD WHEN REMOVING THE PAN, BE CAREFUL NOT TO
PRESS THE BASKET RELEASE BUTTON. THE PAN WILL SEPARATE FROM THE BASKET AND
MAY CAUSE INJURY.
Clean the pan and basket with hot water, dishwashing liquid, and a non-abrasive sponge. Wipe the inside
and outside of the appliance with a cloth. Note that the pan and basket are dishwasher safe parts.
! ‘SHAKING’ INGREDIENTS
To Ensure even cooking, some foods require “shaking” during the cooking process. To do this, simply
remove the pan and basket from the unit... gently shake the contents as needed and place back into the
appliance to continue cooking. For heavier foods, you might want to separate the basket from the pan
before shaking.
Caution: The pan and basket will be hot... wear an oven mitt during this procedure.
Never move the sliding button guard while shaking or you may press the basket release button
accidentally.
Tip: Set the timer to 1/2 the time needed for the recipe. The timer bell will alert you when it’s time to “shake.”
When you hear the timer emit a beep sound, the preset preparation time has elapsed.
! USAGE
Warning
Never use a cooking vessel filled with cooking oil or any other liquid with this unit! Fire hazard or
personal injury could result. This appliance cooks with hot air only.
1. Place the appliance on a stable, horizontal, even and heat-resistant surface. Leave at least
10cm free space on the back and sides, and pay attention to place the appliance away from
curtains, wall covering and other combustible materials.
2. Put the basket into the pan. DO NOT FILL THE PAN WITH OIL OR ANY OTHER LIQUID.
NEVER USE THE BASKET WITHOUT THE PAN.
3. Place food ingredients into the basket and then put the basket and pan back into the
appliance.
4. Plug the power cord into the mains power oulet.
5. The appliance will emit a beep sound and the display will illuminate the power button.
6. Press the power button once to turn the appliance ON.
7. You will notice that the appliance is showing the default cooking temperature of 180°C and
cooking time of 15 minutes.
SHAKING INGREDIENTS
USAGE

! ! "$ ! !
!
7.1 If you would like to use the default temperature and time, simply press the power button
once to select it.
7.2 You are also able to manually set your own cooking time and temperature. Simply use
the “ ” or “ ” buttons. The timer can be adjusted in one (1) minute increments up to
maximum of sixty (60) minutes. The minimum time that can be set is one (1) minute. The
temperature can be adjusted in 5°C increments up to a maximum of two hundred (200)
degrees Celsius. The minimum temperature which can be set is 80°C. When you are
satisfied with your selection, press the power button once to start.
7.3 If you would like to use one of the seven (7) smart presets, press the M button which will
allow you to scroll to your desired smart preset. When you are satisfied with your
selection, press the power button once to start.
8. Now the control panel will display and illuminate the blue spinning fan blade icon. This
indicates that cooking has started. Note that once you have started cooking, you can at any
time override your previous selection and set your own cooking time and temperature by
simply pressing the increase or decrease time or temperature arrows.
Note: we recommend shaking ingredients midway through the cooking cycle to ensure
more even and uniform cooking. To do this, pull the pan out of the appliance by the handle.
The appliance will automatically turn off the fan and the element. Carefully shake the
ingredients. When done, slide the pan and basket back into the appliance and the
appliance will turn back on and automatically resume the same cooking cycle.
CAUTION: DO NOT PRESS THE BUTTON ON THE HANDLE DURING SHAKING, THIS
WILL DETACH THE BASKET FROM THE PAN. If shaking the ingredients in the pan is
difficult. You can place pan on a pot holder. Wearing oven gloves, release the basket, and
shake the basket.
9. When the cooking cycle has completed and the timer has finished, the appliance will stop
heating and the control panel display will turn off, showing only the power icon and blue
spinning fan icon. The appliance motor will continue to run for approximately 20 seconds to
allow for cooling. Once cooling has completed, the appliance will emit five (5) beep sounds
and turn off.
10.Now pull the pan out from of the fryer and place it on a pot holder. NOTE: Oil from the
ingredients will gather in the bottom of the pan, be careful when sliding the pan out from fryer.
11.To remove the basket from the pan, simply slide the button guard forward and press the
release button on the handle to free the basket from the pan. Carefully pour ingredients out
of basket onto a plate or serving dish. Use nonabrasive utensils to remove larger foods. Do
not turn the basket upside down with the pan still attached... excess oil that has collected on
the bottom of the pan will leak onto the food. If you are using tongs, please make sure to
use non-abrasive, non-metal tongs to avoid scratching the non-stick coating on the basket.
12.When a quantity of food is cooked, the appliance is instantly ready for preparing another
batch. When the cooking cycle is over, you may begin use again immediately.
Notes:
•Do not let food exceed the top of the basket. If the ingredients may become bigger after heating,
please ensure that the heated volume does not exceed the top of the basket.
•Only when the basket and pan are inserted corrected, will the appliance operate.
•Always wear oven mitts when touching the appliance and when inserting or removing the pan
or basket from the appliance.

Model Number: MPA001
E-Mail: [email protected]
www.milex.co.za
Tel: (+27 11) 444 8800
Distributed by the Homemark Group
Private Bag X9979, South Africa.
www.homemark.co.za

while the unit is cooking, it will
trigger the Auto Shut Off mode.
Select a preset or select the
time and temperature. Press
the power button again and
cooking will begin.
Food not cooked
The basket is overloaded.
The temperature is set too low.
Use smaller batches for more
even frying.
Use the temperature control
button to increase the
temperature and continue
cooking
Food is not fried evenly
Some foods need to be
"shaken" during the cooking
process.
Check the “SHAKING
INGREDIENTS” section of this
manual.
Pan won’t slide into the
appliance properly
The basket is overloaded.
The basket is not placed into
the pan correctly.
Do not fill the basket above the
max level.
Gently push the basket into the
pan until you hear a ‘click’
sound.
White smoke coming from unit
Too much oil is being used.
The pan has excess grease
residue from previous cooking.
Foods heavy with oil will cause
dripping in the pan. Oil in the
pan will smoke but have no
effect on the unit or the food.
Wipe down to remove excess
oil.
Clean the appliance, pan and
basket after each use.
Fresh fries are not fried evenly
Wrong type of potato being
used.
Potatoes not rinsed properly
during preparation.
Use fresh, firm potatoes.
Use cut sticks and pat dry to
remove excess starch.
SUGGEST PARBOILING
HOME MADE POTATO CHIPS/
FRIES. PAT DRY TO
REMOVE WATR. LIGHTLY
COAT IN OLIVE OIL AND
THEN AIR FRY.
Fries are not crispy
Raw fries have too much water.
Dry potato sticks properly
before misting oil. Cut sticks
smaller. Coat the potato sticks
in a bit of oil.
Error
E1 - Broken circuit of the
thermal sensor
E2 - Short circuit of the thermal
Call customer service.

! ! "' ! !
!
sensor
! FREQUENTLY ASKED QUESTIONS
1. Can I prepare foods other than fried dishes with my Power Air Fryer XXXL?
You can prepare a variety of dishes including steaks, chops, burgers, and baked goods. Refer to
the recipe guide in the instruction manual as well as recipe booklet.
2. Is the Milex Power Air Fryer XXXL good for making or reheating soups and sauces?
Never cook or reheat liquids in the Power Air Fryer XXXL.
3. Is it possible to shut off the unit at any time?
Press the power button once or remove the pan from the appliance.
4. What do I do if the Unit shuts down while cooking?
As a safety feature, the Power Air Fryer XXXL has an Auto Shut-Off device that
prevents damage from overheating. Remove the pan and set it on a heat resistant surface.
Unplug and allow the appliance to cool down. Plug back in and restart with the power button.
5. Does the Unit need time to heat up?
Pre-heating is needed when you are cooking from a “cold start,” add 3 minutes to the cook time to
compensate.
6. Can I check the food during the cooking process?
You can remove the pan at any time while cooking is in progress. During this time, you can “shake”
the contents in the basket if needed to ensure even cooking. Time and temperature will resume
where you left off once the pan is inserted back into the appliance.
7. Is the Milex Power Air Fryer XXXL dishwasher safe?
Only the pan and basket are dishwasher safe. The appliance itself containing the heating element
and electronics should never be submersed in liquid of any kind or cleaned with anything more than
a hot, moist cloth or nonabrasive sponge with a small amount of mild detergent.
8. What happens if the Unit still does not work after I have tried all the troubleshooting
suggestions?
Never attempt a home repair. Contact the manufacturer and follow the procedures set forth by the
warranty. Failure to do so could render your warranty null and void.
!SERVICING THE APPLIANCE
There are no user serviceable parts in this appliance. If the unit is not operating correctly, please check
the following:
•You have followed the instructions correctly
•That the unit has been wired correctly and that the wall socket is switched on.
•That the mains power supply is ON.
•That the plug is firmly in the mains socket.
FREQUENTLY ASKED QUESTIONS
SERVICING THE APPLIANCE

! ! "( ! !
!
If the appliance still does not work after checking the above:
Consult the retailer for possible repair or replacement. If the retailer fails to resolve the problem
and you need to return the appliance, make sure that:
•The unit is packed carefully back into its original packaging.
•Proof of purchase is attached.
•A reason is provided for why it is being returned.
If the supply cord is damaged, it must be replaced by the manufacturer or an authorised service
agent, in order to avoid any hazard. If service becomes necessary within the warranty period, the
appliance should be returned to an approved service centre. Servicing outside the warranty period
is still available, but will however be chargeable.
!CHANGING THE PLUG
Should the need arise to change the fitted plug, follow the instructions below.
This unit is designed to operate on 230V-240V current only. Connecting to other power sources
may damage the appliance. Connect a three-pin plug as follows:
The wires in this mains lead are coloured in accordance with the following code:
•Green/Yellow (Earth)
•Blue (Neutral)
•Brown (Live)
!SPARES AND ACCESSORIES
Please visit www.milex.co.za to find your nearest Milex retailer as well as information about spares and
accessories. The use of genuine Milex spare parts helps to maintain optimised performance and validates
your guarantee.
ADD MILEX WARRANTY INFO
!
CHANGING THE PLUG
SPARES & ACCESSORIES

WARRANTY INFORMATION
Please note that all Milex product returns
are subject to the following conditions :
· Original proof of purchase must be produced.
· All accessories that come with the product are returned, and complete in all respects.
Any item received with the product purchased must be returned.
· All products carry a 7 day money back guarantee and a 30 day exchange if the product is unopened
or unused, unless expressly indicated on the product.
· All products must be returned in their original packaging.
· Milex reserves the right to refer products to the head oce for assessment when
an in-store decision regarding defect cannot be taken.
· All Milex products carry a 24 month warranty.
Certificate of Warranty
Our goods come with guarantees that are consistent with the Consumer Protection Act. You are
entitled to a replacement for any major failure or manufacturing defect. You are also entitled to
have the goods repaired or replaced if the goods fail to meet prescribed specifications or quality
standards.
The benefits under the MILEX warranty are in conjunction with other rights you will be entitled
to under the Consumer Protection Act in relation to the goods.
In order for this warranty to be valid and to allow us to meet your requirements,
please register your purchase(s) with MILEX. Please visit www.milex.co.za and complete all
details. You must have a valid email address to register. Please retain your original receipt to
validate your purchase.
Servicing outside the warranty period is still available, but will however be chargeable.
(Excludes monetary refunds under normal purchasing conditions)
www.milex.co.za
Table of contents
Other Milex Fryer manuals


