Milo Fitness Flipper TS-03 Installation guide
Models TS-03 and TS-04
Please refer to the Owner’s Manual for assembly instructions,
product registration and information on accessory products.
U.S. PATENTS PENDING


All rights reserved
Copyright ©2011 Kevin G. Abelbeck
Flipper Training Manual, 1st Edion
Published by Milo Fitness, LLC
Fort Collins, CO 80525
To obtain addional copies of this manual,
contact Milo Fitness, LLC at www.MiloFit.com
or email a request to [email protected]om
“Because Strength Maers”
The publisher is not responsible for any injury resulng from any material contained herein. This
publicaon contains informaon relang to the use of an exercise device but is not considered
exhausve of all informaon related to the use of this device. As with any exercise device, use
cauon and only use this device under supervision of a trained strength and condioning profes-
sional.


Table of Contents
FLIPPER Overview
Why Flip? ......................................................................................... 1
What is a FLIPPER? .......................................................................... 3
Using the FLIPPER
Liing Techniques ........................................................................... 5
Standard Li ......................................................................... 5
Side Li ................................................................................ 10
Foot Placement ............................................................................... 13
Size Maers .................................................................................... 21
Using the Loading Charts ................................................................ 25
Training Drills
Indoor Training Drills
Single Li and Rotate .......................................................... 30
Mulple Li and Rotate ...................................................... 31
Mixed Li and Rotate .......................................................... 31
Last Man Standing .............................................................. 32
FLIPPER Clean ...................................................................... 32
FLIPPER Pull ......................................................................... 33
FLIPPER Power Clean ........................................................... 34
Outdoor Training Drills
1-Man Relay, Even ............................................................... 35
1-Man Relay, Uneven .......................................................... 36
2-Man Relay, Even ............................................................... 37
2-Man Relay, Uneven .......................................................... 38
1-Man Race, Even ............................................................. 39
1-Man Race, Uneven .......................................................... 40
2-Man Race, Even ............................................................... 41
2-Man Race, Uneven .......................................................... 42
Last Man Standing .............................................................. 43
Single Duel .......................................................................... 44
Tesng Protocols
60 Second Test .................................................................... 45
Club Test ............................................................................. 46
References ........................................................................................ 47

Overview
Why Flip?
Tire ipping has long been used as a test of strength in Strongman compeons and more re-
cently as a training tool for numerous sports athletes (Corcoran & Bird, 2009; Hedrick, 2003; Hen-
drick, 2008; Keogh, Payne, Anderson, & Atkins, 2010; S. M. McGill, McDermo, & Fenwick, 2009;
Waller, Piper, & Townsend, 2003). Given the number of years Strongman and Funconal Training
have been around, a limited amount of scienc informaon has been produced (Hendrick 2008,
S.M. McGill, et al 2009), let alone with regard to the event of re ipping. More research has
recently been published, as the value of Funconal Training becomes more apparent to athletes
and strength and condioning professionals.
Research on Tire Flipping has shown this event to exhibit a great deal of muscle acvaon com-
pared to other Strongman events (S.M. McGill, et al, 2009). In Figure 1 a graph is presented from
some of the data published by McGill, et al. This graphically shows the mean values of the aver-
age peak muscle acvaon of sixteen muscle groups (eight on each side - right and le - of the
body) some acng as core muscles (rectus abdominis, external obliques and internal obliques),
back muscles (Lassimus dorsi and erector spinae) and hip/knee extensors (gluteus maximus,
biceps femoris, and rectus femoris).
Fig 1
Overview - Why Flip?
1

In Figure 1, the nine strongman events [Farmer’s Walk (FW), Right-Hand Suitcase Carry (RHSC),
Le-Hand Suitcase Carry (LHSC), Super Yolk Walk (YW), Log Li (LL), Tire Flip, Keg Walk-Le Shoul-
der (KWLS), Keg Walk-Right Shoulder (KWRS) and Atlas Stone Li (SL)], the Tire Flip had the great-
est average peak muscle acvaon in eight of the sixteen muscles and second greatest in the
other eight. The Atlas Stone Li (SL) was the only other event which reported similar overall peak
muscle acvaon. Strongman events mimic funconal movements, liing, carrying, pushing,
pulling and throwing. These movements are also commonly found in many sporng acvies.
Therefore, using funconal or “strong man” training for sports athletes is a valuable training ad-
dion and the Tire Flip is a top choice.
The scienc literature has been overwhelmed with “core training” and “core condioning”. A
recent single arcle search in the area of Sport Sciences revealed over 230 published papers on
“core training”. Is the strength of the muscles of the abdominal cavity and lower back important?
Yes, they are. We are also learning that abdominal exion may not necessarily be the best way,
and certainly not the only way, to train these muscles. Funconal training, where objects are
lied in a less than stable environment, requiring spinal posture, may be most benecial. Sev-
eral concepts exist that support this, including a rapid muscle contracon for sness, enhanc-
ing muscular binding where several muscles contract together, and also eliminang “muscular
leaks” where the weaker muscles are forced into eccentric contracon by stronger muscles (S.
McGill, 2010). As an example, dead lis have been shown to elicit a greater muscle acvaon of
the rectus abdominis, external oblique, longissimus and mildus muscles compared to stability
ball abdominal and lower back exercises (Nuzzo, McCaulley, Cormie, Cavill, & McBride, 2008). As
shown on the facing page, re ipping had one of the greatest core muscle acvaon results of
several funconal training events (S. M. McGill, et al., 2009).
Liing and carrying objects is probably one of the oldest forms of exercise, therefore it is no won-
der that so many modern compeve sports simulate the movement and physical demands of
a re ip and other liing events (Waller, et al., 2003). As noted by Waller, et al, a concern with
these acvies is low back stress. It is interesng to note that McGill et al (S. M. McGill, et al.,
2009) noted the smallest A/P lumbar joint shear forces with the re ip compared to all other
events, even with the highest mass of load lied in the re ip. Part of this reason may be the
support the re gives to the chest during the inial phase of the li. This will be discussed more
in the “Liing Techniques” secon of this manual.
Another important feature of re ipping in general is the feedback to the lier. These funconal
acvies break up the otherwise typical and possibly monotonous training with something dier-
ent and in the process create some compeon to the athletes (Benne, 2008). The knowledge
of a successful li gives posive feedback to the lier (Randell, Cronin, Keogh, & Gill, 2010). Few
acvies oer a more empowering feedback to an athlete as grabbing a loaded FLIPPER and
throwing it over. That is a big “I beat it! It is on its back, and I put it there”. This builds condence
as well as physical strength and power in your athletes.
Overview - Why Flip?
2

What is a FLIPPER?
The FLIPPER is a funconal training tool designed to simulate “Tire Flipping”. The FLIPPER is the
rst re ipping implement that has been designed as an exercise device. Using discarded truck
and tractor res brings with it a series of limitaons, perhaps most importantly, the inability to
alter the resistance of the device. What the removable weight plate did for training with barbells,
the FLIPPER has done for re ipping.
The basic components of the FLIPPER are shown in Figure 2. The FLIPPER is symmetrical about
the le and right, the front and back as well as the top and the boom. In doing so, the FLIPPER
may be posioned in any orientaon and the same features will be available to the lier.
The handles can be grasped on the front horizontal secon or further toward the center of the
device on the angled secon. Most liers prefer to use the horizontal secon of the handles or
the juncon between the horizontal and angled secons as these provide the greatest leverage
and the most comfort to the lier during the li. More detail on hand placement may be found
in the “Liing Techniques” secon of this manual.
3
HandleHandle
Bumper Chest Support
Bumper Extrusion
Weight Pins
Weight Pins
Overview - What is a Flipper?
Fig 2

There are two types of bumpers, the Bumper Chest Pad and the Bumper Extrusion. The Bumper
Chest Pad provides a comfortable “cushion” to posion against the chest of the lier during the
inial phase of the li. The Bumper Extrusion gives impact absorbing protecon to the frame as
the FLIPPER is ipped over and contacts the ground.
The Weight Pins are used to hold weight plates to vary the loading of the FLIPPER. It is recom-
mended that whatever weight is placed on a weight pin on one side (right or le) the same weight
is placed on the adjacent weight pin across the center beam. This allows for even weight place-
ment between the right and le side of the user and helps the FLIPPER to track straight when
ipped over. The front to back loading of the Weight Pins may be altered to vary the simulated
“Total Weight” of the FLIPPER with a single load setup. This is explained in detail in the “Using the
Loading Charts” secon.
Indoor versus Outdoor Training:
Outdoor training involves ipping the FLIPPER end over end. Indoor training uses a Docking Sta-
on to keep the FLIPPER in a predened locaon. Athletes may also li the FLIPPER to vercal and
then lower or drop the FLIPPER back to the starng posion, rather than ipping it over. Outdoor
training, ipping the FLIPPER end over end, should only be done where space is not a concern due
to the presence of other people or objects that may be hit by the FLIPPER when being ipped.
When the FLIPPER is released from the Athlete’s grip, the device may not track in a straight line.
Large open areas may be used for Outdoor training even if there is a roof overhead. The locaon
of using Outdoor Training is le to the discreon of the Athlete or Coach in charge of the training
area.
Spoers:
Spoers should always be used. The lier is intended to use the lower handles on one end of the
FIIPPER, leaving the upper handles on the same end for a spoer on each side of the lier. The
spoers should stay near the lier to be able to grasp the handles if the lier misses a li. The
spoers should never be too far in front of the lier so as to be in danger of being hit by the FLIP-
PER when it is ipped by the lier. In most cases, if the lier cannot complete a li, the lier will
stop and intenonally step back and drop the FLIPPER. if this is done, the spoers need not assist
in lowering the FLIPPER. As with any liing movement, communicaon between lier and spot-
ters is important.
Warnings:
Consult the Owner’s manual for product detail, care and maintenance. Always inspect your FLIP-
PER before use and comply with all warnings listed in the Owner’s Manual. If your Owner’s Manual
is lost or damaged you may download one from the website at: www.MiloFit.com, or by contacng
your distributor, or Milo Fitness at FLIPPER@Milot.com.
4
Overview - What is a Flipper?

Using the FLIPPER - Liing Techniques
Standard Li Technique:
The literature varies to some degree, but in a re ip, there may be considered four disnct
phases (Keogh, et al., 2010). The rst phase is the “inial pull” or “rst pull” where the device is
rst moved from the ground. The next phase is the “second pull”. In this phase, similar to a hang-
ing clean, the device is rapidly accelerated up by a rapid extension of the legs, hips and back, of
the user. Upon reaching maximum height of the device relave to the user, a “transion” phase
occurs where the hands come o the re, to be reposioned for the nal “push” phase to ip the
re over. Other authors prefer to describe the li in more generalized phases (Hendrick, 2008; S.
M. McGill, et al., 2009; Waller, et al., 2003). Regardless of the terminology, the process starts with
the device on the ground, and ends with the device ipped over away from the lier.
Grips:
To use the FLIPPER, squat down on one side of the device. The lier should grasp the handles
with both hands. The lier may use a supinated grip (wrists forward - Fig 3) or neutral grip (wrists
facing in toward each other - Fig 4). The supinated grip is used when the lier grabs the hori-
zontal poron of the handles and the neutral grip is used when the lier uses the forward facing
outside porons of the handles. There are two liing styles. The Lier’s hands may be inside of
their knees with the feet spaced wide. This is a Sumo Grip (Waller, et al., 2003) and is the supin-
dated grip of Fig 3 with a narrow hand posion.
The lier may, alternavely, use a pronated or overhand grip (wrists facing backward, toward the
feet). Some athletes and coaches prefer the overhand grip, as it is similar to performing a clean
with an Olympic bar. If this grip is used, the transion phase does not require the hands to leave
contact with the handle, and the pronated wrist may reduce tension in the biceps tendon. This
reducon in tendon tension may also be seen with the neutral grip (Fig 4).
Using the Flipper - Liing Techniques
5
Fig 3
Supinated grip
Fig 4
neutral grip
Things to watch if this overhand grip is used include: room for the knuckles to clear the frame
during the li; increased fricon against the hands as the handle must rotate in the hand of the
user, unlike a bar that rotates in the lier’s hand; and losing grip when the palms are facing down
during the li. This may be especially apparent if the lier uses “supplementary second pulls”
(see “Second Pull Phase” secon). Dierent coaches and athletes will have their grip prefernces,
which may also vary with lighter or heavier lis. As a general rule, the neutral grip (Fig 4) is rec-
ommended for both comfort and stability. Ulmately it is the coaches’ decision how their ath-
letes train, including what grip is used.
The lier may also choose to grasp the handles wider with their feet only slightly wider than the
shoulders. The hands will grip the handles slightly wider than the feet with the knees ared out
slightly, as in doing a squat. Some liers prefer to have their knees rest on the outside of their
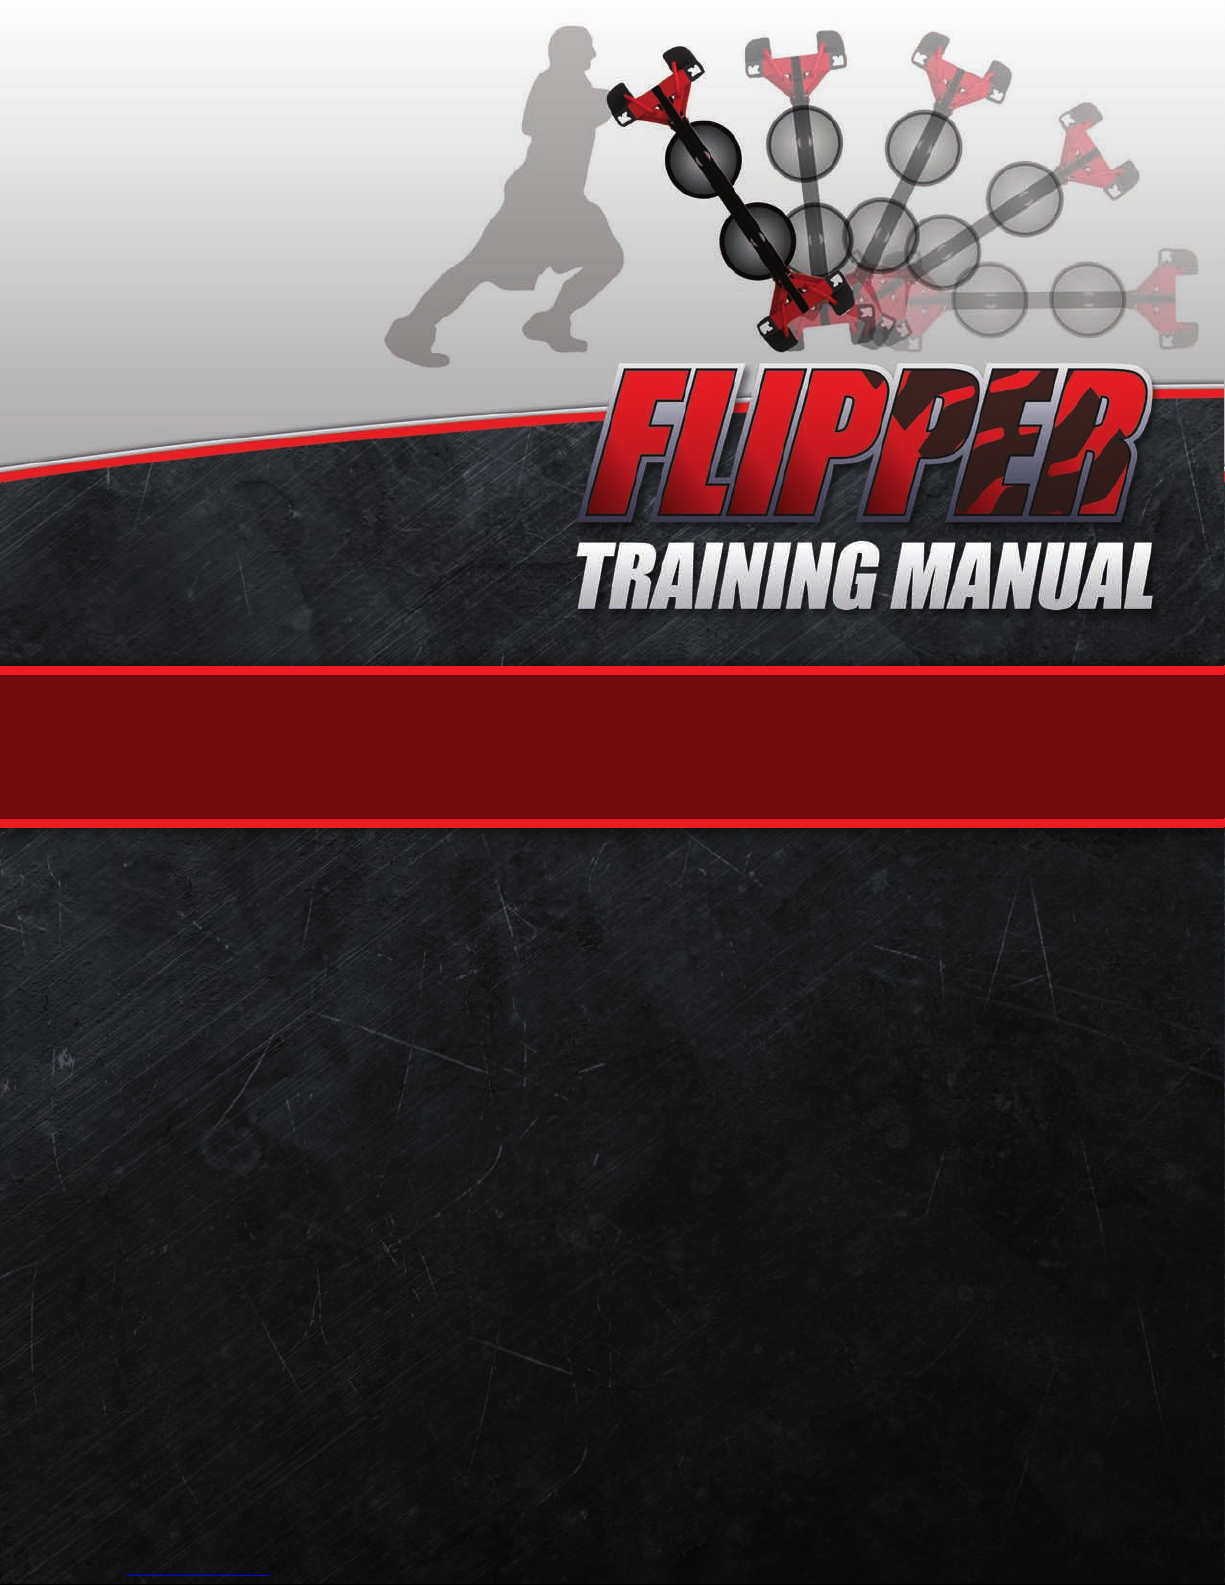
arms. This is the standard or back style (Waller, et al., 2003) and is shown in Figure 5. The feet
should be behind the hands. How far behind may vary. This issue of foot placement is discussed
in detail in the “Foot Placement“ secon. The lier’s chest should be touching the Bumper Chest
Support (item #11).
First Pull Phase:
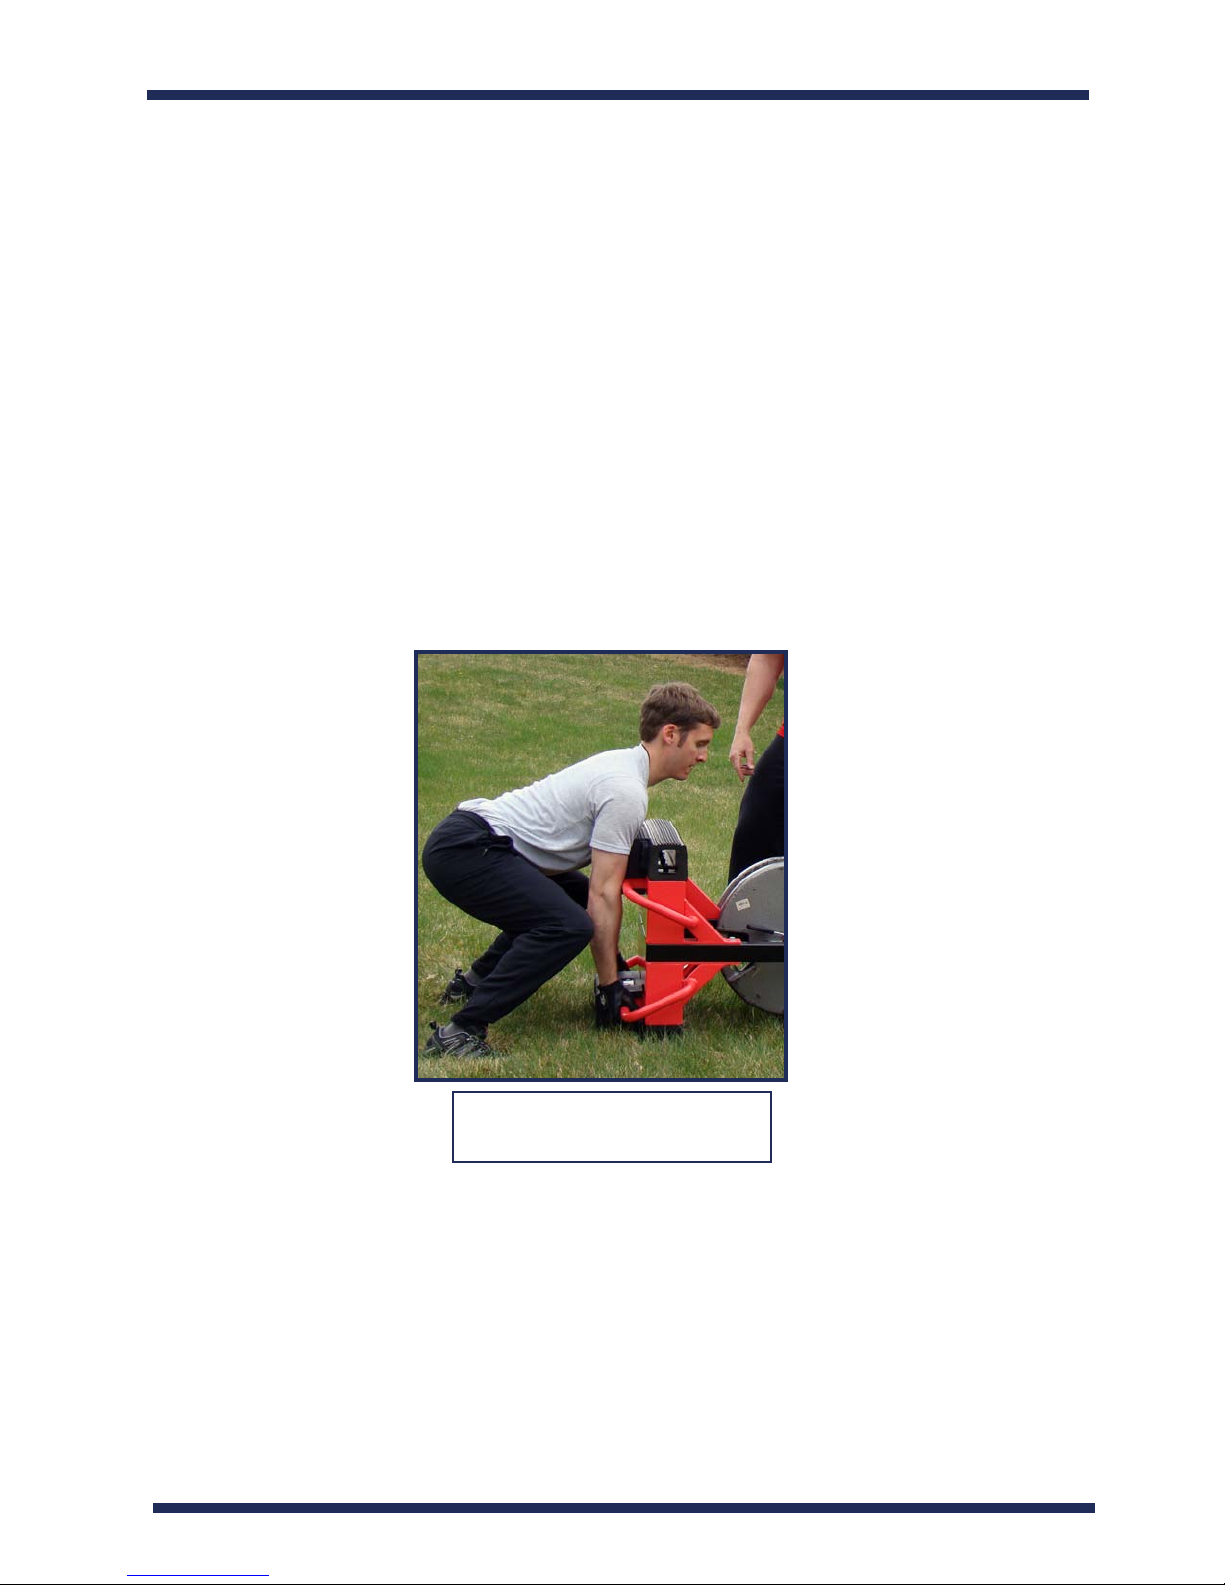
From either liing stance, the lier will extend their hips, knees and ankles (triple extension)
to drive one end of the FLIPPER up (Figure 6). During this “First Pull” phase of the li, the arms
should remain substanally straight and the hips and knees should extend in a relavely equal
manner. This “simultaneous” extension is similar to a squat, as opposed to a deadli which is
a “sequenal” lower body extension, as the bar has to be manipulated around the knee (knee
pass)(Escamilla et al., 2000; Hales, Johnson, & Johnson, 2009). This being stated, it is important
not to rst elevate the hips, by extending the knees, then the hips. This may put excessive stress
on the lower back of the lier. By simultaneous extension, the hips stay lower during the li re-
Using the Flipper - Liing Techniques
6
Fig 5
Standard grip prior to li
quiring less extension of the lower back. For proper liing mechanics, the hips should never be
higher than the shoulders. The improper liing mechanics is shown in Figure 7, where the hips
are higher than the shoulders. The spoer is posioned to the side of the lier to assist the lier
if necessary.
7
Using the Flipper - Liing Techniques
Fig 7
Start of rst pull (improper)
Fig 6
Start of rst pull (proper)

Second Pull Phase:
As the hands of the lier pass the knee, the “Second Pull” phase of the li begins (Figure 8). This
is considered the highest power producon phase of the li. The lier rapidly extends the hips,
knees and ankles and shrugs the shoulders to drive the end of the FLIPPER as high onto the torso
of the body as possible. During this phase, the lier’s feet may come o the ground. Some li-
ers prefer to “kip” or kick the device up with the thigh of one leg contacng the boom Bumper
Extrusion (see Figure 2). This is not necessary and may not be desirable as the training goal is
to build explosive power and strength. This is best aained by centering the body on the device
and generang as much power as possible by rapid simultaneous extension of the legs and hips.
Maximal force and power generaon will not happen if one leg is in the air. With both feet on the
ground, there may be a lower risk of injury (Waller, et al., 2003).
Liing heavier loads, nearing the athlete’s 1RM, the lier may use mulple “second pulls” to get
to the transion phase. The Standard Li with the FLIPPER has many similaries to an Olympic
clean and jerk. Though many of the liing phases are similar, one of the dierences is aer the
second pull of a clean, the athlete must catch the bar in a balanced stance, with the bar on shoul-
ders of the lier. With the FLIPPER, there is a type of “catch”, but with the FLIPPER, the cushioned
rubber bumpers can contact the torso of the lier, even resng against the body of the lier.
In doing so, the lier may perform several sequenal “supplementary second pulls” to work the
implement up their torso unl they are able to rotate their grip, thereby reaching a modied
“transion phase”. If mulple supplementary second pulls are used, the lier will bend their
arms and with the lower bumper on the torso of the lier, squat slightly and drive the FLIPPER
8
Using the Flipper - Liing Techniques
Fig 8
Beginning of second pull
9
up, then exing the arms and shrugging the shoulders for each supplementary second pull. Each
supplementary second pull should increase the height of the FLIPPER on the lier, unl the lier
can posion the FLIPPER on their body to perform the transion phase of the li.
Transion Phase:
Aer the second pull(s), the lier should have the handle height of the FLIPPER at mid-chest.
At this point, with exed arms, the lier rotates their grasp from a pull grip (underhand grip) to
the push grip (overhand grip). This is referred to as the transion phase. The transion phase is
shown in Figure 9.
Geng the device high enough on their body to make the transion phase may be the most
challenging phase for the lier. If the lier cannot complete the li to the transion phase, the
spoer may step in and assist the lier or the lier may step back out of the path of the device
and let it fall to the starng posion. If the lier elects to “scratch” on a li, ensure the lier is
fully aware of the path which the device will fall to the ground and the lier’s feet or any other
body part is clear of this path. Since the FLIPPER acts like it is “hinged” to the ground, the lier
may lean against the cushioned rubber bumpers while they step back away from the device prior
to releasing it and allowing it to fall.
Push Phase:
The nal phase of the ip is the push phase. The end of the transion phase and the beginning
of the push phase is shown in Figure 9. As the name “Push Phase” implies, the lier extends their
arms, keeping their torso upright. The lier pushes the FLIPPER to the vercal posion and over.
The bumpers of the FLIPPER cushion the impact with the ground. Aer this, the “Flip” is com-
plete. Now the same lier, or another lier, may approach the close end and repeat the process
or they may go to the other end and ip the FLIPPER back to the starng posion.
Using the Flipper - Liing Techniques
Fig 9
End of transion phase
and beginning of push phase

When used inside, it is suggested to use the FLIPPER Docking Staon or a large open space, such
as a pracce eld. For outdoor training, any large open space with an appropriately stable and
durable surface may be used. It is recommended that the FLIPPER be used on a grass, turf, or
rubber surface as compared to concrete or asphault, as the harder and more abrasive surface will
wear the bumpers more rapidly. The resistance to the lier may be altered by adding or remov-
ing weight plates from the weight pins as described in the “Using the Loading Charts” secon of
this manual.
Side Li Technique:
If you are not red enough of hearing about “core training”, that’s good, because we are not yet
nished. Previously we discussed the rather overwhelming amount of literature published in this
area, and for good reason. If the lower body is the foundaon of our athletes, and the arms are
the applicaon of force (blocking, throwing, pushing, pulling, tackling, etc.) the trunk, or core, is
the connecon between the upper body and the lower body. If that is a weak link, the chain of
the body will fail. This may mean injury or at the very least a sub-opmal performance on the
eld, court or mat.
When you examine many movements in sports, there is an element of trunk rotaon with a
stable base on the ground. Think about a baer at the mound, a tennis player striking the ball, a
discus, shot, or hammer thrower in compeon. These are obvious applicaons of power where
the legs provide stabilizaon and the upper body moves to drive through and hit or throw an
object. In some cases the “object” may be an opponent. When a guard pulls, a running back
makes a cut, or a wrestler makes an escape or a takedown, for a moment, the feet do not face
the direcon of movement. A key element is the athlete is driving through the opposion to hit
or “throw” the object or person.
It has been shown that the speed of movement as well as the force applied is dierent when the
athlete is able to “throw” the object as opposed to maintain control throughout the movement
(Newton, Kraemer, Hakkinen, Humphries, & Murphy, 1996). In this study Newton and associ-
ates showed an average power output that was 70% greater when the athletes were allowed to
perform a bench press throw as compared to the same movement except they could not release
the bar at the end of the movement. With few excepons, this “throwing” movement is how
our athletes perform. For example, running and jumping is actually “throwing” their own body.
So how does this apply to training? A similar system used by Newton et al., was used to train a
group of athletes in the jump squat (Hori et al., 2008). One group had to catch the weighted bar
on their shoulders as they completed each repeon of their jump training, and the experimen-
tal group used a braking system to catch the weight for the athletes, as if they were truly throw-
ing the weight. Aer eight weeks of training, the results showed a relave increase in the squat
strength was 76% greater in the group that was allowed to throw and not have to “catch” the
weight. The relave countermovement jump height increase was over 212% greater (yes, over
twice as much) in the group that did not have to catch the weight as compared to the group that
had to catch the weight. This suggests that the movement alone may not be enough to opmally
train your athletes. The ability to follow through and “throw” is also important.
Using the Flipper - Liing Techniques
10
11
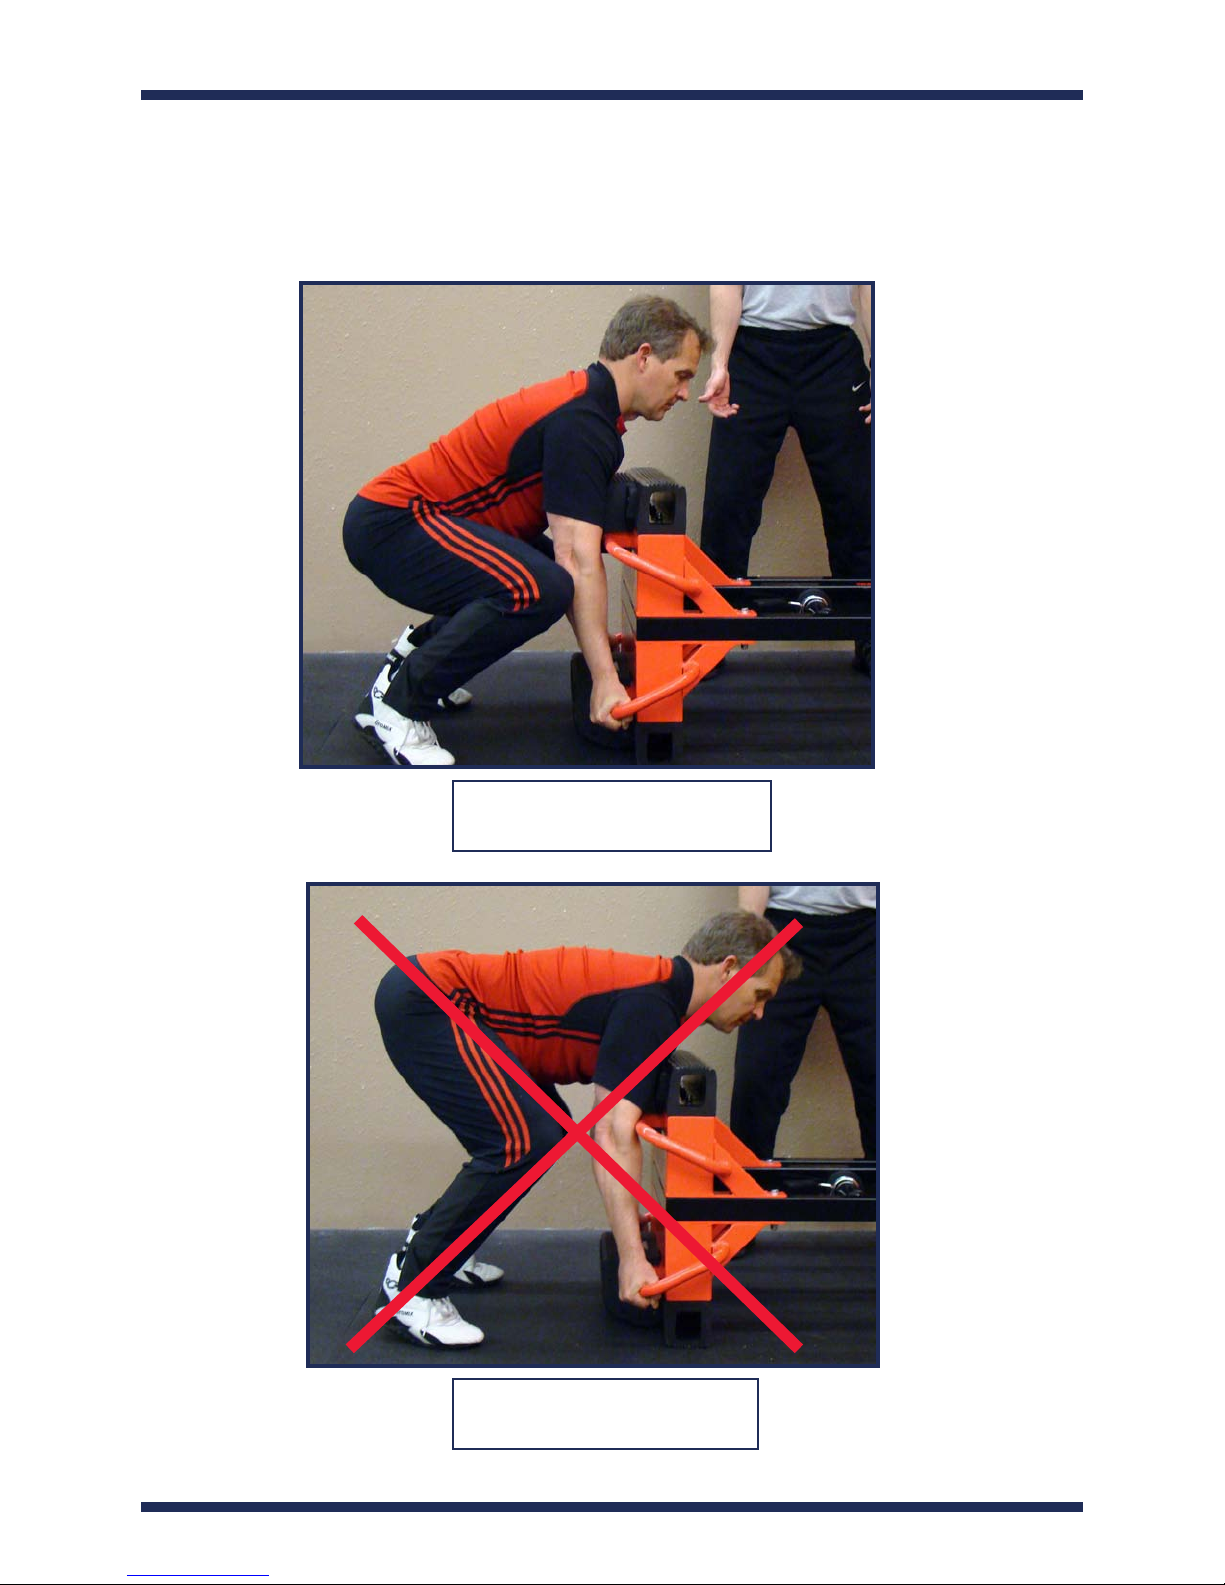
The FLIPPER allows a very unique type of team training that simply cannot be done with a re.
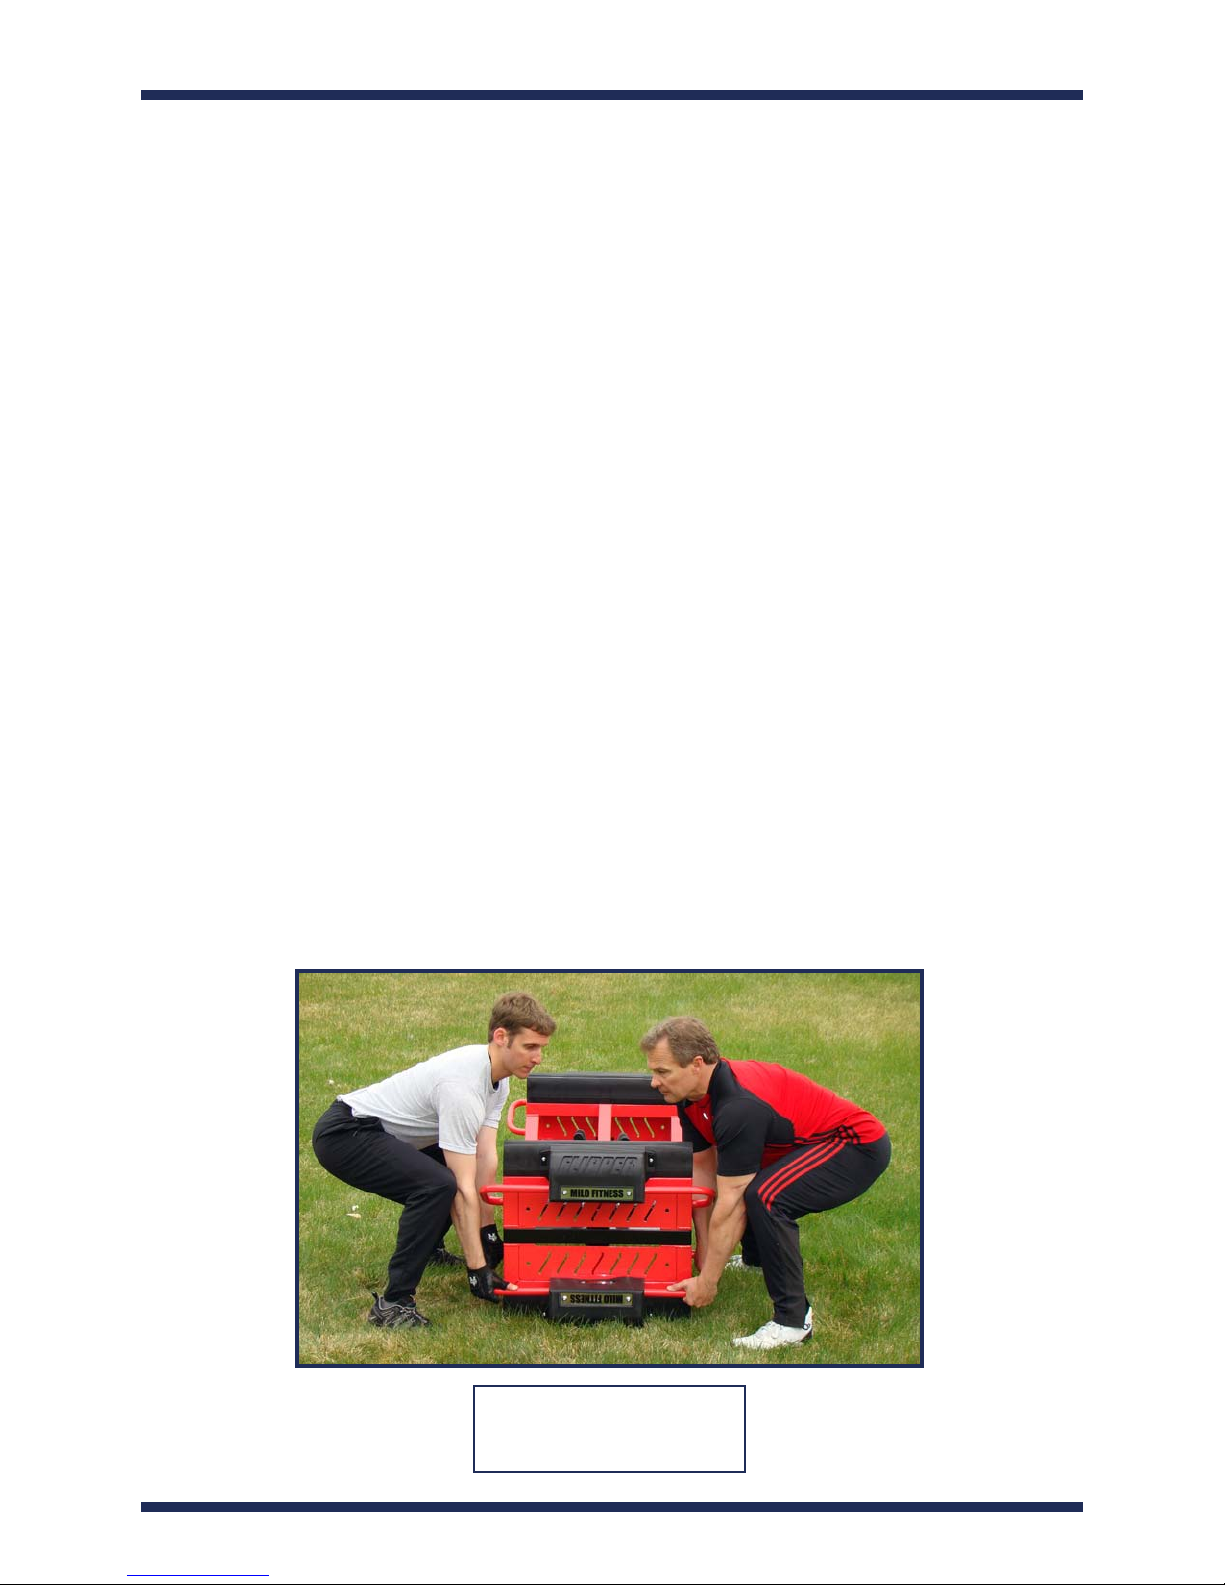
This movement is called a Side Li. The Side Li is performed by two athletes of similar height.
Each athlete stands on the side of the FLIPPER grasping the lower handles, one on each side, as
is shown in Figure 10. Their feet should have a wider than shoulder width stance with their toes
facing the FLIPPER. On command, both athletes extend their hips, knees and ankles to drive the
FLIPPER upward. The movement of the FLIPPER should connue through the beginning of the
second pull phase, as shown in Figure 11, the transion phase, as shown in Figure 12 and the
push phase, as shown in Figure 13. Between the second pull and the push phases the athletes
should rotate their bodies from facing one another, to be in line with driving through the moon
of throwing the FLIPPER over. The acon of the Push Phase should leave the FLIPPER ipped away
from the athletes.
The next repeon is up to the coach, as to another ip in the same direcon or ipping the FLIP-
PER back to the starng posion. It is recommended that for every rotaon the athlete makes to
one side the same rotaon is made to the opposite side. This may be accomplished by keeping
the athletes on the same side of the FLIPPER and for each ip they make “north” they make the
same number of ips “south”. Athletes will tend to want to use only their dominate side. To help
prevent injury and maintain uniform development of the core muscles, equal training to each side
of rotaon is highly recommended.
In that there are two liers, an addional spoer is not mandatory, as each lier is acng as a
spoer to the other lier. If an addional spoer is desired, this spoer may stand between the
liers on the end of the FLIPPER being lied. In essence, the tradional lier/spoer roles are
reversed in that the center athlete is now the spoer and the athletes posioned on the sides of
the FLIPPER are the liers. Many of the drills as presented in this manual may be used for the
Standard Li Technique or the Side Li Technique. The direct applicaon to drills and tesng is
intended to be le to the Strength and Condioning Coaches.
Fig 10
Start of rst pull - Side Li
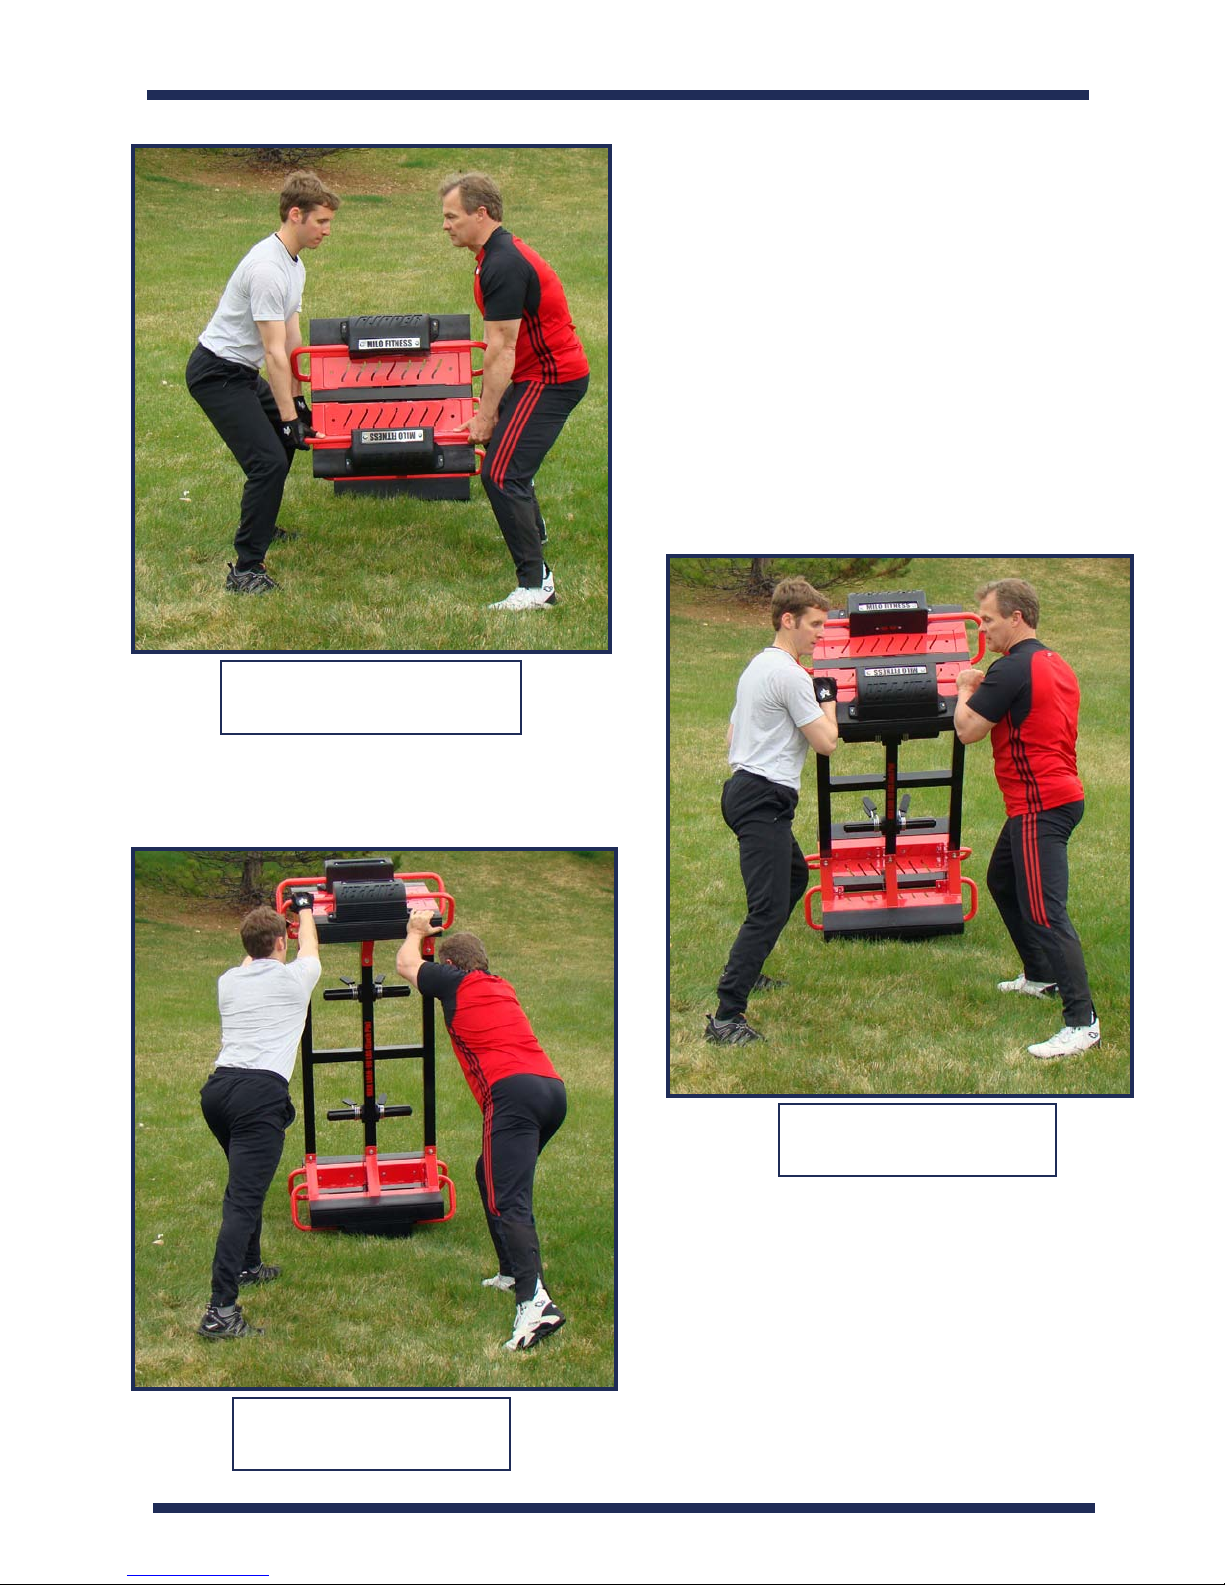
Fig 11
Start of second pull - Side Li
Fig 12
Transion phase - Side Li
Fig 13
Push phase - Side Li
12
Using the FLIPPER - Foot Placement
Foot Placement:
The relave foot placement of the lier to a re has some dierent opinions. In using the FLIP-
PER, some of these variaons are also apparent. A biomechanical and training goal basis will
be presented here for dierent foot posions. Much of the non-scienc data from strongman
competors suggest the feet be placed back away from the close end of the re. The lier is in-
structed to drive not up, as in the deadli, but up and into the re to maximize the liing torque
applied to the re.
The scienc literature presents a dierent perspecve. Waller et al, species the inial move-
ment be similar to a “barbell deadli” and shows the toes of the lier to be near the same fron-
tal plane as the hands of the lier (Waller, et al., 2003). Consistent with this, Hedrick suggests
the lier not allow the knees to dri forward of the toes (Hendrick, 2008). Keogh et al, did not
specify the foot locaon in their study but in their pictorial representaon, at the start of the li,
the liers toes are adjacent to the re and liers hands (Keogh, et al., 2010).
There appears to be a discrepancy between the Strength and Condioning world and that of the
Strongman Compeon world. This may be explained by examining the biomechanics of the li
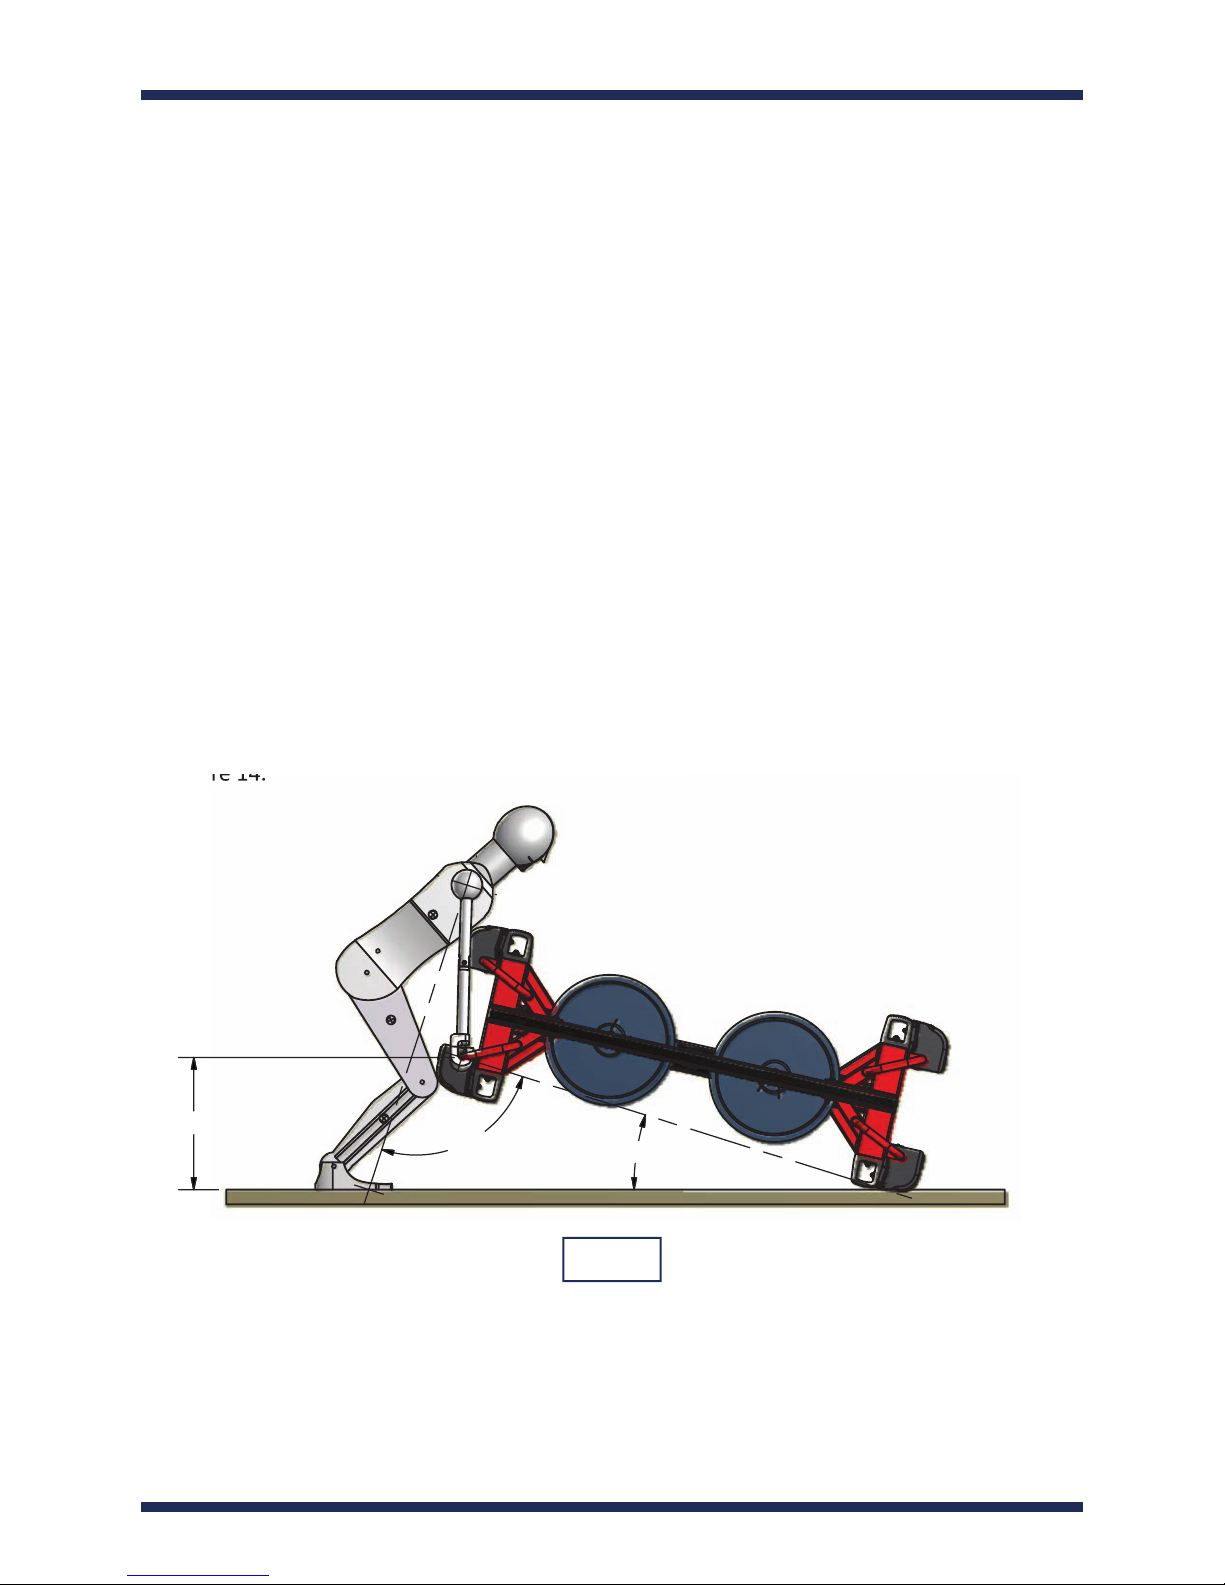
and the relave goals of each lier. A side view of a lier on a simulated TS-03 FLIPPER is shown
in Figure 14.
The point of contact with the lier’s ball of the foot is located with the marker “A” and the trans-
verse axis of the shoulder is idened with the marker “B”. The model of the lier is the average
height American male, which is 1755 mm (69.1 inches). The height of the handle at the begin-
ning of the second pull is esmated to be 91% of the height of the knee on a fully extended leg.
Using the Flipper - Foot Placement
in Figure 14.
0.26*H
90°17°
A
B
Fig 14
13
This calculates to 26% of the height of the lier or in this case 456 mm (18.0 inches). This posi-
on is shown as it is considered to be the start of the second pull phase and therefore the high-
est power output of the li and the most instrumental phase in compleng a successful ip. If
the second pull yields a high posion relave to the lier, the transion and push phases will be
possible.
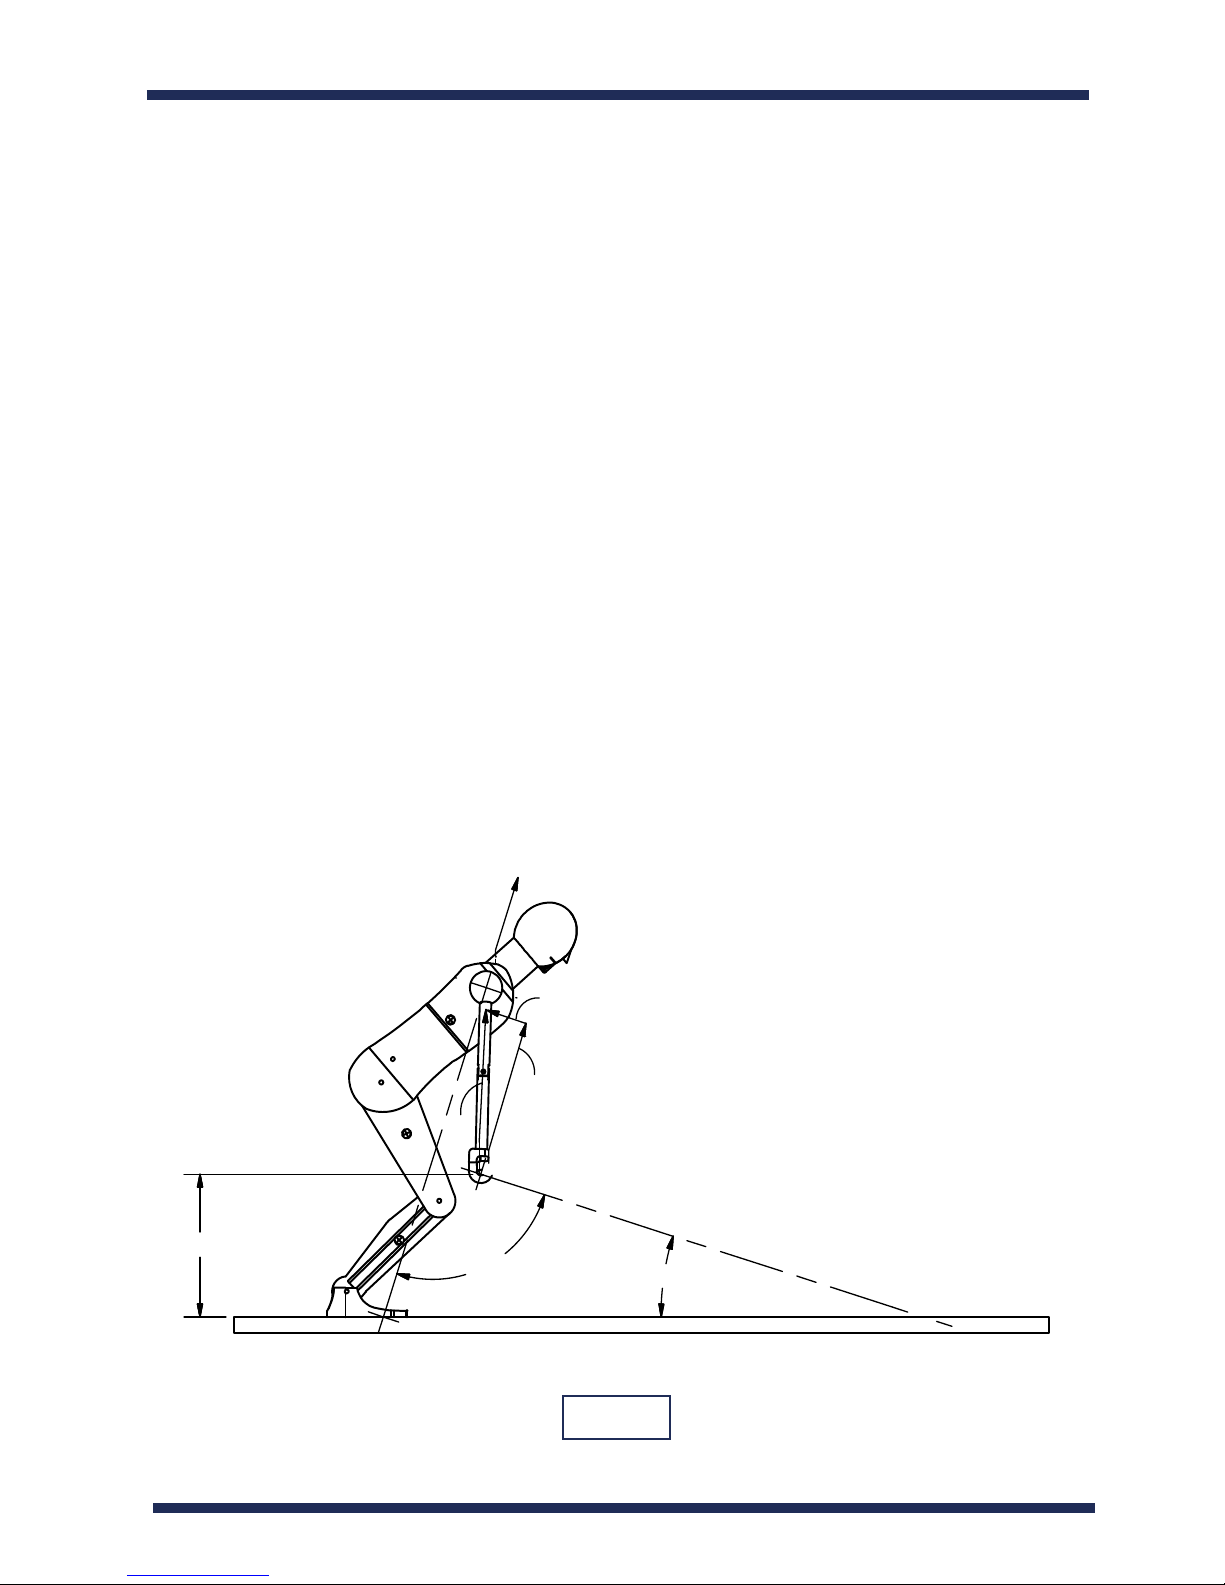
Forces Applied:
A free body diagram of the image in Figure 14 is presented in Figure 15 below. The line of ac-
on from the foot contact (A) to the shoulder (B) is considered the powerhouse of hip, knee and
ankle extension to rapidly drive the FLIPPER up. This force of the body is represented by force
vector FB. The connecon of the body to the FLIPPER is made by the lier’s hands on the handles.
This tensile force of the arm is represented by force vector FT. This vector (FT) is made up of two
component vectors, the force against the chest pad (FC) and the rotaon force (FR) which drives
the moon of the FLIPPER up. Opmally the rotaon force FR and the power force of the body FB
will be parallel, as this is 90 degrees to the line of acon from the handle to the point of contact
of the FLIPPER with the ground (pivot point). Any addional horizontal forces applied to FLIPPER
will act to try to drag it on the ground. These forces would not be transmied to the torque of
rotang the FLIPPER up.
Using the Flipper - Foot Placement
0.26*H
90°17°
A
B
F
F
F
F
B
C
R
T
Fig 15
14
15
With this, we see a theorecal opmal relaonship between the foot posion and the FLIPPER.
The small force of the chest on the pad (FC) is used to stabilize the body against the FLIPPER as the
arms cannot be straight in line with the body due to the physical posion of the FLIPPER. In com-
parison, a second pull in an Olympic style li, the opmal direcon of the force vector against the
bar is always vercal, as the bar is desired to be lied up against gravity. In contrast, the FLIPPER
is rotated about a point of contact with the ground. To generate the greatest amount of torque
to rotate the FLIPPER, the force vector (FR) is opmally 90 degrees relave to the line of acon of
the point of contact of the lier (handle) to the axis of rotaon with the ground (point of contact).
This force (FR) mulplied by the distance to the point of contact, is the torque applied by the lier
when the FLIPPER is rotang (liing) at a constant velocity.
For the purposes of our illustraons, we will use the locaon of the shoulder to the foot (FB) as
the force generaon vector. It is understood that the contact with the FLIPPER is the actual force
vector (FR) that provides the torque to li the FLIPPER. Opmally these vectors are parallel due
to a force placed on the chest pad (FC). Therefore, the body’s force (FB) will be used to generalize
the driving force to generate the liing torque to rotate and therefore li the FLIPPER.
How long is it?
The diameter of the re being lied makes a dierence in the liing torque. This is further evalu-
ated in the “Size Maers” secon of this manual. Regarding foot placement, it also maers. This
dierence further reiterates the desire for standards in Strongman implements for both training
and tesng.
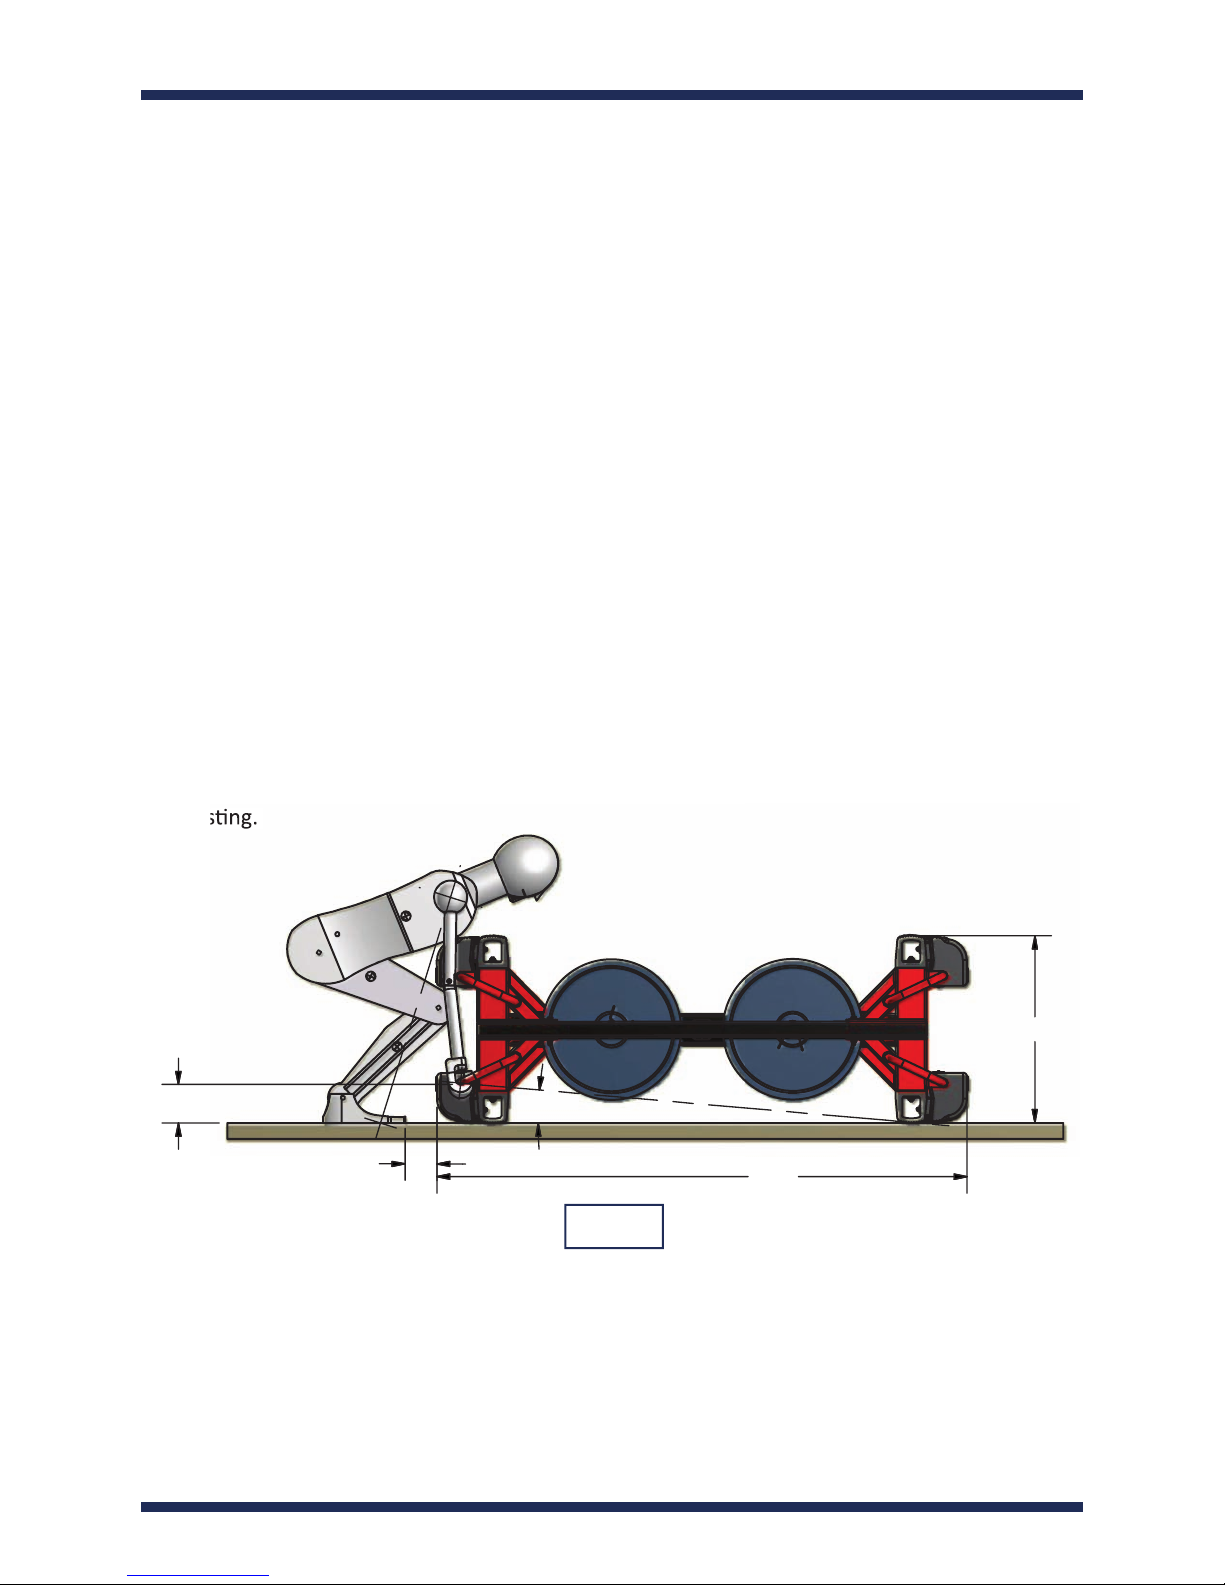
Figure 16 shows a simulated TS-03 in a boom posion with the feet unmoved from the theore-
cally opmal posion preparing for the second pull as was shown in Figure 14. Here, the fronts of
the feet of the lier are 4.0 inches back from the back of the chest pads. If a high power explosive
movement is desired, and the feet are not moved from rst pull to second pull as there would not
be me to do so in a rapid explosive movement, this would be the theorecally opmal posion
to generate the greatest torque at the start of the second pull.
Using the Flipper - Foot Placement
and tesng.
4.9
4.0 67.2
23.5
5°
Fig 16
This manual suits for next models
1
Table of contents


