Mind Machine AstroLine Manual
Electronic mask
for lucid dreaming
«AstroLine»
Technical description
and operating instructions
_____________________________________________________
2021

AstroLine ver. 1.3 Redaction 1.1
2 - 2 -
CONTENTS
1. PREFACE
1.1 General description .......................................................................... 3
1.2 Operating modes of the device ...................................................... 5
1.3 Recommendations for working with the device
1.3.1 Beginning of work ............................................................................ 7
1.3.2 Organization of data on the memory card ................................... 8
1.3.3 Battery charge control ...................................................................... 8
1.4 Set ........................................................................................................ 9
1.5 Specifications ..................................................................................... 9
1.5.1 Equipment composition and characteristics.................................. 9
1.5.2 Operating modes «AstroLine»........................................................ 10
1.5.3 Weight and dimensions .................................................................. 10
1.5.4 The consumed current from the battery....................................... 11
1.5.5 Operational requirements ............................................................... 11
2. HOW TO WORK WITH THE DEVICE
2.1 General ………………………..................................................... 12
2.2 Appearance, controls and connectors .......................................... 12
2.3 The procedure for connecting and disconnecting
external devices when working with the device.......................... 14
3. EMBEDDED SOFTWARE ver. 1.3
3.1 General. Main menu ........................................................................ 15
3.2 Overview of main menu items and operating modes
Start .................................................................................................... 16
Settings .............................................................................................. 16
Test .................................................................................................... 19
Time set ............................................................................................. 20
Sleep timer ........................................................................................ 20
End time of sleep ………………................................................. 20
Light prompts ………………….................................................. 20
Recording folder .............................................................................. 21
Record ............................................................................................... 21
Play folder .................................................................................. ...... 22
Player.................................................................................................. 22
Wi-Fi .................................................................................................. 22
3.3 WEB-interface .................................................................................. 22
Software update ……………...……………………………... 26
4. OPERATION IN USB STORAGE MODE ......................... 26
5. CHARGING THE STORAGE BATTERY .......................... 27
Attachment 1
LOG file form and sleep event analysis ........................................ 27

AstroLine ver. 1.3 Redaction 1.1
3 - 3 -
Annotation
This document contains a description of the AstroLine lucid dreaming
device and how to operate it in different modes.
To understand what «lucid dreaming» is and to get methods of working with
them, we recommend the book by Stephen LaBerge «Lucid Dreaming».
1. PREFACE
1.1 General description
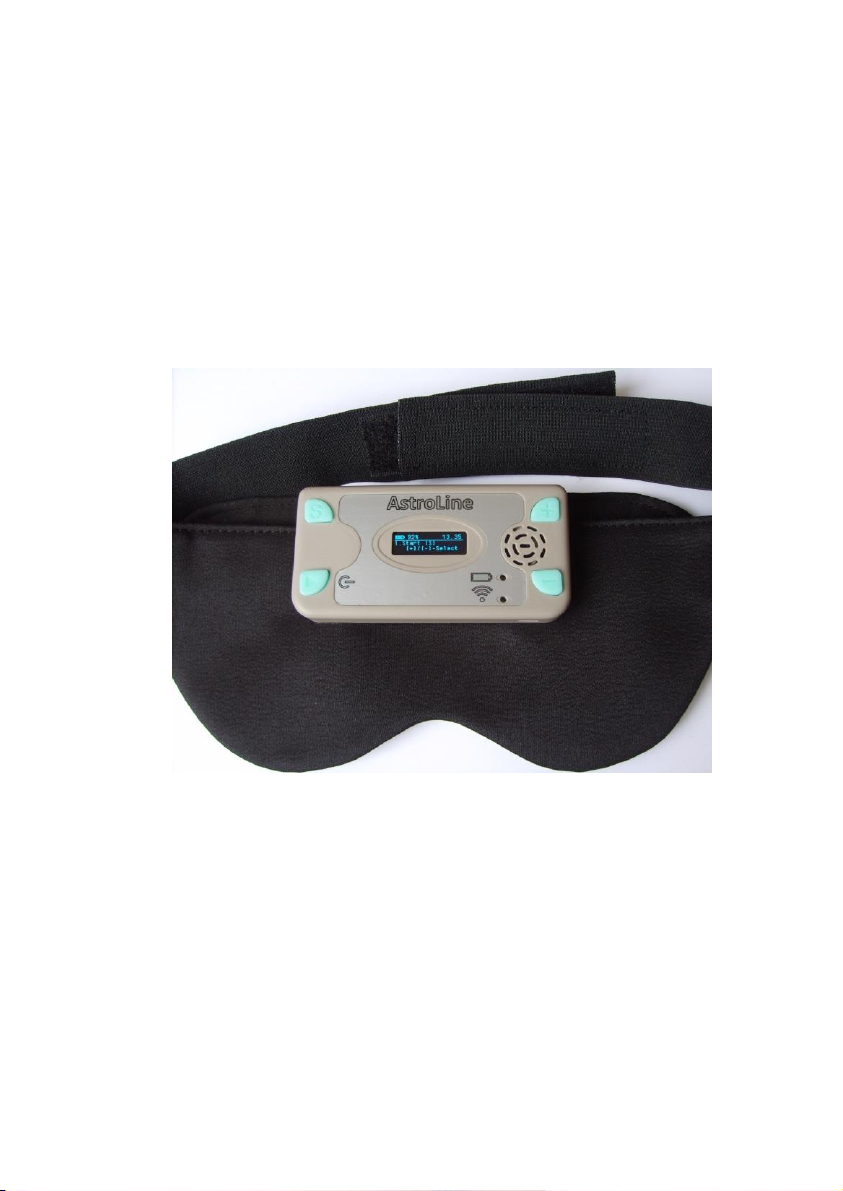
The device for lucid dreaming AstroLine (hereinafter «AstroLine») is an
electronic device attached to a head mask made of opaque black material, which also
houses a board with eye movement sensors and LEDs for issuing light prompts.
«AstroLine» differs from previously produced devices for lucid dreaming in
the following advantages:
Construction of the mask:
■the device is mounted outside (forehead), and not inside the mask itself,
which makes it easy to control the device and select the desired operating mode
using the keys and display, does not give a tangible load on the face, distributing it
on the forehead.
■the mask does not touch the eyes and face, does not interfere with falling
asleep.
■when the mask is put on, then in the waking state, lowering its eyes, it allows
you to see objects and adjust modes using a tablet or smartphone, selecting the
optimal effect of light and sound.
■the mask consists of a base (mask), two fasteners and a forehead pad over
these elements. The head cover is the single most contaminated part and can be
easily removed and washed. The device itself, together with the eye movement
sensor board, can also be removed from the mask, if necessary, and the mask
washed and ironed.
■dividing the product into functional units «device» and «board with sensors»
allows you to replace the board with sensors in the future, installing various special
versions, for example, for taking EEG (electroencephalogram) with a corresponding
headband.
Functional of the electronic part:
■the presence of a display and keys allows you to independently configure the
device and turn it on without any additional devices.
■in addition, the device has a WEB-interface, accessible by connecting to it as
to a Wi-Fi access point from any device (smartphone, computer or tablet), upon
activation of the corresponding function. In this mode, it is also possible to
download a firmware update for the instrument.

AstroLine ver. 1.3 Redaction 1.1
4 - 4 -
■eye movement sensors are placed on each eye. This allows you to more fully
track the sleep pattern, since not always in the REM (rapid eye movement) phase,
both eyes move simultaneously.
■full-color RGB LEDs are used for issuing light tips, allowing you to set the
color of the light tip and thereby reduce the addiction to one color. In addition, this
solution allows the mask to be used in other applications - playback of audio-visual
sessions for falling asleep or audio recordings made using AudioStrobe® technology
with a strobe signal frequency of 19200 Hz. *
■play WAV and MP3 audio files before bedtime (as relaxation music) and after
bedtime ends (Alarm clock).
■dictaphone with high sound quality (16 bit) and the ability to record, listen
and delete records in the device itself. Recordings are formed as WAV files and are
ready to be directly played as prompts, before and after highlights.
■real time clock. They allow you to set the usual time in the device and record
all events (start of sleep, triggering of sensors, end of sleep or interruption of
monitoring), with reference to this time. Events are displayed and recorded in
special LOG files, which can then be easily viewed with a regular text editor or
processed by drawing up a sleep diagram.
■the device has a head movement sensor (accelerometer) with an adjustable
response threshold. Information about head movement is not only noted in the
events of the LOG file, but also allows, with appropriate setting, to interrupt the
issuance of prompts from the device. This information also makes it possible to
distinguish between triggering when the mask is accidentally displaced in front of
the eyes during head movement and eye movement during sleep.
■the ability to work as a USB drive when connected to a computer via a USB
cable, which allows you to quickly view LOG files about a past dream, as well as
download or delete music files and voice prompts.
■there is an LED indication of the operation of the Wi-Fi access point or the
mode of replacing the firmware, as well as the operation of the charger. During
operation (during monitoring or when playing music and prompts), the indication is
made by backlighting the «Enter/Start» button.
■all files for the device operation are located on a microSD memory card,
which is installed on top of the device and is easily accessible. However, the device
can work without a memory card, respectively, events during sleep will not be
recorded in LOG files, as well as voice prompts and music will be recorded and
played.
■for sound output there is a built-in speaker and a 3.5 mm stereo audio jack,
when headphones are connected to which the speaker is disabled. The mask has
loops on the headband through which the headphone wire can be put on so that it
does not fall on the face.
■there is also a vibrating call with adjustable intensity, used to issue a prompt
in sync with the light.
■the device contains a Li-Pol (lithium polymer) battery with a capacity of 800
mAh and a built-in charger from a USB socket.

AstroLine ver. 1.3 Redaction 1.1
5 - 5 -
■automatic shutdown of the device is provided: when it is in the settings mode
and there is no action for more than a specified time, when sleep and monitoring
mode are completed, and when the audio recording is stopped. This function allows
you to significantly save battery power when the device is used during settings and
testing. In the off state, the device does not consume current from the battery, only
the real time clock works.
*
work with sessions and strobe tracks is available in special firmware
versions.
Software:
Software replacement is provided by downloading a binary file with a new
version via the web interface. For menus and labels in the web interface, the
language can be selected: Russian or English. The software defines all the device
functions available to the user. When creating it 3 main tasks were set:
make the most simple, intuitive interface, not overloaded with unnecessary
functions and settings.
realize the maximum capabilities of this device in its logic of operation.
leave a reserve for expanding the software functionality of the device.
What will it be like in the future? Perhaps you yourself can answer this
question and give a useful idea.
1.2 Operating modes of the device
AstroLine has the following operating modes:
Sleep monitoring
This is the main operating mode of the device. When this mode is enabled,
then after the music playback is finished (if it was turned on) and the countdown
until falling asleep starts monitoring the sensors.
At the same time, if a MicroSD memory card is installed, then information
about the triggering of sensors is recorded as a LOG file with a number
corresponding to the internal indexing, which will increase by 1 for each new
monitoring.
If the playback of prompts (light and/or voice) is allowed, they will be played
when the eye movement sensors are triggered, taking into account the set delay.
First of all, a voice prompt from the BEFORE folder is issued, then a light and
vibro-prompt (it stimulates easy awakening and perception), and then a voice
prompt from the DICT folder. If the head movement prompts are turned on, the
prompts will turn off when the head moves. The volume levels when issuing voice
prompts from the BEFORE and DICT folders can be different.
Sleep monitoring can be interrupted by pressing any button on the device or
at the end of the set sleep time. In the latter case, if the Alarm is enabled, the file for
the Alarm will be played. After sleep monitoring is completed, the LOG file will be
closed with the end time assigned (from the real time clock). If sleep monitoring was
completed before the sleep timer expired, the LOG file will not be created.

AstroLine ver. 1.3 Redaction 1.1
6 - 6 -
Record from the built-in microphone and listen or delete voice prompts
Allows you to record voice guidance in WAV file format. The file name is an
index that increases by 1 with each new record. Files can be immediately selected for
listening or deleting (if not needed). Also, in the voice recorder mode, you can set
the maximum time for recording a hint in minutes, after which the recording will be
closed.
When the eye movement sensors are triggered, the tips will be played back in
the order of their recording, after the delay set in the settings. In the same order they
can be viewed (scrolled) in the voice recorder playback or delete mode. The folder
with which the voice recorder works can be changed.
Play audio files from a folder designed to store music and play before going
to sleep in the PLAYER mode
This mode is needed for preliminary listening to music that will be played
before falling asleep. It can also be used as a regular MP3/WAV player. In the
player mode, you can play music from both the main folder, and listen to the
recordings intended for playback in the Alarm mode, depending on the folder set
for the Player.
Play music from the folder for storing alarm recordings after sleep
Switching to it is possible only when the monitoring is completed at the set
sleep end time, while the Alarm clock was enabled and the MicroSD card was
installed, and there are WAV or MP3 files in the corresponding folder for the Alarm
clock. Files are played one after another until the end (while they are in the folder),
or when the playback is interrupted by the user (pressing the keys).
Work in the mode of setting various parameters directly on the device
The device configures a lot of basic and auxiliary parameters that allow you to
set the optimal sleep monitoring mode and prompts. They can be selected among
the main menu items in the device, among the «Settings» menu items, as well as
through the WEB interface, when the device is connected to an external device via
Wi-Fi. If the device is in the state of selecting a setting or changing parameters for a
long time and no action occurs, but the power off timer is enabled, the device will
be turned off after the specified time.
Working in web-interface mode via Wi-Fi
This mode provides communication between the user's device (computer,
tablet or smartphone) and «AstroLine». Through it, it is possible to change a
number of device settings, as well as load a new version of the firmware into the
device itself. In addition, from this mode, you can test the operation of vibrating,
light and voice prompts when the mask is already on the head. And also change the
internal recording indices of the voice recorder files and LOG files (this cannot be
done on the device itself).

AstroLine ver. 1.3 Redaction 1.1
7 - 7 -
Checking the operation of the device (test sensors and prompts)
It is possible to start a full test of the device operation, as if it were in the
monitoring mode. This is where the eye movement sensors and the head movement
sensor are tested. The triggering results are firstly displayed on the display. Second,
they lead to prompts. This allows you to select both the sensitivity of the sensors
and the required delay intervals in prompting and monitoring, as well as the volume
and brightness levels of prompts. In addition, determine the optimal position of the
mask on the head when the sensors are working.
Working in USB storage mode
Designed for navigation and work with the contents of the microSD memory
card installed in the device. The mode is activated by connecting the device to a
computer via a USB cable and turning on the power. In this case, a memory card
must already be inserted.
Battery charge
To charge the battery, it is enough to connect the charger or USB cable from a
running computer to the device. The power supply should not be switched on.
1.3 Recommendations for working with the device
1.3.1 Beginning of work
It is better to start working with the device with simple monitoring without
prompting. In this case, the sensitivity of the sensor should be sufficiently high
(value about 30), and the interval between monitoring phases should be small (1-3
minutes). In this case, it will be possible to see the complete picture of your sleep
and determine the sensitivity thresholds of the sensors. Such work on removing the
«picture» of sleep can be carried out within 2-3 days.
At the next stage, you can already turn on light/voice prompts and
vibration. It is necessary to start with the minimum values of brightness and
loudness audible in the mode of checking. Disable vibration if you want to see
movement in a dream among the events of the LOG file (activated vibration
automatically turns off the head movement sensor, since the sensor is in the device
itself !). This is important because the selected high light intensities or the volume of
the voice prompts can completely awaken you. The dream is then fragmented and
unhealthy. In this case, you need to reduce the brightness and volume levels to
reduce the number of recorded movements.
One of the recommendations for using the device is the preliminary
development of regular sleep, when the sleep phases occur at approximately the
same time of day. But, if you have sleep disorders or insomnia, the device is not
recommended to use.
The mask is designed to sleep on either side or back. It is not recommended
to cover yourself with your head or put your hands on your head (mask), since
pressing the button during sleep monitoring interrupts work and after a while the
device turns off.
AstroLine ver. 1.3 Redaction 1.1
8 - 8 -
To work effectively with the device and to exclude missed alarms or false
alarms, it is best to turn it on in the test mode when the mask is on the head. The
position of the sensors and LEDs in front of your eyes will be visible. It is also
worth making sure that nothing interferes with the operation of the device (hair,
clothes).
1.3.2 Organization of data on the memory card
To fully work with the device, it is important to know what information is on
the memory card and in what folders.
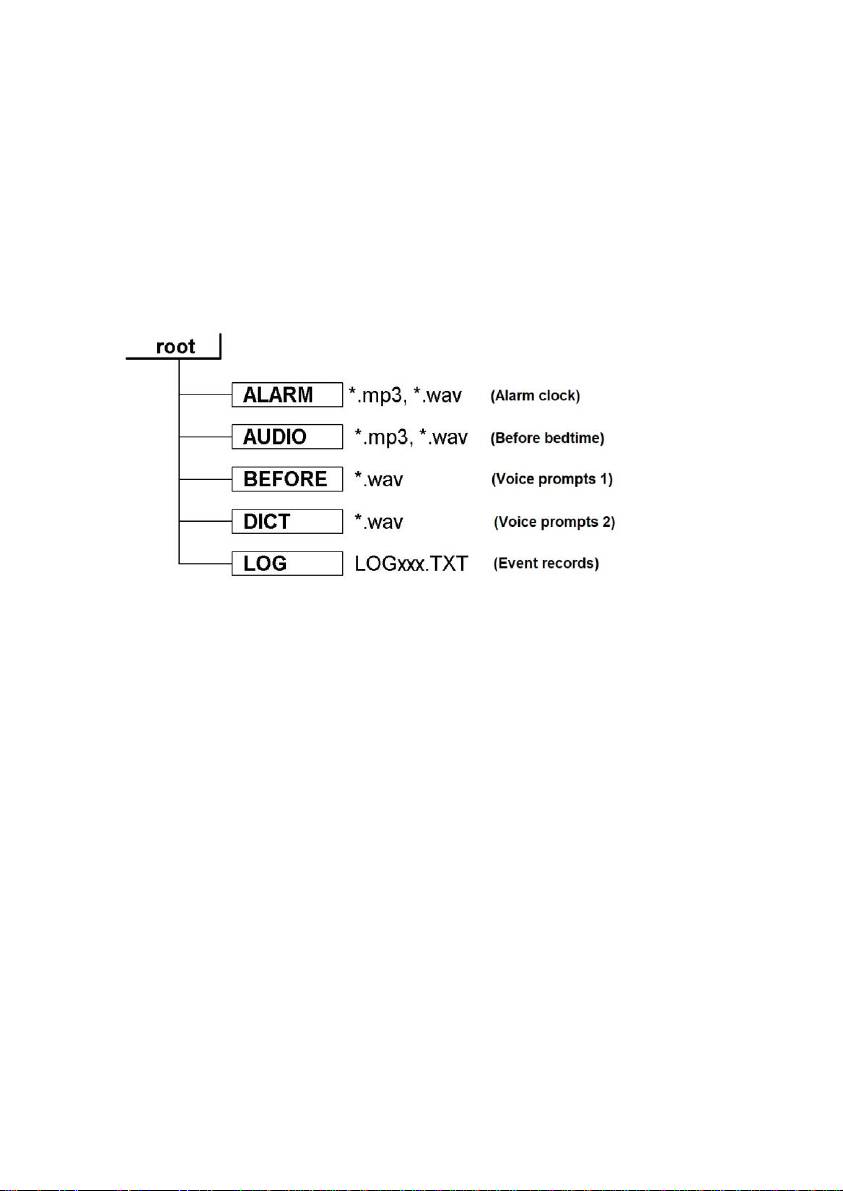
The folder structure is shown in Figure 1.
Figure 1. Folder structure on the memory card
The device is delivered with a memory card, on which the designated folders
are already present, and test records are recorded in the ALARM and AUDIO
folders. You need to write your files to these folders. Voice prompts are created
when recording from a voice recorder. LOG files are created during monitoring.
If a new (blank) memory card is installed, then the folder structure shown in
Figure 1 will be created on it automatically.
It is important to note that the memory card must be pre-formatted with the
following parameters:
-type of file system FAT32
-standard cluster size (512 bytes).
Otherwise, work with the memory card will be impossible.
1.3.3 Battery charge control
Before starting monitoring mode, it is important to pay attention to the
battery charge. This value is displayed in the header of the main menu of the device
next to the battery icon.
If the charge level is below 30%, it is not recommended to start monitoring
mode. It is also not recommended to start replacing the firmware on a low battery
charge (20% or less).

AstroLine ver. 1.3 Redaction 1.1
9 - 9 -
Switching off the device at the time of software update may lead to the loss
of its performance, which can only be restored by sending it to the manufacturer for
repair.
1.4 Set
The «AstroLine» delivery set includes the following devices and accessories:
- «AstroLine» device with an eye movement sensor board.
-Mask with a forehead pad.
- AC adapter/charger.
- USB cable.
- MicroSD memory card with a capacity of 8 GB.
-Paper copy of this manual and annex (if available in the current version).
- Packing box.
1.5 Specifications
«AstroLine» is designed to determine the sleep phase by eye movement,
generate a time report about these events, move in sleep and play back light and
sound prompts, WAV and MP3 audio files. It is also designed to perform a number
of service and auxiliary functions both in stand-alone operation and when working
with a computer.
The device complies with technical conditions 262016-002-79494790-2020.
1.5.1 Equipment composition and characteristics
■Microcontroller –32 bit, ARM Cortex-M3 architecture;
■Measurement of small movements (eye movement) using two IR sensors
located on the external board;
■Motion detection using the built-in accelerometer, sensitivity resolution no
worse than 0.03g;
■Built-in wireless Wi-Fi interface (IEEE 802.11g);
■Real time clock/timer, measurement and formation of time intervals;
■16-bit audio digital-to-analog converter (DAC)/analog-to-digital converter
(ADC) with digital sound processing unit;
■Communication interface with a personal computer –USB 2.0, mini USB
connector;
■Slot for inserting microSD memory cards, including support for SDHC
memory cards. File system type for memory cards –FAT32;
■Audio output for connecting headphones:
- 3.5 mm «mini-jack» (1/4" TRS mini);
- permissible resistance of the connected load - not less than 32 Ohm;
■Built-in short-range microphone for recording voice messages to a memory
card;
■Built-in speaker for playing messages or audio files;
■Play MP3 and WAV audio files;
■Indicator LEDs:

AstroLine ver. 1.3 Redaction 1.1
10 - 10 -
- indication of the battery charging process (red / green),
- indication of the Wi-Fi interface operating mode (red / green),
- indication of sleep monitoring mode, playback of audio files, sleep timer
operation (green in the backlight of the «Enter/Start» button);
■Image –monochrome graphic display (OLED technology) with a resolution
of 128x32 pixels;
■Input –4 tact buttons, including a combined «Enter/Start» button with
power on/off;
■Two 24-bit RGB LEDs located on the eye movement sensor board. The
addressing and setting of each LED is individual. The interface is serial, single-wire.
■Maximum LED brightness:
- red spectrum (wavelength 620-630 nm) 500-600 mcd,
- green spectrum (wavelength 515-530 nm) 900-1100 mcd,
- blue spectrum (wavelength 465-475 nm) 200-400 mcd;
■Slot for installing the sensor board on the device: eight-pin, for a flat
cable/board of the FB-8R type;
■Battery Li-Pol, 800mA/h;
■Built-in battery charger from USB socket with a charge current of no more
than 300mA;
■Firmware update: download the binary file via the web-interface (when
establishing a Wi-Fi connection).
1.5.2 Operating modes «AstroLine»
■Sleep monitoring.
■Record from the built-in microphone and listen or delete voice prompts.
■Play audio files in the PLAYER mode.
■Play music from the folder designed to store the Alarm recordings after
sleep.
■Work in the mode of setting various parameters directly on the device.
■Work in web-interface mode via Wi-Fi to manage settings and replace
firmware.
■Checking the operation of the device (test sensors and issuing prompts).
■Work in USB storage mode.
■Battery charge.
1.5.3 Weight and dimensions
«AstroLine» measures 90.5x45x15 mm, taking into account the protruding
parts (buttons, fasteners to the mask) and without an installed microSD memory
card.
The weight of the assembled product and its individual parts is shown in
Table 1.1.
AstroLine ver. 1.3 Redaction 1.1
11 - 11 -
Product
Weight not more than (g)
Device without mask
50
Device with mask, sensor board and cover
plate
84
Sensor board
2
Table 1.1. Weight and dimensions of the «AstroLine»
1.5.4 The consumed current from the battery
The current consumed by the device differs depending on the operating
mode. You need to know this when starting certain modes on the device, taking into
account the current battery charge level.
The data on the consumed current are given in Table 1.2.
Mode
Current consumption no
more (mA)
Work in the settings menu, playback of
melodies by the player at medium volume
50
Recording messages from the microphone
45
Monitoring mode when prompts are turned on
at medium brightness and volume values
22
Working with the web-based interface (Wi-Fi
enabled)
110
Firmware update inside the device (Wi-Fi
disabled)
40
Table 1.2. Consumption current «AstroLine» in different modes
In the process of improving the firmware, work is underway to reduce the
current consumption in various modes, therefore, for new versions of the firmware,
the data may change.
1.5.5 Operational requirements
«AstroLine» together with accessories in accordance with the state standard
15150-69 refer to products of the placement category –4 for climatic performance –
moderate and cold climate, with a range of operating temperatures from +1 to
+ 40°C and is intended for operation in heated indoor premises.

AstroLine ver. 1.3 Redaction 1.1
12 - 12 -
Not allowed during operation:
ーplace the device near heat sources and open flames;
ーwipe the case, display screen, keyboard buttons with organic solvents and other
cleaning agents that are aggressive to plastic;
ーcreate mechanical pressure in the display area;
ーuse other types of power adapters (chargers) instead of those recommended by
the manufacturer or supplied with the device;
ーconnect and disconnect the sensor board during device operation;
ーremove the sensor board and place it on surfaces that can accumulate static
electricity;
ーreplacing the microSD memory card with the device turned on;
ーstatic electricity hitting the device connectors;
ーusing the device in rooms with a relative humidity of more than 80% and
storage in damp rooms;
ーconnecting headphones with a load impedance of less than 32 Ohm to the
audio jack, as well as applying considerable force to this jack when inserting the
plug;
ーturning off the power supply of the device during the replacement
(programming) of the firmware;
ーwash the mask and pad at a water temperature of more than + 40°C;
ーiron the mask with an iron at temperatures over + 80°С.
2. HOW TO WORK WITH THE DEVICE
2.1 General
Before working with the device, you must read this manual.
Upon receipt of the device, it is necessary to check its completeness and
safety after transportation, the absence of damage to the container. If the device is
moved from a cold (temperature below 0ºC) to a warm room, then before switching
it on, leave it at this temperature for 20-30 minutes.
The device is delivered with a battery installed in it. During storage, due to
self-discharge, it can be partially discharged. It is necessary to pay attention to the
charge level after switching on.
It is displayed in% near the battery icon in the upper left corner of the main
menu. If the level is 40% or less, then it is necessary to charge the battery in
accordance with paragraph 5.
2.2 Appearance, controls and connectors
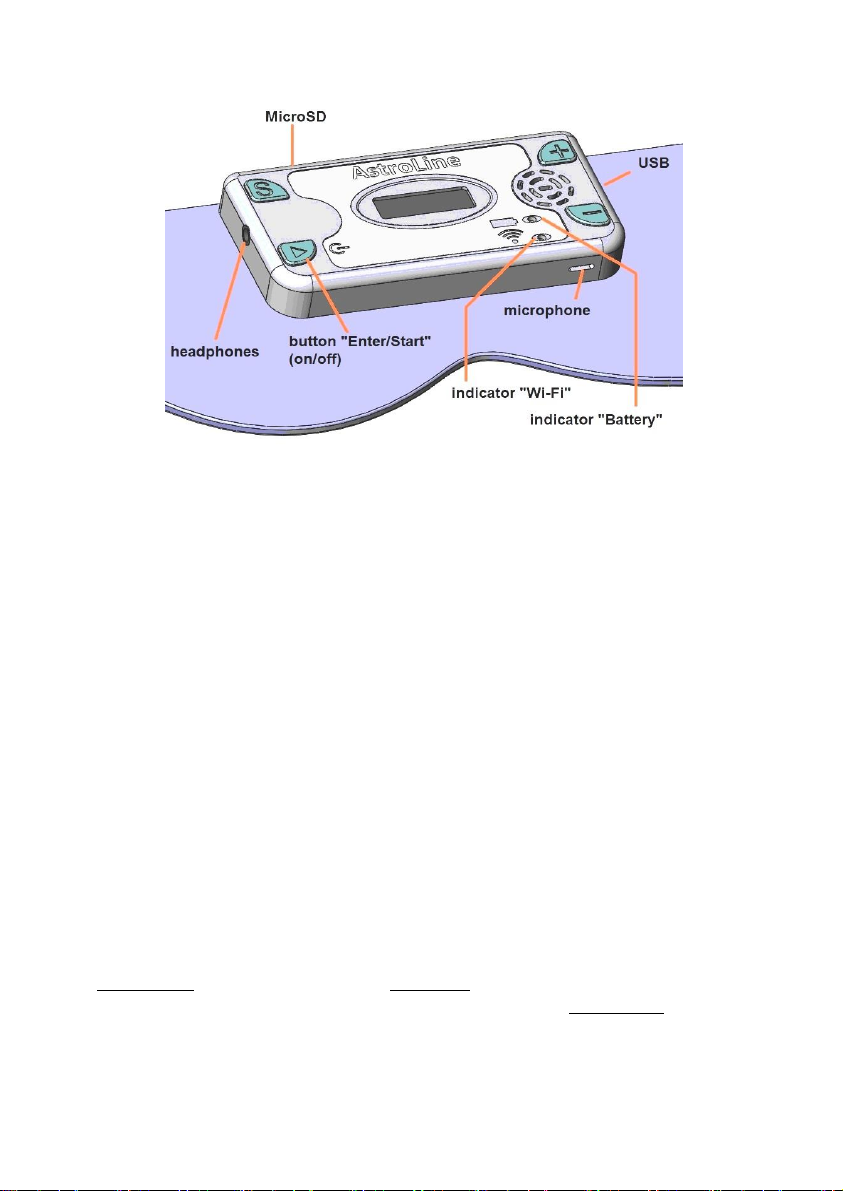
Figure 2 shows the external view of the device and gives callouts with the
designation of connectors, indications and keys.
AstroLine ver. 1.3 Redaction 1.1
13 - 13 -
Figure 2. View of the device on the mask
Connectors, controls, indication
Headphones. The device has a 3.5mm Jack socket for connecting
headphones. Allows connection of headphones with a total impedance of at least 32
Ohm. The built-in speaker is disabled when headphones are connected. On the
strap of the mask on the side of the headphone jack, there are loops through which
you can thread the wire so that it does not fall off your face.
USB. The device also has a USB connector for connecting a charger or for
connecting to a computer. A 5-pin miniUSB connector is used. This interface is
used to copy/delete files on a memory card and view LOG files (Mass Storage
Device mode).
MicroSD. On the top of the device there is a slot for a microSD memory card
of the «push-push» type (push to insert the memory card and push to eject).
Microphone. The opening of the housing, opposite which the microphone is
located, faces down the mask. Voice messages for prompts are recorded from a
short distance (about 20 cm to the microphone).
On the front side of the device there is a built-in speaker, display, indicator
LEDs and control buttons.
Indicator «Wi-Fi» and «Battery». The LEDs are bi-color. During basic Wi-
Fi operation, the indicator is mostly red. When preparing files for firmware update -
blinks green, during programming - blinks red. When the charger is working, the
battery indicator glows red, after the end of the charge it glows green (when the
device is turned off).
Button «Enter/Start» (hereinafter «Enter»). It is multifunctional. When
pressed for a long time, this button turns on or off the power (from the main menu
or during Wi-Fi operation).

AstroLine ver. 1.3 Redaction 1.1
14 - 14 -
With a short press in the mode of changing settings, it confirms the change
and sets the value, saving it to non-volatile memory. When pressed in the playback
file selection mode (in the PLAYER or RECORD menu), it starts the file playback.
If the button is pressed during the playback of voice guidance by the player /
recorder or playback of an audio file, this playback stops and the button is
highlighted in green. Pressing again - continues playing the file. In addition, this
button is illuminated (blinking) in sleep monitoring mode, while counting intervals
of delays and sensor operation, or when playing prompts and audio files. This
backlight allows you to judge the active operation of the device, including when the
display is turned off (turned off) in the sleep monitoring mode.
Button «S» (Select). When working in the main menu, the button enters the
selected item of the main menu (starts the operation). When working in settings
modes, this button selects the desired setting or is a function key (modifying the
operation of the «+» and «–» buttons). When playing an audio file, this button
interrupts playback and switches to the menu (when the PLAYER or RECORD is
running).
Button «+» and «–». When working in the main menu, the buttons change
the main menu item, and when working in the settings, they change the setting. In
the PLAYER or RECORD these buttons change the file to be played or deleted.
When playing an audio file, these buttons change the playback volume (the setting is
saved directly to energy independent memory).
2.3 The procedure for connecting and disconnecting external devices when
working with the device
While working with the device, it is necessary to follow the order of
connecting some devices in order to avoid damage to both the device and the
devices themselves.
Headphones. They can be connected and disconnected at any time during
the operation of the device. When headphones are connected –the speaker is
disabled.
Memory card. It is allowed to remove and install only when the device is
switched off.
AC adapter. It is allowed to disconnect and reconnect it at any time. It is
necessary to connect the adapter when the charge level drops below 30% (displayed
in the main menu in the upper left corner).
Work with USB in removable storage mode. The USB cable is connected
to the device and the computer when the device is turned off. Switching on the
device (with inserted memory card) activates the mode of operation as a USB
removable data carrier.
Turn on/off the device. It is allowed to produce at any time except for:
- process of copying files via the USB-interface,
- process of replacing the firmware.
In these cases, in the event of an abnormal shutdown, the data will be lost,
and in the latter case, the performance of the device may be impaired.

AstroLine ver. 1.3 Redaction 1.1
15 - 15 -
3. EMBEDDED SOFTWARE
VER. 1.3
3.1 General. Main menu
All functions and available capabilities of the device are determined by the
firmware version. Therefore, the description of the AstroLine operation is related to
the current version of the firmware. It is necessary to check the software version
specified in this manual and the version recorded in the device. You can read this
version through the web interface (indicated at the bottom of the page).
After turning on the device with the «Enter» button (on), you go to the main
menu. Before that, the presence of a memory card is checked (if it is absent, a
message is displayed about the absence of a memory card). If there are no folders
required for operation on the memory card (see Figure 1), then these folders are
created. The state of the settings stored in the energy independent memory is also
checked.
If a failure (loss of settings) is detected, they are set by default, and the RTC
Config… message will appear on the screen, after which you will go to the main
menu.
Figure 3 shows the view of the main menu of the device.
Figure 3. Main menu of the device
The main difference between the main menu and others is navigation through
its items. It is made only with the «+» and «–» buttons, and the selection of a menu
item –with the «S» buttons.
At the same time, the «Enter» button works as a power off button when
pressed for a long time and does not perform any other actions when working in the
main menu. The screen, in addition to the main menu item, also displays the battery
status and current time.

AstroLine ver. 1.3 Redaction 1.1
16 - 16 -
3.2 Overview of main menu items and operating modes
Start
Selecting this item starts sleep monitoring mode. If at the same time playback
of melodies is allowed in the settings, a MicroSD memory card is installed and the
files are in the AUDIO folder, then after the countdown of the 20 second interval
(time for preparing and putting on the mask), they begin to play until they run out.
During melody playback use the «+» and «–» buttons to change the sound volume.
Pressing the «S» or «Enter» button interrupts playback and returns to the main
menu. When the audio files in the AUDIO folder have finished playing, the sleep
timer starts.
--------------------------------------------------------------------------------------------------------
Important! In the AUDIO folder, you should place melodies that make it
easy to fall asleep or set you to sleep. At the same time, their playback time has
nothing to do with the set time for the sleep timer. And in fact, the time before the
start of monitoring will be determined by the playback time of audio files from the
AUDIO folder and the time set for the sleep timer. It is necessary to consider this
point when choosing the number and duration of audio files and the time to fall
asleep.
--------------------------------------------------------------------------------------------------------
During the ringtone playback before sleep monitoring and after the first 5
minutes of the sleep timer, the display screen dims to save battery power. The
activity of the device can be seen by the blinking backlight of the «Enter» button. If
the blinking of this indicator interferes with falling asleep, then it can be turned off
through the setting in the web interface.
The time for the sleep timer is set by the SLEEP TMR menu item.
After the sleep timer expires, sleep monitoring begins with recording events in
the LOG file. If hints are enabled in the settings, they will be played. Light and
vibration prompts are played first (if enabled), followed by a voice prompt (if
enabled and recorded in the DICT folder). After that, the scan delay begins and
then - the interrogation of the eye movement sensors.
If prompts are interrupted by head movement, a corresponding entry is made
in the LOG file. Sleep monitoring continues until the set sleep end time (menu item
END TIME). Pressing any key during sleep monitoring or counting time intervals
and playing prompts will terminate monitoring, close the LOG file and exit to the
main menu.
The end of sleep monitoring and its time is also recorded in the LOG file as
well as the reason why it ended. If this record is not present, your device turned off
during monitoring due to a discharged battery.
Settings
Selecting this menu item leads to the transition to the settings editing mode.
The setting is selected with the «S» button, and its change with the «+» and
«–» buttons.

AstroLine ver. 1.3 Redaction 1.1
17 - 17 -
Pressing the «Enter» key ends the settings editing mode and switches to the
main menu.
It should be noted that the saving of the setting in the energy-independent
memory occurs always after its change.
There are 14 items in the setup menu. Let's consider each of them:
Language
Sets the interface language. The choice is [Rus] –Russian language, [Eng] –
English. Immediately, after changing this setting, pressing the «S» or «Enter» buttons
will go to the main menu, where the entire display will be in the selected language.
To continue editing the settings, select this item in the main menu again. The
second feature of this setting is that the value set here sets the display language for
the web interface. The device page will be displayed in Russian or English,
depending on the value set here.
Sensitivity
Sets the sensitivity of the eye movement sensor. It can vary from 1 to 99. A
small value corresponds to the maximum sensitivity, and a large value to the
minimum. The average value (by default) is 30. The eye movement sensor can be
tested by selecting the TEST item in the main menu.
Scan time
The parameter defines the scanning time interval –5 ms (milliseconds). The
range of change is from 1 to 9. Accordingly, the value «1» is 5 ms, the value «3» is 15
ms, etc. This parameter determines the recorded speed of movement of the eyelids
during REM. The recommended average value is «3» (set by default). The larger this
parameter, the slower eyelid movements will be visible to the sensors.
●Motion Det.
This setting sets the sensitivity of the head movement sensor and can be in
the range from 0 to 9. The minimum value «0» corresponds to the maximum
sensitivity to movements, the maximum value –the minimum sensitivity. The
motion detector always works in monitoring mode.
Motion stop Off
Interruption of head movement prompts. The setting is [On] –enabled and
[Off] –disabled. If there is a value corresponding to «On», then when the head
moves at the time the prompt is issued, this prompt will be immediately interrupted.
This setting does not work (equivalent to «Off») if the vibrating alert is enabled for
prompting.
Vibro volume
The setting enables and sets the vibration intensity when prompting. It can
take a value from 0 to 9. The value «0» corresponds to off vibration. The minimum
value corresponds to a low vibration level, a value of 9 –to the maximum. The
default is «3» (optimal). Vibration is generated synchronously with the light prompt.
Sound volume
This setting sets the sound volume when playing voice prompts (from the
DICT folder) and playing audio files before falling asleep (from the AUDIO folder).
It can range from 0 (soundless) to 30 (maximum volume).

AstroLine ver. 1.3 Redaction 1.1
18 - 18 -
Scan delay
The setting sets the delay time in minutes between the triggering of the eye
movement sensor with prompts and the start of the next scan. Accepts a value from
0 to 45. If the value is «0» –there is no delay and scanning starts immediately after
the prompt is issued.
Prompter On
Turns light and vibration prompts on or off. The setting is [On] –enabled
and [Off] –disabled. If the value is «Off», then light and vibration prompts are not
issued regardless of the values set there.
VOX_prompt On
The parameter enables or disables the issuance of voice prompts. Works
regardless of the setting of the previous parameter (prompts by light and vibro). The
setting is [On] –enabled and [Off] –disabled. If voice prompts are turned on, while
a MicroSD memory card is installed in the device, and voice prompts are recorded
in the BEFORE and DICT directories, they will be issued when the eye movement
sensor is triggered during sleep monitoring. First, a voice prompt is issued from the
BEFORE folder, then –light and vibration, after that a voice prompt is issued from
the DICT folder.
The prompts are issued in the order of their formation (recording): when the
sensor is first triggered, the first prompt from the folder is displayed, during the
second –the second, and so on until the end. If the tips run out in the folder, the
first tip will be displayed again, and so on in a loop. If only one voice prompt is
recorded in the DICT or BEFORE folders, then it will always be issued when the
sensors are triggered.
VOX_P. Delay
This setting determines the delay time in seconds between the activation of
the light and vibration prompts and the issuance of a voice message, if its issuance is
allowed. Accepts a value from 0 to 99. The parameter affects the perception of the
voice prompt. If you see lights in a dream, then at first you do not understand what
it is, it takes time to perceive the voice. And only after a few preset seconds you hear
a voice. When set to «0», there is no delay and the voice plays immediately after the
light. A small value between 2 and 10 seconds is recommended. The default is 3
seconds.
Time_OFF
Sets the time for the off timer in minutes. Accepts a value from 0 to 15.
When the value is set to «0», there is no auto power off, the device works constantly
(not recommended). The default is 5 minutes. The timer is triggered when you
forgot the device while editing the settings or stopped the player or performed any
other action that leads to the expectation of further actions from you, but they do
not happen. The auto-off timer is deactivated when working in sleep monitoring, as
well as when the Wi-Fi interface is started.
ALARM volume
This setting specifies the volume with which the audio file from the ALARM
folder will be played back after monitoring by the end of sleep time (this is the

AstroLine ver. 1.3 Redaction 1.1
19 - 19 -
Alarm mode). The sound volume can take a value from 1 to 30. The default value is
21. When the value is «0», the alarm clock is turned off and after the sleep
monitoring is completed, you exit to the main menu without playing files from the
ALARM folder.
BEFORE volume
This setting determines the volume of the voice guidance from the BEFORE
folder. It is generally recommended that this prompt be heard at a lower volume
than that after the light prompt. The volume can range from 1 to 30, just like other
volume settings.
Tune
Enables or disables playback of tunes before falling asleep from the AUDIO
folder. The setting is [On] –enabled and [Off] –disabled. If this mode is enabled
and there is a memory card, and there are corresponding files in the AUDIO folder,
then when monitoring starts from the main menu, the message Tune_ON will
appear and the countdown will begin for 20 seconds (preparation time), after which
music will be played.
Reset settings
Allows you to return all settings to the «default» state, i.e. to some parameters
set by the manufacturer. In addition, the values of the index counters for the voice
recorder and the LOG file will be set to «000».
When this item is selected, if you press the «Enter» button, then only in this
case a reset will be performed and an automatic transition to the main menu will
occur.
If you press the «+» or «S» buttons, you will go to the next menu item. When
you press the «–» button, you will go to the previous item TUNE.
Test
Selecting this item of the main menu allows you to fully check the operation
of the device and simulate sleep monitoring. In this mode, you can be sure not only
of the correct volume and brightness of prompts, the triggering of sensors and their
sensitivity, but also to evaluate how the mask sits on the face and how the operation
of the device depends on its position. After starting this mode, the screen displays
the values:
SL: 000 SR: 000
SENS: --
Then there is a countdown of 20 seconds for preparation (putting on the
mask) –it can be reset by pressing any key. The backlight LED in the «Enter» key
starts blinking –the test mode is working.
If the eye movement sensor is triggered, then opposite to the SL and SR
mnemonics (corresponding to the left and right eyes), the values of the relative
magnitudes of the amplitude of movement for the set scanning time appear. In this
case, the SENS line displays the event «01» –an eye movement sensor was triggered,
«02» –a head movement sensor was triggered.

AstroLine ver. 1.3 Redaction 1.1
20 - 20 -
After the eye movement sensor is triggered, prompts are issued (light and
vibration), as well as voice prompts –in the same order as they will be issued during
sleep monitoring according to the specified parameters in the settings.
This mode is stopped by pressing the «Enter» button, while the top line
displays the inscription STOP. Pressing the «Enter» button again or the «S» button
leads to the main menu.
Time set
When you select this item of the main menu, the screen displays:
Time hh:mm,
where «hh» is the hour and «mm» is the minutes of the current time. You can set
them by pressing the «+» and «–» buttons, the hours will change from 0 to 23. By
pressing the «+» and «–» while holding the «S» button, the minutes will change in the
range from 0 to 59.
Pressing the «Enter» button sets the current time and returns to the main
menu. If the time has not been changed by pressing the «+» and «–» buttons, then
the time that was displayed during editing is not set. The default (when reset) is
«0:00».
The clock always works, even when the device is off.
Sleep timer (Sleep Tmr)
The setting edits the sleep time in the same way as for the main time. The
difference is that the maximum sleep time that can be set is 3 hours 59 minutes. In
fact, the sleep monitoring mode with prompts and recording events in the LOG file
will start after this time. The default is 1 hour 30 minutes.
End time of sleep (END Time)
The sleep end time is edited here. The coincidence of the current time with
this value during sleep monitoring leads to its end. If the Alarm clock is enabled,
then the audio files from the ALARM folder will be played. Editing of this
parameter is performed in the same way as for setting the current time. The default
is 9 hours 30 minutes.
Light prompts (Light)
This item of the main menu starts editing the parameters of the light tip. The
setting line is displayed on the screen:
Col. 00 Br. 00
where «00» is the color number (from 0 to 15) and the brightness value (from 0 to
15). Pressing the «+» and «–» buttons changes color, while pressing them together
with the «S» button changes the brightness. If you set any of these values to «0»,
then the light prompts will actually be turned off. Pressing the «Enter» button saves
the light setting (if it was changed) and exits to the main menu. The frequency
parameters of the light prompt (number of flashes, frequency and duty cycle) can be
configured via the web interface.
Table of contents
Popular Personal Care Product manuals by other brands

American Standard
American Standard Doral Classic Champion 2058.014 Specification sheet

Vitalmaxx
Vitalmaxx RH-0156 instructions

Ohio Medical
Ohio Medical Area Installation and maintenance manual

Sterne
Sterne Si-Line Series user guide

BIOCOM
BIOCOM AC048 manual

sensiplast
sensiplast MANU ACTIVE Instructions for use


