miniland baby humiplus advanced User manual

3
12
21
30
Español
English
Português
Français
39
48
57
66
Deutsch
Italiano
Polski
Русский
humiplus
advanced
minilandbaby.com


ÍNDICE
1. Introducción
2. Contenido
3. Instrucciones de seguridad
4. Características del producto
5. Instrucciones de uso
6. Mantenimiento
7. Especificaciones técnicas
8. Información sobre la retirada del producto
1. INTRODUCCIÓN
Le felicitamos por haber adquirido este humidificador ultrasónico, en cuyo
diseño y fabricación la seguridad y la fiabilidad han sido la máxima prioridad.
Antes de utilizar este dispositivo, lea cuidadosamente todas las instrucciones
de este manual. Conserve el manual para poder utilizarlo como referencia en
el futuro puesto que contiene información importante.
Las características descritas en esta guía de usuario están sujetas a
modificaciones sin previo aviso.
2. CONTENIDO
1 Humidificador ultrasónico
1 Mando a distancia
1 Cepillo
1 Manual de Instrucciones y Garantía
Si faltara cualquiera de los elementos arriba indicados, póngase en contacto
con el establecimiento en el que adquirió el producto.
3. INSTRUCCIONES DE SEGURIDAD
A la hora de utilizar cualquier aparato eléctrico, es necesario seguir ciertas
precauciones básicas con el fin de reducir el riesgo de incendio, sacudida
eléctrica y lesiones personales. Algunas de estas precauciones son las
siguientes:
1. Lea cuidadosamente este manual de instrucciones y consérvelo para poder
consultarlo en el futuro si fuera necesario.
2. Asegúrese de que el voltaje de la toma eléctrica corresponda al voltaje
indicado en la etiqueta de especificaciones del aparato.
3. Asegúrese de que siempre haya agua en el depósito cuando el aparato esté
en funcionamiento.
4. Utilice solo agua del grifo fría y limpia para llenar el depósito (en las áreas en
las que el agua sea dura se recomienda utilizar agua ablandada o destilada).
5. Asegúrese de que la tapa de llenado del fondo del depósito de agua esté
bien apretada.
6. Asegúrese de que la boquilla y la cámara de vapor siempre estén instaladas
cuando el aparato esté en funcionamiento. Gire la boquilla de manera que no
esté dirigida hacia niños, paredes o muebles.
7. Coloque el humidificador sobre una superficie lisa y nivelada
ESPAÑOL
3

8. Desenchufe siempre el aparato de la toma eléctrica mientras no lo esté
utilizando y antes de proceder a su limpieza o si va a moverlo de sitio.
9. Este aparato solo está diseñado para el uso en hogares.
10. No cubra nunca el humidificador mientras esté en funcionamiento, ya que
podría resultar dañado.
11. No añada aceites de aromaterapia a la boquilla, la base o el depósito de
agua.
12. No cubra ninguna de las aperturas del aparato ni introduzca ningún objeto
en ellas.
13. No incline el aparato ni intente vaciarlo o llenarlo mientras esté en
funcionamiento.
14. No sumerja nunca el humidificador en agua ni permita que el agua entre en
contacto con el conector o el dispositivo de control.
15. No intente abrir ninguna parte del humidificador.
16. Mantenga limpio el humidificador. No permita la entrada de ningún objeto
en las aperturas de ventilación del aparato, ya que podría resultar dañado.
17. Es necesario supervisar a los niños que utilicen cualquier aparato eléctrico
y extremar las precauciones si hay niños en las proximidades durante el uso.
18. No permita que el cable de alimentación entre en contacto con superficies
húmedas o calientes, se retuerza o esté al alcance de los niños.
19. No utilice al aparato al aire libre.
20. No coloque el aparato sobre, o cerca de, una cocina de gas o eléctrica
caliente.
21. No opere ningún aparato eléctrico si el cable o el enchufe estuvieran
dañados, si no funcionara correctamente o si hubiera sufrido cualquier tipo de
daños.
22. No intente abrir ninguna pieza del humidificador o desmontar los controles.
El fabricante no se hará responsable de ningún fallo del aparato si no se
hubieran seguido estas instrucciones.
23. No utilice el humidificador para ningún propósito aparte de su uso previsto.
24. Si fuera necesario reparar el humidificador, las reparaciones solo deben ser
efectuadas por un técnico de servicio autorizado.
25. El aparato no debe dejarse desatendido en habitaciones cerradas, ya que
el aire podría saturarse de humedad y se formaría condensación sobre las
paredes y los muebles.
26. No coloque el aparato cerca de fuentes de calor como radiadores y estufas.
Coloque el aparato alejado de las tomas eléctricas de pared. Para obtener el
mejor rendimiento, el humidificador debe colocarse a una distancia mínima de
10 cm de la pared y de 60 cm del suelo.
27. No utilice detergente para limpiar las piezas que entren en contacto con el
agua. El detergente podría afectar al funcionamiento del aparato si entrara en
contacto con el agua.
28. Este aparato no debe ser utilizado por personas (incluyendo niños) que
ESPAÑOL
4

2
3
4
7
10
9
1
5
8
6
11
presenten una disminución de sus capacidades físicas, sensoriales o mentales,
o que carezcan de la experiencia y los conocimientos necesarios para utilizarlo,
a menos que lo hagan bajo supervisión o hayan recibido instrucciones en lo
relativo al uso del aparato por parte de una persona responsable de su
seguridad.
29. Si el cable de alimentación sufriera daños, debe ser reemplazado por el
fabricante, su agente de servicio u otro profesional con una cualificación similar
con el fin de evitar situaciones de peligro.
¡ESTE HUMIDIFICADOR NO ES UN JUGUETE!
No permita que los niños jueguen con este aparato. Existe el riesgo de lesiones
personales graves y electrocución. Este aparato solo debe ser utilizado por
adultos. Es necesario supervisar a los niños con el fin de evitar que jueguen
con el humidificador.
IMPORTANTE: Le informamos de que los cambios y modificaciones en el
equipo no efectuados por un técnico de servicio de MINILAND no están
cubiertos por la garantía del producto.
4. CARACTERÍSTICAS DEL PRODUCTO
4.1. DESCRIPCIÓN DE LAS PIEZAS
4.1.1. HUMIDIFICADOR
1. Salida de humedad
2. Asa del depósito de agua
3. Depósito de agua
4. Tapa del depósito de agua
5. Salida de aire
6. Cuerpo principal
7. Cable de alimentación
8. Panel de control
9. Sensor de nivel de agua
10. Transductor ultrasónico
11. Filtro del agua
ESPAÑOL
5

4.1.2. PANEL DE CONTROL
A. Interruptor ON/OFF
B. Vapor caliente / Luz nocturna / Ionizador
C. Humidistato automático
D. Ajuste del temporizador
E. Ajuste de humedad
F. Ajuste de la emisión de vapor
INFORMACIÓN DE LA PANTALLA
G. Humidistato automático encendido
H. Ionizador encendido
I. Vapor caliente conectada
J. Temporizador activado
K. Depósito de agua vacío
L. % de humedad relativa
NOTA: La pantalla se apaga después de dos minutos para un mejor descanso
nocturno; sin embargo, el humidificador continúa en funcionamiento. La luz
puede encenderse en cualquier momento simplemente pulsando cualquier
botón.
4.1.3. MANDO A DISTANCIA
I. ON/OFF
II. Humedad automática
III. Ajuste de Humedad
IV. Ionizador / Vapor caliente / Luz compañía
V. Temporizador
VI. Ajuste de la emisión de vapor
VII. Compartimento de las pilas
4.2. PRINCIPIO OPERATIVO
El Humidificador Automático transforma el agua almacenada en el depósito en
vapor de agua. El sistema de ventilación incorporado a la máquina emite esta
nebulización al aire seco, creando así la humedad requerida.
L
G H I J K
I
II III
IV
VVI
VII
ESPAÑOL
6

5. INSTRUCCIONES DE USO
5.1. ADICIÓN DE AGUA
1. Se recomienda al usuario que la primera vez que utilice el humidificador lo
haga con agua destilada. (Siga las instrucciones indicadas en la sección de
Limpieza).
2. Sujete el depósito de agua en posición invertida (al revés).
3. Retire la tapa del depósito de agua girándola en el sentido contrario a las
agujas del reloj.
4. Añada agua fría al depósito de agua. No añada agua caliente, ya que se
producirían fugas.
5. Instale de nuevo la tapa del depósito de agua cuidadosamente y compruebe
que haya quedado bien fijada y que no haya fugas.
6. Sujete el depósito de agua en posición vertical y colóquelo de nuevo en la
base.
7. Coloque la salida/boquilla de vapor en el orificio de la superficie del depósito
de agua.
ATENCIÓN:
1. Utilice el asa para transportar el depósito de agua lleno, sujetándolo por
debajo al mismo tiempo con la otra mano.
2. No añada agua directamente a la base, ya que el aparato podría resultar
dañado o provocar situaciones de peligro.
3. No mueva el aparato cuando el depósito de agua esté totalmente lleno de
agua.
5.2. ENCENDIDO / APAGADO DEL HUMIDIFICADOR
Pulse suavemente el botón ON/OFF (A, o en el mando a distancia I). El
aparato comenzará a emitir vapor por la boquilla. El % de humedad relativa se
mostrará en la pantalla. Pulse de nuevo el botón ON/OFF para apagar el
humidificador.
NOTA: La pantalla se apaga después de dos minutos para un mejor descanso
nocturno; sin embargo, el humidificador continúa en funcionamiento. La luz
puede encenderse en cualquier momento simplemente pulsando cualquier
botón.
5.3. VAPOR CALIENTE / LUZ NOCTURNA / IONIZADOR
El ajuste por defecto es: función Ionizador ACTIVADA (ON), Vapor Caliente
DESACTIVADO (OFF) y Luz Nocturna DESACTIVADA (OFF). El humidificador
volverá a este ajuste por defecto después de la sexta pulsación.
Si pulsa el botón Vapor Caliente / Luz Nocturna / Ionizador (B, o en el
mando a distancia IV):
- 1ª pulsación: Función Ionizador ON, Vapor Caliente OFF y Luz Nocturna ON
- 2ª pulsación: Función Ionizador OFF, Vapor Caliente OFF y Luz Nocturna ON
ESPAÑOL
7

- 3ª pulsación: Función Ionizador ON, Vapor Caliente ON y Luz Nocturna ON
- 4ª pulsación: Función Ionizador ON, Vapor Caliente ON y Luz Nocturna OFF
- 5ª pulsación: Función Ionizador OFF, Vapor Caliente ON y Luz Nocturna OFF
La Luz Nocturna es una luz arco iris de colores cambiantes.
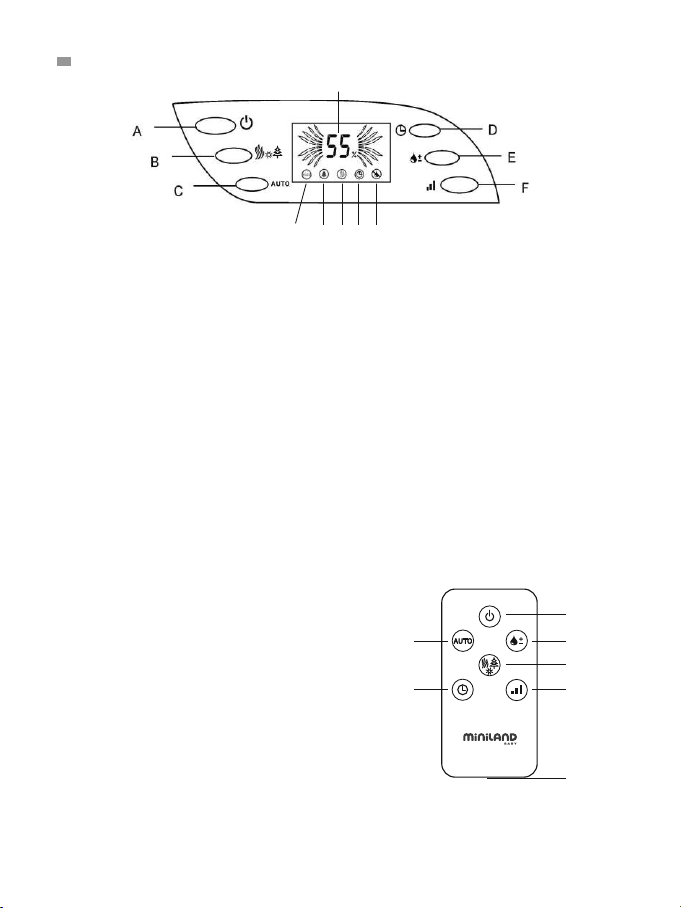
5.4. HUMIDISTATO AUTOMÁTICO
Pulse el botón Humidistato Automático (C, o en el mando a distancia II)
para activar la función de humidistato automático.
Con esta función se mantiene la humedad ideal del 55%. Mientras el nivel de
humedad de la habitación sea inferior el nivel de humedad automático (55%), el
humidificador seguirá produciendo vapor automáticamente. Una vez se haya
alcanzado dicho nivel de humedad del 55% en la habitación, el humidificador
se apagará por sí solo.
5.5. AJUSTE DEL TEMPORIZADOR
Este humidificador está equipado con una función de ajuste de temporizador
desde 1 hora hasta 12 horas. Para utilizar esta función, simplemente pulse el
botón de Temporizador (D, o en el mando a distancia V).
La señal de ajuste del temporizador se muestra en la pantalla. Tras ajustar 12
horas, pulse el botón de Temporizador y se desactivará la función de ajuste del
temporizador.
5.6. AJUSTE DEL % DE HUMEDAD RELATIVA
Pulse suavemente el botón de Ajustar Humedad Relativa (E, o en el mando
a distancia III) para activar el ajuste de la Humedad Relativa. Pulsando este
botón, el usuario puede ajustar el % de humedad relativa (HR) deseado e
incrementarlo si lo desea. Recomendamos una humedad relativa de entre el
40% y el 60%. El aparato puede configurarse entre el 40% y el 75% de
humedad relativa o en el modo de Operación Continua (Co).
La señal de ajuste del % de HR se muestra en la pantalla. Pulsando el botón un
segundo puede incrementarse o reducirse continuamente el % de HR. Si no
pulsa el botón en 4 segundos, se volverá a mostrar el % de HR actual en la
pantalla. Cuando el % de HR real supere en más de un 3% al ajuste del % de
HR deseado, el humidificador se detendrá automáticamente.
El aparato no se apagará por sí solo si se ha ajustado para el modo de
Operación Continua (Co). Mientras usted hace la selección se muestra el valor
deseado. Después de algunos segundos, la pantalla vuelve a mostrar
automáticamente el valor actual.
5.7. AJUSTE DE EMISIÓN DE VAPOR
El botón de Emisión de Vapor (F, o en el mando a distancia VI) permite
ajustar el nivel de vapor, que el usuario puede aumentar o reducir según lo
desee.
AUTO
ESPAÑOL
8

Hay tres niveles de vapor: bajo, medio y alto. Para el uso nocturno
recomendamos el nivel bajo.
Si no pulsa el botón en 4 segundos, se volverá a mostrar el % de HR actual en
la pantalla.
5.8. SEÑAL DE DEPÓSITO DE AGUA VACÍO
Cuando el depósito de agua esté vacío se mostrará una señal en la pantalla
que le avisará de ello (K). El humidificador se apagará automáticamente.
El usuario debe rellenar el depósito de agua cuando se muestre la señal
destellante de advertencia.
ATENCIÓN:
1 Debido al riesgo de electrocución nunca debe tocarse el enchufe, el cable de
alimentación y el aparato con las manos mojadas.
2 Es necesario evitar la obstrucción de la salida/boquilla de nebulización con
objetos.
3 Si el cable de alimentación o el aparato estuvieran dañados, deje de utilizar
inmediatamente el aparato.
Los daños deben ser reparados por el fabricante, su agente de servicio u otro
profesional con una cualificación similar con el fin de evitar situaciones de
peligro.
5.9. LOCALIZACIÓN DE FALLOS
El indicador de alimentación
no funciona y el aparato no
produce ni aire ni vapor
SÍNTOMAS CAUSA ACCIÓN
No se ha conectado la
unidad a la red eléctrica
Conecte el humidificador
a la red eléctrica
No se ha encendido
el humidificador Encienda el humidificador
La pantalla está
encendida, el aparato
produce aire pero no vapor
No hay agua en el depósito
de agua
Llene el depósito de agua
La nebulización tiene un
olor desagradable
El aparato es nuevo Abra el depósito de agua y
déjelo en un lugar sombreado
durante 12 horas
El agua está sucia o lleva
demasiado tiempo en el
depósito de agua
Limpie el depósito de agua,
llénelo con agua limpia
La pantalla está encendida,
pero el aparato no produce
ni aire ni vapor
Hay demasiada agua en el
canal de la base
El nivel de humedad en la
habitación es mayor que el
nivel de humedad automático
del humidificador
Vacíe el canal y cierre la
tapa del depósito de agua
Incremente el nivel de
humedad del humidificador
ESPAÑOL
9

SÍNTOMAS CAUSA ACCIÓN
Se emite poca cantidad de
nebulización por la boquilla
El transductor ultrasónico
está sucio
El agua está sucia o lleva
demasiado tiempo en el
depósito de agua
Limpie el transductor
Limpie el depósito de agua,
llénelo con agua limpia
El aparato emite ruidos
extraños
El nivel de agua del depósito
de agua es insuficiente
Llene de depósito con agua
Vibraciones procedentes de
la superficie sobre la que se
apoya
Coloque el aparato sobre
una superficie lisa y estable
Otros problemas Póngase en contacto con el servicio técnico de MINILAND
6. MANTENIMIENTO
En invierno, la falta de humedad puede secar su piel y provocar irritación nasal,
resfriados frecuentes, dolor de garganta, etc. Los humidificadores proporcionan
humedad relativa para proteger su salud. Para obtener los mayores beneficios
del humidificador y evitar problemas con el aparato, siga cuidadosamente todas
las instrucciones de mantenimiento. Si no se siguen las instrucciones de
cuidado y mantenimiento del aparato indicadas, podrían desarrollarse
microorganismos en el agua del interior del humidificador.
6.1. MANTENIMIENTO DIARIO
1. Antes de proceder a la limpieza del aparato, sitúe el interruptor de
alimentación en OFF y desenchufe la unidad de la toma eléctrica de pared.
2. Levante el depósito y el alojamiento del humidificador para retirarlos.
3. Lleve el depósito de agua a una pila, vacíe el agua y enjuague
cuidadosamente el depósito de agua con el fin de eliminar cualquier rastro de
sedimentos y suciedad. Utilice un trapo suave y limpio o toallitas de papel para
limpiar y secar el depósito de agua.
4. Llene de nuevo el depósito de agua con agua del grifo fría de acuerdo con
las instrucciones indicadas anteriormente para el llenado del depósito de agua.
6.2. MANTENIMIENTO SEMANAL
1. Repita los pasos 1-3 de la sección anterior.
2. Añada un vaso de vinagre blanco (aproximadamente 200 ml) a la base del
aparato y déjelo actuar durante aproximadamente 15 minutos. A continuación,
elimine los depósitos de cal, especialmente en el transductor, utilizando un
cepillo suave.
3. Elimine los depósitos de cal desprendidos y la solución de vinagre blanco
con un trapo suave limpio.
ESPAÑOL
10

6.3. PRECAUCIONES DURANTE EL MANTENIMIENTO
1. Asegúrese de no sumergir nunca el cuerpo principal en agua.
2. Limpie las partes internas del aparato con un trapo suave.
3. Utilice el cepillo solo para limpiar el transductor. El transductor debe limpiarse
una vez a la semana.
4. Utilice solo la parte de cerdas suaves del cepillo.
5. Cambie el agua del depósito de agua al menos una vez a la semana.
6.4. ALMACENAMIENTO DEL HUMIDIFICADOR
- Limpie el humidificador tal como se ha indicado anteriormente y séquelo
cuidadosamente.
- Es preferible almacenar el aparato en su embalaje original.
- Las temperaturas en el lugar en el que se almacene el aparato no deben ser
elevadas.
7. ESPECIFICACIONES TÉCNICAS
Tensión de alimentación: 230V
Frecuencia: 50HZ
Capacidad de humedad: 400 ml/h (vapor caliente)
Flujo de aire: 100 – 400 ml/hr
Tiempo de funcionamiento: 18 - 70 horas
Volumen del depósito de agua: 7,0 l
Potencia nominal: 30W (vapor fría), 130W (vapor caliente)
Dimensiones: 324 mm (largo) x 200 mm (ancho) x 339 mm (alto)
Peso: 2,1 kg
Área de cobertura: 45 m²
8. INFORMACIÓN SOBRE LA RETIRADA DEL PRODUCTO
· Es necesario desechar el producto de manera responsable.
· No se deshaga de los productos que muestren el símbolo del
contenedor de basura tachado junto con el resto de los residuos
domésticos.
· Una vez finalizada su vida de servicio, estos productos deben desecharse
llevándolos a un centro de recogida y tratamiento designado por las
autoridades locales.
También puede ponerse en contacto con el establecimiento en el que adquirió
el producto.
ESPAÑOL
11

INDEX.
1. Introduction
2. Contents
3. Safety instructions
4. Product features
5. Instructions for use
6. Maintenance
7. Technical specification
8. Product disposal information
1. INTRODUCTION
Congratulations on your purchase of this ultrasonic humidifier. Each unit has
been manufactured to ensure safety and reliability.
Before using this device, please read all instructions in this manual carefully.
Please keep this manual as it contains important information.
The features described in this user's guide are subject to modifications
without prior notice.
2. CONTENTS
1 Ultrasonic humidifier
1 Remote control
1 Brush
1 Instruction manual and guarantee
If any of the above is missing, please contact your retailer.
3. SAFETY INSTRUCTIONS
When using any electric appliance, basic safety precautions should always be
followed to reduce the risk of fire, electric shock and injury, including the
following:
1. Read the instructions carefully before use, and save them for future
reference.
2. Make sure the power used is as indicated on the rating label.
3. Always have water in the water tank when operating the unit.
4. Use only clean, cool tap water to fill the tank (softened or distilled water is
recommended in hard water areas).
5. Ensure the filling cap at the bottom of the water tank is tightly closed.
6. Always have the mist nozzle and the mist chamber in place while the unit is
operating. Rotate the mist nozzle so it is aimed away from children, walls, and
furniture.
7. Place the humidifier on a smooth level surface.
8. Always disconnect the humidifier from the mains supply when not in use and
when cleaning or moving the unit.
9. This appliance is intended for household use only.
10. Never cover the humidifier when being used as this could damage the unit.
11. Do not add aromatherapy oils to the nozzle, base or water tank.
ENGLISH
12

12. Do not cover any openings of the unit or insert
objects into any of the openings.
13. Do not tilt or tip the unit or attempt to empty or fill it while it is operating.
14. Do not immerse the humidifier in water or let water come into contact with
the connector or control device.
15. Do not attempt to open any part of the humidifier.
16. Keep the humidifier clean. Do not allow objects to enter the ventilation as
this may damage the unit.
17. Close supervision is required when any appliance is used near or by
children.
18. Never allow the cord to touch wet or hot surfaces, become twisted or be
within the reach of children.
19. Do not use outdoors.
20. Do not place on or near hot gas or an electric burner.
21. Never use the appliance with a damaged cord or plug or after the appliance
has malfunctioned or been damaged in any way.
22. Never attempt to open any part or dismantle the controls. Responsibility for
failure cannot be accepted if these instructions have been ignored.
23. Do not use the appliance for anything other than its intended use.
24. Any repairs that need to be done to the humidifier must be referred to an
authorized Service Agent only.
25. The unit should not be left unattended in closed rooms as the air could
become saturated and leave condensation on the walls or furniture.
26. Do not place the humidifier near heat sources such as stoves, radiators, and
heaters. Do not locate your humidifier on an inside wall near an electrical outlet.
The humidifier should be at least 10cm away from the wall and raised 60cm
from the floor for best results.
27. Do not use detergent to clean any parts containing water. The detergent
may interfere with the output of the unit if it comes into contact with the water.
28. This appliance is not intended for use by persons (including children) with
reduced physical, sensory or mental capabilities, or lack of experience and
knowledge, unless they have been given supervision or instruction concerning
use of the appliance by a person responsible for their safety.
29. If the supply cord is damaged, it must be replaced by the manufactures, the
service agent or similarly qualified persons in order to avoid a hazard.
THIS HUMIDIFIER IS NOT A TOY!
Do not let your child play with this appliance. Serious injury and electrocution
are possible. This appliance must only be operated by an adult. Children
should be supervised to ensure that they do not play with the humidifier.
IMPORTANT: You are advised that changes and modifications not carried out
on the equipment by the MINILAND technical service are not covered by the
product guarantee.
ENGLISH
13

4. PRODUCT FEATURES
4.1. PARTS DESCRIPTION
4.1.1. HUMIDIFIER
1. Moisture outlet
2. Water tank handle
3. Water tank
4. Water tank cap
5. Air outlet
6. Main body
7. Power cord
8. Control Panel
9. Water level sensor
10. Ultrasonic transducer
11. Water filter
2
3
4
7
10
9
1
5
8
6
11
ENGLISH
14

4.1.2. CONTROL PANEL
A. ON/OFF switch
B. Warm Mist / Light Night / Ionizer
C. Auto Humidistat
D. Timer setting
E. Set Humidity
F. Mist emission setting
DISPLAY INFORMATION
G. Auto humidistat on
H. Ionizer on
I. Warm mist on
J. Timer on
K. Water tank empty
L. % relative humidity target
NOTE: The display turns off after 2 minutes for better rest during the night,
however the humidifier continues working. It is possible to turn it on by pressing
any button.
4.1.3. REMOTE CONTROL
1. ON/OFF
2. Auto Humidity
3. Set Humidity
4. Ionizer / Warm Mist / Night Light
5. Timer
6. Mist emission setting
7. Battery compartment
4.2. WORKING PRINCIPLE
The Ultrasonic Humidifier transforms the water stored in the tank, into water
vapour. The ventilation system built into the machine emits this mist into the dry
air, creating the required humidity.
L
G H I J K
I
II III
IV
VVI
VII
ENGLISH
15

5. INSTRUCTIONS FOR USE
5.1. ADDING WATER
1. The user is recommended to use distilled water the first time. (Please follow
the instructions given in Cleaning section)
2. Hold the water tank upside-down.
3. Unscrew the water tank cover anti-clockwise.
4. Add cool water into water tank. Do not fill with warm water as this may
cause leaking.
5. Screw the water tank cover carefully and check it is properly locked without
leakage.
6. Hold the water tank vertically and then place back the base.
7. Put the mist outlet/nozzle on the hole of the water tank surface.
ATTENTION:
1. Use the water tank handle (2) when carrying the fully filled water tank and
place the other hand under for assistance.
2. Don't put water into the base directly otherwise it will be damaged or cause
danger.
3. Don't move the appliance when the water tank is filled full with water.
5.2. TO TURN ON / OFF THE HUMIDIFIER
Gently press On/ Off button (A, or on the remote control I). The moisture will
be sprayed from the nozzle. The moisture-spraying signal will be shown on
screen. Press the On/ Off button a second time to turn off the humidifier.
NOTE: The display turns off after 2 minutes for better rest during the night,
however the humidifier continues working. It is possible to turn it on by pressing
any button.
5.3. WARM MIST / NIGHT LIGHT / IONIZER
The default setting is: Ionizer Function ON, Warm Mist OFF and Night Light
OFF, the humidifier will come back to default setting after the above 6th press.
If you press the button Warm Mist / Night Light/ Ionizer (B, or on the remote
control IV):
- 1st press: Ionizer ON, Warm Mist OFF and Night Light ON
- 2nd press: Ionizer ON, Warm Mist OFF and Night Light ON
- 3rd press: Ionizer ON, Warm Mist ON and Night Light ON
- 4th press: Ionizer ON, Warm Mist ON and Night Light OFF
- 5th press: Ionizer OFF, Warm Mist ON and Night Light OFF
The Night Light is a rainbow light with changing colours.
ENGLISH
16

5.4. AUTO HUMIDISTAT
Press Auto Humidistat button (C, or on the remote control II) to activate the
automatic humidity function.
The ideal humidity of 55% is maintained. When the humidity level in the room is
less than the auto humidity level (55%), the humidifier will continue producing
moisture automatically. Once the humidity level of room level is reached, the
humidifier will turn itself off.
5.5. SETTING TIME
This humidifier has 12 hours timer setting, from 1 hour up to 12 hours. To use
this feature, simply press the Timer button (D, or on the remote control V).
The timer setting signal is displayed on the screen. After setting 12 hours, press
the timer button, it will turn off the timer setting function.
5.6. SETTING THE RELATIVE HUMIDITY %
Gently press the Set Humidity button (E, or on the remote control III), it will
enter the Relative Humidity setting control. Press the Set Humidity button to set
the desired relative humidity % (RH) and increase RH%. We recommend a
relative humidity of between 40% and 60%. The appliance can be regulated
from 40% to 75%, or Continuous operation (Co).
With all settings, the RH% signal is displayed on the screen. By pressing the
button for one second, you can continuously increase or decrease the RH%.
If you don't press the button for more than 4 seconds, the actual RH% will be
shown on the screen panel again. When the actual RH% is greater than the
desired setting RH% over 3%, the humidifiers will be automatically stopped.
The appliance will not turn itself off if it has been set for Continuous operation
(Co). The desired value is shown while you are making the selection. After a
few seconds, the display automatically switches to the current value.
5.7. MIST EMISSION SETTING
Press the Mist emission button (F, or on the remote control VI) it will enter
the Spray level setting control. Press the Mist emission button to increase the
spray level.
The spray level is low, medium and high. We recommend a low mist emission
setting for night use.
If you don't press the button for more than 4 seconds, the actual RH% will be
shown on the screen panel again.
5.8. WATER EMPTY SIGNAL
When the water tank is empty, there will be a water empty sign shown on the
display (K). The humidifier will automatically turn itself off. Users need to
refill with water when the flash warning signal is shown.
AUTO
ENGLISH
17

Power indicator doesn't
work and there is no air
and mist
SYMPTOMS CAUSE ACTION ITEMS
The unit isn't connected to
the mains power supply Connect the humidifier to the
mains power supply
The humidifier isn't turned on
ATTENTION:
1 To avoid an electric shock, do not touch the mains when your hands are wet.
2 You must not obstruct the mist outlet/nozzle with any object.
3 If the power cord or the product is damaged, please do not use the product.
It must be replaced by the manufacturer or its service agent or a similarly
qualified person in order to avoid a hazard.
5.9. TROUBLESHOOTING
The display is on, the unit
with air but no mist
Switch on the unit
There is no water in the
water tank
Fill the water tank
with water
Unpleasant-smelling mist
New unit
Dirty water or stored too
long in the water tank
Open water tank, put it in
the shade for 12 hours
Clean the water tank, fill
with clean water
The display is on, but the
unit doesn't emit air or mist
Too much water in the
base flume
The humidity level in the
room is higher than the auto
humidity level of the humidifier
Increase the humidity level
of the humidifier
Empty the flume then close
the water tank cap.
Small fog output Dirty ultrasonic transducer
Dirty water or long-time to
store water in water tank
Clean the transducer
Clean the water tank, fill
clean water in.
Strange noise
Other malfunctions
Caused by insufficient water
in water tank Fill water tank with water.
Vibration from the surface it
is resting on Place on a stable level
surface.
Contact the MINILAND technical service
ENGLISH
18

6. MAINTENANCE
In the winter, the lack of humidity can dry out your skin and cause nasal irritation,
frequent colds, sore throats, etc. Humidifiers provide relative humidity to protect
our health. To get maximum benefit from the humidifier and avoid product failure,
follow all the maintenance instructions carefully. If the recommended care and
maintenance guidelines are not followed, micro-organisms may grow in the
water inside the humidifier.
6.1. DAILY MAINTENANCE
1. Before cleaning, turn the power OFF and unplug the unit from the socket.
2. Lift the tank and the casing off the humidifier.
3. Carry the water tank to a sink, then drain and rinse the water tank thoroughly
to remove any sediment and dirt. Wipe clean and dry with a clean soft cloth or
Tank cappaper towel.
4. Refill the water tank with cool tap water as instructed in the 'filling the water
tank' section of the instructions.
6.2. WEEKLY MAINTENANCE
1. Repeat steps 1-3 above.
2. Pour one cup of white vinegar (about 200ml) into the basin and leave for
about 15 minutes, then wipe off the limescale in the basin, especially in the
transducer with a soft brush.
3. Remove the limescale and white vinegar solution with a clean soft cloth.
6.3. CAUTION OF MAINTENANCE
1. Make sure that the main body is never submerged in water
2. Do not use any solvents or aggressive cleaning agents to clean the humidifier.
3. Clean the inner parts with a soft cloth.
4. Only use the brush to clean the transducer. This should be done once a week.
5. Only use the soft-bristle portion of the brush.
6. Change the water in the water tank at least once a week if water is left
standing for more than one week.
6.4. STORING HUMIDIFIER
- Clean the humidifier as described earlier and dry thoroughly.
- Preferably store the humidifier in its original box.
- Avoid storing in high temperatures.
ENGLISH
19

7. TECHNICAL SPECIFICATION
Input voltage: 230V
Frequency: 50HZ
Moisture capacity: 400ml/h (warm mist)
Airflow: 100 - 400ml/hr
Working time: 18 -70 hours
Water tank volume: 7.0L
Rated power: 30W (Cool Mist), 130W (Warm Mist)
Dimension: 324(L) x 200(W) x 339(H) mm
Weight: 2.1 kgs
Coverage Area: 45m²
8. PRODUCT DISPOSAL INFORMATION
· Remember to dispose of the product responsibly.
· Do not mix products bearing the crossed -out bin symbol with your
general household waste.
· For the correct collection and treatment of these products take them
to the collection points designated by your local authority.
Alternatively contact the retailer who sold you the product.
ENGLISH
20
Table of contents
Languages:
Other miniland baby Humidifier manuals
Popular Humidifier manuals by other brands

Sharper Image
Sharper Image EV-HD10 Instruction manual and warranty information

Suntec Wellness
Suntec Wellness Klimatronic Monsun 100 instruction manual

ResMed
ResMed C-Series user guide

Philips
Philips HU4801 quick start guide

Air-O-Swiss
Air-O-Swiss AOS 7144 Instructions for use

Imetec
Imetec Living Air HU-200 Instructions and warnings