Mistral LBS430PR Assembly instructions

Installation Guide and User Manual
Instructions d’installation et guide de l’usager
NOTE:
Installer: Leave this guide with the homeowner. Homeowner: Keep this guide for future reference.
Installateur: Laisser ce guide au propriétaire. Propriétaire: Conserver ce guide pour référence ultérieure.
30‐08‐2018‐mct
IMPORTANT:Readandsavetheseinstructions.Lireetconservercesinstructions.
M
istral Wall mounted range hood
Hotte murale Mistral
Model/Modèle:LBS430PR

TABLE OF CONTENTS
1.IMPORTANTSAFETYMEASURES.................................................................................3‐4
2.INSTALLATIONINSTRUCTIONS……………………………………………..………………………………...5‐9
3.OPERATINGTHEHOOD…………………………………………………………………………………….…....10
4.MAINTENANCE……………………………………………………………………………………………………….11‐12
5.SERVICEANDWARRANTY……………………………………………………………………………………….12

1. IMPORTANTSAFETYMEASURES
READANDSAVETHESEINSTRUCTIONS
CAUTION
Forresidentialuseonly.Donotusetoexhausthazardousorexplosivematerialsand/orvapors.
CAUTION
Therangehoodmayhaveverysharpedges;pleasewearprotectivegloveswheninstalling,cleaning
orservicingtheunit.
Thisappliancemustbeinstalledbyaqualifiedtechnician.Themanufacturerdeclinesall
responsibilityincaseoffailuretoadheretosafetystandards.Installthishoodinaccordancewith
allthespecifiedrequirements.
WARNING
Toreducetheriskoffire,electricshock,orinjurytopersons,observethefollowing:
Usethisunitonlyinthemannerintendedbythemanufacturer.Ifyouhaveanyquestions,contact
themanufacturer.
Beforeservicingorcleaningtheunit,switchpoweroffattheservicepanelandlocktheservice
disconnectingmeanstopreventpowerfrombeingswitchedonaccidentally.Iftheservice
disconnectingmeanscannotbelocked,securelyfastenanoticeablewarningdevice,suchasa
tag,totheservicepanel.
Installationworkandelectricalwiringmustbedonebyaqualifiedpersoninaccordancewithall
applicablecodes&standardsincludingfireratedconstruction.
Sufficientairisneededforpropercombustionandexhaustingofgasesthroughthechimneyfor
fuelburningequipmenttopreventback‐drafting.
Followtheheatingequipmentmanufacturer’sguidelineandsafetystandardssuchasthose
publishedbytheCanadianFireSafetyAssociation(CFSA),theAmericanSocietyforHeating,
RefrigerationandAirConditioningEngineers(ASHRAE)andthelocalcodeauthorities.
Whencuttingordrillingintowallorceiling,donotdamageelectricalwiringandotherhidden
utilities.
Ductedfansmustalwaysventtotheoutdoors.
Donotaltertheoriginalwiring.
Donotattempttorepairorreplaceanypartofyourhoodunlessitisspecificallyrecommended
inthismanual.
Allotherservicingshouldbereferredtoaqualifiedtechnician.
3

1.IMPORTANTSAFETYMEASURES(continued)
CAUTION
Donotexhausthazardousorexplosivematerialand/orvapors.
Toreduceriskoffireandtoproperlyexhaustair,besuretoductairoutside‐donotvent
exhaustairintospaceswithinwalls,ceilings,attics,crawlspacesorgarages.
Automaticallyoperateddevice‐toreduceriskofinjury,disconnectfrompowersupply
beforeservicing.
WARNING:TOREDUCETHERISKOFFIRE,USEONLYRIGIDMETALDUCTWORK..
WARNING
Toreducetheriskofarangetopgreasefire:
Neverleavearangeunattended.
Boil‐overscausesmokeandgreasyspilloversthatmayignite.Heatoilsslowlyonlowor
mediumsetting.
AlwaysturnhoodONATALLTIMESwhencookingathighheatorwhenflambéingfood
(i.e.CrepesSuzette,CherriesJubilee,Flambés,etc…).
Cleantheunit’ssurfacesfrequently.Greasecanaccumulateonfanorfilters.
Useproperpansize.Alwaysusecookwareappropriateforthesizeofthesurface
element.
WARNING
Toreducetheriskofinjurytopersonsintheeventofarangetopgreasefire,observethe
followingguidelines:
Smotherflameswithaclose‐fittinglid,cookiesheet,ormetaltray,andthenturnoffthe
burner.
Iftheflamesdonotgooutimmediately,EVACUATETHEPREMISEESANDCALLTHEFIRE
DEPARTMENT.
Neverpickupaflamingpan‐youmayBURNYOURSELF.
DONOTUSEWATER,includingwetdishclothsortowels–asthiswillresultaviolentsteam
explosion.
UseanextinguisherONLYif:
a)YouknowyouhaveaclassABCextinguisherandyoualreadyknowhowtooperateit.
b)Thefireissmallandcontainedintheareawhereitstarted.
c)Thefiredepartmenthasbeencalled.
d)Youcanfightthefirewithyourbacktoanexit.
4

Dimensions
Theinformationcontainedhereinisbasedonsourcesthatwebelievetobereliable,butisnotguaranteedbyus,
maybeincompleteand/ormaychangewithoutnotice.
Needtechnicalsupport?1(888)651‐2534
AFloortoceilingheightvariable
BFloortocountertopheight
(standard)36’’
C
Recommendedheightbetween
cookingsurfaceandbottomof
thehood
28to30’’
DHoodheight1¾(total10½’’)’’
EChimneyheight2x19½’’
Installation
Ducttransition
1¾’’
8,66’’
5
Total:10½’’
29½’’
17.7’’
2x19½’’
Top6’’round

2. INSTALLATIONINSTRUCTIONS
TOOLSNEEDEDTOINSTALLTHERANGEHOOD
Phillipsscrewdriver
Hammerandflatbladescrewdriver
Sheetmetalsheers
Pairofpliers
Scissors(tocutducttape)
MetalDucttape
Markerorpencil
Level
Measuringtape
BEFOREINSTALLINGTHEHOOD
Forthemostefficientairflowexhaustuseastraightrunorasfewelbowsaspossible.
Ventunittotheoutsideonly.
Two(2)peoplearerequiredforinstallation.
Removetherangehoodfromthecartonpackagingandplaceonaflatsurfacefor
assembly.
ELECTRICALREQUIREMENTS
CAUTION:THISAPPLIANCESHOULDBEPROPERLYGROUNDED.
Thishoodmustbepowersuppliedfrom110‐120V,60Hzsourceandconnectedtoan
individual,properlygroundedcircuit(3‐prongoutlet).
Iftheelectricalsupplydoesnotmeetaboverequirements,callalicensedelectrician
beforeproceeding.
Routehousewiringascloseaspossibletotheinstallationlocation,intheceilingorback
wall.
Thehoodmustbeconnectedtothehousewiringinaccordancewiththelocalcodesand
norms.
WALLFRAMINGFORADEQUATESUPPORT
Thisventhoodisheavy.Adequatestructureandsupportmustbeprovidedinalltypesof
installations.Ifmountingondrywall,thehoodmustbesecuretoverticalstudsinthewallortoa
horizontalsupport.
6

2.INSTALLATIONINSTRUCTIONS(continued)
PREPARINGTHEINSTALLATION
Forindooruseonly.
Forhouseholduseonly.Thishoodisnottobeusedtoexhaustexplosiveordangerous
fumesormaterials
.
Forsafetyandforoptimumperformance,theventhoodmustbeinstalledataminimumof28”
aboveanelectriccookingsurfaceandaminimumof30”aboveagascookingsurface(ifthe
instructionsforinstallationofthegashobspecifyagreaterdistance,thishastobetakeninto
account).
Theexhaustairmustnotbedischargedintoachimneywhichisusedforexhaustingfumesfrom
otherappliancesthatburngasorotherfuels.
Determinetheexactlocationoftheventhood.Markthe
location.Findthecenterlineofthecooktop.Usealevel
todrawaverticalstraightpencillineonthewall.
Plantherouteforventingexhausttotheoutdoors.Usethe
shortestandstraightestductroutepossible.Makesurethe
firstductrunsisatleast12’’beforeredirecting.Longduct
runs,elbowsandtransitionswillreducetheperformanceof
thehood.Useasfewofthemaspossible.Largerducting
mayberequiredforlongerductruns.
Installawallcapwithdamperorroofcapattheexterior
opening/wall.Jointhewallorroofcaptotheductwork.
Connectroundmetalductworktocapandworkbacktowards
thehoodlocation.Use2"metalfoilducttapetosealthejoints.
INSTALLATIONDRAWINGS
Itisimportanttoinstallthehoodatthepropermountingheight.
Ahoodmountedtoolowcouldresultinheatdamageandfirehazard,
whileahoodmountedtoohighwillbehardtoreachandwillloseits
performanceefficiency.
Thehooddistanceaboveanelectriccookingsurfacemustbe
Nolessthan28”.Thehooddistanceaboveagascookingsurface
mustnotbelessthan30’’.
Forceilingsof9’ormore,theminimumhooddistancemust
benolessthan30"foranytypeofcooktop.
6"ROUNDDUCT
ROOFCAP
(
verticalventin
g)
DECORATIVE
CHIMNEY
6"ROUNDELBOW
WALLCAP
(horizontalventing)
HOOD
HOOD
Clearance:
28”FORAN
ELECTRICCOOKTOP
30”FORAGAS
COOKTOP
STANDARD
HEIGHTOF
ARANGE
ORLOWER
CABINETIS
36"
7

2.INSTALLATIONINSTRUCTIONS(continued)
ELECTRICALINSTALLATION
WARNING
THISRANGEHOODMUSTBEPROPERLYGROUNDED.TURNOFFELECTRICALPOWERATSERVICE
ENTRANCEBEFOREWIRING.MAKESURETHATTHEELECTRICCORDISNOTINCONTACTWITHTHE
SHARPEDGESOFTHEAPPLIANCE.
IMPROPERGROUNDINGCANRESULTINARISKOFELECTRICSHOCK.CONSULTAQUALIFIED
ELECTRICIANIFTHEGROUNDINGINSTRUCTIONSARENOTCOMPLETELYUNDERSTOODORIFDOUBT
EXISTSASTOWHETHERTHEAPPLIANCEISPROPERLYGROUNDED.DONOTUSEANEXTENSION
CORD.IFTHEPOWERSUPPLYCORDISTOOSHORT,HAVEAQUALIFIEDELECTRICIANINSTALLAN
OUTLETNEARTHEAPPLIANCE.
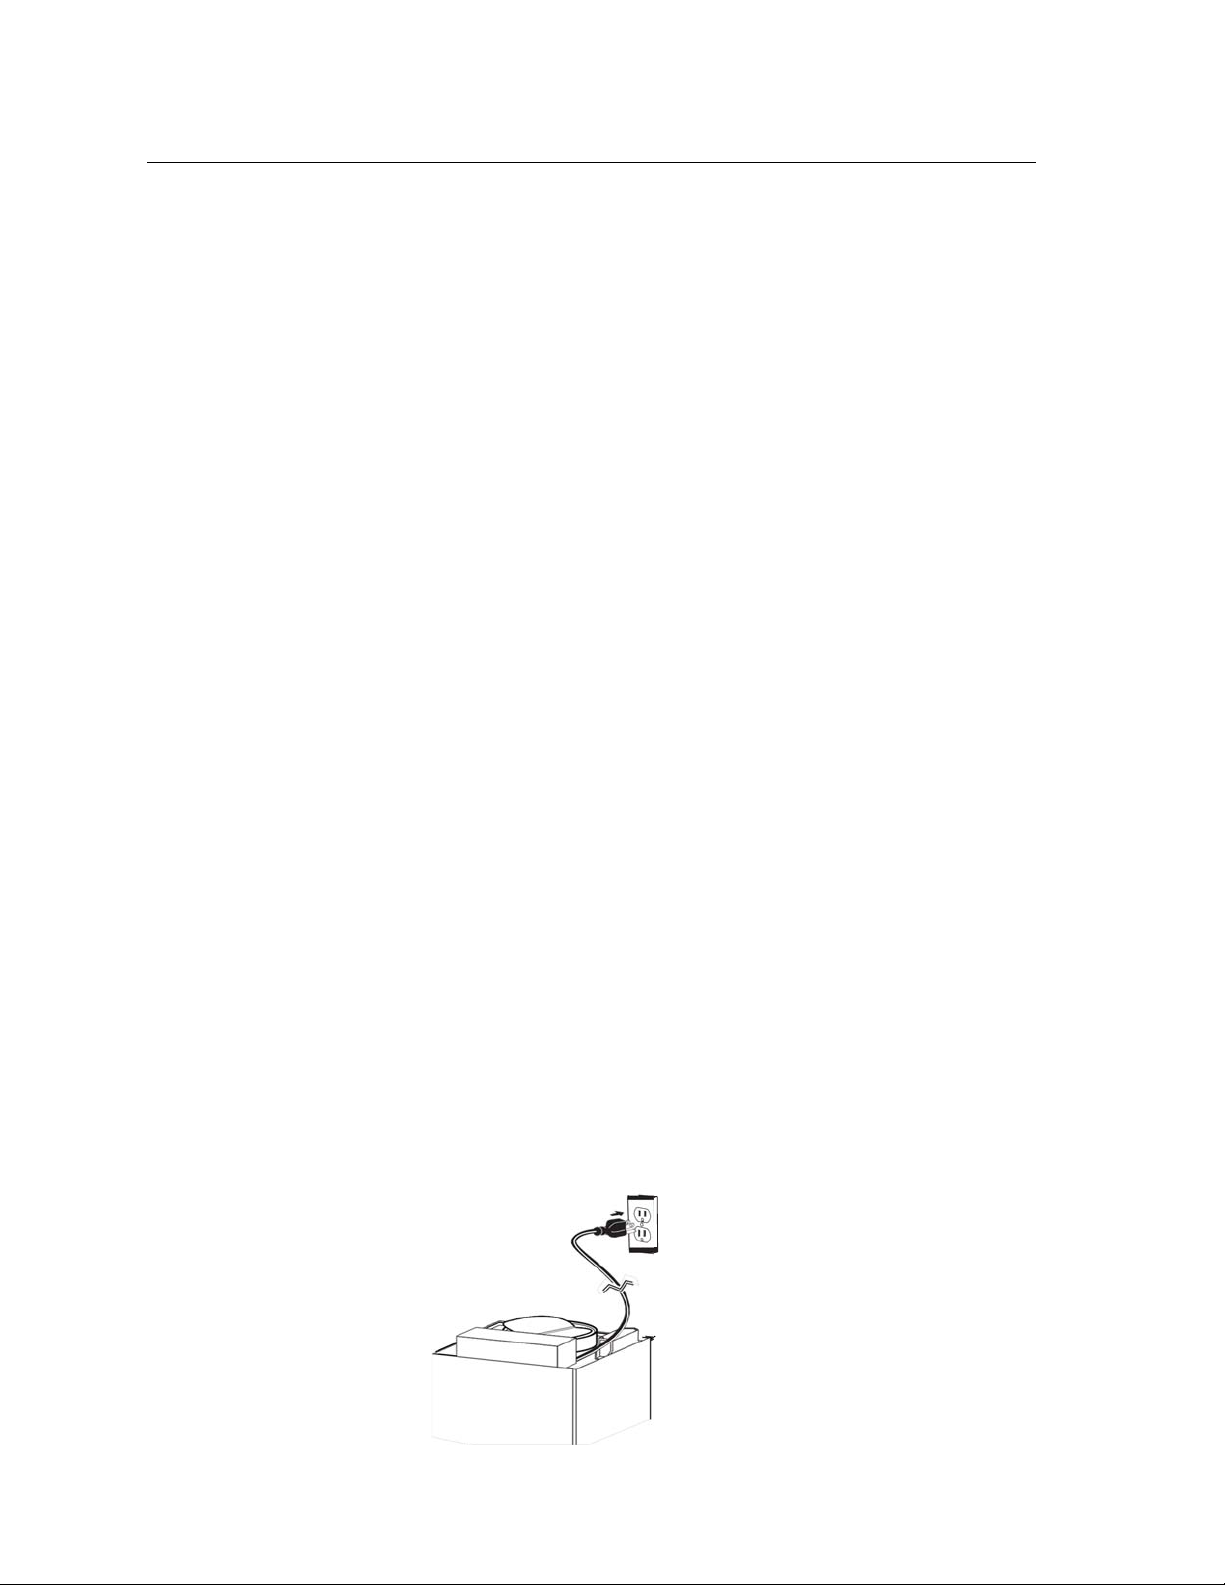
RISKOFELECTRICSHOCK.THISAPPLIANCEMUSTBEGROUNDED.
Intheeventofanelectricalshortcircuit,groundingreducestheriskofelectricshockbyproviding
anescapewirefortheelectriccurrent.Thisapplianceisequippedwithacordhavingagrounding
wirewithagroundingplug.Theplugmustbeconnectedtoanindependentoutletthatisproperly
installedandgrounded.
A110‐120‐volt,60Hz,AC‐only,fusedelectricalsupplyisrequiredonaseparate15‐ampcircuit,
fusedonbothsidesoftheline.
Donotgroundtoagaspipe.
Therangehoodshouldbeconnecteddirectlytothefuseddisconnect(orcircuitbreaker)box
throughflexiblearmoredornon‐metallicsheathedcoppercable.AU.L.‐orC.S.A.‐listedstrain
reliefmustbeprovidedateachendofthepowersupplycable.Donotuseextensioncordor
adapterplugwiththisappliance.
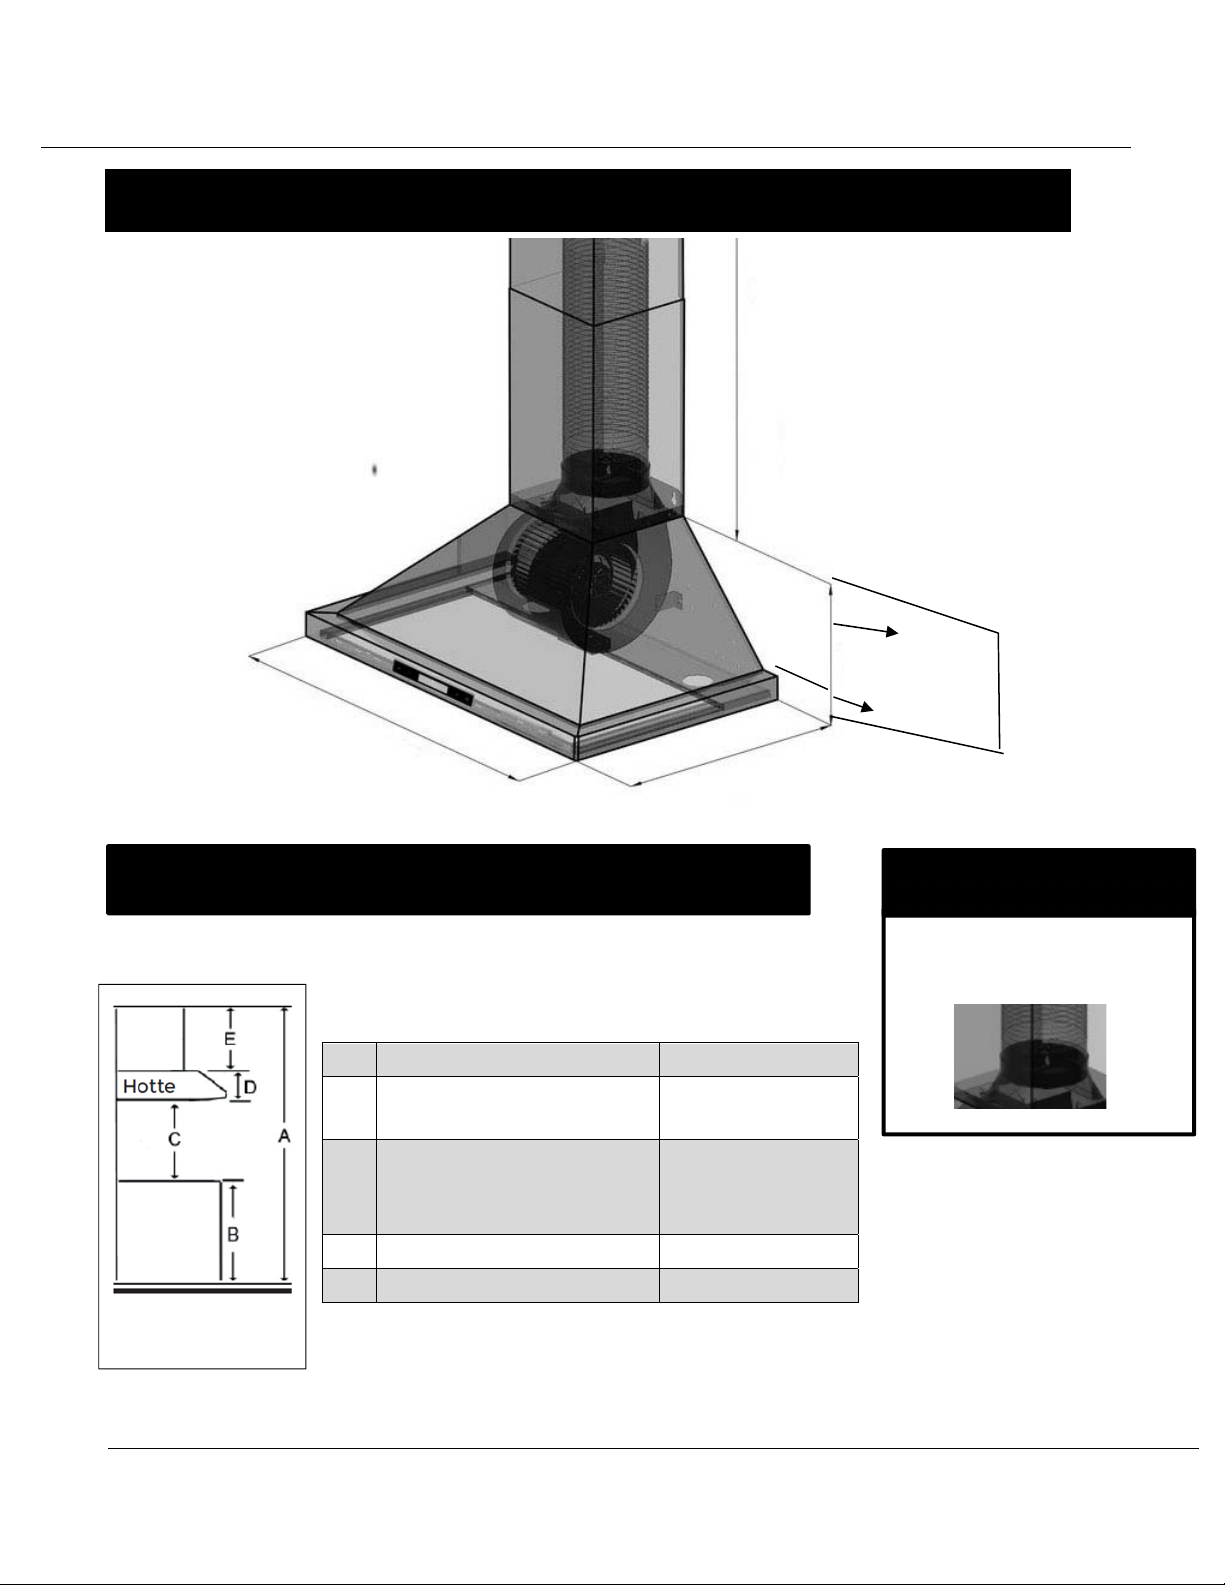
Settheelectricalpowersupplywithinthespacecoveredbythedecorativechimney.
Positiontheoutletoffsetsothatthepowercordwillnotinterferewiththeroundduct.
Makesurethisdoesnotinterferewithamountingbracketfasteningareaorwiththedecorative
chimney(wherethechimneytouchesthewall).
IMPORTANT
Itisthecustomer’sresponsibility,t
ocontactaqualifiedelectricalinstaller.Pleasemakeassurethat
theelectricalinstallationisadequateandisconformwithNationalElectricalCode,ANSI/NFPA70—
latestedition*,orCSAStandardsC22.1‐94,CanadianElectricalCode,Part1andC22.2No.0‐M91‐
latestedition**andalllocalcodesandordinances
8

2.INSTALLATIONINSTRUCTIONS(continued)
WARNING
WHENCUTTINGORDRILLINGINTOWALL,DONOTDAMAGEELECTRICALWIRINGANDOTHERHIDDENUTILITIES.
WHENBUILDINGFRAMEWORK,ALWAYSFOLLOWALLAPPLICABLECONSTRUCTIONCODESANDSTANDARDS
.
IMPORTANT:
MAKESURETHATTHEHOLESLOCATIONSARELEVELANDCORRECTLYCENTEREDWITHTHE
VERTICALCENTERLINE(THISINSTALLATIONINSTRUCTIONAPPLIESFORCONCRETEWALL).
WARNING
DUETOTHEWEIGHTANDSIZEOFTHEHOODTWO(2)PEOPLEAREREQUIREDTOLIFTANDPOSITIONTHEHOOD
ONTOTHEMOUNTINGBRACKET.
WARNING
BECAREFULWHENINSTALLINGTHEDECORATIVECHIMNEYANDHOODASTHEYMAYHAVESHARPEDGES.
CAUTION
DONOTREMOVETHEPROTECTIVEPLASTICFILMCOVERINGTHEDECORATIVECHIMNEYATTHISSTAGE.
INSTALLINGTHEUPPERCHIMNEYMOUNTINGBRACKET
Measurethedistancebetweenthecooktopandthebottomendofrangehood.Werecommenda
minimumclearanceof28”foranelectriccookingsurfaceandof30”foragascookingsurface.
1. Markthelevelingpointofthehood.Positionthetwomountingscrews
onthewall.
2. Measurethewidthofthechimneythenfastenthechimneymounting
bracketstothewalltotheheightrequiredfortheupperchimney.
NOTE:Usethreadeddrywallanchorsonlywhenmountingthehoodonsheetrock.Whenpossible,we
recommendmountingthehoodonwallstuds.
3. Alignhood‐mountingholestothescrewsonthewallandattachhookthehoodintoplace.
Tightenscrewstosecurehoodtothewall.
CAUTION:MAKESURETHERANGEHOODISSECURELYATTACHEDBEFORERELEASING.
9

2.INSTALLATIONINSTRUCTIONS(continued)
INSTALLATION(CONTINUED)
WARNING:RISKOFELECTRICALSHOCK
Thisrangehoodmustbeproperlygrounded.Makesureitisinstalledbyaqualifiedelectricianinaccordance
withallapplicablenationalandlocalelectricalcodes.Beforeconnectingwires,switchpoweroffatthe
servicepanelandlockservicepaneltopreventpowerfrombeingswitchedonaccidentally.
INSTALLATIONOFTHEUNIT
Install6"roundadapter/damperontopofthehoodusingfour(4)no.8x7/16"mountingscrews.
Alignthehoodandcenteritabovethehoodmountingbracket.Gentlylowerthehooduntilit
securelyengagesthebracket.
Withthehoodhanginginplace,drillthroughbothholeslocatedatthebackofthehoodusinga
5/16"drillbit(seeFig.2).
Inserttheincludeddrywallanchorsintothedrilledholes(oneforeachhole).Inserttwo(2)no.8x
1¼"mountingscrewsintwo(2)washers,theninsertintothedrywallanchors.Verifythatthehood
iscenteredandleveled.Tightenallscrewscompletely.
Removeprotectiveplasticfilmcoveringthelowerchimneyonly.
Ifpossible(whenspaceissufficient),installthelowerchimneybrackettothechimneyusingtwo(2)
no.8x7/16"mountingscrews,makingsurethattheslotspointup(seeFig.3).
Carefullyplacebothchimneysontopofthehood.NOTE:Slightlyslideuptheupperchimneyto
avoiddamagingit.
Slidea6"metalroundductovertheadapter/damper(seeFig.2).Usemetalfoilducttapetoseal
thejoint.
Plughoodpowercordintotheoutlet.
Slideuptheupperchimneyuntilitisalignedwithitsmountingbracket.Thebracketmustbeinside
thechimney.Securetheupperchimneytoitsbracketusingtwo(2)no.8x7/16"mountingscrews.
Removeprotectiveplasticfilmcoveringtheupperchimneyandthehood.
Note:Thisimageisforreferenceonly.Yourunitmightdifferfromtheoneshowninthisdiagram.
Fig.1Fig.2Fig.3
Upper
chimney
mounting
bracket
10

3. OPERATINGTHEHOOD
SOFTTOUCHCONTROLS
TIMER/POWERBUTTON(K1)
Presstimer/Powerbutton(K1)oncetoturnonthesystem.
Presstheplus“+”button(K4)toactivatethehood,pressthetimerbutton(K1)againandstart
power‐offdelaytimer.Usetheplus“+”button(K4)andtheminus“‐“button(K3)tosetdelay
timerperiod(1to10minutes).Oncethesettimeisterminated,thehoodwillshutitselfoff.If
youneedtostopitbeforetimeelapses,simplypresstimer(K1)again.
BLOWERSPEEDINDICATOR(K3&K4)
Theplus“+”button(K4)turnstheblowerontothree(3)speedssettings:lowesttostrongest.The
minus“‐“button(K3)goesfromstrongesttothelowest.Presstheclock/timer(K1)oncetoturnthe
LCDscreenonandusetheminus“‐“button(K3)todecreaseandtheplus“+”button(K4)toincreasethe
speeduntildesiredspeedisattained.
Lowspeed:usedforlightfrying/lowcooking.
Mediumspeed:usedforfrying/wokcooking/boiling.
Highspeed:usedforheavyboiling/grilling/intensivefrying/wokcooking.
ADJUSTINGTHETIMERSETTING
Thisbuttonisusedtosettimeandtimeisdisplayedina24‐hourcycle.Tosettimer,pressthetimer
button(K1)forfour(4)seconds.Thefirsttwodigitswillflash.Usetheminus“–“button(K3)to
decreaseandtheplus“+”button(K4)toincrease.Pressthetime/delaybutton(K1)again;thelasttwo
digitswillflash.Usetheminus“–“button(K3)todecreaseandtheplus“+”button(K4)toincrease.
Pressthetime/delaybutton(K1)againtoconfirmandexitthetimesettingmodeorwaitfive(5)seconds
anditwillautomaticallyexit.
ADJUSTINGTHELIGHT
PresstheLightbutton(K2)oncetoturnthelightsonandonceagaintoturnthelightsoff.
11

4. MAINTENANCE
Foroptimaloperation,cleantherangehood,surfacesandfilterregularly.Regularcarewillhelppreserve
theappearanceoftherangehood.
SAFETYWARNING:NEVERPUTYOURHANDINTOAREATHATHOUSESTHEFAN
CLEANINGEXTERIORSURFACES
Cleanperiodicallywithhot,soapywaterandcleancottoncloth.Donotusecorrosiveorabrasive
detergentorsteelwool/scouringpads,whichwillscratchanddamagethestainlesssteelsurface.For
heaviersoil,useliquiddegreasingcleaner.Useastainlesssteelcleanertocleanthesurfaceofthehood.
Avoidgettingcleaningsolutionontoorintothecontrolpanel.Followdirectionsforthestainlesssteel
cleaner.
CAUTION
Usesofttoweltowipeoffthecleaningsolution,gentlyrubbingoffanystubbornspots.Usedrysoft
toweltodrythehood.Alwaysscrublightly,withacleancottonclothandinthedirectionofthegrain.
Donotallowdepositstoaccumulateorremainonthehood.Donotuseordinarysteelwoolorsteel
brushes.Smallbitsofsteelmayadheretothesurfaceandcauserusting.
Donotallowsaltsolutions,disinfectants,bleaches,orcleaningcompoundstoremainincontactwith
stainlesssteelforextendedperiods.Manyofthesecompoundscontainchemicalswhichmaybeharmful.
Rinsewithwaterafterexposureandwipedrywithacleancloth.
CLEANINGGREASEFILTER
Thefilterswilleliminatevaporsandfumesfromcookingandshouldbekeptclean.Filtersshouldbe
cleanedafter30hoursofuse(oronceeverymonth,accordingtousage).Removeandcleanbyhandin
soapywater.Drythefiltersandre‐install.DONOTwashindishwasherasthiswilldamagethefinish.
REPLACINGFILTERS
Shouldfilterswearoutduetoageandprolongeduse,pleasecontactyourservice/partsproviderfor
replacementfilters.NOTE:ALSOREPLACEDAMAGEDORBENTFILTERS.
CLEANINGSTAINLESSSTEELSURFACE
Regularlywashsurfacewithclothorcleanclothsoakedinwarmwaterandmildsoaporliquiddish
detergent.Alwayscleanfollowingthegrainofthematerialandrinsethoroughlywithclearwater(2‐3
times)beforewipingcompletely.Speciallydesignedstainlesssteelcleanerscanalsobeused.
12

4.MAINTENANCE(continued)
REPLACINGTHELEDLIGHTBULBS
Cutthepowersupplybyturningthehoodoff.WaitfortheLEDlampstocool.Topreventdamageortoavoid
reducingthelifeofthenewbulb,donottouchthebulbwithyourbarefingers.Replacethebulbby
manipulatingwithatissuepaperorcottongloves.
Ifthenewlightsdonotwork,ensurethateachlampisproperlyinsertedintoitssocketbeforerequesting
theinterventionofaserviceagent.
CAUTION:LEDlampscanonlybereplacedwithanewLEDlamp.Thelampratingmustbeequaltothe
onealreadyused.Makesureallthecontrolswitchesareoffandthehoodisunpluggedorthatthebreaker
isOFF.
STEPS:
•ThisrangehoodusesLEDlightfixture:3WMax12VLED
•MakesuretherangehoodisunpluggedorturnOFFthebreaker.Makesurethelightsarecooltotouch.
•Placeaflat‐headscrewdriverbetweenthelighthousingandthehoodbody,gentlypryupthelighthousing
andsearchforthemetalclip.
•Applyforcetothemetalclipandpulloutthelightfixture.Disconnectthepowercableanddiscardthe
usedlightfixture.
•ReversethestepstoinstallanewLEDlightfixture.TurnthebreakerorhoodONtotestforoperation.
5.SERVICEANDWARRANTY
Wewarrantourhoodunderordinaryresidentialuseforone(1)yearagainstdefectsinmaterialsand
workmanshipfromthedateofitsoriginalpurchase.Thislimitedwarrantyappliestoanyin‐houserepair
and/orreplacementparts.
Thislimitedin‐housewarrantyisnotsubjecttoimproperinstallation,accident,misuse,neglect,fire,or
otherexternalcausessuchasalteration,repairbyunqualifiedpersonnelorcommercialuse.
TocontactourAfterSales/ServiceDepartment,MondaythroughFriday,8:30amto4:30pm(EST):
AGI SERVICE
Tel:450.963.1303/Tollfree:1.888.651.2534
Fax:450.963.1416
Web/E‐mail:www.agiservice.ca/customer@agintl.qc.ca
Openinghours:MondaytoFriday8h30‐4h30(closedfrom12hto1pm)
Li
g
htFlat‐head
Screwdriver
Power
Plug
HoodMetal
Clip
13

TABLE DES MATIÈRES
1. MESURES DE SÉCURITÉ IMPORTANTES .................................................................... 14-15
2. INSTRUCTIONS D’INSTALLATION ………………………………………….…………….... 16-21
3. MODE D’EMPLOI …...……………………………………………..……………….................. 22
4. ENTRETIEN ………………………………………………………………………………….….. 23
5. SERVICE ET GARANTIE ..……..………………………………………………………….…... 24

1. MESURESDESÉCURITÉIMPORTANTES
AVERTISSEMENT
Pourusagedomestiqueseulement.Nepasutiliserpourévacuerdesvapeursoudesmatières
dangereusesouexplosives.
ATTENTION
Cettehottepeutavoirdesbordstrèstranchants;veuillezporterdesgantsdeprotectionlorsde
l'installation,dunettoyageoudel'entretiendel'appareil.
Cetappareildoitêtreinstalléparuntechnicienqualifié.Lefabricantdéclinetouteresponsabilitéen
casdedéfautdeseconformerauxnormesdesécurité.Installezcettehotteenrespectanttoutesles
exigencesspécifiées.
AVERTISSEMENT
Afinderéduirelesrisquesd’incendie,d’électrocutionoudeblessurescorporelles,suivezlesdirectives
suivantes:
N’utilisezcetappareilquedelafaçonprévueparlemanufacturier.Sivousavezdes
questions,contactezlemanufacturieràl’adresseouaunumérodetéléphoneindiquédansla
garantie.
Avantderépareroudenettoyerl’appareil,coupezl’alimentationélectriqueenverrouillantle
panneaudedistributionafind’évitersaremiseenmarcheaccidentelle.Silepanneaude
distributionnepeutêtreverrouillé,yfixerunavertissementenévidence,tellequ’une
étiquettedecouleurvive.
Lestravauxd’installationetderaccordementélectriquedoiventêtreeffectuésparune
personnequalifiée,conformémentauxcodesetauxstandardsdeconstruction,incluantceux
concernantlaprotectioncontrelesincendies.
Unequantitéd’airadéquateestrequiseafind’assurerunebonnecombustionetl’évacuationdes
gazparlacheminée(danslecasdeséquipementsalimentésaugaz)afindeprévenirlesretours
decheminée.
Conformez‐vousauxinstructionsetauxstandardsdesécuritédesmanufacturiersd’équipement
dechauffage,telqu’ilssontpubliésparlaCanadianFireSafetyAssociation(CFSA)etl’American
SocietyforHeatingRefrigerationandAirConditioningEngineers(ASHRAE)ainsiquelescodeset
standardslocaux.
Veillezànepasendommagerlecâblageélectriqueoud’autreséquipementsnonapparentslors
deladécoupeouduperçagedumurouduplafond.
Lesventilateursavecconduitsdoiventtoujoursévacuerl’airversl’extérieur.
Nefaitespasdemodificationsaucâblaged'origine.
N'essayezpasderéparerouderemplacern'importequellepartiedevotrehotte,saufs'ilest
spécifiquementrecommandédanscemanuel.
Touteslesautresréparationsdevraientêtreeffectuéesparuntechnicienqualifié.
14

1.MESURESDESÉCURITÉIMPORTANTES(SUITE)
AVERTISSEMENT
Afinderéduirelesrisquesd’incendie,assurez‐vousd’évacuerl’airàl’extérieur.Nepasévacuerl’air
dansdesespacesrestreintscommel’intérieurdesmurs,duplafond,danslegrenier,fauxplafondou
garage.
Dispositifautomatique‐pourréduirelesrisquesdeblessures,débrancherl’appareilavant
d’effectuerl'entretien.
AVERTISSEMENT
AFINDERÉDUIRELESRISQUESD’INCENDIE,N’UTILISEZQUEDESCONDUITSDEMÉTAL.
AVERTISSEMENT
AFINDERÉDUIRELESRISQUESDEFEUDECUISINIÈRE:
Toujoursmettrelahotteenmarchelorsquevouscuisinez.
Nejamaislaisserlesappareilsdecuissonsanssurveillancelorsqu’ilssontréglésàfeuvif.
Lesdébordementsengendrentdelafuméeetdesdéversementsgraisseuxpouvant
s’enflammer.Chauffezl’huilelentement,àfeudouxoumoyen.
Ilestessentield’avoirlahotteenmarchelorsquevouscuisinezàfeuvifouquevous
cuisinezdesmetsflambés(parex.:crêpesSuzette,cerisesjubilées,steaksaupoivre
flambés,etc).
Nettoyezrégulièrementla(les)roue(s)duventilateur.Nepaslaisserlagraisse
s’accumulersurleventilateur,lesfiltresoulesconduitsd’évacuation.
Utilisezlebonformatdecasserole.Servez‐voustoujoursdecasserolesetd’ustensiles
appropriésàladimensiondelasurfacechauffante.
AVERTISSEMENT
AFIND’ÉVITERTOUTRISQUEDEBLESSURESLORSD’UNFEUDECUISINIÈRE,SUIVEZCES
DIRECTIVES:
Étouffezlesflammesavecuncouverclehermétique,unetôleàbiscuitsouunplateau
métalliqueetensuite,éteindrelebrûleur.
Silesflammesnes’éteignentpasimmédiatement,ÉVACUEZLESLIEUXETAPPELEZLES
POMPIERS.
Neprenezjamaisunecasseroleenflammedansvosmains.Vouspourriezvousbrûler.
N’UTILISEZPASD’EAU,incluantunlingeàvaisselleouuneserviettemouillée,cela
pourraitoccasionneruneviolenteexplosiondevapeur.
N’utilisezunextincteurQUEDANSLECASOÙ:
a) Voussavezqu’ils’agitd’unextincteurdeclasseABCetquevousenconnaissez
lefonctionnement.
b) L’incendieestpetitetlimitéàl’endroitoùiladébuté.
c) Lespompiersontétéavisés.
d) Vouspouvezcombattrel’incendieenayantaccèsàunesortiedesecours.
15

Dimensions
Lesrenseignementsquecettefichecontientsontfondéssurdessourcesquenouscroyonsfiables,maisnousnepouvons
lesgarantiretilspeuventparailleursêtreincompletset/ouchangersanspréavis.
Besoind’assistancetechnique?1(888)651‐2534
AHauteurduplancherauplafondvariable
BHauteurduplancheraucomptoir
(standard)36’’
C
Hauteurrecommandéeentrela
surfacedecuissonetledessousde
lahotte
28’’à30’’
DHauteurdelahotte1¾’’
EHauteurdelacheminée2x19½’’
Installation
Sortie
Haut6’’rond
2X19½’’
1¾’’
8,66’’
Total:10½’’
29½’’17.7’’
16

2. INSTRUCTIONSD’INSTALLATION
OUTILSNÉCESSAIRESPOURINSTALLERLAHOTTE
TournevisPhillips(têteétoilée)
Marteauettournevisàtêteplate
Pinces
Ciseauxàmétal
Ciseaux(pourcouperdurubanpourconduit)
Rubanpourconduitsdemétal
Marqueuroucrayon
Niveau
Rubanàmesurer
AVANTD'INSTALLERLAHOTTE
Pourunéchappementd'airplusefficace,nousrecommandonsuneinstallationleplus
rectilignepossibleetd'utiliseraussipeudecoudesquepossible.
Évacuezl'airàl'extérieurseulement.Nepasévacuerl’airdansdesespacesrestreints
commel’intérieurdesmurs,plafond,grenier,fauxplafondougarage.
Àcausedupoidsetdeladimensiondelahotte,deuxouplusieurspersonnessont
nécessairespourdéplaceretinstallerlahottedefaçonsécuritaire.
Retirezlahottedesonemballageetdéposez‐lasurunesurfaceplanepourl'assemblage.
AVERTISSEMENT
CETAPPAREILDOITÊTRECORRECTEMENTMISÀLATERRE:
Cettehottedoitêtrebranchéedansuneprisedecourantà3brins,120V/60Hz,
correctementinstalléeetmiseàlaterre.
Sil'alimentationélectriquenerépondpasauxexigences,consultezunélectricienavantde
continuer.
Lecâblageélectriquedoitêtreleplusprèspossibledel'emplacementd'installation,dans
leplafondoulemurarrière.
Lahottedoitêtreraccordéeaucâblageélectriquedelamaisonconformémentaux
normesetcodeslocaux.
MURENCADRANTUNAPPUISUFFISANT
CETTEHOTTEESTLOURDE.UNESTRUCTUREETUNSUPPORTADÉQUATSDOIVENTÊTREPRÉVUSPOUR
TOUSLESTYPESD’INSTALLATION.ENCASDEMONTAGESURCLOISONSÈCHE(GYPSE),LAHOTTEDOIT
ÊTRESÉCURISÉEPARDESSOLIVESVERTICALES(ENBOIS)DANSLEMUROUPARUNSUPPORT
HORIZONTAL.
17

2.INSTRUCTIONSD’INSTALLATION(suite)
PRÉPARATION
Pouruneutilisationàl’intérieurseulement.
Pourusagedomestiqueseulement.Nepasutiliserpourévacuerdesvapeursoudesmatières
dangereusesouexplosives.
Pourunemeilleureévacuationdesodeursdecuisson,ladistanceminimalerecommandéeau‐dessus
delasurfacedecuissonestde28"pourunesurfaceélectriqueetde30"pourunesurfaceaugaz.
lesinstructionsdemontagedelasurfacedecuissonaugazspécifientunedistanceplusgrande,cela
doitêtreprisencompte.
CAPUCHONDETOIT(installationverticale)
Déterminezl'emplacementexactdelahotte.Marquezl'emplacement.Trouvezl'axecentralenligne
aveclasurfacedecuisson.Utilisezunniveaupourtracerunelignedroiteverticalesurlemur.
Planifiezlecircuitd'évacuationversl'extérieur.Planifiezleparcourslepluscourtetleplusrectiligne
possibleetutilisezaussipeudecoudesquepossible.Assurez‐vousquelepremierconduitestd'au
moins12''avantdelerediriger.Tropdecoudesetdetransitionsréduirontlaperformancedela
hotte.Desconduitsplusgrandspeuventêtrenécessaireslorsd’unecanalisationpluslongue.
Installezuncapuchondetoitoudemur.Reliezleconduitdemétalaucapuchon,puisacheminez
leconduitjusqu’àl’emplacementdelahotte.Scellezlesjointsavecdurubanpourconduitmétallique
dedeux(2)poucesdelargeur.
SCHÉMAD'INSTALLATION
Ilestimportantd’installerlahotteàlahauteurdemontageadéquat.
Unehotteinstalléetropbassepourraitprovoquerdesdégâtsouun
incendie,alorsqu’unehottemontéetrophauteseradifficileà
atteindreetperdradesaperformanceetsonefficacité.
Ladistanceminimaledelahotteau‐dessusdelasurfacedecuisson
nedoitpasêtreinférieureà28"pourunesurfaceélectriqueetpas
moinsde30"pourunesurfaceaugaz.
Pourlesplafondsde9'ouplus,ladistanceminimaledela
hottenedoitpasêtremoinsde30''pourtouttypedesurface
decuisson.
CONDUIT ROND DE 6’’
CHEMINÉEDECORATIVE
CAPUCHON
MURAL
(installation horizontale)
COUDERONDDE6’’
HOTTE
D
É
GAGEMENT:
28"POURUNE
SURFACEDECUISSON
ÉLECTRIQUE
30"POURUNE
SURFACEDECUISSON
AUGAZ
HAUTEUR
STANDARD
D’UNE
CUISINIÈREOU
D’UNEARMOIRE
INFÉRIEUREEST
DE36’’
HOTTE
18

2.INSTRUCTIONSD’INSTALLATION(suite)
INSTALLATIONÉLECTRIQUE
AVERTISSEMENT
LERACCORDEMENTÉLECTRIQUEDOITÊTREEFFECTUÉPARDUPERSONNELQUALIFIÉENRESPECTANTLES
NORMESETRÈGLEMENTSENVIGUEUR.CETAPPAREILDOITÊTRERELIÉÀUNEMISEÀLATERRE.AVANT
D’EFFECTUERLEBRANCHEMENT,COUPEZL’ALIMENTATIONÉLECTRIQUEDEPUISLETABLEAUDEDISTRIBUTION
PRINCIPAL.
UNMAUVAISBRANCHEMENTPEUTENTRAÎNERUNRISQUED’ÉLECTROCUTION.CONSULTEZUNÉLECTRICIENSI
LESINSTRUCTIONSDEMISEÀLATERRENESONTPASTOUTÀFAITCOMPRÉHENSIBLESOUSIUNDOUTE
PERSISTEQUANTÀSAVOIRSIL’APPAREILESTCORRECTEMENTRELIÉÀLATERRE.NEPASUTILISERDERALLONGE
ÉLECTRIQUE.SILECORDOND’ALIMENTATIONESTTROPCOURT,DEMANDEZÀUNÉLECTRICIEND’INSTALLER
UNEPRISEDECOURANTPRÈSDEL’APPAREIL.
Risquedechocélectrique.Cetappareildoitêtrereliéàunemiseàlaterre.
Encasdecourt‐circuitélectrique,lamiseàlaterreréduitlerisqued’électrocutionenfournissant
uncâbled’évacuationducourant.Cetappareilestmunid’uncordond’alimentationavecune
ficheà3brins.Lafichedoitêtrebranchéedansuneprisedecourantcorrectementinstalléeet
miseàlaterre.
Unealimentationélectriquede110‐120volts,60Hz,Ca,protégéeparfusiblesuruncircuit
séparéde15ampèresfusionnéauxdeuxextrémitésdelaligneestrequisepourl’installationde
ceproduit.
N’effectuerpasdemiseàlaterresurunecanalisationdegaz.
Lahottedoitêtreraccordéedirectementàlaboîtededéconnexion(oudisjoncteur)àfusiblepar
uncâbledecuivresousgaineblindéounonmétalliqueflexible.UnréducteurdetensionU.L.‐
ouC.S.A.‐doitêtreinstalléàchaqueextrémitéducâbled'alimentation.
N'utilisezpasderallongeélectriqueoud'adaptateurdeprisepourbranchercetappareil.
Placezlaprisedecourantélectriquedansl'espacecouvertparlacheminéedécorative.
Installezlaprisedesorteàcequelecordond'alimentationnegênepasleconduitrond.
Assurez‐vouségalementquelecordonn'interfèrepasavecl’emplacementdefixationdusupport
demontageouaveclacheminéedécorative(làoùlacheminéetouchelemur).
19
Table of contents
Languages:
Other Mistral Ventilation Hood manuals
Popular Ventilation Hood manuals by other brands

Electrolux
Electrolux EFP 6446 Installation and operating instructions

Lamona
Lamona LAM2300 User's installation guide

JSI
JSI 3173-90-IX installation instructions

Lamona
Lamona HJA2480-1 User's installation guide

Summit
Summit SEH3630 instruction manual

Siemens
Siemens LC67KFN60 User manual and installation instructions