MiVue C560 Series User manual

User Manual
MiVue™C560/C570 Series

4
Getting to know your dash cam
Note: The screenshots and other presentations shown in this manual may differ from the ones
generated by the actual product.
1 Device mount socket
2Mini-USB connector
3Memory card slot
4Microphone
5System indicator
6 LCD screen
7 Camera lens
8 Speaker
9Power button ( ) / Function keys
10
Shutdown button
1
4
5
67
2
3
8
9
10

5
Using your dash cam in a vehicle
Precautions and notices
lDo not operate the device while driving. Using this product does not change the
requirement for a driver to take full responsibility for his or her behavior. This
responsibility includes observing all trafc rules and regulations in order to avoid
accidents, personal injury or property damage.
lA window mount is needed when using the dash cam in a car. Make sure that you
place the dash cam in an appropriate place, so as not to obstruct the driver’s view
or deployment of airbags.
lMake sure that no object is blocking the camera lens and no reective material is
placed near the lens. Please keep the lens clean.
lIf the car’s windscreen is tinted with a coating, it may impact the recording quality.
lTo ensure the highest quality recordings, you are advised to place the dash cam
near the rear view mirror.
lSelect an appropriate location for mounting the device in a vehicle. Never place
the device where the driver’s eld of vision is blocked.
lIf the car’s windscreen is tinted with a reective coating, it may be athermic and
impact the GPS reception. In this instance, please mount your device where there
is a “clear area.”
lThe system will automatically calibrate the G sensor of the device during start-up.
To avoid G sensor malfunction, always turn the device on AFTER you mount it in
the vehicle properly.

6
Mounting the dash cam
Make sure that your car is parked on level ground. Follow the instructions to mount
your dash cam in a vehicle securely.
1. Before attaching the device mount to the windscreen, it is recommended to clean
the windscreen with rubbing alcohol and make sure that the installation area is
free of dust, oil and grease.
2. Attach the mount to the windscreen ( 1), and press the tab ( 2) to lock the suction
cup in place.
1
2
3. When adjusting the angle of mounting, make sure that the camera’s view is
parallel with the level ground and the ground/sky ratio is close to 6/4.

7
4. Route the cable through the top ceiling and the A-pillar so that it does not interfere
with driving. Make sure that the cable installation does not interfere with the
vehicle's airbags or other safety features.
Note: The installation illustrations are for your reference only. The placement of the devices and
cables may vary depending on the vehicle model. If you encounter any problems during installation,
contact a skilled installer (such as the service personnel of the vehicle) for assistance.
MiVue rear camera
Depending on your model, your device may support a rear camera (may be sold
separately).
1Mounting pad
2 Camera lens
3 Adjustment bolt
4Micro-USB connector
16
1
2
34

8
Follow the illustration to connect the rear camera to the dash cam.
Y cable Rear camera cable
Car charger
Using a memory card
Note:
lDO NOT apply pressure to the centre of the memory card.
lMiTAC does not guarantee the product’s compatibility with memory cards from all manufacturers.
l Beforeyoustartrecording,pleaseformatthememorycardtoavoidmalfunctioncausedbylesnot
created by the dash cam.
lTurn the device off before removing the memory card.
You must insert a memory card (not supplied) before you can start recording. The
dash cam supports the Class 10 memory cards with 8 GB – 128 GB capacity. You
should use separate MicroSD cards for recording and for regular data storage.
Hold the card (MicroSD) by the edges and gently insert it into
the slot as shown in the illustration.
To remove a card, gently push the top edge of the card inwards
to release it and pull it out of the slot.
Formatting a card
To format a memory card (all data will be erased), press > Format.

9
Turning the dash cam on
Complete the installation according to the instructions in the “Using your dash cam
in a vehicle” section. Once the vehicle engine is started, the dash cam automatically
turns on.
Note: Press and hold the Power button for 2 seconds to manually turn the dash cam on and off.
Shutting down the dash cam
Occasionally, you may need to perform a hardware reset when the dash cam stops
responding or if it appears to be “frozen” or unresponsive. To turn off the dash cam,
press and hold the Power button until the system shuts down.
If the system does not turn off by keeping the Power button
pressed, you can force it to shut down by inserting a small
rod (such as a straightened paper clip) into the Shutdown
button of the device.
System icons
Various system icons on the status bar at the top of the screen provide the status
information of your device. The displayed icons will vary depending on your device
model and state.
1 2 4
5
3
1Recording indicator
2Time display
3Microphone status
4GPS signal*
5 Current GPS car speed*
* For selected models only.

10
Function keys
The device provides 4 function keys to control the corresponding icons displayed on
the LCD screen. The keys' functions may vary on different screens.
Takes a photo.
Adds a custom safety (speed) camera.
Manually starts an event recording.
Opens the Menu screen.
Recording screen
Moves to the next option.
Acts as the ENTER button.
Moves to the previous option.
Acts as the BACK button.
Menu screen
Switching screens
Once you connect the rear camera and start recording, the icon will appear on
the screen. You can switch the front and rear camera images by pressing .
Setting the date and time
To make sure that the date and time of your recordings are correct, check the
settings before you begin recording.
1. Press > System >Date/Time.
2. Do one of the following:
lSelect Use GPS time, and then select the time zone of your location. The
system will set date and time according to the GPS location.

11
Note: This feature is not available on all models.
lSelect Manual, and the system will display the date and time setting screen.
Use / to adjust the value of the selected eld; press and repeat the
step until all elds have been changed. When done, press .
Recording in driving mode
Continuous recording
The system will automatically begin continuous recording in few seconds after start-
up. The System indicator ashes in green and amber alternately while the recording
is in progress.
When continuous recording is in progress, you can manually stop recording by
pressing . Press to return to the recording screen; the system will start
continuous recording automatically.
The recording may be divided into several video clips; recording will not stop
between video clips. When your memory card lls up with continuous recordings, it
will automatically record over the oldest existing les in this category.
The continuous recordings can be found in the “Normal” category for le playback.
Event recording
By default, if an event happens such as a sudden impact, high speed driving, an
aggressive turn or an accidental crash during continuous recording, the G sensor will
prompt the dash cam to start recording the event.
Note: You can change the sensitivity level of the G sensor by selecting > Video Recording >
G-Sensor Sensitivity.
The event recording will save moments before and moments after the event. When

12
your memory card lls up with event recordings, it will automatically record over the
oldest existing les in this category.
If you want to manually start an event recording while continuous recording is in
progress, press the Event button ( ).
The event recordings can be found in the “Event” category for le playback.
Parking mode
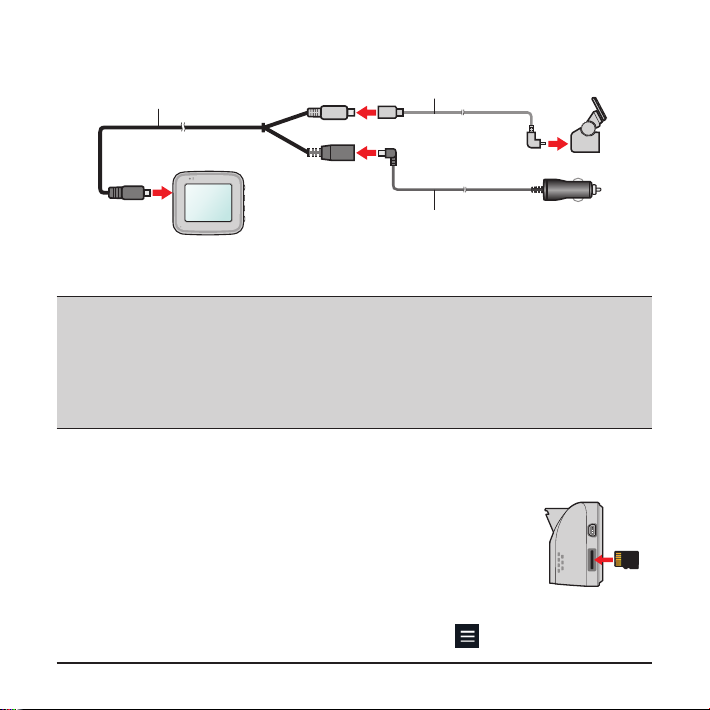
Your dash cam supports the parking recording function. You must use an additional
power source to record the video during the Parking mode, such as a Mio
uninterruptible power cable which is sold separately. For more information on using
a Mio power cable, see the provided documentation in its package.
The Parking mode is disabled by default. Before enabling the Parking mode, please
check the memory storage allocation of your device. Select > System > Storage
Allocation to set a proper allocation for parking recording. Changing the allocation
will erase the memory card, so save any videos or photos to your computer rst.
You can enable the function by selecting > Parking Mode > Detection > On.
(The icon will appear on the screen.) When the Parking mode detection is
enabled, the system will enter the Parking mode when the car stops moving for
about 5 minutes.
In the Parking mode, parking recordings could be triggered only when movements
or vibrations are detected. The parking recording will save the duration from seconds
before the event until seconds after the event. When your memory card lls up with
parking recordings, it will automatically record over the oldest existing les in this
category.

13
Note:
lYou can press to manually enter the Parking mode while continuous recording is in progress.
lThe parking recording is triggered by the G sensor and motion detection of the device. You can
changethecongurationbyselecting > Parking mode > Motion Detection and G-Sensor
Sensitivity.
lThe rear camera (optional) does not support motion detection.
To exit the Parking mode and resume continuous recording, press . If
movements are detected and recorded during the Parking mode, you will be asked
to playback the video when you exit the Parking mode.
The parking recordings can be found in the “Parking” category for le playback.
Camera mode
The dash cam allows you to take a photo. Do one of the following:
lIf the recording is in progress, press to take a photo. (This function is not
available when the rear camera is connected.)
lPress > Camera > .
The photos can be found in the “Photo” category for le playback.
Playback mode
Note: Not all functions and options are available for all models.
To select a video or photo for playback:
1. Press > File Playback.
2. Select the desired type.

14
3. Press / to select the desired le from the list, and then press to start
playback.
4. During playback, you can:
lPress to return to the list.
lWhile playing videos, press / to play the previous/next video.
Press to display the pop-up menu to select:
lPlay: Resumes playback.
lPlay rear video / Play front video: The "D" icon displayed on the thumbnail
on the playlist indicates that the video comes with a corresponding rear video.
While playing the video, you can use this option to switch between the front
and rear videos.
Note: Thevideolesrecordedbythefrontandrearcameraswillbesavedseparately
in the corresponding folders of the memory card. If you move or delete a front video, its
corresponding rear video will be processed synchronously.
lMove to Event: Moves the le to the “Event” category.
lDelete: Deletes the le.
lWhile viewing photos, press / to display the previous/next photo.
Press to delete the le.

15
Safety camera alerts
Note: For legal reasons, the safety camera function is not available in all countries.
You can receive alerts to warn you about the
locations of safety (speed) cameras which will
enable you to monitor your speed through these
areas.
When a safety camera appears and is positioned
in the detectable direction, you will receive alerts.
The screen will display the visual alert and you will
also receive audio warnings.
When the alert sound setting is set to Beep:
lWhen your car approaches a safety camera, you will receive a normal beep alert.
lWhen your car approaches a safety camera at a speed over the set threshold,
you will receive a persistent beep alert until your car speed drops lower than the
appropriate speed limit.
lWhen your car passes through a safety camera, you will be notied by a different
beep alert.
You can change the settings about how you want to receive the safety camera alerts.
See the “System settings” section for information.
Adding a safety camera
Note:YoucanaddacustomsafetycameraonlywhenaGPSxisestablished.
Your dash cam allows you to customise the safety camera database. You can add
up to 100 custom safety cameras in your dash cam.
Follow the steps to congure a custom safety camera:
110108km/h
500m

16
1. To add a custom safety camera in the current location, press on the recording
screen. (This function is not available when the Parking mode is enabled.)
2. The next time when you pass by the location, you will receive alerts by the dash cam.
3. To view the information of the custom safety camera, select >SafetyCam >
Custom SafetyCam and then select the safety camera that you want to check.
4. Press to remove the custom safety camera from the dash cam.
Updating safety camera data
MiTAC does not warrant that all types and locations of safety camera data are
available as cameras may be removed, relocated or new cameras installed.
Occasionally, MiTAC may offer you updates of safety camera data. Visit the Mio
website for available downloads and follow the instructions to complete update.
System settings
Note: Not all setting items and options are available for all models.
To customise the system settings, press .
File Playback
Plays the recorded videos and photos.
Camera
Press to enter Camera mode.
Sound Recording
Sets if you want to include sounds in the recordings.
SafetyCam

17
lDetection: Enables or disables the safety camera alert.
lAlert Sound: Turns on (Beep or Voice) or off (Mute) the alert sound.
lAlert Distance: The system will alert you at a preset distance (Short, Medium or
Long) when a safety camera is detected.
lAlert Method
lSmart Alert: Sets the alert distance function according to the current GPS car
speed.
lStandard Alert: Sets the alert distance function according to the speed limit.
lThreshold: Sets the speed value for the dash cam to start offering alerts.
lCruise Speed Alert: Sets the limit for the cruise speed. When you drive at a
cruise speed over the set value, you will receive alerts by the dash cam.
lCustom SafetyCam: Lists all custom safety cameras which are sorted by the
created time.
Parking mode
lDetection: When enabled, the dash cam will automatically enters the Parking
mode when the car stops moving for about 5 minutes.
lDetection Method: Sets the parking detection method to Only G-Sensor, Only
Motion or Both.
lAuto Entry: Sets the mode for the system to enter the Parking mode
automatically.
lMotion Detection: Sets the sensitivity level of motion detection that triggers the
system to save the parking recording.
lG-Sensor Sensitivity: Sets the sensitivity level of the G sensor that allows
automatic triggering of the parking recording when the dash cam is in the Parking
mode.

18
Video Recording
lVideo Clip Length: Sets the length of each video clip for a continuous recording.
lWDR: Enables the Wide Dynamic Range (WDR) function to improve the dash
cam's image quality under high-contrast lighting conditions.
lEV: Sets the exposure level to adjust the brightness of the image.
lFrequency: Sets the frequency for the camera to avoid problems caused by
articial light sources that are not constant.
lG-Sensor Sensitivity: Sets the sensitivity level of the G sensor that triggers the
event recording during continuous recording.
lStamps: Sets the information (Coordinates or G-Sensor) that will be displayed on
the recorded video.
lSpeed stamp: Displays the driving speed on the recorded video.
lText stamp: Displays customisable text information.
System
lSatellites: Displays the status of the GPS/GLONASS signal reception. You can
press and then select GPS or GLONASS for better signal reception if the
need arises.
lDate/Time: Sets the system date and time.
lSystem Sound: Enables or disables system notication sounds.
lWelcome Sound: Enables or disables the notication sounds during start-up.
lVolume: Adjusts the volume level.
lLCD Standby
lAlways On: Keeps the LCD on.
lHUD: Turns off the LCD (in specied time) but still displays the time and speed
information.

19
l10 sec / 1 min / 3 min: Sets the timer for the LCD to turn off automatically
after recording starts.
lLanguage: Sets the language.
lDistance Unit: Sets the preferred distance unit.
lStorage Allocation: The system provides 3 memory congurations to store the
videos and photos. Select the proper conguration based on your usage.
lRestore to Defaults: Restores the system settings to the factory defaults.
lVersion: Displays the software information.
Format
Formats a memory card. (All data will be erased.)
MiVue Manager
MiVue Manager™ is a tool for you to view the videos recorded on a MiVue dash cam.
Note: Not all features are available for every model.
Installing MiVue Manager
Download MiVue Manager from the Support page of Mio website (www.mio.com/
support) and follow the on-screen prompts to install it. Make sure to download the
correct software version (Windows or Mac) according to your computer's operating
system.
Playing the recording les
1. Remove the memory card from the dash cam and access the card on the
computer via a card reader. You are advised to copy the recording les to your
computer for backup and playback.
2. Start MiVue Manager on the computer.

20
lBy default, MiVue Manager shows the calendar and the le list on the right.
lWhen a recording le exists, you will see the date marked with “ .” Click that
date to display the les that were recorded on that date.
lYou can select the le type to display: Event / Normal / Parking.
lTo display all les in the current folder, click All. To return to the calendar view,
click Calendar.
3. Double-click the desired le on the le list to start playback.
4. The playback controls are described as follows:
1 2 3 4 5 6 7
1 Skips to the previous / next le on the list.
2 Starts or pauses the playback.
3 Changes the playback speed to 1/4x, 1/2x, 1x (default), 1.5x, or 2x.
4Mutes or unmutes the volume.
5 Adjusts the volume level.
6Plays the video in full screen.
7 Displays the playback progress. You can click on a point along the track bar
to move directly to a different location for the playback.
5. During playback, you can view more driving information from the dashboard panel
and the G sensor chart that are displayed below the video playback screen.
lOn the dashboard panel, click to display the map screen.
lThe G sensor chart displays data in 3-axis waveform about the car’s shift
forward/backward (X), to the right/left (Y) and upward/downward (Z).

21
Note: The map screen may not display when the computer is not connected to the Internet or
when your MiVue model does not support the GPS function.
6. The tool bar allows you to do the following:
1 2 3 4 5 6 87
1 Selects the folder that stores the recording les.
2Previews and prints the current video image.
3Saves the selected les to the specied location on your computer.
4Captures and saves the current video image to the specied location on your
computer.
5Opens the Settings Menu.
lChange Language: Sets the display language of MiVue Manager.
lChange Skin: Sets the colour scheme of MiVue Manager.
lCheck for Update: Checks if there is any new version of MiVue Manager.
(Internet access is required for this feature.)
lAbout: Displays the version and copyright information of MiVue Manager.
6Exports the GPS information of the selected le in the KML format to the
specied location on your computer.
7Uploads the selected le to Facebook / YouTube™.
8In the playlist, the "F" and "R" marks displayed on the lename indicate that
the video comes with a corresponding front video (F) or rear video (R). While
playing the video, the screen displays the PIP (picture-in-picture) mode. You
can switch the front and rear videos by clicking .
Note: This feature is for selected models only.
Table of contents